Candle-dye decorative effects are intentional color patterns created inside candle wax by controlling dye incorporation, wax state, pouring, manipulation, temperature, and cooling.
This guide is for candle makers who want repeatable solid colors and controlled swirls, marbling, dirty pours, layers, feathering, or ombre effects, using wax-compatible candle dye rather than mica, paint, botanicals, embeds, vessel decoration, or other surface embellishments. Working temperatures and timing depend on the wax, dye format, supplier instructions, fragrance load, and intended effect, so no single number fits every batch. Begin by adding dye only after the wax is fully melted and while enough heat and mixing time remain for complete incorporation.
- Use wax-compatible candle dye.
- Produce solid color and internal decorative color effects.
- Set temperatures and timing from the selected wax, dye, fragrance load, and intended effect.
- Exclude mica, paint, botanicals, embeds, and vessel decoration.
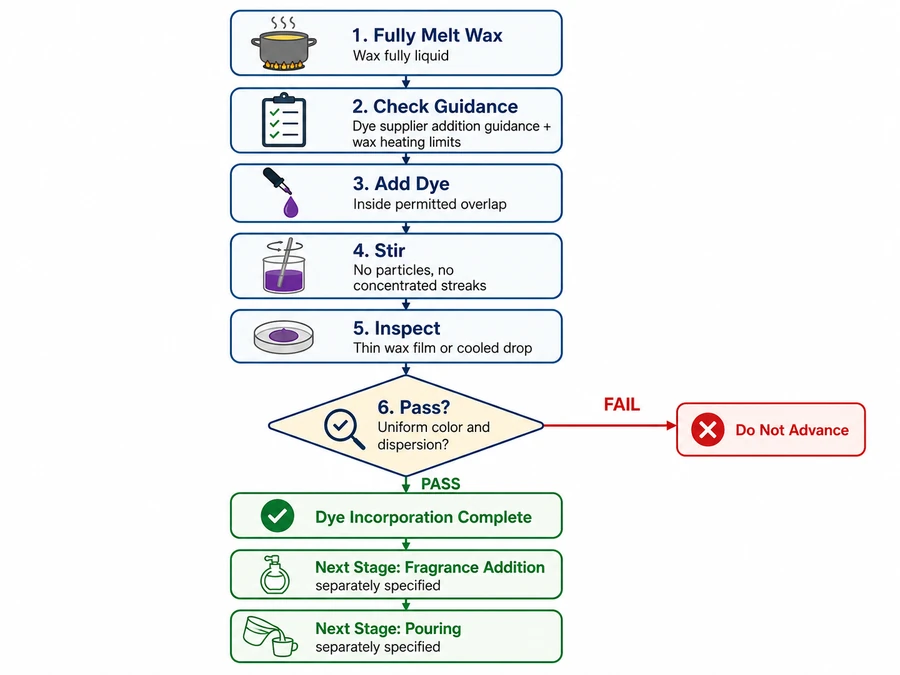
When should candle dye be added to wax?
Add candle dye after the wax is fully melted, while enough product-specific heat and mixing time remain for complete incorporation.
The correct stage depends on the dye format, wax, and supplier instructions. Add the colorant before later fragrance and pouring steps only when that order leaves enough permitted heat and mixing time to dissolve or disperse the dye fully.
Follow this sequence:
- Melt the candle wax completely.
- Check the dye supplier’s addition-temperature guidance and the wax supplier’s heating limits.
- Add the candle dye while the wax remains inside both permitted ranges.
- Stir until no particles, concentrated streaks, or sediment remain.
- Check a thin wax film or cooled drop before moving to the next production stage.
- Add fragrance and pour only at their separately specified temperatures.
CandleScience provides one valid sequence by mixing a dye block into fully melted wax, checking the temperature after the dye is mixed, adding fragrance at 185°F (85°C), and pouring at 160°F (71°C). This sequence illustrates why dye incorporation, fragrance addition, and pouring should be treated as separate stages rather than one interchangeable temperature. (candlescience.com)
| Process gate | Add the dye? | Reason |
|---|---|---|
| Wax contains unmelted material | No | The dye cannot be judged for complete incorporation. |
| Wax is fully liquid and inside the supplier’s dye window | Yes | Heat and movement remain available for mixing. |
| Visible particles or concentrated streaks remain | Do not advance | The dye has not passed the incorporation check. |
| Fragrance-add temperature has been reached | Check instructions | Dye-add and fragrance-add stages may differ. |
| Pour temperature has been reached | Often too late for slow-dissolving solids | Limited heat and mixing time may leave incomplete dissolution. |
Methods: This sequence compares two public supplier instruction sets reviewed on June 14, 2026. The sample contains documented workflows rather than private testing. The wax must be fully melted, and the instructions for the selected products take priority over this general sequence.
Add candle dye early enough to complete incorporation, but never earlier or hotter than the selected products permit.
What temperature should candle dye be added?
Add candle dye within the wax-and-product working range that permits complete incorporation without exceeding supplier heat limits.
Dye-add temperature is separate from fragrance-add temperature and pour temperature. The correct setting is the overlap between the dye’s published addition guidance and the wax’s permitted working state, not one universal number.
| Process value | Published example | What it controls |
|---|---|---|
| Dye-add temperature | 175–185°F (79–85°C) | Current Flaming Candle guidance, especially for dye chips and blocks |
| Wax melt point | 114°F (45.6°C) | The listed melt point for Golden Brands 454 wax |
| Wax pour temperature | 170°F (76.7°C) | CandleScience’s starting pour temperature for Golden Brands 454 |
| Fragrance-add temperature | Product-specific | Fragrance incorporation rather than dye dissolution |
The matching or overlapping numbers in an example do not make the stages interchangeable. A wax may be liquid below the dye’s preferred incorporation range, while the selected pour temperature may leave too little heat for a slow-dissolving dye format. (help.theflamingcandle.com)
Supplier check — June 14, 2026: The Flaming Candle’s current help article recommends adding dye at 175–185°F (79–85°C), especially for dye chips or blocks. CandleScience lists 170°F (76.7°C) as the starting pour temperature for Golden Brands 454 and recommends testing 5°F (2.8°C) adjustments for the maker’s conditions. These values are product-specific starting points, not universal candle-making temperatures. (help.theflamingcandle.com)
Methods: The heat-window dataset compares one current dye-supplier instruction with one current wax product page, both reviewed on June 14, 2026. The sample size is two published sources; the method is direct value comparison without bench testing. Product revisions, dye format, wax composition, fragrance load, and intended effect may change the usable overlap.
Set the dye-add temperature from the selected dye and wax instructions, then verify incorporation before moving to fragrance or pouring.
How do you fix candle dye that has not dissolved?
Stop the pour, restore the permitted working conditions, and verify candle-dye dissolution before continuing.
Inspect the pitcher for particles, sediment, or concentrated streaks. A uniformly dark molten color does not prove complete dissolution because solid dye can remain suspended or collect on the pitcher’s sides or base. This guide’s three-stage check uses the pitcher, a thin wax film, and a cooled sample.
Dissolution failure log
| Check point | Failed observation | Corrective action | Pass condition |
|---|---|---|---|
| Pitcher | Particles, sediment, or concentrated streaks remain | Pause pouring and return the wax to the supplier-permitted working state | No visible solid material remains after mixing |
| Thin wax film | Specks or uneven color appear when wax is spread thinly | Continue permitted heating and mixing, then repeat the film check | The film appears evenly colored without particles |
| Cooled sample | Dark dots, concentrated patches, or settled color appear | Do not continue the batch until the cause is corrected and the sample is repeated | The cooled sample shows uniform incorporation |
Use this recovery sequence:
- Stop pouring before undissolved material enters the candle.
- Scrape visible dye from the pitcher wall back into the wax with a clean, heat-safe tool.
- Restore only the heat allowed by the wax and dye instructions.
- Mix through the full depth and around the pitcher wall and base.
- Repeat the pitcher and thin-film inspections.
- Cool a small sample and inspect it before restarting the pour.
Do not keep raising the temperature without checking the product limits. Excess heat cannot correct every incorporation problem and may move the batch outside its permitted working conditions.
Methods: Record observations at the pitcher, thin-film, and cooled-sample stages. Change only the permitted heat or mixing condition during one recovery attempt. This log confirms visible incorporation but does not replace full failed-batch analysis or formulation testing.
Resume pouring only after all three checks show complete candle-dye incorporation.
How does wax type affect candle-dye color?
Wax type changes candle-dye appearance because opacity, base color, crystallization, and cooling alter how the cooled color is seen.
The same candle dye can appear lighter, duller, warmer, clearer, or more opaque in different wax bases even when it is fully incorporated. This difference is a wax-appearance effect, not automatic proof of poor dispersion.
Matched wax-base benchmark
| Wax-base condition | Likely cooled appearance | What the result does not prove |
|---|---|---|
| More translucent base | Clearer or deeper-looking color | That more dye dissolved |
| Whiter, more opaque base | Lighter or more pastel-looking color | That the dye is weak |
| Naturally cream or yellow base | Warmer or shifted final hue | That the dye color changed chemically |
| Visible crystallization or frosting | Mottled, pale, or chalky-looking areas | That dye settled or failed to mix |
| Different cooling behavior | Changes in surface tone or color uniformity | That dye concentration was different |
A fair comparison must hold the other variables steady. Use the same candle dye, dye amount, wax mass, fragrance load, vessel, mixing sequence, pour geometry, and cooling environment. Change only the wax base.
Judge each sample after cooling. Molten wax often looks darker or clearer than the finished candle, so a hot-color comparison cannot separate wax opacity from an incorporation failure.
Methods: Prepare matched small batches with one wax-base variable changed at a time. Photograph the cooled samples under the same lighting and background. Record surface appearance and an interior cut or cross-section where practical because the exterior alone may not show the full color pattern.
Treat wax-base appearance as a comparison variable before changing the candle-dye process.
How do you make candle color even throughout?
Fully incorporate candle dye, maintain uniform mixing during pouring, and inspect the cooled candle’s top, sides, and interior for consistent solid color.
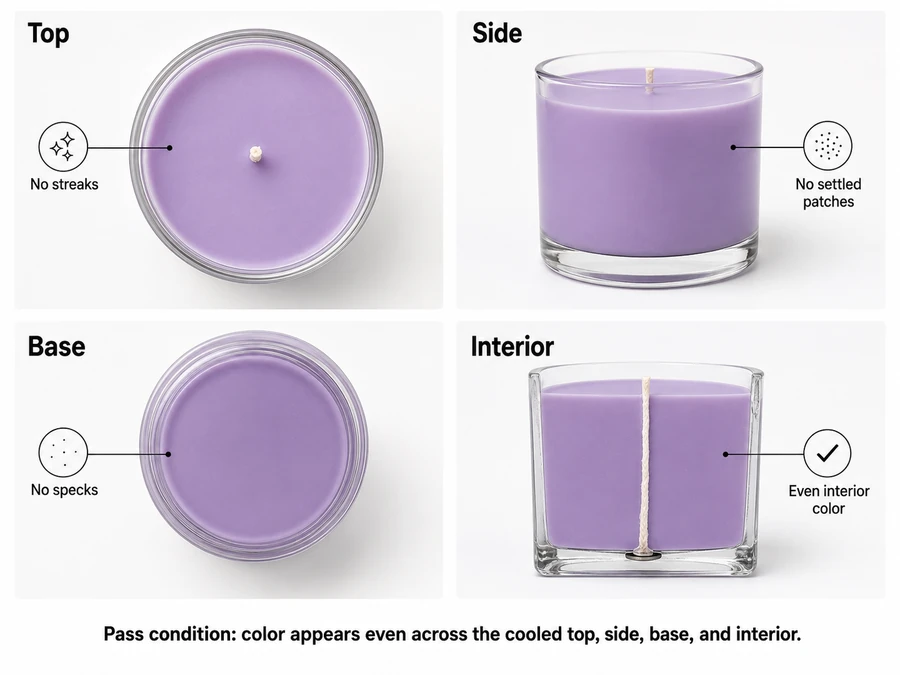
A solid color has an intentional, even hue across visible surfaces and the candle’s interior. A uniformly dark molten batch does not prove that the cooled candle will remain even because settling, incomplete incorporation, wax appearance, and pour-stage separation may become visible only after cooling.
Use this verification sequence:
- Melt the wax completely and incorporate the candle dye within the product’s permitted working conditions.
- Mix through the center, wall, and base of the pitcher rather than stirring only near the surface.
- Inspect a thin wax film for particles, streaks, or concentrated color.
- Keep the remaining batch gently and evenly mixed while pouring without introducing unnecessary air.
- Let the test candle cool under the intended production conditions.
- Compare the top, sides, base, and an interior section where practical.
- Repeat the process only after the cooled zones show the intended solid color.
A lighter top, darker base, isolated specks, or interior streaks indicate different problems. Compare the location and shape of the variation before changing the process; do not assume every uneven result needs more candle dye.
Judge solid candle color from the cooled candle body, not from molten wax alone.
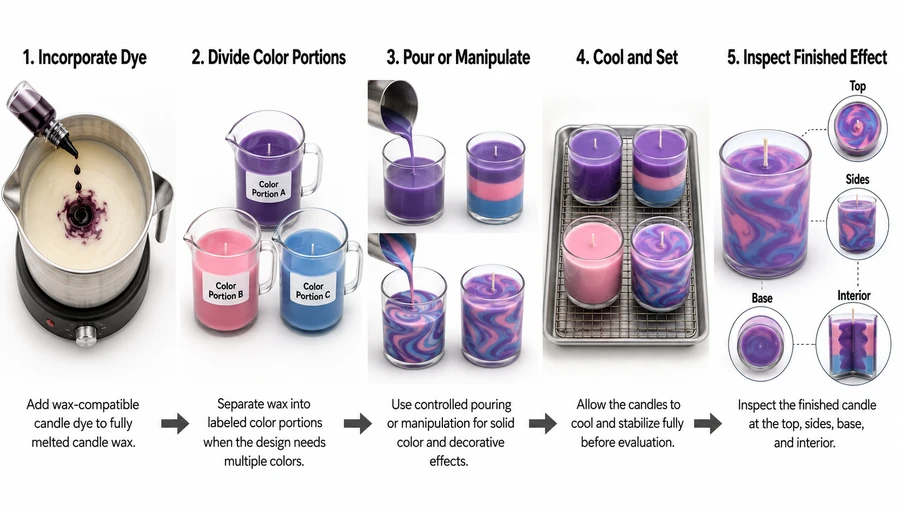
How do you divide wax for different candle colors?
Divide fully melted candle wax by measured mass or a documented design ratio, then label each portion before applying separate dye colors.
A measured color portion is a known mass of wax reserved for one planned color. Portion mass controls how much wax receives that color, while dye concentration controls the shade within that portion; the two values are not interchangeable.
Illustrative portion-allocation dataset
| Planned portion | Design share | Wax mass from a 600 g batch | Intended use |
|---|---|---|---|
| Portion A | 50% | 300 g | Main color |
| Portion B | 30% | 180 g | Secondary color |
| Portion C | 20% | 120 g | Accent color |
| Total | 100% | 600 g | Complete batch |
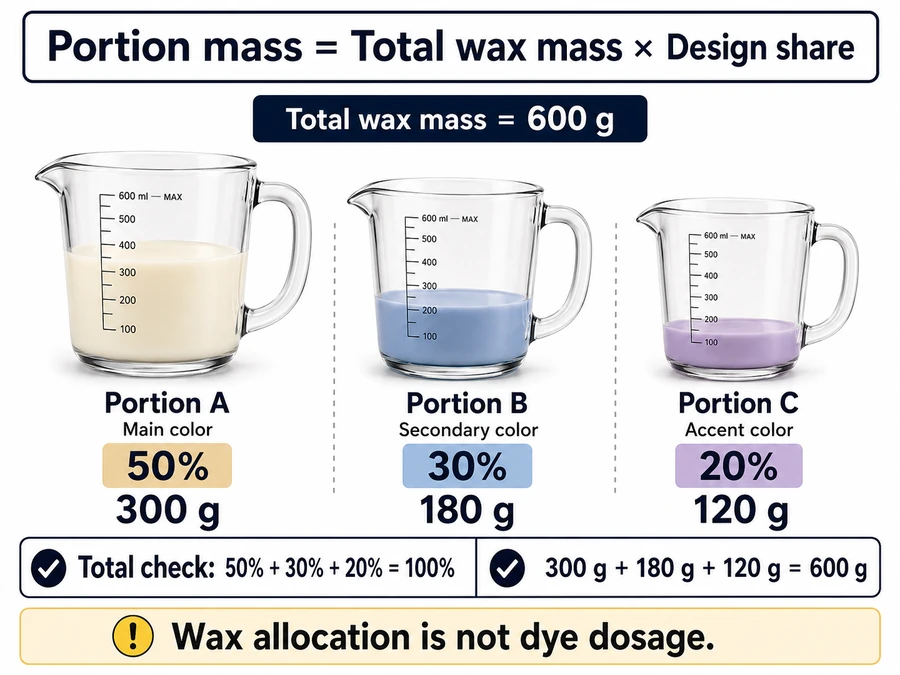
The table shows wax allocation only. It does not prescribe dye amounts or convert one dye format into another.
Follow this sequence:
- Choose the total wax mass required for the decorative pour.
- Record the planned share for each color portion.
- Confirm that all shares total 100%.
- Weigh each portion into a labeled, heat-safe pitcher.
- Keep every portion within the wax and dye suppliers’ permitted working state.
- Apply and incorporate each candle-dye color separately.
- Recheck each portion’s label, mass, color role, and pour order before combining or staging the pours.
Methods: This allocation dataset uses one illustrative 600 g batch with three design portions calculated by percentage arithmetic. The assumed tool is a calibrated gram scale, and the wax remains fully melted within its supplier-defined working conditions. The ratio demonstrates portion planning only; it is not a dye-dosing formula or production recommendation.
Measure wax allocation before coloring so the decorative design remains traceable without confusing portion size with dye concentration.
How do you prevent candle-dye color contamination?
Prevent candle-dye color carryover by handling pale colors before saturated colors where practical and checking every pitcher, pipette, stirrer, and pour path before reuse.
Color carryover occurs when dye residue from a tool or container enters a different wax portion unintentionally. It differs from migration between cooled wax zones and from intentional blending during a decorative pour.
| Check point | Failure sign | Correction | Pass condition |
|---|---|---|---|
| Pitcher wall or base | Streaks, droplets, or tinted residue from the previous color | Clean the pitcher with a method suitable for its material, or use a verified dedicated pitcher | No visible residue remains |
| Pipette or dropper | Old dye remains in the tip, stem, or bulb | Replace it or verify complete cleaning before drawing another color | Inspection shows no trapped dye |
| Stirring tool | Color appears in grooves, seams, or porous areas | Use a non-porous, clean tool or assign it to one color family | No old color transfers to a clean wipe |
| Pour path | Residue remains on a spout, funnel, scraper, or work surface | Clean and inspect every contact point before the next portion passes through it | The full path is free of visible residue |
| Wax portion | An unexpected color appears immediately after tool contact | Isolate the portion and identify the source before continuing | No unplanned hue appears during mixing |
| Cooled candle | Color spreads later across an intended color line | Check the wax, dye, temperature, and cooling interaction | Do not classify delayed movement as tool carryover |
Use separate tools for pale and strongly saturated colors when repeatability matters. Where tools must be shared, work from the lightest color toward the darkest and verify every contact surface between portions.
A tinted tool does not always prove active contamination, but visual cleanliness alone does not prove that a narrow tip, seam, or porous surface is free of dye. Test uncertain equipment with a small amount of uncolored melted wax before it touches a planned color portion.
Methods: Record the tool, previous color, next color, cleaning action, immediate wax observation, and cooled result. Classify a failure as carryover only when the unexpected color appears after contact with a contaminated source; delayed movement across a color line belongs to a different process condition.
Control the tools and pour path before changing the candle-dye formula.
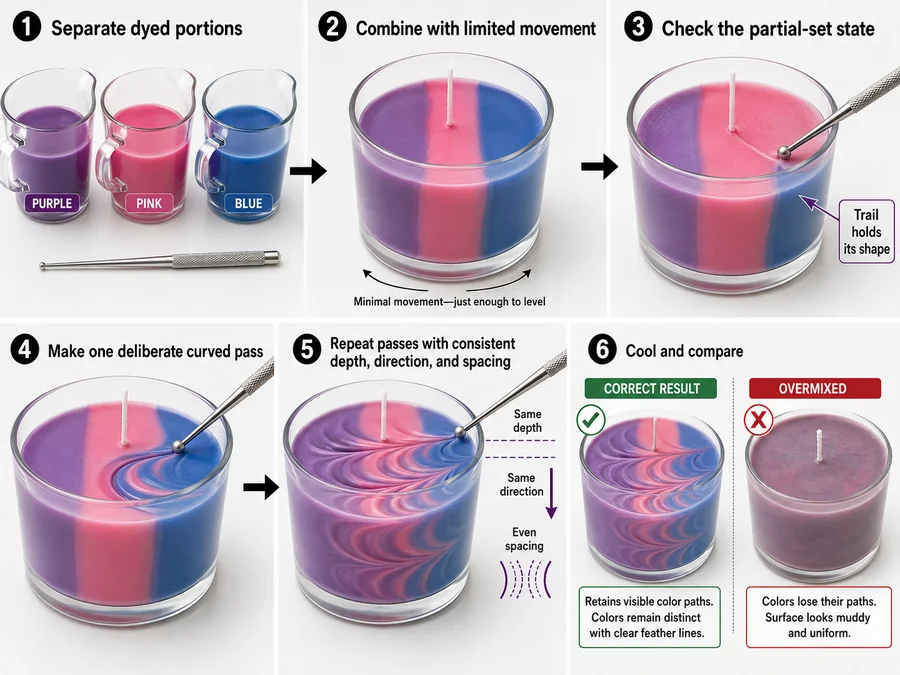
How do you create a candle swirl?
Create a candle swirl by partially combining separately dyed wax portions while the wax remains movable but thick enough to retain curved color separation after cooling.
Compatible wax portions use candle materials approved for the same application; compatibility does not mean matching colors, identical temperatures, interchangeable waxes, or unsupported generic chemical compatibility.
A candle swirl contains visible curved bands or trails formed by controlled movement between compatible dyed wax portions. It is not undissolved dye, random streaking from poor mixing, or the irregular vein pattern associated with marbling.
- Prepare each dyed wax portion separately and confirm complete candle-dye incorporation.
- Keep every portion within the wax and dye suppliers’ permitted handling conditions.
- Bring the portions to compatible working states rather than relying on one fixed temperature.
- Introduce the accent wax as a limited stream, ribbon, or placed portion.
- Move the wax with one controlled pour motion or a small number of deliberate tool passes.
- Stop while distinct curved color paths remain visible.
- Cool the candle under stable conditions and inspect the full pattern before repeating the method.
| Cooled result | Process interpretation |
|---|---|
| Distinct curved bands with soft color transitions | The portions moved together without becoming uniform |
| One flat, blended color | The wax was combined too fully or manipulated for too long |
| Sharp isolated blocks with little movement | The wax may have been too resistant to form a flowing swirl |
| Specks or concentrated dye marks | Dye incorporation failed before swirl formation |
| Irregular vein-like separation | The result is closer to marbling than a planned swirl |
| Surface-only trails | The movement did not occupy enough of the candle body |
The useful working state is relative to the wax system and intended pattern. Wax that flows too freely can homogenize the colors, while wax that has thickened too far may form chunks or isolated patches instead of smooth curves.
For a repeatable trial, hold the portion masses, colors, vessel, pour direction, manipulation count, and cooling conditions constant. Change one process variable, such as wax state or stream placement, between samples.
Methods: Compare a controlled sample with an intentionally overmixed sample after both have cooled. Photograph the same side and an interior section where practical, then record whether the result shows curved separation, uniform blending, irregular veins, or incorporation defects.
Stop manipulating the wax as soon as the planned swirl remains visible and stable enough to survive cooling.
How does pouring technique affect decorative candle patterns?
Pour height, stream thickness, direction, spout geometry, and wax state determine how dyed wax penetrates, spreads, and occupies the candle body.
Pour geometry is the combined path, angle, stream shape, and entry point used to transfer colored wax. Change one pouring variable at a time under matched conditions so the cooled pattern can be attributed to that variable rather than a different wax state or batch condition.
Matched-pour benchmark
| Test condition | Variable changed | Variables held constant | Cooled pattern to inspect |
|---|---|---|---|
| Control pour | None | Wax, dye, portion mass, vessel, wax state, cooling, and pour path | Baseline depth, spread, and edge shape |
| Different entry point | Pour location | All control conditions | Whether color remains localized or crosses more of the candle body |
| Different stream thickness | Stream width | All control conditions | Whether the accent forms narrow trails or broader color zones |
| Different direction | Pour path | All control conditions | Whether the pattern curves, angles, or settles asymmetrically |
| Different spout geometry | Pitcher or spout shape | All control conditions | Whether the stream stays narrow, breaks apart, or spreads at entry |
| Different wax state | Relative fluidity | All other practical conditions | Whether colors penetrate, blend, or remain separated |
Do not compare a high, thin pour made with freely flowing wax against a low, broad pour made after the wax has thickened. That comparison changes several conditions and cannot isolate the effect of pouring technique.
Avoid universal pour-height recommendations. Vessel depth, wax type, portion mass, spout shape, and intended effect change how the stream behaves.
Methods: Prepare one control pour and separate variants that each change only one listed variable. Record the entry point, stream shape, direction, wax-state cues, and cooling conditions. Compare the same external view and an interior section after cooling.
Use matched pours to identify which transfer movement creates the intended pattern without turning the colors into one uniform shade.
When is candle wax partially set?
Candle wax is partially set when it remains movable but has thickened enough to retain a deliberate pattern after the tool or pour movement stops.
The useful window cannot be identified by elapsed time or one temperature alone. Readiness depends on the wax, batch size, vessel, room conditions, dye and fragrance load, and the decorative movement being performed. Judge appearance, movement, measured temperature, and tool resistance together.
Wax-state dataset
| Observable wax state | Appearance | Movement | Tool resistance | Pattern behavior |
|---|---|---|---|---|
| Fully fluid | Smooth, glossy surface | Levels immediately | Very little | Colors may spread or blend too freely |
| Beginning to thicken | Slightly heavier flow | Movement slows but continues | Light | Broad trails may remain briefly |
| Useful partial-set window | Visible body with retained movement lines | Moves when poured or dragged but does not level immediately | Noticeable, controlled resistance | Swirls, feathers, or veins can remain defined |
| Over-set | Skin, lumps, or rigid sections form | Breaks or shifts as pieces | High or uneven | Tool movement may tear, gouge, or displace wax |
Use this check:
- Observe whether the wax still moves as one continuous mass.
- Tilt or move the container gently and note how quickly the surface levels.
- Draw a clean heat-safe tool through a small test area.
- Watch whether the path closes immediately, remains defined, or breaks into rigid edges.
- Record the measured temperature as a batch-specific reference.
- Begin the decorative movement only when the wax moves without instantly erasing the pattern.
A useful partial-set state sits between unrestricted flow and rigid resistance. Wax that levels immediately is still too fluid for some retained patterns, while wax that tears or forms chunks has progressed too far.
Methods: Record elapsed time, measured temperature, surface appearance, movement, and tool resistance at several cooling stages. Use the resulting observations only for the tested wax, batch, vessel, and room conditions; do not convert them into a universal readiness threshold.
Identify partially set wax through combined physical cues, then use the recorded temperature and time only to reproduce that same tested setup.
How do you create tool-dragged feather lines in dyed candle wax?
Drag a clean heat-safe tool through planned colored wax zones during the partial-set window to form repeated lines without fully mixing the colors.
Tool-dragged internal wax feathering creates repeated directional lines inside colored candle wax by moving a tool through adjacent dye zones. It does not mean palm-wax crystallization, carving cooled wax, painting the surface, adding inclusions, or applying non-dye embellishments.
- Prepare adjacent or layered zones of fully incorporated candle-dye color.
- Let the wax reach the documented partial-set state where it moves but retains a tool path.
- Insert a clean heat-safe tool to the planned depth.
- Pull the tool through both color zones in one deliberate direction.
- Repeat the movement with consistent spacing where a regular feather pattern is required.
- Keep the insertion depth and direction stable unless the design intentionally changes them.
- Stop before repeated passes turn the separate colors into a uniform mixture.
- Let the candle cool without further movement, then inspect the interior pattern where practical.
| Cooled result | Likely process condition |
|---|---|
| Repeated fine lines with visible color separation | Tool movement and wax state were controlled |
| Broad blended bands | The wax was too fluid or manipulated too much |
| Torn or broken channels | The wax had set too far before manipulation |
| Uneven feather spacing | Tool position or movement changed between passes |
| Pattern appears only at the surface | Tool depth did not reach the intended wax zone |
Use controlled tool movement only while the wax can retain feathered lines without breaking apart or becoming fully blended.
How does internal wax marbling differ from other marbled-candle methods?
Internal wax marbling differs from other marbled-candle methods by placing contrasting dyed wax inside the candle body during filling rather than applying color only to a finished surface.
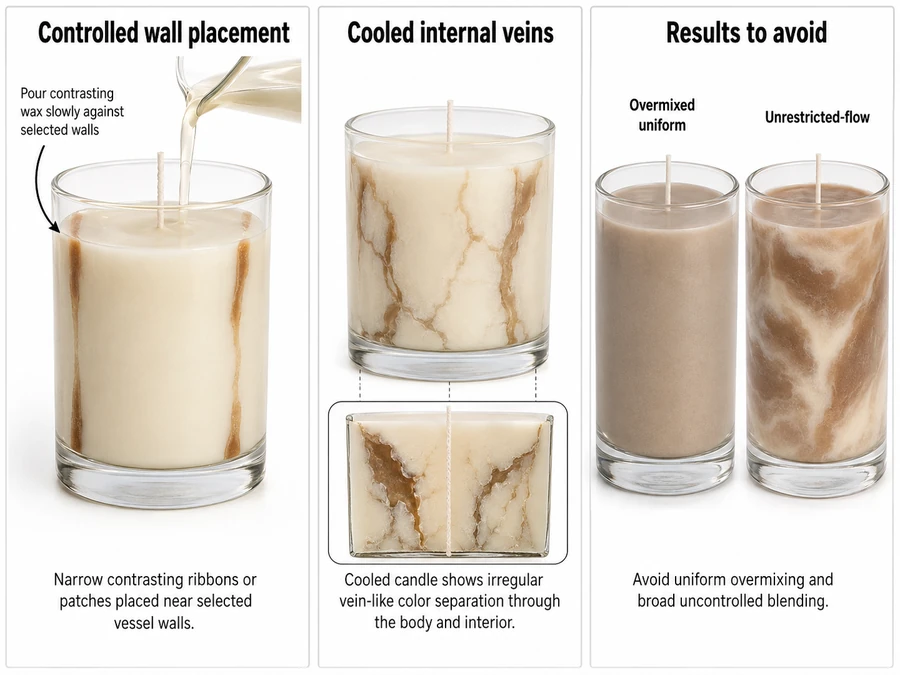
This guide uses controlled wall-placement marbling, one internal marbling method in which narrow portions of contrasting candle wax are positioned during filling rather than fully stirred together. Candle makers may use “marble” and “swirl” for overlapping effects, so this section defines marbling by irregular vein-like separation within the candle body.
| Method condition | Placement action | Expected cooled distinction |
|---|---|---|
| Controlled wall placement | Place narrow contrasting wax portions along selected vessel-wall areas during filling | Irregular veins remain concentrated through chosen areas |
| Unrestricted central pour | Pour the contrasting wax freely into the center | Color may spread broadly instead of forming placed veins |
| Repeated stirring | Move a tool through the colors several times | Veins become blended bands or one mixed shade |
| Surface-only application | Add color after the candle surface forms | The effect remains on the surface and is not internal marbling |
| Brief pre-combination | Combine colored portions immediately before transfer | The result is closer to a dirty-pour pattern |
Prepare the base and contrasting wax portions separately, confirming that each dye is fully incorporated. Keep the wax, dye, and vessel inside their product-specific handling limits. Pour part of the base wax, place limited ribbons or patches of contrasting wax near selected wall areas, then continue filling without stirring the entire vessel.
Judge the result only after cooling. A successful sample retains irregular vein-like separation through the intended candle area, while an overmixed sample loses that distinction.
Methods: Prepare matched small samples with the same wax, dye portions, vessel, filling sequence, and cooling conditions. Compare controlled wall placement against one intentionally overmixed sample and one unrestricted-flow sample. Record the placement path and inspect the same cooled side and interior section for each sample.
Limit the contrasting wax movement so the cooled candle preserves irregular internal veins rather than uniform blending.
How does temperature contrast affect internal wax marbling?
A controlled temperature difference between compatible colored wax portions can change marble-vein definition, but every portion must remain within its product and vessel limits.
Temperature contrast is the measured difference between the colored wax portions at placement. It is a relative test variable, not a universal marbling temperature or permission to exceed the wax, dye, or candle-vessel instructions.
Temperature-contrast benchmark
| Small-batch condition | Controlled variable | Conditions held constant | Cooled result to record |
|---|---|---|---|
| Same-state control | No planned temperature difference | Wax, dye, portion mass, vessel, placement path, and cooling | Vein width, spread, contrast, and edge shape |
| Cooler accent portion | Accent wax is allowed to thicken slightly while remaining inside its permitted range | All other control conditions | Whether the accent stays more localized or forms clearer veins |
| Greater permitted contrast | The relative difference is increased without leaving either product’s working range | All other control conditions | Whether definition improves, stops changing, or produces broken placement |
| Rejected condition | One portion or the vessel falls outside its stated handling conditions | Not tested | Reject rather than treating the condition as a decorative technique |
The warmer portion normally moves more freely, while a cooler portion may resist movement and remain nearer its placement path. Establish the useful relationship with small matched samples because wax composition, dye, fragrance load, vessel conditions, and cooling can change the result.
Current supplier examples show why the stages must remain separate. The Flaming Candle recommends 175–185°F (79–85°C) for incorporating dye, especially solid chips or blocks. CandleScience lists 170°F (76.7°C) as the starting pour temperature for Golden Brands 454 and recommends adjusting the pour temperature by 5°F (2.8°C) increments for the maker’s conditions. Neither value establishes a universal marbling contrast. (help.theflamingcandle.com)
Methods: Prepare at least one same-state control and one contrast sample using the same wax, dye portions, vessel, placement path, and cooling environment. Measure each portion immediately before placement. Photograph the same cooled side and interior section, then record vein width, spread, color separation, and defects without claiming that one contrast works across other materials.
Choose the smallest permitted temperature contrast that preserves the intended veins without moving any component outside its stated working conditions.
How do you create a dirty-pour candle?
Briefly combine separately dyed candle-wax portions before or during pouring, then transfer them before the colors become one uniform mixture.
A dirty-pour candle uses only compatible candle wax and candle dye in the color-forming process. Acrylic-paint additives, silicone pouring media, resin formulas, mica, and other non-candle techniques do not belong in this method.
- Melt and divide the candle wax into labeled portions.
- Incorporate each candle-dye color separately under its supplier-approved conditions.
- Bring the portions to compatible pouring states without exceeding the wax, dye, or vessel limits.
- Add the colored portions to one pouring pitcher in a planned order, or introduce them together during transfer.
- Use little or no stirring after the portions meet.
- Pour immediately through one controlled path.
- Stop scraping once the remaining material would create an unintended mixed band.
- Cool the candle under stable conditions and inspect the sides and interior pattern.
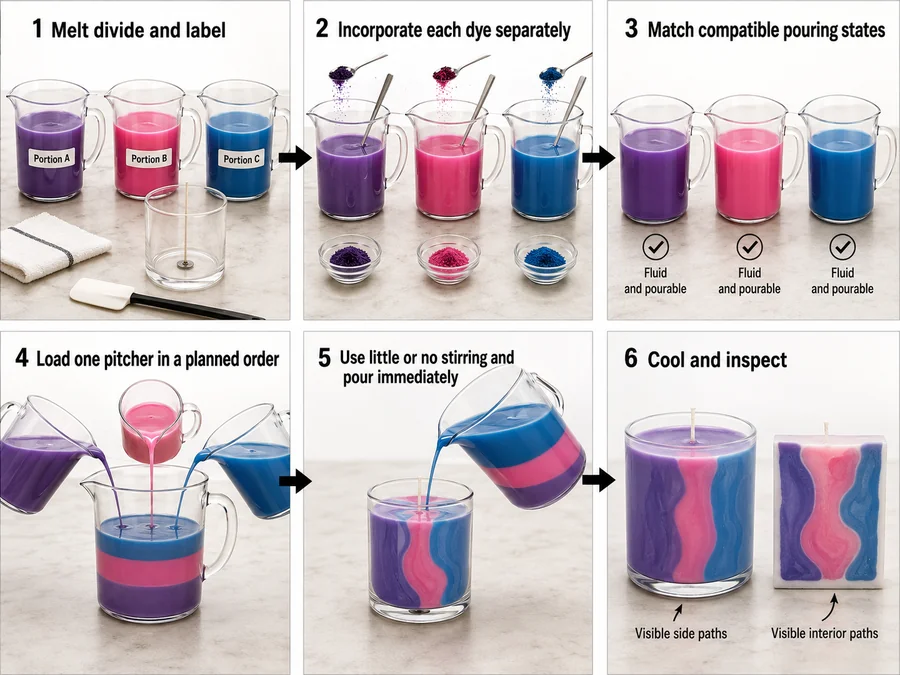
A dirty pour differs from marbling because the colored wax portions meet before or during transfer rather than being placed as controlled veins near selected vessel areas. It differs from a swirl because the pattern comes mainly from the combined pour path rather than deliberate curved manipulation inside the candle.
The wax must remain fluid enough to transfer continuously but not be mixed long enough to homogenize. CandleScience’s current examples illustrate why the selected wax controls the starting point: one soy-candle tutorial pours at 160°F (71°C), while Golden Brands 454 starts at 170°F (76.7°C). (candlescience.com)
Methods: Prepare one control sample with a documented portion order, transfer path, wax-state observation, and cooling setup. Repeat by changing only one variable, such as the order of the colored portions or the duration before transfer. Compare the cooled pattern for color separation, broad blending, isolated patches, and unintended uniformity.
Transfer the briefly combined candle wax before the separate colors lose their visible paths.
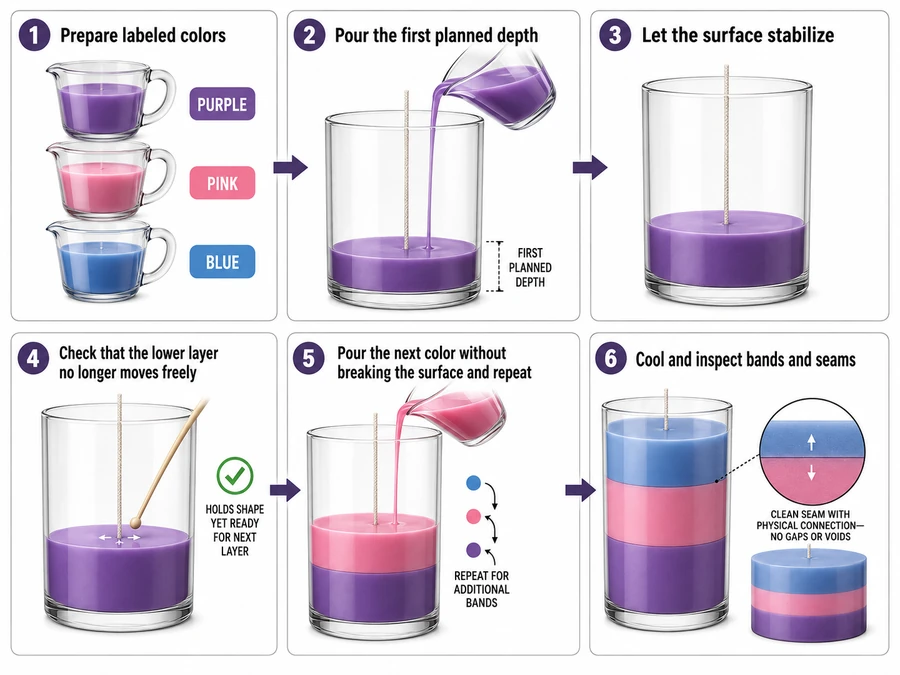
How do you pour layered candle colors?
Pour layered candle colors in a planned sequence after each lower layer can hold its color line while still accepting the next layer.
A layered candle pour stacks separately dyed wax portions so each cooled band remains visually distinct and physically connected to the wax above and below it. The surface state between pours controls both outcomes.
- Prepare and label every colored wax portion before the first pour.
- Confirm complete candle-dye incorporation in each portion.
- Keep the portions within their wax- and dye-specific handling conditions.
- Pour the first color to its planned depth.
- Let its surface stabilize without assigning one fixed waiting time.
- Check that the surface no longer moves freely or allows the next color to penetrate uncontrollably.
- Pour the next portion through a controlled stream that does not break the lower surface.
- Repeat the readiness check before each later color.
- Cool the completed candle under stable conditions.
- Inspect the cooled bands and their seams rather than judging the molten layers alone.
| Cooled observation | Interpretation |
|---|---|
| Distinct bands with connected seams | The staged pours preserved both separation and connection |
| Colors penetrate unevenly into one another | The lower layer was too fluid or the next pour disturbed it |
| Layers separate at the seam | The interface did not form an acceptable connection |
| Sharp color line with a visible gap | Visual definition was achieved without adequate seam quality |
| Uneven band thickness | Portion mass, vessel position, or pour control changed between stages |
Pour each colored candle-wax layer according to surface readiness rather than one universal clock time.
When is a candle layer ready for the next pour?
Pour the next layer when the previous surface can hold a clean color line but remains receptive enough to form an interlayer bond.
No single number of minutes applies to every layered candle. Wax composition, layer mass, vessel dimensions, room conditions, and the temperature of the next portion change how quickly the surface reaches the required state.
Cooling and readiness dataset
| Prior-layer state | Observable cues | Likely next-pour result | Action |
|---|---|---|---|
| Fully fluid | Surface moves, ripples, or levels immediately | Colors may penetrate or mix | Continue cooling |
| Beginning to stabilize | Surface movement slows but remains easily disturbed | Color line may form unevenly | Recheck before pouring |
| Color-line-ready | Surface is stable, shows no free lateral flow, and remains compatible with the next pour | Distinct band with a connected seam | Pour the next layer carefully |
| Fully rigid | Surface is hard and no longer responds as a warm wax interface | A sharp band may form, but seam separation becomes more likely | Test the wax system before production |
| Contracted or damaged | Gap, crack, sink, or detached edge appears | The next pour may preserve the defect | Stop and assess the test sample |
Use appearance and movement first, then record elapsed time and temperature as repeatability data for that exact setup. Time becomes useful only after a small-batch test connects it to a verified surface state.
Methods: Record the wax, layer mass, vessel, room conditions, prior-layer temperature, next-layer temperature, elapsed time, surface cues, and cooled seam result. Compare samples made with one changed waiting condition while holding the other variables steady. This dataset is an observational test template, not a universal production schedule.
Start the next colored layer from a verified surface condition, not from an unqualified waiting period.
How do you balance layer adhesion and sharp color lines?
Evaluate physical layer bonding and visual color-line definition separately, then choose staged-pour conditions that produce an acceptable balance for the tested wax system.
Layer adhesion means adjacent candle-wax layers remain joined during cooling, handling, and section inspection. Color-line definition means the color transition remains visually distinct; a sharp line does not prove that the layers formed a strong seam.
Seam-quality benchmark
| Cooled seam result | Visual color line | Physical connection | Interpretation |
|---|---|---|---|
| Distinct and intact | Sharp | Layers remain joined | The tested interface balanced definition and connection |
| Distinct but separated | Sharp | Gap, crack, or detachment appears | Visual sharpness concealed weak layer adhesion |
| Soft-edged and intact | Slightly blended | Layers remain joined | The interface favored connection over a crisp color line |
| Blurred and weak | Colors spread across the seam | Separation or cracking appears | The staged-pour conditions failed both requirements |
| Uneven | Sharp in some areas and blended in others | Connection varies around the vessel | Pour direction, surface state, or cooling was inconsistent |
Compare samples only after complete cooling. Judge the color line visually, then inspect whether the seam remains joined around the vessel and through a cut section where practical.
Methods: Build the benchmark from one control and one comparison candle for each tested interface condition. Record the wax, candle dye, portion mass, surface cues, measured temperatures, pour sequence, cooling conditions, test date, and inspection tools. Change only the prior-layer state or next-pour condition, and treat the findings as specific to that wax system rather than universal limits.
Accept a layered-candle method only when the cooled seam meets both the visual and physical requirements of the intended design.
Why does candle dye bleed between layers?
Candle-dye bleed occurs when color moves across a formed wax color division after pouring, usually through delayed migration or a material-compatibility problem.
Bleed means color crosses an intended candle-wax color line after that line has formed. Immediate mixing occurs during pouring, migration develops later, and muddiness describes reduced color distinction without identifying the cause.
Time-sequenced failure log
| First appearance of the change | Observation | Classification to test |
|---|---|---|
| During the next pour | The upper color penetrates or moves through the lower layer | Immediate spread from surface state or pour disturbance |
| Immediately after tool contact | An unrelated color streak appears | Tool or pitcher carryover |
| During cooling | Color lines soften as the wax contracts or crystallizes | Wax-appearance or cooling effect |
| After storage | Color slowly crosses a previously stable color line | Delayed dye migration or compatibility issue |
| Mainly near the vessel wall | Tint appears on the container rather than through the seam | Vessel staining or wall interaction |
| Across exposed surfaces | Color becomes paler without crossing a color line | Fading rather than bleed |
Is every blurred color line candle-dye bleed?
No. A color line that blurs during pouring is usually an immediate process interaction, while true migration appears after an initially distinct color line has formed.
Can tool contamination look like layer bleed?
Yes. Residue on a pitcher, pipette, stirrer, or scraper can introduce an unexpected streak immediately after contact, but that is carryover rather than movement through a formed seam.
Can frosting make colors look as though they moved?
Yes. Crystallization or frosting can lighten or mottle selected areas without transferring candle dye across the layer seam.
Is fading the same as migration?
No. Fading reduces color intensity, while migration changes the location of color by crossing an intended color line.
What should be recorded before changing the process?
Record the first appearance time, location, color-line shape, tool contact, wax system, candle dye, temperatures, cooling conditions, storage duration, and photographs under matched lighting.
Methods: Create the failure log from one control candle and one matched variant for each suspected process condition. Inspect and photograph them during pouring, after cooling, and at documented storage checks using the same lighting and viewing angle. The log classifies visible timing patterns but does not replace product-specific stability or compatibility testing.
Classify the color change by timing and location before altering the layered candle-dye process.
How do you make an ombre candle?
Create a poured ombre candle from measured wax portions with approved cooled shades that progress gradually, then pour them in order using the layered-candle process.
An ombre candle has a gradual light-to-dark or hue-to-hue progression across adjacent candle-wax layers. Distinct bands with abrupt shade changes form an ordinary layered design rather than a verified ombre gradient.
Cooled shade-ladder dataset
| Pour position | Planned wax portion | Cooled sample shade | Progression check | Pour decision |
|---|---|---|---|---|
| First | Measured and labeled | Lightest approved shade | Starting point is visually distinct | Pour first |
| Second | Measured and labeled | Slightly deeper or shifted shade | Change is gradual rather than abrupt | Pour after the first layer is ready |
| Middle | Measured and labeled | Midpoint shade | Fits between adjacent cooled samples | Pour in planned order |
| Fourth | Measured and labeled | Deeper shade | Continues the same direction | Pour after the prior color line stabilizes |
| Final | Measured and labeled | Darkest approved shade | Ends the progression without an unrelated color jump | Pour last |
- Divide the fully melted wax into measured, labeled portions.
- Prepare a small cooled sample from each planned candle-dye shade.
- Arrange the samples in the intended visual order.
- Adjust the plan when two adjacent samples look identical or change too abruptly.
- Return the approved portions to their product-specific working conditions.
- Pour the lightest, darkest, or alternate starting shade according to the planned direction.
- Apply the same surface-readiness checks used for layered candles before every later pour.
- Cool the finished candle completely and compare it with the approved shade ladder.
Molten wax can appear darker, clearer, or more saturated than cooled wax. Validate the gradient with cooled samples rather than judging the shades inside the heated pitchers.
Methods: Prepare and label one cooled sample for every planned wax portion under matched lighting and background conditions. Record the wax, candle dye, portion mass, sample order, working-state observations, and cooled appearance. The shade ladder verifies visual progression only and does not create a universal dye-dosing formula.
Approve the shade sequence before pouring so the finished candle reads as a gradual ombre progression rather than separate color bands.
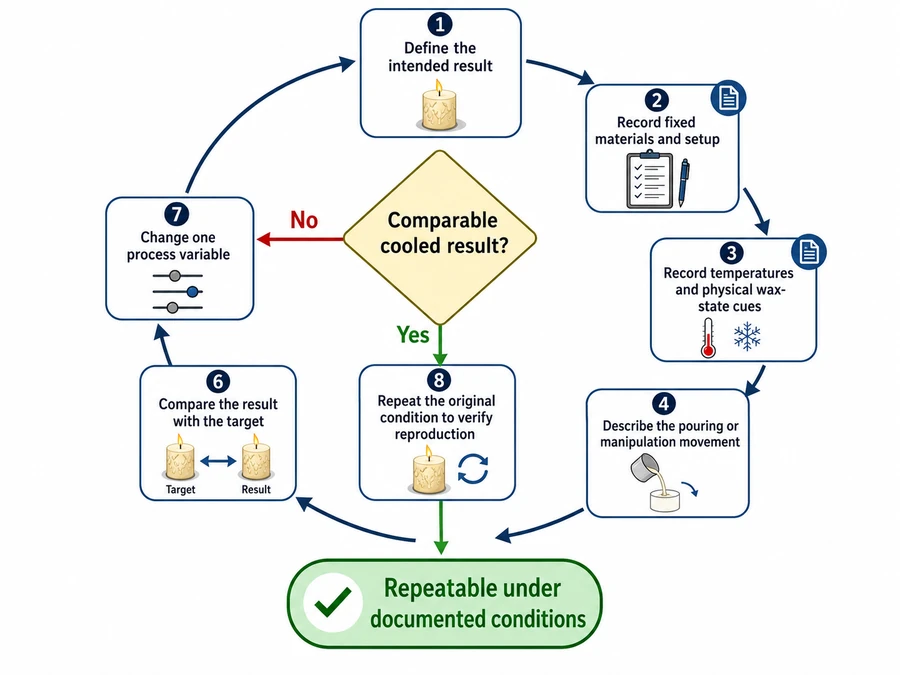
How do you repeat decorative candle-dye effects?
Record every material and process condition with the cooled result before treating a decorative candle-dye effect as repeatable.
A repeatable decorative effect is a color pattern that can be reproduced under documented conditions, not a single successful candle judged from memory. The record must connect the materials, wax states, movements, pouring sequence, cooling conditions, and final appearance.
Decorative Effect Test & Pour Record
| Record field | Information to enter |
|---|---|
| Test identification | Date, batch label, effect name, and sample number |
| Wax system | Wax product, batch reference where available, and total wax mass |
| Candle dye | Product identification, color, and amount recorded under the maker’s established process |
| Color portions | Mass, label, intended role, and pour order for each portion |
| Working conditions | Measured temperatures and observable wax-state cues at each key stage |
| Incorporation | Mixing method, duration record, and pitcher, film, or cooled-sample observations |
| Effect formation | Pour path, stream shape, placement, tool depth, direction, and manipulation count |
| Layer staging | Surface-readiness cues and elapsed time between staged pours where applicable |
| Vessel and environment | Vessel type, room conditions, and relevant setup notes |
| Cooling | Location, movement restrictions, and observed cooling sequence |
| Cooled result | Top, sides, base, seam, and interior observations where practical |
| Decision | Repeat unchanged, retest one variable, or reject the tested condition |
Use the record in this order:
- Define the intended visual result before preparing the wax.
- Enter every fixed material and setup condition.
- Record temperatures and physical wax-state cues when each action occurs.
- Describe the pouring or manipulation movement in observable terms.
- Photograph the cooled candle from matched positions.
- Compare the result with the intended pattern.
- Change only one process variable in the next controlled test.
- Repeat the original condition before calling the result reproducible.
Do not turn the record into a broad commercial tolerance system or full failed-batch diagnostic system. Its purpose is to reproduce an in-scope decorative candle-dye process under the same small-batch conditions.
Methods: Use one completed record for each test candle and retain the same field definitions across comparisons. A repeat requires the same documented conditions and a comparable cooled result; an undocumented visual resemblance does not establish process repeatability.
Treat the decorative candle-dye process as repeatable only after the written conditions reproduce the intended cooled effect.