
The right candle wick for this page is the smallest starting wick family and test size for a container candle that can bring the melt pool close to full by hours two to three without soot or an overheated jar, then repeat that result in burn tests; it does not mean the wick with the highest hot throw, the most crackle, the best decorative effect, or one universal best wick for every candle format.
Choosing a wick feels confusing because diameter charts, wax types, and fragrance loads can point in different directions. The practical goal is a full melt pool by the second or third burn without soot or an overheated jar. Start by matching wick family to wax and vessel, then use diameter charts to shortlist one or two sizes. Final approval comes from repeat burn tests in your exact wax, fragrance, dye load, fill height, and container.
This page helps you choose a starting wick family and first test size for container candles and jars. Use it to set the first wick path, then move to separate pages for exact size matching, wooden-wick width, or full double-wick setup when you need those steps. Pillars, votives, tealights, and other formats need their own start points and testing rules.
Quick starting rule: choose the wick family before you choose the exact size
Choose the wick family first because wax type and vessel behavior decide whether you need a calmer or more aggressive series before exact sizing.
If you already know the wick family and need the exact size-selection workflow, move to how to size your candle wick correctly before you compare more series notes here.
For the wider context, start with the full guide to candle wick types and sizing before you lock in a wick family or test plan.
| Candle setup | Best starting move | Why it usually works | Step down if… | Step up if… |
|---|---|---|---|---|
| Paraffin or paraffin-rich blend in a straight-sided jar | Start with a steadier cotton series such as HTP- or LX-type | These blends usually open a melt pool easily and can soot when over-wicked | the flame is tall, smoky, or the jar runs hot | a hard wax ring remains after 3 hours |
| Soy, rapeseed, or other slower vegetable wax in a straight-sided jar | Start with a hotter series such as CD/CDN/ECO/TCR-type that is known to work with your wax | Vegetable waxes often need more wick power to reach the wall cleanly | mushrooming or early soot appears | the melt pool stays narrow by hours two to three |
| Coconut-heavy or softer blend | Start one step smaller than your soy guess, then test | Softer blends can fuel the flame more easily | the melt pool reaches the wall in the first hour | the flame struggles or self-extinguishes |
| Small to medium jar where you want crackle | Start with a supplier-matched single wooden wick sampler | Wooden wicks change more with wax and fragrance than cotton series | the flame is loud, smoky, or unstable | the wick drowns or only chars on one side |
| Wide vessel where one safe wick cannot reach the edges | Test two smaller wicks instead of one oversized wick | Splitting the heat usually gives better edge coverage and lower soot | both flames merge or the vessel gets very hot | hard wax remains at both outer edges |
Use this table to choose a starting family only. Final approval still comes from burn tests in your exact wax, fragrance, dye load, fill height, and vessel.
When to switch wick family instead of moving one size up or down
Move one size up or down when the wick is close but not quite right in the same wax and vessel. Switch wick family when the behaviour points to the series itself being wrong for the job, such as repeated tunneling with larger sizes, repeated soot or overheating with smaller sizes, or a flame style that stays too weak or too aggressive across multiple nearby sizes.
In practice, stay within the same family when you are fine-tuning around a nearly correct result. Change family when you keep chasing the right burn with bigger or smaller sizes and the candle still misses in the same direction.
Steps — Match wick size to container diameter
Match wick size to the container’s inside diameter at the wax fill line, then confirm that choice with burn tests in your exact wax, fragrance, dye load, and vessel. Melt pool means the layer of liquid wax around the flame. The right wick size gives you a full, even melt pool by hours two to three without overheating the jar. Measure the inside diameter of the container at the wax fill line, not the outer diameter and not the rim if it tapers. Note your wax type, fragrance percentage, and whether the wax is undyed, lightly dyed, or heavily pigmented.
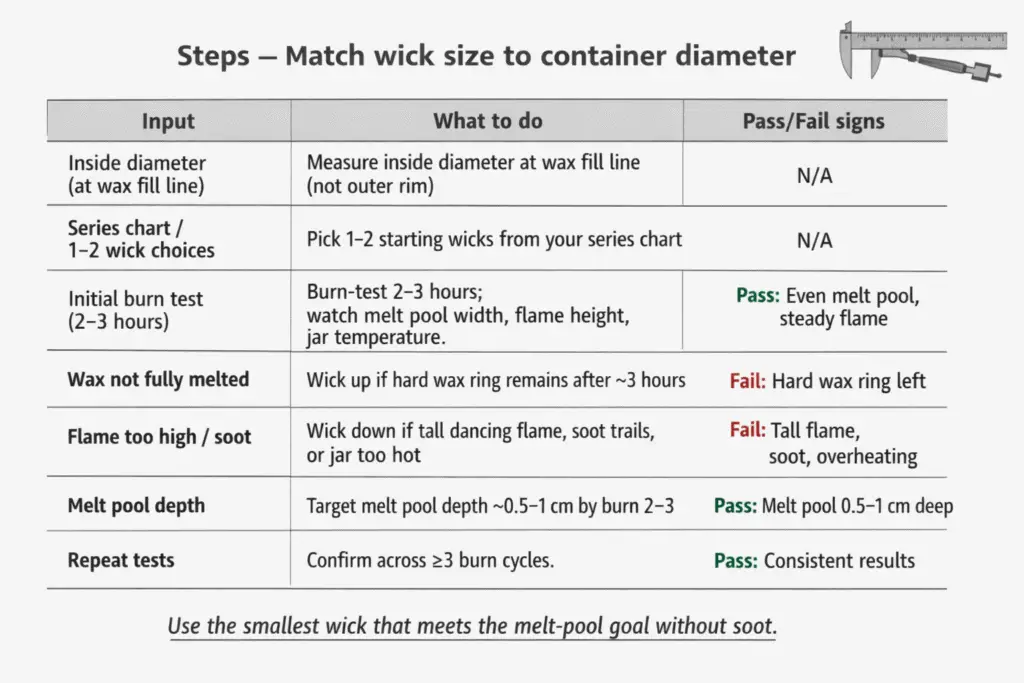
Use a reputable wick chart or a wick size estimator for your chosen wick series to pick one or two starting sizes for that diameter and wax family. Treat those sizes as test candidates, not final answers. Pour at least two testers with identical wax, fragrance, and fill level for each wick size. After curing, run two- to three-hour burns and watch the melt pool width, flame height, and jar temperature. If you still have a thick ring of hard wax after three hours, step the wick up; if you see tall, dancing flames, soot trails, or an uncomfortably hot jar, step the wick down.
A simple rule-of-thumb that keeps you honest is to use the smallest wick that can reliably achieve a melt pool about 0.5–1 cm deep that reaches close to the container wall by the second or third burn. If the melt pool reaches the glass in the first hour, or if the flame regularly becomes unusually tall for that wick and vessel, that wick is too large. Re-test until your melt pool and flame behaviour are repeatable across at least three burn cycles, because wick performance often changes after the first burn as the burn tunnel forms and the wax level drops.
Treat those depth and timing numbers as tested starting rules for this page, not as universal standards. No wick chart or estimator can choose the final wick on its own, so keep wax, fragrance load, dye level, fill height, and vessel constant and approve the wick only after repeat burn tests in the finished candle.
| What you see during testing | What it usually means | What to do next |
|---|---|---|
| A hard wax ring remains after 3 hours and the flame stays small | The wick is too small or too gentle for the wax and vessel | Step up one size or move to a stronger wick family |
| The melt pool reaches close to the wall by hours two to three and the flame stays steady | The wick is close to correct | Repeat the same test for at least two more burn cycles |
| The melt pool hits the wall very early, the flame looks tall, or the jar runs very hot | The wick is too large or too aggressive | Step down one size or test a calmer wick family |
These sizing rules are starting rules, not universal standards. Hold wax, fragrance load, dye level, fill height, and vessel constant, then confirm the wick with repeat burn tests before treating it as final.
How wax type changes wick choice
Wax type changes wick choice because each wax melts, feeds fuel, and holds heat differently, so the same jar diameter can need a different wick family or size. Wax family means the base wax or blend the wick must burn through. Wax family changes wick choice as much as container diameter does because each wax melts, feeds fuel, and holds heat differently. Softer, lower-viscosity waxes like many paraffin blends generally need smaller, cooler wicks to avoid sooting and excessive melt pools. Slower-burning vegetable waxes, such as soy or rapeseed, are more viscous when melted and often need a slightly larger or more aggressive wick series to achieve the same melt pool width.
Additives can shift the result in either direction, so treat hardeners, beeswax, coconut-heavy blends, mineral oils, and other blend changes as test variables rather than fixed rules. For vegetable-wax start points, see best wicks for soy candles, then confirm the choice with wax-specific charts and your own burn tests.
CD vs HTP vs LX vs wooden — which wick series to choose
Choose wick series by matching the flame style to your wax, vessel, and testing goal, because the right family makes sizing easier and the wrong one makes every size harder to tune. Wick series means a wick family with its own braid, paper thread, or wood construction. The right series makes sizing easier because it gives you a sensible starting point before you move up or down. The wrong series forces you to chase performance with bigger or smaller sizes when the real issue is the wick family itself.
| Wick series | Best starting fit | Main upside | Main risk | Usually move up when… | Usually move down when… |
|---|---|---|---|---|---|
| CD/CDN-type | Soy, rapeseed, and harder-to-open container blends | Strong melt-pool power and solid hot throw | Can mushroom or run hot when oversized | vegetable wax keeps tunneling | soot, oversized flame, or a very hot jar shows early |
| HTP-type | Paraffin, paraffin blends, and blends needing a steadier burn | Balanced flame and cleaner look in many containers | Can underpower stubborn natural waxes | the flame stays weak or the pool stays narrow | the jar runs hot or mushrooming appears |
| LX-type | Paraffin or softer blends where you want a calmer flame | Stable burn and modest jar temperatures | May tunnel in denser natural waxes | wax hangs on the wall after three hours | the flame is already tall or soot appears |
| Wooden wick | Design-led jars, crackle-focused candles, and selected soft blends | Distinct look and sound | More sensitive to wax, fragrance, and priming | the strip drowns or chars weakly | soot, loud crackle, or an unstable flame appears |
Use cotton vs wooden wicks when you are deciding between material systems. If you are working specifically with soy, compare CD vs ECO wicks before you test.
For a broader family overview, review the main candle wick types. If wood is still the better fit for your jar and brand, see wood wicks for candles for the material-specific setup and limits.
Why fragrance load changes wick size
Fragrance load changes wick size because the oil becomes part of the fuel, so higher or heavier loads can make the same wick run hotter, smoke more, or behave differently in the same jar. Fragrance load means the percentage of fragrance oil in the wax. Fragrance load changes wick size because the oil becomes part of the fuel the wick pulls into the flame. A higher fragrance load means more combustible material in the melt pool, which often makes the candle burn hotter and faster if you keep the same wick size. That is why a wick that behaves perfectly at 6% fragrance can suddenly soot, mushroom, or overheat the jar when you pour the same wax at 10%.
Do not assume one wick size will cover every scent in a line. When you change fragrance percentage or move from an easy-burning scent to a heavier one, repeat your burn tests and keep the wick only if the flame stays steady, the melt pool reaches near the wall by hours two to three, and the jar stays within your tested range.
Why dyes and pigments affect wick performance
Dyes and pigments affect wick performance because they change the fuel the wick must pull and burn, which can either clog a wick slightly or push it hotter depending on the colour system. Colourants are the dyes or pigments added to the wax. Colourants affect wick performance because they change the chemistry and thickness of the fuel feeding the flame. Liquid dyes dissolve into the wax and can thin or slightly thicken the melt pool depending on their base, while solid chips, blocks, and concentrated pastes add extra solids the wick must pull through. Heavy pigment loads, especially from concentrated blocks or micas, can partially clog the wick and make the flame struggle.
Treat colour as a test variable, not a cosmetic detail. Lock the wick in with an undyed or lightly tinted tester first, then retest your final colour load and adjust only if the coloured candle tunnels, smokes, mushrooms, or runs hotter than the lighter version.
How vessel geometry and heat retention affect wick sizing
Vessel geometry changes wick sizing because container width, shape, and material control how heat spreads, so the same wax can need a different wick in a wide bowl than in a tall tumbler. Vessel geometry means the internal shape, height, and wall profile of the container. Vessel geometry and heat retention affect wick sizing because the container controls how heat spreads around the flame. Wider, shallow vessels usually need more wick power or multiple wicks than tall, narrow jars of the same volume. Tall, narrow jars concentrate heat in a smaller area, so the same wick that struggles in a low, wide bowl might burn very hot in a slim tumbler.
Measure the inside width at the wax line, note wall thickness and material, and treat curved or heat-holding vessels as separate test cases rather than chart matches. If a wide vessel still leaves outer wax with the largest tested single wick, move to the double-wick decision branch instead of forcing more size into one wick.
Steps — Run a proper burn test and log data
Run standardised 2–3 hour burn tests and log the same measurements each time, because a wick choice is only correct when it repeats cleanly across several burns in the finished candle. Burn test means a controlled series of burns that checks whether the wick really works in your finished candle. Start by trimming the wick to about 3–6 mm, or to your tested house standard, before the very first burn, then place the candle on a flat, heat-resistant surface away from drafts. Light it, start a timer, and stay in the room so you can observe how the wick behaves rather than checking only at the end.
| Checkpoint | What to record | Pass sign | Fail sign |
|---|---|---|---|
| 1 hour | Melt pool width, melt pool depth, flame height | the pool is expanding evenly and the flame is steady | a thin tunnel, weak flame, or visible smoke |
| 2 hours | Edge coverage, soot, jar warmth | the pool is nearing the wall and the flame stays controlled | a thick hard-wax ring, soot, or a sharply rising flame |
| 3 hours | Final pool width/depth, jar temperature, mushrooming | a near-full pool, modest flame, and no worrying heat | an oversized flame, mushrooming, soot, or an overheated vessel |
| Burn 2 | The same checks with a lower wax level | behaviour stays close to burn 1 | the flame grows taller or the jar gets much hotter |
| Burn 3 | The same checks again | results repeat cleanly | the candle drifts into tunneling or overheating |
Use the same room, trim length, and burn window for every tester so the comparison stays valid.
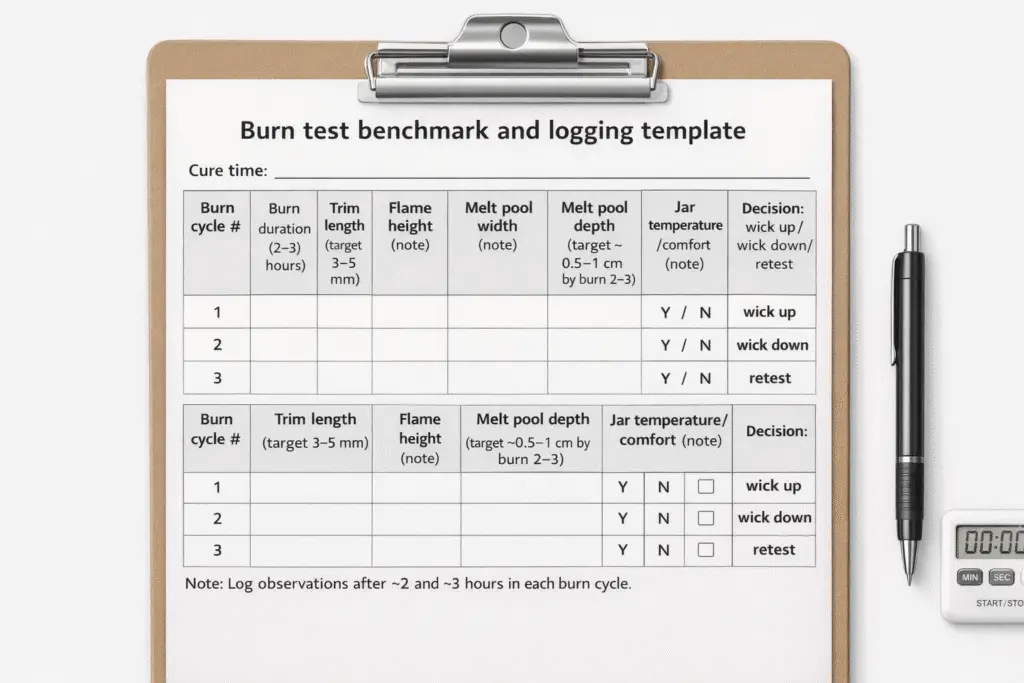
Check the candle at fixed intervals, such as 1 hour, 2 hours, and 3 hours, and log melt pool width and depth, flame height, soot, and jar temperature if you measure it. Run at least three burn cycles in the finished candle so you can see whether the wick stays stable as the wax level drops.
Use this page for the short approval rule only: keep the wick if later burns stay close to the first result and reject it if the candle drifts into tunneling, soot, mushrooming, or a hotter vessel. For the full workflow and record sheet, use the burn test guide and the candle burn test log template.
How to decide when to double-wick
Double-wick only when the widest safe single wick still cannot cover a wide vessel evenly, because splitting the heat with two smaller flames is usually safer than forcing one oversized wick. Double-wicking means using two smaller wicks instead of one larger wick in the same container.
Treat this as a decision branch, not a full setup guide. If a small or medium jar reaches a near-full melt pool with one safe wick, stay single-wick. If a wide jar still leaves outer wax with the largest safe single wick, test two smaller wicks instead of sizing up again.
Offload the full setup to the dedicated guide if the flames merge, the vessel runs very hot, or the multi-wick layout becomes too finicky to repeat cleanly.
If your main failure mode is persistent carbon build-up or smoke rather than edge coverage, treat that as a troubleshooting branch instead of continuing to size up. See fix mushrooming in cotton wicks for carbon caps and wick curl for self-trimming behaviour before changing more variables at once.
If you are still building the rest of your setup, the complete candle making hub connects wick choice with wax, containers, scenting, and testing pages.