

Measure a candle jar from the inside, set the fill line and headspace, then use that usable fill basis—not the jar label size or overflow volume—to estimate wax per jar and batch totals.
Use supplier wax capacity to the fill line first; if it is missing, measure water to the same fill line and convert that result with the wax’s stated density or specific-gravity basis.
A candle jar is a fill vessel whose inside diameter, usable depth, fill line, and headspace determine how much candle wax it can hold. Capacity here means usable fill at the chosen wax line, not the label size, brimful volume, or outside jar dimensions. Good measurement helps you plan wax per jar and repeat the same pour later, but it does not prove the container is heat safe for candle use. Start with the inside jar measurements before deciding the final fill rule.
- Measure the candle jar from the inside first
- Set the fill line and headspace before calculating capacity
- Separate jar label size from usable fill capacity
- Estimate wax per jar from the chosen fill line
- Save the measurement basis so the jar can be reused consistently
Measure the candle jar from the inside first
Measure the candle jar’s usable inside width where wax will sit, not the outside glass width, widest decorative point, or labeled jar size.
A candle jar is a fill vessel in the Candle Containers & Jars group, so the first measurement is the internal space that will hold wax. Diameter here means usable inside width at the wax-bearing zone, not the outside span, opening decoration, or product label.
Use this order:
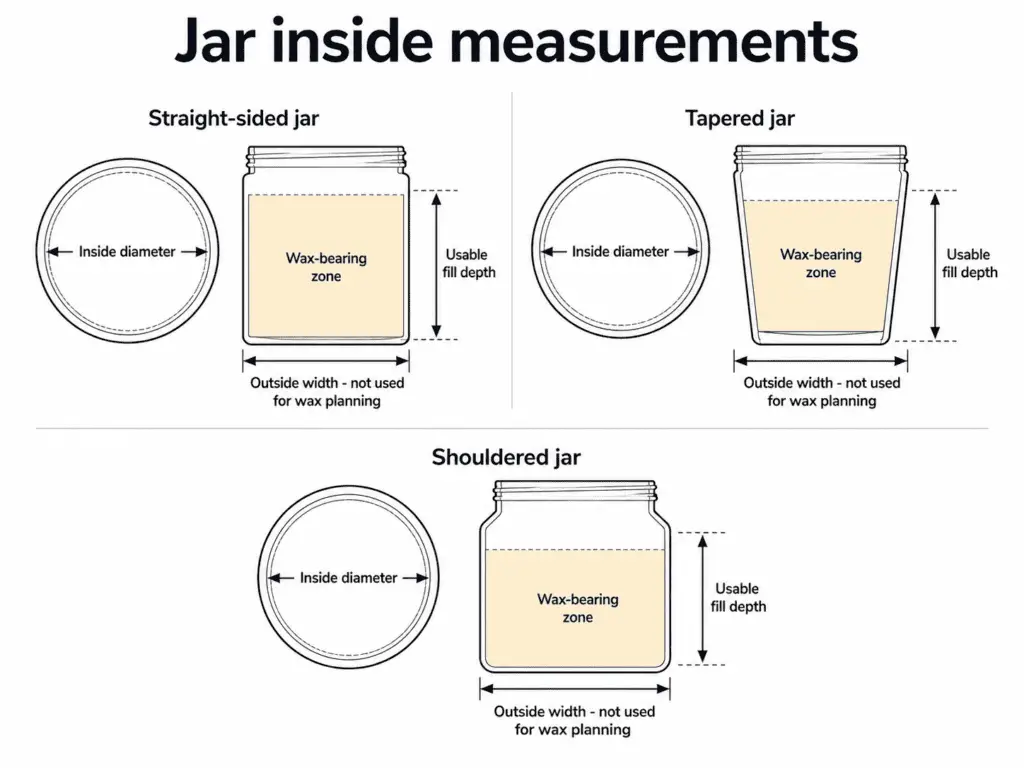
- Place the empty jar on a flat surface.
- Measure straight across the inside of the jar where the wax will sit.
- Keep the tape or ruler level, not angled across the rim.
- Record the unit you used, such as inches or millimeters.
- Note the measurement zone if the jar is tapered, shouldered, or curved.
Inside width, outside width, and label size are different numbers. Inside width tells you the real wax-bearing space. Outside width includes glass thickness. Label size is a naming shortcut, not a measured fill value.
Wrong diameter measurement can carry errors into fill planning, wax estimates, and wick routing. Jar Geometry, Wicking & Performance belongs after the jar’s usable inside diameter is confirmed, because this page only establishes the measurement basis.
Measure the usable fill depth, not just the jar height
Usable fill depth is the inside height that will actually hold wax after you leave the intended headspace above the fill line.
Total jar height is not the same as fill depth. Measure from the inside bottom of the candle jar to the intended wax stop-point, not to the very top rim. The rim marks the physical top of the container, while the fill line marks where the wax should stop.
Use a simple note when recording the jar:
- Internal height to rim: the full inside height.
- Planned headspace: the empty top space you will leave.
- Usable fill depth: the wax-holding height below that headspace.
After you know the usable fill depth, set the final fill line and headspace rule before converting that space into capacity or wax need.
Measure the wax-bearing zone, not the jar’s widest decorative point
Use the inside width and depth that match the zone where wax will sit, not the widest decorative span of the jar.
A straight-sided jar can usually be measured across the same inner width from top to bottom. A tapered jar changes width as the wax level changes, so the relevant width is the internal zone near the planned fill area. A shouldered jar may look wide near the shoulder but hold wax in a narrower body below it.
Jar shape changes where you measure; it does not change the purpose of the page. If you need to choose a wick from the measured jar diameter, use the wick-focused page after confirming the jar measurement. When Does a Candle Jar Need Two Wicks? is a separate question because double-wick thresholds depend on wick testing and burn behavior, not jar measurement alone.
Now that the inside measurement is stable, the next step is to turn it into a fill line and headspace rule.
Set the fill line and headspace before calculating capacity
The fill line is the intended wax stop-point below the rim, and headspace is the empty top space above it.
Capacity here means usable candle-fill capacity at the chosen fill line and headspace, not brimful overflow volume. A candle jar can look full without being filled to the rim, because the usable planning number depends on the wax line you choose.
Use this fill-line process:
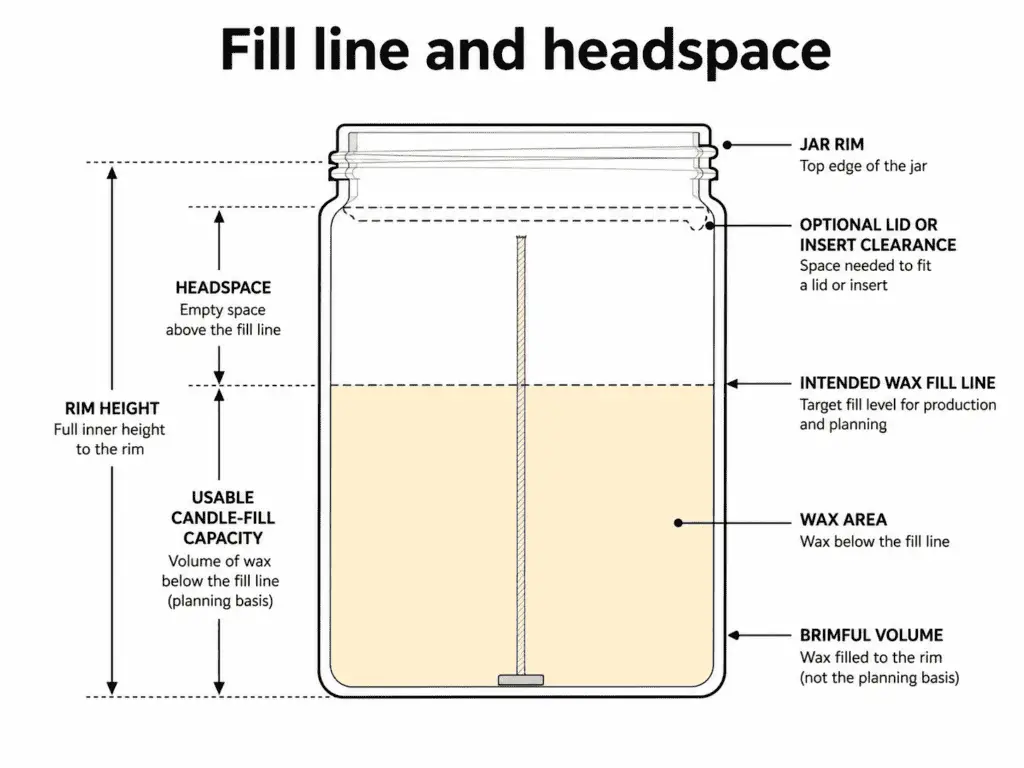
- Start with the jar’s inside measurements.
- Choose the wax stop-point below the rim.
- Mark or record that point as the fill line.
- Treat the empty space above that line as headspace.
- Use that fill line as the basis for every capacity and wax estimate that follows.
Filling to the brim is not the planning standard here. Brimful volume tells you how much liquid the jar might hold at the very top, but candle planning needs the amount held at the intended wax line. That difference matters because later wax estimates inherit this fill rule.
Account for lid clearance without redefining the fill rule
A lid does not create a new capacity definition; it adds a clearance condition to the same fill-line rule. If the jar has a lid or insert, keep the same fill-line logic but reduce the usable top space as needed for clearance. “Full” means visually appropriate at the intended wax line while still preserving closure clearance.
This lid note stays inside fill planning, not packaging or storage. Record the closure condition with the jar so repeat pours use the same headspace decision.
A usable fill line improves planning consistency, but it does not certify that a container is safe for candle heat performance. Container Safety & Heat Qualification is the right next stop when the question is whether the vessel is appropriate for candle heat, not just whether it can be measured and filled.
With the usable fill line set, jar label size can be separated from real usable capacity.
Separate jar label size from usable fill capacity
A candle jar’s label size is shorthand; usable fill capacity is the amount the jar holds at the chosen fill line.
Size means the name or comparison band on the jar, such as 8 oz. Capacity means the usable candle-fill amount at your fill line and headspace. Overflow volume means the amount a vessel may hold at or near the rim, so it should not become the planning number unless you intentionally fill to that same point.
| Number you see | What it usually means | Use it for wax planning? |
|---|---|---|
| Label size | A naming shortcut or size band | No, not by itself |
| Overflow-style capacity | A brimful or near-brim volume figure | No, unless it matches your fill line |
| Usable fill capacity | The amount held at the chosen candle fill line | Yes |
| Wax weight to fill line | A supplier or measured wax-weight basis | Yes, when the fill line matches your plan |
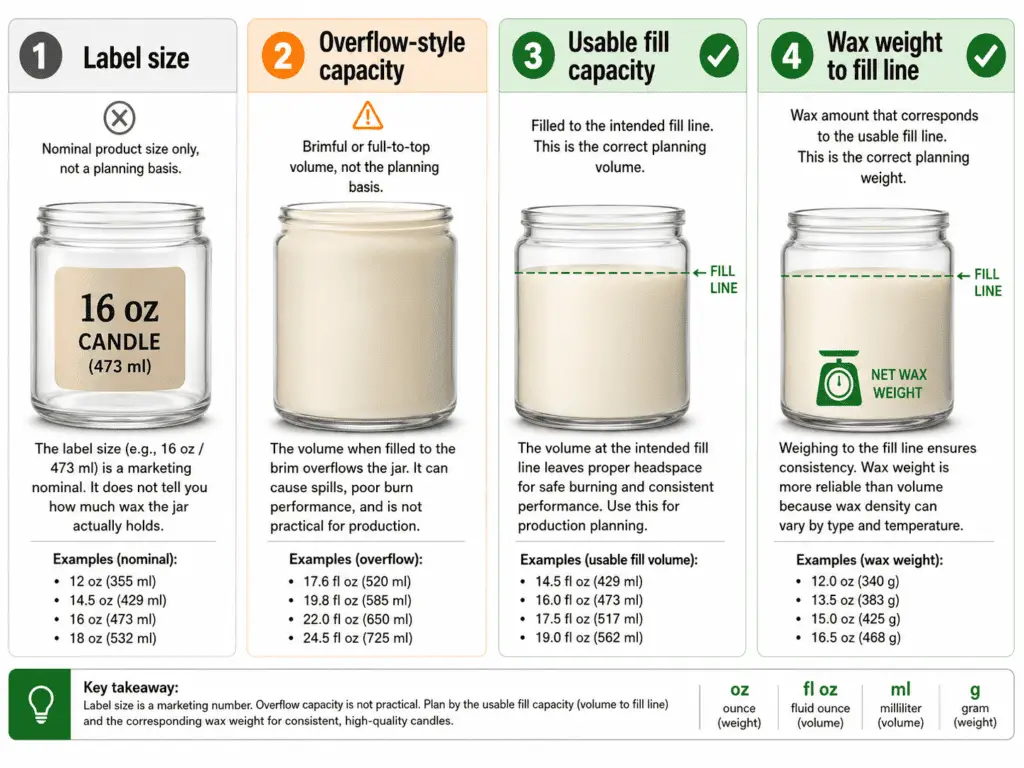
An 8 oz jar may not need 8 oz of wax because the label can describe a size band, fluid-volume idea, or selling shorthand rather than wax weight. The most useful number is the fill-line basis that matches your actual pour. Units and Naming Mismatch matters here because a jar label can mix language that sounds similar but measures different things.
Separate label language from the unit you use for planning
Oz, fl oz, ml, and g cannot be treated as interchangeable shorthand without naming what each number means.
A candle jar can be described with volume units, weight units, or a marketing size label. Before planning wax, identify whether the number describes liquid volume, wax weight, jar naming, or a tested fill-line value.
| Unit or label | What to confirm before using it |
|---|---|
| oz | Whether it means weight or is being used loosely as a size label |
| fl oz | Whether it means fluid volume, not wax weight |
| ml | Whether it describes liquid volume at a specific fill level |
| g | Whether it describes wax weight at the intended fill line |
Do not convert a jar label into wax weight without naming the basis. If the supplier gives a wax weight to fill line, that is more direct than a label-size guess. If the supplier gives only volume language, keep volume and weight separate before estimating.
Use common jar-size bands as examples, not as universal capacity rules
Common size bands are comparison shortcuts, not universal promises of identical usable fill.
An 8 oz, 10 oz, or 12 oz jar can help you compare general vessel size, but it does not prove the exact wax amount. Two jars in the same size band can have different wall thickness, shoulder shape, internal height, or recommended fill line.
Use size bands like this:
| Common label | Safe way to use it |
|---|---|
| 8 oz jar | A rough comparison band until the usable fill basis is known |
| 10 oz jar | A larger comparison band, not a guaranteed wax weight |
| 12 oz jar | A size cue that still needs fill-line confirmation |
This is not a shopping comparison or brand ranking. Best Candle Jar Sizes for Beginners and Sellers is the better place for product-selection guidance; here, the goal is to prevent label language from contaminating wax planning.
Once the correct capacity basis is identified, use that value—not the label size—to estimate wax per jar.
Estimate wax per jar from the chosen fill line
Fill weight means the wax needed for one measured candle jar at one chosen fill line.
Use a supplier wax value to that same fill line first; if it is missing, use a water-test result at the chosen fill line and convert it with the wax’s stated density or specific-gravity basis.
This value is not the jar’s label size, overflow volume, or finished product weight. Use the measured jar and declared fill line first, then estimate wax by weight from that usable fill basis. Fill Weight Estimate per Jar keeps the planning number tied to the vessel you are actually pouring.
Use this quick planning table:
| Input | What to enter |
|---|---|
| Jar ID or name | The exact jar you measured |
| Fill-line basis | Supplier fill-line value, water-test value, or measured fill level |
| Unit basis | Weight or volume, clearly labeled |
| One-jar wax estimate | Wax weight needed for one jar at that fill line |
| Check after test pour | Actual filled wax weight compared with the estimate |
A supplier’s fill-line wax value is the cleanest input when it matches your intended fill line. If that value is missing, create a practical estimate instead of guessing from the label. Avoid adding fragrance-load, costing, or inventory math here, because those belong to a fuller calculation workflow.
Convert a water-test result into a wax-weight estimate
Convert a water-test result into wax weight by using the same fill line and the wax’s stated density or specific-gravity basis.
Use a supplier wax capacity first when it matches your intended fill line. If the supplier does not give one, measure water only to the chosen fill line, label the water weight or volume, then convert it with the wax data you plan to use.
Estimated wax weight = water-test amount at the fill line × wax-specific conversion basis
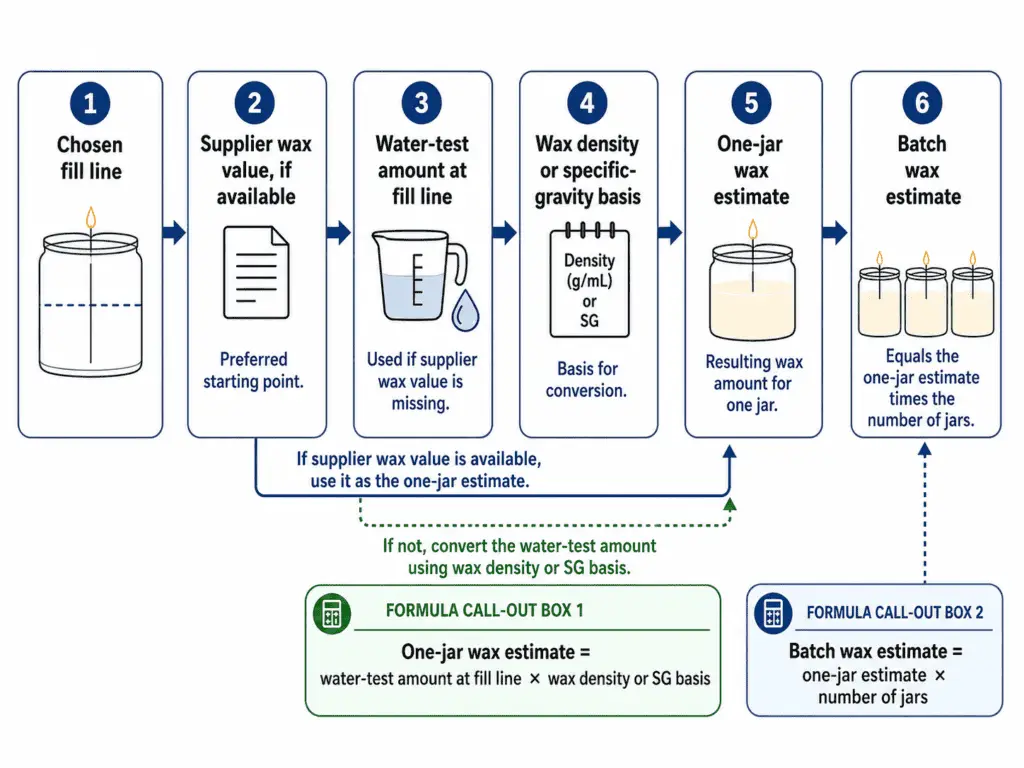
A shortcut factor is only an estimate unless it comes from the wax supplier or your own confirmed test pour. Keep fragrance oil outside this step; fragrance-load handling belongs in the Candle Wax Calculator workflow.
Practical note: Treat any volume-to-weight shortcut as an estimate, not a universal constant. Record the assumed basis beside the result so you can compare the estimate with the actual filled wax weight after a test pour.
Use a tare-scale or water test when supplier fill data is missing
Use a chosen fill line, then test and weigh a practical fill amount to create a usable estimate; do not treat it as overflow volume.
Use this method when the jar has no clear supplier fill-line wax value:
- Put the empty jar on a scale and tare it to zero.
- Fill with water only to the intended candle fill line.
- Record the water weight or measured volume at that fill line, not at the rim, and label the unit before converting it into a wax estimate.
- Empty and dry the jar fully before candle work.
- Use that result as a planning estimate, then compare it against a real wax fill.
This test models your usable fill level, not the jar’s brimful capacity. It gives you a better starting point than the label size, but it still needs confirmation with the actual wax and fill line you plan to repeat. Candle Wax Calculator is the better next step when you need fragrance-load handling or larger formula math.
Scale one-jar fill into a batch wax plan
Batch total scales the one-jar fill basis; it does not redefine capacity.
Use the same one-jar number for every jar in that batch:
Batch wax estimate = one-jar wax estimate × number of jars
For example, if one measured jar needs 170 g of wax at the chosen fill line, 12 jars need 2,040 g of wax before any separate fragrance-load or calculator adjustment.
Candle Batch Record Sheet Template helps preserve the measurement basis once the batch number is set.
Save the measurement basis so the jar can be reused consistently
A candle jar measurement log records one jar’s dimensions, fill-line rule, unit basis, and jar conditions for repeat pours.
Save the basis of each number, not just the number. Repeatable means future pours of the same jar can reuse the same setup logic because the fill line, unit meaning, and method source were recorded. This is a lightweight jar record, not a full production system, inventory database, or cost-tracking sheet.
Use this template for each jar you plan to reuse:
| Field to save | What to record | Why it matters later |
|---|---|---|
| Jar ID or name | The exact vessel being measured | Prevents mixing records across similar jars |
| Inside diameter | The usable inside width and unit | Keeps the jar measurement tied to the wax-bearing zone |
| Usable fill depth | The inside depth to the chosen fill line | Separates fill planning from full jar height |
| Fill-line basis | Supplier value, water test, wax test, or marked line | Shows where the capacity number came from |
| Unit basis | Weight, volume, measured, listed, or estimated | Prevents oz, fl oz, ml, and g from being mixed |
| Wax conversion basis | Supplier wax fill value, wax specific gravity, or water-test conversion factor | Prevents a future batch from reusing the same jar estimate with a different wax basis |
| Lid or closure note | Lid clearance, insert clearance, or no lid | Keeps headspace decisions consistent |
| Retest trigger | New supplier batch, changed lid, changed fill line, or different jar shape | Shows when the saved setup should not be reused blindly |
An “8 oz jar” note alone is not enough because it does not tell you the fill line, unit type, or method source. A better record says what was measured, where the wax stopped, and whether the number came from a supplier listing, a water test, or an actual wax fill. If the jar has a lid, record the lid condition beside the fill line so the next pour does not accidentally remove the clearance you planned.
Reuse the saved record only when the same jar, same fill line, same unit basis, and same closure condition apply. Retest the jar when any of those inputs changes, or when a new jar looks similar but has different wall thickness, shoulder shape, or internal depth.
Use this checklist to preserve the jar’s measurement basis, then move to the Candle Batch Record Sheet Template only if you need broader batch tracking beyond the jar setup.