
Remove candle wax from glass jars and holders by matching the method to the vessel and wax state: use freezing for thick wax, hot water for uneven medium wax, and gentle follow-up cleanup for tabs, film, and residue.
Glass jars and holders here means reusable glass candle vessels, including straight candle jars and decorative holders, after wax, residue, or wick hardware is left behind. Safe means lowering the chance of breakage, temperature shock, scratching, or wax smear; it does not mean every holder is heat-proof or reusable after damage. This page covers wax removal from glass vessels only, not wax spills on fabric, wood, walls, carpet, or upholstery.
Start with the method comparison so you do not force the wrong cleanup step onto a fragile, narrow, chipped, or already-clean vessel. <!– META-DESCRIPTION: Remove candle wax from glass jars and holders with freezer, hot-water, residue, and reuse-check methods matched to wax amount and vessel condition. –>
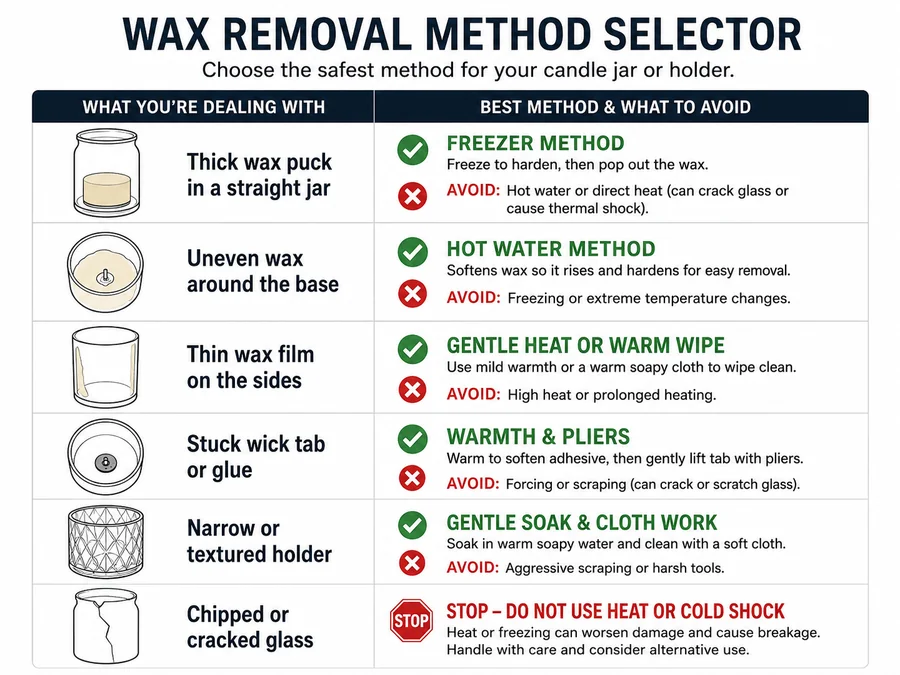
Freezer vs Hot Water for Removing Candle Wax from Glass
Use the freezer method for thick wax in a sturdy jar, and use hot water for uneven wax that will soften and float. Choose the gentler path—low pressure, low temperature swing, and soft or non-metal contact—when the glass is thin, cracked, decorative, or hard to identify.
Direct answer: The safest method depends on three things: how much wax remains, whether the vessel can handle temperature change, and how easy it is to reach the wax. A straight-sided jar with a solid wax puck usually suits freezing, while a wide-mouth jar with uneven wax often suits hot water.
Do not move a frozen jar straight into hot water. That fast temperature swing can stress glass and raise the chance of cracking, especially when the glass type is unknown.
| Wax or vessel condition | Better method | Why this method fits | Avoid |
|---|---|---|---|
| Thick wax puck in a straight glass jar | Freezer | Cold shrinks the wax so it can release from the wall | Forcing a knife deep against the glass |
| Uneven wax around the base | Hot water | Warm water softens wax so it can lift and cool at the surface | Pouring wax water down the drain |
| Thin wax film only | Gentle heat or warm wipe | The goal is to soften residue, not remove a wax block | Overheating the whole holder |
| Stuck wick tab or glue | Warmth, pliers, and residue wipe | Adhesive usually needs loosening after the main wax is gone | Gouging the base with a sharp blade |
| Narrow or textured holder | Gentle soak and cloth work | Scraping pressure is harder to control in tight shapes | Hard metal scraping |
| Chipped, cracked, or stressed glass | Do not use heat or cold shock | Damage reduces reuse safety | Reusing for heat, food, or storage that needs safety |
Other Heat Methods for Candle Jars: Oven, Water Bath, Hair Dryer, and Microwave
Other heat methods can help with glass candle jars only when the glass is plain, intact, and at room temperature. Easiest means the method that removes the most wax with the least pressure for the vessel’s wax amount and condition, not the fastest method in every jar.
Direct answer: Use oven heat only for plain, sturdy jars, use a water bath for indirect softening, and use a hair dryer or heat gun only for thin residue or spot-softening. Do not microwave a candle jar if a metal wick tab, foil label, metallic coating, or unknown hardware remains.
| Heat method | When it fits | Boundary to keep |
|---|---|---|
| Oven | Plain, sturdy jars with wax that needs broad softening | Avoid thin, cracked, painted, coated, or unknown glass |
| Water bath or double boiler | Indirect warming when you do not want water inside the jar | Keep the jar stable and avoid boiling or sudden temperature swings |
| Hair dryer or heat gun | Thin wax film, spot-softening, or residue after bulk wax is gone | Do not treat direct heat as the main method for fragile holders |
| Microwave | Rarely a good fit for used candle jars | Avoid if metal, foil, coating, labels, wick hardware, or unknown glass remains |
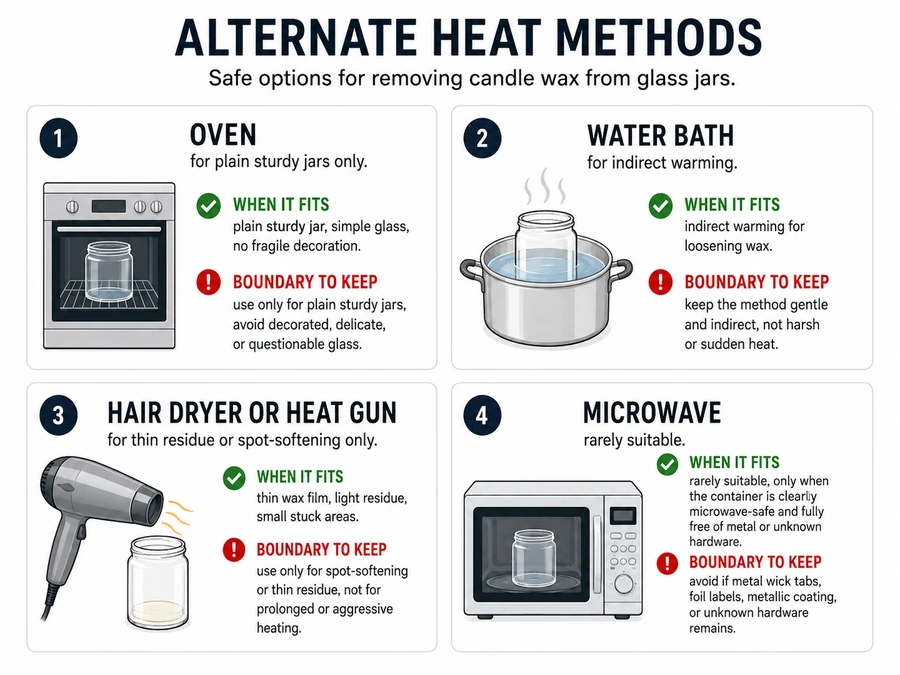
Use this heat-method check as a limit, not a reason to add stronger heat. If you cannot identify the glass, stay with warm water, a warm cloth, or no heat instead of forcing a high-temperature method.
A simple rule works well: remove the bulk wax first, then deal with the wick tab, then clear the film. Mixing all three jobs at once creates more mess and increases the chance of scratching the glass.
How to Remove Candle Wax from Glass with the Freezer Method
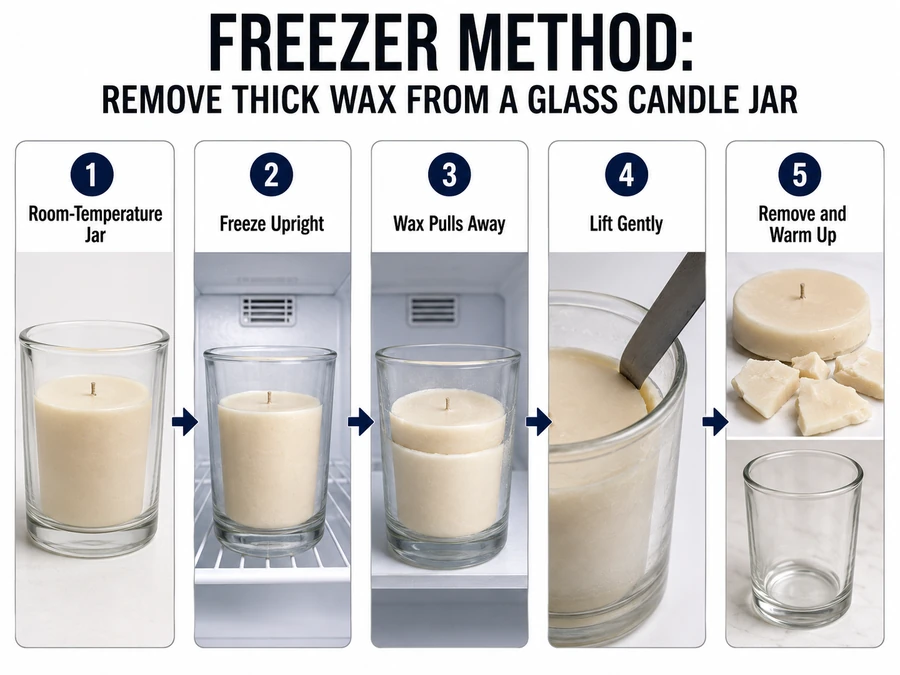
Freeze a sturdy glass candle jar until the wax contracts, then loosen the wax puck with light pressure. This method works best when a thick wax layer remains in a straight-sided jar.
Direct answer: Let the jar reach room temperature, place it in the freezer, then lift the hardened wax out once it has shrunk away from the glass. Use a spoon handle or dull butter knife only at the wax edge, not as a forceful wedge against the jar wall.
Freezer Method Steps for Thick Wax in a Glass Jar
Most jars need several hours or overnight in the freezer; the usable signal is wax that feels hard and has pulled slightly from the glass.
- Let the jar cool to room temperature.
- Remove loose soot, labels, lids, or debris from the opening.
- Place the jar upright in the freezer.
- Wait until the wax feels hard and slightly separated from the glass.
- Press lightly at one edge of the wax with a dull tool.
- Lift out the wax disc or break it into large pieces if needed.
- Let the jar return to room temperature before using warm water or residue cleanup.
Freezer Method Failure Checks
| Problem | Likely cause | Better correction |
|---|---|---|
| Wax will not pop out | Wax is too thin, too soft, or locked around the wick tab | Switch to warm water or gentle heat |
| Glass makes a cracking sound | Vessel may be stressed or temperature-shocked | Stop and let it return to room temperature |
| Tool scratches the inside | Too much force or a sharp edge | Use a plastic scraper or cloth-wrapped dull tool |
| Wax breaks into crumbs | Wax layer is brittle or uneven | Remove large pieces first, then wipe residue later |
| Wick tab stays behind | Adhesive is stronger than the wax bond | Remove the tab after warming the base |
Do not treat freezer removal as a strength test. If the wax does not release with light pressure, the jar is telling you to change methods. Forcing the puck can chip the rim, crack the base, or leave deep scrape marks.
How to Remove Candle Wax from Glass with Hot Water
Use hot water when leftover candle wax is uneven, stuck around the base, or too thin to pop out cleanly. The water softens the wax, then the wax cools into a removable top layer.
Direct answer: Let the jar reach room temperature, add hot water slowly, and wait for the wax to rise and harden at the surface. Remove the cooled wax cap, then wipe the remaining film from the glass.
Hot-Water Steps for Uneven Wax in a Glass Jar
- Place the room-temperature jar on a stable, heat-tolerant surface.
- Add hot water slowly into the jar, leaving space at the top.
- Wait while the wax softens and lifts.
- Let the water cool until the wax forms a firm top layer.
- Lift the wax cap out with a spoon or paper towel.
- Strain out any loose wax pieces before discarding the water.
- Wipe the inside with warm, soapy water after the bulk wax is gone.
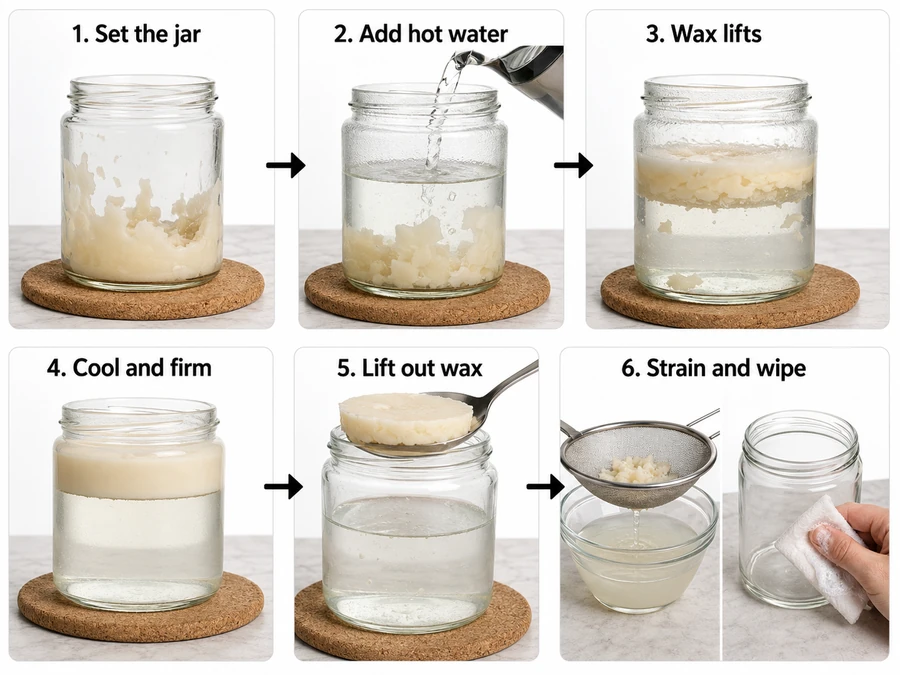
Do not pour loose wax into a sink drain. Melted wax can cool inside plumbing and create a blockage after it leaves the jar.
Hot-Water Method Checks
| Checkpoint | What it tells you | What to do next |
|---|---|---|
| Wax floats to the top | The method is working | Wait until it hardens before removal |
| Wax stays stuck at the base | Wick tab or glue may be holding it | Move to tab removal after cooling |
| Glass feels stressed or sounds odd | The vessel may not tolerate heat well | Stop heating and let it cool naturally |
| Water turns oily or cloudy | Residue is loosening | Finish with soap, cloth, or alcohol wipe |
| Wax breaks into small pieces | Wax was thin or mixed with debris | Remove pieces with a paper towel or strainer |
Hot water is useful, but it is not a reason to shock the glass. Avoid sudden hot-to-cold or cold-to-hot changes, especially with decorative holders or jars of unknown quality.
How to Remove Wick Tabs, Glue, and Wax Residue from a Candle Jar
Remove wick tabs after the main wax is out, because the metal tab and adhesive need different handling than bulk wax. Warmth loosens the base; cloth, soap, or alcohol clears the film.
Direct answer: Warm the base gently, grip the wick tab with pliers, and lift without gouging the glass. After the tab releases, wipe leftover glue and wax haze with warm soapy water or a small alcohol-dampened cloth.
Steps
- Remove the bulk wax before working on the wick tab.
- Let the jar sit at room temperature.
- Warm the base with warm water or a warm cloth.
- Grip the metal wick tab with pliers.
- Rock the tab lightly instead of twisting hard.
- Scrape softened glue with a plastic scraper or cloth-wrapped dull tool.
- Wipe the area with dish soap, then dry and check for haze.
- Use a small alcohol-dampened cloth only on stubborn film, away from flame or heat.
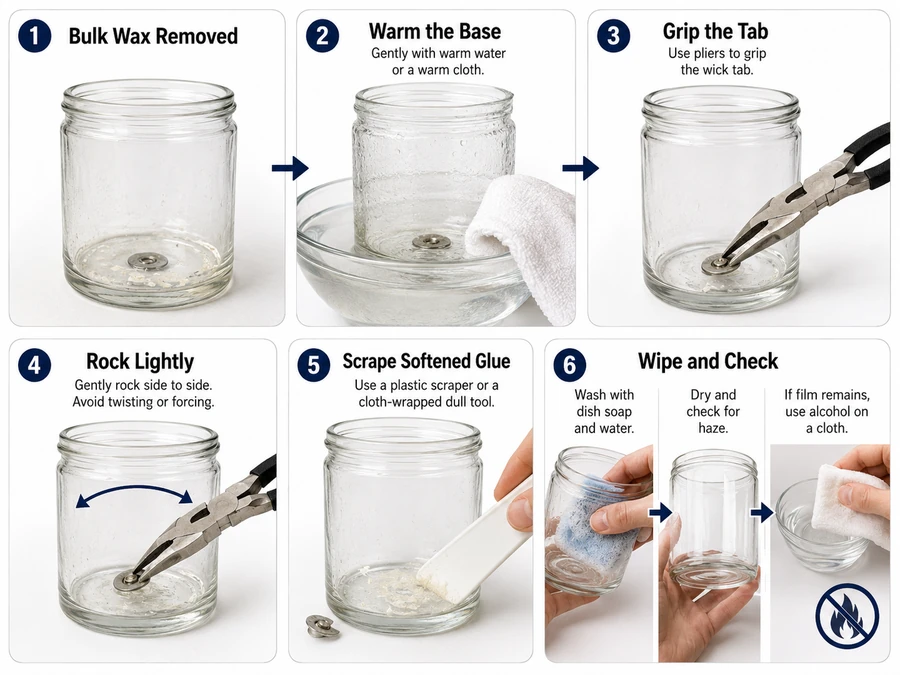
Failure Log
| Problem | Likely cause | Better correction |
|---|---|---|
| Wick tab will not lift | Adhesive is still firm | Add more gentle warmth and try again |
| Glue smears across the base | Adhesive softened but was spread too early | Blot first, then wipe in short strokes |
| Wax haze remains on the wall | Thin oil and wax film stayed behind | Wash, dry, then polish with a clean cloth |
| Glass scratches at the base | Tool edge is too hard or too sharp | Switch to plastic or cloth-wrapped pressure |
| Soot stains remain near the rim | Residue is not only wax | Use dish soap first, then a light residue wipe |
Treat the wick tab as hardware, not wax. Pulling it before the wax is cleared often spreads glue and leaves the bottom harder to clean.
How to Loosen Thin Candle Residue or Stubborn Wick Adhesive with Gentle Heat
Use gentle heat for thin wax film, stuck glue, or residue that remains after the main wax is gone. The goal is to soften the residue, not heat the glass as if it were cookware.
Direct answer: Warm the residue slowly with warm water, a warm cloth, or indirect low heat, then wipe it before it cools again. Stop if the holder is cracked, very thin, painted, metallic-coated, or unknown decorative glass.
A hair dryer or heat gun belongs only in this thin-residue stage, not as a default method for unknown, cracked, coated, or narrow decorative glass.
Steps
- Remove loose wax pieces first.
- Let the glass sit at room temperature.
- Place warm water in the jar or press a warm damp cloth against the residue.
- Wait until the wax film softens.
- Wipe in short strokes with a paper towel or soft cloth.
- Repeat with dish soap if the surface still feels oily.
- Dry the glass before checking for remaining haze.
Method Check
| Residue state | Gentle correction | What to avoid |
|---|---|---|
| Thin wax haze | Warm cloth, then dry polish | Scraping the whole wall |
| Sticky wick glue | Warm the base, then lift slowly | Twisting the tab hard |
| Oily film | Dish soap, rinse, dry, then polish | Leaving soap pooled at the base |
| Soot near rim | Soap wash before residue solvent | Rubbing soot into wax film |
| Decorative coating nearby | Clean only the bare glass area | Soaking painted or coated sections |
Gentle heat is a cleanup stage, not the main removal method for a heavy wax block. If the jar still has a thick puck, freezing or hot water usually removes more wax with less rubbing.
How to Remove Candle Wax from Narrow or Decorative Glass Holders
Narrow and decorative glass holders need lower pressure because the wax is harder to reach and the surface may scratch, chip, or carry a coating. Use softening and wiping before scraping.
Direct answer: Soften the wax with warm water or a warm cloth, then lift pieces with a wooden stick, plastic scraper, or cloth-wrapped dull tool. Avoid hard metal scraping inside textured, thin, painted, or shaped holders.
Steps
- Check the holder for chips, cracks, paint, metallic coating, or glued decorations.
- Remove any loose wax by hand.
- Add warm water only if the holder has no obvious damage or sensitive coating.
- Let the wax soften instead of forcing a tool into the base.
- Use a cotton swab, cloth, wooden stick, or plastic scraper for tight corners.
- Blot softened wax rather than spreading it around textured glass.
- Wash, rinse, and dry before judging whether more residue remains.
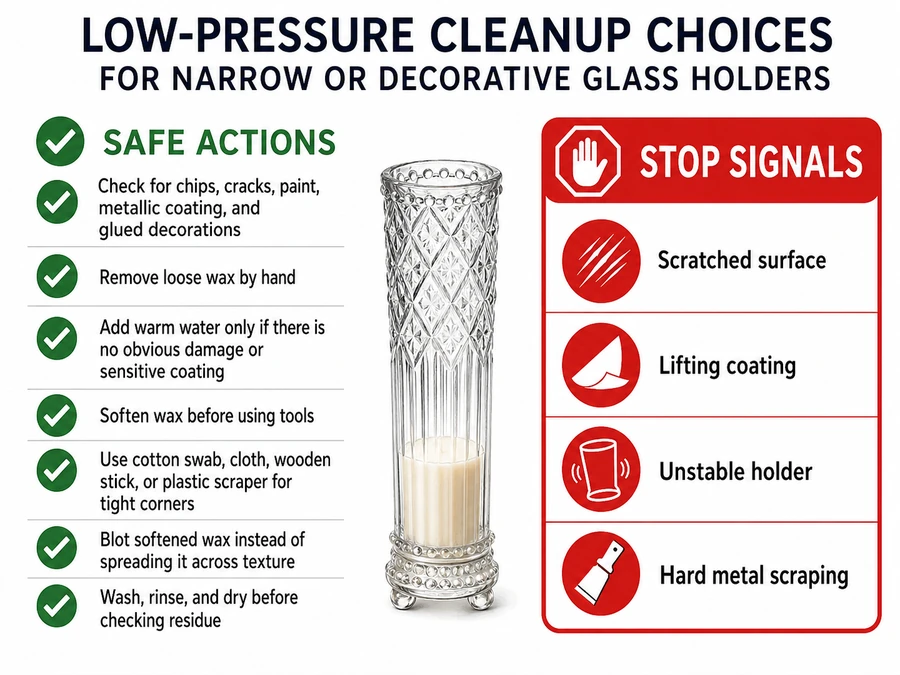
Failure Log
| Problem | Likely cause | Better correction |
|---|---|---|
| Wax is trapped in a corner | Holder shape blocks tool access | Soften again and use a cotton swab |
| Surface looks scratched | Tool was too hard for the glass or coating | Stop scraping and switch to cloth pressure |
| Wax smears across texture | Wax softened but was wiped too broadly | Blot, rotate the cloth, then wipe again |
| Coating starts lifting | Holder finish does not tolerate soaking or rubbing | Stop cleaning that area |
| Holder feels unstable | Glass may be thin, damaged, or stressed | Do not use heat or strong pressure |
A decorative holder should not be treated like a plain straight-sided jar. Shape, coating, and reach matter as much as the amount of wax.
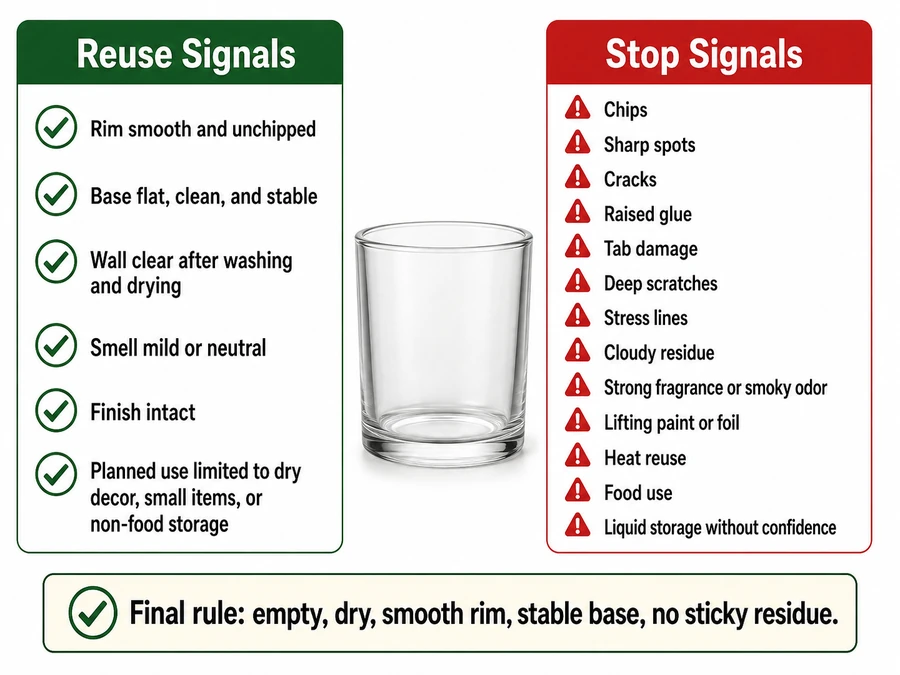
Can You Reuse a Candle Jar After Removing the Wax and Residue?
You can reuse a candle jar for dry storage or decor when the glass is clean, dry, and undamaged. Do not reuse cracked, chipped, heat-stressed, or residue-heavy glass for food storage, liquid storage, heat reuse, candle refilling, or any use where breakage or residue matters.
Direct answer: Reuse the jar only after the wax, wick tab, glue, soot, and oily film are removed and the glass shows no chips or cracks. Decorative reuse is safer to judge than food-contact or heat reuse.
Reuse Checkpoint
| Checkpoint | Reuse signal | Stop signal |
|---|---|---|
| Rim | Smooth and unchipped | Chips, sharp spots, or cracks |
| Base | Flat, clean, and stable | Raised glue, tab damage, or cracks |
| Wall | Clear after washing and drying | Deep scratches, stress lines, or cloudy residue |
| Smell | Mild or neutral after washing | Strong fragrance or smoky odor remains |
| Finish | Coating remains intact | Paint, foil, or decoration is lifting |
| Planned use | Dry decor, small items, or non-food storage | Heat reuse, food use, or liquid storage without confidence |
Removing wax does not automatically make a jar suitable for every second life. A clean jar may work for decor, cotton pads, desk items, or dry storage, while damaged glass should be discarded rather than repurposed.
Final Check
The safest finished jar is empty, dry, smooth at the rim, stable at the base, and free of sticky residue. If any crack, chip, sharp edge, or unstable coating remains, stop the reuse plan.