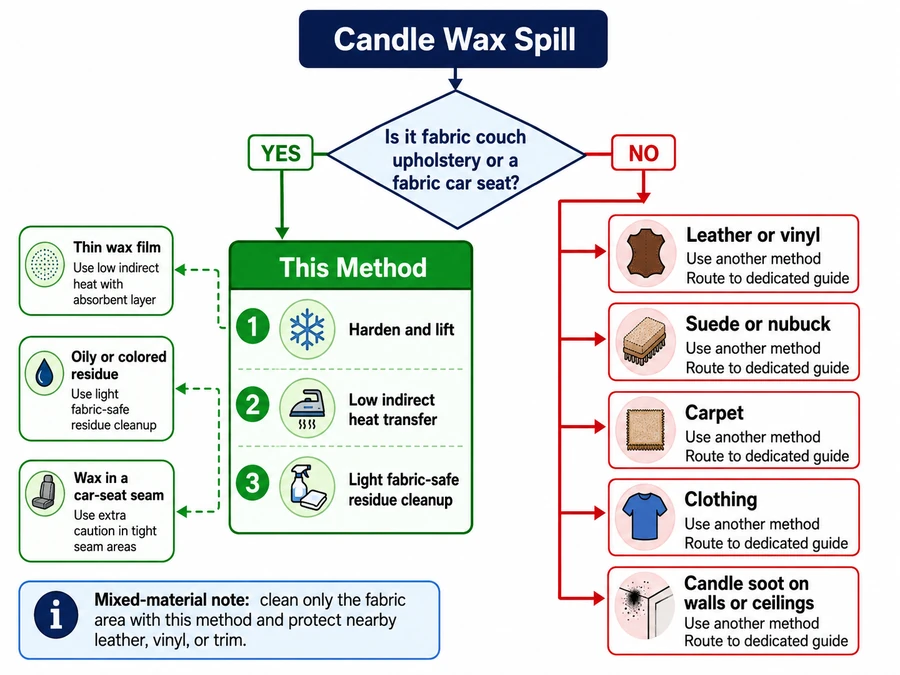
FS-H1: To remove candle wax from fabric upholstery, harden and lift the bulk wax first, then use low indirect heat and fabric-safe residue cleanup.
Here, candle wax on upholstery means hardened or semi-hardened candle wax sitting in or on fabric couch upholstery and fabric car-seat material. It does not cover leather, vinyl, suede, nubuck, carpet, clothing, soot, or permanent dye restoration.
The goal is to remove the wax in the safest order: lift the brittle mass, draw out what remains, and clean the final oily or colored mark. Start by checking that the surface is fabric, then harden the wax before using any heat. <!– META-DESCRIPTION: Learn how to remove candle wax from fabric couch upholstery and car seats by hardening bulk wax, using low indirect heat, and cleaning residue safely. –>
What “upholstery” means here before you start
FS: Upholstery here means fabric couch upholstery and fabric car-seat fabric only.
This matters because fabric, leather, vinyl, suede, carpet, and clothing do not react the same way to heat, scraping, moisture, or spot cleaners. A method that is safe for one surface can flatten fibers, spread dye, or leave a water mark on another.
For this page, continue only if the candle wax is on fabric upholstery. Microfiber still belongs here, but treat it as a more delicate fabric: use less pressure, lower heat, and more testing before you touch the visible area.
Leather, vinyl, suede, carpet, and clothing need separate wax-removal methods. Do not use this fabric-upholstery sequence as the full answer for those surfaces.
How to harden and lift bulk candle wax from upholstery first
FS: Harden and lift the bulk wax before any heat-transfer step.
Bulk wax is the visible hardened or semi-hardened wax sitting on the fabric surface. Cooling it makes the wax more brittle, so it can lift upward instead of smearing sideways or being pushed deeper into the weave.
Steps:
- Let hot wax cool fully before touching it.
- Place ice in a sealed bag, then hold it over the wax if the wax still feels soft.
- Lift brittle wax with a plastic card, spoon edge, or dull scraper.
- Work from the outer edge toward the center.
- Pick up loose flakes instead of rubbing them into the fabric.
- Stop when only a thin wax trace or stain remains, then move to low indirect heat.
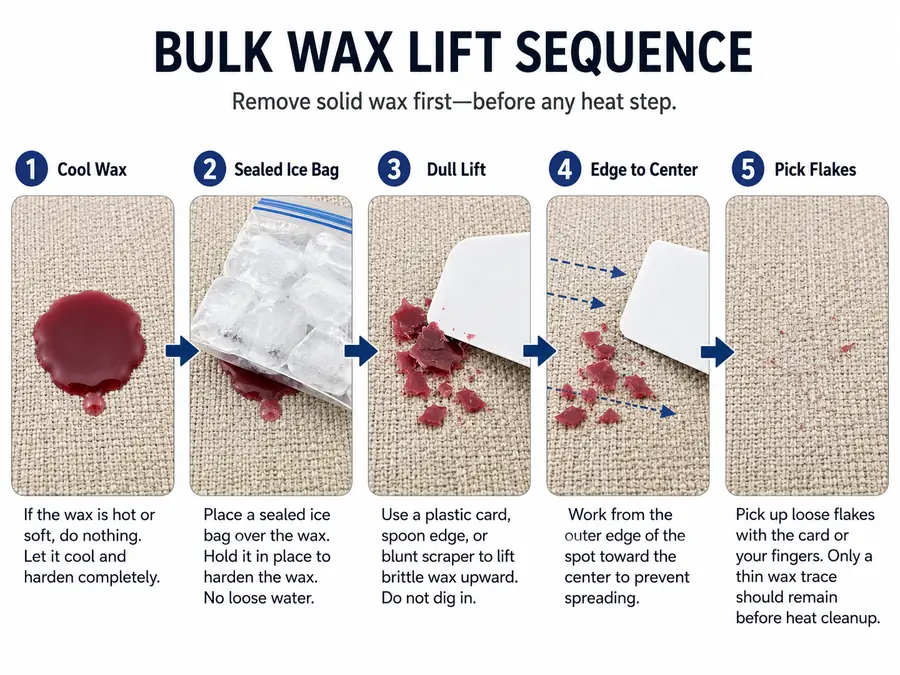
Failure log: Scraping warm wax is the mistake that spreads the spill fastest. Pressing down, using a knife, or picking with fingernails can grind wax into fibers or snag the upholstery surface.
Method note: This sequence is based on aggregated fabric-cleaning guidance and common user failure cases around couch and car-seat wax spills. It is not a lab test. The safe default is low pressure, dull lifting tools, and a test-first approach on delicate or unknown fabric.
| Before heat, check this | Why it matters |
|---|---|
| Wax is cool or brittle | Soft wax smears under pressure |
| Tool edge is dull | Sharp tools can cut or snag fibers |
| Motion lifts upward | Sideways scraping can spread residue |
| Loose flakes are removed | Flakes can melt back into the fabric |
| Only thin residue remains | That is the point where heat-transfer cleanup begins |
Does freezing still help if the wax already feels hard?
FS: Freezing can still help if the wax feels hard but bends, smears, or clings to the fabric.
Wax can feel firm on top while staying flexible in the fibers. A short cooling pass makes the surface more brittle, which helps the wax crack and lift in pieces. Do not over-wet the fabric with loose ice; keep ice sealed in a bag and blot any condensation.
What tool is safest for lifting wax from fabric upholstery?
FS: A plastic card, dull spoon edge, or blunt scraper is safest for lifting wax from fabric upholstery.
The safest tool has a smooth, dull edge that lifts wax without cutting threads. Avoid knives, razor blades, metal corners, and stiff brushes. The goal is not to scrape the fabric clean in one pass; it is to remove the raised wax without damaging the surface underneath.
How to use low indirect heat to pull the remaining wax out
FS: Use low indirect heat with an absorbent layer to draw thin wax residue out of fabric upholstery.
This step is for the wax that remains after the raised pieces are gone. Heat softens the residue, and the absorbent layer gives the softened wax somewhere to move besides deeper into the fabric.
Steps:
- Place a plain white paper towel, brown paper, or clean cotton cloth over the wax trace.
- Set a hair dryer to low or warm, not hot.
- Warm the covered area in short passes.
- Lift the absorbent layer and check for wax transfer.
- Replace the paper or cloth section once it picks up wax.
- Repeat until the transfer slows or stops.
- Let the fabric cool before judging the remaining mark.
Do not press a hot iron directly onto upholstery. Direct contact can flatten fibers, set dye, melt synthetic blends, or push wax farther into padding.
Method note: The transfer step works best after bulk wax removal. Heat is not the first move because softened wax spreads more easily when there is still a thick deposit on the surface.
| Heat-transfer mistake | What can happen | Safer correction |
|---|---|---|
| Heating raised wax before lifting it | Wax spreads into a wider patch | Harden and lift first |
| Using high heat | Fiber shine, dye movement, or padding absorption | Use low indirect heat |
| Reusing the same paper spot | Wax transfers back onto fabric | Move to a clean section |
| Pressing hard | Soft wax moves deeper | Let warmth and absorption do the work |
| Judging while warm | Residue may look darker than it will when cool | Recheck after cooling |
Can you use a hair dryer on wax in couch fabric?
FS: Yes, a hair dryer can help remove thin wax residue from couch fabric when used on low indirect heat.
Keep the dryer moving and use an absorbent layer between the heat and the fabric. The goal is to soften the wax just enough for transfer. Stop if the fabric feels hot, changes texture, darkens unevenly, or smells like overheated material.
Should you use an iron on upholstery wax?
FS: Avoid direct iron contact on upholstery wax because concentrated heat can damage fabric and push wax deeper.
An iron may appear in older wax-removal advice, but upholstery is less forgiving than flat cotton cloth. If you use one despite the risk, keep it on the lowest setting, place a clean absorbent layer between the iron and fabric, avoid steam, and test a hidden area first.
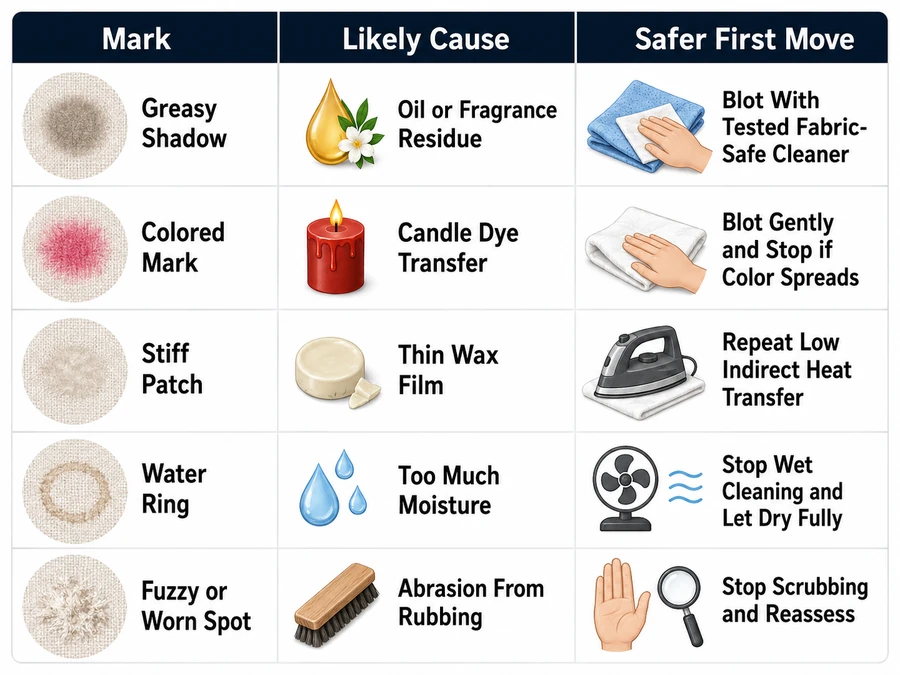
How to remove leftover oily or colored wax residue from fabric
FS: Clean leftover wax residue only after the wax mass is gone and the fabric has cooled.
A remaining mark usually comes from oil, fragrance, dye, or a thin wax film, not from the raised wax itself. Treating that mark too early can turn a removable surface spill into a wider stain.
Steps:
- Let the fabric cool after the heat-transfer step.
- Vacuum or lift away any loose flakes.
- Check the upholstery care label before adding moisture or cleaner.
- Test a hidden area with a fabric-safe spot cleaner.
- Blot the mark from the outside toward the center.
- Use a barely damp cloth to remove cleaner residue if the fabric allows water.
- Blot dry with a clean towel.
- Let the area air-dry before repeating.
Colored or scented candles need extra caution because pigment and fragrance oil can stay behind after the wax is gone. If the cloth picks up color, keep blotting with clean sections instead of rubbing.
Failure log: Rubbing is the common residue mistake. It can drive pigment into fibers, enlarge the stain, or leave a fuzzy patch on microfiber and woven upholstery.
| Leftover mark | Likely cause | First safe move |
|---|---|---|
| Greasy-looking shadow | Oil or fragrance residue | Blot with tested fabric-safe cleaner |
| Colored mark | Candle dye transfer | Blot gently and stop if color spreads |
| Stiff patch | Thin wax film still present | Repeat low indirect heat transfer |
| Water ring | Too much moisture | Stop wet cleaning and let dry fully |
| Fuzzy or worn spot | Abrasion from rubbing | Stop scrubbing and reassess |
Is rubbing alcohol safe for colored wax residue?
FS: Rubbing alcohol may help some dye residue, but it must be tested on a hidden upholstery spot first.
Alcohol can affect dye, backing, adhesives, or synthetic fabric finishes. Apply a small amount to a white cloth, test an unseen area, and wait until it dries. Do not pour alcohol directly onto the seat or cushion.
Why is there still a stain after the wax is gone?
FS: A stain can remain because candle dye, fragrance oil, or softened wax film stayed in the fabric.
Plain white wax often leaves less visible residue than colored or scented wax. A stain that keeps returning after drying may mean wax or oil is still below the surface. Repeat the absorbent heat-transfer step before adding more cleaner.
When couch cleanup and car-seat cleanup stop being the same
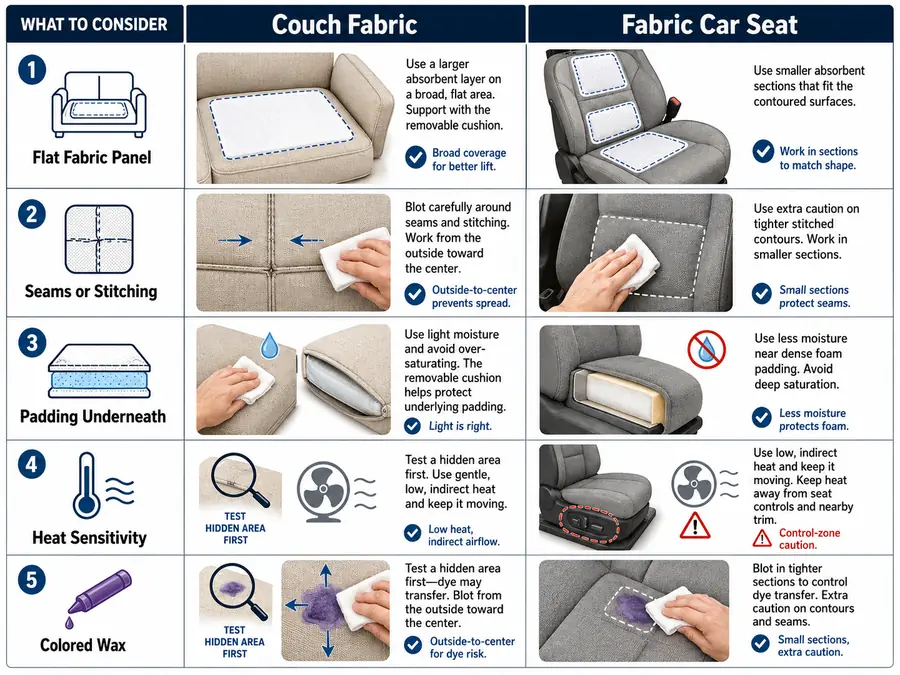
FS: Couch and car-seat wax cleanup differ once seams, padding depth, tight contours, or heated-seat parts affect the work.
A couch cushion usually gives you a flatter surface and easier towel placement. A fabric car seat adds seams, curved bolsters, stitching, and deeper padding, so softened wax can move into areas that are harder to reach.
For couch upholstery, remove loose cushions when possible and work on a supported flat area. Keep moisture light so it does not soak into foam or leave a ring around the cleaned patch.
For fabric car seats, use smaller absorbent pieces and shorter heat passes. Keep liquid cleaner away from seat controls, wiring, heated-seat zones, buckles, and seat-track hardware.
| Surface issue | Couch fabric approach | Fabric car-seat approach |
|---|---|---|
| Flat fabric panel | Work with a larger absorbent layer | Use smaller sections on contours |
| Seams or stitching | Lift flakes away from the seam line | Avoid melting wax deeper into seams |
| Padding underneath | Keep moisture light | Use even less moisture near dense foam |
| Heat sensitivity | Test hidden fabric first | Test and keep heat away from controls |
| Colored wax | Blot outside-to-center | Blot in tighter sections to limit spread |
What changes when wax gets into a car-seat seam?
FS: Wax in a car-seat seam needs small tools, low heat, and careful lifting before residue cleanup.
Use a plastic card corner, spoon edge, or soft cloth-wrapped tool to lift brittle flakes from the seam. Do not flood the seam with cleaner. Liquid can carry dye and oil deeper into the seat and toward hardware below.
Can heated car seats change the cleanup method?
FS: Heated car seats need extra caution because heat, moisture, and wiring can sit close to the stained fabric.
Do not soak the area, steam the seat, or use high heat near seat controls. Use short warm passes, small absorbent sections, and light blotting. Stop if the seat fabric feels hot or the mark keeps spreading.
Hair dryer vs iron for candle wax on upholstery
FS: A hair dryer is usually safer than an iron for candle wax on fabric upholstery.
A hair dryer gives low indirect heat without pressing a hot plate onto the fabric. An iron can transfer stronger heat through one spot, which raises the risk of fiber shine, dye setting, melted synthetics, or wax being pressed into padding.
| Choice | Best use | Main risk | Safer rule |
|---|---|---|---|
| Hair dryer | Thin residue after bulk wax is lifted | Overheating if held too close | Low setting, keep it moving |
| Iron | Flat, heat-tolerant fabric only | Direct heat and pressure damage | Avoid direct contact; use barrier |
| No heat yet | Raised or thick wax | Wax stays stuck | Harden and lift first |
| More heat | Never the fix for stubborn wax | Wider stain or fabric damage | Repeat short low-heat transfers |
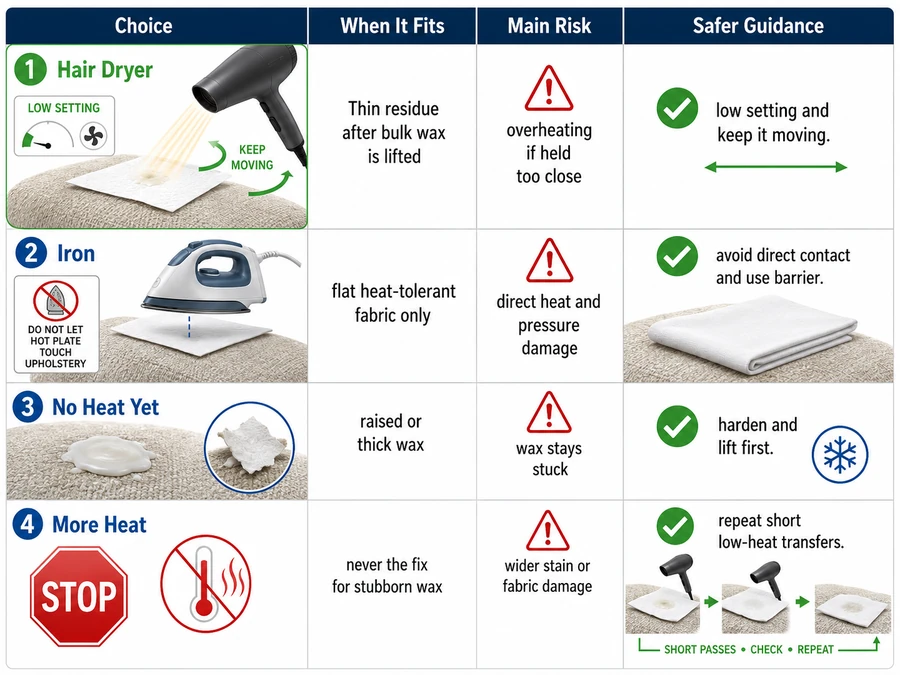
Choose the hair dryer when the fabric type is unknown, the seat or couch has texture, or the wax sits near seams. Treat the iron as a last resort for sturdy fabric only, never as the default first tool.
Why not just use more heat?
FS: More heat can spread wax, set dye, flatten fibers, or push residue deeper into upholstery padding.
If transfer slows, switch to a clean absorbent layer rather than raising heat. A fresh paper towel or cloth section often removes more wax than a hotter tool.
When is an iron too risky?
FS: An iron is too risky on microfiber, synthetic blends, textured upholstery, delicate fabric, or car seats with seams and controls nearby.
Direct pressure is the issue. Even with a barrier layer, an iron can concentrate heat in one place. Stop before ironing if the care label limits heat, the fabric changes texture during testing, or colored wax has already left dye behind.
When to stop DIY and call an upholstery cleaner
FS: Stop DIY if dye spreads, fabric texture changes, the stain returns, or the upholstery label forbids water or heat.
The stop point matters because repeated attempts can turn a small wax spill into a larger dye mark, water ring, or worn fabric patch. Fabric upholstery can often handle careful wax removal, but delicate fibers and colored candle residue reduce the safe margin.
Stop and escalate when:
- The wax came from a dark or strongly colored candle.
- The fabric label says dry clean only or blocks water-based cleaning.
- A hidden test spot changes color, texture, or sheen.
- The stain spreads during blotting.
- The mark keeps returning after the fabric dries.
- The wax is deep in a seam, button tuft, or car-seat crevice.
- The upholstery is expensive, antique, or hard to replace.
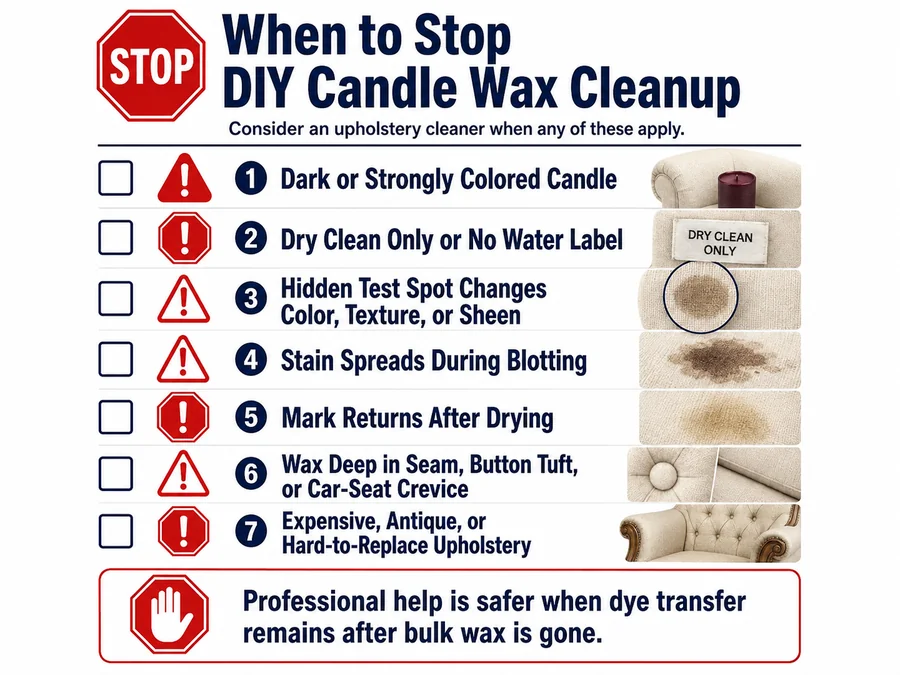
A professional cleaner is the safer choice when the remaining problem is dye transfer, not wax mass. DIY steps can lift and transfer wax, but they cannot reliably reverse permanent dye movement inside the fabric.
| Stop signal | What it means | Safer next move |
|---|---|---|
| Color appears on the blotting cloth | Dye is moving | Stop rubbing and use clean blotting only |
| Fabric looks shiny or flattened | Heat or pressure is changing fibers | Stop heat-transfer attempts |
| Water ring forms | Moisture spread beyond the stain | Let dry and avoid more liquid |
| Stain returns after drying | Wax or oil remains below the surface | Repeat low heat only if fabric stayed stable |
| Test spot changes | Cleaner is not safe for that fabric | Do not use it on the visible area |
Can repeated cleaning make upholstery wax stains worse?
FS: Yes, repeated cleaning can make wax stains worse by spreading dye, soaking padding, or abrading fabric.
More passes are not always safer. Once wax stops transferring to paper or cloth, extra heat and cleaner may work against you. Let the area dry fully before deciding whether the mark is residue, dye, or fabric damage.
What should a professional cleaner handle?
FS: A professional cleaner should handle delicate fabric, dye transfer, deep seam wax, and stains that spread during testing.
Professional help is most useful after the bulk wax is gone but a colored or oily mark remains. At that point, the risk shifts from “remove wax” to “avoid permanent fabric damage.”
What to clean here vs what to route to leather, carpet, clothes, or soot pages
FS: Use this method for fabric couch upholstery and fabric car seats, not leather, vinyl, suede, carpet, clothing, or soot cleanup.
This article stays narrow because “wax on upholstery” can mean several different surfaces in search results. Here, upholstery means fabric furniture covering and fabric vehicle-seat material. The method is built around brittle lifting, low indirect heat transfer, and light fabric-safe residue cleanup.
Use this page when:
| Situation | Covered here? | Why |
|---|---|---|
| Candle wax on a fabric couch cushion | Yes | Fabric upholstery is the main surface |
| Candle wax on a fabric car seat | Yes | Fabric seat cleanup is in scope |
| Thin wax film after scraping | Yes | Low indirect heat transfer applies |
| Oily or colored residue after wax removal | Yes | Fabric-safe spot cleanup applies |
| Wax in a car-seat seam | Yes, with caution | Small tools and low moisture are needed |
| Wax on leather or vinyl | No | Those surfaces need different cleaners and heat limits |
| Wax on suede or nubuck | No | Nap damage and staining risks are different |
| Wax on carpet | No | Pile depth and backing change the method |
| Wax on clothing | No | Laundering and garment labels change the sequence |
| Candle soot on walls or ceilings | No | Soot is a separate residue problem |
The safest decision is to match the method to the surface before touching the stain. If the surface is not fabric upholstery, do not borrow these steps and hope they transfer.
What if the couch has leather trim or mixed materials?
FS: Treat mixed-material furniture by cleaning only the fabric area with this method and protecting nearby leather, vinyl, or trim.
Keep heat, moisture, and spot cleaner away from non-fabric sections. If wax bridges fabric and leather, separate the cleanup by material instead of using one method across both surfaces.
What if the wax is on upholstery and carpet at the same time?
FS: Clean the fabric upholstery and carpet as separate surfaces because padding, pile, backing, and moisture behavior differ.
Start with the surface where wax can be lifted most safely. Do not soak either surface. If wax has melted between a couch cushion and carpet, lift the hardened wax from both areas before using any heat-transfer step.