
Candle making is the process of matching wax, wick, fragrance, container, temperatures, cure time, and testing so a candle burns safely, smells strong, and performs consistently.
This guide is for beginners, hobby makers, and small brands that want a clear starting point. You will learn how to choose materials, follow the basic workflow, and test each candle before gifting or selling it. The main decisions are wax family, wick size, fragrance load, container type, and temperature control. Start with the quick workflow below, then use the child pages when you need deeper formulas, comparisons, or troubleshooting.
Candle Making Workflow at a Glance
If you are new to candle making, use the same order every time: choose the candle format, match the wax to that format, size the wick to the container diameter, set the fragrance load within the wax limit, pour inside the recommended temperature window, cure the candle fully, and then burn test before gifting or selling anything.
Use this quick-start order for a simple first project:
- Pick one straight-sided jar or tin.
- Choose one beginner-friendly container wax.
- Select one wick series and buy two or three nearby sizes.
- Add one candle-safe fragrance oil within the wax’s recommended load.
- Pour inside the supplier’s recommended temperature window and let the candle cure fully.
- Burn test before gifting or selling anything.
For a faster first project, start with one straight-sided jar, one beginner-friendly container wax, one fragrance oil, and two or three wick sizes from the same wick series. That gives you cleaner test results and makes troubleshooting much easier.
If you need the formula behind scent percentages, see what fragrance load means in candle making. If you want the full walkthrough, start with how to make candles step by step.
Make Your First Candle: Best Starter Setup
If you want the fastest path to a good first result, start with one simple container candle before you test multiple jars, waxes, and scents.
| Decision | Best starter choice |
|---|---|
| Candle type | Single-wick container candle |
| Container | Straight-sided jar or tin |
| Wax | Beginner-friendly container wax |
| Fragrance | One candle-safe fragrance oil |
| Wick strategy | Test 2–3 sizes in one wick series |
| Goal | Clean burn, full melt pool, stable scent |
A practical first test set is three identical small jar candles made with the same wax and fragrance, with only the wick size changed between jars.
Use this sequence for your first project:
- Pick one straight-sided jar or tin.
- Choose one container wax made for that candle format.
- Select one wick series and buy two or three nearby sizes.
- Add one candle-safe fragrance oil within the wax’s recommended load.
- Pour inside the supplier’s temperature window and let the candle cure fully.
- Burn test before gifting or selling anything.
- Keep notes on wick size, fragrance load, pour temperature, cure time, and burn results.
If you need batch math, use the candle wax amount calculator.
Essential Candle Making Supplies for Beginners
You do not need a large studio to start making candles, but you do need the right basics:
- wax suited to your candle type
- a matching wick series and two or three candidate sizes
- a heat-safe jar or mold
- fragrance oil designed for candles
- a digital scale
- a thermometer
- a pouring pitcher or melter
- a stir utensil and wick holder
- labels or batch notes for tracking test candles
A simple beginner setup is one wax, one jar family, one wick series, and one fragrance family. That gives you more useful test data than changing multiple materials in the same session.
See candle making equipment for a full tools list and candle kits if you want a pre-packed starter option.
Use This Hub in Order
Use this page for the big picture, then open the deeper guide that matches the problem you are solving.
- Start here if you need the full candle-making workflow from materials to testing.
- Go to candle wax types when you need to choose a wax family.
- Go to candle wick types and sizing when you need to match a wick to a jar and formula.
- Go to candle fragrance & scenting when you need fragrance-load and oil-compatibility help.
- Go to burn testing and candle troubleshooting when a candle looks finished but does not burn correctly.
- Go to candle safety & compliance and candle labels & packaging when you plan to gift or sell candles.
That keeps this page as the main entry point while the deeper pages handle formulas, edge cases, calculators, and region-specific details.
Wax Types — What are the main candle wax options and when to choose each?
The main candle wax options are paraffin, soy, coconut, beeswax, palm, and blends, and you choose between them based on melt point, scent throw, appearance, price, and sustainability goals.
When you learn candle-making basics, wax no longer feels like a random choice because each family behaves predictably once you know its hardness, melt point, and intended use. Paraffin often delivers strong hot throw and a smooth finish, soy and coconut blends are popular for container candles and plant-based positioning, and beeswax or palm are usually chosen for their texture, burn profile, or specialty look rather than as an all-purpose beginner default.
A simple way to choose wax is to line up three decisions: container vs. pillar, branding vs. performance, and production environment. For indoor container candles in glass, many makers start with soy or a coconut blend because they balance a natural-forward story with workable scent throw. For pillars, votives, and tapers that must hold their shape, harder waxes or blends are easier to manage. In hot climates or summer shipping conditions, higher melt points and supplier-approved additives matter more.
Keep your first setup simple: one container wax, one harder blend only if you plan to make pillars, and one specialty option such as beeswax only after the basics are stable. If you want a deeper side-by-side comparison, see best wax for strong scent throw, how to blend waxes, and the full guide to candle wax types.
Whatever you choose, confirm the wax’s intended use, maximum fragrance load, and wick guidance in your supplier documents before you test new combinations.
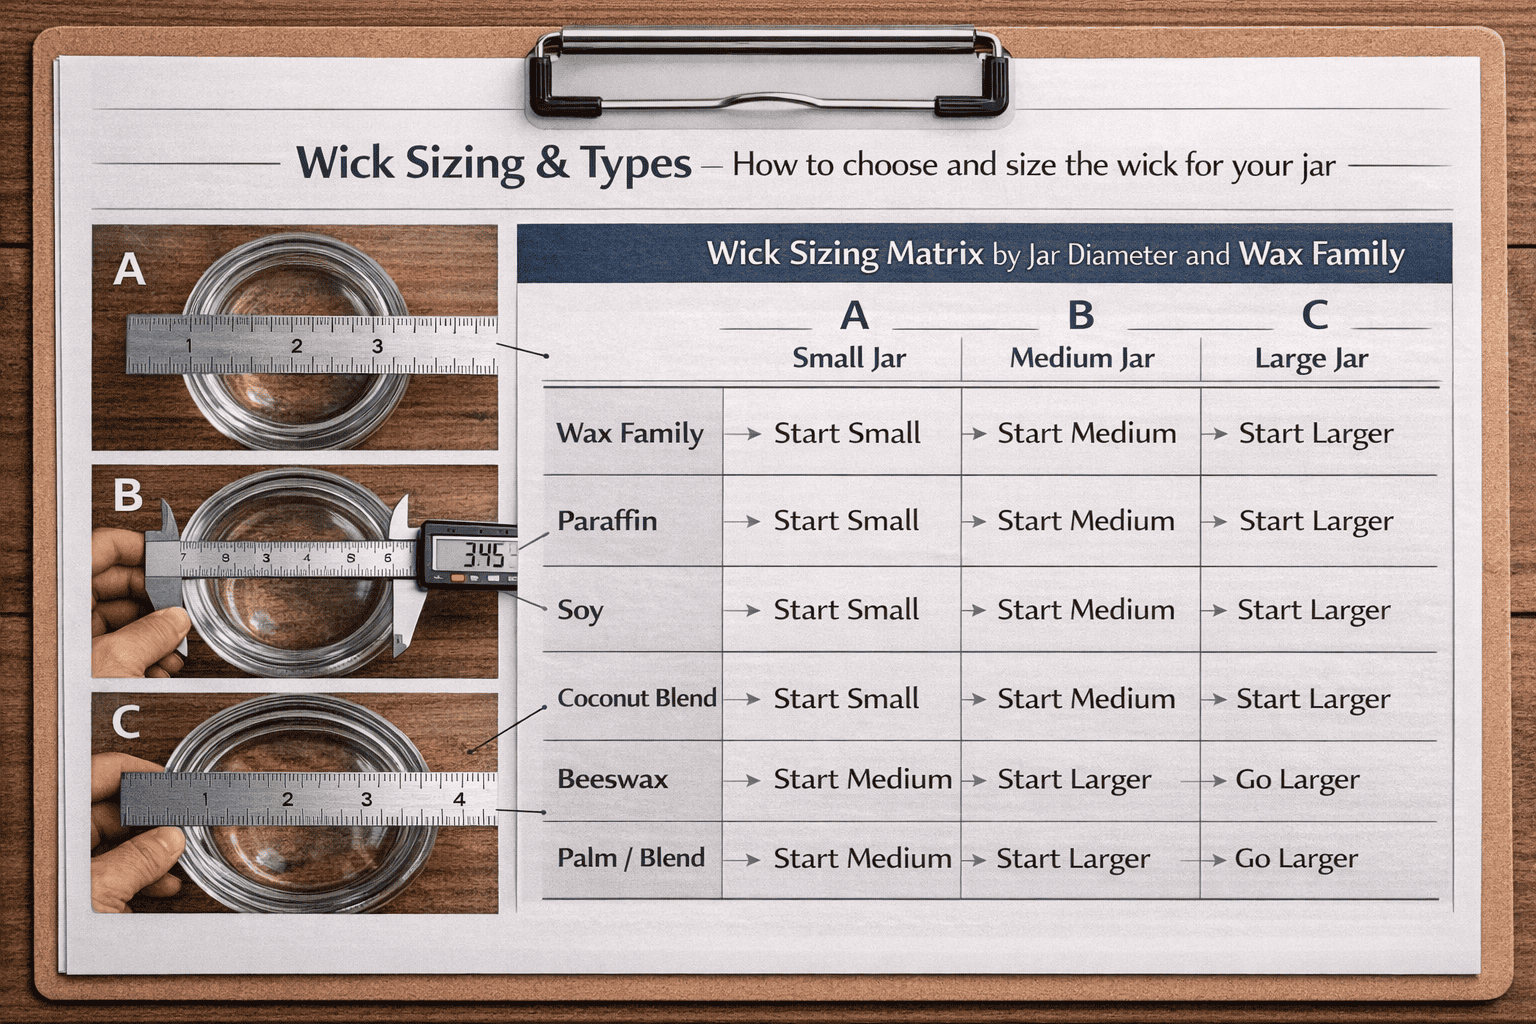
Wick Sizing & Types — How to choose and size the wick for your jar
Wick sizing and type control melt pool width, flame height, soot, and safety, and you choose them by matching a wick series and size to jar diameter, wax blend, and fragrance load, then validating the choice with burn tests.
The wick is the fuel pump of the candle, pulling melted wax up to the flame at a specific rate. If the wick is too small, the melt pool stays narrow and the candle tunnels. If the wick is too large, the flame can grow too tall, soot can build on the glass, and the container can run hotter than expected. A sizing method is safer than guessing or copying another maker’s result without testing your own formula.
Wick families, often called supplier series charts, group wicks into lines such as CD, ECO, LX, HTP, and wooden styles. Those charts are starting points, not final answers, because wax blend, fragrance load, dye, and jar shape all change how the wick behaves. Use one series at a time so your test results stay easier to read.
A practical wick sizing method starts with jar diameter. Measure the inside diameter of the container at the widest fill point, then test two or three candidate wick sizes that straddle the supplier recommendation. Pour identical test candles with the same wax, fragrance load, and pour temperature, and label each one clearly. Adjust one size up if tunneling persists or one size down if flame height, soot, or overheating suggest an overwicked candle.
Basic cotton wicks are the easiest default for most beginners, while decorative options usually demand more testing. As your notes build up, you will also build a private record of which series work best for your jars, waxes, and fragrance loads.
Quick comparison: wooden vs cotton wicks
Cotton wicks are the easier default for most beginners because they have broader supplier support, clearer sizing charts, and a wider testing history across common container waxes. If your goal is easier troubleshooting and a faster path to a stable burn, start with cotton first.
Wooden wicks are a style choice, not an automatic upgrade. They can add a modern look and a soft crackle, but they usually have a narrower performance window and need tighter control over wax viscosity, fragrance load, and jar width. If you want the deeper comparison, go to wooden vs cotton wicks.
Fragrance Load & Oils — How to set FO/EO load and pick compatible oils
Fragrance load is the percentage of scent you add to wax by weight, and you set it by staying within your wax’s stated limit, your supplier’s guidance, and what actually performs well in burn tests.
Think of fragrance as a powerful additive, not proof that more is better. Many wax data sheets list a maximum load within a moderate range, often around 6–12% by weight, but the real limit depends on the wax, the oil, and the wick. Start with the wax data sheet and the fragrance supplier guidance, then weigh both wax and fragrance on a scale so your tests stay repeatable.
Next, balance oil type with the rest of the formula. Candle-safe fragrance oils usually perform more predictably than essential oils alone, and some blends that smell good in the bottle still underperform once burned. If you want a deeper breakdown, see fragrance oil and essential oil compatibility and the main guide to candle fragrance & scenting.
Batch planning becomes easier if you treat scent like a formula you can plug into a candle fragrance load calculator. Add fragrance inside the manufacturer’s recommended temperature range, stir thoroughly, and allow a full cure before you judge hot throw. Keep notes on wax type, fragrance, percentage, pour temperature, cure time, and burn performance so you can compare results instead of relying on memory.
Containers & Molds — What jars and molds are safe and practical for candles
Safe container and mold choices start with materials that handle heat, resist cracking, and keep the flame stable, which is why you prioritize heat-resistant candle containers and sturdy molds designed for repeated pours.
Not every pretty jar or thrifted glass is safe for candles, even if it looks thick. Container candles generate concentrated heat, and thin or damaged glass can crack or shatter when stressed by repeated burns. Purpose-made candle vessels and repeated burn tests are safer defaults than reusing unknown decorative glassware. Before committing to a container line, test several samples by running full burn cycles and checking for excessive external temperatures, hairline cracks, or sharp edges.
A structured safe candle jar selection process keeps you from chasing aesthetic trends that compromise safety. Start by deciding your target fill volume and diameter, then source containers that match those dimensions with straight or gently curved walls. Avoid heavily tapered or hourglass shapes until you have advanced testing experience, because unusual shapes tend to cause tunneling or hot spots. Check that lids fit loosely enough not to trap heat during burning, and if using wooden lids, ensure customers understand they are decorative and should be removed before lighting. For metal tins, confirm that seams are well constructed and the base stays flat on heat-resistant surfaces during burns.
Freestanding candles use molds instead of jars, and here, material and design matter just as much. Silicone, polycarbonate, and aluminum are among the best molds for pillar candles because they withstand repeated heating and cooling cycles while releasing candles cleanly. Silicone molds are flexible and great for complex shapes, while metal molds excel at classic pillars and votives that need perfectly straight sides. Whatever mold you choose, secure wicks properly and support them while the candle sets so you do not end up with off-center wicks that cause uneven burning or dripping.
Practical workflow also influences container and mold choices. Wider-mouth jars are faster to wick and pour at scale, saving time if you plan to pour hundreds of candles per month. Containers that stack or nest reduce storage space and shipping costs, while standardizing on a small family of sizes simplifies wick selection and testing. For pillars, select mold sizes that match your existing wick knowledge so you are not constantly starting from zero. When you treat containers and molds as part of a planned system rather than random art pieces, your production becomes safer, more efficient, and much easier to scale.
Temperature Control — Steps to set melt, add, pour, and cure windows
Temperature control means choosing and sticking to specific melt, add, pour, and cure ranges so your wax, fragrance, and container work together instead of fighting each other.
Think of your thermometer as the steering wheel for wax behavior, not an optional accessory. A temperature plan should follow a set sequence instead of one magic number:
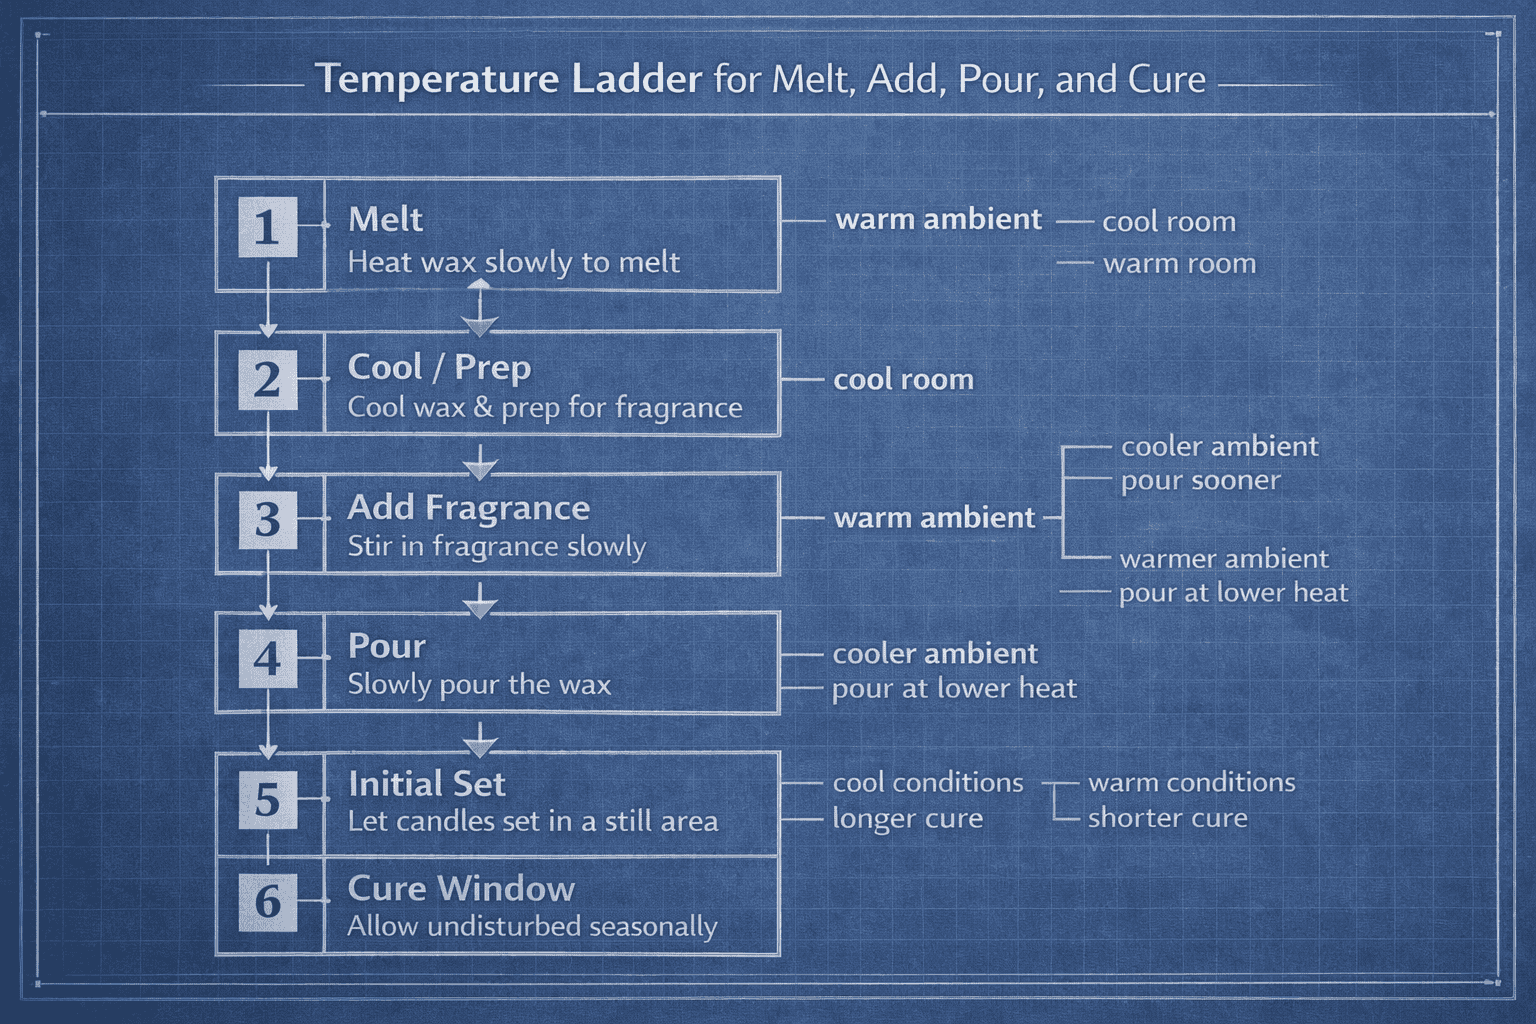
- Set the melt window from the wax data sheet. Heat only as high as needed to fully liquefy the wax and dissolve any additives.
- Set the fragrance-add window from supplier guidance. Add fragrance inside the recommended range, then stir thoroughly so the formula stays consistent from top to bottom.
- Set the pour window for the wax, jar, and room. Test a few pours inside the recommended band instead of assuming one temperature works in every season.
- Control the cooling environment. Keep jars level, avoid drafts, and cool batches as consistently as possible.
- Set a cure window before evaluation. Judge adhesion, cold throw, hot throw, and burn only after the wax has had time to stabilise.
A practical batch record should include wax type, fragrance percentage, melt temperature, fragrance-add temperature, pour temperature, room temperature, cure time, and burn-test notes. That single habit makes it much easier to identify whether a defect came from wax selection, pouring conditions, or wick performance.
For exact ranges, use the wax and fragrance supplier sheets as the final authority and compare your notes against candle science & temperatures.
Colorants & Additives — How to use dyes, UV inhibitors, and enhancers without defects
Colorants and additives work best when they solve a specific problem, not when they are added “just in case.” The more extras you add to a candle, the more likely you are to change wick performance, adhesion, surface finish, and scent throw.
Start with candle-safe dyes only. Add small amounts to fully melted wax, mix thoroughly, and check the cooled color before darkening the batch further. Wax often dries lighter than it looks in the pot, so build color slowly instead of overcorrecting in one pour. If you increase dye significantly, retest the wick rather than assuming burn performance will stay the same.
Then evaluate additives by job:
- UV inhibitor: helps slow fading and discoloration in light-sensitive candles
- hardness or opacity enhancer: useful when you need a firmer pillar, a different finish, or easier mold release
- surface or adhesion helper: sometimes used to reduce visible defects, but only when the wax supplier recommends it
Add one variable at a time and retest after each change. If you change dye level, additive level, fragrance load, and wick size all at once, you will not know which variable actually improved the candle.
For deeper guidance, see candle dye & coloring and additives & enhancers.
Safety & Compliance — Overview Before You Gift or Sell
This section is the main-page overview, not a country-by-country legal checklist.
On the candle making hub, the job is to confirm that the candle burns safely, that your materials are documented, and that you know which detailed compliance page to check next. Basic consumer safety still applies: trim the wick, keep the candle away from drafts and flammables, and stop using any candle that overheats, cracks, or reaches its stop-use point.
Before you gift or sell a candle, confirm these basics:
- every finished formula has been burn tested
- the container and wick combination stays inside a safe burn window
- the warning label includes burn-use guidance and stop-use guidance
- your batch notes connect the formula, pour date, cure time, and test results
- supplier documents for wax, fragrance, dye, and packaging are on file
- any US, EU, CLP, or marketplace-specific rules are checked on the dedicated compliance pages before launch
Use this page for the overview, then go deeper in candle safety & compliance, candle labels & packaging, and safety standards and labeling.
Common Candle Problems at a Glance
Most beginner candle failures come from a short list of variables, so diagnose the visible symptom first and then check the formula, wick, jar, and burn conditions in a fixed order.
| Problem | Most likely cause | First thing to check | Go deeper |
|---|---|---|---|
| Tunneling | Wick too small or burn sessions too short | Jar diameter, wick size, first-burn duration | burn testing |
| Mushrooming | Wick too large or formula too heavy | Wick size, trim length, dye level, fragrance load | wick sizing |
| Soot on glass | Overwicking, drafts, or long burns | Wick trim, flame height, room airflow | candle burning & usage |
| Frosting | Wax crystal formation, especially in soy | Cooling speed, room temperature, wax family | troubleshooting |
| Wet spots | Shrinkage and poor glass adhesion | Pour temperature, jar temperature, cooling speed | containers & jars |
| Weak hot throw | Low fragrance load, poor cure, or wick mismatch | Fragrance percentage, cure time, melt pool | fragrance & scenting |
If you are troubleshooting, diagnose in this order: wick size and trim, jar diameter, fragrance load, dye or additive changes, pour and cooling conditions, and then burn-session behavior. That order usually tells you faster whether the problem is combustion, formula weight, or temperature control.
For full fixes, go to candle troubleshooting.
Burn Testing & Metrics — Steps to run reliable candle tests
A reliable candle burn test procedure starts before you ever light a wick. Use identical candles from the same batch so the wax, fragrance load, wick series, wick size, and container stay comparable.
Use this sequence:
- Label each test candle with wax type, fragrance percentage, wick series, wick size, pour date, and cure time.
- Burn on a level, heat-safe surface in a room with minimal drafts.
- Trim each wick consistently before lighting.
- Record observations at the same interval every session instead of relying on memory.
- Change one variable at a time between rounds so the next test still teaches you something useful.
Track at least these metrics:
| Metric | What good looks like | What signals a problem |
|---|---|---|
| Melt pool reach | Approaches the jar edge in the expected test window | Persistent tunneling or edge hang-up |
| Flame height | Stable and proportional to the jar | Tall, dancing, or self-extinguishing flame |
| Melt pool depth | Controlled and even | Excessively deep or very shallow pool |
| Wick tip | Small, manageable carbon build-up | Heavy mushrooming |
| Glass temperature | Warm but not alarmingly hot | Overheating or visible stress |
| Soot | Minimal to none | Black streaks on glass or visible smoke |
| Hot throw | Noticeable but not harsh | Weak scent or scorched scent |
Treat every wick chart recommendation as a starting point, not a final answer. If a candle is underwicked, overwicked, or inconsistent across sessions, adjust one variable at a time and test again.
For the full protocol, go to candle burn test.
Selling Candles? Go to the Business Pages Next
Costing, pricing, and batch scaling matter after your candle formula already burns cleanly and consistently.
Keep this page focused on making and testing the candle first, then move into the business pages once the product is stable.