
To blend different candle waxes, choose a base and modifier, mix by weight, then confirm the ratio, temperature window, wick, and fragrance load with controlled burn tests.
This guide is for makers who already pour candles and want a repeatable way to tune performance. It shows how to choose a base wax, set starting ratios, and test the blend without changing too many variables at once. The goal is to get cleaner burn behavior, better surface finish, and steadier scent throw from the same vessel. You will move from first blend idea to burn-test notes you can reuse on the next batch.
Choose your starting lane first
Choose the candle type first because container blends and pillar blends need different wax traits, wick retests, and temperature choices.
That first choice decides which result matters most before you test any ratio. Container candles usually prioritize glass adhesion, smooth tops, and steady hot throw, while pillars and molded candles prioritize rigidity, clean sides, and mold release.
| Build type | Prioritize first | Better base candidates | Common modifier role | Retest first |
|---|---|---|---|---|
| Container candle | glass adhesion, smooth tops, stable hot throw | soy, coconut-soy, parasoy | paraffin or coconut to improve throw and finish; small beeswax percentages for firmness | wick size, then pour temperature |
| Pillar / votive / molded candle | rigidity, mold release, clean sides | paraffin, beeswax, pillar blends | beeswax or other hard waxes to increase structure | wick series, then pour temperature |
Once you fix the lane, choose the ratio by weight, not volume, and keep the vessel or mold, wick family, fragrance load, and cooling conditions stable for the full round. If you still need help deciding which wax should lead the formula, choose the right wax for your candles before you run the first blend test.
Quick-start blend starting points
These quick-start ratios are first-round test blends, not fixed formulas. Keep the fragrance load, wick series, jar size, and temperature limits inside the strictest supplier specs for every wax in the blend.
Scope note: Use the ratios, temperatures, and wick moves below as first-round test starters, not universal formulas. Wax brand, vessel size, fragrance oil, dye, room temperature, and cure time can all change the result. For every blend, stay inside the strictest melt, add, pour, and fragrance-load limits from the component wax data sheets, then confirm the final setup with your own burn tests before scaling up.
| Goal | Starting blend by weight | Best fit | Retest first |
|---|---|---|---|
| Stronger hot throw in container candles | 70/30 soy/paraffin | jars and tins | wick size, then fragrance load |
| Smoother tops with a softer natural-leaning blend | 80/20 soy/coconut | jars and luxury containers | wick size, then pour temperature |
| More structure without going fully paraffin-heavy | 85/15 soy/beeswax | firmer containers and rustic jars | wick size, then cure time |
| Harder pillar-style performance | 70/30 paraffin/beeswax | pillars, votives, molded candles | wick series, then pour temperature |
Pour at least 2 identical test candles for each blend. Change only 1 variable per round so you can tell whether the ratio, wick, fragrance load, or temperature caused the result. If you still need to compare pure wax behavior before you choose a base, use the candle wax types guide first.
Why blend candle waxes? (benefits & trade-offs)
Blend candle waxes when one wax gets you most of the way there but another wax fixes a specific weakness.
Your base wax should carry the main job, such as container adhesion, hot throw, or pillar strength, while your modifier wax should solve one problem without changing the candle’s whole identity. The trade-off is that every improvement shifts something else: a harder blend can raise shrinkage or cracking risk, a softer blend can weaken warm-room performance, and a stronger-throwing blend can force a wick retest.
How to choose base and modifier waxes
To choose base and modifier waxes, pick one wax that leads the blend on structure and burn, then add a second wax in smaller percentages to fix specific problems or improve performance.
Start by deciding what “non-negotiable” result you want from your candle: clean burn, strong hot throw, shiny smooth top, jar adhesion, or pillar rigidity. Your base wax is the one that best delivers that non-negotiable without help. If soy is your likely starting point, review how to use soy wax in candles before you set your first ratio. For many makers, that’s a soy or coconut-soy for containers, or a paraffin or beeswax blend for pillars. A side-by-side look at coconut wax vs soy wax can help when both are strong base candidates for the same jar style. The modifier wax is then chosen to fix what the base does poorly (for example, weak scent, frosting, or easy cracking) rather than to completely change its character.
A simple way to think about it: if you pour a test candle at 100% of one wax and you like 70% of what it does, that wax is a good base candidate. If another wax fixes the remaining 30% but would be too expensive, too soft, or too sooty on its own, that second one is a modifier. Start with ratios like 80/20 or 70/30 by weight and adjust slowly based on test burns. Industry groups such as the National Candle Association remind makers to always stay within each supplier’s safety limits for melt temperature and fragrance load, even when combining waxes, so keep the strictest limit from any ingredient in the blend.
You can also use your blend notes to categorize possible bases: “structural” waxes (paraffin, beeswax, some hard soy blends) hold shape and release from molds better, while “aesthetic” waxes (soft soy, coconut, specialty plant blends) give smoother surfaces and a softer look. If you’re unsure which direction to go, revisit a wax types guide and note which waxes tend to be brittle, soft, slow-burning, or very strong-throwing. Then shortlist one base and one or two modifiers that make sense for your climate, vessel type, and price point. As you test, log which wicks from your wick sizing guide pair well with each ratio so your future experiments start from a known-good combo instead of from scratch.
Step-by-step: blending workflow (temps, ratios, curing)
A repeatable blending workflow starts with one target result, one base wax, and one modifier wax, then moves through measured mixing, controlled pouring, full cure, and burn testing.
Repeatable blend workflow
- Pick 1 base wax and 1 modifier wax.
- Define the single result you are trying to improve first: hot throw, smooth tops, adhesion, rigidity, or burn time.
- Mix 3 test ratios by weight: 80/20, 70/30, and 60/40.
- Keep the jar, wick series, fragrance load, and cure window the same across all 3 tests.
- Label each candle with the ratio, wick, melt temperature, fragrance-add temperature, pour temperature, and date.
- Burn-test on the same schedule, then change only 1 variable on the next round.
That order keeps the test readable. If you change the ratio, wick, fragrance load, and pour temperature all at once, you will not know what actually caused the result.
What to change first when a blend underperforms
- Keep the ratio fixed until the finish and burn behavior repeat.
- If the problem appears during burning, retest wick size or wick series before changing the ratio.
- If the problem appears while cooling or setting, retest jar preheat, pour temperature, and cooling speed before changing the wick.
- If the issue is sweating, weak throw, or oil separation, retest fragrance load and fragrance-add temperature inside the strictest supplier limit.
- Change the wax ratio again only after the process variables above are stable.
To run a blending workflow, plan your ratio on paper, melt and combine the waxes carefully, then pour, cure, and test in a controlled way.
Start by clarifying your goal (stronger throw, smoother tops, better adhesion) and reviewing your blend notes so you know which waxes you’re pairing and why. Choose a base and modifier, then write down 2–3 starting ratios (for example 80/20, 70/30, 60/40 by weight) and stick to grams or ounces, never volume. Before you touch the wax, prepare your workspace: clean pitchers, accurate scale, thermometer, and pre-wicked jars so you aren’t scrambling with hot wax.
Melt each wax separately in a double boiler or melter, staying within the manufacturer’s safe melt range. When both are fully liquid and clear, combine them into one pouring pitcher at roughly the base wax’s recommended working temperature. Stir slowly but consistently for a couple of minutes to help the blend homogenize, then add fragrance at the supplier’s suggested temperature, again guided by your wax types guide. Keep notes on actual temperatures, not just “hot” or “warm”, so you can reproduce success.
Next, cool the blend to an appropriate pour temperature for your vessel type; many makers find that slightly cooler pours improve adhesion in containers while somewhat hotter pours suit pillars and molds. Pour each test ratio into at least two identical jars, label them clearly with date, ratio, and fragrance load, and protect them from drafts while they set. Let the candles cure for the full recommended time—especially for soy-heavy blends—before burn testing, and log the wick size you used from your wick sizing guide so performance differences are easy to trace back to the wick, not just the wax.
Troubleshooting: sinkholes, frosting, wet spots
To troubleshoot blend defects, match the symptom to the most likely cause, change one variable first, and re-run the same candle before you move the ratio again.
Symptom → likely cause → first fix
| Symptom | Likely blend cause | Change first | Keep constant in the next test |
|---|---|---|---|
| Sinkhole or crater around the wick | the blend shrank hard or cooled too fast | warm the jars and pour slightly hotter | wick series and fragrance load |
| Frosting on the surface or sides | soy-heavy crystallization plus unstable cooling | cool more slowly and test a slightly different ratio | wick and fragrance load |
| Wet spots or pull-away from glass | contraction mismatch between wax and container | warm the jars and test a slightly cooler pour | wick series and cure window |
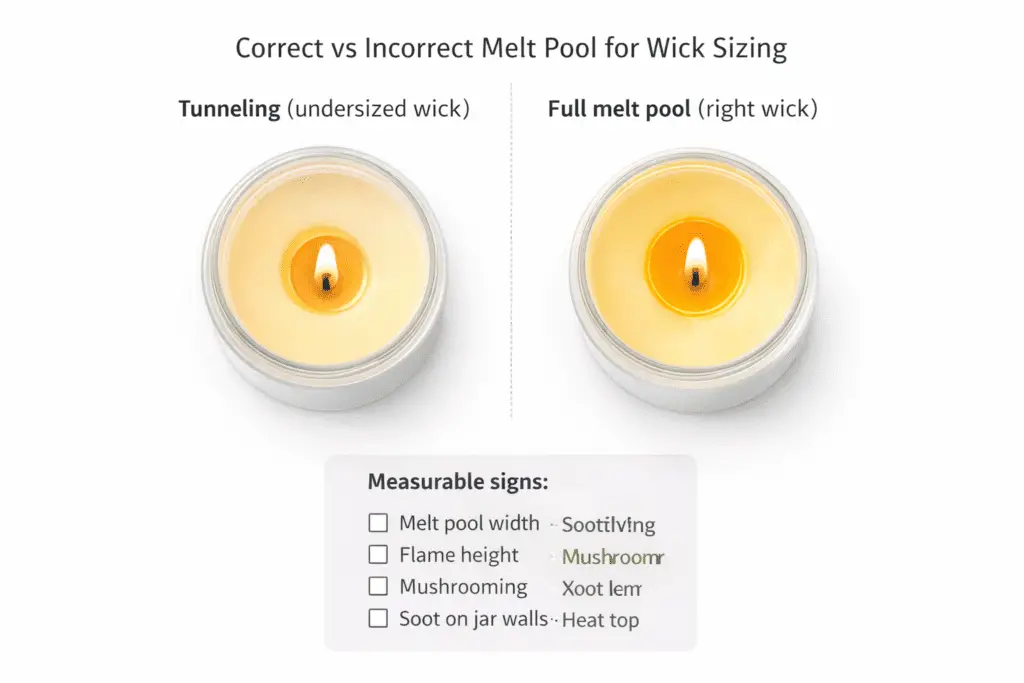
| Tunneling | the wick is too small or the blend burns too cool | test 1 wick size up in the same series | ratio and fragrance load |
| Mushrooming or soot | the wick is too large or the blend burns too hot | test 1 wick size down in the same series | ratio and fragrance load |
| Sweating or oil beads | fragrance load is too high or the oil was added poorly | lower the fragrance load or retest the add temperature | wick series and jar size |
Work from left to right. Fix the most likely cause first, then re-run the same candle with every other variable locked.
Fast diagnosis flow for a new blend
- Keep the ratio fixed and decide whether the problem appears before lighting or only during the burn.
- If the defect shows up while cooling, retest jar preheat and pour temperature before changing the wick.
- If the candle tunnels or leaves heavy hang-up after the third burn, move 1 wick size up in the same series.
- If the flame mushrooms, smokes, or overheats the jar, move 1 wick size down before changing the ratio.
- If oil beads appear on the surface, lower the fragrance load or retest the fragrance-add temperature before changing wax percentages.
- Change the blend ratio again only after temperature, wick, and fragrance variables are stable.
To fix sinkholes, frosting, and wet spots in blends, adjust pour temperature and cooling speed, tweak ratios, and rematch wicks while keeping other variables as constant as possible.
When you see defects, go back to your blend notes and check whether you changed more than one variable at once. Sinkholes and craters around the wick usually point to rapid cooling or heavy shrinkage, so try pouring a little hotter, warming jars beforehand, or using a small top-off pour to fill gaps. For a paraffin-heavy version of the same problem, see how to fix sinkholes in paraffin candles. If the surface repeatedly fractures or caves in, a bit more hard wax or a slightly lower fragrance load can reduce shrinkage stress. Always change only one factor per batch so you can tell what actually helped.
Frosting and crystal patterns on soy-heavy blends often come from temperature swings during cooling. For a deeper soy-specific checklist, see how to fix common soy wax candle issues. Use notes from your wax types guide to remember which components are prone to frosting, then cool those blends more gradually: avoid refrigerators, keep candles away from windows, and aim for a stable room temperature. Wet spots (patchy adhesion to glass) usually mean the wax pulled away as it shrank, so experiment with warmer jars, slower cooling, and slightly cooler pour temperatures. Tapping the jar right after pouring can also release trapped air against the glass.
For wicks, problems show up as tunneling, mushrooming, or sooting long before the candle is finished. Compare your burn test notes against your wick sizing guide and look for patterns: are all the sinkhole-prone blends using the same undersized series, or are sooty candles all over-wicked? Correct by sizing up or down one step at a time and keeping the wick family the same while you test. Over a few cycles, link each defect to a cause-and-fix in your notebook so troubleshooting becomes a checklist instead of guesswork.
Testing protocol & record-keeping for blends
A reliable testing protocol uses consistent burn tests and detailed notes so you can repeat successes and isolate exactly what caused problems.
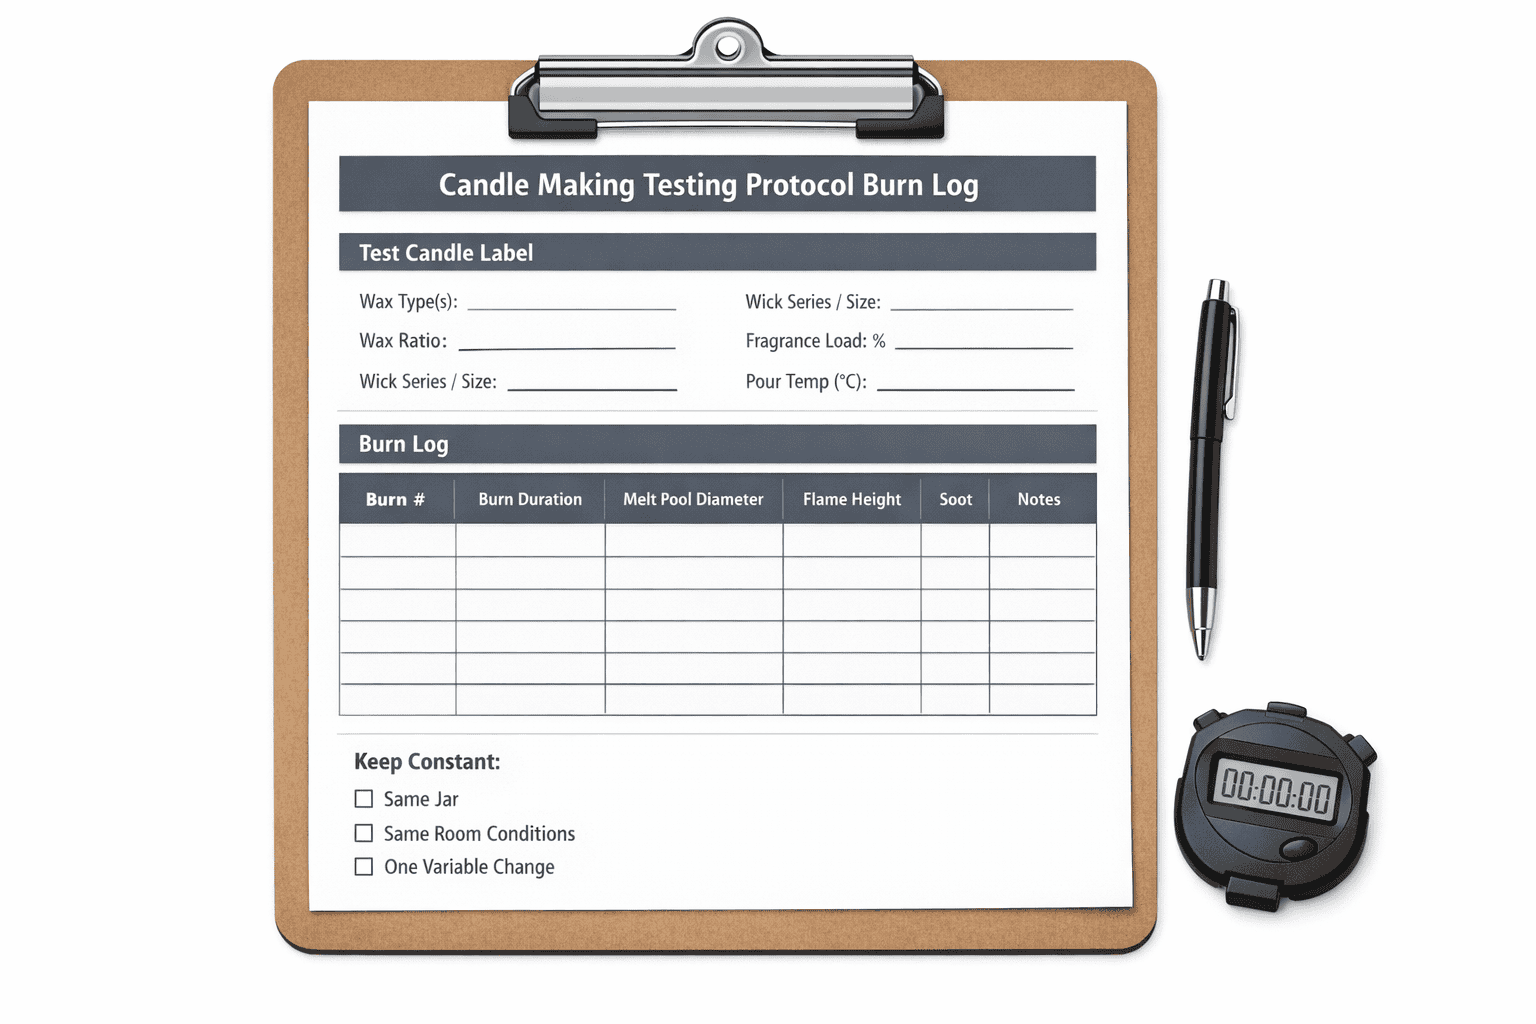
Burn-test log template
| Candle ID | Blend ratio | Fragrance load | Melt / add / pour temps | Wick | Cure days | 2-hour melt pool | Flame behavior | Glass / surface notes | Next change |
|---|---|---|---|---|---|---|---|---|---|
| A1 | 80/20 | — | — / — / — | — | — | — | — | — | — |
| A2 | 70/30 | — | — / — / — | — | — | — | — | — | — |
| A3 | 60/40 | — | — / — / — | — | — | — | — | — | — |
If you keep this table for every round, you can compare blends quickly instead of relying on memory after the jars have cooled and cured.
Pass/fail checks for the first three burn cycles
| Check | Pass signal | Re-test signal | Change first |
|---|---|---|---|
| Full melt pool timing | Reaches a near-full pool at about 1 hour per 1 inch of vessel diameter | Pool stays narrow well past that point or catches up only very late | wick size, then wick series |
| Melt pool depth | About 1/4–1/2 inch deep during a normal test burn | Very shallow pool or an overly deep, overheated pool | wick size |
| Flame height | About 1/2–2 inches and steady | Tiny struggling flame, aggressive flicker, or oversized flame | wick size or series |
| Glass and rim heat | Warm but manageable during a normal test burn | Jar feels excessively hot or shows soot buildup | wick down first |
| Surface and sidewall behavior | Minor early hang-up that improves by later burns | Persistent tunneling, heavy soot, or repeated mushrooming | wick and fragrance load before ratio |
Begin by reviewing your blend notes so every test has a clear purpose, like stronger hot throw or better glass adhesion. Choose one or two ratios to test at a time and keep everything else consistent: same jar, wick series, room temperature, and burn schedule. Label each candle with ratio, wax types, fragrance load, pour temperature, and date. During test burns, record objective data such as melt pool diameter at fixed intervals, flame height, and total burn time, rather than just “good” or “bad.”
To make sense of patterns over time, build a simple notebook or spreadsheet where each row is a candle and each column tracks a variable and result. Use your wax types guide to add notes on which waxes in the blend are likely driving specific behaviors, like frosting or extra-strong throw. As you refine, stick to a consistent scent throw testing protocol—same trim length, room size, airflow, and burn duration per cycle—so changes in performance clearly link back to the ratio or wick rather than sloppy testing. Refer to your wick sizing guide whenever you adjust wicks, and always record those changes next to the wax blend so future experiments start from a proven baseline.
Choose a starting ratio by pair and goal
Choose a starting ratio by pairing the waxes that fit your candle type, then move the blend toward the one performance trait you need most.
Use one wax pair per test round and change the ratio in small steps by weight. Keep the vessel, wick family, fragrance load, and cooling routine stable until one band starts to repeat cleanly.
| Blend pair | Best fit | Use this when you want… | Starting test band by weight | Retest first |
|---|---|---|---|---|
| Soy + paraffin | containers | stronger hot throw and easier glass performance | 70/30, then 65/35 | wick size |
| Soy + coconut | containers and luxury jars | smoother tops and a softer finish without losing a soy-led profile | 80/20, then 75/25 | wick size, then pour temperature |
| Soy + beeswax | firmer containers and rustic pillars | more structure and a longer burn without going fully paraffin-led | 85/15, then 80/20 | wick size, then cure time |
| Paraffin + beeswax | pillars, votives, molds | higher rigidity, better mold release, cleaner pillar behavior | 70/30, then 60/40 | wick series, then pour temperature |
Treat these as starting bands, not fixed formulas. Once a pair looks promising on paper, keep the vessel and wick family constant and change only one ratio step at a time. For soy–paraffin container testing, a parasoy blend guide can help you compare the same pair in more detail before you scale up.
Temperature windows for blends (melt/pour/cool)
To manage temperature windows in blends, use supplier data sheets and stay inside the strictest melt, fragrance-add, and pour limits of any wax in the mix.
Use pour temperatures by wax and container and when to add fragrance as starting references, then keep the ratio fixed and move only one temperature variable at a time.

Your blend notes should already list the preferred melt and pour temperatures for each single wax you use. When you combine them, take the narrowest safe range—especially for fragrance add temperature—and treat that as your hard limit. Melt each wax separately within its recommended range, then combine them at a shared working temperature that doesn’t exceed the most delicate component. Use your wax types guide to flag waxes that scorch easily or crystallize quickly so you handle them gently during melting and mixing.
Think of the process as three linked stages: melt hot enough to fully liquefy without degrading, add fragrance in the middle of the safe band so it binds well, and pour a bit cooler for containers or a bit warmer for pillars and molds. For example, many makers melt to the higher end of the range for speed, then let the blend cool down before adding fragrance and again before pouring. Whatever schedule you follow, write down the exact numbers and room temperature so you can see how even a 3–5° shift changes surface finish, adhesion, and throw. Temperature also affects how wicks behave, so log any changes in tunneling, mushrooming, or soot against the same wick series in your wick sizing guide as you refine your temperature window.
Once you have those numbers, use them as deliberate levers when defects show up. If a soy–paraffin container blend shows sinkholes or deep craters even with a reasonable wick, try pouring 3–5 °C hotter and letting jars cool more slowly away from drafts. If frosting is the main issue, step the pour temperature up slightly and keep candles away from cold window sills or sudden temperature swings. When you see persistent wet spots and pull-away rings, experiment with pouring a little cooler into gently warmed glass so the wax contracts more evenly as it sets.
Use supplier data sheets as the temperature source for every wax in the blend, then run your own tests inside the narrowest safe window. A practical routine is to keep the ratio fixed, hold the fragrance load steady, and move only the pour temperature in small 3–5 °C steps until tops, adhesion, and hot throw stabilize. Once one blend gives you clean tops and a full melt pool, lock that temperature window before you retest wicks or fragrance loads.
Consistent temperature control is one of the quiet levers that separates hobby-level results from a repeatable small-batch workflow. Once you know the sweet spot for melt, add, and pour in your main blends, you can train helpers, scale up batches, and maintain quality even as orders increase, instead of chasing mysterious frosting or sinkholes that turn up only in certain seasons.
Wick sizing for blended waxes
Wick sizing for a blend starts by treating the blend like a new fuel system, then testing a small ladder of sizes and series around your best ratio.
Wick retest ladder for blends
| Burn result | What it usually means | Next wick test |
|---|---|---|
| Tunneling after the first full burn cycle | the wick is too small or the blend burns cool | same series, 1 size up |
| Very wide hot pool or soot on the glass | the wick is too large or the blend burns hot | same series, 1 size down |
| Mushrooming with a mostly correct melt pool | the wick may be oversized for the oil load | same series, 1 size down or a cleaner-burning series |
| Small weak flame that struggles to stay stable | the wick may be undersized for the blend viscosity | same series, 1 size up |
| Jar gets too hot near the top | the wick is likely too aggressive for the vessel | same series, 1 size down |
Retest wicks only after the blend ratio is close. If the ratio is still moving around, your wick test results will keep changing with it.
To size wicks for blended waxes, treat each new blend like a brand-new wax and test a small range of wick sizes and series instead of assuming your old “go-to” will still work.
Start with the most successful ratio from your blend notes and pick two or three wick sizes around what you’d use for that jar in a single-wax candle. Because blends often burn hotter or cooler than their components, expect surprises: a soy blend with added paraffin may need a smaller wick than 100% soy, while a soft coconut-heavy blend might need a size up to reach a full melt pool. Use notes from your wax types guide to predict whether the blend is likely to run cool (soy, some plant waxes) or hot (paraffin, some harder blends) before you even light a match.
During burn tests, focus on measurable signs: melt pool width after set intervals, flame height, mushrooming, soot on jar walls, and how hot the container feels near the top. Log each result carefully in your wick sizing guide, creating a sub-section for each blend you care about. If one wick tunnels but the next size mushrooms and smokes, consider switching wick series rather than just climbing up or down the ladder; different series handle viscous, high-additive blends better than others. Always change only one variable at a time—wick size, not wick plus fragrance load—so you can clearly see cause and effect.
Over time, your goal is to turn “guess and check” into a shortcut: when you design a new blend for a certain vessel, you glance at your blend notes, spot similar wax combinations in your wax types guide, and then jump straight to the 2–3 wick options that have already worked in comparable blends, as recorded in your wick sizing guide. That’s how your testing notebook slowly becomes a custom reference book for your own candles, not just a pile of random test jars.
Fragrance bind & cure behavior in blends
Fragrance binding and cure time in blends depend on how the different waxes hold and release oil, so you need to test add temperatures and cure length just as carefully as wick size.
Before you pour, skim your blend notes to remind yourself which wax is driving the blend’s personality. A soy-dominant mix may still need a longer cure for strong hot throw, while a paraffin-heavier blend often throws well with a shorter rest. Use your wax types guide to note which components are known for high fragrance loads and which struggle with certain oils (heavy vanillas, spice, citrus). Always respect the strictest maximum fragrance load and when to add fragrance guidance from any wax or supplier in the blend to avoid sweating, seeping, or unsafe candles.
Practically, that means melting your blend, letting it cool into the recommended “fragrance add” window, and then stirring slowly for a full couple of minutes to help the oil disperse evenly. Pour test candles at a single fragrance load first—say 6% or 8% by weight—then vary cure time: burn some after 24–48 hours, others at one week, and another set at two weeks or more for soy-heavy blends. Record cold throw, first hot throw, and how scent develops mid-way through the candle in your test log, noting whether the wick still works well at that fragrance level or starts to mushroom or soot.
If your notes show strong cold throw but disappointing hot throw, try adjusting the add temperature slightly within the safe range, or tweaking the ratio so more of the wax that binds fragrance well takes the lead. Pair those adjustments with small changes to wick choice, guided by your blend notes, so you don’t accidentally fix scent at the cost of a safe flame. Over time, you’ll build a clear map in your wax types guide of which oils and wax combinations need extra cure time, which handle high loads without sweating, and which are best kept for lighter, more subtle scents.
To make those tests more concrete, you can run a small ladder with both load and cure time. For example, pour one set of soy–paraffin jars at 6% fragrance and another at 8%, then cure half of each load for 7 days and the rest for 14 days. On your burn sheets, note whether the 8% candles at 7 days show oil beads on the surface, smoky flames, or duller cold throw compared with the 6% set, and whether the 14-day jars give cleaner glass and stronger, steadier hot throw. If the higher load consistently sweats or smokes while the lower load stays clean and still smells strong, record that the practical sweet spot for that blend, vessel, and climate is closer to the lower percentage.
When to test additives in a wax blend
Test additives only after the base wax blend already burns correctly. Lock the wax ratio, wick range, fragrance load, and pour window first so you know how the blend behaves on its own.
Once the base blend is stable, run a separate additive micro-test at one level per round, such as 0%, 1%, and 2% by weight. Record what changed in surface finish, adhesion, rigidity, and wick behavior, then keep only the additive level that solves a clear problem without creating a new one.
FAQs about blending candle waxes
These short answers cover the blend questions that usually come up after the first test batch, especially around wax pairing, melting order, wick retesting, and cure time.
Can you mix soy and paraffin wax?
Yes. Soy–paraffin blends are common for container candles because soy can soften the look of the candle while paraffin can improve hot throw and surface finish. Start with small test batches and recheck the wick before you raise fragrance load.
Should you melt the waxes separately?
Usually yes, especially when the component waxes have different melt ranges or one scorches easily. Separate melting makes it easier to avoid overheating the more delicate wax before you combine them.
Does every new blend need a new wick test?
Yes. Treat each blend as a new fuel system because changing wax ratio, fragrance load, or additives can change melt pool width, flame size, and soot risk.
How long should a wax blend cure before burn testing?
Use the cure window required by the slowest or most cure-sensitive wax in the blend. Paraffin-heavy blends often read earlier, while soy-heavy blends usually need a longer cure before you judge hot throw.