You fix paraffin sinkholes by slowing cooling, pouring within your wax’s tested range, and using poke-and-repour for deep voids or a heat gun only for shallow surface dips.
Paraffin makers who see craters around the wick or hidden voids under an otherwise smooth top need a fast way to diagnose whether the problem came from temperature, airflow, vessel geometry, or formulation. For broader context, see candle wax types. This page helps you decide which variable to adjust first and which repair method fits the size of the defect.
It focuses on paraffin-specific shrinkage behavior rather than generic candle-surface problems. Start with the fast diagnosis table below, then use the matching fix path for your jar, wax, and defect depth. For the broader troubleshooting page that covers other wax types and related top defects, see fix candle sinkholes.
For the wider wax-type guide, see candle wax types.
Fast diagnosis: match the sinkhole to the first variable to test
You diagnose most paraffin sinkholes by matching the visible defect to one main variable first: cooling pattern, trapped air, jar geometry, or formula load.
| What you see | Most likely cause | Change first | Best repair now |
|---|---|---|---|
| Small center dip with no deep void | Normal top shrinkage | Slow cooling slightly and keep jars warmer | Heat gun surface reflow |
| Deep hole near the wick after full set | Core stayed liquid longer than the top | Use relief holes and a repour | Poke-and-repour |
| Repeating crater in tall jars | Vessel geometry + uneven cooling | Use slower cooling and test a second pour | Poke-and-repour or planned double-pour |
| Rough, pitted top with tiny cavities | Trapped air from stirring or high pour height | Stir more gently and pour lower | Thin top-up or light reflow |
| Ring-shaped dip near the glass and center void | Cold jar or cold surface pulled heat too fast | Preheat jars and avoid stone counters | Second pour |
| Sinkholes start only after raising FO or changing additives | Formula tolerance issue | Return to the last stable FO/additive level | Repour one controlled test candle |
For the broader troubleshooting page that covers other wax types and related top defects, see fix candle sinkholes.
Which fix should you use first?
Use a heat gun for a shallow surface dip, poke-and-repour for a deeper hollow center, and a planned second pour when the same jar keeps trapping a void.
Start with the smallest repair that matches the true depth of the defect, then move to repour or double-pour only when the center is hollow or the problem repeats.
- Press or probe the center lightly once the candle is fully set.
- If the dip is shallow and the wax underneath feels solid, use surface reflow.
- If the tool drops into a soft or hollow center, open relief channels and repour.
- If the same jar and wax combination keeps doing this, switch from rescue mode to a planned second-pour workflow.
- After the repair, cool the candle in still air and recheck the top before trimming or labeling.
Steps to poke and repour to fix paraffin sinkholes (timing, depth, fill)
You can use the poke-and-repour method to fix paraffin sinkholes by waiting for partial set, poking deep relief channels, topping with fresh wax, and allowing a slow, even recool.
Methods note: The timing, depth, and fill cues in this section are working shop ranges, not fixed standards. Confirm them on one test candle first because jar size, wax blend, and room conditions change how quickly a sinkhole forms and how much refill wax it takes.
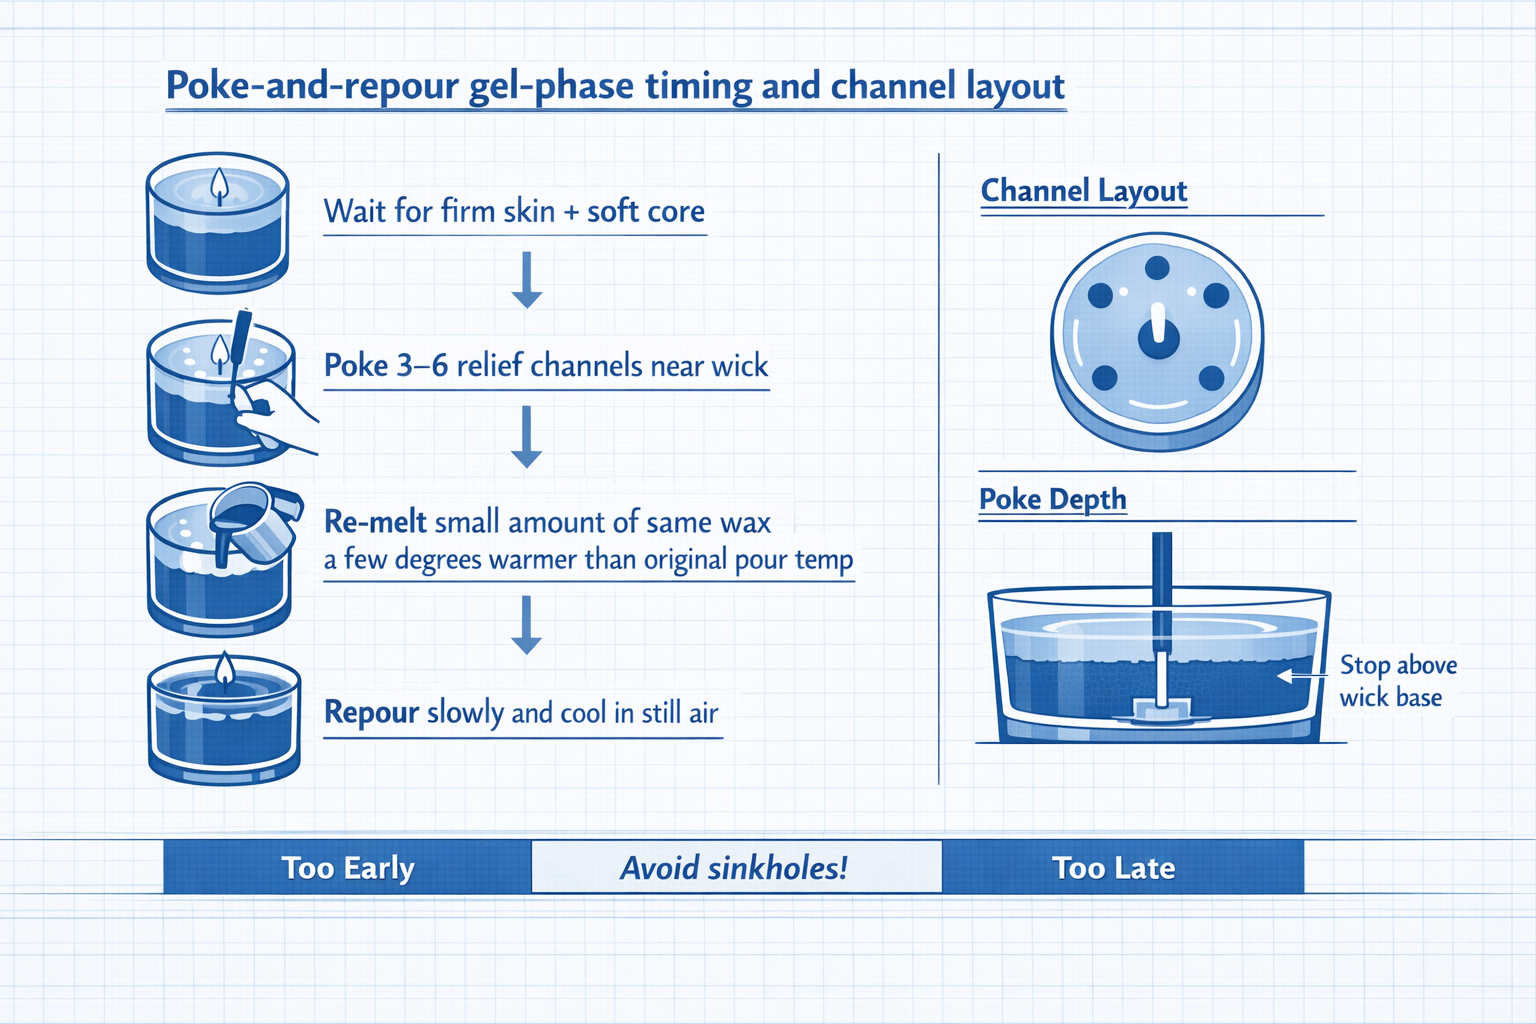
Image: A timing graphic showing when to open relief channels and add a thin top-up pour for paraffin sinkholes.
The goal is not to stab randomly at the top, but to give shrinking wax a path to draw in fresh material so the final surface stays smooth and solid. When done thoughtfully, poke-and-repour can rescue a whole batch that would otherwise look unsellable, especially in deeper jars where the voids tend to hide just below the surface.
Wait until the candle has cooled enough that a firm skin has formed but the core is still soft—typically a couple of hours after pouring, depending on jar size and room conditions. Then choose the right poke depth by inserting a clean skewer or wick trimmer straight down close to the wick, stopping just above the bottom so you don’t pierce the tab or container. Make three to six evenly spaced channels around the wick, wiping your tool between candles to avoid dragging debris or dye. You should feel that the tool passes through a soft inner zone; that’s the void you’re trying to relieve.
Next, gently re-melt a small amount of the same wax formulation, ideally just a few degrees warmer than your original pour temp so the fresh top layer bonds well without shocking the existing candle. Pour slowly over the surface, allowing wax to flow down into the channels and displace trapped air before it builds up on top. Keep the layer thin—often just enough to cover the original surface by a few millimetres—so you can refill sinkholes without visible rings or harsh double-pour lines. Let the candle cool again in calm, stable conditions and avoid moving it during this second set.
If the batch was badly affected, repeat the process on one test candle first and burn it through several cycles to confirm that the repair hasn’t introduced new issues like tunnelling or wick drowning. Once you’re confident in your timing, depth, and fill level, repeat the same pattern across the rest of the affected candles, taking notes on when you poked, how deep you went, and how much wax you added so you can refine your timing for the next production run.
Fixing shallow dips with a heat gun: distance, sweep, and reflow safety
To fix shallow dips with a heat gun, hold the nozzle about 10–20 cm above the surface and make two or three quick passes so you only soften the upper 1–2 mm of wax. Used gently, this lets you smooth tops safely with surface reflow instead of blasting heat deep into the candle and creating new voids.
Methods note: The distance, pass count, and cooling times here are conservative working ranges, not standard-set limits. Start farther away and with fewer passes on one test candle, then adjust only if the top still needs light leveling.
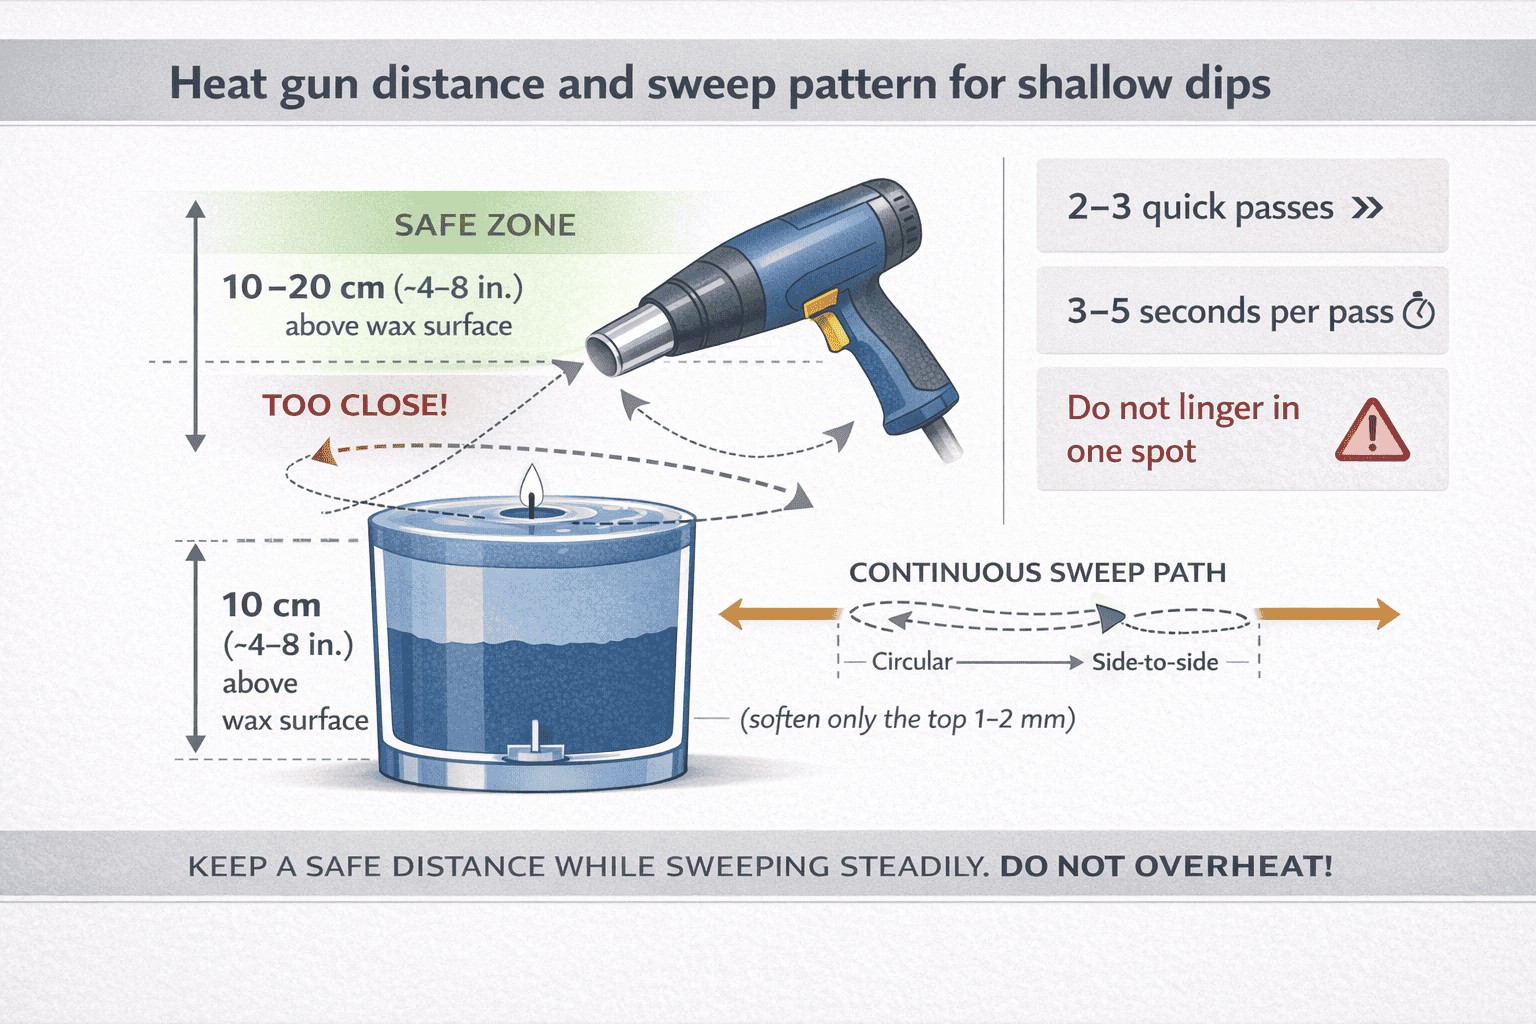
Image: A heat-gun leveling graphic showing safe distance and sweep direction for shallow paraffin surface dips.
Think of a “leveling pass” as a moving, circular or side-to-side sweep that briefly liquefies the top skin so it can relax and flatten, while the core stays solid and structurally sound. That approach follows a “minimum heat, maximum control” workflow and uses only enough heat to reflow the surface without overheating the jar, wick, or surrounding area.
Set the heat gun to a low or medium setting, place the candle on a heat-resistant mat or tile, and check that the wick is trimmed and the flame is out before you start. Begin just outside the rim, then sweep across the surface in smooth arcs, spending no more than a second or two over any one spot. You’re looking for a thin, glossy melt that appears and then quickly settles, not a deep pool. If you see the wick starting to lean, the jar getting very hot, or the wax around the glass edge beginning to sag, you’re too close or moving too slowly and should back off immediately. A simple heat shield mat under your candles protects the work surface and gives you a clear “safe zone” to work within.
Once you follow the leveling technique consistently—distance, passes, and resting time—you’ll find that small dips and tiny ridges from cooling usually vanish without leaving rings. After a few practice rounds, it helps to time yourself: for many 7–9 cm paraffin jars, one or two passes of 3–5 seconds each are plenty, followed by at least 10–15 minutes of undisturbed cooling in still air. If, after that, you’re still staring at a crater deeper than about 3–4 mm, that defect is no longer “shallow,” and it’s usually wiser to use repour when dips are deeper rather than keep adding heat from above. Reserve the heat gun for light cosmetic leveling, and switch to poke-and-repour for substantial voids so you don’t overcook the wick or destabilise the container.
You’ll get the safest, most repeatable results by treating the heat gun like any other hot tool: keep it moving, keep it away from flammables and curious pets or children, and never operate it near a burning candle. Make a short checklist you glance at each time—wick trimmed, surface dusted, mat in place, low setting selected, maximum number of passes—and your “finishing station” will feel like a controlled step in your workflow instead of a risky last-minute rescue.
Steps to time a double-pour for paraffin (gel-phase windows that avoid lines)
You time a double-pour by letting the first pour cool to a firm, cloudy gel, then topping with slightly cooler wax so both layers bond without leaving a visible line.
Methods note: The gel-phase cues in this section are visual working markers, not fixed timestamps. Confirm the window on one test candle first because jar depth, wax blend, and room temperature change how fast the first pour firms up.
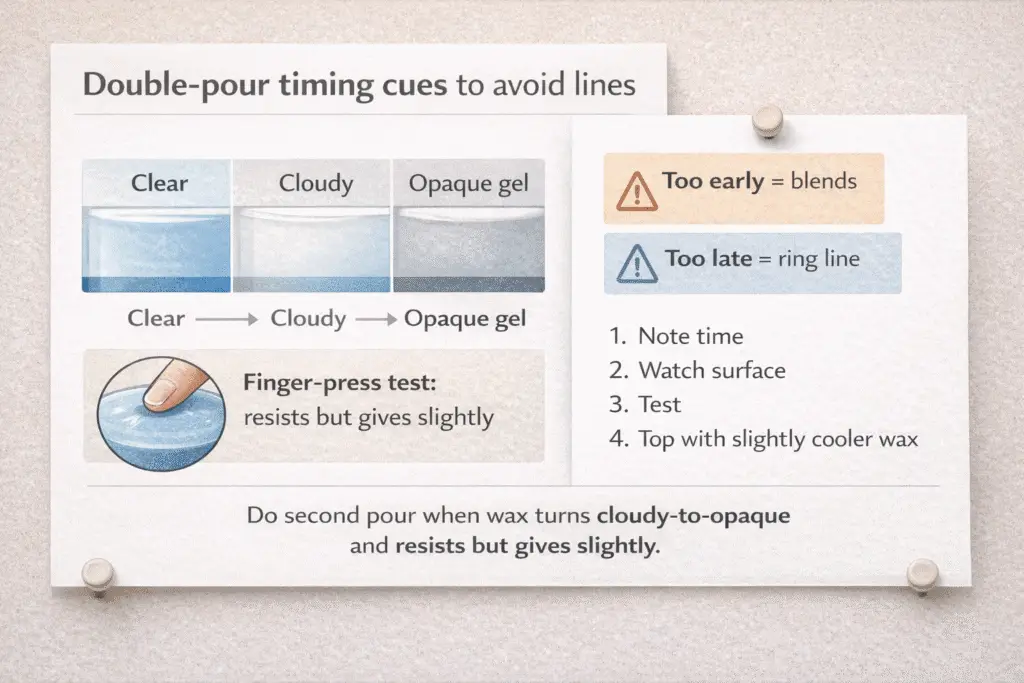
Image: A double-pour timing card showing the firm, warm first-pour stage that helps refill a paraffin void without a hard line.
Handled well, this lets you choose the right double-pour window to refill voids in deep jars without repeatedly attacking the top with a heat gun. The sweet spot is when the first pour is fully opaque and holds a gentle finger press, yet still feels warm; pour too early and both layers blend into a single mass, too late and you’ll get a hard “ring” where the second pour sits on top instead of knitting in.
Right after pouring the main fill, note the time and watch the surface. As the wax cools, it will move from clear to cloudy to a matte, jelly-like stage; this is when you watch the gel phase carefully. At that point, gently poke a test candle near the wick: the surface should resist but give slightly without cracking. Re-melt a smaller batch of the same wax, aiming for a temperature a little lower than your first pour, and stir well so any fragrance and dye are evenly distributed. Pour slowly over the set layer, letting wax flow into any micro-voids around the wick before building up a smooth new top a few millimetres thick.
To avoid visible double-pour lines, keep the second pour thin and the temperature difference modest—large contrasts between cold base and very hot top-up are what create sharp rings. Cool the candles again in steady, draft-free conditions and resist the temptation to move or tap jars while that second layer is setting. If you do see a faint line in a test candle, adjust by pouring a little earlier in the gel window or slightly closer in temperature next time. Once you’ve logged a successful timing pattern for your typical jar size and room conditions, repeat it as a standard step whenever you work with tall containers or waxes that are especially prone to deep sinkholes.
What pour temperature window (°C/°F) prevents sinkholes in paraffin?
Use the supplier’s recommended pour range for your exact paraffin blend as the starting point, then test a few controlled pours to find the lowest temperature that still gives a smooth, solid top.
There is no single universal paraffin pour temperature that prevents sinkholes in every jar, fragrance load, and room condition. Keep the wax, fragrance percentage, jar, and cooling spot the same, and change only the pour temperature so you can see whether temperature is really the problem.
- Prepare three identical jars.
- Pour one near the low end of the supplier range, one near the middle, and one near the upper end.
- Let all three cool in the same still-air location.
- Check for a hidden center void, surface dips, and pull-away from the glass after full set.
- Keep the temperature that gives the smoothest top with no soft or hollow center.
For this page, treat supplier product sheets and wax-brand instructions as the authority for mix and pour windows, then use your own test pours to narrow the sweet spot for your jar, fragrance load, and room conditions. Use safety standards and trade-group guidance for burn and handling context, not as proof of the exact pour temperature for a specific wax.
Over-hot pours drive more expansion and then aggressive contraction as the candle cools, which can pull wax away from the center and leave a buried void. Over-cool pours can be sluggish and trap tiny air bubbles, especially if you pour from high up or into cold jars; those bubbles later coalesce into a sinkhole. Keeping detailed notes on wax grade, fragrance percentage, room temperature, and your test results makes it easier to compare future batches. For the broader temperature-selection page, see choose pour temperature by wax type.
If paraffin sinkholes keep repeating, test these variables in this order
If the same wax and jar keep producing sinkholes, test the setup in a fixed order instead of changing everything at once.
This order keeps the page on-node and makes troubleshooting easier to repeat. Paraffin usually forms sinkholes because the center cools and shrinks differently from the top, so start with the conditions most likely to change that cooling pattern before you change the formula, wick, or tools.
1. Cooling setup first
Paraffin sinkholes appear when the outer wax and top surface cool and shrink faster than the still-liquid center, leaving a hidden cavity that eventually collapses. To prevent and fix sinkholes long-term, you need to slow and even out how heat leaves the jar instead of relying only on pour temperature. As paraffin cools it shrinks; if the wax touching the glass and the wick solidifies first while the internal core is still hot, the rigid outer shell can’t move with the contracting center, so a void forms directly under the top. Drafts, cold countertops and un-preheated glass all steepen that temperature difference, increasing the stress and the size of the cavity.
You can picture the problem as a stack of temperature bands inside the candle: the glass and outer wax are hugging room temperature, the mid-layer is warm and soft, and the center around the wick is still very hot. The steeper that curve from center to edge, the more the middle has to “pull away” as it contracts, and the more likely it is to leave a sinkhole rather than gently feeding new wax into place. Insulated environments flatten this curve and give the whole candle time to move together. Many makers see far fewer sinkholes once they start curing candles in a protected space at roughly 20–24 °C (68–75 °F) with steady conditions instead of on an open, drafty bench.
A very practical way to do that is to build a simple curing box from a clean cardboard box with a loose-fitting lid or towel over the top so unlit candles cool slowly and evenly. The idea is not to “bake” the candles but to shield them from cold air and sudden drafts while they drop from pour temperature down to room temperature. Once you have thermal gradient explained in those simple terms—hot core, cooler wall, and the risk that the difference between them gets too steep—it becomes clear why fans, air-conditioning vents and cold windowsills are sinkhole factories.
A quick habit that helps is a “tissue-flag” draft test: before pouring, tape a light tissue strip near your curing area; if it flutters, the airflow is strong enough to skin the tops of your candles prematurely and exaggerate gradients. Place filled jars on a wooden board instead of bare stone so the bottom doesn’t dump heat too fast into a cold countertop, and keep them spaced so warm air can circulate gently between them. Finally, give paraffin time; rushing candles from hot pour to a chilly storage room can undo otherwise perfect pouring technique. Treat cooling as deliberately as you treat melting and pouring, and you’ll see far fewer voids hiding under those tops.
Keep the room stable and the air still while candles set, and use the simplest draft checks first before you blame the formula. If you want to see whether a loose-lidded box helps in your own space, compare one small batch in protected still air against one in open air and keep the method that leaves fewer voids.
If you pour from large pots, note any temperature drift after the heat goes off and fold that into the same sinkhole log you use for cooling tests. Treat it as a support variable for steadier pours, not as a separate troubleshooting branch.
2. Container setup second
Lightly preheating candle containers to just above room temperature, and giving heavier tumblers a slightly warmer preheat than thin jars, helps paraffin cool evenly and dramatically reduces sinkholes caused by cold-shock at the glass wall.
You can prevent sinkholes with proper preheating by making sure the jar never starts out so cold that it skins the surface while the wax core is still hot and shrinking. In many home workshops that means warming jars to roughly 10–15 °C above a cool room—taking glass that sits at 18 °C up into the high twenties, for example—rather than making them genuinely hot. Thicker or heavier glass holds more thermal mass, so it usually benefits from the higher end of that range, while lightweight jars in a mild room may only need a gentle nudge above ambient.
To keep those targets repeatable, follow the preheat SOP you design for your own space, whether that’s a low-temperature oven cycle, a warming drawer, or staging jars in a closed box in a heated room for a set period. If you occasionally warm jars with a heat gun instead of an oven, pause to review heat-gun safety so you avoid concentrating heat in one spot, overheating the rim, or blowing dust and moisture into open containers. Whatever method you choose, measure a few jars with an infrared thermometer or by touching a probe gently to the outside wall so you know roughly where your preheat actually lands rather than guessing. Trade bodies and safety standards such as the National Candle Association and ASTM F2417 focus on conservative handling temperatures, so your goal is a comfortable, slightly warm jar, not glass that feels hot to the touch or risks thermal stress when filled with wax.
Once the wax is poured, that modest preheat slows the rate at which the wall and top lose heat compared with the core, flattening thermal gradients, keeping the whole candle in step as it shrinks, and leaving fewer voids under the surface. You will often see the difference clearly in side-by-side tests: in cold winter rooms, unheated thick tumblers tend to show ring-shaped depressions or hidden cavities near the wick, while preheated jars from the same batch of wax set with smoother, more even tops. Over time, logging ambient temperature, jar type, preheat range, and resulting defect rates turns preheating from a vague “nice-to-have” into a specific lever you can pull whenever your workspace or season changes.
All else equal, wide-mouth tumblers with a low, squat profile tend to be more forgiving than tall, narrow jars with a deep wax column. For this page, treat geometry as a sinkhole risk flag: if one vessel keeps trapping a deep center void, keep preheat and cooling steady, then move that jar style into a separate container test instead of expanding this repair pass into full jar-selection tuning.
Tall jars often need more careful cooling and a planned second pour because the center stays hot longer than the top and walls. Wide jars are usually easier to level, but they still need the same controlled cooling and post-set check before you call the defect solved.
3. Formula and process third
If sinkholes started after you raised fragrance oil percentage, changed oils, added additives, changed dye, or altered your mixing routine, return to the last stable formula before changing anything else. Test one small batch with the earlier setup first, then reintroduce one variable at a time so you can tell whether the problem is formula tolerance or cooling.
Use the wax maker’s maximum fragrance guidance, the fragrance supplier’s candle-use notes, and one controlled retest before you change several variables together. For those separate workflows, see fragrance load calculator, stearic vs vybar, and candle dye types.
4. Measurement and validation last
Finish by confirming the repaired candle sets solid, the wick stays centered, and no new ring or soft hollow appears after the top cools. If you still need a separate temperature-check routine after the repair holds, see candle thermometer.
Paraffin sinkhole prevention checklist
You prevent most paraffin sinkholes by keeping temperature, cooling, airflow, and formula changes under control from one batch to the next.
- Pour within the tested range for your exact wax, not a generic paraffin number.
- Keep jars slightly warm instead of cold-soaking them on a hard surface.
- Cool candles in still air away from vents, fans, and cold countertops.
- Stir gently and pour from low height to avoid entrained air.
- Use a planned second pour or poke-and-repour for jars that repeatedly trap a deep center void.
- Re-test whenever you change fragrance load, additive ratio, wick series, or jar geometry.
Before you call the candle fixed
Do not burn-test, label, sell, or gift a candle that still feels hollow near the wick area or develops a new ring after cooling.
Let the repair fully set in still air, then check the center before you decide the batch is done. A smooth-looking top is not enough if the wick has shifted, the wax still feels hollow, or a second dip appears during cooling.
If a void remains, the melt pool can reach it later and change wick behavior, flame shape, or how evenly the candle burns.
Use this short final check:
- let the repair fully set in still air
- press or probe the center lightly to confirm the void is gone
- confirm the wick is still centered and not buried or leaning
- burn-test one sacrificial candle from the batch before releasing the rest
If a candle only develops a new defect after handling, shelving, or shipping, treat that as a separate finished-candle storage issue instead of expanding this page into a transport guide. For the validation workflow, see how to conduct a candle burn test for fire risk.