
To make paraffin candles, choose container or pillar wax, set the wick and vessel or mold, melt, add optional scent or dye, pour, cool, trim, and check.
Paraffin candles are candles made from paraffin wax that is melted, wicked, poured, cooled, and finished for burning. Container candles stay inside a heat-suitable vessel, while pillar candles harden in a mold and stand on their own after release. Safe means controlled heat, suitable containers or molds, centered wicks, attended burning, and a finished candle that behaves correctly. The process stays focused on paraffin wax, container and pillar workflows, basic troubleshooting, and first-burn readiness.
Use this page as the paraffin workflow page; use separate wick charts, fragrance-load calculators, container guides, pillar guides, and troubleshooting pages when the question becomes exact sizing, percentage math, buying choice, or repeated defect diagnosis.
What Paraffin Wax to Use
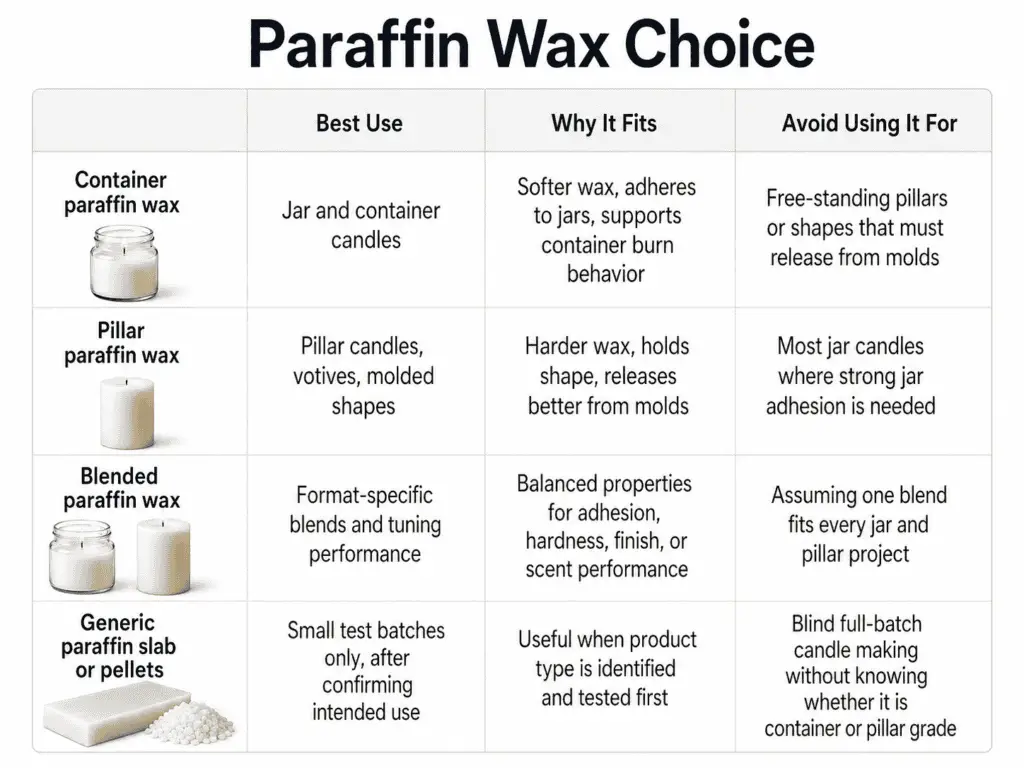
Use container paraffin wax for jars and pillar paraffin wax for molded freestanding candles.
Do not assume one paraffin wax works equally well for both formats. Container paraffin is chosen for vessel behavior, while pillar paraffin is chosen for hardness, shrinkage, mold release, and freestanding shape.
Use container paraffin wax for jar candles and pillar paraffin wax for freestanding molded candles because each blend is made for a different structure, cooling behavior, and burn format. A wax that behaves well inside a vessel may be too soft for a pillar, while a pillar wax may shrink or pull away more than you want in a container.
| Wax choice | Best use | Why it fits | Avoid using it for |
|---|---|---|---|
| Container paraffin wax | Jar candles and tins | It is made to stay inside a vessel and bond more cleanly to the container wall. | Freestanding pillars that must hold shape on their own. |
| Pillar paraffin wax | Molded pillars | It is made to harden, release from a mold, and stand without a container. | Jar candles where wall adhesion matters. |
| Blended paraffin wax | Format-specific recipes | It may include additives for adhesion, hardness, opacity, or release. | Any format not named by the supplier. |
| Generic paraffin slab or pellets | Testing small batches | It can work when matched to the right wick, format, and supplier directions. | Finished candles without a test burn. |
Do not turn the wax decision into a full paraffin vs soy candles debate here; the useful choice is whether the paraffin wax is made for a container or a pillar. Check the wax supplier’s directions before adding fragrance, dye, or additives, because each blend can have its own handling range. Once the wax format is clear, the next decision is whether the candle will stay in a vessel or come out of a mold.
Container vs Pillar Method
A container paraffin candle stays in its vessel, while a pillar paraffin candle is poured into a mold and released after cooling.
The difference is structural: a container candle depends on a heat-suitable vessel, while a pillar candle depends on wax hardness, mold release, and freestanding stability. Both formats use melted paraffin wax, a centered wick, controlled pouring, cooling, trimming, and a first-burn check.
| Step | Container candle lane | Pillar candle lane |
|---|---|---|
| Choose the format | Pick a heat-suitable jar, tin, or vessel. | Pick a mold that matches the pillar shape and release method. |
| Choose the wax | Use container paraffin wax. | Use pillar paraffin wax. |
| Set the wick | Secure the wick to the vessel base and center it. | Thread or secure the wick through the mold and seal leak points. |
| Pour | Pour into the container and keep the wick centered. | Pour into the mold and allow for shrinkage or top-off. |
| Cool | Let the candle cool in the vessel. | Let the candle cool fully before release. |
| Finish | Trim the wick and check the container, surface, and burn behavior. | Release the pillar, finish the base, trim the wick, and check stability. |

Keep jar-only depth inside a dedicated container candle guide when the question becomes only about vessel prep, jar adhesion, or container workflow details. Keep mold shopping, mold materials, and shape comparisons inside a pillar mold comparison guide instead of turning this process into a buying page. After the format is set, gather the workspace tools that support the lane you chose.
Workspace and Supplies
You need paraffin wax, a wick, container or mold, thermometer, scale, pouring pot, heat source, wick holder, protected surface, and optional fragrance, dye, and finishing tools.
For paraffin candles, each supply should match the chosen lane: container or pillar. Keep the setup built around safe heat handling, accurate weighing, clean pouring, wick control, and surface protection rather than brand choice.
| Supply | Container candle use | Pillar candle use | Why it matters |
|---|---|---|---|
| Paraffin wax | Container blend for jars or tins | Pillar blend for mold release and shape | The wax format controls structure and finish. |
| Wick | Secured to the container base | Threaded or secured through the mold | The wick sets the flame path and melt pool. |
| Container or mold | Heat-suitable vessel | Pillar mold with a sealed wick hole | The candle format depends on this choice. |
| Thermometer | Tracks melt and mixing stages | Tracks melt and pouring stages | Heat control reduces overheating and handling errors. |
| Scale | Weighs wax, fragrance, dye, and additives | Weighs wax, fragrance, dye, and additives | Weight is more repeatable than guessing by volume. |
| Pouring pot | Holds melted wax for controlled pouring | Holds melted wax for controlled pouring | A spout helps steady the pour. |
| Wick holder | Keeps the wick centered while cooling | Keeps the wick aligned through the mold | Centering prevents an uneven burn path. |
| Protected surface | Catches drips and heat transfer | Catches drips, leaks, and mold overflow | Work surfaces need protection from wax and heat. |
| Optional fragrance or dye | Added only if compatible | Added only if compatible | Additions can change burn behavior and appearance. |
Check supplier safety data sheets for wax, fragrance oil, dye, and additives before heating or mixing them. Keep the full candle-making supplies guide for a complete shopping list, not for deciding the basic workflow here. Save a wax melter buying guide for equipment selection once the first small batch needs better heat control.
Estimate Wax Needed
Estimate wax from the jar or mold capacity, then add a small reserve for shrinkage, transfer loss, and top-off.
For paraffin candles, the beginner estimate starts with the container or mold capacity, not with a full batch calculator. This keeps the math simple for one candle or one mold while leaving multi-container batch planning to a candle wax calculator.
| Step | Simple formula | Example placeholder |
|---|---|---|
| Find capacity | Fill the empty jar or mold with water, then measure that amount. | Capacity = measured fill amount |
| Convert to wax estimate | Use the measured capacity as the starting wax estimate. | Starting wax = capacity estimate |
| Add reserve | Add a small extra amount for transfer loss, shrinkage, and top-off. | Final wax to melt = starting wax + reserve |
| Record the result | Note the wax amount used and the cooled result. | Batch note = wax amount + finish result |
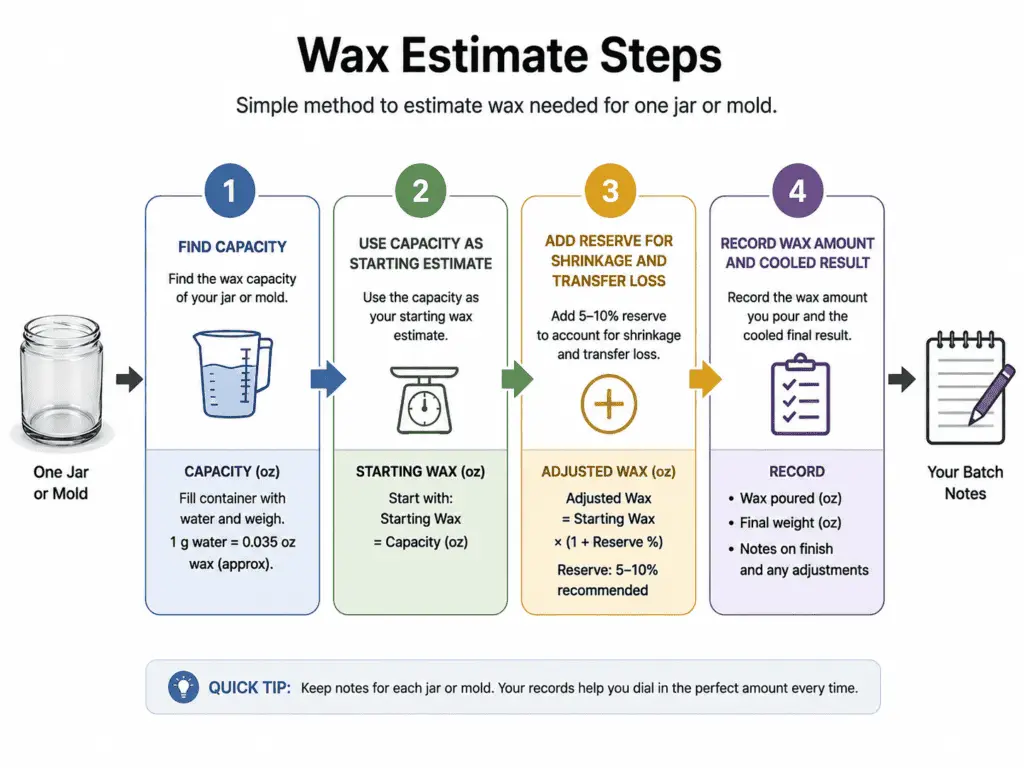
Use the same measuring method for the container or mold you plan to pour, because jar shape and pillar mold shape affect usable fill space. Do not scale this into several jars, fragrance percentages, dye math, or production planning inside this step. The next variable is wick fit, because the wax amount fills the form, but the wick controls how the candle burns.
Wick Selection
Choose a wick that fits the wax type, candle diameter, fragrance load, and format, then secure and center it before pouring.
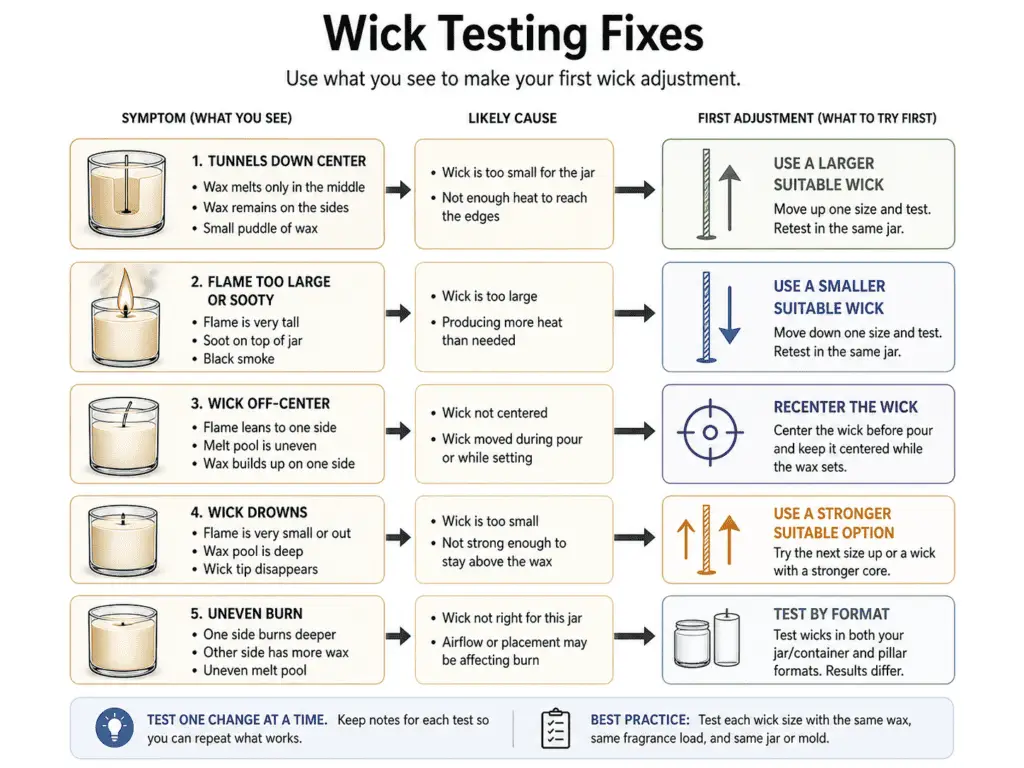
For paraffin candles, wick choice is a starting fit, not final proof that the candle burns correctly. Container and pillar candles can need different wick behavior because the wax pool, airflow, and candle shape are not the same.
| Wick issue during testing | Likely starting cause | First adjustment to try |
|---|---|---|
| The candle tunnels down the center. | The wick may be too small for the wax, diameter, or fragrance load. | Test the next larger suitable wick in the same wick family. |
| The flame is too large or sooty. | The wick may be too large or the candle may be overloaded. | Test a smaller suitable wick and check fragrance use. |
| The wick leans or moves off-center. | The wick was not secured or held straight while cooling. | Secure the base and use a wick holder during the pour. |
| The wick drowns in melted wax. | The wick may be too small, poorly matched, or bent into the melt pool. | Recenter the wick and test a stronger suitable option. |
| The candle burns unevenly. | The wick may be off-center or mismatched to the candle shape. | Recenter the wick and test by format, not by wax alone. |
Use a wick-size chart only when you need exact starting ranges for diameter, wax blend, and candle format. Use a burn test log to record the final result, because a wick that looks right before pouring can still burn too hot, too weak, or unevenly. After the wick is centered and secured, the next control point is how the paraffin wax is melted.
Melting Heat Control
Melt paraffin wax with controlled heat, monitor it with a thermometer, keep it attended, and avoid direct overheating or open-flame risk.
Safe melting means craft heat and fire handling, not medical safety, food safety, environmental safety, or legal certification. Follow the wax supplier’s directions and safety data sheet because paraffin blends can have different melting, mixing, and pouring instructions.
| Heat-control stage | What to do | Why it matters |
|---|---|---|
| Before heating | Use clean equipment, a protected surface, and a thermometer. | The setup reduces spills, guessing, and heat surprises. |
| During melting | Heat gradually and stir gently as the wax melts. | Gradual heating gives more control than rushing the melt. |
| While monitoring | Watch the thermometer and do not leave hot wax unattended. | Paraffin candle making needs active heat control. |
| Before additions | Add fragrance, dye, or additives only within supplier directions. | Additions can behave poorly if mixed at the wrong stage. |
| Before pouring | Check that the wick, container, or mold is ready. | Hot wax should not wait while the setup is unfinished. |
| After heating | Remove heat sources from the work area before finishing. | The pour area should stay controlled and uncluttered. |
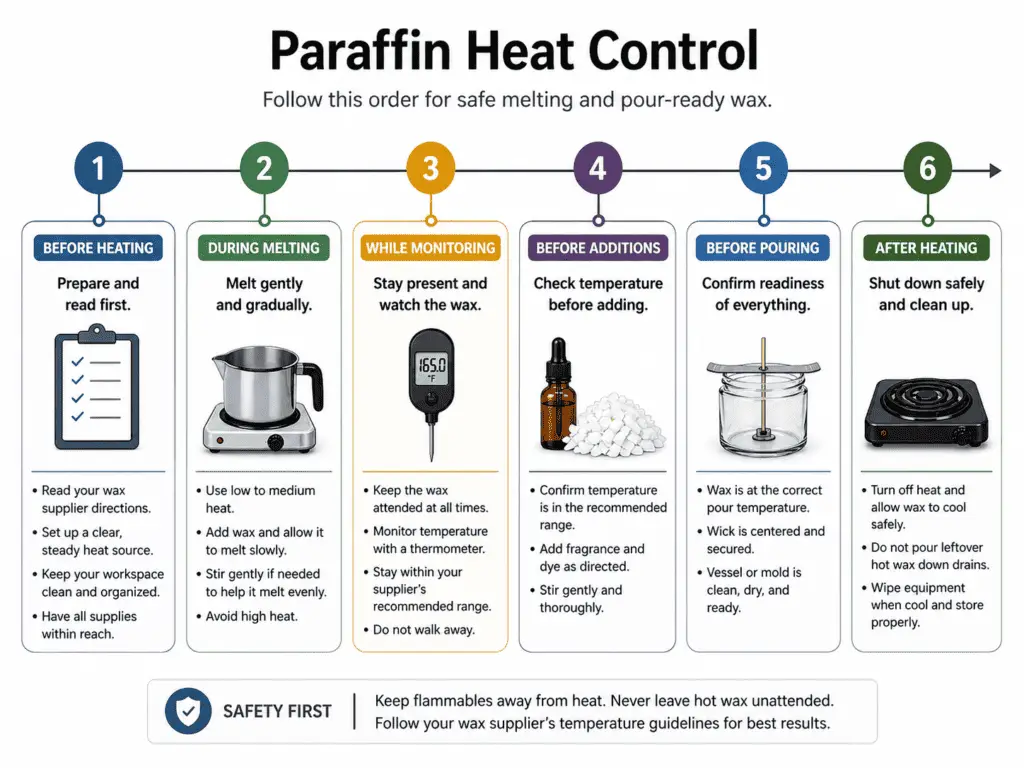
A double-boiler style setup or dedicated melter can help control heat, but the method still needs a thermometer and attention. Use a wax melter buying guide only when equipment choice becomes the main problem, not while learning the basic melting sequence. Once the paraffin is melted and controlled, decide whether fragrance or dye belongs in the batch.
Fragrance and Dye
Add compatible fragrance oil after paraffin wax is fully melted and within the supplier’s recommended mixing range, then stir evenly before pouring.
Use fragrance oil and dye only when the product is made for candle wax and matched to the paraffin blend. Do not guess the amount, because too much fragrance or dye can weaken burn quality, cause seepage, increase soot, or make the candle smell sharp instead of clean.
| Addition | When to add it | What to check | Warning signs |
|---|---|---|---|
| Fragrance oil | After the wax is fully melted and inside the supplier’s mixing range | Compatibility with paraffin wax and the chosen candle format | Oily surface, sweating, weak flame, soot, or poor scent throw |
| Liquid dye | After melting and before pouring | Candle-wax compatibility and color strength | Uneven color, speckling, or a wick that struggles |
| Dye chips or blocks | While the wax is hot enough to dissolve them evenly | Full melting before pouring | Color streaks or undissolved particles |
| No fragrance or dye | Any beginner test batch | Wick behavior, cooling, and wax finish without extra variables | Fewer variables to diagnose if the candle fails |
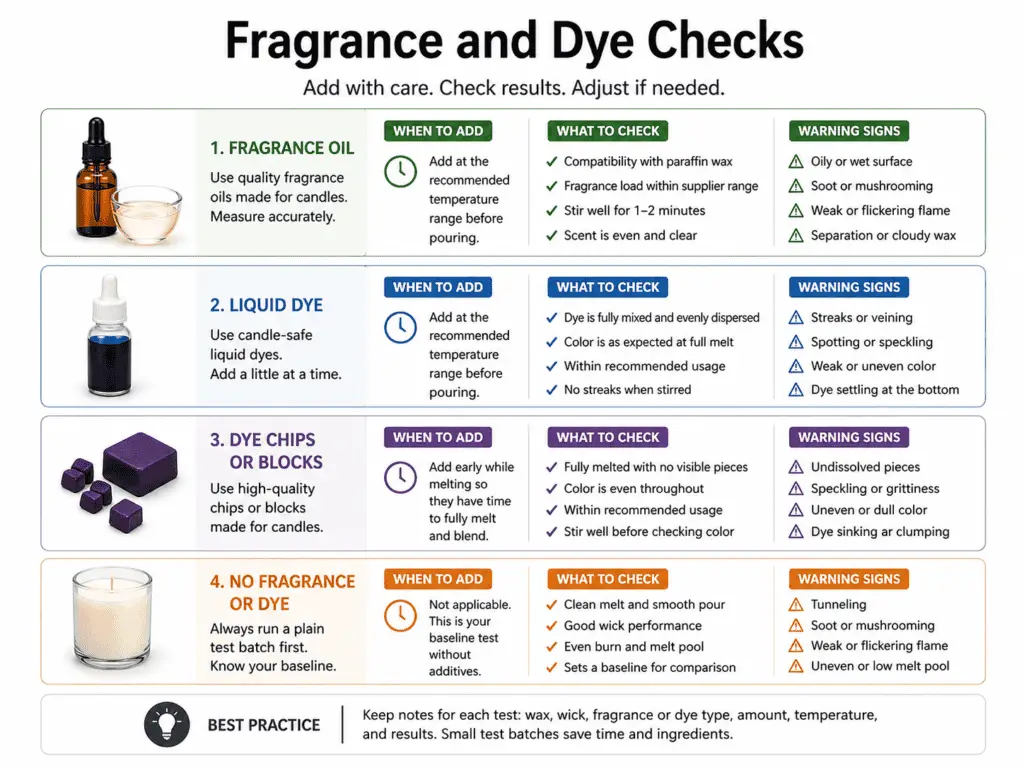
Use the supplier’s directions for mixing range, amount, and stirring time instead of a universal number. When the main question is exact percentage math, use a fragrance-load calculator instead of turning this paraffin workflow into a formula page. Once scent and color are controlled, decide whether the candle needs any additive at all.
Optional Additives
Additives are optional and should only be used when compatible with the wax, wick, fragrance, dye, and candle format.
For beginner paraffin candles, additives should solve a specific problem rather than make the recipe more complicated. A container candle may need different behavior than a pillar candle, so do not add hardeners, release aids, or color helpers unless the wax supplier says they fit the candle format.
| Additive type | Possible purpose | Use with caution when | Keep out when |
|---|---|---|---|
| Hardening additive | Helps a candle hold shape or resist softening | The candle is a pillar or molded format | The container wax already performs correctly |
| Mold-release aid | Helps a pillar release cleanly | The mold and wax call for it | The candle stays inside a jar or tin |
| Opacity or finish additive | Changes surface look or hardness | The finish problem is repeatable | The issue is actually poor cooling or pouring |
| Scent-support additive | Supports fragrance behavior in some blends | The supplier lists it for that wax | Fragrance amount has not been checked first |
| No additive | Keeps the test batch simple | You are learning the wax, wick, and pour behavior | You need a documented fix for a repeated defect |
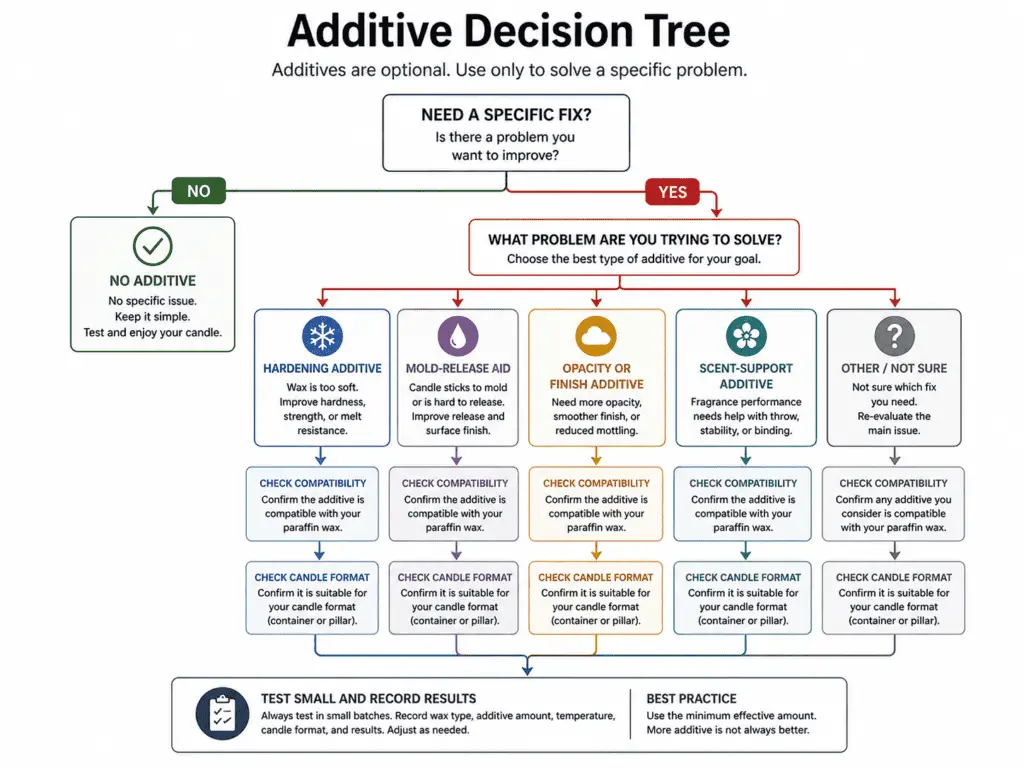
Use a fragrance-load calculator when the additive question is really about scent percentage, not wax behavior. Use a candle additive guide when you need deeper detail on additive types, compatibility, and side effects. After the optional materials are limited, the next step is turning the chosen wax, wick, fragrance, dye, and additives into a starting recipe.
Starting Recipe Fields
Starting recipe fields for a paraffin candle are the wax format, candle format, wick, fragrance, dye, additives, pour conditions, cooling result, and first-burn result.
This section sets the variables for a test recipe; exact fragrance percentage, dye amount, and multi-jar wax math belong in calculator or supplier-specific pages.
A beginner recipe should keep the variables visible: wax format, candle format, wick, fragrance, dye, additives, pour conditions, cooling result, and burn result. Treat supplier limits as the boundary for fragrance, dye, and additives, not as a place to invent one universal recipe.
| Recipe field | Starting entry | What to adjust after testing |
|---|---|---|
| Wax | Container paraffin for vessels or pillar paraffin for molds | Change only if the format or finish is wrong. |
| Wick | A wick matched to wax type, diameter, and format | Adjust after the first burn shows weak, hot, or uneven behavior. |
| Fragrance | Compatible candle fragrance within supplier directions | Adjust only after checking overload signs and burn behavior. |
| Dye | Candle-safe dye used sparingly | Adjust if color is weak, streaked, or affecting the wick. |
| Additives | None unless the wax or format needs one | Add only to solve a repeated issue. |
| Pour notes | Wax stage, room conditions, and format | Adjust if shrinkage, bubbles, cracks, or sinkholes appear. |
| Test result | Surface, wick trim, first burn, and defect notes | Use the result to guide the next small batch. |
Use a candle wax calculator when the problem is exact batch quantity across several jars or molds. Use a fragrance-load calculator when the problem is exact scent percentage, not the basic paraffin candle workflow. Once the starting recipe is logged, the pour determines whether the wax settles cleanly or needs correction.
Pouring
Pour paraffin candles steadily at the wax’s proper stage, keep the wick centered, allow for shrinkage, and top off sinkholes during cooling.
Use the wax supplier’s directions for pour timing because container paraffin and pillar paraffin do not need one universal pour temperature. The practical goal is a controlled pour, centered wick, clean fill line, and enough room to correct shrinkage as the candle cools.
Paraffin often shrinks as it cools, so a small sinkhole, top-off, or second pour can be part of the normal workflow, especially for pillars.
| Pour symptom | Likely cause | First correction |
|---|---|---|
| Sinkhole near the wick | Wax shrank as it cooled. | Let the candle cool enough to reveal the dip, then top off with compatible melted wax. |
| Wick moved off-center | The wick was not held firmly during pouring or cooling. | Recenter and secure the wick before the wax sets. |
| Surface has bubbles | Air entered during stirring, pouring, or mold handling. | Pour more steadily and avoid aggressive stirring before filling. |
| Cracks appeared | Cooling was uneven or too fast for the wax and format. | Cool in a stable, draft-free area and record the conditions. |
| Wax leaked from a mold | The wick hole or mold seam was not sealed well. | Stop and fix mold sealing before pouring the next batch. |
| Jar wall looks uneven | The container, wax, or cooling condition did not settle cleanly. | Record the jar, wax, and cooling setup before adjusting the next test. |
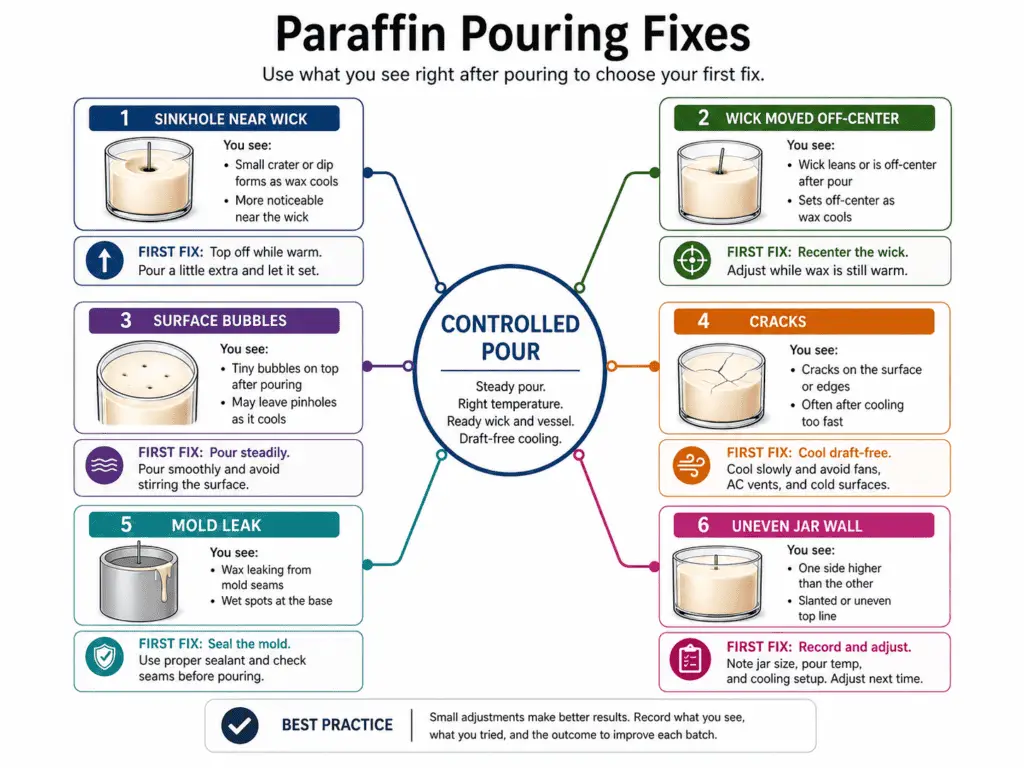
Keep deep defect diagnosis inside a candle troubleshooting guide when the candle has repeated soot, tunneling, sweating, cracking, or burn problems. For the current batch, record what happened, correct only the visible pour issue, and avoid changing the wax, wick, fragrance, and cooling conditions all at once. After the pour is controlled, the next step is the container-only lane.
Container Candle Steps
Prepare a candle-safe container, secure the wick, melt paraffin, add optional fragrance or dye, pour into the vessel, cool, trim, and check before the first burn.
A paraffin container candle is built to stay inside its vessel, so this lane depends on container suitability, wick centering, controlled melting, steady pouring, and finished burn behavior. Keep the jar workflow separate from pillar steps because a container candle does not need mold sealing, unmolding, or freestanding shape strength.
- Choose a candle-safe container that is stable, undamaged, clean, dry, and suited to candle heat.
- Secure the wick tab to the center of the container base.
- Hold the wick upright with a wick holder, skewer, or centering bar.
- Melt container paraffin wax with controlled heat and a thermometer.
- Add compatible fragrance or dye only if the wax supplier allows it.
- Pour steadily into the vessel without knocking the wick off-center.
- Let the candle cool in place until the wax sets.
- Correct shrinkage or a small sinkhole with a careful top-off if needed.
- Trim the wick after the candle has cooled.
- Check the vessel, surface, wick position, and first-burn behavior before regular use.
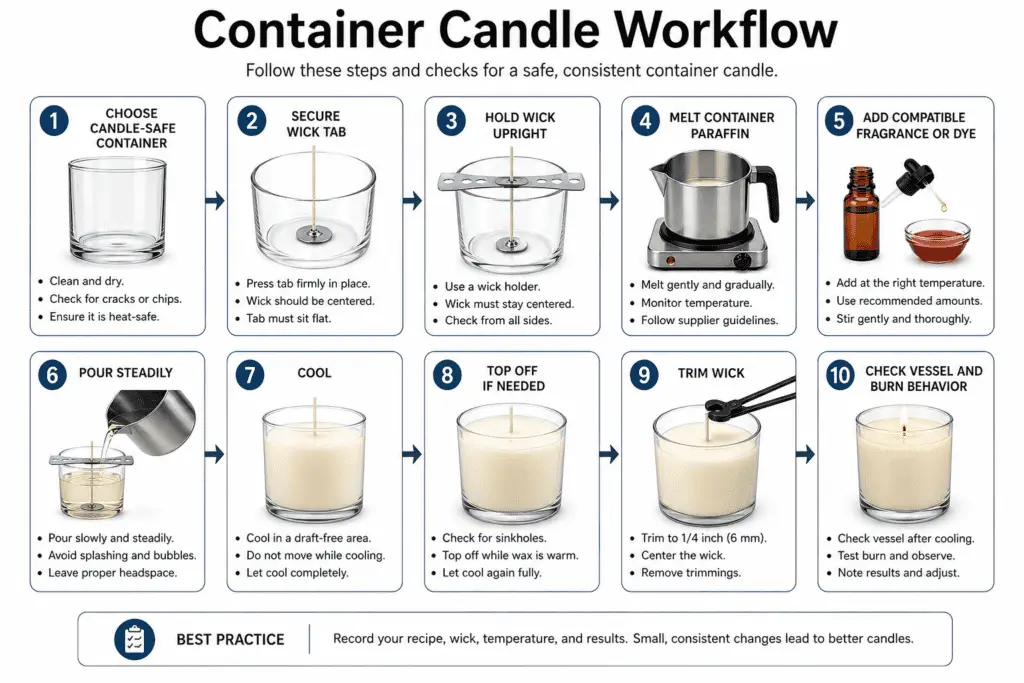
Use a dedicated container candle guide when the project needs jar-only detail such as vessel prep, adhesion, jar finish, or repeated container-specific defects. For this paraffin workflow, the container lane should stay compact enough to show what changes from pillar making without becoming a separate jar-candle article. Before pouring any container candle, the vessel itself needs a safety check.
Candle-Safe Container
A candle-safe container must be suitable for candle heat, stable, undamaged, compatible with the wick and wax, and not assumed safe because it is decorative glass.
Safe container means practical burn suitability for a homemade paraffin candle, not legal certification, food safety, medical safety, or an environmental claim. Decorative jars, thin glass, cracked vessels, unknown ceramics, and containers with unstable bases should not be treated as safe just because they look strong.
| Container check | Better sign | Risk sign | What to do |
|---|---|---|---|
| Heat suitability | Made or sold for candle use | Decorative glass with no candle-use basis | Do not pour until suitability is confirmed. |
| Condition | No chips, cracks, scratches, or weak spots | Visible damage or stress marks | Reject the container for candles. |
| Stability | Flat, balanced base | Wobbly, narrow, or top-heavy shape | Choose a more stable vessel. |
| Size and wick fit | Wick can sit centered with enough side clearance | Wick sits too close to the wall | Rework the wick plan or use another container. |
| Material behavior | Consistent wall thickness and heat-tolerant use | Thin, uneven, painted, glued, or unknown material | Avoid using it for a burning candle. |
| Fill plan | Wax line leaves room at the top | Overfilled vessel or wick holder crowding | Lower the fill level before pouring. |
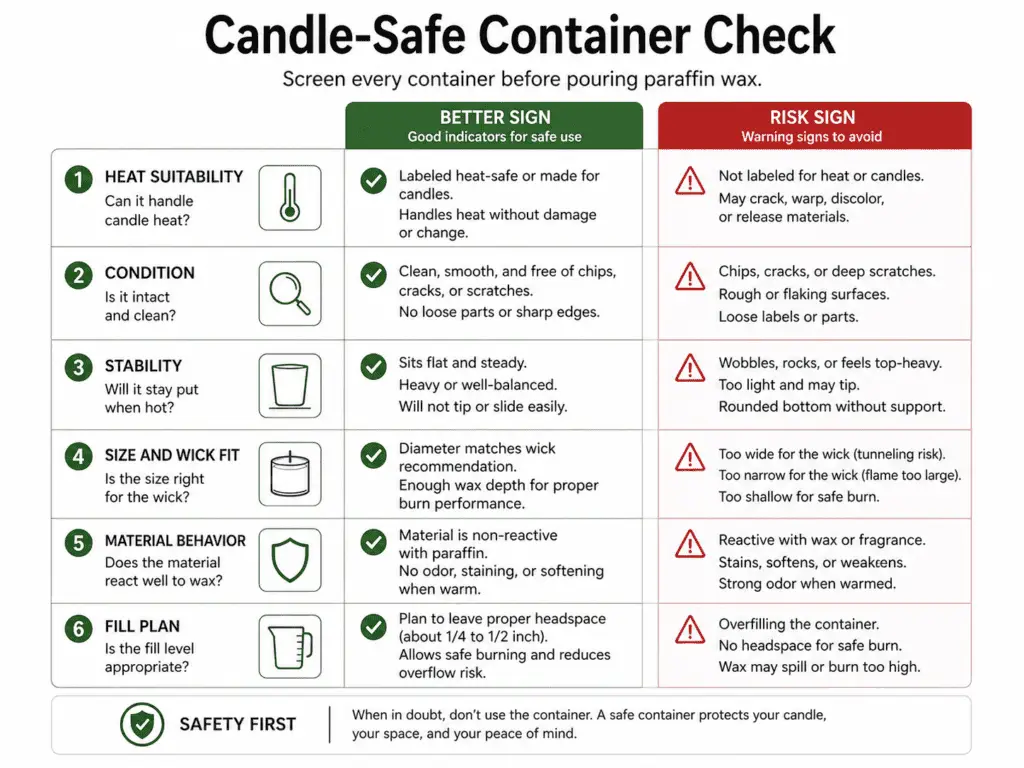
Use a candle jar safety testing guide for deeper jar validation, stress testing, and repeatable container checks. Keep warning labels and selling rules out of this step unless the candle is being made for sale, because the job here is choosing a vessel that can handle the paraffin candle workflow. Once the container lane is clear, the next format is the pillar candle lane.
Pillar Candle Steps
Prepare and seal the mold, secure the wick, melt paraffin, add optional fragrance or dye, pour, cool fully, release, finish, trim, and check.
A paraffin pillar candle is made to stand without a container, so the mold, wick path, wax hardness, cooling, and release steps matter more than jar adhesion. Keep this lane separate from container candles because the pillar has to hold its shape after unmolding.
- Choose pillar paraffin wax that is made for molded freestanding candles.
- Check that the mold is clean, dry, stable, and suited to the candle shape.
- Thread or place the wick through the mold according to the mold design.
- Seal the wick hole or seam if the mold needs leak protection.
- Hold the wick centered and straight before heating the wax.
- Melt paraffin with controlled heat and follow the wax supplier’s directions.
- Add compatible fragrance or dye only if the wax allows it.
- Pour steadily into the prepared mold without disturbing the wick.
- Let the pillar cool fully before trying to release it.
- Remove the candle, level or finish the base if needed, trim the wick, and check stability before burning.
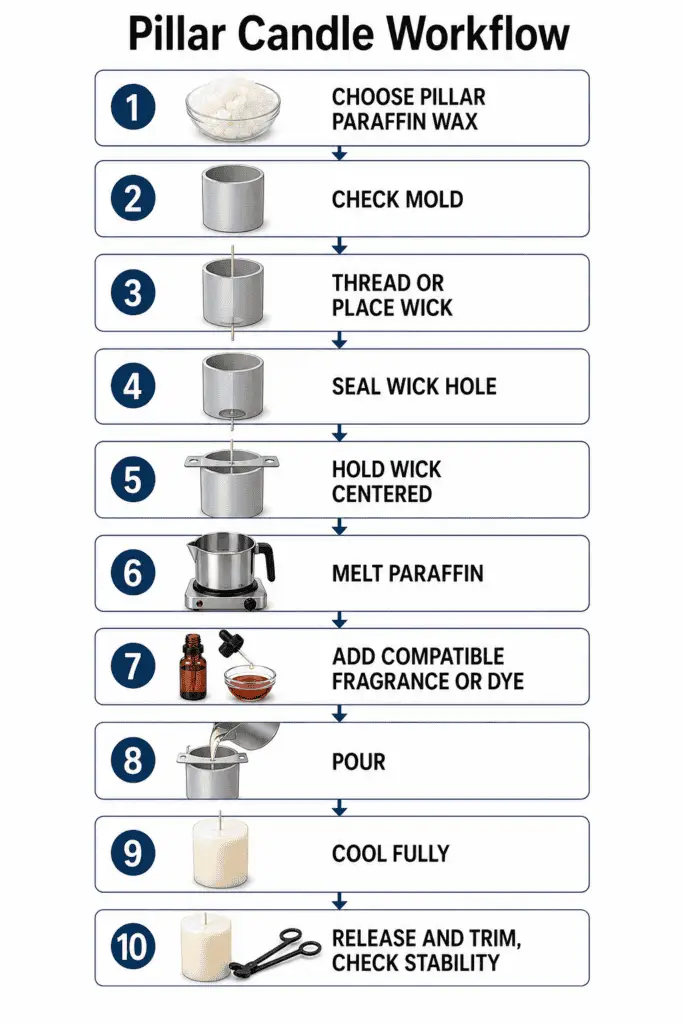
Use a dedicated pillar candle guide when the project needs deeper pillar-only detail, but keep mold shopping, carved candle art, and decorative shaping outside this basic paraffin workflow. Before wax goes into the mold, the mold setup has to prevent leaks, wick drift, and release problems.
Pillar Mold Prep
Prepare the mold by checking it, sealing it if needed, setting the wick, planning release, and preventing leaks before pouring paraffin wax.
Good mold prep is a prevention step, not a buying comparison. The goal is to make the mold hold hot paraffin, keep the wick aligned, release the cooled pillar, and avoid defects caused by leaks or poor setup.
| Mold-prep problem | Likely cause | Fix before pouring |
|---|---|---|
| Wax leaks from the bottom. | The wick hole, plug, or seam is not sealed. | Seal the opening and test the fit before heating wax. |
| Wick sits off-center. | The wick was threaded loosely or not held straight. | Tighten and center the wick before the pour. |
| Pillar sticks in the mold. | The mold was not prepared for release or the candle was unmolded too early. | Follow the mold supplier’s release directions and let the candle cool fully. |
| Base sets unevenly. | The mold was tilted or sitting on an unstable surface. | Place the mold on a flat, protected work surface. |
| Surface marks appear after release. | The mold was dirty, scratched, damp, or handled roughly. | Clean and dry the mold before setup and release the pillar gently. |
| Shape looks distorted. | The mold was moved, squeezed, or released before the wax was firm. | Leave the mold still until the pillar is fully set. |
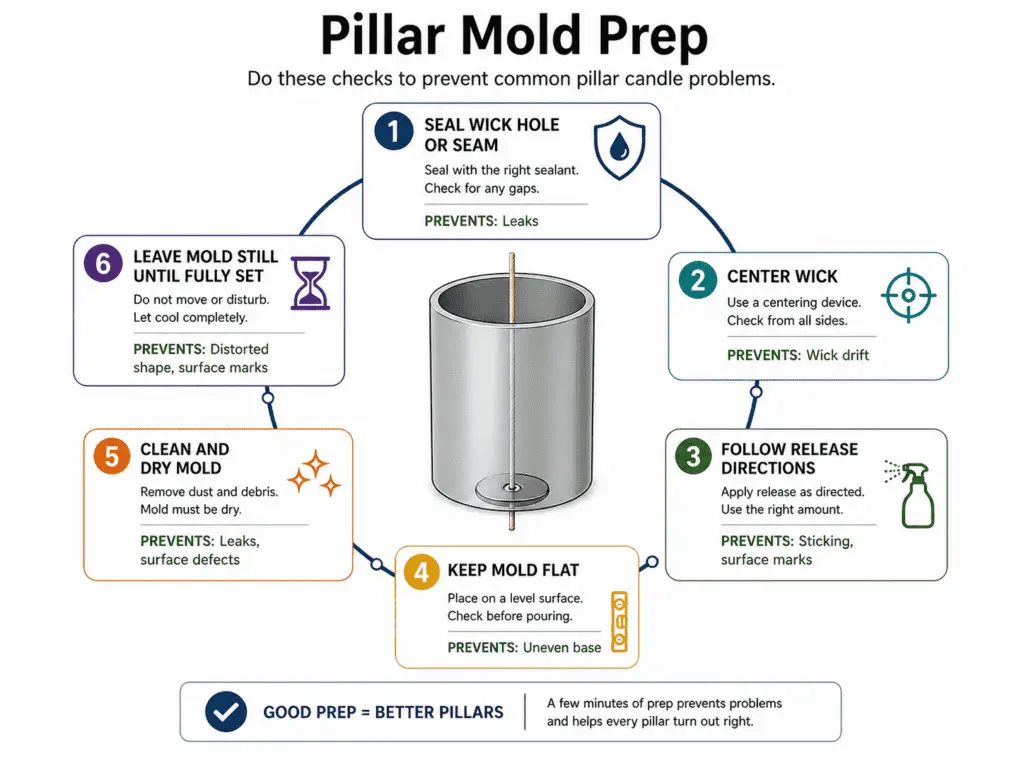
Use a pillar mold comparison guide when the real question is mold material, shape, size, or buying choice. For the current candle, focus on leak control, wick alignment, release readiness, and a stable cooling position. Once the pillar or container candle has been poured, cooling and finishing decide whether it is ready to trim and test.
Cooling and Finishing
Let the candle cool fully, correct shrinkage if needed, finish the surface or mold release, trim the wick, and check stability before burning.
Cooling is the stage where paraffin hardens in the container or mold; resting is the extra time before handling or burning; burn readiness is the final check before flame. A candle can look finished on the surface before the center, base, or mold release is ready.
| Finish-readiness check | Container candle | Pillar candle | Ready sign | Stop sign |
|---|---|---|---|---|
| Cooling | Let the jar stay still until the wax sets. | Let the mold stay still until the pillar firms through. | Wax is firm and not shifting. | Soft center, denting, cracking, or sloshing. |
| Shrinkage | Top off a sinkhole if needed. | Top off or repair shrinkage if the mold design needs it. | Surface or fill line looks settled. | Deep dip, open cavity, or exposed wick gap. |
| Release | Leave the candle in the vessel. | Release only after the pillar is firm enough. | Pillar slides out without force or damage. | Sticking, tearing, bending, or surface damage. |
| Wick trim | Trim after the wax is fully set. | Trim after release and base finishing. | Wick is upright and centered. | Wick is buried, loose, bent, or off-center. |
| Stability | Check the vessel base and fill. | Check the pillar base and balance. | Candle sits flat and steady. | Wobble, lean, crack, or unstable base. |
| Burn readiness | Move to a supervised first burn only after checks pass. | Move to a supervised first burn only after checks pass. | Candle is cool, stable, trimmed, and clean. | Heat, movement, damage, or uncertain wick position. |

Use a candle care guide for ongoing storage, trimming habits, and later burn maintenance, not for replacing the first finish check. For this paraffin workflow, the finish step is complete only when the candle is cool, stable, trimmed, and visibly free from defects that would affect the first burn. The next check is the first supervised burn.
First Burn
A homemade paraffin candle is burn-ready only after it is cooled, stable, trimmed, checked for vessel or pillar stability, and burned under supervision.
Safe here means finished-candle burn safety: stable placement, clear surroundings, suitable container or pillar condition, controlled flame behavior, and active supervision. It does not mean medical safety, environmental safety, food safety, or legal labeling compliance.
| First-burn check | Do this before lighting | Stop if you see this |
|---|---|---|
| Candle temperature | Confirm the candle is fully cooled. | Wax is still warm, soft, or shifting. |
| Wick position | Check that the wick is centered and upright. | Wick leans toward the wall or side of the pillar. |
| Wick trim | Trim the wick before lighting. | Wick is long, frayed, buried, or loose. |
| Container or pillar stability | Place the candle on a stable, heat-resistant surface. | Jar is cracked, pillar wobbles, or base is uneven. |
| Burn area | Keep the candle away from drafts, clutter, and flammable items. | Flame could reach nearby material. |
| Supervision | Stay present during the test burn. | You cannot watch the candle. |
| Early flame behavior | Watch for steady flame, reasonable melt pool, and no sudden soot. | Large flame, heavy soot, cracking glass, leaking wax, or pillar wall failure. |
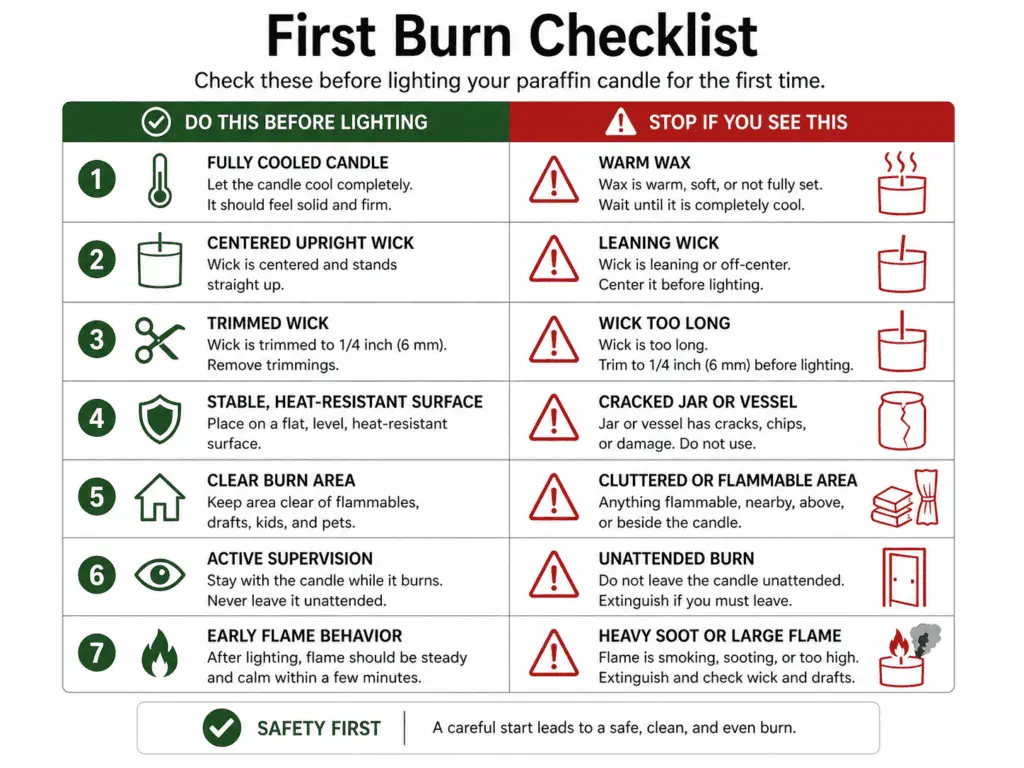
Use a burn test log to record wick behavior, melt pool shape, flame size, soot, scent behavior, and any defect from the first burn. Use a candle warning label guide only when the project moves toward gifting, selling, or formal warning-language decisions; do not treat labeling as proof that an unsafe candle is safe to burn. After the first burn, diagnose visible defects before changing the whole recipe.
Quick Troubleshooting
Most paraffin candle defects come from wax format, heat control, pour technique, cooling speed, wick setup, or container and mold handling.
Fix one variable at a time so the next batch shows what changed. A container candle defect often points to vessel, adhesion, wick, or cooling issues, while a pillar defect often points to mold prep, wax hardness, release, or cooling conditions.
| Defect | Likely cause | First fix to try |
|---|---|---|
| Sinkhole near the wick | Paraffin shrank as it cooled. | Top off after the dip appears and record the cooling result. |
| Bubbles in the wax | Air entered during stirring, pouring, or mold handling. | Stir gently, pour steadily, and avoid moving the candle while it sets. |
| Cracks on the surface | Cooling was uneven or too fast for the wax and format. | Cool in a stable, draft-free area and change only the cooling setup next time. |
| Frosty or cloudy look | Wax blend, cooling speed, or additives affected the finish. | Check wax compatibility and simplify fragrance, dye, or additive use. |
| Weak flame | Wick may be too small, off-center, or overloaded by fragrance or dye. | Recenter the wick and test a suitable wick adjustment. |
| Large flame or soot | Wick may be too large or the candle may be overloaded. | Test a smaller suitable wick and check fragrance amount. |
| Pillar sticks in the mold | Candle was unmolded too early or mold prep was poor. | Let it cool fully and improve release prep before the next pour. |
| Jar wall looks uneven | Container, pour stage, or cooling condition did not settle cleanly. | Record the jar, wax, and cooling setup before changing the recipe. |

Common beginner questions usually sound like this:
- “Why did my candle sink in the middle?” It likely shrank during cooling, so top off carefully and use a candle troubleshooting guide if it repeats.
- “Why are there bubbles in my paraffin candle?” Air likely entered during stirring, pouring, or mold movement, so use steadier handling and route repeated defects to a candle troubleshooting guide.
- “Why did my pillar crack?” The wax may have cooled unevenly or too quickly, so keep the mold still and use a candle troubleshooting guide if cracking repeats.
Use a candle troubleshooting guide when the defect repeats after one clean adjustment or when soot, tunneling, sweating, cracking, or mold failure needs deeper diagnosis. For this paraffin workflow, the goal is to identify the likely variable without turning every defect into a separate recipe change.
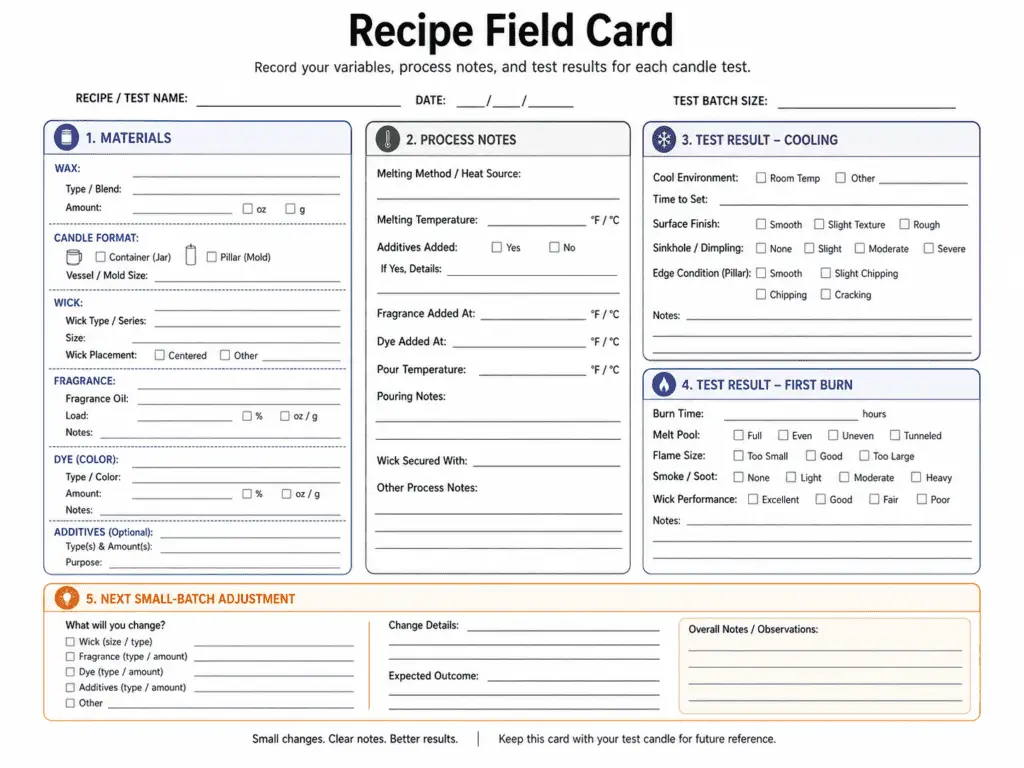
Batch Notes
Record wax, wick, fragrance, dye, additives, temperatures, pour conditions, cooling results, first-burn behavior, defects, and next adjustment.
Batch notes make paraffin candle testing repeatable because they connect each visible problem to the wax, wick, vessel or mold, pour, cooling, and burn result. Without notes, a good candle becomes hard to repeat and a failed candle becomes hard to fix.
| Batch note field | What to record | Why it helps |
|---|---|---|
| Candle format | Container or pillar | Separates jar issues from mold and release issues. |
| Wax | Brand or blend name, container or pillar type, and supplier directions used | Shows whether the wax matched the format. |
| Vessel or mold | Jar, tin, or mold size and material notes | Connects defects to container or mold behavior. |
| Wick | Wick series, size, tab, and centering method | Links flame behavior to wick setup. |
| Fragrance | Fragrance name and amount used | Helps diagnose weak flame, sweating, soot, or scent problems. |
| Dye | Dye type and amount used | Helps diagnose color streaks, specks, or wick issues. |
| Additives | Additive type and reason for use | Shows whether the additive solved or caused a problem. |
| Heat and pour notes | Melting stage, mixing stage, pour stage, and supplier limits followed | Helps avoid guessing about heat handling. |
| Cooling notes | Room condition, movement, sinkholes, cracks, bubbles, or release result | Connects finish defects to cooling behavior. |
| First burn | Wick trim, flame size, melt pool shape, soot, and stability | Confirms whether the candle is usable or needs adjustment. |
| Next adjustment | One planned change for the next batch | Prevents changing too many variables at once. |
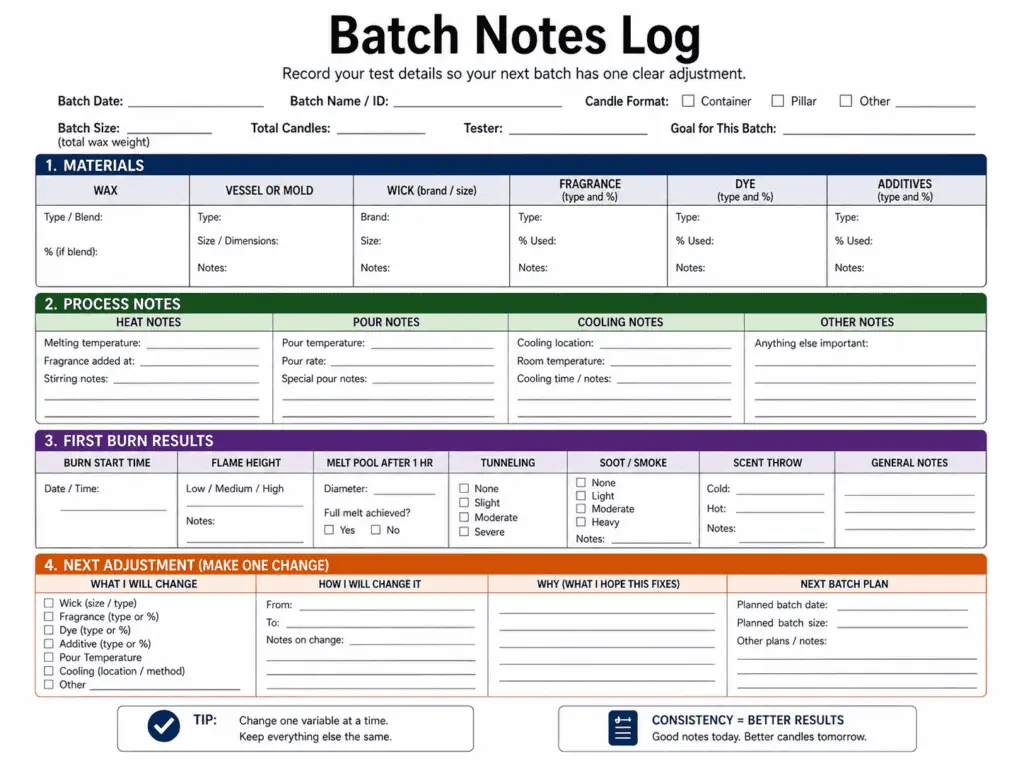
Use a burn test log when the main question is flame behavior, melt pool shape, soot, tunneling, or wick validation. Use a candle troubleshooting guide when the notes show the same defect across more than one batch. Keep the log practical: one batch, one visible result, and one next change.
Final Supply Check
Workflow-safe supplies for paraffin candles are the items that support measuring, melting, wicking, pouring, cooling, finishing, and checking the first burn.
- Use container paraffin for jars or tins and pillar paraffin for freestanding molded candles.
- Use a wick plan that matches the wax, candle diameter, and format.
- Use a heat-suitable container or a clean, stable, sealed mold.
- Use a thermometer, scale, controlled heat setup, pouring pot, and protected work surface.
- Use wick holders to keep the wick centered while the paraffin cools.
- Use fragrance, dye, and additives only when they are compatible with the wax and supplier directions.
- Use finishing tools and batch notes only after the candle is cool, stable, trimmed, and ready for a first-burn check.
Keep full shopping depth in a candle-making supplies guide so this paraffin workflow stays focused on making the candle, not ranking brands. Put jar-specific buying choices in a candle jars buying guide, mold material decisions in a pillar mold comparison guide, and equipment upgrades in a wax melter buying guide. A good final supply check should leave you with the correct wax format, a centered wick plan, a suitable container or mold, controlled heat, and a clear first-burn check.