
To sell candles legally, label each unit with product identity, net quantity, and responsible business contact, then add a separate fire-safety warning block for candle use and add CLP hazard elements only when the finished candle triggers EU/UK classification.
Small candle labels must carry a lot of information on very little space, and the rules look different depending on where the candle is sold. For broader context, see candle packaging. A missing net quantity line or contact address can trigger marketplace rejections, while weak burn-safety wording can raise real burn and fire risks. The fastest way to get it right is to separate “always required on-pack” items from “required only when a regulation or hazard classification applies.” When a candle ships across borders, check the target market’s labeling law and the fragrance supplier’s safety data before printing a big run.
What Required Fields Must a Candle Label Include?
A candle label needs four core elements: product identity, a responsible party line, a net quantity statement, and clear fire-safety warnings/instructions. For the main guide, see candle making.
As a practical checklist, this separates the baseline on-pack fields from the candle-safety layer so you can keep the must-have text visible even when your design space is tight.
Minimum required fields (the “baseline set”)
- Product identity / statement of identity: a clear label that tells the buyer what the product is, not only the fragrance or collection name.
- Responsible party: who made it or who’s selling/distributing it, plus a traceable address.
- Net quantity: what the customer is actually buying (the contents, not the jar).
- Safety warnings & burning instructions: the standard candle fire-safety messaging (commonly aligned with ASTM F2058).
What counts as the product identity / statement of identity?
Product identity is the plain product name or function, such as “scented soy candle,” “beeswax pillar candle,” or “candle tin.” A fragrance name like “Sea Salt & Orchid” can appear on the label, but it should not be the only text telling the buyer what the product is.
Example label snapshot (what “compliant minimal” looks like)
- Front panel shows the scent/name and the net contents in a clear line.
- Side or back panel shows “Manufactured for/Distributed by …” with city/state (and country if relevant).
- A dedicated warning area uses a consistent block that specifies safety warnings without being crammed into decorative text.
Where those fields should live (PDP vs adjacent panel)
| Field | Best placement |
| Net quantity | On the principal display panel (or right next to it) so it’s hard to miss |
| Responsible party | Back/side panel is common, as long as it’s readable and complete |
| Safety warnings | Back/side panel, or bottom label if it’s still easy to find and read |
If you’re working with tins or very small jars, inserts and QR pages can add extra detail—but they shouldn’t replace the on-pack minimums. Your net contents line is also where many sellers get tripped up, so use a consistent pattern that formats net statements the same way across every size and scent.
Those baseline fields belong on every sellable unit for this page’s purpose. EU/UK CLP elements are conditional and come in later only when the finished candle’s classification or sensitiser wording triggers them.
How to Add Fire-Safety Warnings & Icons (ASTM Three-Rule Block)
Use a dedicated warning block that communicates the three core candle rules, and make it readable at real viewing distance.
This is the candle-safety layer commonly aligned with ASTM F2058 practice; it sits alongside the primary label fields rather than replacing product identity, net quantity, or responsible party details.
Do candle safety warnings replace CLP hazard elements? No. They are separate layers, and one does not replace the other when both apply.
The three-rule warning message (plain-language core)
- Burn within sight.
- Keep away from things that catch fire.
- Keep away from children and pets.
Layout snapshot (what works on curved jars)
- Reserve a rectangular “quiet” area for the warning block (avoid heavy patterns behind it).
- Put icons and/or bold headers first, then the three rules as short lines.
- Follow ASTM F2058 as the go-to reference for common candle warning formats and icon usage; it also details ASTM icon set conventions people expect to see.
A simple sizing approach that avoids guesswork
| Label space | What to do |
| Tight (small tins, narrow side labels) | Use a compact block, prioritize contrast, and keep lines short |
| Medium (most jars) | Use icons + text, keep generous spacing, avoid wrapping mid-phrase |
| Large (wide jars, boxes) | Use a full block with icons and comfortable line spacing |
Before you approve artwork, print a 100% proof and read it at arm’s length under normal room lighting; if it strains your eyes, it will strain your customer’s too. Legibility guidance defines x-height thresholds for tiny text, so measure your proof and scale up before you commit to a full run.
How to Format the Responsible Party Line (Manufacturer/Importer Address)
Your candle label should name the brand owner or importer and give a traceable postal address on the package, rather than relying on a QR code alone.
That contact line ties to required fields because it’s what a retailer, regulator, or customer uses to identify who stands behind the product.
A practical rule is to treat the line as “recall-ready”: it should clearly identify the business and where it can be reached by mail. FPLA (Fair Packaging and Labeling Act) is the common US reference for including a name and place of business on consumer product packaging, and it’s why “website-only” contact details routinely fail checks.
Reliable format patterns that work across most candles
These patterns keep intent clear while letting you fit long legal names on small labels.
- “Manufactured for: Brand Name, City, ST, Country” (when a contract maker pours it, but the brand owns the product)
- “Distributed by: Brand Name, City, ST, Country” (when you’re the seller of record)
- “Imported by: Company Name, City, Region/Postal Code, Country” (when the importer is the responsible contact in-market)
Use a single, consistent pattern across SKUs so you don’t accidentally swap roles on different scents, and keep the words “Manufactured for” or “Distributed by” intact when they’re true. That wording clarifies manufactured for/distributed by in a way marketplaces and customs reviewers can quickly understand.
What “traceable” means on a tiny label
A traceable line usually contains:
- The business name that matches your invoices or registrations
- A locality (city + state/region) and country for cross-border sales
- A postal detail sufficient to receive official mail (street address or an acceptable mailing address, depending on your situation)
If privacy is a concern, many makers use a business mailing address, but avoid making the label depend on a QR link for the only contact path. The smallest improvement that prevents rejections is typography: keep the contact line in a clean font, avoid extreme letterspacing, and print-test it on the actual jar curve so it ensures address readability after shrink, heat, and handling.
Next, once the “who” line is locked, the “how much” line becomes easier to standardize across sizes and jars.
How to Measure & Declare Net vs Fill Weight (g/oz, ml)
To label net contents correctly, weigh the candle contents without the container (tare), then declare that amount as net weight in g and oz on the principal display panel.
This measurement ties to minimum set because it’s the fastest way to show shoppers (and regulators) what they’re actually buying, independent of jar size.
The clean equation is simple: net weight = gross weight − tare weight, where gross is the filled container and tare is the empty container plus any non-product components you exclude consistently (like a removable lid). NIST (National Institute of Standards and Technology) weights-and-measures guidance is the common reference for unit conventions and conversions, which is why most dual-unit lines pair grams and ounces rather than mixing weight with volume.
Step-by-step: tare, compute, and format a net statement
These steps reduce the two most common errors: accidentally using gross weight and accidentally switching units mid-SKU.
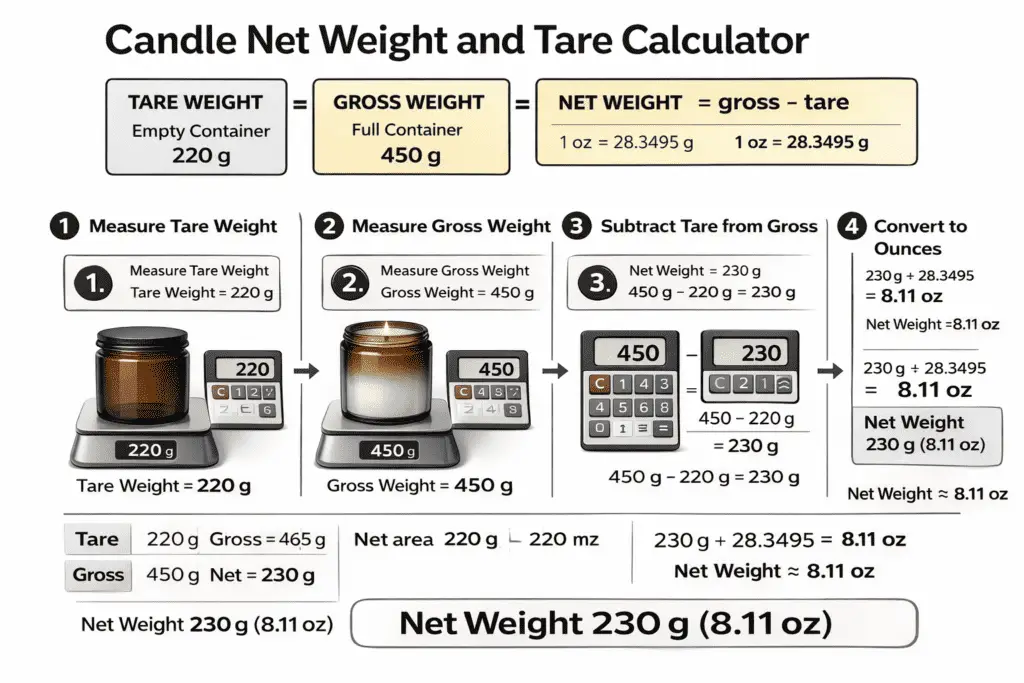
- Weigh one empty jar of the same type you’re filling and record the tare in grams.
- Fill, cool, and cap the candle the same way you sell it, then weigh the finished unit for gross weight in grams.
- Subtract tare from gross to get net weight in grams, then convert grams to ounces using 1 oz = 28.3495 g (NIST).
- Round and format your final display consistently across the line, then proof-print so the net contents line stays readable on the front.
A mini “net contents calculator” you can copy into a spreadsheet
These fields help you compute the label value consistently across batches and vessels, and the conversion step converts g↔oz correctly without guessing.
| Input/Output | What you enter or calculate | Example |
| Tare weight (g) | Empty container (and any excluded parts) | 220 g |
| Gross weight (g) | Filled, finished unit | 450 g |
| Net weight (g) | Gross − tare | 230 g |
| Net weight (oz) | Net g ÷ 28.3495 | 8.11 oz |
Method note: The example uses the standard ounce-to-gram relationship as defined in weights-and-measures references, and it assumes you record tare and gross on the same scale in the same unit. Your label number should reflect the net contents you intend to sell, not the maximum you can sometimes pour.
Net weight vs fill weight vs ml
Net weight is what belongs on most candle labels because wax is a solid sold by mass, while “fill weight” can be a maker’s internal target for pouring and doesn’t always match what’s in the finished unit. Use ml only when you are truly declaring volume for a product that’s sold as a liquid; candles are usually better kept in mass units to avoid confusion and disputes. When space is tight, the typography matters as much as the math, so choose placement and font size that keeps net readable on PDP even on dark labels or curved glass.
Next, once your net contents line is consistent, you can add traceability details like batch codes without crowding the design.
Steps to Implement Batch/Lot Codes for Traceability
Batch or lot codes can support traceability, but they are not part of the universal “what to put on every candle” field set.
Are batch/lot codes required on every candle? No. Use them when your production, recall, or retailer process needs unit-level traceability, but do not treat them as part of the baseline label set in the same way as product identity, net contents, responsible party details, or the candle-safety block.
How to Meet Label Legibility & Placement Rules (x-height, PDP)
Make candle labels readable by meeting minimum x-height, keeping strong contrast, and placing required fields on the principal display panel or an adjacent panel that stays visible on curved containers.
Treat legibility as a compliance and customer-safety issue: if someone can’t read net contents or warnings at arm’s length, the label fails its job.
Your layout inherits readability constraints from the warning block, so design net quantity, responsible party, and safety text as one consistent “readable system,” not separate decorative elements.
A practical proofing checklist for tiny labels
Use a print-first check that confirms required text is easy to find and easy to read on the real container before you approve a run.
- Print a 100% proof on the actual label stock and apply it to the real jar, tin, or box.
- Check that net quantity is visible on the principal display panel or right next to it.
- Check that the responsible party line is complete and still readable on curves, seams, and dark backgrounds.
- Keep the warning block in its own clear zone so patterns, foil, or glare do not swallow the text.
- If you use inserts or QR pages, confirm they add support without replacing the on-pack minimums.
Converting design sizes to print sizes (without guesswork)
- Set your file at print resolution (often 300 dpi), then convert pixels to millimeters before finalizing type size.
- Use line spacing around 120% for tiny text so lines don’t blur together on curved jars.
- Avoid metallic or high-gloss backgrounds behind required text, because glare can erase contrast at common viewing angles.
A simple cheat sheet that applies minimum sizes to each label width helps you standardize typography across 4 oz, 8 oz, and 12 oz jars without redesigning from scratch.
Placement rules that prevent “missing info” complaints
- Put net quantity on the PDP or an immediately adjacent panel that stays visible on shelf.
- Keep warnings in a dedicated block with clear contrast and no busy pattern behind it.
- Reserve space for the barcode so the layout avoids barcode-warning overlap—especially on small back labels where everything competes for the same rectangle.
US vs EU/UK Required Candle Labels: What Always Stays On-Pack vs What Depends on CLP
The main split is simple: every candle needs the baseline identity, net contents, and responsible business details, while EU/UK CLP hazard elements apply only when the finished candle’s classification or sensitiser wording triggers them.
Small-container limits can change how you present extra detail, but they do not erase the on-pack minimums that tell the buyer what the candle is, how much is inside, and who is responsible for it.
Candle fire-safety wording and CLP hazard elements are separate layers, so one does not replace the other when both apply.
Do all candles sold in the EU/UK need CLP?
No. CLP does not apply to every candle just because it is sold in the EU/UK. It comes in when the finished candle mixture is classified as hazardous or when the label must carry a sensitiser statement such as “Contains … May produce an allergic reaction.”
When is a sensitiser / allergen statement required?
When your supplier documents or your classification work show that the finished candle must carry a sensitiser statement, plan packaging space for it from the start. That is a conditional CLP-style obligation, not part of the universal baseline that belongs on every candle regardless of market.

EU/UK CLP: a quick decision ladder
Use this as an “IF X → do Y” check before you print labels for EU/UK sales.
- IF your finished candle (wax + fragrance + any additives) is not classified as hazardous, THEN CLP hazard pictograms/signal words/H-phrases/P-phrases usually do not apply to the unit—keep your standard identity, net contents, and burn-safety labeling consistent.
- IF your supplier documentation indicates the mixture is classified as hazardous (for human health, environment, or physical hazards), THEN the product must be packaged and labelled in accordance with CLP before it is placed on the market. For candles, that means the CLP label goes on packaging, not on the wax.
- IF you see a requirement such as “Contains (name of sensitising substance). May produce an allergic reaction,” THEN treat that as a CLP-triggered labeling obligation and plan packaging space for it.
- IF the candle is sold in an open container or format where a label can’t be firmly affixed to a “package,” THEN you need an actual package that qualifies as packaging (so the CLP label can be firmly affixed and easily read).
- IF the candle is classified as hazardous for consumer or professional use, THEN you may also need poison centre notification (PCN) and a UFI (Unique Formula Identifier) placed on the label, depending on the mixture and market rules.
US vs EU/UK: what usually stays on-pack vs what can move
| Label element | US (common small-label approach) | EU/UK (CLP-driven approach) |
| Product identity + business contact | Keep on the unit; shorten layout, don’t delete | Keep on the unit; importer/distributor clarity matters |
| Net contents | Keep on the unit, visible on the main display area | Keep on the unit, visible and readable |
| Candle fire-safety instructions | Keep on the unit; compress wording before removing meaning | Keep on the unit; don’t let CLP crowd out burn safety |
| Extra care text (storage, trimming detail, long FAQs) | Often moved to insert/box panel/QR | Often moved to insert/box panel/QR if permitted |
| Hazard elements (pictograms, signal word, H/P text) | Not typically required unless another rule triggers it | Required when classified; small-pack rules may affect sizing/presentation |
A simple decision flow for micro tins and tealights
- Start by writing the smallest label that still covers identity, net contents, and a readable safety block.
- If you’re dealing with micro formats, choose solutions that handles tealight/votive cases (like a base label plus an outer carton label) rather than shrinking everything until it’s illegible.
- If you sell in the EU/UK and the fragrance triggers classification, plan for CLP elements early; if space becomes the bottleneck, use a controlled “on-pack minimum + insert/box” layout instead of burying critical content in a QR page.
- If you sell in more than one language, reserve space up front for bilingual layout on micro-labels so you don’t end up with a last-minute, unreadable over-sticker.
Many small-batch brands keep a one-page “micro-label rule” worksheet per market (US vs EU/UK) so seasonal tins don’t drift into inconsistent layouts when designs change.
How to Label by Form Factor (Containers, Pillars, Tealights, Gel)
Form factor changes where required text can live, but it does not change the baseline fields themselves.
Container candles usually have enough room for net contents on the main display area and the warning block on a side or base panel; very small formats such as tealights, votives, or micro tins may need outer packaging or an additional label so the required identity, net contents, responsible party details, and safety text stay with the sellable product.
Use form factor as a placement exception check, not as a reason to drop required information.