Candle jar heat and burn safety means testing the exact container for cracking, overheating, leaks, and structural failure under defined pour, burn, cooldown, and observation conditions.
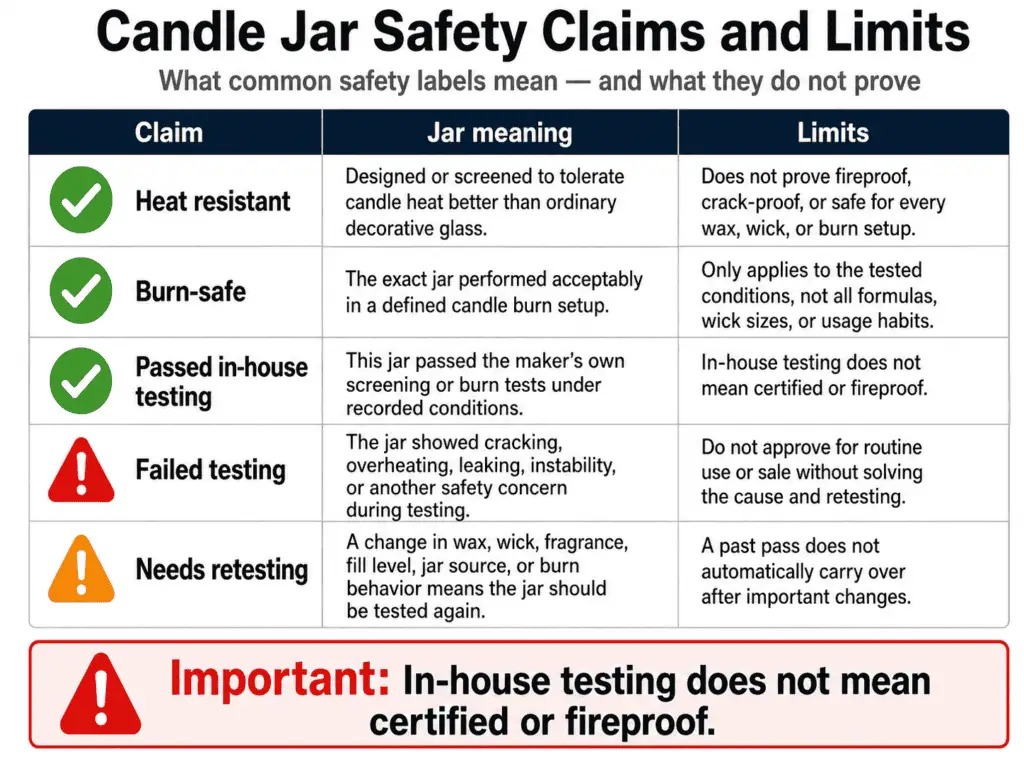
Candle jars are the containers being tested, not the full candle formula, wick choice, or scent performance. The goal is to qualify the exact jar under the heat, flame, burn-cycle, cooldown, and handling conditions it will face before routine use or sale. A jar that passes an in-house test is approved only for the tested setup and recorded conditions. This process supports safer rejection decisions, but it does not certify the jar, make it fireproof, or replace legal compliance review.
What “Heat and Burn Safety” Means for Candle Jars
A candle jar is heat- and burn-safe only when the exact container shows no jar-level failure under defined test conditions.
For candle jars, safe means suitable for the recorded pour, burn-cycle, flame, cooldown, and handling conditions, not fireproof, universally approved, or legally certified. The test qualifies the jar as a container, while wick performance, scent throw, wax behavior, and full candle quality stay separate.
| Claim | What it means for the jar | What it does not mean |
|---|---|---|
| Heat resistant | The jar tolerates the tested candle heat without cracking, leaking, or showing abnormal stress | The jar can handle every heat source or oven-like condition |
| Burn-safe | The jar remains stable during supervised candle burn cycles | The whole candle is certified or permanently risk-free |
| Passed in-house testing | The exact jar setup showed no jar-level failure under recorded conditions | The result applies to every jar, supplier batch, wax, wick, or fill level |
| Failed testing | The jar showed cracks, leaks, severe hot spots, fracture, or structural stress | The problem is automatically a wick, wax, or fragrance issue |
| Needs retesting | A meaningful variable changed, or the evidence is incomplete | The previous test should be stretched across untested conditions |
Use supplier documentation only for the exact jar model or batch it describes, then confirm the container through observation. If you need to choose candle jars designed for heat exposure, start with containers sold for candle use rather than decorative glass, food jars, or thin novelty vessels. A broader container page can help you compare candle jar materials, but the final approval still comes from testing the exact jar you plan to use.
Method note: This is an observational maker test, not a laboratory certification. It records what happened to one jar setup under defined conditions so you can accept, reject, or retest the container with less guessing.
Before any flame test can mean anything, the jar needs a close pre-test inspection for visible weak points.
Inspect the Jar Before Wax or Flame Exposure
Inspect rim, wall, base, seams, chips, scratches, bubbles, coating, supplier batch, and visible damage before wax or flame exposure.
The candle jar should enter testing clean, dry, undamaged, and identifiable by model or batch. Inspection happens before wax, flame, or heat because a damaged jar can fail for reasons unrelated to the burn test.
Use this checklist before filling or lighting the test candle:
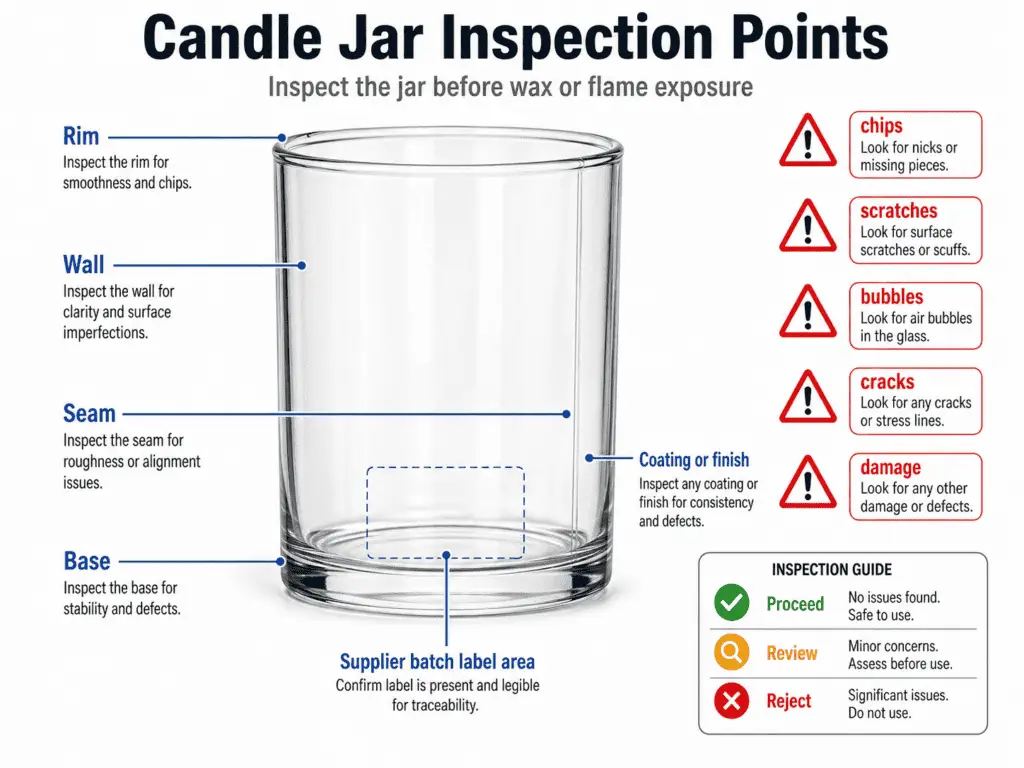
| Jar part | What to check | What the observation means |
|---|---|---|
| Rim | Chips, sharp edges, uneven finish, cracks | Reject if damage could spread under heat or handling |
| Wall | Scratches, thin spots, bubbles, cloudy stress marks | Review closely; reject if the wall looks weakened or inconsistent |
| Base | Uneven base, star cracks, impact marks, heavy mold seams | Reject if the base is unstable or visibly stressed |
| Seam | Raised seam, rough seam, crack starting at seam | Review or reject if the seam looks like a stress path |
| Coating or finish | Peeling paint, flaking coating, discoloration, unknown finish | Review intended use before heat exposure |
| Supplier batch | SKU, lot, packaging label, size, fill line, intended use notes | Record it so later results apply to the exact jar tested |
| Prior use or handling | Drops, storage damage, reused glass, residue, unknown history | Reject reused or damaged glass when its heat history is unclear |
A candle jar quality checklist helps separate structural safety concerns from cosmetic irregularities. A small cosmetic bubble in thick glass may only need review, but a crack at the base, rim chip, leaking seam, or unknown decorative coating should stop the test before wax or flame. When buying jars, choose heat-suitable candle jars with documented candle use, consistent batches, and enough physical quality control to make repeat testing meaningful.
Document each inspection with the jar part, observation, decision, and photo when possible. Keep the decision practical: proceed, review, reject, or retest with a fresh jar from the same batch.
Once the jar passes inspection, the next step is setting up a controlled test area where any heat or burn failure can be observed safely.
Set Up a Controlled Jar Test Area
Use a stable nonflammable surface, supervise the test, control drafts, keep spacing, remove flammables, use good lighting, and define stop conditions.
The test area should make candle jar failures easy to see while reducing injury and fire risk during heat exposure. A poor setup can hide the real cause of a jar problem because drafts, crowding, unstable surfaces, and poor visibility can change how heat reaches the jar.
Use this setup checklist before lighting the test candle:

| Setup item | What to do | Why it matters for jar testing |
|---|---|---|
| Surface | Place the jar on a level, heat-resistant, nonflammable surface | Keeps the base stable and makes leaks or cracks easier to see |
| Supervision | Stay in the room for the full test burn | Allows immediate shutdown if the jar cracks, leaks, pops, or overheats |
| Draft control | Keep the jar away from open windows, fans, vents, and door swings | Reduces flame movement that can create uneven wall heating |
| Spacing | Keep test jars separated from each other and from walls | Prevents shared heat and makes each jar’s behavior easier to judge |
| Flammable items | Remove paper, packaging, towels, curtains, and loose labels nearby | Keeps a jar failure from turning into a broader hazard |
| Lighting | Use enough light to inspect the rim, wall, base, wax line, and table surface | Makes hairline cracks, leaks, and discoloration easier to catch |
| Stop conditions | Decide in advance what ends the test | Prevents hesitation when the jar shows a clear failure sign |
Stop the test if the jar cracks, leaks, makes a popping sound, tips, shows severe localized heat, or behaves differently from the recorded baseline. The goal is not to prove that the whole candle is safe in every setting; it is to observe the candle jar as the tested container under controlled conditions.
Broader home fire rules belong in a candle safety and compliance overview, while formal candle safety requirements should not be treated as satisfied by an in-house jar setup. For this jar test, the setup is acceptable only when it keeps the container visible, stable, supervised, and isolated from preventable outside causes.
Once the test area is controlled, the next risk to reduce is sudden or uneven temperature change in the jar wall and base.
Reduce Thermal Shock Before and During Testing
Reduce thermal shock by avoiding sudden, uneven temperature changes during pouring, active burn cycles, cooldown, and handling.
Thermal shock means sudden temperature stress that affects the jar wall, base, or rim. It is different from impact damage because the jar is stressed by heat change rather than being struck, dropped, or chipped. A crack after heat exposure should be logged by stage so pour stress, burn stress, cooldown stress, and handling damage are not treated as the same problem.
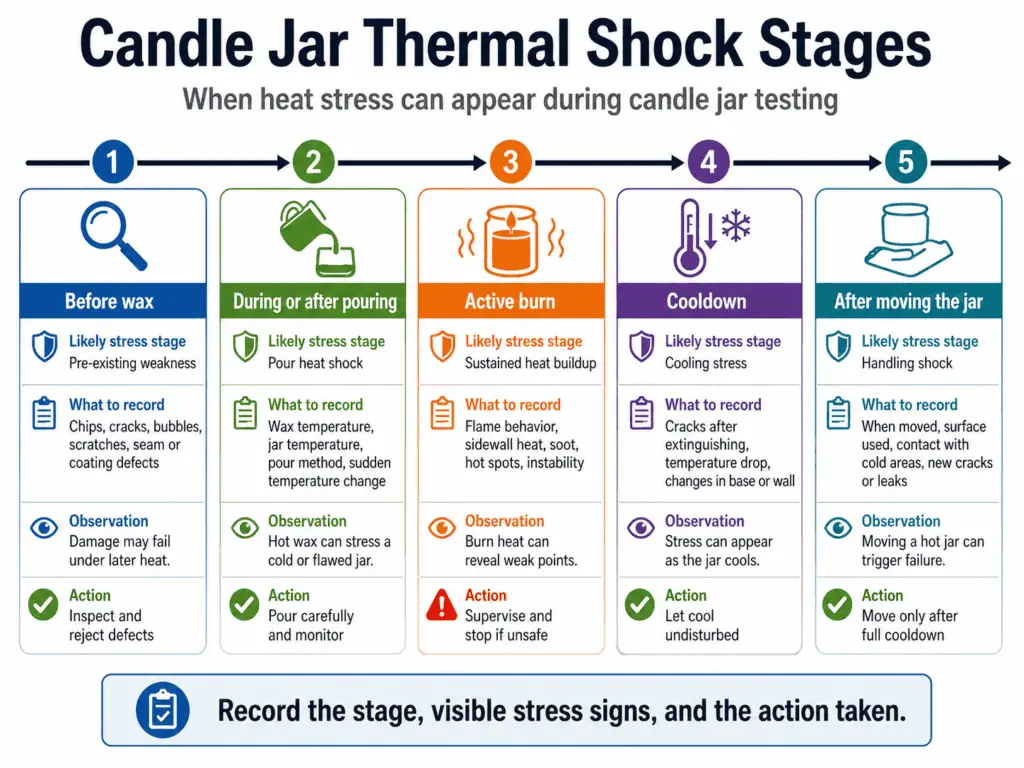
| When the crack appears | Likely jar stress stage | What to record | Action |
|---|---|---|---|
| Before wax is added | Pre-existing damage or handling impact | Rim, wall, base, seam, chip, scratch, or prior storage condition | Reject or replace the jar before testing |
| During or soon after pouring | Hot wax stressing a cold, thin, damaged, or unsuitable jar | Jar temperature feel, visible crack location, leak timing, and pour condition | Stop the test and do not proceed to burn cycles |
| During active burn | Uneven flame heat, wall hot spot, base stress, or weak jar structure | Burn time, flame position, crack location, sound, leak, and hot area | Stop, cool safely, and reject or investigate |
| During cooldown | Uneven cooling, cold surface contact, draft, or sudden environment change | Cooling location, airflow, surface material, crack timing, and base condition | Retest only with controlled cooling and a fresh jar |
| After moving the jar | Handling impact or weakened glass after heat exposure | Movement timing, contact point, visible damage, and whether the jar was still warm | Treat as failed evidence unless impact is clearly separate |
Method note: These observations support practical jar decisions, not glass-stress certification. The useful outcome is a clearer record of when the jar failed, what changed around it, and whether the same jar design should be rejected, retested, or investigated further.
If the crack pattern is unclear, use a failure log to diagnose why a candle jar cracked before blaming the wax, wick, or supplier. A deeper candle jar crack troubleshooting process can separate repeated base cracks, rim cracks, seam cracks, and leaks, but this jar-safety test should stay focused on whether the container remains suitable under the tested conditions.
Account for Hot Wax as a Pre-Burn Jar Stress
Hot wax can stress a cold, damaged, thin, or unsuitable jar before the first burn.
A candle jar that cracks or leaks after pouring should not move into flame testing, because the container has already shown heat-related failure. Hot wax belongs in this workflow only as jar stress; wax blend behavior, scent performance, and wax-specific pour ranges belong outside the jar qualification process.
| Pour-stage observation | What it suggests about the jar | Decision |
|---|---|---|
| Crack appears during or after filling | The jar may not tolerate the pour condition or had hidden weakness | Reject the jar for burn testing |
| Wax leaks from the base or seam | The jar structure or seal is not suitable for the tested setup | Reject and record the failure location |
| Popping sound occurs after pouring | The jar may be reacting to heat stress or existing damage | Stop and inspect after safe cooling |
| No crack, leak, or sound appears | The jar passed this pre-burn observation only | Continue to controlled burn cycles after cooling and inspection |
Use wax pouring temperature and jar stress as a narrow checkpoint, not a full wax process lesson. When wax-specific pour ranges, additives, or blend behavior become the main question, move that decision to a wax pouring temperature guide and keep this test focused on whether the jar itself survived the pre-burn heat exposure.
The jar that survives inspection, setup, thermal control, and pour-stage stress is ready for repeated burn-cycle observation.
Run Controlled Burn Cycles for the Jar
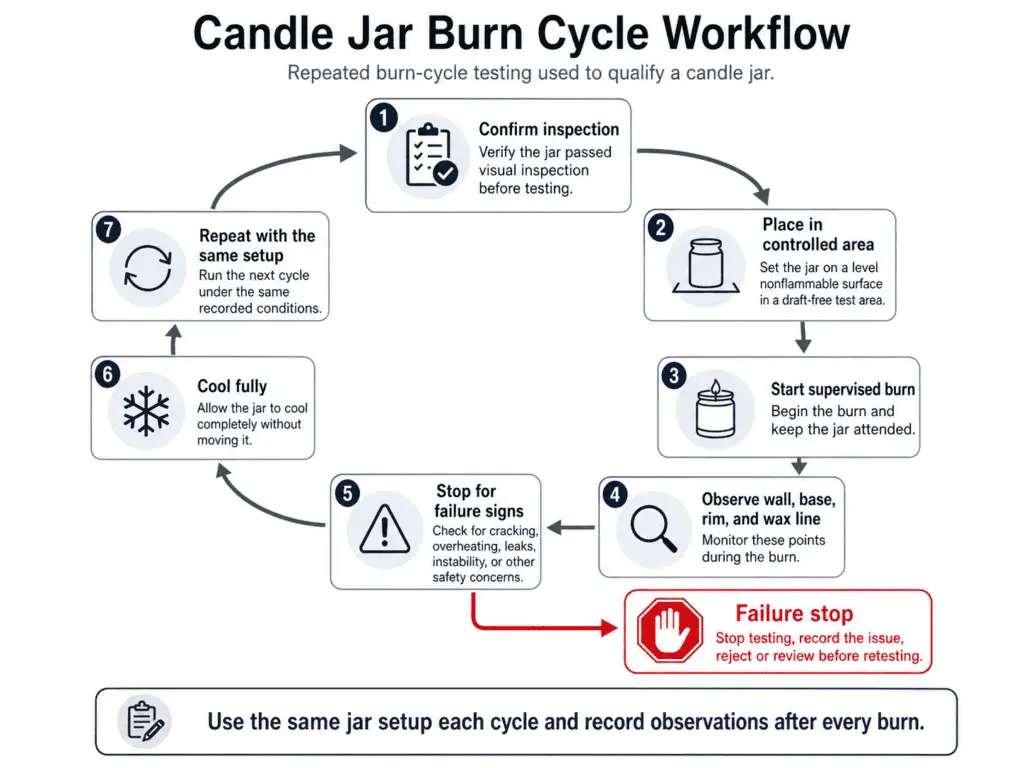
Burn cycles qualify the candle jar through repeated heating, cooling, inspection, and recorded observation.
The jar is evaluated while holding a finished test candle, but the approval target is still the container. Keep wax, wick, fill level, fragrance load, room conditions, and jar model consistent so the burn cycle shows jar behavior rather than a moving set of variables.
Follow this burn-cycle checklist:
| Step | What to do | What to record |
|---|---|---|
| 1 | Confirm the jar passed inspection and pour-stage observation | Jar model, batch, fill level, wax, wick, and test date |
| 2 | Place the jar in the controlled test area | Surface, spacing, airflow, room condition, and supervision |
| 3 | Start the supervised burn cycle | Start time, flame position, first visible heat pattern, and jar condition |
| 4 | Observe wall, base, rim, wax line, flame position, and exterior heat | Cracks, leaks, sounds, hot spots, discoloration, or unusual stress signs |
| 5 | Stop the test for any failure sign | Time, exact jar location, visible evidence, and shutdown reason |
| 6 | Let the jar cool fully before handling or close inspection | Cooldown location, airflow, surface, and post-cool inspection notes |
| 7 | Repeat only with the same recorded setup | Cycle number, changes from the previous cycle, and final decision |
Define the planned burn-cycle length before lighting the test candle, then use the same cycle length for each comparison. Many candle burn-test workflows use multi-hour supervised cycles, but this jar test should record the chosen cycle instead of claiming one universal pass standard.
Use repeated cycles to see whether the same candle jar remains stable after heating and cooling, not to judge scent throw, melt pool quality, tunneling, or wick sizing. If the question becomes product performance rather than container stability, move that work to full candle burn testing. A complete candle burn test can judge wick behavior and candle quality, but this section only decides whether the jar shows container-level failure under the recorded conditions.
Use this failure log during each cycle:
| Burn-cycle evidence | What it means for the jar | Action |
|---|---|---|
| Hairline crack appears | The jar showed structural stress during heat exposure | Stop, cool safely, reject, and photograph |
| Wax leaks from base or seam | The container failed to hold the candle safely | Stop and reject |
| Popping sound occurs | The jar may have fractured or shifted under heat stress | Stop and inspect after cooling |
| One wall area becomes much hotter than surrounding areas | The jar may be receiving uneven heat or showing a localized hot spot | Stop or review before continuing |
| No crack, leak, sound, or abnormal heat pattern appears | The jar passed that recorded cycle only | Continue only if the setup stays unchanged |
Method note: Inputs are the exact jar, fill level, wax, wick, room condition, burn duration, observation locations, and cooldown condition. The observation method is visual inspection, surface-heat monitoring, failure logging, and photo records where useful. The result supports an in-house approval decision for that tested setup only; it does not certify the jar or prove every future batch will behave the same way.
After the burn cycle is repeatable, the next step is measuring where the jar exterior becomes hot and whether the pattern is normal for the test or a reason to stop.
Monitor Surface Temperature and Hot Spots
Monitor the outside wall, base, rim, and hot spots during active burn cycles, then record time, location, pattern, and action.
A candle jar can look intact while still showing abnormal exterior heat. “Too hot” should mean unsafe handling risk, abnormal hot spots, or a recorded change from the tested baseline, not a universal legal temperature claim.
Use the same measurement points during every burn cycle:
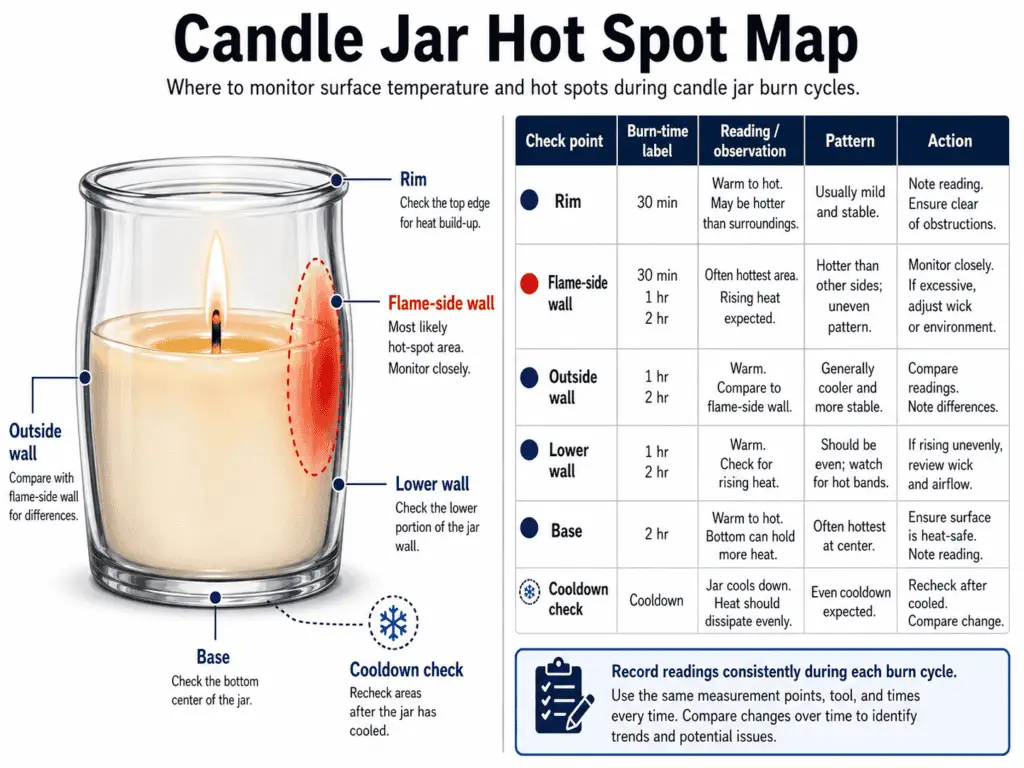
| Time into burn | Jar location | Reading or observation | Pattern | Action |
|---|---|---|---|---|
| Start | Outside wall | Baseline touch-free reading or observation | No active heat pattern yet | Record and continue |
| Early burn | Wall nearest flame | Exterior heat begins to rise | Even or localized | Continue if stable; review if sharply localized |
| Mid burn | Base and lower wall | Heat near base or lower side | Even, uneven, or concentrated | Stop if heat is severe or paired with cracking signs |
| Later burn | Rim and upper wall | Upper heat pattern near flame area | Stable, drifting, or worsening | Review flame position if heat tracks one side |
| Cooldown | Base, wall, and rim | Heat reduction after flame is out | Cooling evenly or unevenly | Inspect after full cooling |
Method note: Use the same tool or observation method at the same jar locations and similar burn times. Do not compare one jar’s bare-hand feel against another jar’s measured reading and call it proof. The useful evidence is the pattern: where heat appears, whether it worsens, whether it repeats, and whether it appears with cracks, leaks, sounds, or visible stress.
A practical candle jar testing log turns vague heat comments into repeatable evidence. To document a candle jar test, record the jar location, burn time, exterior reading or observation, hot spot pattern, and decision for each cycle. The log should show whether the container stayed stable, needed review, or failed because heat concentrated in a risky place.
Separate Jar Failure From Wick or Flame Variables
Wick and flame position matter only when they change how heat reaches the candle jar.
The jar remains the measured object. An off-center flame, moving flame, or flame close to the glass can create a hot spot, but the section should not turn into wick selection, tunneling correction, mushrooming fixes, or flame-height tuning.
| Evidence during test | Treat it as jar evidence when… | Handle it separately when… |
|---|---|---|
| Hot spot on one wall | The jar wall becomes abnormally hot or stressed at the same location | The issue follows wick placement or flame movement |
| Crack near flame side | The jar fails during heat exposure at a stressed wall area | The main question becomes wick centering or flame behavior |
| Soot near rim | Heat or flame position may be affecting the jar area | The main question becomes wick selection or candle performance |
| Stable jar with poor burn quality | The container shows no crack, leak, or severe heat stress | The issue is melt pool, scent throw, tunneling, or wick size |
| Repeated heat pattern after wick change | The jar still shows the same container-level stress | The problem disappears when wick and flame variables are corrected |
Use wick testing variables only to keep the jar test fair. If the hot spot follows flame position instead of the jar design, diagnose wick-related hot spots outside the jar approval decision. When the maker needs to choose the right wick size, send that work to a wick size guide rather than mixing wick optimization into jar pass or fail safety.
Once surface heat and flame variables are separated, the next step is identifying the jar failure signs that require rejection.
Identify Jar Failure Signs After Heat Exposure
Reject jars with cracks, leaks, fractures, popping sounds, broken base, severe hot spots, or structural stress evidence.
Jar failure means the candle jar showed structural, leak-related, audible, or heat-stress evidence during pouring, burning, cooling, or handling after heat exposure. Wax frosting, sinkholes, wet spots, weak scent, or uneven wax appearance are not jar failures unless they connect to cracking, leaking, overheating, or weakened glass.
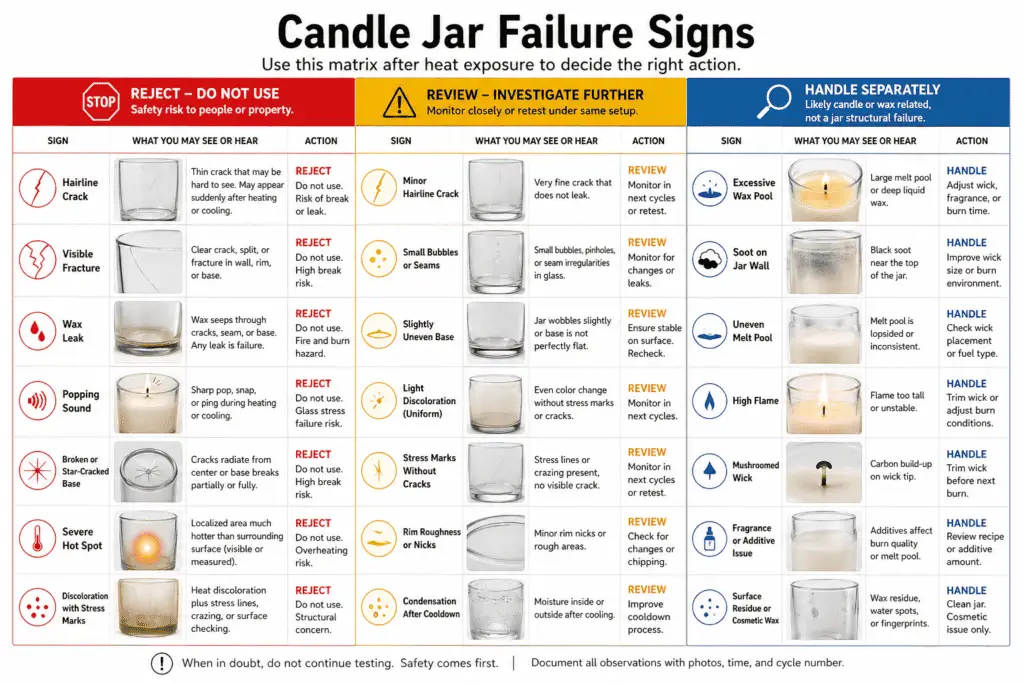
| Failure sign | Where to look | What it means | Decision |
|---|---|---|---|
| Hairline crack | Wall, base, rim, or seam | The jar structure has been stressed or weakened | Reject |
| Visible fracture | Wall or base | The glass has separated or started to separate | Reject |
| Wax leak | Base, seam, wall crack, or under the jar | The container no longer holds the candle safely | Reject |
| Popping sound | During pour, burn, or cooldown | The jar may have shifted, cracked, or fractured under stress | Stop and reject after safe cooling |
| Broken or star-cracked base | Bottom surface or base edge | The load-bearing part of the jar has failed | Reject |
| Severe hot spot | One wall area, base, or rim | Heat is concentrated in a way that may stress the container | Stop, review, or reject |
| Discoloration with stress marks | Glass wall, coating, or base | Heat may have affected the jar finish or structure | Review or reject if structural safety is unclear |
| Cosmetic wax issue only | Wax surface or side adhesion | The jar has not necessarily failed | Handle as candle performance troubleshooting, not jar rejection |
Use a photo record when a jar fails. Label each photo with the jar model, test cycle, burn time, failure location, and action: proceed, review, reject, retest, or handle separately. If the same crack pattern repeats, diagnose why a candle jar cracked before approving the next jar from the same batch. A deeper candle jar crack troubleshooting process can compare base cracks, seam cracks, rim chips, leaks, and burn-stage timing without turning this jar test into wax or wick troubleshooting.
A jar should not be watched for a little longer once it shows a clear crack, leak, fracture, or broken base. The correct outcome is to stop the test, let the jar cool safely, photograph the evidence, mark the jar as failed, and keep it out of routine use or sale.
After failure signs are identified, the same observations need to become a pass, fail, or retest decision.
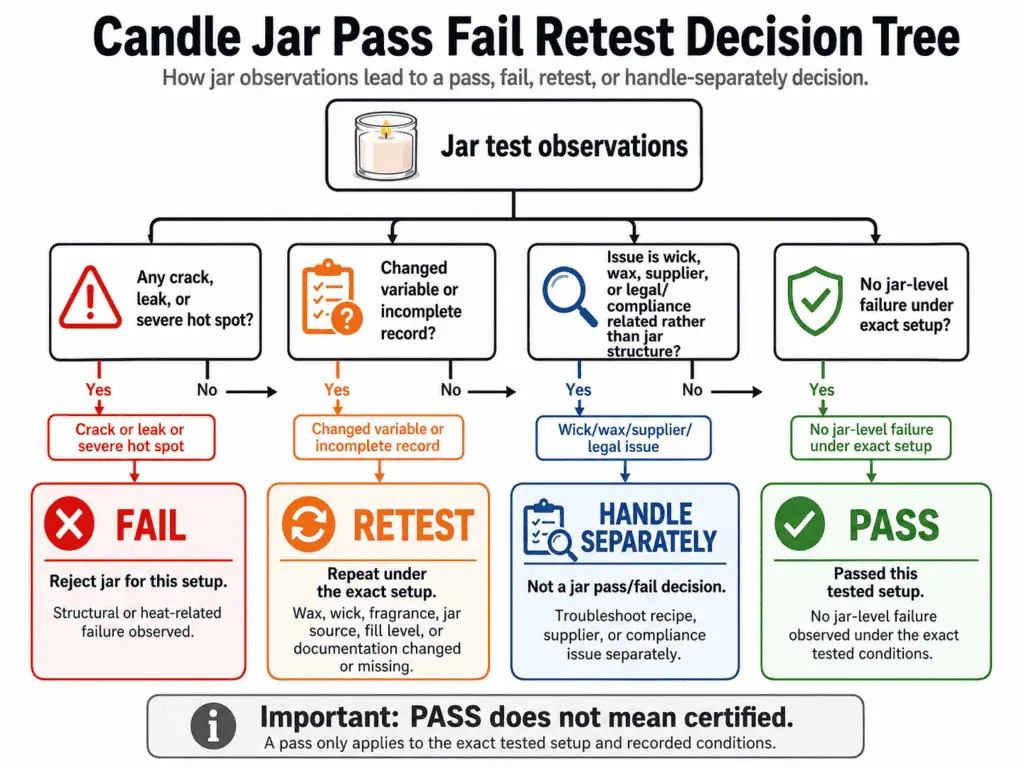
Decide Whether the Jar Passes, Fails, or Needs Retesting
A jar passes only for the exact tested setup when no jar-level failure appears under documented test conditions.
The approval subject is the candle jar, not the full candle’s performance. A passed jar showed no observed container failure under the recorded jar model, supplier batch, wax, wick, fill, burn-cycle, cooldown, and test environment. That result supports an in-house decision, but it does not certify the product, guarantee the jar forever, or replace formal review.
| Decision | Use this decision when… | What to record | What not to claim |
|---|---|---|---|
| Pass | The exact jar setup shows no cracks, leaks, fractures, severe hot spots, popping sounds, or structural stress after the planned test cycles | Jar model, batch, fill, wax, wick, burn cycles, temperature observations, photos, and final approval note | Do not claim universal safety or legal certification |
| Fail | The jar cracks, leaks, fractures, breaks at the base, overheats abnormally, or shows unsafe behavior | Failure sign, location, time, cycle, photo, and shutdown reason | Do not keep testing the same failed jar to confirm failure |
| Retest | A meaningful variable changed, or the evidence is incomplete | Changed variable, missing evidence, new test date, and replacement jar details | Do not stretch old approval across untested conditions |
| Handle separately | The main question becomes wick sizing, scent throw, wax appearance, supplier auditing, or legal compliance | The reason the issue moved outside jar pass or fail testing | Do not solve unrelated candle performance or legal topics inside the jar decision |
Use this short approval log to document a candle jar test before marking the jar as passed:
| Field | Entry to complete |
|---|---|
| Jar identity | SKU, supplier, batch, size, shape, coating, and intended candle use if available |
| Candle build used for the test | Wax, wick, fill level, fragrance load if used, and any known flame-position control |
| Test conditions | Surface, spacing, airflow, room condition, supervision, burn-cycle length, and cooldown condition |
| Observations | Cracks, leaks, sounds, exterior heat pattern, hot spots, discoloration, and photos |
| Decision | Pass, fail, retest, or handle separately |
| Decision limit | The result applies only to the exact recorded setup |
A candle jar testing log keeps the decision from becoming “it looked fine.” If the jar passed, the log should show the setup that passed. If the jar failed, the log should show the first failure sign and the reason testing stopped. If the evidence is missing or a variable changed, retest with a fresh jar rather than extending the old result.
For legal, certification, or jurisdiction-specific questions, use a candle safety and compliance overview instead of treating in-house jar testing as approval. Formal candle safety requirements are separate from practical jar qualification, so a pass here means “no observed jar-level failure under the recorded test,” not “certified safe for every use.”
After the pass, fail, or retest decision is made, the next step is recording the test in enough detail that the result can be repeated or challenged later.
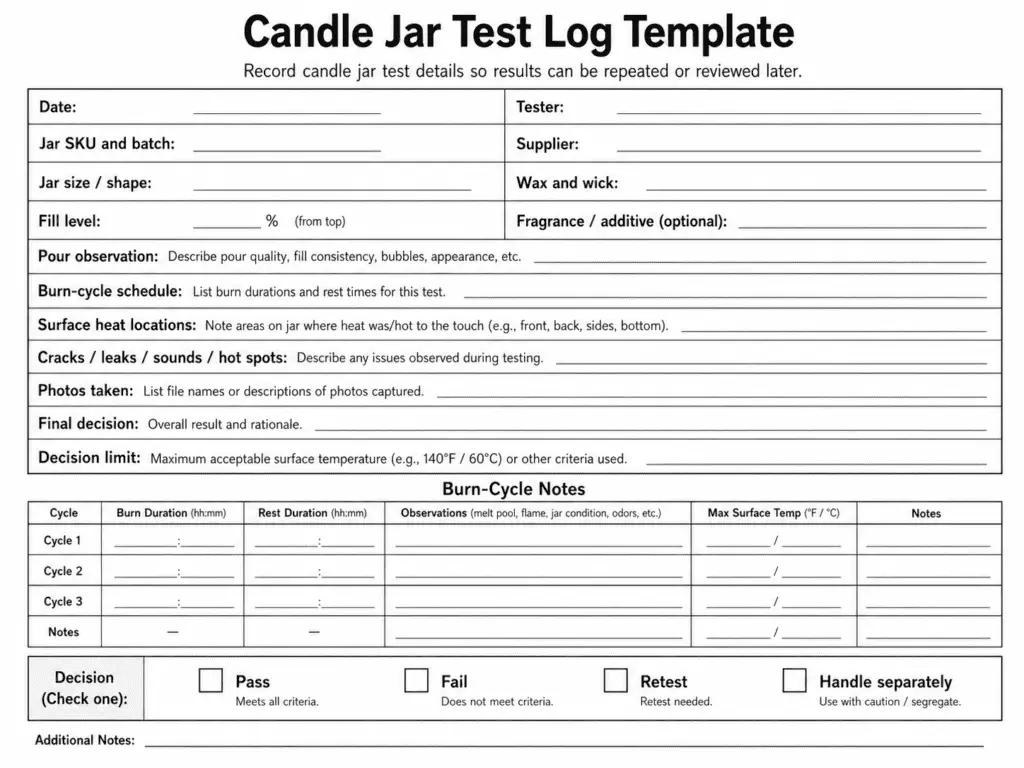
Document the Jar Test So Results Can Be Repeated
Record jar SKU, supplier batch, wax, wick, pour condition, burn cycles, temperatures, photos, failure signs, and final decision.
The record should identify the exact candle jar and the exact conditions that were tested. It supports repeatable in-house approval, but it is not a legal compliance file, certification record, or proof that every future jar will behave the same way.
Use this recordkeeping checklist during the test, not after memory fades:
| Record field | What to write down | Why it matters |
|---|---|---|
| Jar identity | SKU, supplier, batch, size, shape, color, coating, and intended candle use if available | Connects the result to the exact container |
| Pre-test condition | Rim, wall, base, seam, coating, chips, scratches, bubbles, and damage notes | Shows whether the jar entered testing with visible risk |
| Pour condition | Whether the jar cracked, leaked, popped, or stayed stable after filling | Separates pre-burn heat stress from flame exposure |
| Candle build | Wax, wick, fill level, fragrance load if used, and wick position | Keeps the jar result tied to the tested setup |
| Burn cycle | Cycle number, start time, stop time, room condition, surface, spacing, and airflow | Makes repeated heating and cooling evidence readable |
| Surface heat | Wall, base, rim, hot spot locations, readings or observations, and timing | Shows whether exterior heat stayed stable or became abnormal |
| Failure signs | Crack, leak, fracture, popping sound, base damage, severe hot spot, or discoloration with stress | Connects the final decision to observable jar evidence |
| Photos | Before-fill, after-pour, mid-burn, after-cool, and failure closeups when useful | Reduces guesswork when reviewing the decision later |
| Final decision | Pass, fail, retest, or handle separately | Prevents vague approval language |
| Decision limit | Exact setup the result applies to | Stops old approval from being stretched across changed conditions |
Use a candle jar testing log when results need to be repeated across multiple jars, batches, or test dates. To document a candle jar test clearly, record the observation, the decision, and the limit of that decision in the same row. A useful log does not just say “passed”; it says what passed, under which setup, after which observations, and with which limits.
Method note: Treat the log as a practical maker record. It can support internal consistency, supplier conversations, and batch review, but it should not be described as formal certification or jurisdiction-specific compliance documentation.
| Test log row | Entry |
|---|---|
| Test date | |
| Jar SKU and batch | |
| Supplier and container note | |
| Wax and wick used for this test | |
| Fill level and pour observation | |
| Burn-cycle schedule | |
| Surface heat locations checked | |
| Cracks, leaks, sounds, or hot spots | |
| Photos taken | |
| Final decision | Pass, fail, retest, or handle separately |
| Decision limit | Applies only to this recorded jar setup |
Know When a Candle Jar Must Be Retested
Retest after supplier, batch, size, coating, wax, wick, fill, environment, unexplained failure, or incomplete-record changes.
A tested candle jar is condition-specific, not permanently approved across all variants. If the container, candle build, or test evidence changes in a way that could affect heat exposure, the old result should not be reused as if nothing changed.
Use this retesting decision table:
| Trigger | Retest? | Why |
|---|---|---|
| Same jar, same supplier batch, same candle build, complete records | Usually no | The prior result still matches the recorded setup |
| New supplier batch or unclear batch identity | Yes | Batch differences can change the evidence you are relying on |
| New jar size, shape, wall thickness, base, coating, or finish | Yes | The tested container is no longer the same container |
| New wax, wick, fill level, fragrance load, or flame position control | Yes | The heat pattern around the jar may change |
| New test environment, surface, airflow, spacing, or burn-cycle length | Yes | Conditions that affect jar heat exposure changed |
| Any unexplained crack, leak, pop, severe hot spot, or base failure | Yes | The failure needs fresh evidence before approval resumes |
| Missing photos, missing burn-cycle notes, or unclear final decision | Yes | The record is not strong enough to support repeatable approval |
| Supplier evaluation becomes the main question | Handle separately | Use compare candle jar suppliers and supplier batch changes as sourcing review topics, not as proof inside this jar test |
Do not turn retesting into a full supplier audit. Supplier changes can trigger retesting, but supplier pricing, procurement quality, lead times, and sourcing criteria belong outside this jar qualification workflow.
FAQs About Candle Jar Heat and Burn Safety Testing
Candle jar heat and burn safety FAQs should clarify what the test proves, what it does not prove, and when jar questions must route to wax, wick, sourcing, or compliance topics.
The answers below stay focused on candle jars as containers being tested under heat, burn-cycle, cooldown, and observation conditions. When a question belongs to wax, wick, supplier sourcing, or legal compliance, handle it separately instead of expanding the jar test beyond its purpose.
Does a home burn test certify a candle jar?
No. A home or studio burn test can support an in-house decision for the exact tested jar setup, but it does not certify the jar, make it fireproof, or replace a candle safety and compliance overview. Legal or standards questions belong with formal candle safety requirements, not a practical jar log.
Can I use any glass jar if it survives one burn?
No. One burn only shows what happened once under one recorded setup. A candle jar should be inspected, filled, burned, cooled, monitored, and documented through the planned test conditions before routine use or sale.
What is the difference between a heat-resistant jar and a fireproof jar?
A heat-resistant candle jar is suitable for the defined candle conditions it was tested under. Fireproof implies a broader claim that this test does not prove, so do not use “passed” to mean immune to all heat or flame conditions.
Should I test jars before or after choosing wax and wick?
Test the jar with the candle build it will actually hold, but keep the approval focused on the container. Wax and wick are control variables in this workflow, not the main subject of the jar safety decision.
Can hot wax crack a candle jar before the first burn?
Yes. Hot wax can stress a cold, damaged, thin, or unsuitable jar before flame exposure, so pour-stage cracks or leaks should stop the test. Use wax pouring temperature and jar stress as a jar-safety checkpoint, then move wax-specific process questions to a wax pouring temperature guide.
Is a hot candle jar always a jar problem?
No. A hot spot can come from the jar, the flame position, or the wick setup. Use wick testing variables only to keep the jar test fair, and handle flame-position or wick-sizing questions with diagnose wick-related hot spots rather than turning this page into wick optimization.
When should I reject a candle jar immediately?
Reject a jar immediately after cracks, leaks, fractures, broken base evidence, popping sounds, severe hot spots, or structural stress signs. Do not keep burning a failed jar to gather more proof.
When should I buy different jars instead of retesting the same style?
Buy or source different jars when repeated tests show cracks, leaks, abnormal hot spots, poor batch consistency, or unclear intended use. A candle jar quality checklist can help screen defects before testing, and choose heat-suitable candle jars should remain a sourcing decision before approval testing begins.
Can I reuse approval from one supplier batch for another batch?
Not automatically. A new supplier batch can trigger retesting because the old record may not describe the exact jar now being used. Treat the new batch as unapproved until the jar identity and test evidence match.
What is the safest final rule for makers?
Approve only the exact jar setup that passed the recorded test, reject any jar with container-level failure, and retest when meaningful conditions change. That rule keeps the candle jar decision observable, limited, and easier to defend.