
To make candles in a jar, choose a heat-safe candle container, prepare and wick the jar, measure wax to the fill line, melt and scent the wax, pour carefully, cool, cure, and safety-check it.
A jar candle is a container candle made by pouring melted wax into a heat-safe jar with a centered wick. Beginner-safe means the jar can handle candle heat, the wick matches the vessel, and the finished candle is checked before burning. A thick, clean, or attractive jar is not automatically safe for candle making. The goal is a usable homemade jar candle, not a product roundup, business-compliance guide, or full burn-test protocol.
What Kind of Jar Is Safe for Candles?
A candle jar should be intended for candle heat, free of cracks or damage, and paired with a suitable wick.
A safe jar is not just thick, clean, or decorative. For this process, safe means the container can handle candle heat, the wick does not overheat the glass, and the finished candle is checked before regular use.
Use this checklist before pouring wax into a jar:
| Choice | What it means | Beginner decision |
|---|---|---|
| Use | A candle-intended container with no chips, cracks, seams, or unknown damage. | Best starting point for heat-safe candle jars. |
| Avoid | Thin decorative glass, cracked glass, uneven containers, plastic-lined vessels, or jars with narrow unstable bases. | Do not use them for jar candles. |
| Needs testing | Food jars, thrifted jars, unknown glass, reused candle vessels, and mason jars for candles. | Treat them as uncertain until their condition and burn behavior are checked. |
| Needs testing | recycled jars for candles, even when they look clean and thick. | Reused glass can have hidden stress, scratches, or heat history. |
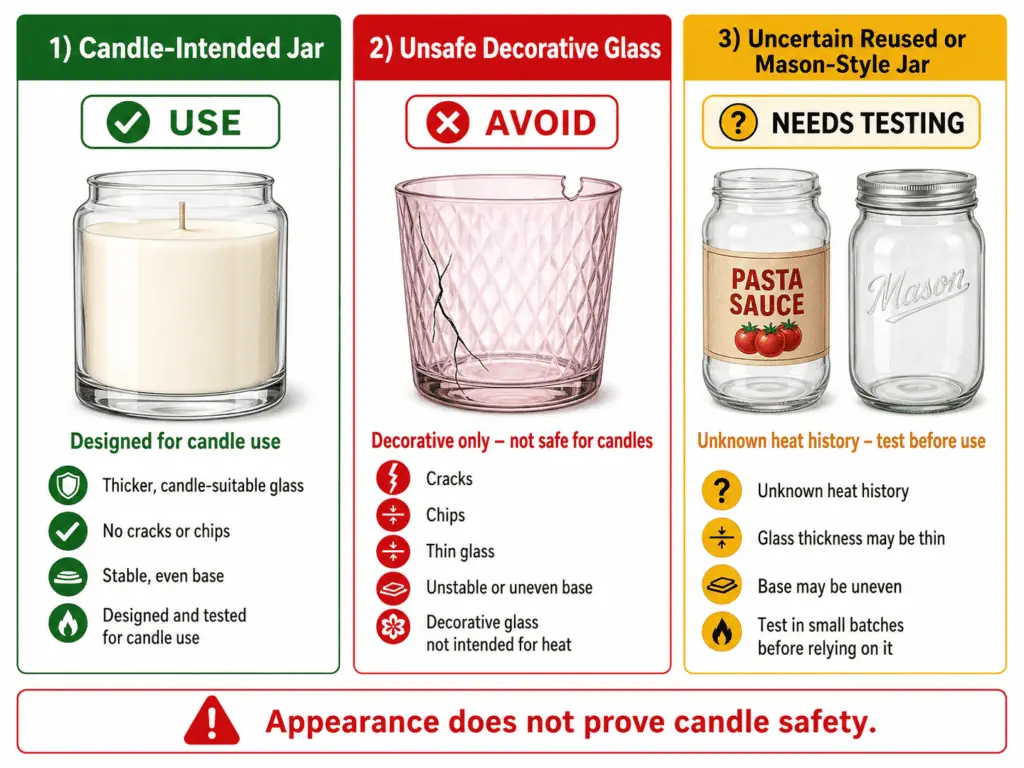
Appearance does not prove candle safety. A jar can look sturdy and still crack, overheat, or behave poorly when the wick, wax, and melt pool create sustained heat.
Photo note: Visual examples can help compare a candle-intended jar with an uncertain decorative jar, but a photo does not certify that any specific container is safe. A jar still needs a good wick match and an observed burn before you rely on it.
Keep this section narrow: choose a suitable jar, reject obvious risks, and route uncertain cases to test candle jars for heat and burn safety rather than guessing. Detailed buying comparisons, mason-jar exceptions, and reused-glass rules belong outside the basic jar-candle workflow.
How Do You Prepare a Jar for Candle Making?
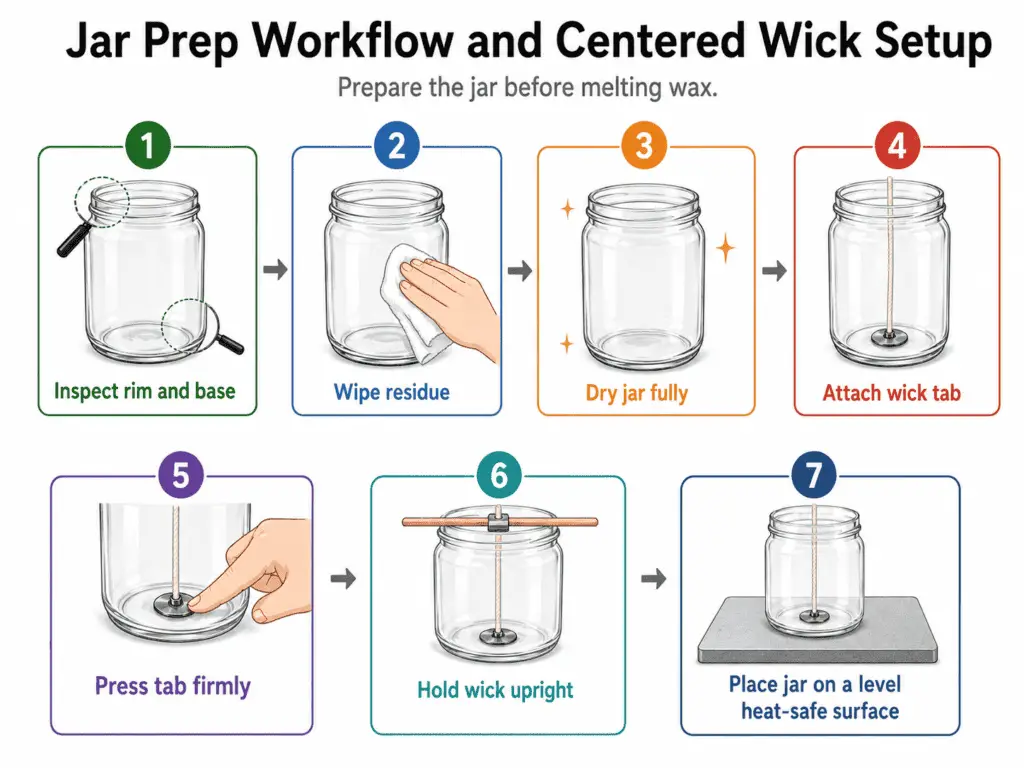
Inspect the jar, wipe out dust, dry it completely, attach the wick in the center, hold it upright, and place the jar where it can cool undisturbed after pouring.
A clean jar means dry and residue-free, not sterilized or proven heat-safe. Preparation makes the candle easier to pour and cool, but it does not turn an unsafe container into a safe candle jar.
Follow these steps before melting wax:
- Inspect the rim, base, sides, and inner wall for cracks, chips, sharp edges, or cloudy stress marks.
- Wipe out dust, fingerprints, label residue, or loose particles with a clean cloth.
- Let the jar dry completely so moisture does not interfere with wick adhesion or hot wax.
- Attach the wick tab to the center of the jar base.
- Press the wick tab firmly so it stays fixed when wax is poured.
- Use a wick holder, clothespin, or centering bar to keep the wick upright.
- Place the jar on a level, heat-safe work surface where it can sit without being moved.
A dry jar helps the wick sticker or adhesive hold at the base. Moisture, oil, or residue can loosen the wick, shift the flame path, or leave debris inside the finished candle.
Check these points before pouring wax:
| Readiness check | Pass condition |
|---|---|
| Jar condition | No visible cracks, chips, unstable base, or questionable glass. |
| Inside surface | Dust-free, residue-free, and fully dry. |
| Wick position | Wick tab is centered and firmly attached. |
| Wick support | Wick is held upright above the jar opening. |
| Work area | Jar is level and can cool without being bumped or moved. |
A centered wick is a setup step, not a full wick-size decision. If the wick later causes soot, tunneling, overheating, or an unstable flame, the issue belongs to wick fit and burn behavior, not basic jar prep.
How Much Wax Do You Need for a Jar Candle?
Estimate wax from usable fill volume, not brim capacity.
Leave headspace above the wax and use a candle wax calculator when exact weight matters because jar volume and wax weight are not the same. A jar candle should be measured by the fill line you plan to use, not by how much liquid the jar can hold to the rim.
Use this compact estimate for planning small beginner batches:
| Jar label size | Usable fill target | Headspace to leave | Approximate wax need |
|---|---|---|---|
| 4 oz jar | About 3.5 fl oz | About 0.5 fl oz | About 3 oz by weight |
| 6 oz jar | About 5.25 fl oz | About 0.75 fl oz | About 4.5 oz by weight |
| 8 oz jar | About 7 fl oz | About 1 fl oz | About 6 oz by weight |
| 10 oz jar | About 8.75 fl oz | About 1.25 fl oz | About 7.5 oz by weight |
| 12 oz jar | About 10.5 fl oz | About 1.5 fl oz | About 9 oz by weight |
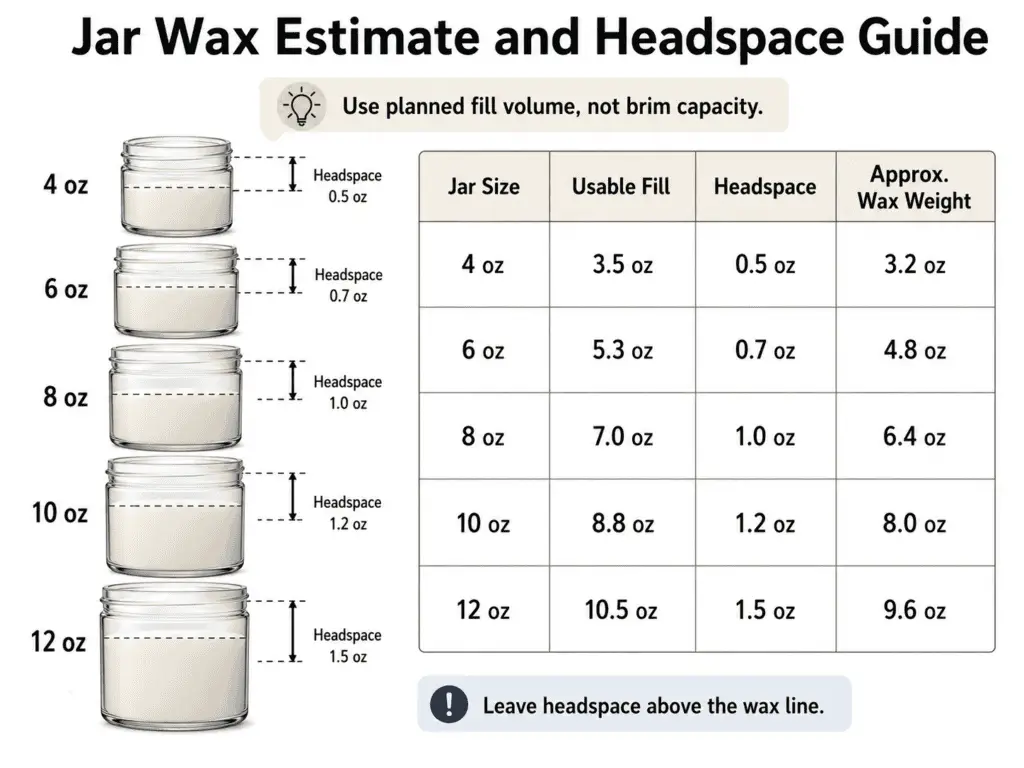
Estimate note: These figures are modeled planning estimates, not a jar-capacity database. They assume wax weight is slightly lower than liquid fill volume, and the real result can shift by wax type, fragrance load, jar shape, and fill line.
The key distinction is capacity versus fill. Capacity is how much a jar can hold near the brim, while usable fill is the safer working level that leaves space above the wax. For size-specific tables on how much wax a candle jar holds, use a dedicated capacity reference instead of turning this beginner process into a full measurement database.
When a recipe needs precision, weigh the wax rather than relying on jar labels. A label such as “8 oz jar” can describe the container size, not the exact wax weight needed for a finished candle.
Where Do You Place the Wick in a Jar Candle?
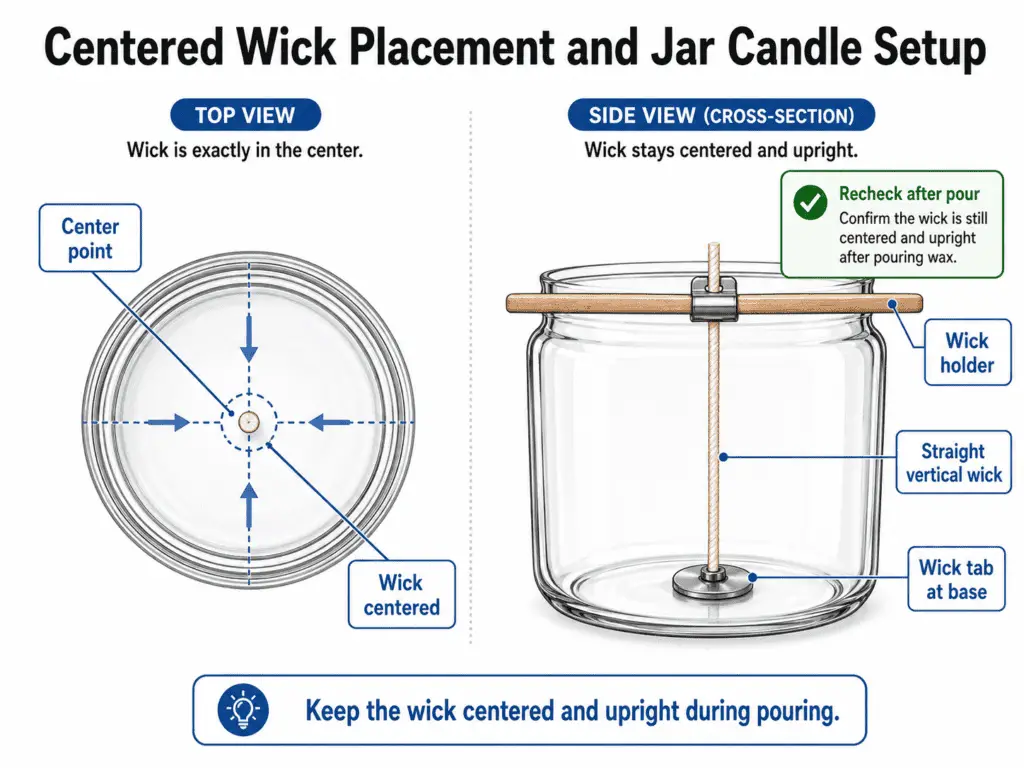
Place the wick in the center of the jar base, secure it firmly, and hold it upright while pouring.
Centering helps the flame burn more evenly, but wick placement is not the same as wick sizing. Wick fit still depends on jar diameter, wax type, fragrance load, and observed burn behavior.
Follow these steps to place the wick:
- Find the visual center of the jar base.
- Attach the wick tab to the center point with a wick sticker or suitable adhesive.
- Press the tab firmly so it does not lift when warm wax is added.
- Pull the wick straight upward without bending the tab loose.
- Hold the wick in place with a centering bar, wick holder, or clothespin.
- Check that the wick still looks centered from above before pouring.
- Recheck the wick after pouring, while the wax is still liquid enough for small adjustments.
A centered wick supports a cleaner candle setup, but it does not guarantee the right flame size. Use a wick size chart by jar diameter and wax type only as a starting point because the same jar can behave differently with another wax, fragrance, dye, or fill height.
Watch the first burns for warning signs tied to wick behavior. Soot, tunneling, overheating glass, a large flame, or an unstable flame means the wick may not fit the candle, even if it was placed perfectly in the center. A separate burn test candle wicks workflow is needed when you need to validate flame behavior, melt pool, heat, and safety over repeated burns.
Fit note: These placement steps cover where the wick goes in a jar candle. They do not replace a wick chart, supplier starting point, or burn test for a finished candle.
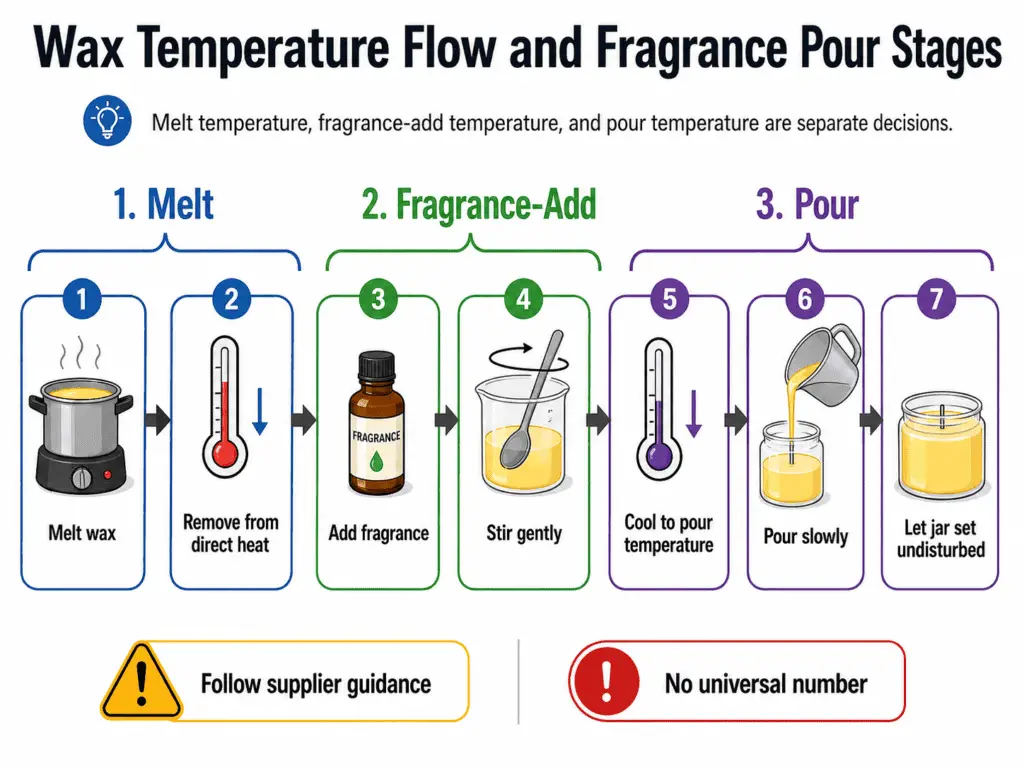
What Temperature Should You Pour Wax Into a Jar?
Pour temperature depends on the wax and fragrance system.
Treat melt temperature, fragrance-add temperature, and pour temperature as separate decisions. Follow the wax and fragrance supplier’s guidance instead of using one universal number for every jar candle.
Use this process when working with a jar candle:
- Melt the wax only to the temperature range recommended for that wax.
- Remove the wax from direct heat before it gets hotter than needed.
- Add fragrance at the temperature recommended for that wax and fragrance system.
- Stir gently and evenly so the fragrance is mixed through the wax.
- Let the wax cool to the recommended pour temperature.
- Pour slowly into the prepared jar without splashing wax onto the wick holder.
- Leave the jar level and undisturbed while the wax sets.
Melt temperature is the heat needed to turn wax fully liquid. Fragrance-add temperature is the range where fragrance can mix into the wax properly. Pour temperature is the point where the wax enters the jar, and that number can change by wax type, fragrance, dye, room temperature, and jar shape.
| Temperature decision | What it controls | Beginner mistake to avoid |
|---|---|---|
| Melt temperature | Whether the wax becomes fully liquid. | Heating far past the wax supplier’s range. |
| Fragrance-add temperature | Whether fragrance mixes evenly into the wax. | Adding fragrance at a random temperature. |
| Pour temperature | How the candle sets inside the jar. | Treating one online number as universal. |
Warning: Do not copy a single pour range across all waxes. A soy wax pour temperature range may not fit paraffin, coconut wax, beeswax blends, or a supplier-specific soy blend.
Exact fragrance amount belongs outside the basic pour step. Use a fragrance load calculator when you need the fragrance percentage based on wax weight and supplier limits, because “more fragrance” can cause poor burn behavior, sweating, or weak candle structure.
Method note: Temperature guidance is supplier-dependent. Common maker discussions can help identify failure patterns, but they do not replace the instructions for the specific wax, fragrance, and container system being used.
After pouring, the next decision is not burning the candle right away; the jar candle needs time to cool, cure, and be checked before its first burn.
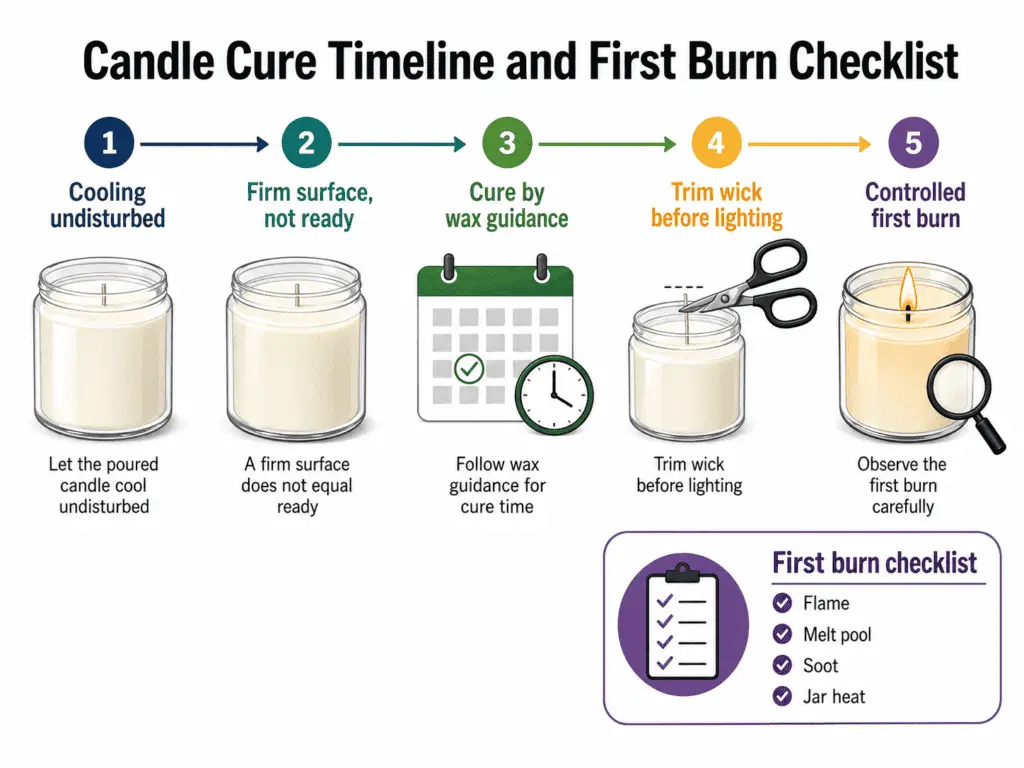
How Long Should Jar Candles Cool and Cure?
A jar candle should cool undisturbed until fully hardened, then cure according to the wax and fragrance system before the first burn.
Let it cool undisturbed, cure according to the wax and fragrance system, trim the wick, then use a controlled first burn. Cooling means the wax has hardened; curing means the candle has rested long enough for better fragrance and burn behavior.
| Stage | What it means | What to do |
|---|---|---|
| Cooling | The poured wax hardens in the jar. | Keep the candle level and undisturbed. |
| Early set | The surface looks firm. | Do not assume the candle is fully ready. |
| Cure time | The wax and fragrance rest together. | Follow the wax supplier’s cure guidance. |
| Wick trim | The wick is prepared for lighting. | Trim the wick before the first burn. |
| First burn | The candle is observed under controlled use. | Watch flame behavior, melt pool, soot, and jar heat. |
A solid surface is not the same as a cured candle. Some waxes can be handled after cooling but still need more resting time before fragrance throw and burn behavior are checked.
Use this first-burn checklist:
- Put the candle on a stable, heat-safe surface.
- Trim the wick before lighting.
- Keep the candle away from drafts, curtains, shelves, and loose objects.
- Watch the flame for flickering, smoking, or excessive height.
- Check whether the jar becomes unusually hot.
- Stop using the candle if the jar cracks, soots heavily, overheats, or burns unstably.
Cure windows vary by wax and fragrance system, so how long candles should cure is a separate wax-specific question. The safe beginner rule is to let the candle cool fully, follow the wax supplier’s cure guidance, and avoid treating “looks solid” as “ready.”
Keep cure-time details on the wax-specific curing page because cure time depends more on wax type, fragrance load, and supplier guidance than on the jar itself.
A first burn candle guide can go deeper into melt-pool timing and wick behavior, but this jar-candle workflow only needs the boundary: burn slowly, observe closely, and stop if the candle behaves unsafely.
Method note: The readiness stages above are modeled for beginner decision-making, not as universal cure-time rules. Wax type, fragrance load, jar size, room conditions, and supplier instructions can all change the best waiting period.
After the candle has cooled and cured, visible defects can help show whether the jar, wax, wick, pour temperature, or first burn needs adjustment.
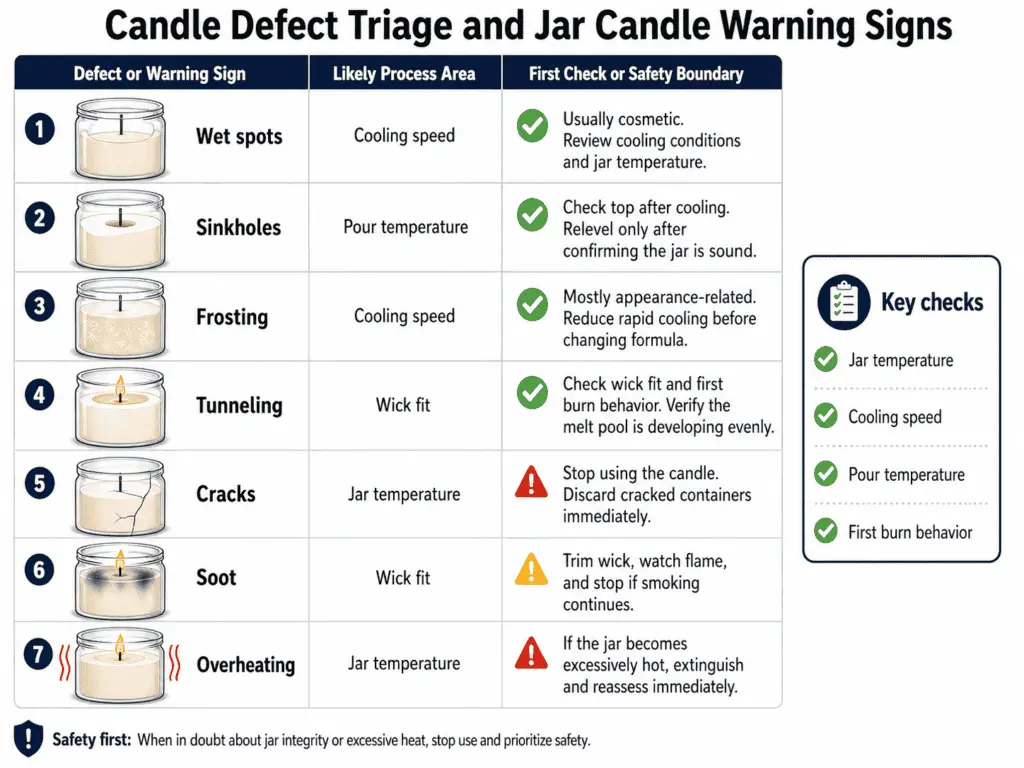
Why Does a Jar Candle Get Wet Spots, Sinkholes, Frosting, or Tunneling?
Wet spots, sinkholes, frosting, cracks, and tunneling usually point to jar choice, cooling, wick fit, pour temperature, fragrance mixing, or first-burn behavior.
Use quick triage here, then move detailed repairs into defect-specific fixes. Cosmetic defects can make a jar candle look uneven, while safety defects can make it unsafe to burn.
| Defect | What it often means | First check | Boundary |
|---|---|---|---|
| Wet spots | Wax has pulled away from parts of the jar wall. | Check jar temperature, cooling speed, wax type, and pour conditions. | Use fix wet spots in candles for detailed adhesion and cooling fixes. |
| Sinkholes | Wax shrank or left hidden gaps while cooling. | Check pour temperature, jar size, cooling conditions, and whether a second pour is needed. | Use fix sinkholes in candles for repair steps. |
| Frosting | The wax surface has a white or cloudy crystalline look. | Check wax type, cooling speed, and temperature changes. | Use fix candle frosting for wax-specific surface fixes. |
| Tunneling | The candle burns down the middle and leaves wax on the sides. | Check wick fit, first burn, jar diameter, and melt pool. | Use fix candle tunneling for repair and prevention steps. |
| Cracks | The surface split while cooling or after temperature change. | Check cooling speed, room temperature, jar movement, and wax behavior. | Treat cracks as a process warning; check burn behavior before use. |
| Soot or overheating | The flame, wick, or jar heat may be wrong. | Check wick fit, draft exposure, fragrance load, and flame size. | Treat this as a safety issue, not a cosmetic defect. |
Pattern note: These issue categories group common jar-candle problems, but they are not proof that a candle is safe or unsafe by themselves. A candle with wet spots may burn normally, while a clean-looking candle can still overheat, soot, crack, or burn unstably.
Beginner question: Are wet spots dangerous?
Wet spots are usually cosmetic because they show where wax pulled away from the glass. They become more important when they appear with overheating, cracking, wick problems, or unstable burning.
Beginner question: Does tunneling mean I used the wrong jar?
Tunneling can come from the jar, but it more often points to wick fit, first-burn timing, wax behavior, or burn conditions. A centered wick can still tunnel if the wick is too small for the jar and wax system.
A defect should be read as a clue, not a final diagnosis, because the next step is checking whether the finished jar candle burns safely.
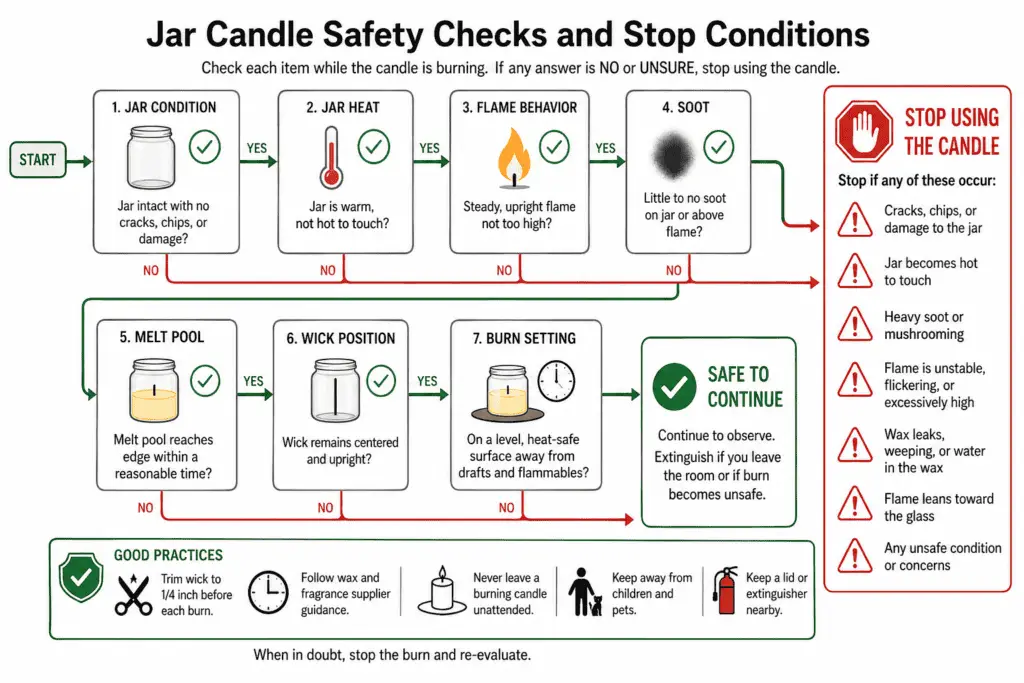
How Do You Know If a Homemade Jar Candle Is Safe to Burn?
Check the jar, wick, flame, container heat, melt pool, and burn stability.
Stop using the candle if the jar cracks, overheats, soots heavily, burns unstably, or shows unsafe flame behavior. A visual check can catch obvious problems, but it is not the same as a formal burn test or selling compliance.
Use this stop-condition checklist before and during the first burns:
| Check | Safe enough to continue | Stop using the candle if… |
|---|---|---|
| Jar condition | The jar has no cracks, chips, leaks, or stressed-looking glass. | The jar cracks, pops, leaks wax, or shows sudden damage. |
| Jar heat | The container feels warm in normal use but not alarmingly hot. | The glass gets unusually hot or heat concentrates in one area. |
| Flame behavior | The flame stays steady and controlled. | The flame gets too tall, flickers aggressively, or behaves unpredictably. |
| Soot | Little to no visible soot appears during normal burning. | Heavy soot appears on the jar, rim, wall, or nearby surface. |
| Melt pool | Wax melts outward in a controlled way. | The melt pool gets too deep, reaches the edge too aggressively, or overheats the jar. |
| Wick position | The wick stays centered and upright. | The wick leans, drifts, mushrooms heavily, or pulls the flame toward the glass. |
| Burn setting | The candle sits on a stable, heat-safe surface away from drafts and objects. | Drafts, nearby items, or an unstable surface affect the flame. |
A home safety check is a practical screen for obvious danger signs. It does not certify the candle, prove the jar is heat-rated, or replace test candle jars for heat and burn safety when you need a repeatable jar-safety method.
Wick problems need their own validation. If soot, tunneling, overheating, flame height, or unstable burning appears, use burn test candle wicks instead of assuming the centered wick is correct.
Beginner question: Can I burn the candle if it looks perfect?
No. A smooth top and clean jar do not prove safety because heat, flame behavior, wick fit, and melt pool behavior only show up during burning.
Beginner question: Can I gift or sell a homemade jar candle after one good burn?
No. Personal-use checks are not the same as labeling, documentation, testing, or candle business compliance. Keep homemade-use decisions separate from gifting, selling, insurance, and legal requirements.
Checklist note: This safety checklist is a beginner screening tool, not a compliance certificate. It helps you spot obvious stop conditions before a jar candle causes avoidable heat, glass, flame, or soot problems.
If the candle passes basic home-use checks, the remaining questions should stay short and focused so the jar-candle process does not turn into a buying, testing, or legal page.
FAQs About Making Candles in Jars
Jar candle FAQs should stay short and focused on jar choice, wax amount, wick fit, pouring, curing, defects, and safety boundaries.
A jar candle is only beginner-friendly when the container, wax, wick, pour, cure, and burn behavior work together. These answers handle quick follow-up questions without turning the process into a buying guide, calculator, full troubleshooting page, or compliance article.
Can I use any glass jar for candles?
No. Use heat-safe candle jars intended for candle heat, and avoid thin decorative glass, cracked containers, unstable vessels, or unknown jars that have not been checked during burning.
Can I use mason jars for candles?
Some makers use mason jars, but mason jars for candles need separate safety guidance because food storage glass, decorative glass, and candle-intended glass are not the same thing.
Can I use recycled jars for candles?
Treat reused jars as uncertain. recycled jars for candles can have scratches, stress, old heat damage, or shape issues that are not obvious before wax and flame are added.
Do I need to fill the jar to the top?
No. Leave headspace above the wax so the candle has a cleaner finish and safer working fill level. Use a candle wax calculator when exact wax weight matters.
How do I know what wick size to use?
A centered wick is only the starting point. Use a wick size chart by jar diameter and wax type for a starting size, then watch burn behavior because wax, fragrance, and jar shape can change the result.
How long should I wait before burning a jar candle?
Let the candle cool fully, then cure it based on the wax and fragrance system. how long candles should cure depends on the wax, fragrance load, and supplier guidance.
Are wet spots a safety problem?
Wet spots are usually cosmetic, but they do not prove the candle is safe or unsafe. Use fix wet spots in candles when you need adhesion and cooling fixes, then still check flame behavior and jar heat.
Can I sell homemade jar candles after making a few successful ones?
No. Home use is different from gifting or selling. candle business compliance involves safety documentation, labeling, testing expectations, and legal duties that go beyond a beginner jar-candle process.
When should I stop using a homemade jar candle?
Stop using it if the jar cracks, overheats, soots heavily, burns unstably, leaks wax, or pulls the flame toward the glass. A candle that looks smooth can still fail during burning.