
Mason jars can work for candles, but only true canning jars that pass inspection and burn testing are worth using.
This page answers the safety question first, then shows how to screen the jar, control heat stress, and test the setup. The main risks are decorative lookalikes, hidden damage, poor wick fit, and repeat-burn overheating. A true canning jar is the better starting point, but it still needs inspection and controlled burn testing. Use this guide to reject weak jars early and keep only setups that stay stable.
Mason jars can be used for candles only when they are true canning jars, undamaged, and fully burn-tested with the intended setup.
Some mason jars are suitable to test, while decorative lookalikes and unknown recycled jars are not safe to treat the same way. The real decision comes down to jar type, glass condition, wick fit, and how the setup behaves through repeated burns. Heat stress, overwicking, and hidden damage can turn a jar that looks fine into a failure risk. A clear screening and test routine makes it easier to reject weak jars early and keep only setups that stay stable.
Are Mason Jars Safe for Candles?
Yes, but only true canning jars that pass inspection and burn testing are worth using for candles.
A mason jar is only a reasonable candle container when it is a real canning jar, has no damage, and stays stable with the exact wax and wick you plan to use. Safe here does not mean guaranteed safe in every setup. It means safe enough to test under controlled conditions, then stop using at the first sign of overheating, smoke, or glass stress. To widen the choice set, Compare candle-safe container options in our Candle Containers & Jars hub. The real pass-or-fail work starts when you Inspect Mason Jars for Cracks, Chips, and Wear and Burn-Test Mason Jar Candles Before Regular Use.
Safety calls are not based on the word “mason” alone. They depend on intended use, glass condition, wick fit, fill level, and repeat-burn behavior. How do you tell a true canning jar from a mason-style lookalike? Check whether it is sold and marked for canning or preserving food rather than decor, storage, or gift use. That is why makers often treat guidance from the National Candle Association, ASTM F2179 for glass candle containers, and ASTM F2417 for candle fire safety as part of a bigger system, not a label check by itself.
| Jar type | Intended use | Safety call |
| True canning jar | Home canning and repeated sealing use | Worth testing if undamaged |
| Decorative mason-style jar | Decor, storage, gift use | Do not assume candle-safe |
| Recycled food jar | Packaging for food products | Too uncertain for a default yes |
Use a simple gate before you pour:
- Start with a true canning jar from a known source.
- Reject any jar with cracks, chips, stress marks, or deep scratches.
- Match the wick to the jar’s inside diameter, not the outside width.
- Leave headspace instead of filling close to the rim.
- Run full burn tests before treating the jar as a regular candle container.
If you are not sure what the jar is, treat that as a no. In maker forums, later jar failures usually trace back to one of three causes: decorative lookalikes, hidden damage, or a wick that ran too hot for the jar.
Mason Jars vs Decorative or Recycled Glass
True canning jars may be worth testing, while decorative mason-style jars and recycled food jars should not be treated as equivalent by default.
A true canning jar is sold and marked as a jar for canning or preserving food. A decorative mason-style jar can look similar but may be made for storage, display, or gifts rather than repeated heat exposure. A recycled food jar has an even larger unknown, because the glass type, prior stress, and original purpose may all be unclear.
The fastest way to sort them is to check the jar’s origin, markings, and intended use. Brand identity, canning-specific labeling, and a product line built for food preservation are better clues than thickness or shape alone. If the jar came from salsa, sauce, or jam packaging, it should not be treated like a tested canning jar by default.
If the label or origin is unclear, Return to the mason-jar safety verdict and treat the container as unconfirmed until you Inspect Mason Jars for Cracks, Chips, and Wear. The same caution carries into New vs Reused Mason Jars, because reuse adds heat-history questions even when the glass looks clean.
Inspect Mason Jars for Cracks, Chips, and Wear
Any jar with cracks, chips, deep scratches, or stress marks is a reject for candle use.
Damage screening should take less than a minute, but it needs to be firm. A cracked rim, chipped lip, scratched sidewall, or stressed base can turn a jar from usable to risky before the first pour or during a later burn. When in doubt, See the mason-jar safety verdict first, then move through a fast screening routine. Damage checks become stricter in New vs Reused Mason Jars, and the same jar can still fail later if you do not Prevent Thermal Shock and Glass Stress.
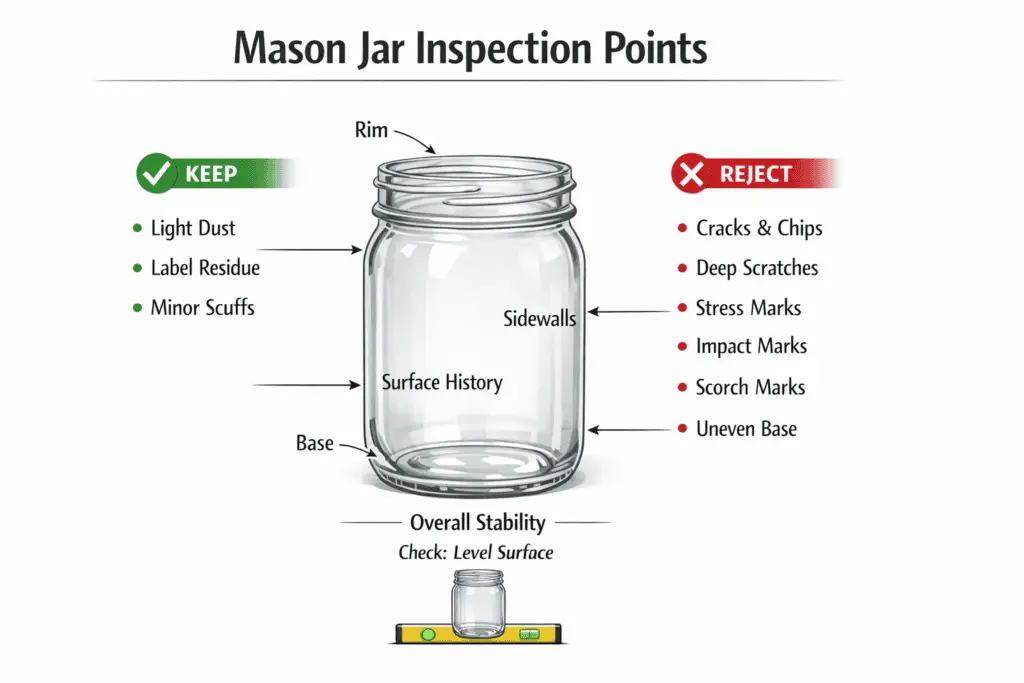
Check the jar in this order:
- Rim: look for chips, hairline cracks, and rough spots that catch a fingernail.
- Sidewalls: look for deep scratches, star-shaped marks, or cloudy stress lines.
- Base: look for impact marks, uneven wear, or cracks that spread from the bottom edge.
- Surface history: reject jars that show scorch marks, stubborn soot staining, or signs of prior overheating.
- Overall stability: set the jar on a flat surface and make sure it sits level.
Use this keep-or-reject rule:
- Keep: light surface dust, label residue, or minor cosmetic scuffs that do not break the glass.
- Reject: cracks, chips, deep scratches, stress marks, or any damage near the rim or base.
Chips are worse than ordinary light scratches because they remove material and create a weak point. Cosmetic wear can look ugly without changing the jar’s strength, but structural damage changes how heat and pressure move through the glass. Once you find meaningful damage, replace the jar instead of trying to make it work.
New vs Reused Mason Jars
New mason jars are the safer baseline, while reused jars need extra caution because past heat and hidden wear reduce predictability.
A reused jar is not automatically unsafe. It just starts from a lower level of certainty. A clean jar can still carry old stress from previous candle burns, dishwasher cycles, impact, or storage damage that is hard to see before reheating.
Before a second pour, Use the jar-inspection checklist first. Then Match Wick Size to Mason Jar Diameter again and Burn-Test Mason Jar Candles Before Regular Use, because reuse does not lock in the old setup forever.
Think of the choice this way:
- New jar: better starting point, clearer history, fewer unknowns.
- Reused jar with known history and no damage: possible to test again, but still needs full screening.
- Reused jar with unknown history or wear: retire it from candle use.
In maker forums, the common mistake is assuming that “clean” means “ready.” Clean only means the jar is free of wax and soot. It does not prove the glass still has the same margin it had before the last burn cycle.
Prevent Thermal Shock and Glass Stress
Sudden temperature shifts can crack an otherwise usable mason jar.
Thermal shock is glass failure caused by a fast temperature swing, not just by a wick that burns hot. A jar near 40°F / 4°C that meets a hot pour or lands on a cold stone counter faces more stress than one already near 68–72°F / 20–22°C.
To Return to the mason-jar safety verdict, treat temperature handling as part of the same pass-or-fail screen as jar type and wick fit. ASTM F2417 and the National Candle Association both point back to careful handling and controlled testing, not guesses about what glass will tolerate.
| Starting condition | Temperature change | Likely result |
| Room-temp jar on a steady indoor surface | Warm wax, slow handling | Lower shock risk |
| Very cold jar | Hot wax poured in fast | Higher crack risk |
| Hot jar after pouring or burning | Set on cold stone or metal | Higher crack risk |
| Hot jar | Moved into a draft or cooler spot too fast | Higher crack risk |
This matrix is a modeled handling guide, not a lab test. It sorts risk by starting jar temperature, contact surface, and the kind of breakage makers report when glass swings from cold to hot or hot to cold.
This model is a screening aid built from the page’s safety variables, not a manufacturer chart or an ASTM pass-or-fail test. Use it to sort obvious risk before testing, not to override inspection or real burn behavior.
Thermal shock and overheating are related but not the same. Thermal shock comes from a fast change. Overheating comes from too much heat building over time. A jar can survive one issue and fail from the other.
Use this short handling routine before and after a hot pour:
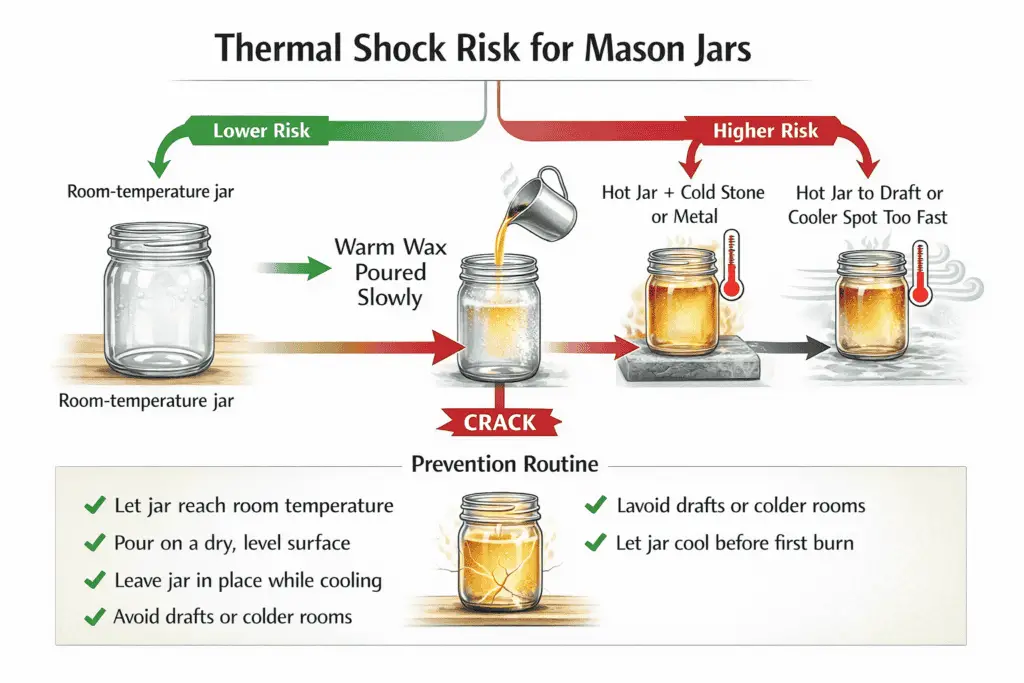
- Let the jar sit indoors until it is close to room temperature.
- Pour on a dry, level surface instead of cold stone, bare metal, or a wet counter.
- Leave the jar where it is while the wax settles and cools.
- Do not move hot glass into a colder room or near an open window.
- Let the jar cool at its own pace before the first burn.
If a jar keeps cracking, check the handling chain before blaming the wick alone. Inspect Mason Jars for Cracks, Chips, and Wear first, because an old weak point can look like a pure temperature problem. Then Burn-Test Mason Jar Candles Before Regular Use on a steady surface so you can tell whether the failure came from heat build-up, sudden temperature change, or both. For the glass-specific side, see Heat-Resistant Glass for Candles: Annealing & Thermal Shock.
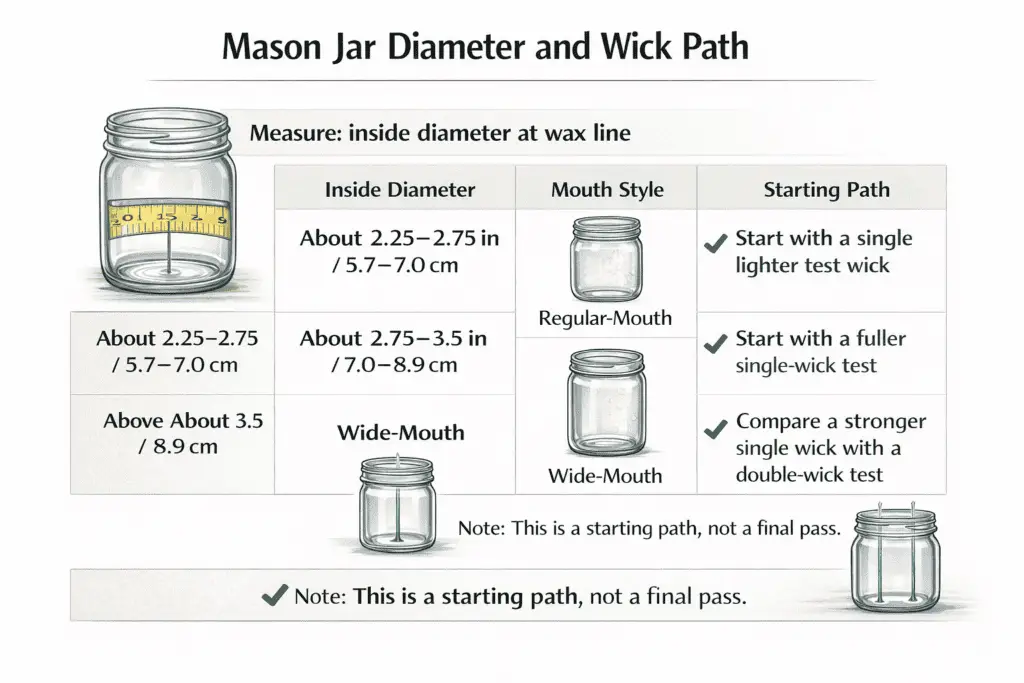
Match Wick Size to Mason Jar Diameter
Wick fit starts with the jar’s inside diameter, not its outside width or height.
Measure the inside diameter at the wax line in inches or centimeters, then choose a starting wick from that number. A jar around 2.5 inches / 6.4 centimeters follows a different starting path than one around 3.5 inches / 8.9 centimeters, even when both jars look similar.
Before you size anything, Start with the mason-jar safety verdict so you do not spend time testing a jar that never passed the basic screen. Supplier wick-testing guides and the National Candle Association treat wick choice as a test process, not a one-chart promise. For the geometry side, see How Jar Shape and Diameter Affect Wick Choice, Hot Throw, and Overheating.
| Inside diameter at wax line | Mouth style | Starting path |
| About 2.25–2.75 inches / 5.7–7.0 cm | regular-mouth | start with a single lighter test wick |
| About 2.75–3.5 inches / 7.0–8.9 cm | wide-mouth | start with a fuller single-wick test |
| Above about 3.5 inches / 8.9 cm | wide-mouth | compare a stronger single wick with a double-wick test |
This table is a modeled starting guide, not a promise that one wick will pass. It uses inside diameter and mouth style to sort the first test, then real burn results decide whether you stay, size up, size down, or change wick series.
Does wide-mouth vs regular-mouth change the safety test? Only as a starting screen, because mouth style changes inside diameter and surface area but does not replace burn testing. This model is a screening aid for first-pass setup, not a final wick chart or manufacturer claim.
For first-pass direction, use the Mason Jar Wick & Retest Planner instead of treating any single chart as final. After that, Set a Safe Fill Line and Headspace because fill height changes how the jar holds heat.
Set a Safe Fill Line and Headspace
Overfilling a mason jar cuts your heat margin and can make an otherwise workable wick behave too hot.
Start with jar diameter and wick fit, then choose a wax line that leaves visible space between the top of the wax and the rim. Headspace is that open space. It gives hot wax and hot glass more room to behave without crowding the rim.
A shoulder fill often gives a calmer starting point than a top fill. Deeper jars can hold more heat than they first appear to. That is why fill line and wick fit need to be judged together, not one at a time.
Use this fill-line check:
- Keep space between the wax surface and the rim.
- Treat the shoulder as a safer starting line than a brim-close fill.
- Recheck the plan if the jar is deep and narrow, because heat can sit longer in the glass.
- Lower the fill line before changing too many other variables at once.
The choice in Single vs Double Wick in Wide-Mouth Jars changes when the jar is filled too high, because extra retained heat can make a wide jar seem more overwicked than it really is. After any fill-line change, Burn-Test Mason Jar Candles Before Regular Use again before calling the setup done.
Single vs Double Wick in Wide-Mouth Jars
A wide-mouth mason jar may need one stronger wick or two smaller wicks, but the call comes from burn behavior, not mouth style alone.
For this choice, Start with wick fit by jar diameter before you compare one wick with two. A single wick is simpler to test. Two wicks can spread heat more evenly across a wider surface, but they can raise jar heat fast if the pair is too strong.
Use a simple split:
- Try one wick first when the jar is only slightly wider than your single-wick range.
- Compare one stronger wick against two smaller wicks when the jar is clearly wide-mouth.
- Retest after each change instead of changing wick count, fill line, and wax at the same time.
Use the Mason Jar Wick & Retest Planner to sort the next test when one wick tunnels, drowns, or throws a weak melt pool. Then Burn-Test Mason Jar Candles Before Regular Use so the final call comes from flame height, melt behavior, soot, and jar heat rather than guesswork.
Retest When Wax Type Changes
A wick that passed in one wax can fail in another, so any wax change resets the test.
Wax type changes how fast the candle feeds the flame and how much heat sits in the jar. When you swap wax, start with wick fit by jar diameter again, then use the Mason Jar Wick & Retest Planner to choose the next test path.
Treat wax swaps as a fresh setup step when:
- the new wax burns harder or softer than the last one
- the melt pool reaches the glass faster or slower
- flame height changes even though the wick size stayed the same
- soot or jar heat appears after a wax change
Watch Stop-Use Red Flags During Burn Tests after any wax swap, because a wick that looked calm in one wax can become too weak or too strong in another.
Mason Jar Wick & Retest Planner
Use one planner to choose a starting wick path, then change one variable at a time after each test.
The three inputs are inside diameter, wax family, and fragrance load. The output is not a final wick size. It is a starting path for the next controlled test after you watch the flame, melt pool, soot, and jar heat. Use it to narrow the first move, not to lock in a final answer.
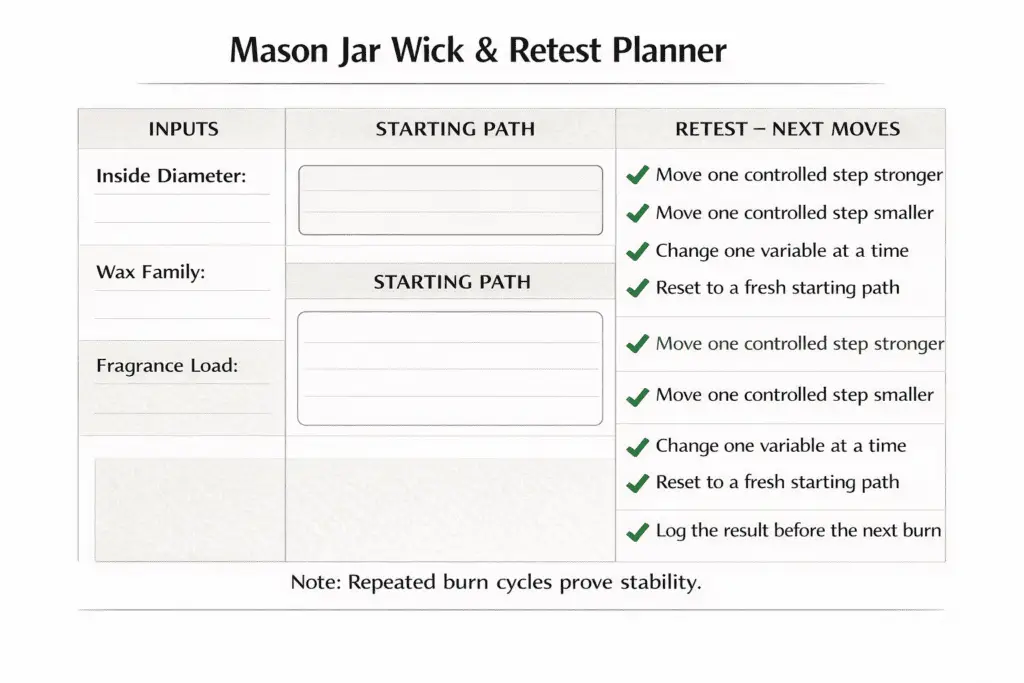
Keep the retest tight: measure the inside diameter at the wax line, note whether wax family or fragrance load changed, then change one variable at a time and log the result before the next burn. If a test burns weak, move one controlled step stronger. If it burns hot or dirty, move one controlled step smaller. If a wide-mouth jar leaves heavy wax at the edge or a wax change shifts behavior, reset to a fresh starting path.
The planner helps you choose the next move, but repeated burn cycles are what prove whether the jar-wax-wick combination is stable enough to keep.
Burn-Test Mason Jar Candles Before Regular Use
Burn-test a mason jar candle through repeated cycles before regular use, because early burns can look stable before later heat problems appear.
A real burn test checks the full jar-wax-wick combination, not only whether the first burn lights cleanly. The goal is to watch repeat behavior, log what changes, and stop as soon as the setup shows stress. Return to the mason-jar safety verdict when a jar starts acting unlike the rest of your test group. Use the Mason Jar Wick & Retest Planner to set the next change, then watch for Stop-Use Red Flags During Burn Tests instead of guessing from one burn.
Keep the test method steady from run to run. Use the same jar type, wick series, wax, fill line, room setup, and trim routine for each cycle. Change one variable at a time and record the same checkpoints on every pass. That is how the pass-or-fail call stays tied to the setup you changed, not to random room differences.
| Burn cycle | What to log | Pass sign | Fail sign |
| First burn | flame shape, soot, melt spread, jar heat | calm flame, even early behavior | smoke, sharp heat rise, unstable flame |
| Next burn | repeat the same checks | similar behavior to the first run | hotter jar, new soot, rougher flame |
| Later burn | compare against earlier notes | stable pattern across runs | drift toward smoke, excess heat, or weak burn |
Use this burn-test sequence:
- Start with a screened jar and a measured wick path.
- Burn the candle in repeated cycles, not as a one-time check.
- Log the same signs each time.
- Stop the test as soon as the setup turns hotter, dirtier, or less stable.
- Retest only after one clear change.
Stop-Use Red Flags During Burn Tests
Any repeated soot, smoke, very high flame, or fast-rising jar heat means stop the test and change the setup before burning again.
The job here is not to rescue the candle in place. It is to stop early, log the failure, and decide whether to retest or retire the setup. Start with the burn-test process so each red flag is judged against the same routine, not memory. Some failures only appear after you Retest When Wax Type Changes, which is why the same jar can pass one formula and fail another.
| Red flag | What it often means | What to do next |
| Repeated soot | The wick path may be too strong or the formula may be burning too rich | Stop, review the wick path, and retest |
| Smoke after a steady start | Heat or airflow may be pushing the flame out of control | Stop, let the jar cool, and retest on a steady surface |
| Very high or wild flame | The wick may be mismatched for the jar | Stop and reduce the heat load before another run |
| Jar heat rises faster than earlier cycles | The setup may be stacking too much heat in the glass | Stop and retest with a calmer setup |
| The candle keeps drowning or going out | The wick path may now be too weak | Move one controlled step stronger and retest |
Do lids or screw bands make a mason jar candle safer while burning? No. Lids, bands, and storage handling matter after the flame is out, but they do not prove the jar is safe. Use them for curing, dust control, and storage after the candle has cooled. Do not treat a lid or band as a shortcut that cancels the need for a real burn test.