
You fix paraffin sinkholes by slowing cooling, pouring within your wax’s tested range, and using poke-and-repour for deep voids or a heat gun only for shallow surface dips.
Paraffin makers who see craters around the wick or hidden voids under an otherwise smooth top need a fast way to diagnose whether the problem came from temperature, airflow, vessel geometry, or formulation. This page helps you decide which variable to adjust first and which repair method fits the size of the defect. It focuses on paraffin-specific shrinkage behavior rather than generic candle-surface problems. Start with the fast diagnosis table below, then use the matching fix path for your jar, wax, and defect depth.
Fast diagnosis: match the sinkhole to the first variable to test
You diagnose most paraffin sinkholes by matching the visible defect to one main variable first: cooling pattern, trapped air, jar geometry, or formula load.
| What you see | Most likely cause | Change first | Best repair now |
|---|---|---|---|
| Small center dip with no deep void | Normal top shrinkage | Slow cooling slightly and keep jars warmer | Heat gun surface reflow |
| Deep hole near the wick after full set | Core stayed liquid longer than the top | Use relief holes and a repour | Poke-and-repour |
| Repeating crater in tall jars | Vessel geometry + uneven cooling | Use slower cooling and test a second pour | Poke-and-repour or planned double-pour |
| Rough, pitted top with tiny cavities | Trapped air from stirring or high pour height | Stir more gently and pour lower | Thin top-up or light reflow |
| Ring-shaped dip near the glass and center void | Cold jar or cold surface pulled heat too fast | Preheat jars and avoid stone counters | Second pour |
| Sinkholes start only after raising FO or changing additives | Formula tolerance issue | Return to the last stable FO/additive level | Repour one controlled test candle |
For the broader troubleshooting page that covers other wax types and related top defects, see fix candle sinkholes.
Which fix should you use first?
Use a heat gun for a shallow surface dip, poke-and-repour for a deeper hollow center, and a planned second pour when the same jar keeps trapping a void.
- Press or probe the center lightly once the candle is fully set.
- If the dip is shallow and the wax underneath feels solid, use surface reflow.
- If the tool drops into a soft or hollow center, open relief channels and repour.
- If the same jar and wax combination keeps doing this, switch from rescue mode to a planned second-pour workflow.
- After the repair, cool the candle in still air and recheck the top before trimming or labeling.
Steps to poke and repour to fix paraffin sinkholes (timing, depth, fill)
You can use the poke-and-repour method to fix paraffin sinkholes by waiting for partial set, poking deep relief channels, topping with fresh wax, and allowing a slow, even recool.
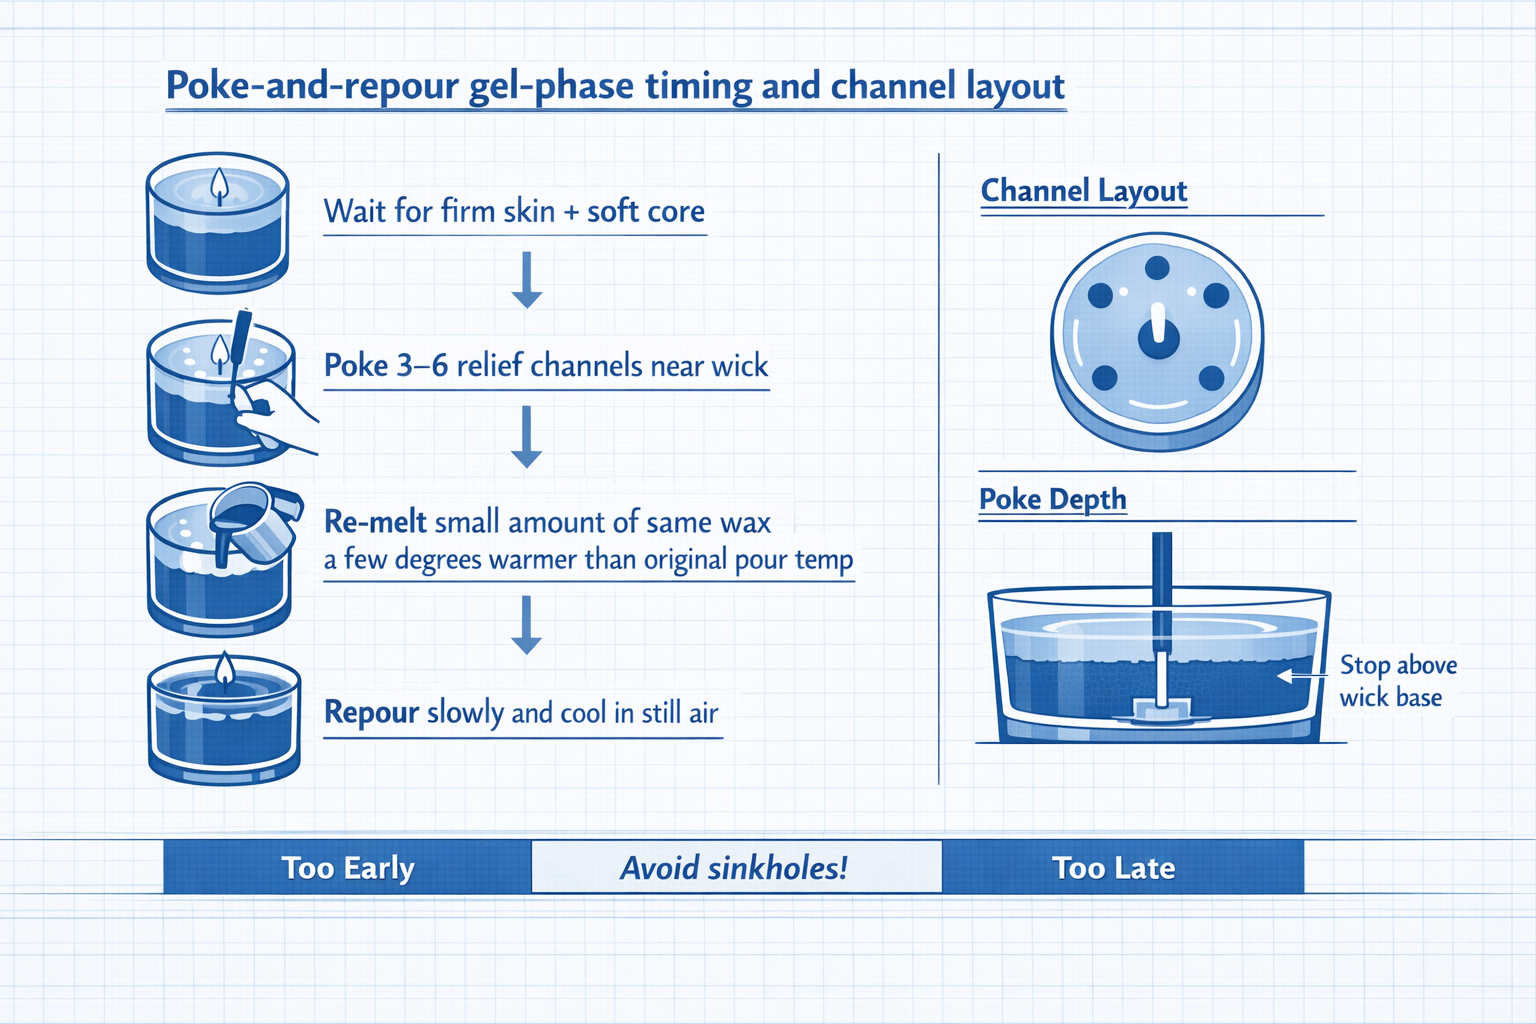
The goal is not to stab randomly at the top, but to give shrinking wax a path to draw in fresh material so the final surface stays smooth and solid. When done thoughtfully, poke-and-repour can rescue a whole batch that would otherwise look unsellable, especially in deeper jars where the voids tend to hide just below the surface.
Wait until the candle has cooled enough that a firm skin has formed but the core is still soft—typically a couple of hours after pouring, depending on jar size and room conditions. Then choose the right poke depth by inserting a clean skewer or wick trimmer straight down close to the wick, stopping just above the bottom so you don’t pierce the tab or container. Make three to six evenly spaced channels around the wick, wiping your tool between candles to avoid dragging debris or dye. You should feel that the tool passes through a soft inner zone; that’s the void you’re trying to relieve.
Next, gently re-melt a small amount of the same wax formulation, ideally just a few degrees warmer than your original pour temp so the fresh top layer bonds well without shocking the existing candle. Pour slowly over the surface, allowing wax to flow down into the channels and displace trapped air before it builds up on top. Keep the layer thin—often just enough to cover the original surface by a few millimetres—so you can refill sinkholes without visible rings or harsh double-pour lines. Let the candle cool again in calm, stable conditions and avoid moving it during this second set.
If the batch was badly affected, repeat the process on one test candle first and burn it through several cycles to confirm that the repair hasn’t introduced new issues like tunnelling or wick drowning. Once you’re confident in your timing, depth, and fill level, repeat the same pattern across the rest of the affected candles, taking notes on when you poked, how deep you went, and how much wax you added so you can refine your timing for the next production run.
Fixing shallow dips with a heat gun: distance, sweep, and reflow safety
To fix shallow dips with a heat gun, hold the nozzle about 10–20 cm above the surface and make two or three quick passes so you only soften the upper 1–2 mm of wax. Used gently, this lets you smooth tops safely with surface reflow instead of blasting heat deep into the candle and creating new voids.
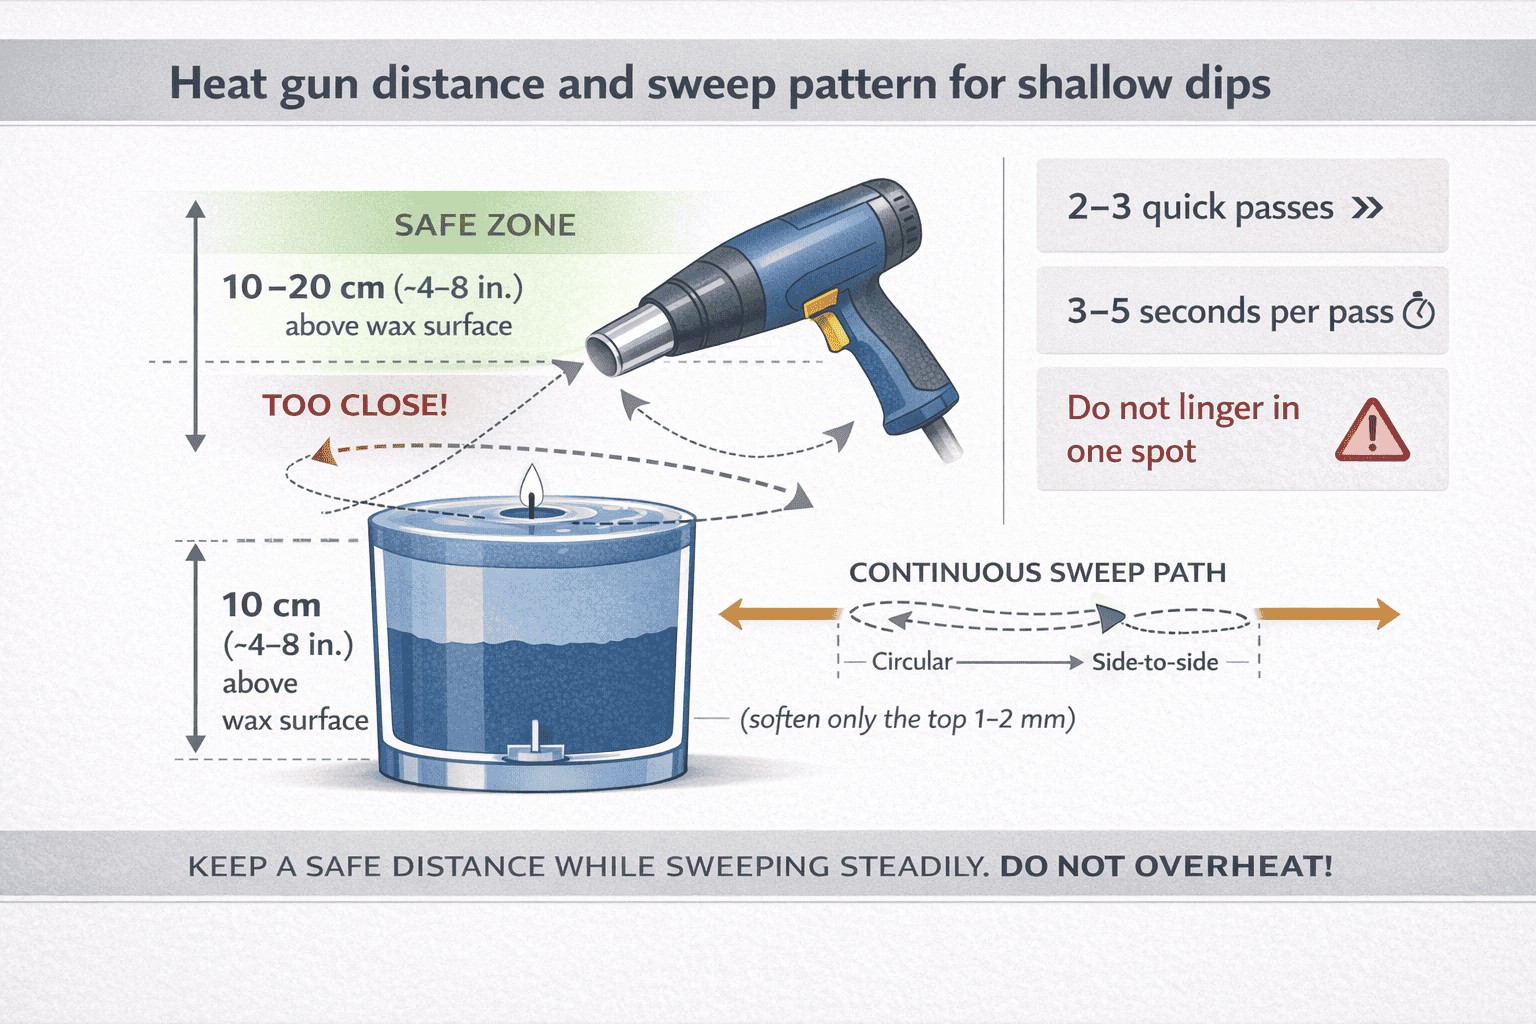
Think of a “leveling pass” as a moving, circular or side-to-side sweep that briefly liquefies the top skin so it can relax and flatten, while the core stays solid and structurally sound. That approach lines up with the general “minimum heat, maximum control” style of safety advice from groups like the National Candle Association and test-based standards such as ASTM F2417.
Set the heat gun to a low or medium setting, place the candle on a heat-resistant mat or tile, and check that the wick is trimmed and the flame is out before you start. Begin just outside the rim, then sweep across the surface in smooth arcs, spending no more than a second or two over any one spot. You’re looking for a thin, glossy melt that appears and then quickly settles, not a deep pool. If you see the wick starting to lean, the jar getting very hot, or the wax around the glass edge beginning to sag, you’re too close or moving too slowly and should back off immediately. A simple heat shield mat under your candles protects the work surface and gives you a clear “safe zone” to work within.
Once you follow the leveling technique consistently—distance, passes, and resting time—you’ll find that small dips and tiny ridges from cooling usually vanish without leaving rings. After a few practice rounds, it helps to time yourself: for many 7–9 cm paraffin jars, one or two passes of 3–5 seconds each are plenty, followed by at least 10–15 minutes of undisturbed cooling in still air. If, after that, you’re still staring at a crater deeper than about 3–4 mm, that defect is no longer “shallow,” and it’s usually wiser to use repour when dips are deeper rather than keep adding heat from above. Reserve the heat gun for light cosmetic leveling, and switch to poke-and-repour for substantial voids so you don’t overcook the wick or destabilise the container.
You’ll get the safest, most repeatable results by treating the heat gun like any other hot tool: keep it moving, keep it away from flammables and curious pets or children, and never operate it near a burning candle. Make a short checklist you glance at each time—wick trimmed, surface dusted, mat in place, low setting selected, maximum number of passes—and your “finishing station” will feel like a controlled step in your workflow instead of a risky last-minute rescue.
Steps to time a double-pour for paraffin (gel-phase windows that avoid lines)
You time a double-pour by letting the first pour cool to a firm, cloudy gel, then topping with slightly cooler wax so both layers bond without leaving a visible line.
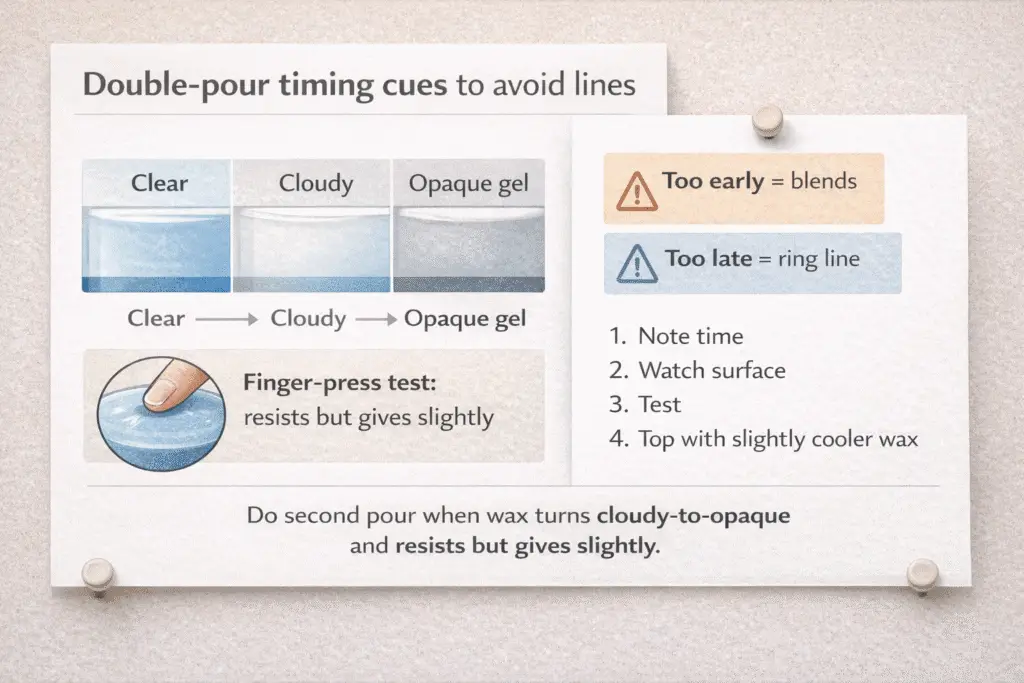
Handled well, this lets you choose the right double-pour window to refill voids in deep jars without repeatedly attacking the top with a heat gun. The sweet spot is when the first pour is fully opaque and holds a gentle finger press, yet still feels warm; pour too early and both layers blend into a single mass, too late and you’ll get a hard “ring” where the second pour sits on top instead of knitting in.
Right after pouring the main fill, note the time and watch the surface. As the wax cools, it will move from clear to cloudy to a matte, jelly-like stage; this is when you watch the gel phase carefully. At that point, gently poke a test candle near the wick: the surface should resist but give slightly without cracking. Re-melt a smaller batch of the same wax, aiming for a temperature a little lower than your first pour, and stir well so any fragrance and dye are evenly distributed. Pour slowly over the set layer, letting wax flow into any micro-voids around the wick before building up a smooth new top a few millimetres thick.
To avoid visible double-pour lines, keep the second pour thin and the temperature difference modest—large contrasts between cold base and very hot top-up are what create sharp rings. Cool the candles again in steady, draft-free conditions and resist the temptation to move or tap jars while that second layer is setting. If you do see a faint line in a test candle, adjust by pouring a little earlier in the gel window or slightly closer in temperature next time. Once you’ve logged a successful timing pattern for your typical jar size and room conditions, repeat it as a standard step whenever you work with tall containers or waxes that are especially prone to deep sinkholes.
What pour temperature window (°C/°F) prevents sinkholes in paraffin?
Use the supplier’s recommended pour range for your exact paraffin blend as the starting point, then test a few controlled pours to find the lowest temperature that still gives a smooth, solid top.
There is no single universal paraffin pour temperature that prevents sinkholes in every jar, fragrance load, and room condition. Keep the wax, fragrance percentage, jar, and cooling spot the same, and change only the pour temperature so you can see whether temperature is really the problem.
- Prepare three identical jars.
- Pour one near the low end of the supplier range, one near the middle, and one near the upper end.
- Let all three cool in the same still-air location.
- Check for a hidden center void, surface dips, and pull-away from the glass after full set.
- Keep the temperature that gives the smoothest top with no soft or hollow center.
For this page, treat supplier product sheets and wax-brand instructions as the authority for mix and pour windows, then use your own test pours to narrow the sweet spot for your jar, fragrance load, and room conditions. Use safety standards and trade-group guidance for burn and handling context, not as proof of the exact pour temperature for a specific wax.
Over-hot pours drive more expansion and then aggressive contraction as the candle cools, which can pull wax away from the center and leave a buried void. Over-cool pours can be sluggish and trap tiny air bubbles, especially if you pour from high up or into cold jars; those bubbles later coalesce into a sinkhole. Keeping detailed notes on wax grade, fragrance percentage, room temperature, and your test results makes it easier to compare future batches. For the broader temperature-selection page, see choose pour temperature by wax type.
If paraffin sinkholes keep repeating, test these variables in this order
If the same wax and jar keep producing sinkholes, test the setup in a fixed order instead of changing everything at once.
This order keeps the page on-node and makes troubleshooting easier to repeat. Paraffin usually forms sinkholes because the center cools and shrinks differently from the top, so start with the conditions most likely to change that cooling pattern before you change the formula, wick, or tools.
1. Cooling setup first
Paraffin sinkholes appear when the outer wax and top surface cool and shrink faster than the still-liquid center, leaving a hidden cavity that eventually collapses. To prevent and fix sinkholes long-term, you need to slow and even out how heat leaves the jar instead of relying only on pour temperature. As paraffin cools it shrinks; if the wax touching the glass and the wick solidifies first while the internal core is still hot, the rigid outer shell can’t move with the contracting center, so a void forms directly under the top. Drafts, cold countertops and un-preheated glass all steepen that temperature difference, increasing the stress and the size of the cavity.
You can picture the problem as a stack of temperature bands inside the candle: the glass and outer wax are hugging room temperature, the mid-layer is warm and soft, and the center around the wick is still very hot. The steeper that curve from center to edge, the more the middle has to “pull away” as it contracts, and the more likely it is to leave a sinkhole rather than gently feeding new wax into place. Insulated environments flatten this curve and give the whole candle time to move together. Many makers see far fewer sinkholes once they start curing candles in a protected space at roughly 20–24 °C (68–75 °F) with steady conditions instead of on an open, drafty bench.
A very practical way to do that is to build a simple curing box from a clean cardboard box with a loose-fitting lid or towel over the top so unlit candles cool slowly and evenly. The idea is not to “bake” the candles but to shield them from cold air and sudden drafts while they drop from pour temperature down to room temperature. Once you have thermal gradient explained in those simple terms—hot core, cooler wall, and the risk that the difference between them gets too steep—it becomes clear why fans, air-conditioning vents and cold windowsills are sinkhole factories.
A quick habit that helps is a “tissue-flag” draft test: before pouring, tape a light tissue strip near your curing area; if it flutters, the airflow is strong enough to skin the tops of your candles prematurely and exaggerate gradients. Place filled jars on a wooden board instead of bare stone so the bottom doesn’t dump heat too fast into a cold countertop, and keep them spaced so warm air can circulate gently between them. Finally, give paraffin time; rushing candles from hot pour to a chilly storage room can undo otherwise perfect pouring technique. Treat cooling as deliberately as you treat melting and pouring, and you’ll see far fewer voids hiding under those tops.
Keeping a stable, moderate environment and avoiding moving air over cooling candles helps control ambient humidity and airflow so bubbles don’t form and collapse into sinkholes.
When fresh paraffin cools, the surface is especially vulnerable: sudden breezes can ruffle the top layer and drag tiny air pockets down into the soft wax, while high humidity encourages condensation on cool glass or wax. Those micro-droplets behave like little voids; as the wax shrinks and dries out around them, they leave hidden pockets that often appear as craters near the wick.
Drafts are doubly problematic because they both chill one side of the candle faster and literally push air across the setting surface. To manage drafts around cooling candles, choose a curing area away from windows, doors, HVAC vents, and fans, and do a quick “tissue test” by taping a thin strip of tissue near your shelves; if it flutters, air movement is strong enough to disturb the surface. Group candles on a stable shelf or in a loose-lidded box so air circulates gently rather than racing across the tops.
Humidity is a quieter saboteur. In very damp rooms, warm wax and glass cool into air that’s already saturated with moisture, so condensation can appear as a fine mist or fog on the inside walls. As wax shrinks and tries to pull away, those moisture spots act like weak points where cavities form. Keeping a simple hygrometer in your workspace and aiming for a comfortable mid-range—neither desert-dry nor steamy—makes it much easier to prevent trapped air in paraffin and the voids that follow.
A handy way to tie it all together is to make a small “environment card” you check before each pour: room temperature band, humidity band, and a note about airflow status (fan off, windows closed, vents redirected). Over time, you’ll notice patterns like “sinkholes show up when humidity spikes after a storm” or “this shelf near the door always gives more craters,” and you can move your curing station or add simple shields to stabilise those conditions.
An insulated box usually cuts paraffin sinkholes more reliably than open-air cooling, but you only know for sure in your space when you compare insulated box vs open air with simple side-by-side tests.
In an open room, every draft, cold countertop, and temperature swing shows up as uneven cooling: the top skins too fast, the core stays hot, and the wax shrinks into a cavity around the wick. An insulated box—anything from a thick cardboard carton to a purpose-built curing cabinet—slows heat loss and equalises temperature from jar wall to centre, so the whole candle contracts together instead of in layers.
To turn that from theory into proof, deliberately dial in your curing setup with experiments. Pour one small batch and cool half the jars in calm open air on a wooden board, while the other half sit in a loose-lidded box with a couple of small vent gaps. Label the bottoms, track room temperature and time to full set, and log how many sinkholes, rings, or adhesion issues you see in each group. You’ll usually find that the boxed candles show fewer centre dips and more consistent tops, especially in colder seasons or in rooms with lively HVAC systems.
Once you’re confident the box helps, refine details instead of guessing: adjust how tightly you close the lid, how many jars you place inside, and whether you add a simple spacer rack so air can circulate gently. That testing mindset also pays off when you invest in gear: rather than buying the priciest curing cabinet you can find, you can start with an inexpensive DIY box and only upgrade if your notes show a clear benefit for larger production runs. In every case, test cooling methods side by side so each new box, shelf, or curing corner earns its place by actually reducing defects rather than just looking organised.
Large paraffin batches can drift a few degrees after the heat is off, so log the overshoot and fold it into your pour-temperature testing notes. This matters most with heavy pots and big pours, but it supports sinkhole prevention rather than standing as a separate root-cause branch.
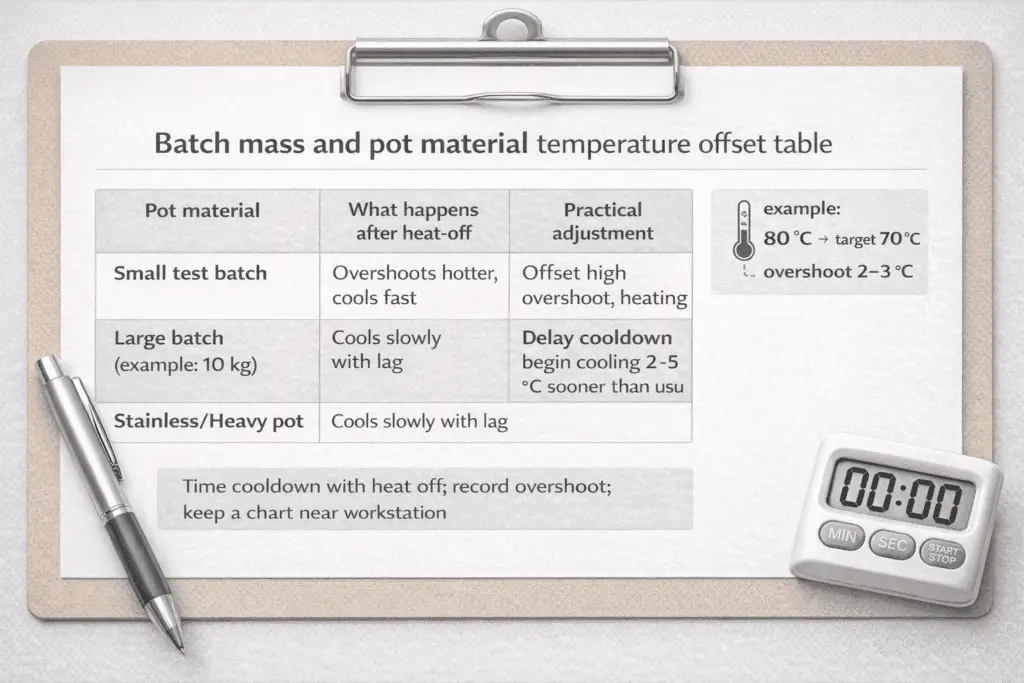
If you pour from large pots, expect wax temperature to keep moving briefly after the burner is off, especially in heavy stainless equipment. Record that drift by pot and batch size, then use it to time your pours more consistently instead of treating batch inertia as a separate troubleshooting topic.
2. Container setup second
Lightly preheating candle containers to just above room temperature, and giving heavier tumblers a slightly warmer preheat than thin jars, helps paraffin cool evenly and dramatically reduces sinkholes caused by cold-shock at the glass wall.
You can prevent sinkholes with proper preheating by making sure the jar never starts out so cold that it skins the surface while the wax core is still hot and shrinking. In many home workshops that means warming jars to roughly 10–15 °C above a cool room—taking glass that sits at 18 °C up into the high twenties, for example—rather than making them genuinely hot. Thicker or heavier glass holds more thermal mass, so it usually benefits from the higher end of that range, while lightweight jars in a mild room may only need a gentle nudge above ambient.
To keep those targets repeatable, follow the preheat SOP you design for your own space, whether that’s a low-temperature oven cycle, a warming drawer, or staging jars in a closed box in a heated room for a set period. If you occasionally warm jars with a heat gun instead of an oven, pause to review heat-gun safety so you avoid concentrating heat in one spot, overheating the rim, or blowing dust and moisture into open containers. Whatever method you choose, measure a few jars with an infrared thermometer or by touching a probe gently to the outside wall so you know roughly where your preheat actually lands rather than guessing. Trade bodies and safety standards such as the National Candle Association and ASTM F2417 focus on conservative handling temperatures, so your goal is a comfortable, slightly warm jar, not glass that feels hot to the touch or risks thermal stress when filled with wax.
Once the wax is poured, that modest preheat slows the rate at which the wall and top lose heat compared with the core, flattening thermal gradients, keeping the whole candle in step as it shrinks, and leaving fewer voids under the surface. You will often see the difference clearly in side-by-side tests: in cold winter rooms, unheated thick tumblers tend to show ring-shaped depressions or hidden cavities near the wick, while preheated jars from the same batch of wax set with smoother, more even tops. Over time, logging ambient temperature, jar type, preheat range, and resulting defect rates turns preheating from a vague “nice-to-have” into a specific lever you can pull whenever your workspace or season changes.
All else equal, wide-mouth tumblers with a low, squat profile cool more evenly and are less prone to sinkholes than tall, narrow jars with a deep wax column. That makes them a simple way to choose jar geometry to avoid voids before you even start tuning temperatures and additives. In wider vessels the heat from the wick spreads out in a shallow layer, so the top and core tend to contract together; in tall jars the core stays hot long after the walls and top have set, pulling the surface downward and leaving hidden cavities near the wick. Geometry doesn’t replace testing, but it sets the difficulty level of getting smooth, reliable tops from your paraffin blend.
One handy way to think about this is the diameter:height ratio (D:H). Jars where the internal diameter is similar to, or slightly greater than, the wax depth (ratios around 1.0–1.3) are usually forgiving; as height climbs to 1.5–2 times the diameter (ratios closer to 0.5–0.7), thermal gradients get steeper and sinkhole risk rises. Wider jars also tend to expose more surface area to room air, but because the wax layer is shallower, the cooling front moves through the candle more evenly. Tall containers concentrate heat in a narrow chimney around the wick, so the centre can stay molten and shrinking while the outer ring has already gone rigid.
To make this more concrete, imagine a simple test set:
- Jar A: ID 8 cm, wax depth 7.5 cm → D:H ≈ 1.1 → few minor dips.
- Jar B: ID 7 cm, wax depth 10 cm → D:H ≈ 0.7 → occasional centre sinkhole.
- Jar C: ID 6.5 cm, wax depth 13 cm → D:H ≈ 0.5 → frequent voids under the top.
Those numbers are illustrative, not strict rules, but they show why many makers find wide-mouth tumblers more forgiving than tall mason-style jars for paraffin containers. Safety guidance from organisations such as the National Candle Association also reminds you to choose containers designed for candles in the first place, with heat-resistant glass and stable bases, so geometry and safety work together instead of against each other.
To use that insight in your own studio, start by measuring inner diameter at the wax fill line and the actual wax depth for each jar style you buy. Once you understand container geometry this way, you can group your vessels into “wide and forgiving” vs “tall and demanding” and plan your testing effort accordingly. For tall, narrow jars, expect to lean harder on curing boxes, careful preheating, and more rigorous wick testing to keep sinkholes under control. You’ll also want to pair geometry with wick size deliberately: a wick that behaves beautifully in a wide tumbler may burn too hot and create aggressive shrinkage in a narrow column, while an undersized wick in a tall jar can leave a cool core that collapses into a tunnel.
Over time, you can build a small geometry log that records each jar’s D:H ratio, wick series, and observed defect rate. That log quickly reveals which shapes give you smooth, low-stress pours and which ones demand more skill and attention. With those notes in hand, you can prioritise wide-mouth tumblers for new scents or large production runs, and reserve tall jars for small batches where you have time to fine-tune every variable.
3. Formula and process third
If sinkholes started after you raised fragrance oil percentage, changed oils, or altered your mixing routine, return to the last stable formula before changing anything else. In paraffin, excess fragrance can soften the wax structure, slow clean set-up, and make the center more likely to collapse into a void.
Use the wax maker’s maximum fragrance guidance, the fragrance supplier’s candle-use notes, and one small retest batch before you change wick, jar, and additive variables at the same time. A fragrance load calculator helps you confirm the percentage by weight instead of guessing, and a stable result after stepping the load down points to a formula-tolerance problem rather than a cooling mystery.
Methods note: Flash point is the temperature at which vapors can ignite in the presence of a spark or flame; it is not a stand-alone rule for fragrance-add temperature in normal paraffin candle making. Use wax-specific mixing instructions first, then judge the result by finished-candle surface quality, burn behavior, and repeatable test pours.
For a poured batch that already shows oily tops or repeated voids, test one candle first. If it burns cleanly, you can remelt the rest, reduce the fragrance percentage into the documented range, and repour under steadier cooling conditions. If the test candle spits, smokes heavily, or behaves unpredictably, set the batch aside instead of selling or gifting it.
You can reduce shrinkage and sinkholes in paraffin by adding small, measured amounts of stearic, vybar, or microcrystalline wax within safe ratios that strengthen the wax structure without making the candle brittle.
Think of additives as a way to reduce sinkholes with formulation tweaks, gently changing how the wax crystallises and holds its shape as it cools. At the micro level, these ingredients encourage tighter, more uniform crystal networks so the wax shrinks more predictably instead of pulling a thin top skin down into a hollow. They also adjust viscosity in the cooling range, helping the wax flow into tiny gaps rather than leaving empty pockets around the wick or near the container wall.
To keep those levers under control, many makers use the additive ratio calculator or at least a simple notebook so every batch starts from a documented percentage instead of guesswork. That same record should remind you to follow the correct mixing order, adding additives to clean, fully melted wax at the temperatures your supplier recommends before you introduce fragrance or dye. A sensible starting point for container paraffin is often around 0.5–2% stearic and 0.5–1% vybar by weight, with any microcrystalline wax added sparingly on top of that, always staying within the ranges printed on Supplier Safety Data Sheets and technical documents. Within those bands, lower ratios tend to give a subtle smoothing effect, while higher ratios firm up the candle and can noticeably cut sinkhole rates, especially in deeper jars.
Push the percentages too far, though, and the candle can become overly hard and brittle, making shrinkage marks or edge separation more visible even if sinkholes disappear. The safest way to dial things in is to change only one additive at a time, pour a small set of test candles, label each with additive type and ratio, and compare tops, burn quality, and any new defects after a full cure. Supplier SDS, product notes, and general safety guidance all point in the same direction: stay within documented additive limits and validate real burn behaviour instead of assuming more is always better.
More crystalline, highly refined paraffin shrinks more as it cools, so picking container-friendly grades and tuning temperature and additives is key to reducing shrinkage and sinkholes.
When you understand root causes of sinkholes, those cryptic grade codes and “fully refined” labels stop being marketing fluff and start looking like practical tools you can use. Paraffin wax is made of many different hydrocarbon chains; how they crystallise—tightly packed and orderly or looser and more oily—controls how much the wax contracts as it moves from liquid to solid. Fully refined grades with low oil content often give beautiful clarity and strong scent throw but can pull away from glass more aggressively, while semi-refined or higher-oil blends may shrink less and hide minor voids better.
Supplier datasheets are the best place to check melting ranges, oil percentages, and whether a wax is intended for containers instead of pillars or votives. Before you buy another slab, check the supplier sheet or see the grade comparison you keep for your workshop, paying attention to which grades are marketed specifically for containers rather than pillars or votives. Those notes also show how hot you can safely heat and pour each wax, which matters because higher-crystallinity paraffin is more sensitive to over-hot pours that exaggerate shrinkage and create deeper voids under the top. As you tune each recipe, you’ll also want to review additive options—for example, tiny amounts of stearic, vybar or microcrystalline wax—to modify crystal growth so the wax shrinks more evenly instead of tearing away from the wick channel.
In practice, many makers get the most reliable results by choosing one container-grade, fully refined paraffin as their “base” and then experimenting with small batches rather than constantly switching blends. For a new wax, confirm its recommended melt and pour ranges, run a few test candles at slightly different pour temperatures, and note which combination gives the lowest crack and sinkhole rate. If a particular grade still pulls too hard from glass, you can shift to a slightly higher-oil variant or add modest levels of compatible additives to soften the crystal network while keeping burn performance within safe limits. Over a few rounds of testing, your notes will show which specific grades, temperatures and additive tweaks give both clean, strong-burning candles and tops that stay smooth instead of hiding a cavity just under the surface.
You fix dye- and solvent-related sinkholes by keeping colourants within the wax supplier’s limits, matching dye type to wax, and testing any solvent-heavy additives in small batches first.
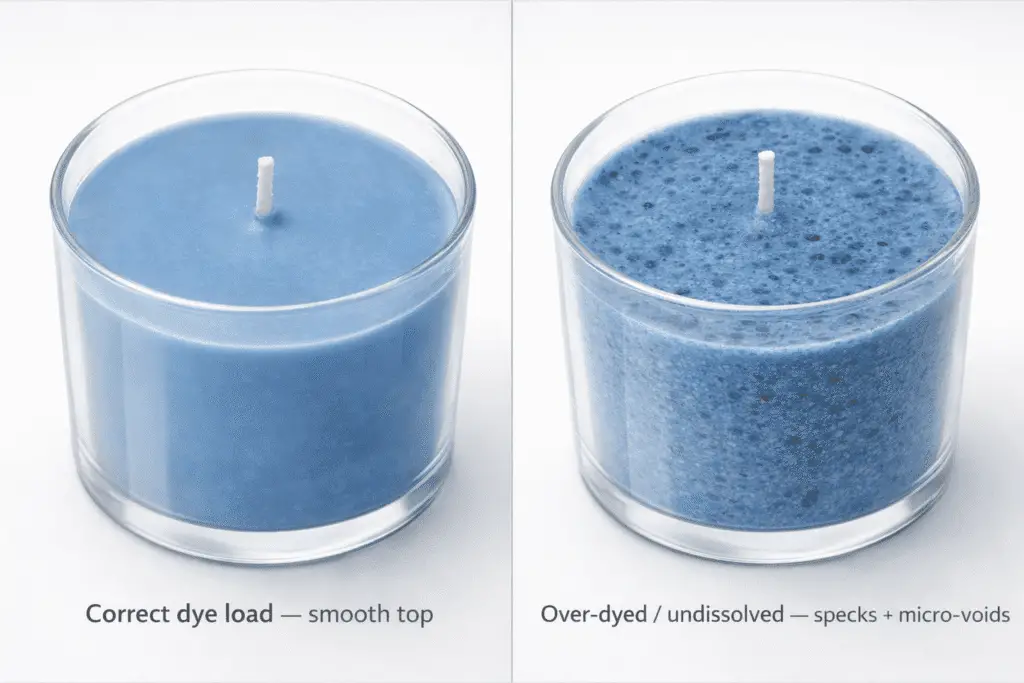
Start by learning to diagnose dye-related sinkholes: if you see strong colour but weak structure—crumbly tops, oily patches, or craters clustering around the wick—there’s a good chance the wax is overloaded with dye or the colourant isn’t fully dissolved. Extra dye behaves like soft filler in the paraffin crystal network, so as the candle cools and shrinks, the wax can slump away from the wick channel instead of holding a firm shape.
To get back in control, always weigh dye and wax rather than guessing by chips or drops, and adjust paraffin dye load so you stay at or below the maximum in your wax data sheet. Liquid dyes should be mixed into fully melted, unfragranced wax and stirred for at least a minute so you don’t end up with darker, weaker “veins” that sink differently to the rest of the candle. Blocks, flakes, or chips need an extra melt period to dissolve completely; if you can still see specks on a cooled test, your colourant is probably clumping and creating weak spots that contract unevenly.
Solvent-heavy additives—like some liquid dyes, colour stabilisers, or FO boosters—can also soften the matrix and encourage voids, especially when combined with high fragrance load. The safest route is to solve solvent compatibility issues by changing only one variable at a time: lighten the colour while keeping fragrance the same, then try the opposite, and note which change reduces sinkholes. If a particular dye or additive always correlates with craters, park it for later and test alternatives that are explicitly labelled as paraffin-compatible. Over a few batches, your notes will show exactly which combinations give rich colour, clean tops, and solid structure instead of a pretty surface hiding a hollow core.
You fix moisture-related sinkholes by stopping water getting into the wax, keeping fragrance oils dry, and avoiding steam or heavy humidity while candles cool.
Start by learning to identify moisture contamination so you know when water is the real villain. Tell-tale signs include foggy patches or droplets on the inside of the jar, spitting or popping sounds as you pour, and sinkholes that show up in clusters near the glass rather than only around the wick. If you see tiny tunnels radiating from the sides inward, or craters that look “crumbly” instead of cleanly sunken, there’s a good chance moisture was trapped and then boiled off or evaporated as the candle set.
The easiest prevention is to keep fragrance and equipment dry at every step. Store FO bottles tightly capped, away from steamy kitchens or bathrooms, and never leave open jugs sitting next to kettles, humidifiers, or simmering pots. Make sure measuring jugs, spoons, and pouring pitchers are fully dry before they touch wax or fragrance; even a film of rinse water can break into bubbles under heat. If you refrigerate or chill any materials, let containers come back to room temperature before opening them so condensation doesn’t form on the inside walls and drip into your mix.
During melting and pouring, do everything you can to avoid steam and sudden humidity spikes. Don’t run boiling pots or dishwashers in the same room, and avoid placing curing racks near bathrooms, laundry rooms, or vents that carry moist air. In cool, damp weather, a basic dehumidifier or a move to a drier room can dramatically cut moisture-related defects. If you suspect a batch was poured in “wet” conditions, mark a few candles for testing only, burn them carefully, and watch for hissing, sputtering, or uneven flame—all signs that water pockets might still be hiding below the surface.
If a particular fragrance seems to invite moisture issues, run a controlled test with fresh, carefully stored FO and fully dried tools. When the problem disappears, you’ll know the scent wasn’t cursed; the workflow was. From there you can tighten habits—dryer storage, better ventilation, and more disciplined equipment drying—so water has far fewer chances to sneak into your paraffin in the first place.
You prevent a surprising number of sinkholes simply by stirring gently, keeping pour height low, and degassing before you fill jars so you don’t trap micro-bubbles under the surface. Once you commit to standardize pour and stir to avoid voids, your batches stop feeling “mysteriously inconsistent” and start behaving like a repeatable process.
Air entrainment is the hidden culprit here. Aggressive, whisk-like stirring drags air into the wax, especially if you create a deep vortex that looks like a whirlpool. Those bubbles don’t always rise out before pouring; instead, they sit suspended until the surface starts to set, then collapse into tiny cavities that merge into noticeable sinkholes. To avoid this, aim for a steady, moderate stir cadence—more like folding batter than whipping cream—using a flat spatula or spoon that sweeps the bottom of the pot without splashing. Make that cadence part of how you follow the pour–stir SOP for every batch: heat, add fragrance and dye, stir gently for a set time, then pause to let any bubbles rise before you pour.
When it’s time to fill containers, keep the spout close to the jar—usually just a few centimetres above the rim—so the wax flows in a smooth, laminar stream instead of a frothy waterfall. Pouring from high up or stopping and starting repeatedly injects more air and can splash wax onto cooler glass, both of which encourage voids. If you do see scattered tiny pits or a “peppered” look in finished tops, stop and identify bubble vs shrinkage issues before changing recipes: bubbles usually leave round, crater-like marks with a clear origin in vigorous stirring or high pour height, while pure shrinkage problems behave more like smooth centre dips tied to temperature or cooling.
Over time, it helps to treat your ladle, pour pot, and stirrer like a mini production line. Mark preferred fill points on your jars, note ideal pour rates for each wax and vessel, and train anyone who helps you to match your cadence instead of improvising. That discipline doesn’t require fancy gear—just consistent technique and, if you like, a few small upgrades such as a narrow-spout pouring pitcher that makes low-height streams easier to control. The payoff is quieter defect logs, fewer “mystery” holes to repair, and more candles that look clean and professional straight out of the mold.
4. Measurement and validation last
To minimize sinkholes, size the wick to your jar by measuring inner diameter, choosing a chart-based starting wick, then test-burning and adjusting one size at a time.
Think of wick selection as part of how you solve sinkholes step-by-step, not an afterthought once you’ve poured and found a crater hugging the wick. When the wick is wrong, the wax near the center either never fully melts or overheats, so the cooling wax shrinks in uneven columns that collapse into voids. An undersized wick leaves a cool core that pulls away from the top surface, while an oversized wick can tunnel, leaving the center hollow even if the walls look fine.
Start by measuring the jar’s inner diameter at the top opening and, if it tapers, at the tightest point that the melt pool must reach. Use that diameter, plus your wax type and average fragrance percentage, to use the paraffin wick chart from your wax or wick supplier as your initial recommendation instead of guessing from forum anecdotes. When you wick and glue tabs, do everything you can to keep the wick perfectly centered, because even the right size will create asymmetric voids if it leans toward one side of the jar. Off-center wicks make one side run hotter than the other, so one half of the candle shrinks more and pulls the top into a dip that often shows up as a “half-moon” sinkhole.
Run structured test burns rather than casual “background” burns: trim the wick to about 3–5 mm, then burn the candle in 3–4 hour cycles, recording melt-pool width, wick mushrooming, and any sinkhole formation. After each cycle, you want the melt pool to reach close to the jar wall—typically within about 0.5–1 cm for straight paraffin containers—without smoking, sooting, or making the jar too hot to touch comfortably. If you still see a cool, un-melted core or a dip forming near the wick after two or three burns, step the wick up one size in the same series; if the top craters or the flame is tall and sooty, step down one size instead. Industry guidance from bodies like the National Candle Association and safety standards such as ASTM F2417 emphasise this kind of documented wick and burn testing as part of making a safe, stable candle, not just a pretty top.
Methods: the diameter and melt-pool ranges here are working starting points drawn from common container-wax instructions and wick-chart heuristics, plus real-world reports from makers; they are not legal limits. Always confirm your chosen wick against your own chart, then repeat burn tests under safe conditions that align with NCA and ASTM-style recommendations for flame height, stability, and container temperatures before selling or gifting any candle.
Calibrate your candle thermometer with ice and boiling-water tests, note the offset, then read wax temperature at mid-depth away from the pot walls for accurate decisions.
Once you control pour temps to prevent sinkholes, every small calibration habit directly reduces surprise craters and inconsistent tops. If your thermometer reads even a few degrees high or low, you might pour outside the sweet spot without realising it, and paraffin shrinkage will show up as tunnels or hidden voids. Industry standards such as ASTM F2417 and guidance from groups like the National Candle Association emphasise accurate temperature control as part of overall candle safety and quality, not just perfectionism.
Start with a simple two-point check. Fill a glass with crushed ice and a little water, wait a couple of minutes, then place the probe tip in the slushy middle; it should read close to 0 °C (32 °F) and any difference is your first offset. Next, place the probe in a gentle boil, avoiding contact with the pot, and note how far it is from your local boiling point; write both offsets where you can see them so you apply the correction whenever you check wax. To keep that routine consistent, write the steps down and use the calibration SOP you’ve created every time you change equipment or start a new production run. If you prefer contactless tools, keep IR vs probe explained in your notes so you remember that shiny, glossy wax can trick infrared readings and that an immersed probe at mid-depth is still the most reliable reference.
When measuring wax, stir gently first so hot and cool layers blend, then clip the probe so the tip sits roughly halfway between surface and pot bottom, well away from the metal wall or the side of a pouring jug. Wall and surface readings often run cooler than the true bulk temperature; if you rely on them, you may think you’re pouring at a safe 70 °C when the core is actually several degrees hotter. Over time, logging corrected readings, pour temperatures and resulting defects will show you patterns, letting you tune your process instead of guessing why one batch behaves perfectly while the next one sinks around the wick.
You avoid post-cure sinkholes by letting paraffin rest for a defined period, then checking tops, sides, and burn behaviour before selling or gifting.
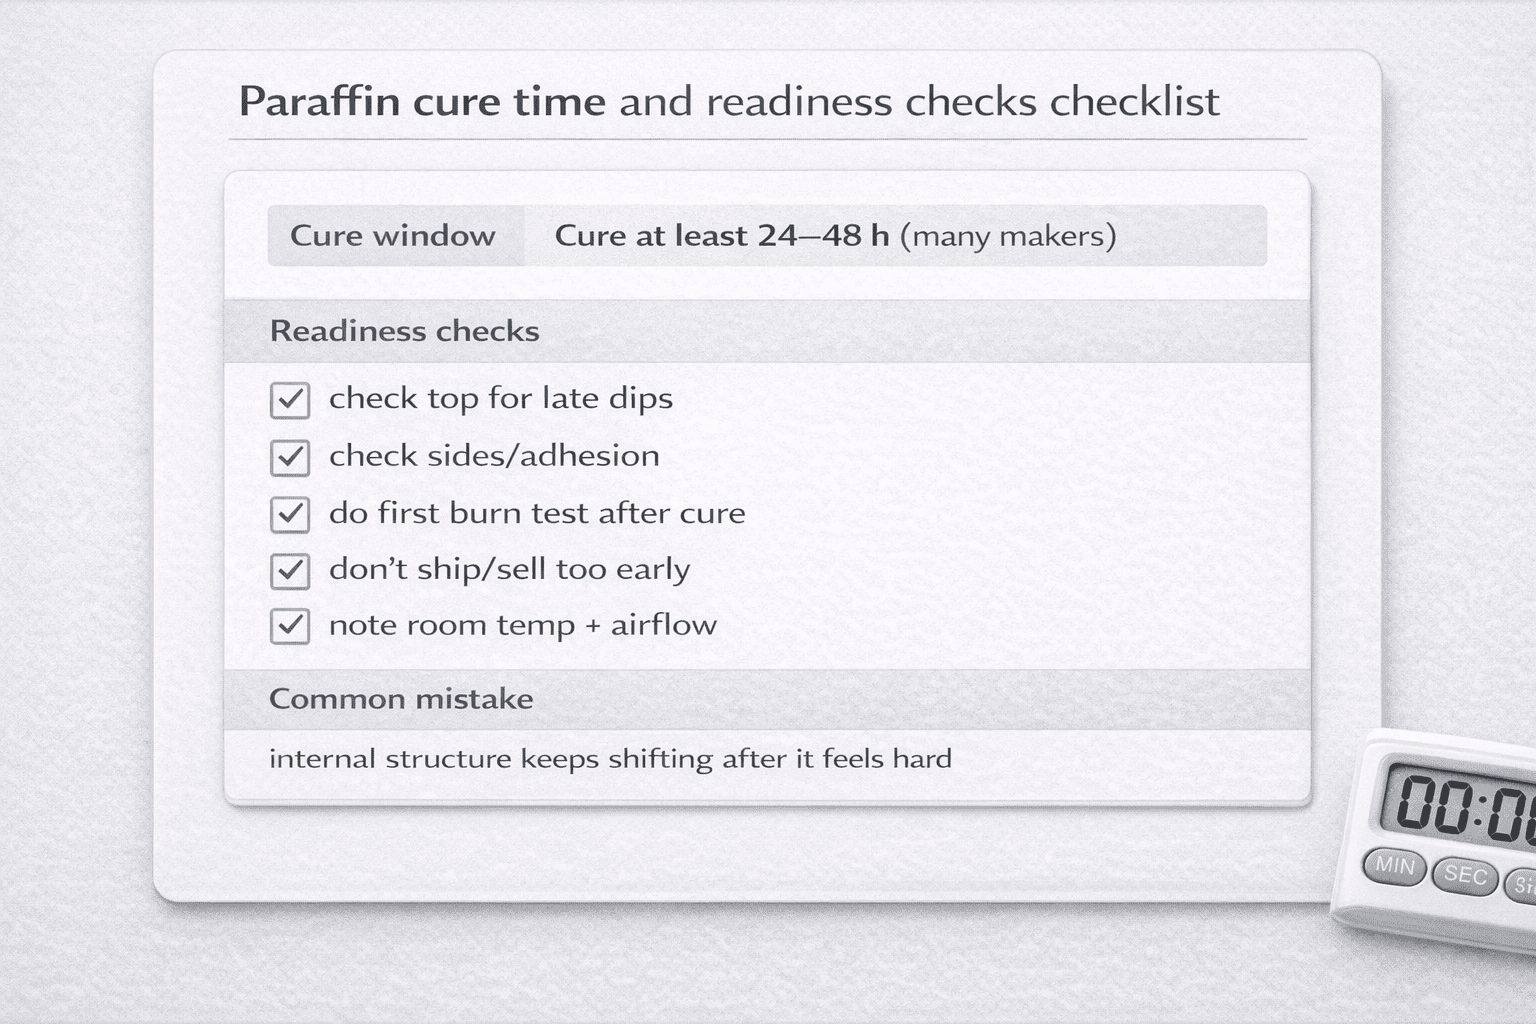
A simple decision to set a consistent paraffin cure time turns curing from guesswork into a predictable part of your process. While paraffin often feels hard within hours, internal structure keeps shifting as residual heat escapes and crystals continue to arrange themselves. If you burn-test or ship candles too quickly, you may miss slow-forming voids that only appear after a day or two, showing up as late sinkholes or ring-shaped depressions around the wick.
Choose a cure window that fits your wax and workflow—many makers use at least 24–48 hours for standard paraffin containers—and stick to it unless real testing shows a better number. After that window, perform simple readiness checks on each batch: inspect tops under good light, tilt the jar to catch any faint depressions, and run a thumb gently around the area near the wick to feel for soft spots or hollows just beneath the surface. Pick a couple of candles from each pour as dedicated test pieces and burn them through several cycles, watching for late-stage tunnelling or sudden craters appearing after the second or third session.
Those checks are your last chance to avoid post-cure sinkholes in finished candles that customers will discover instead of you. If a test candle reveals late voids, quarantine the rest of that batch and look back at your notes: cure room conditions, pour temperature, FO load, and any changes in wick or jar. Often you’ll spot a pattern—new jar geometry, a rushed cooling step, or an over-enthusiastic fragrance tweak—that explains why sinkholes appeared after curing instead of right away.
Make these steps part of a small “release checklist” you review before any candle leaves your studio: minimum cure date reached, visual check passed, basic burn test logged. Once you treat cure time and readiness checks as non-negotiable, post-cure surprises drop sharply, and you gain the confidence that each candle has already proved itself in your hands before anyone else ever lights it.
Paraffin sinkhole prevention checklist
You prevent most paraffin sinkholes by keeping temperature, cooling, airflow, and formula changes under control from one batch to the next.
- Pour within the tested range for your exact wax, not a generic paraffin number.
- Keep jars slightly warm instead of cold-soaking them on a hard surface.
- Cool candles in still air away from vents, fans, and cold countertops.
- Stir gently and pour from low height to avoid entrained air.
- Use a planned second pour or poke-and-repour for jars that repeatedly trap a deep center void.
- Re-test whenever you change fragrance load, additive ratio, wick series, or jar geometry.
Before you call the candle fixed
Do not burn-test, label, sell, or gift a candle that still feels hollow near the wick area or develops a new ring after cooling.
Let the repair fully set in still air, then check the center before you decide the batch is done. A smooth-looking top is not enough if the wick has shifted, the wax still feels hollow, or a second dip appears during cooling.
Use this short final check:
- let the repair fully set in still air
- press or probe the center lightly to confirm the void is gone
- confirm the wick is still centered and not buried or leaning
- burn-test one sacrificial candle from the batch before releasing the rest
If a candle only develops a new defect after handling, shelving, or shipping, treat that as a separate finished-candle storage issue instead of expanding this page into a transport guide. For the validation workflow, see how to conduct a candle burn test for fire risk.