Fix common soy wax candle issues by matching each visible symptom to the cause, changing one variable, and retesting the next batch.
Soy candle problems usually trace back to wick fit, temperature control, cooling conditions, fragrance load, or cure time. This page helps you separate cosmetic defects from burn-performance problems before you start changing random variables. It keeps the focus on soy-specific issues that show up after pouring or during test burns. Use it to choose the fastest likely fix, then confirm the result with a fresh test batch.
Fix soy candle problems by matching the symptom to the cause, changing one variable, and retesting the next batch.
If your soy candles keep frosting, tunneling, or showing wet spots, the root cause is usually wick fit, temperature control, cooling conditions, or cure time. This guide helps you diagnose the visible symptom before you start changing random variables. It focuses on soy-specific cosmetic and burn-performance problems that show up after pouring or during test burns. Use the sections below to match the symptom, apply the fastest fix, and retest one variable at a time.
Start here: cosmetic issue, burn-performance issue, or QC fail?
Classify the candle before you try a fix.
Within the broader candle wax types workflow, soy-specific problems usually come back to wick fit, temperature control, fragrance load, or cooling conditions.
Cosmetic issues include frosting, light wet spots, and minor rough tops when the candle still burns normally. Burn-performance issues include tunneling, weak hot throw, soot, mushrooming, or a melt pool that never reaches the glass. QC-fail issues include deep fragrance pooling, a wick that repeatedly drowns or self-extinguishes after retesting, an unstable oversized flame, or any cracked or overheated container.
Use cosmetic fixes only for appearance defects. Use burn tests for performance problems. If the candle falls into the QC-fail bucket, stop rescue methods, reformulate from a fresh jar, and do not sell or gift that batch.
Fast diagnosis for common soy wax candle problems
The fastest way to fix a soy candle problem is to match the symptom to the right fix path first, then change only one variable in your next test batch.
If you are still learning the basics of making soy candles, use this page as your troubleshooting companion after pouring, curing, and first-burn testing.
| Symptom you see | Most likely cause | Fastest fix to try now | What to retest next batch |
|---|---|---|---|
| White crystal film or patches | Soy crystallization plus uneven cooling | Warm jars slightly, pour in-range, cool away from drafts | Pour temp and room conditions |
| Wax stuck to the center with a ring on the sides | Wick is underpowered or the first burn was too short | Reset once with a foil collar, then retest wick size | Wick series and jar diameter |
| Light patches on the glass | Wax shrank away from the jar during cooling | Preheat jars lightly and cool more evenly | Jar temp, airflow, cooling surface |
| Hole or crater near the wick | Trapped air plus center shrinkage | Poke relief holes and do a thin top-off pour | Pour temp and cooling speed |
| Rough, rippled, or pitted top | Air bubbles or uneven surface cooling | Gentle surface reflow or a thin second pour | Stir speed and pour temp |
| Weak hot throw | FO %, add temp, cure time, or weak wick | Test one variable at a time with labeled jars | FO %, add temp, cure days, wick size |
| Mushrooming or soot | Wick too large, wick too long, or over-fueled flame | Trim the wick and size down if needed | Wick series, FO %, dye load |
| Oily beads on top | FO overload or unstable storage | Bring FO back within supplier limits and store cooler and drier | FO %, add temp, storage conditions |
Fast diagnosis flow
- Decide whether the problem is cosmetic, burn-performance, or both.
- Check your batch log for wick, FO %, pour temp, add temp, jar, cure time, and room conditions.
- Choose the symptom section that matches what you actually see on the candle.
- Correct only one variable in the next test batch.
- Burn-test long enough to judge melt pool, flame, soot, and scent before locking in the change.
How to prevent frosting on soy candles (pour temp, jar preheat, cooling)
Reduce frosting by narrowing the wax-to-glass temperature gap, using pour temperatures that match your wax type, and cooling slowly away from drafts. Use pour temperatures that match your wax type, and if you want a supplier example of slow, draft-free cooling, review CandleScience’s frosting guidance.
For a deeper symptom-specific breakdown, review soy wax frosting causes and prevention after you test the basic process fixes below.
Frosting is a natural crystal pattern that appears when soy wax solidifies unevenly or the container is much colder than the melt. It is usually cosmetic, which means the job here is to reduce it and standardize it rather than promise a perfectly flawless surface every time.
High humidity and rapid temperature swings exaggerate those crystals, so jars poured in cold, damp rooms often show the heaviest frosting. Judge the final surface after the candle has cooled and cured rather than in the first hour when the top is still changing.
Use this order of fixes if frosting keeps returning:
- Warm jars slightly before pouring so hot wax does not hit cold glass.
- Stay within your wax supplier’s recommended pour range and test small temperature moves instead of big jumps.
- Cool candles in a draft-free area away from vents, windows, and cold stone counters.
- Do not move jars until the tops have fully set.
- Treat light frosting as cosmetic if the candle still burns evenly and throws scent well.
If uneven burn patterns are your real problem rather than surface crystals, move to the tunneling section below.
Fixing tunneling in soy candles (foil method, first-burn memory, wick fit)
Rescue tunneling in soy candles with a foil collar, then correct the root cause by improving first-burn coverage and matching wick size or family to the jar.

Tunneling means the wick cannot create a full melt pool for that jar width, so the candle burns down the center and leaves a ring of wax on the sides. The two most common triggers are a too-short first burn and a wick that is slightly underpowered for the jar, wax, or fragrance load.
Once a tall ring of unmelted wax forms, each new burn tends to deepen the channel unless you add controlled extra heat for a corrective burn. Done carefully, the rescue can save the candle, but the lasting fix comes from better wick fit in the next batch.
Before you light anything, compare your current wick against a wick sizing chart and size your wick for the jar before you retest. If tunneling keeps returning after a corrective burn, move to a fresh jar and test one wick change at a time.
Quick rescue checklist:
- Trim the wick to about 3–5 mm so the flame stays controlled and soot is minimized.
- Wrap a loose foil collar around the jar rim, leaving the center open so heat reflects onto the wax walls without smothering the flame.
- Burn under supervision until the melt pool reaches the glass and the top flattens, then remove the foil and let the candle cool completely.
- If tunneling returns, record the wick code and test one size up or a hotter wick family in a fresh jar until you see a consistent full melt pool.
For the first burn, use a simple rule of thumb of about 1 hour per inch of container diameter, up to roughly 4 hours, so the melt pool has time to reach the glass.
When the flame is too small, drowns, or goes out
A tiny melt pool or a wick that keeps drowning usually points to an underpowered wick, too much fragrance for the recipe, or a wick trimmed too short after a failed burn. You can rescue one test candle by clearing a little wax from around the wick, but the lasting fix is to retest wick size, wick family, or fragrance load in a fresh jar.
- Let the candle cool fully before touching the wick.
- Trim only loose carbon so enough wick remains exposed to relight safely.
- If the wick is submerged, remove a small amount of wax from around the wick and run one supervised test burn.
- If the melt pool still stays narrow, test one wick size up or a hotter wick family in the same jar.
- If a larger wick smokes or mushrooms, reduce fragrance load or dye before blaming the wick alone.
Treat repeated drowning, self-extinguishing, or a persistently tiny melt pool as a formulation problem, not a cosmetic one.
Treat the foil collar as a one-off, supervised rescue step: it can raise the temperature of candle jars and containers, so protect the surface underneath, avoid repeating it on the same candle, and never leave a foiled candle burning unattended.
If juggling jar diameter, soy wax type, fragrance load, and wick families feels like too many variables, move deeper wick-only diagnosis to common candle wick problems.
How to fix wet spots and poor glass adhesion in soy candles
Minimize wet spots by preheating glass, using a pour temperature that fits your wax type, and cooling jars slowly so the wax contracts more evenly against the container wall.
Wet spots are light patches where the wax has pulled back from the glass, usually from shrinkage and tiny air pockets as the candle cools. They are mostly cosmetic rather than a burn-safety defect, but they can make handmade soy candles look inconsistent from jar to jar. Light wet spots are usually cosmetic unless they show up with broader QC-fail signs like repeated wick drowning, deep fragrance pooling, cracked glass, or overheating. If the patches keep returning, move deeper into fixing wet spots and sinkholes in candles.
Large temperature gaps between hot wax and cold glass make the outer wall set first while the center keeps contracting, so gaps and side pull-away show up more than they do in thicker, better-insulated containers. Cooling speed matters here just as much as pour temperature.
Use this order of fixes if adhesion lines keep appearing:
- Start with clean, dry jars and warm them slightly before pouring.
- Pour slowly so you do not trap extra air along the glass wall.
- Cool jars with space between them, away from vents, windows, or direct airflow.
- Set jars on a rack, towel, or other less-cold surface instead of bare stone or metal.
- Treat mild pull-away in a cured candle as cosmetic instead of reworking every jar.
For side-by-side testing, compare a thin, unheated jar cooled under a vent with a thicker prewarmed jar cooled in a box; tracking your adhesion-defect rate across a dozen jars makes it easier to see how jar thickness, preheat, and cooling method improve clear, consistent adhesion versus patchy pull-away.
Steps to fix sinkholes and cavities under the top layer
Fix sinkholes by releasing trapped air first, then leveling the surface with a thin second pour or a gentle top re-melt, and retest future batches with better temperature control.
Sinkholes and hidden cavities show up as dips or soft spots near the wick when soy wax shrinks and traps air as it cools. They matter more than light frosting because a cratered top can affect wick support, final appearance, and how evenly the candle starts burning.
Most sinkholes happen because the outer shell sets while the warmer center keeps contracting, especially if wax is poured very hot into cool jars or a cold room. The repair goal is simple: restore a flat, even top without overheating the jar or overfilling the container.
Methods – how to read the temperature range below: Treat the numbers in this section as supplier-style starting ranges for container soy wax, not universal standards. Use your wax supplier’s published range as the baseline, then confirm the final setting with small test batches.
Many container soy waxes are poured somewhere around 55–70 °C (about 130–160 °F), but you should still choose pour temperature by wax type and retest before committing a bigger batch.
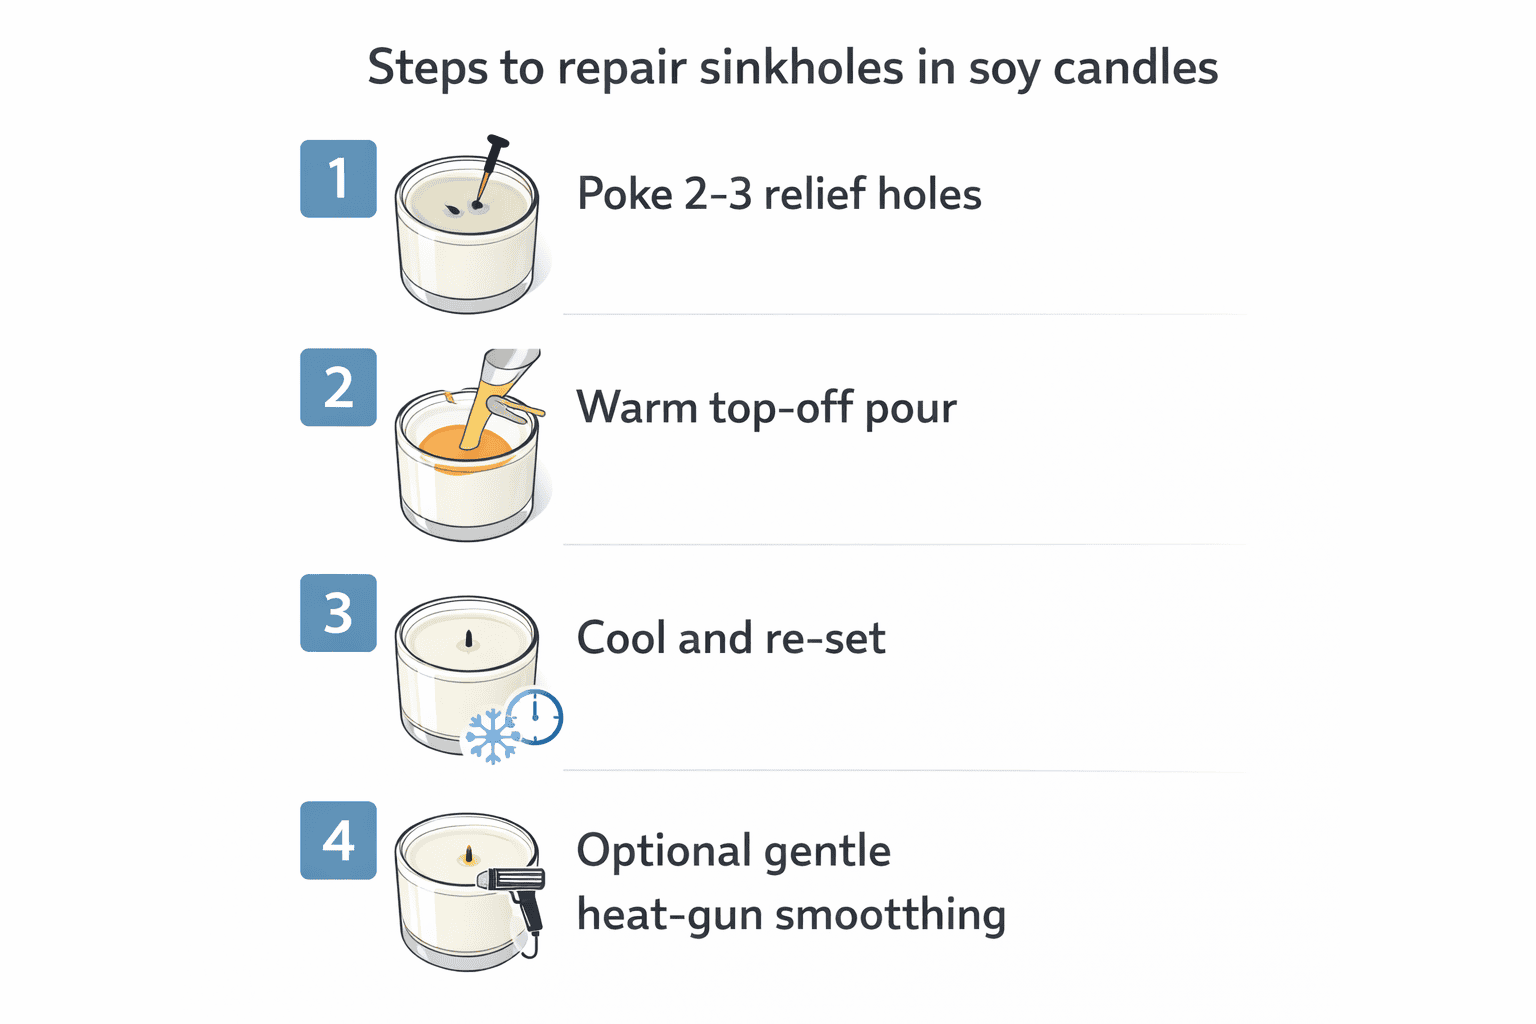
Quick repair steps for a finished candle:
- Warm or save extra wax. Reheat leftover wax or a matching mini-batch back to your normal pour temperature so the top-off layer bonds cleanly.
- Poke to release air. Use a skewer or wick dipper to poke several holes down through the sinkhole area, stopping just above the container base, to vent trapped air.
- Top off with a thin second pour. Slowly pour just enough wax to flood those channels and create a new, shallow top layer without overfilling to the rim.
- Or re-melt the surface. If you do not have spare wax, use a low-setting heat gun or hairdryer 20–30 cm above the candle to melt only the top few millimetres until the surface levels out.
Place the candle on a heat-safe surface, keep labels and nearby materials clear, and never leave the tool running unattended. After the repair sets, compare the result with your batch notes so you can decide whether pour temperature, jar temperature, or room conditions caused the void in the first place.
For a deeper tool-specific repair workflow, move to using a heat gun for surface imperfections after you confirm the void is not coming back in the next batch.
Steps to fix rough or uneven tops (ripples, pits, micro-bubbles)
Smooth rough soy tops by choosing the right repair for the defect: reflow the surface for shallow ripples, or use a thin second pour when pits suggest trapped air under the top layer.
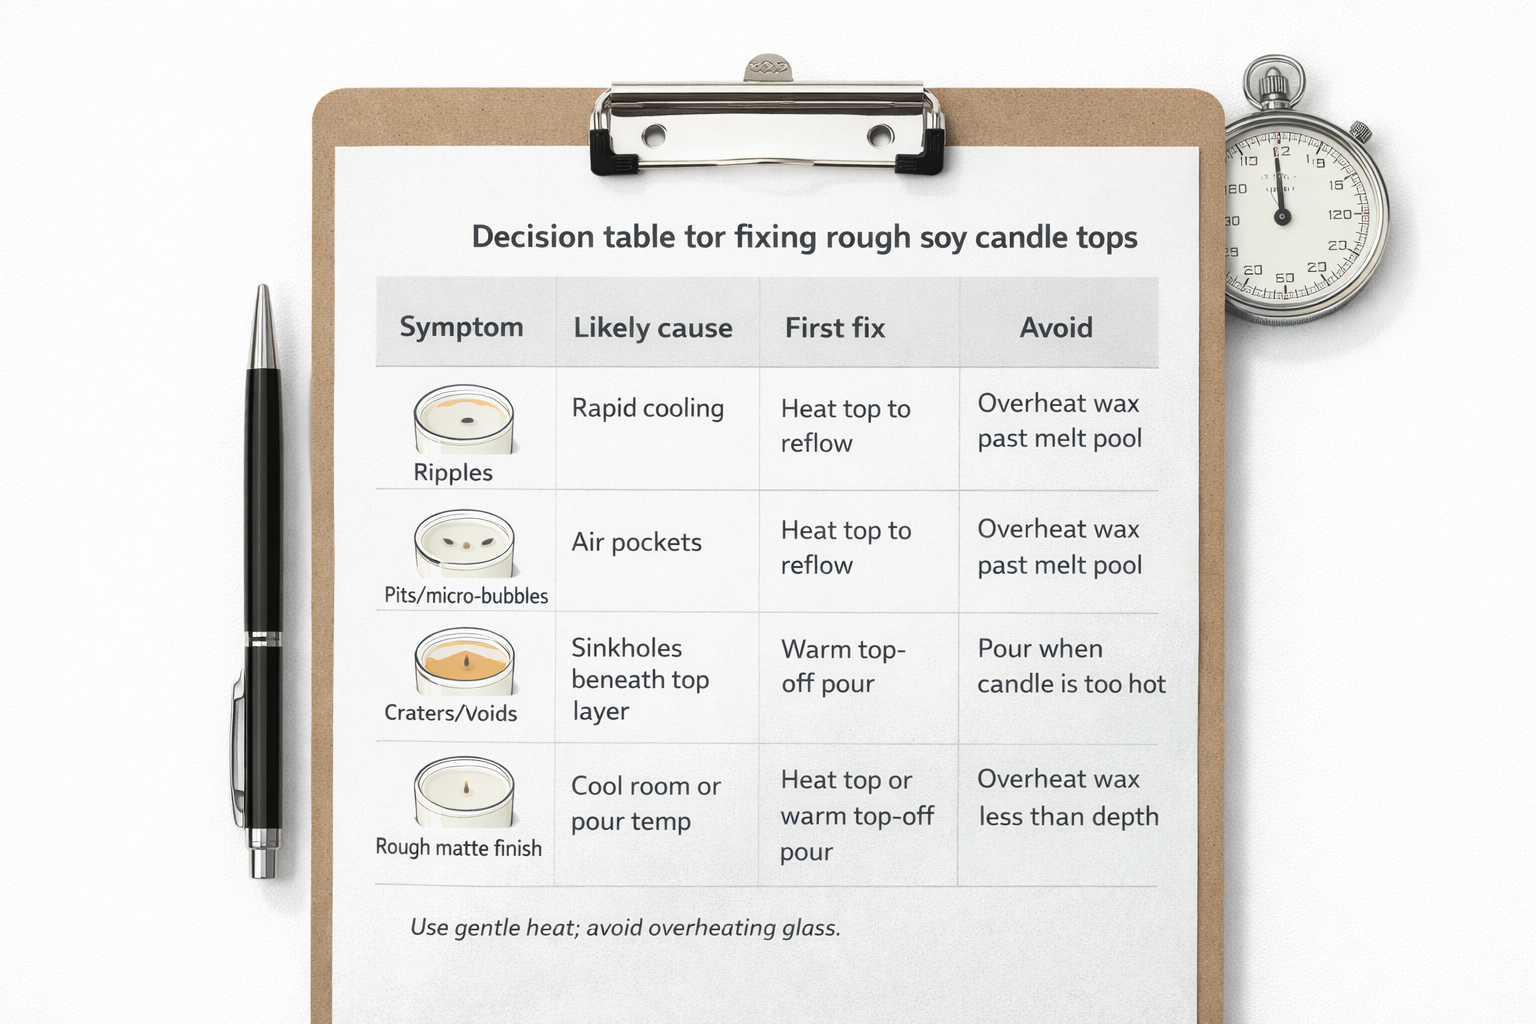
Rough, pitted, or rippled tops usually come from micro-bubbles and temperature swings while the wax sets, and they are mostly cosmetic unless they hide deeper voids. The key difference is depth: shallow texture usually responds to surface heat, while deeper pits often need a vent-and-top-off fix.
When you reflow, you want just enough heat to liquefy the top film without overheating the jar, wick tab, or label. The cleaner the repair, the less likely you are to create a new halo line, glass overheating issue, or repeated pit pattern.
Before you start, confirm that your tool can warm only the surface, then stir gently in future batches so the next batch traps fewer bubbles while you add fragrance to hot wax.
For a heat-gun rescue, use the smallest amount of surface heat needed to level the top, then let the jar reset fully before you judge the finish.
When pits are deeper or the surface looks whipped, a warm second pour is safer than repeated reflow. Compare the result with the sinkhole repair section above so you can tell when a cavity issue, not just a surface ripple, needs attention.
How to improve hot throw in soy candles (FO %, add temp, cure time, wick heat)
Improve hot throw by measuring FO % accurately, adding fragrance at the right temperature, allowing enough soy cure time, and matching wick heat to your jar size.
Cold throw is the scent from the unlit candle; hot throw is how strongly the room smells after a full melt pool forms. Weak hot throw usually comes from one of four issues: too little fragrance, poor binding at add temperature, too little cure time, or a wick that does not generate enough heat across the jar.
Methods – how to use the ranges in this section: Treat the fragrance-load, add-temperature, and cure-time numbers below as supplier-style test ranges for container soy, not fixed standards. Use your wax maker’s listed maximum load and temperature band as the baseline, then confirm performance with labeled jars and repeatable burn tests.
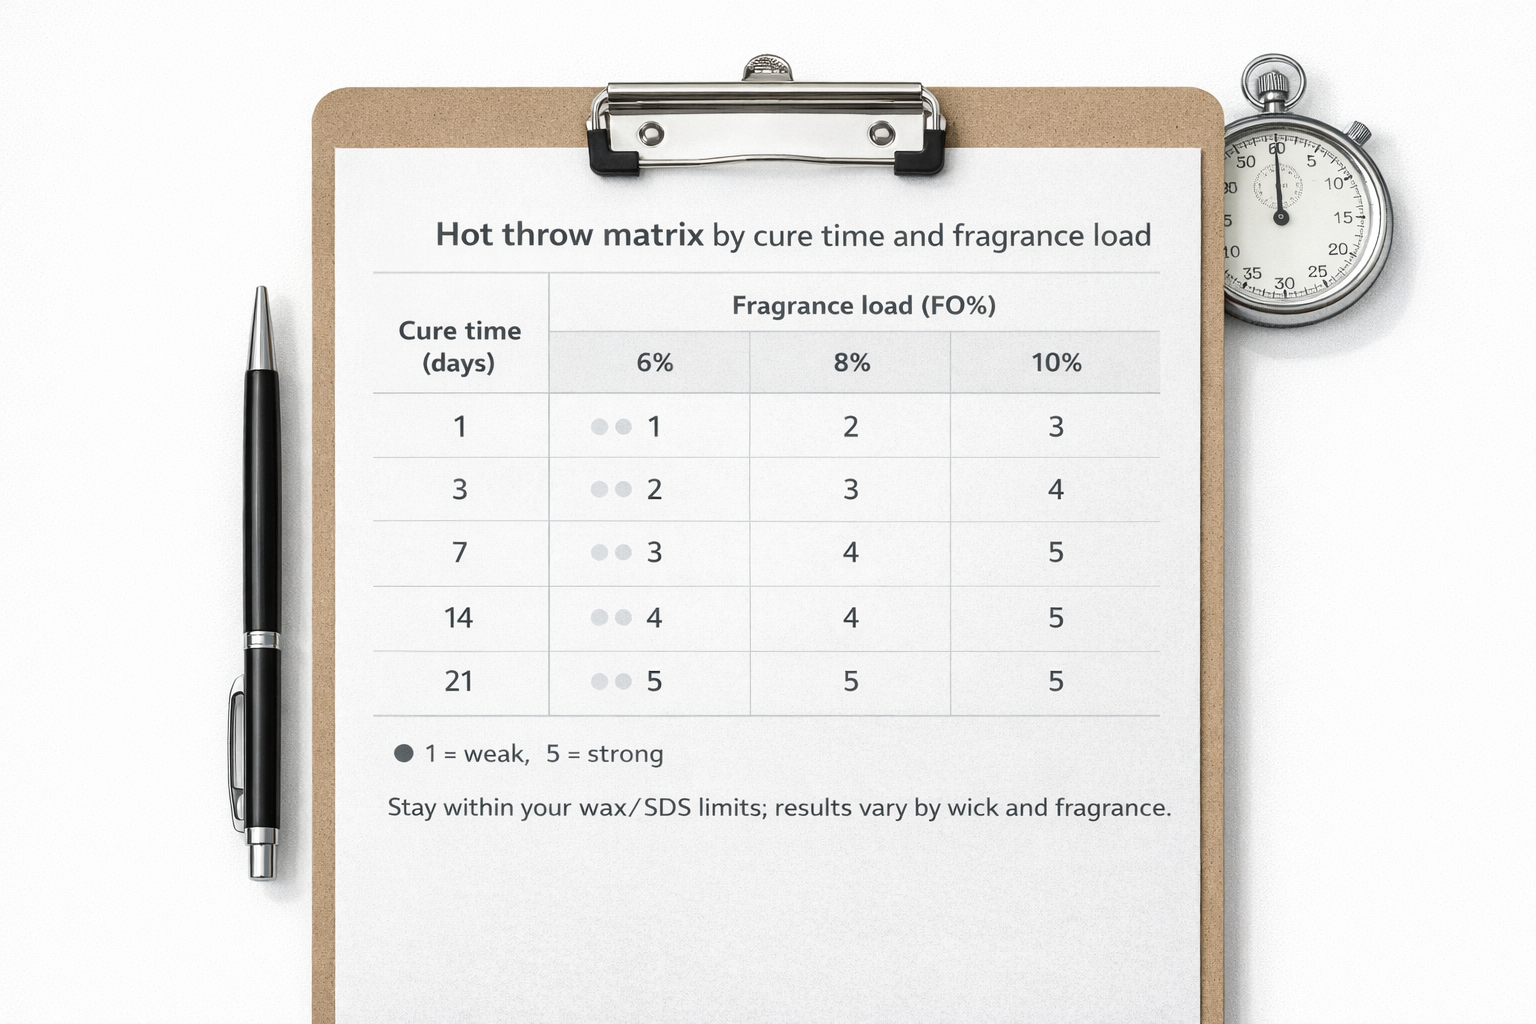
Most container soy waxes perform well around 6–10% fragrance load by wax weight, but the true maximum depends on your specific wax and fragrance pairing. That is why controlled testing beats copying the highest number you see online.
Use a scale so your FO % is precise, then test 6%, 8%, and 10% against your wax’s listed maximum instead of jumping straight to the top. For the math, move to fragrance load in candle making.
Add fragrance when the wax is hot enough for good binding, then let your testers cure before you judge performance. For deeper process detail, see when to add fragrance by wax type.
| Variable to test | Starting test range | What to watch | Keep / reject rule |
|---|---|---|---|
| Fragrance load | 6%, 8%, then 10% only if your wax allows it | Scent strength, sweating, soot, wick drowning | Reject any batch that leaks oil, mushrooms heavily, or smokes |
| Cure time | 2, 7, and 14 days | Cold throw, hot throw, surface stability | Keep the shortest cure that passes burn and scent tests |
| Wick heat | Current size, one size up, alternate series | Melt pool width, flame height, soot | Keep the wick that reaches a strong melt pool without smoke |
| Add temperature | Supplier-recommended band | Scent consistency from jar to jar | Reject batches with separation or weak, uneven throw |
Track how different wick sizes change flame height, melt-pool width, and room-filling scent, and compare those notes with the wick-heat troubleshooting steps elsewhere on this page when you choose your next test wick.
Methods – how to use the benchmark above: Rate hot throw in the same room while you vary only FO %, cure days, or add temperature. Keep jar, wax batch, wick type, and FO identical, and reject any batch that exceeds your supplier’s maximum load or burns poorly in testing.
Maintaining a clean burn: stop wick mushrooming & reduce soot
Prevent mushrooming and reduce soot by trimming correctly, keeping burns within a sensible time window, and balancing wick size with fragrance and dye load.
When a wick is too large, too long, or over-fueled, the flame draws more liquid wax than it can burn cleanly, which leaves carbon deposits on the tip and smoke on the jar. Clean burn is less about one magic wick and more about getting the fuel balance right for your jar, wax, and recipe.
Per National Candle Association consumer guidance, trim cotton wicks to about 6 mm (¼ inch) before lighting, keep burn sessions around 3–4 hours, and avoid drafts that disturb the flame.
Check jar diameter, wick family, and dye load together when you retest so a borderline wick is not pushed into sooty territory by extra fuel or color.
Before every burn, trim and discard the loose wick tip, clear any mushroom cap or debris from the melt pool, and relight only once the wax has fully solidified and cooled. If soot appears after you increase scent or color, back up and retest FO %, dye load, and wick size together instead of assuming trimming alone will solve it.
A dedicated wick trimmer for container candles helps you hit that height consistently without dropping shards into the wax, while FO levels stay at or below the supplier limit shown for your wax and fragrance.
Compare these clean-burn checks with your poor hot-throw troubleshooting notes so FO %, wick heat, and flame profile all move together instead of working against each other.
Why soy candles sweat (surface oil) and how to prevent it
Soy candle sweating happens when fragrance or natural oil rises to the surface, usually because the FO load, add temperature, or storage conditions push the wax beyond what it can comfortably hold.
Sweating usually shows up as tiny clear droplets or an oily sheen and is often cosmetic, but it signals that fragrance did not fully bind to the wax or is being pushed out by temperature swings. The fix is to bring formulation, process, and storage back into alignment instead of wiping the surface and hoping the problem stays gone.
Common drivers are pushing too much fragrance into soy wax beyond the wax’s recommended load, adding FO too cool or with minimal stirring, and storing finished candles in hot, humid spaces or in places that swing from cold to warm quickly.
Methods – how to use this mini table (not a standard): Treat the rows as a planning grid, not as guaranteed outcomes: keep FO % at or below your wax or FO supplier’s maximum, run small batches at slightly warmer add temps, and log room humidity when you notice new sweating so patterns emerge over time.
See the FO percentage limits and add temperatures to set fragrance loads from supplier data instead of copying random recipes that may quietly exceed safe max loads and encourage sweating.
Read storage humidity guidelines to keep finished candles in a stable, moderate environment, away from direct sun, heaters, steamy bathrooms, and summer window displays that can drive oil to the surface.
Day-to-day, prevention breaks into three levers: formulation, process, and storage. Stay inside the wax’s FO max, add fragrance in the recommended temperature band, and keep finished candles in a stable, moderate environment. If storage is the main variable, move deeper into preventing candle sweating in storage or display.
If a cured candle shows light beading but FO is within spec and the wax is not cracked or separating, blot the surface with a lint-free tissue before lighting and treat it as a cosmetic defect, not an automatic discard. However, if you see deep liquid fragrance pools, strong solvent odor, or sweating combined with wick drowning, mark the batch as a QC fail: do not burn-test, sell, or gift those jars until you have reformulated and re-tested the recipe.
Compare your sweating notes with the adjustments you made for wet spots, frosting, and hot throw on other batches so you can change only one or two variables at a time instead of chasing every problem at once.
Prevention and retest checklist for the next soy candle batch
Use one fresh test jar per change and label every jar before pouring.
Keep the jar, wax, wick family, fragrance, dye, and room conditions the same unless that variable is the one you are testing. This method shows which change actually fixed the problem and which change created a new one.
- Record wick code, jar diameter, wax, fragrance load, add temperature, pour temperature, cure days, and room conditions.
- Change only one variable in the next batch.
- Judge the candle after full cooling, after cure, and after a supervised burn test.
- Keep the version that gives a full melt pool, stable flame, clean jar, and acceptable scent without sweating or soot.
- Use a recipe for sale or gifting only after it passes both appearance and burn-performance checks.
That retest rhythm turns one-off fixes into a repeatable house recipe inside your wider candle wax types process.
If several symptoms overlap in the same batch, step back to the broader candle troubleshooting guide before you change more than one variable at once.