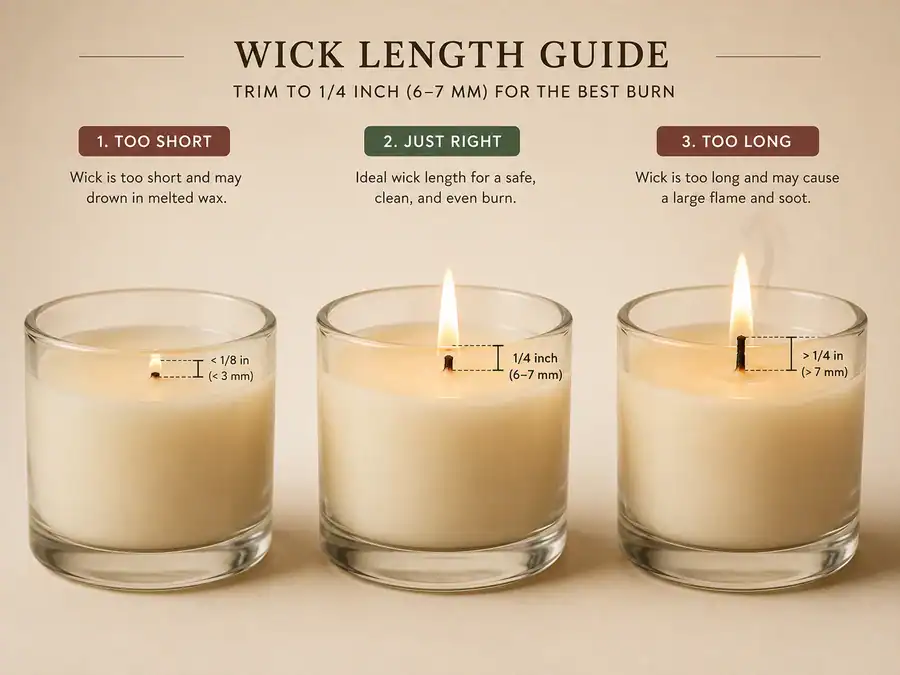
Trim most candle wicks to about ¼ inch, or 6–7 mm, before lighting and after the wax has cooled between burns.
This guide explains consumer candle-wick trimming for cleaner, steadier candle burning. Here, an even burn means a steady flame that melts wax without excess soot, smoke, drowning, or one-sided heat. It covers trim length, timing, tools, debris removal, and common flame problems caused by wick length. It does not cover candle-making formulas, wick sizing charts, fragrance load testing, product safety labeling, full tunneling repair, or full wooden-wick care.
How to keep your wick at ¼ in (6–7 mm) for an even, clean burn
Keep most candle wicks at ¼ inch before lighting so fuel and oxygen stay balanced. The National Candle Association gives the same ¼-inch trim rule. Follow the candle label if it gives a different trim length, especially for wooden wicks or brand-specific candle designs.
A wick tip is the exposed wick above the wax surface. At ¼ inch, the candle wick feeds enough melted wax for a steady flame without overfeeding it. A longer tip can create a taller flame, soot, and smoky glass. A shorter tip can weaken, drown, or fail to melt the surface evenly.
Use this trimming sequence:
- Let the candle cool if it has already burned.
- Hold a wick trimmer or small scissors level with the wax surface.
- Cut the blackened tip down to ¼ inch, or about 6–7 mm.
- Remove the clipped carbon from the wax before relighting.
- Check that the wick still stands centered and upright.
A basic wick trimmer helps most in deep jars because the angled plate catches debris. Scissors can work on shallow candles, but they often drop clippings into the wax pool.
Mini FAQ: Why does wick length change soot?
A long wick pulls more wax into the flame than the flame can burn cleanly. That extra fuel raises the flame and leaves unburned carbon as soot.
End checklist: ¼ inch visible, wick centered, no loose clippings, no draft, and no flame taller than the candle maker’s care label allows.
Keep the ¼-inch target as the default trim unless the candle’s own label gives a different wick length.
Pre-burn vs between-burn: how to time your trims for cleaner burns
Trim before each light; during long sessions, snuff the candle, let the wax and vessel cool, then micro-trim only if needed.
Pre-burn trimming means cutting the wick before lighting. Between-burn trimming means cutting it after a burn session, once the flame is out and the candle has cooled.
Pre-burn trimming is the normal rule because it starts the candle with a controlled flame. Between-burn trimming fixes growth from the last session, such as a carbon cap, curled tip, or smoky relight.
| Timing | Best use | What to do | What to avoid |
|---|---|---|---|
| Before lighting | Every normal burn | Trim to ¼ inch, then remove debris | Lighting a tall, curled, or mushroomed wick |
| Between burns | After the wax cools | Clip the carbon tip and reset the wick | Cutting while wax is liquid |
| During a long session | Only if flame gets too tall or smoky | Snuff, cool, trim 1–2 mm if needed, relight | Trimming over an open flame |
Mini FAQ: Do you trim before the first burn?
Yes. Trim before the first burn unless the candle arrives already cut to the care-label height. A clean first light helps the melt pool form without an oversized flame.
End checklist: trim before lighting, pause if the flame grows tall, snuff before any correction, let wax cool, then relight only after debris is removed.
Cleaner timing means the wick never gets a full session to overgrow into soot, smoke, or uneven heat.
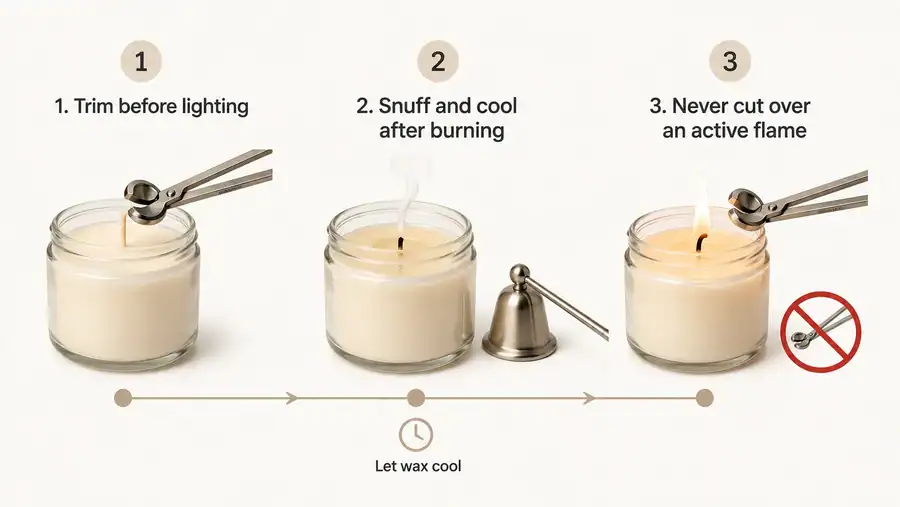
Trimming while lit vs trimming after cool-down: which is safer and cleaner
Do not trim a burning candle. Snuff the flame, let the wax cool, then trim the wick and remove debris before relighting.
Cool-down trimming means cutting the wick only after the flame is out and the wax surface is firm enough to keep clippings from sinking. It is safer and cleaner than trimming while lit because the tool, hand, wick, and loose carbon stay away from an open flame.
| Method | Safety level | Cleanliness | When to use it | Main risk |
|---|---|---|---|---|
| Trim while lit | Unsafe | Poor | Do not use | Flame contact, falling carbon, wax splatter |
| Snuff, cool, trim | Best | Cleanest | Normal correction | Requires patience |
| Snuff, short pause, micro-trim | Limited use | Moderate | Only for long sessions with a tall flame | Wax may still be soft |
| Trim after full cool-down | Best | Best | Between burns | None when debris is removed |
Use this safer sequence:
- Snuff the flame instead of blowing hard across the wax.
- Let the wax pool firm up.
- Trim the wick back to the correct height.
- Remove clipped carbon with tweezers or the trimmer tray.
- Confirm the wick stands centered.
- Relight only when the candle is stable and clear of debris.
Mini FAQ: Why not just cut the wick quickly while the candle is lit?
A quick cut can drop hot carbon into liquid wax, push the wick off-center, or bring metal too close to flame. The safer outcome comes from stopping the burn first.
End checklist: flame out, wax not sloshing, wick cooled, clipping removed, tool clear of flame, and candle stable before relight.
Cooling before trimming turns a risky flame correction into a controlled wick reset.
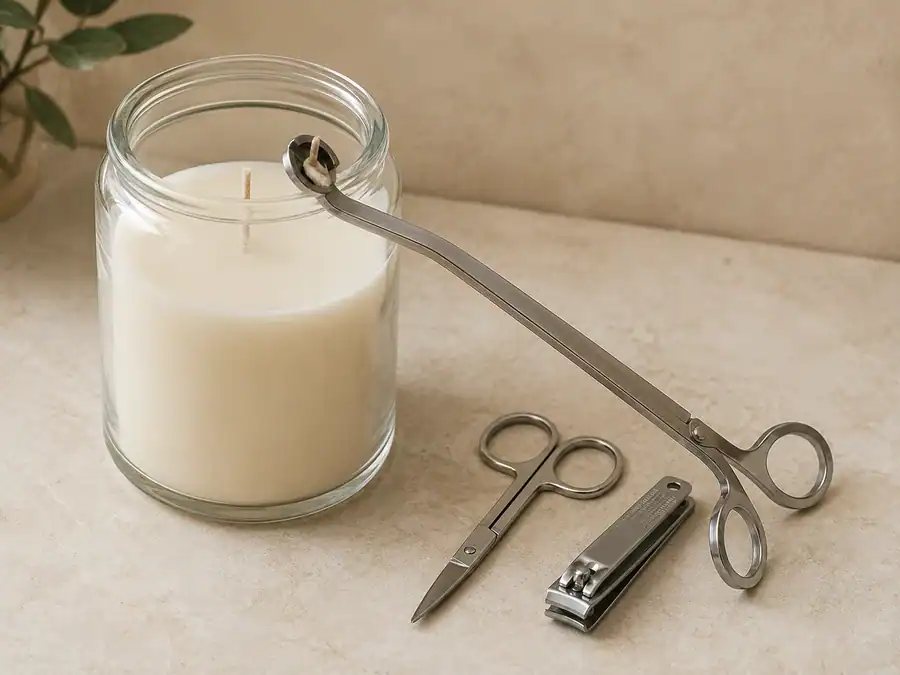
Wick trimmer vs scissors vs nail clippers: which tool trims best (and why)
A wick trimmer is best for deep jars; scissors or nail clippers work only when reach and debris control are safe.
A jaw angle is the cutting angle that lets the tool reach the wick without pushing it sideways. Candle wick trimming depends on that angle because a clean, level cut leaves less fray and fewer loose carbon pieces in the wax.
| Tool | Best use | Main advantage | Main drawback |
|---|---|---|---|
| Wick trimmer | Deep jars and regular candle care | Angled reach and clipping tray | Bulkier than scissors |
| Small scissors | Wide, shallow jars | Easy to control on exposed wicks | Drops debris more easily |
| Nail clippers | Travel tins or emergency trims | Compact and sharp | Poor reach in deep vessels |
Use this tool sequence:
- Choose a wick trimmer when the jar shoulder blocks your hand.
- Use small scissors only when the wick is easy to reach.
- Use nail clippers only for short, accessible wicks.
- Hold the tool level so the wick tip stays upright.
- Remove every clipping before lighting.
Mini FAQ: Why does fray matter?
A frayed wick burns with uneven fibers, so one side can feed more wax than the other. That can make the flame lean, flicker, or smoke before the next trim.
Tool note: Pick a trimmer with a flat cutting plate, a narrow head for jars, and a catching tray. Brand choice matters less than reach, clean cutting, and safe debris control.
The best trimming tool is the one that cuts the wick cleanly without tilting it or leaving carbon in the wax.
Measuring ¼ inch accurately with a guide card instead of guessing
Use a ruler or printed guide card and measure the visible wick above the wax before trimming.
A guide card is a small card marked at ¼ inch, or 6–7 mm, so you can compare the wick height before cutting. The ¼-inch target equals about 6.35 mm, so a 6–7 mm visible wick is close enough for routine candle care.
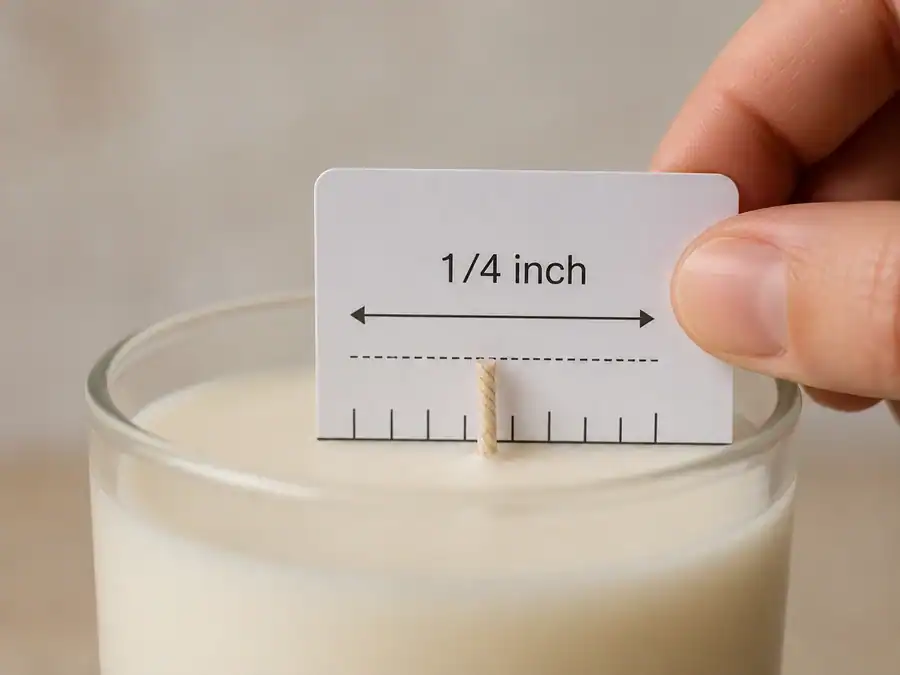
Use this measuring method:
- Wait until the wax surface is firm and cool.
- Place the guide card beside the wick, not into soft wax.
- Align the card’s bottom edge with the wax surface.
- Mark the top of the ¼-inch line with your eye.
- Trim any wick above that line.
- Remove the clipped tip before lighting.
Mini FAQ: Can you measure a curled wick?
Yes, but measure the standing height, not the full curled length. Clip the carbon curl back until the remaining upright wick is close to ¼ inch.
End checklist: card flat, wax cool, wick upright, 6–7 mm visible, no black clipping left behind.
Accurate measuring prevents two common mistakes: leaving a tall smoky wick or cutting so low that the wick drowns in the next melt pool.
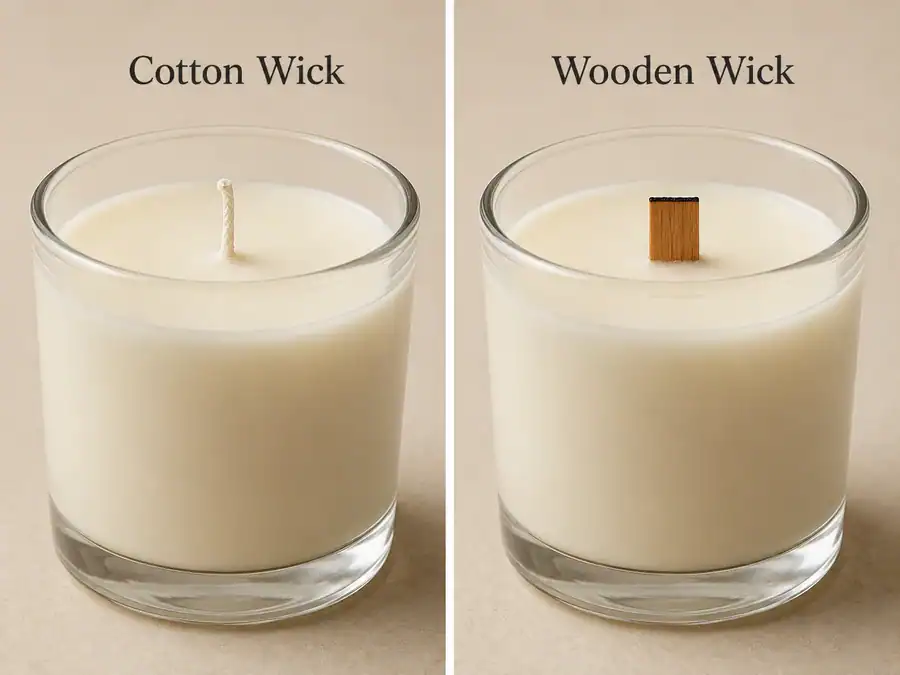
Cotton vs wooden wicks: trim length, tip shape, and relight behavior
Cotton wicks usually stay near ¼ inch, while wooden wicks should follow the candle label and often need a lower, flatter char edge.
A wick curl is the bend that forms as a cotton wick burns. A wood wick char line is the thin blackened edge left after the wood burns. These two tips behave differently, so treating both wick types the same can cause smoke, weak flames, or relight failure.
| Wick type | Best trim target | Tip shape | Main risk | Fix |
|---|---|---|---|---|
| Cotton wick | About 6–7 mm | Upright, lightly curved | Mushrooming or soot | Clip carbon cap and reset to ¼ inch |
| Wooden wick | Label-directed; often lower and flatter than cotton | Flat, square, lightly charred | Going out or flaring | Remove loose char and relight from one edge |
Use this routine:
- Trim cotton wicks to about ¼ inch before lighting.
- Remove cotton mushrooming before it grows into a carbon cap.
- For wooden wicks, pinch or clip only the loose char after the candle cools.
- Keep the wood tip flat instead of pointed.
- Relight wooden wicks from one end so the flame travels across the strip.
Mini FAQ: Which wick type needs more frequent trimming?
Cotton usually needs trimming for length and mushrooming. Wood usually needs trimming for char shape and relight quality. The difference is length control versus surface cleanup.
Wooden-wick trim targets vary by candle design, so the candle label governs when it conflicts with the general ¼-inch rule.
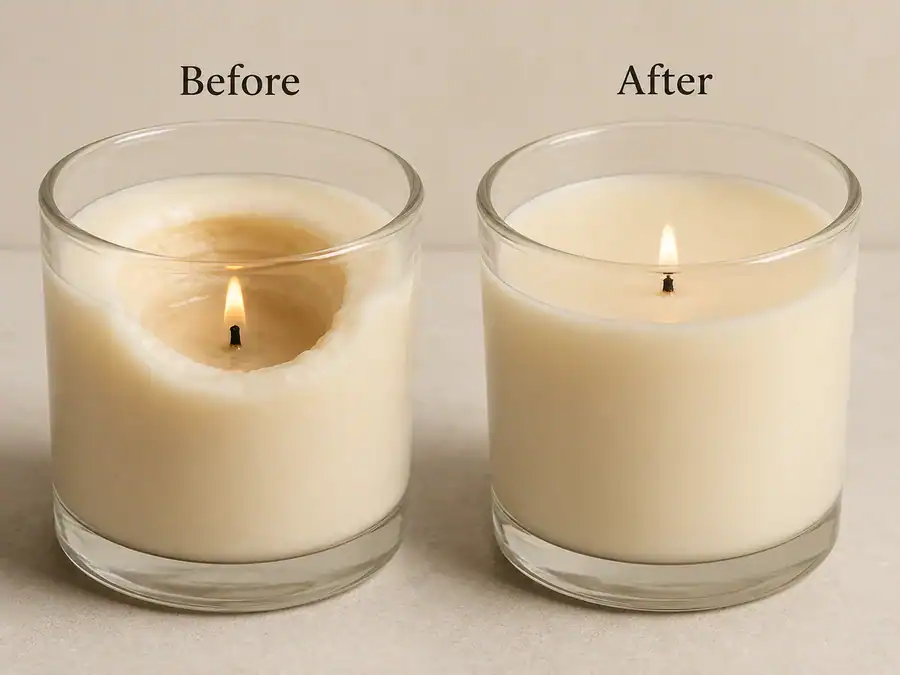
Fixing wick mushrooming before it turns into soot streaks
Fix wick mushrooming by extinguishing the candle, cooling the wax, clipping the carbon cap, and removing every loose piece before relighting.
Wick mushrooming is carbon buildup that forms a bulb or cap at the wick tip. It often appears after long burns, overlong wicks, rich fragrance loads, poor airflow, or a wick that is too large for the candle.
| Visible sign | Likely cause | Correction | Relight check |
|---|---|---|---|
| Small black bead | Normal carbon growth | Trim to 6–7 mm after cooling | Flame stays steady |
| Rounded cap with smoke | Wick ran too long | Cool, clip cap, remove debris | No smoke at relight |
| Large cap with soot | Long session or low airflow | End session, trim, shorten next burn | No soot streaks |
Follow this fixing sequence:
- Snuff the candle instead of cutting over a flame.
- Let the wax pool firm up.
- Clip the mushroom cap in one clean cut.
- Lift the carbon out of the wax with tweezers.
- Relight only when the wick is upright and close to ¼ inch.
Mini FAQ: Is wick mushrooming dangerous?
Small mushrooming is common, but a large cap can flare, smoke, drop debris, and stain the jar. The safer response is to stop, cool, trim, and relight cleanly.
End checklist: flame out, wax cool, cap clipped, debris removed, wick upright, next burn shorter if the cap returns.
Why candles smoke and how to prevent soot on rims and walls
Candles smoke when the wick is too long, the flame flickers, or the candle sits in a draft; trim to ¼ inch and move it away from airflow.
Soot is unburned carbon that leaves black marks on glass, nearby walls, or candle rims. In wick care, soot usually means the flame is getting more fuel or moving air than it can burn cleanly.
| Smoke sign | Likely cause | What to fix first | Clean-burn outcome |
|---|---|---|---|
| Black jar rim | Wick too long | Trim to ¼ inch | Smaller, steadier flame |
| Flame leans sideways | Draft, fan, vent, or window | Move the candle | Less flicker and soot |
| Flame jumps or flares | Debris in wax | Extinguish and remove debris | Cleaner relight |
| Smoke after relight | Carbon cap left on wick | Clip mushroomed tip | Less black residue |
| Wall staining nearby | Candle too close to wall or shelf | Move to open space | Less heat and residue buildup |

Use this prevention sequence:
- Trim the wick before lighting.
- Keep the candle away from fans, vents, windows, and busy walkways.
- Remove wick clippings before every burn.
- Stop the burn if the flame grows tall, flickers hard, or smokes.
- Let the wax cool, then reset the wick before relighting.
Mini FAQ: Is soot always a wax problem?
No. Wax type can affect burn behavior, but soot often comes from wick length, airflow, debris, or long burn sessions. Fix those causes before blaming the wax.
End checklist: ¼-inch wick, no draft, clean wax surface, centered flame, and no black rim after relight.
Smoke prevention is wick control plus air control. A trimmed wick cannot stay clean if the flame is being pushed around by moving air.
How to avoid tunneling with correct wick care and placement
Avoid tunneling by starting each burn with a trimmed wick, keeping the flame centered, and letting the wax surface melt evenly before extinguishing.
Tunneling is a hollow burn path down the candle center while wax stays stuck around the edge. Wick care matters because a weak, short, leaning, or drowned wick cannot heat the full wax surface evenly.
| Tunneling cause | Wick-related sign | Trim-related fix |
|---|---|---|
| Wick too short | Flame is tiny or drowned | Do not cut more; expose the wick only after cooling |
| Wick too long | Tall flame, soot, fast center melt | Trim to ¼ inch before the next burn |
| Wick off-center or draft-exposed | One side melts faster | Extinguish, recenter if safe, and move away from airflow |
Mini FAQ: Can trimming alone fix tunneling?
Not always. Trimming controls flame size, but tunneling can continue if the candle is burned too briefly, placed in a draft, or made with a wick that cannot heat the full diameter.
End checklist: wick centered, flame steady, surface melting outward, no deep center pit, no soot, and no draft.
Proper wick care prevents tunneling by keeping the flame strong enough to melt across the surface, but not so strong that it burns straight down the middle.
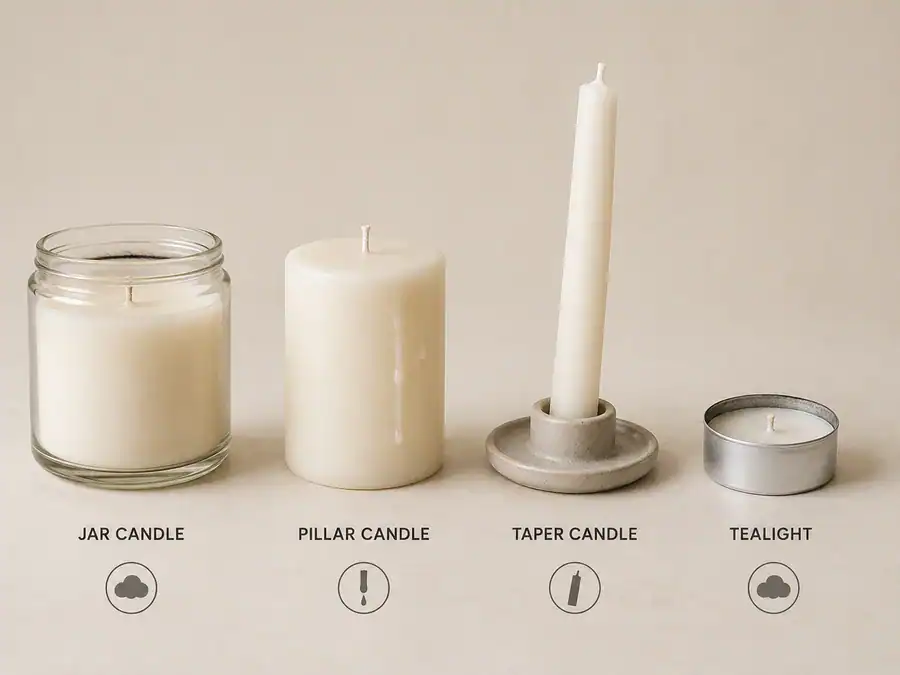
Jar vs pillar vs taper vs tealight: which trimming rules differ and why
Jar, pillar, taper, and tealight candles all need wick checks, but each candle type shows over-trimming or under-trimming differently.
A candle type changes how heat, wax, and wick position behave during candle burning. Jar candles trap heat near glass, pillars expose sidewalls, tapers show drips quickly, and tealights have short wicks inside small cups.
| Candle type | Trim target | Watch for | Best correction |
|---|---|---|---|
| Jar candle | About 6–7 mm | Sooty rim or uneven glass staining | Trim evenly and keep the flame centered |
| Multi-wick jar | Match all wick heights | One flame taller than the others | Trim all wicks to the same visible height |
| Pillar candle | Controlled, not buried | Sidewall drip or center tunnel | Keep wick upright and avoid an aggressive flame |
| Taper candle | Short, neat tip | Dripping, leaning, or dinner-table smoke | Trim lightly and keep taper vertical |
| Tealight | Check before lighting | Soot inside the cup | Remove loose carbon without digging into wax |
Mini FAQ: Do tealights need trimming?
Sometimes. Many tealights arrive short enough, but a blackened or mushroomed tip can still smoke in the cup. Remove only loose carbon and avoid cutting the wick so low that it drowns.
The right candle-type check prevents one trim habit from being applied to four candle shapes with different failure signs.
Why the first-burn memory ring matters and how trim interacts with minutes-per-inch
Plan the first burn by candle diameter while keeping the wick near 6–7 mm so the wax melts outward without soot.
A memory ring is the outer edge of wax reached during the first full melt pool. If the first burn stops too early, the candle can keep melting inside that smaller ring and leave firm wax walls on later burns.
For the first burn, many candle-care guides use about one hour per inch of candle diameter as a planning rule, but the candle label and flame behavior should control the final decision. Stop earlier if the flame smokes, flares, or overheats the vessel.
A clean first burn needs both time and wick control. Time helps the wax surface melt outward; wick length keeps the flame from overfeeding, smoking, or staining the jar during that longer session.
Use this first-burn sequence:
- Trim the wick close to 6–7 mm before first lighting.
- Place the candle on a level, heat-safe surface.
- Estimate burn time from the candle’s diameter.
- Watch the melt pool spread toward the edge.
- Stop if the flame grows too tall, smokes, or flickers hard.
- Let the wax cool before the next trim.
Mini FAQ: Does a longer first burn fix a bad trim?
No. A longer first burn cannot compensate for a wick that is too tall, smoking, leaning, or dropping carbon into the melt pool.
A clean memory ring comes from matching burn time to diameter while keeping the wick short enough to burn steadily.
How often to trim during 2-, 4-, and 6-hour sessions
Trim before every burn, then check flame height during longer sessions; correct only after snuffing and cooling if smoke, mushrooming, or flaring appears.
A burn session is one continuous period from lighting to extinguishing. Wick trimming frequency depends on session length because carbon buildup, flame height, and melt-pool depth increase as the candle burns.
| Session length | Trim before lighting? | Mid-session check | Correction trigger | Best action |
|---|---|---|---|---|
| 2 hours | Yes | Usually once | Small carbon bead or light smoke | Finish session, trim after cooling |
| 4 hours | Yes | Check around midpoint | Tall flame, soot, mushroom cap | Snuff, cool, trim, remove debris |
| 6 hours | Yes | Check more than once | Large cap, flicker, jar soot, deep melt pool | End session or reset only after cooling |
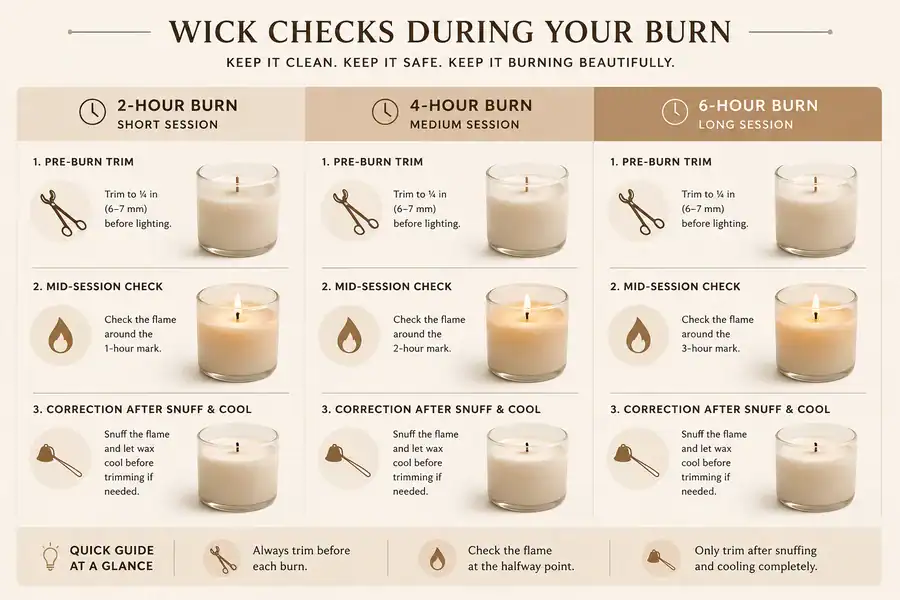
Use this trimming rhythm:
- Trim to about 6–7 mm before lighting.
- Watch the flame during the first 15–20 minutes.
- Check again during longer burns.
- Stop the session if the flame grows tall, smokes, or leans hard.
- Let the candle cool before any trim.
- Shorten the next session if mushrooming returns quickly.
Mini FAQ: Should you trim every hour?
No. Hourly trimming is usually too much and can disturb the burn. Trim before lighting, then intervene only when flame behavior shows the wick has overgrown or carbon has built up.
End checklist: pre-burn trim done, flame steady, no smoky rim, no oversized carbon cap, no debris in wax, and no long unattended session.
The best frequency is not constant cutting. It is a clean pre-burn trim plus a safety check when the session is long enough for the wick to change shape.
Steps to remove wick debris safely after trimming
Remove every wick clipping before relighting because loose carbon can smoke, flare, stain wax, or make the flame behave unevenly.
Wick debris is any clipped carbon, ash, wick fiber, or broken wood char left on the wax surface. It matters because debris can become a second fuel source instead of staying part of the controlled wick.
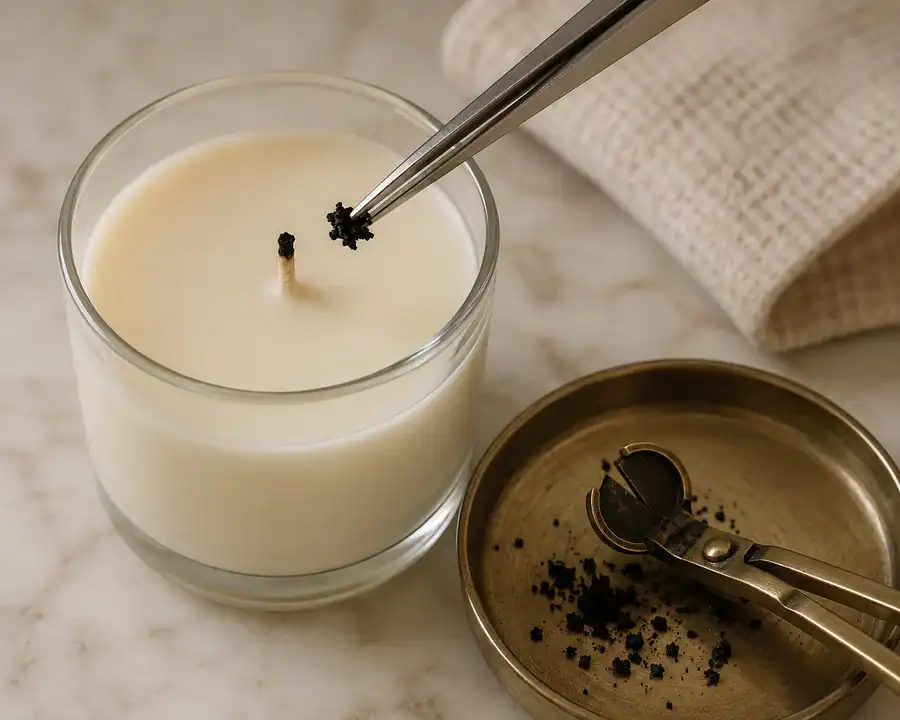
Use this safe cleanup sequence:
- Snuff the candle first if it was burning.
- Let the wax surface firm up.
- Catch the clipped wick with the trimmer tray when possible.
- Lift loose pieces with tweezers if they land on wax.
- Wipe the tool before storing it.
- Check the wick is upright before lighting again.
| Debris type | Where it appears | Why it matters | Best fix |
|---|---|---|---|
| Black carbon cap | Wick tip or wax surface | Can smoke or flare | Lift it out before relight |
| Cotton fibers | Around the wick base | Can make the flame uneven | Remove with tweezers |
| Wood char flakes | On wooden wick candles | Can block relighting | Brush or clip loose char |
| Ash dust | Near the melt pool | Can dirty pale wax | Remove only when wax is cool |
| Dropped match head | Wax surface | Adds foreign fuel | Remove before lighting |
Mini FAQ: Can you leave tiny black specks in the wax?
No, not if you can remove them safely. A few specks may look harmless, but loose carbon can stain the wax and feed smoke during the next burn.
End checklist: flame out, wax firm, clippings removed, tool clean, wick centered, and wax surface clear.
A clean trim is only finished when the cut piece is out of the candle.
Drafts, travel tins, and outdoor candles: keeping flame behavior stable
Move candles away from airflow before blaming the trim, because drafts can make a correctly trimmed wick burn unevenly.
A draft is moving air from a vent, fan, window, doorway, stairwell, or outdoor gust. In candle burning, a draft bends the flame, changes heat direction, and can make a trimmed wick look too long or too short.
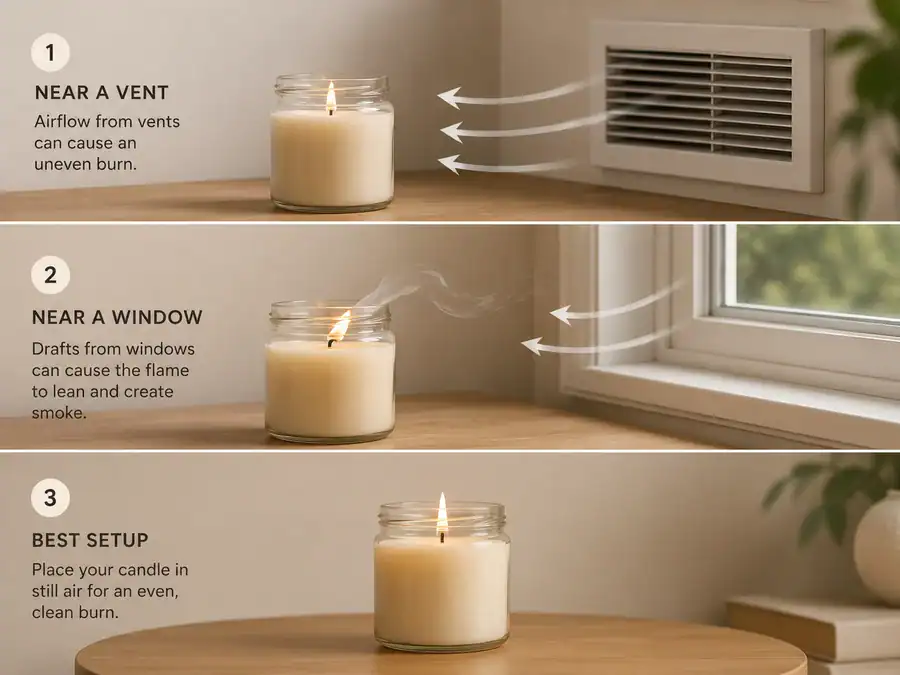
Use this placement check:
- Trim the wick before lighting.
- Put the candle on a level, heat-safe surface.
- Keep it away from vents, fans, windows, and busy walkways.
- Watch the flame for leaning, pulsing, or hard flicker.
- Move the candle before trimming lower.
- Stop outdoor burns when wind makes the flame unstable.
| Flame sign | Likely airflow issue | What to do |
|---|---|---|
| Flame leans one way | Vent, window, or fan | Move the candle to still air |
| Soot crescent on one side | Flame heat pushed sideways | Rotate or relocate the jar |
| Flame dances after trimming | Micro-draft near the surface | Test the area before relighting |
| Travel tin keeps going out | Outdoor gusts or open balcony | Use a safe sheltered spot or stop burning |
| Jar gets hot on one side | Draft pulls flame toward glass | Extinguish, cool, and reposition |
Mini FAQ: Should you trim shorter when a candle flickers outdoors?
No. Fix airflow first. Cutting shorter can weaken the flame, drown the wick, and make relighting harder without solving the wind problem.
A correct trim only works when the flame can stand upright in still air.
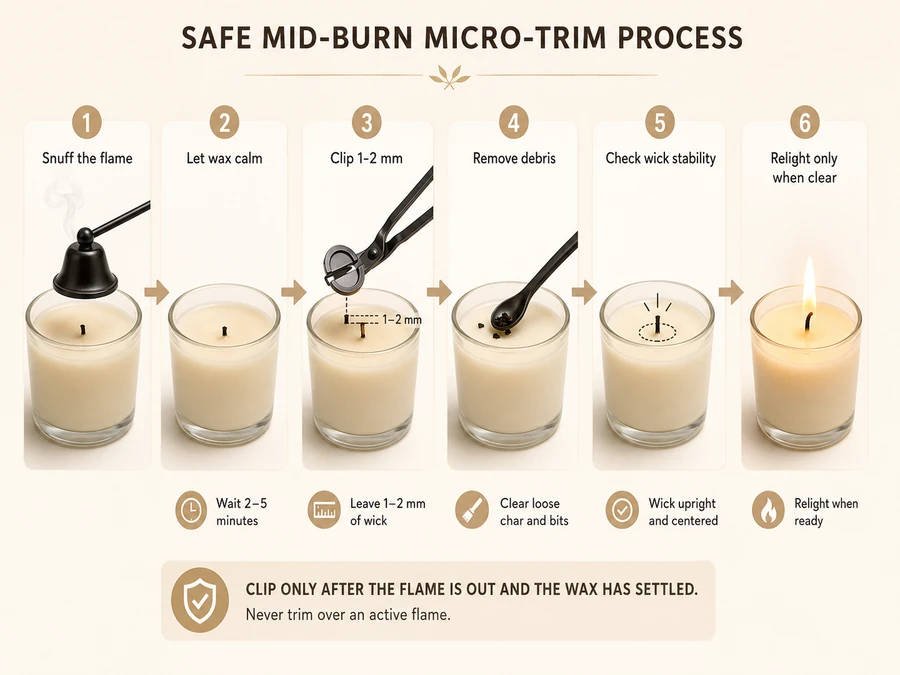
Mid-burn micro-trim technique for long sessions
Snuff, briefly cool, clip 1–2 mm if needed, remove debris, and relight only after the wick is stable.
A micro-trim is a tiny mid-session correction, not a full wick reset. It removes 1–2 mm of excess carbon when a long burn creates a tall, smoky, or dancing flame.
Use this correction sequence:
- Snuff the flame.
- Let the wax stop moving.
- Clip only 1–2 mm from the carbon tip.
- Lift every clipping from the wax.
- Check that the wick still stands upright.
- Relight only if the flame area is clear and stable.
| Situation | Micro-trim? | Better action |
|---|---|---|
| Small carbon bead, no smoke | Not needed yet | Finish the session and trim after cooling |
| Tall flame after 2–3 hours | Yes, if safe | Snuff, cool briefly, clip 1–2 mm |
| Heavy soot or flaring | No | End the burn and let the candle cool fully |
| Wick drowning | No | Do not cut shorter; fix after cooling |
| Drafty flame | No | Move the candle after extinguishing |
Mini FAQ: Is a micro-trim the same as trimming while lit?
No. A micro-trim starts with snuffing the flame. Cutting a burning wick is unsafe and can drop hot carbon into liquid wax.
End checklist: flame out, wax calmer, 1–2 mm clipped, debris removed, wick upright, relight clean.
A micro-trim should calm an overgrown wick without turning a long session into repeated cutting.
How to keep wick maintenance kid- and pet-safe
Keep wick tools, hot wax, matches, and lit candles away from children and pets; trim only when the candle is out, cooled, and stable.
Restricted access means children and pets cannot reach the candle, flame, melted wax, trimming tool, or discarded wick pieces. Wick care is safer when the cutting step happens away from movement, paws, tails, table edges, and curious hands.

Use this safety routine:
- Move children and pets out of the trimming area.
- Extinguish the candle before touching the wick.
- Let the wax cool until it does not move.
- Trim the wick on a stable, heat-safe surface.
- Remove clippings before anyone can touch the candle.
- Store the trimmer, lighter, matches, and tweezers in a closed drawer.
Mini FAQ: Can you trim a candle while a child watches?
Only from a safe distance. Treat wick trimming like using a lighter or sharp tool: explain the rule, but keep the tool and candle out of reach.
End checklist: flame out, wax cooled, tools stored, debris discarded, candle out of reach, and no unattended burn.
Good wick care protects the burn, but the safety win is removing access to flame, hot wax, and sharp tools.
How to maintain wick alignment during storage and transport
Store and move candles upright so the wick stays centered, uncovered, and ready for an even flame at the next burn.
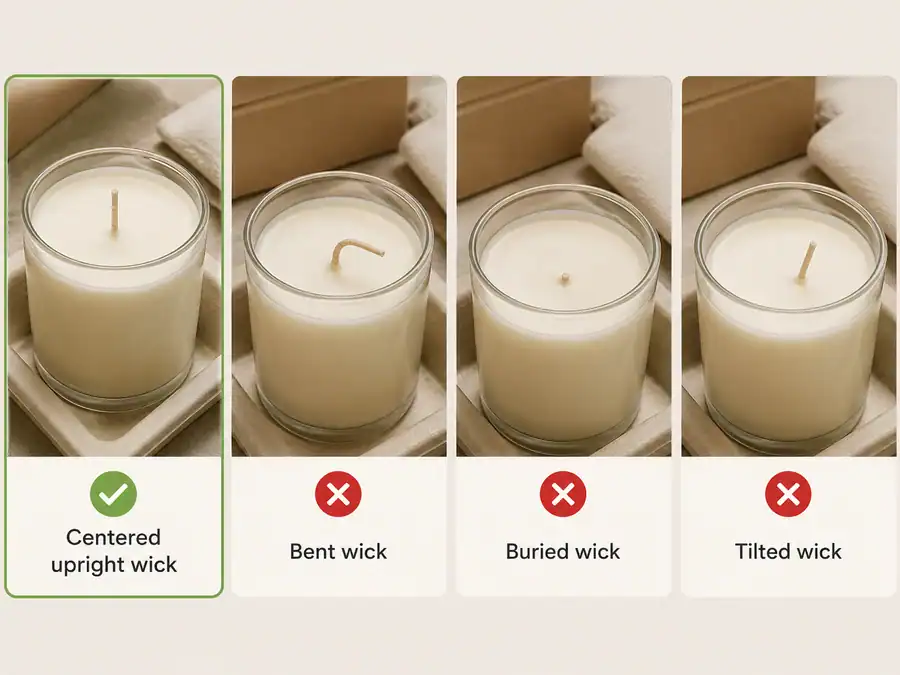
Wick alignment is the wick’s position in relation to the candle center and wax surface. A bent, buried, or off-center wick can make the flame lean, heat one side of the jar, or form an uneven melt pool.
Use this storage routine:
- Let the candle cool fully before moving it.
- Keep the candle upright during transport.
- Do not stack heavy items on top of exposed wicks.
- Cover the candle only after the wick is cool and clean.
- Check the wick angle before the next trim.
- Recenter gently only when the candle is unlit and the wax is slightly soft.
Mini FAQ: Can you straighten a bent wick?
Yes, but only when the candle is out. If the wax is slightly soft, guide the wick upright with tweezers, then let the wax firm before lighting.
End checklist: candle upright, wick centered, lid not crushing the tip, wax clean, and trim checked before the next burn.
Good storage protects the wick before the flame starts, which makes the next trim easier and the next burn more even.
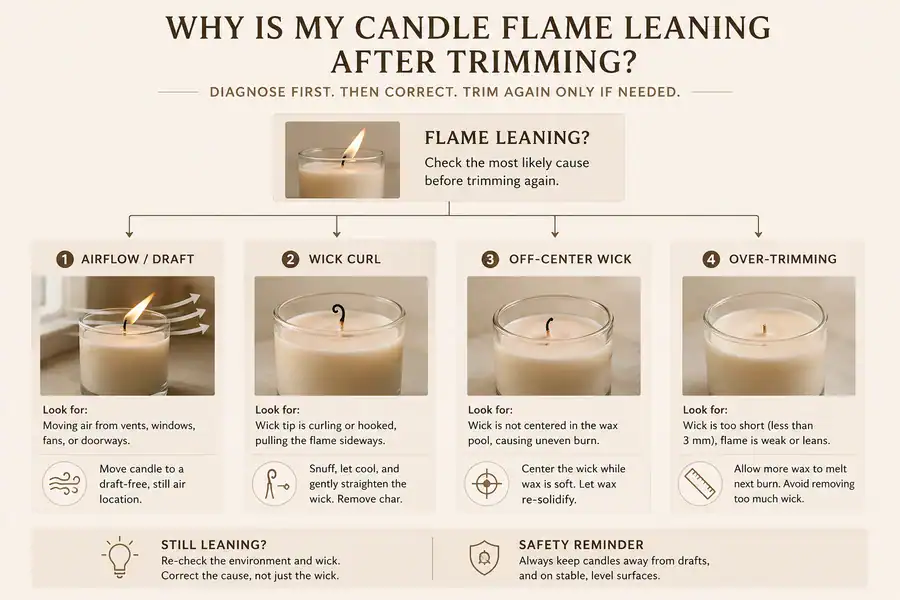
Fixing a leaning flame after a fresh trim: diagnose draft vs wick curl
If a flame leans after trimming, test airflow first, then check wick curl, off-center placement, and over-trimming.
A leaning flame is a flame that bends strongly to one side instead of standing upright above the wick. After a fresh trim, the cause is usually draft, wick curl, uneven char, or a wick that was cut too low on one side.
| Symptom | Likely cause | Quick test | Fix |
|---|---|---|---|
| Flame leans toward one side | Draft or vent airflow | Move the candle to still air | Relight in a calmer spot |
| Flame flickers after a clean trim | Micro-draft near the surface | Watch smoke drift before lighting | Reposition before cutting again |
| Flame leans with no airflow | Wick curl or uneven char | Inspect the wick tip after cooling | Clip only the curled carbon |
| One side melts faster | Wick off-center | Check wick position in soft wax | Recenter only while unlit |
| Flame is tiny and tilted | Over-trimmed wick | Compare visible wick to 6–7 mm | Do not cut more; rescue the wick |
| Flame tall and tilted | Wick still too long or carboned | Check for a remaining mushroom cap | Snuff, cool, trim, remove debris |
Use this diagnosis flow:
- Extinguish the candle before touching the wick.
- Move it away from windows, fans, vents, and walkways.
- Let the wax calm and the wick cool.
- Check whether the wick tip curls or points sideways.
- Recenter the wick only if the wax is soft and the flame is out.
- Relight and watch whether the flame stands straighter.
Mini FAQ: Should you trim again if the flame leans?
Not immediately. A second trim can make the wick too short if the real cause is airflow, curl, or off-center placement. Diagnose first, then trim only the carbon or excess length.
End checklist: no draft, wick upright, tip not curled, wick centered, flame steady, and no soot forming on one side.
A leaning flame is a placement-and-shape problem first, not proof that the candle wax is faulty.
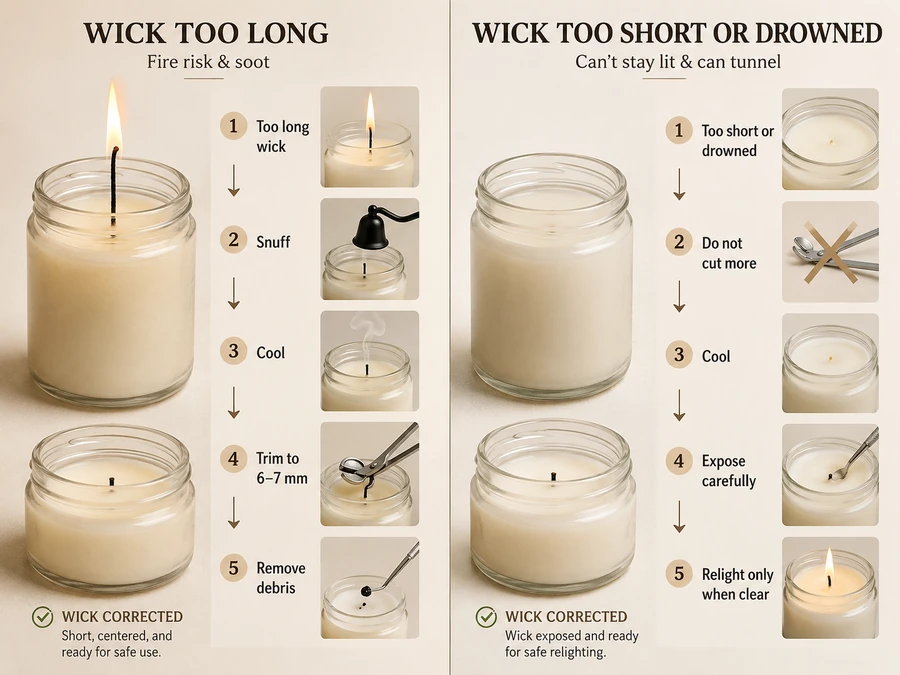
Fixing a wick that’s too short or too long
Fix a long wick by trimming to 6–7 mm; fix a short wick by exposing it carefully instead of cutting more.
A wick rescue is a correction that restores enough exposed wick for a steady flame without digging, flooding, or overheating the candle. A too-long wick overfeeds the flame; a too-short wick underfeeds it and may drown in melted wax.
| Wick problem | Visible sign | Likely cause | Safe correction | Prevention |
|---|---|---|---|---|
| Wick too long | Tall flame, smoke, soot | Missed trim or long burn | Snuff, cool, trim to 6–7 mm | Trim before every light |
| Wick slightly short | Small flame but still lit | Trimmed below target | Let it burn only if stable | Measure before cutting |
| Wick drowned | Flame dies in wax pool | Over-trimmed or excess melt pool | Cool, remove a tiny amount of soft wax only if safe | Avoid repeated low trims |
| Wick buried | Wick barely visible | Wax covered the tip | Warm surface gently through normal use; do not dig deep | Keep candle level |
| Wood wick too tall | Flaring or smoke | Loose char left high | Clip flat and remove char | Keep wood edge low |
| Wood wick too short | Relight fails | Char edge buried or over-cleaned | Expose a clean edge only after cooling | Remove loose char, not solid wick |
Use this rescue sequence:
- For a long wick, snuff the flame and let wax cool.
- Trim back to about 6–7 mm.
- Remove every clipping before relighting.
- For a short wick, do not cut again.
- If wax has covered the wick, let the candle cool first.
- Remove only a small amount of softened wax around the wick if the candle can be handled safely.
- Relight only when the wick is visible, centered, and clear.
Methods note: This failure log separates length problems by visible flame behavior, not by wax type. The correction target stays focused on wick exposure, flame stability, and debris control.
Mini FAQ: Can you save a wick cut too short?
Often, yes. Stop trimming, clear just enough wax to expose the wick, and relight only when the wick can feed a small steady flame. If the wick remains buried, stop using the candle rather than overheating or digging into the vessel.
End checklist: long wick trimmed, short wick not cut further, wax cool before rescue, debris removed, wick centered, and flame stable after relight.
The safest rescue is simple: shorten an overgrown wick, but expose an over-trimmed wick gently without turning the candle into a wax-removal project.