A candle usually won’t stay lit because the wick is too short, buried, drowned in wax, clogged, exposed to drafts, or blocked by tunneling or jar depth. Start by matching the visible symptom to the safest first fix.
A finished candle should hold a small, steady flame after the wick catches under normal indoor conditions. Here, “won’t stay lit” means the wick lights briefly, then dies, shrinks, flickers out, or keeps failing after relighting.
This guide covers user-level fixes for an existing candle. It does not cover full wick replacement, candle formula design, wax repouring, fragrance-load calculations, or unsafe hot-wax fixes.
Here, a safe fix means cooling the candle before touching wax or wick, correcting only visible minor blockage, relighting once from a safe position, and stopping if the flame, wick, jar, wax, or debris remains unsafe.
Why Your Candle Won’t Stay Lit: Start With the Symptom
A candle that will not stay lit usually has a wick, wax, airflow, ignition, contamination, container, or safety-boundary problem.
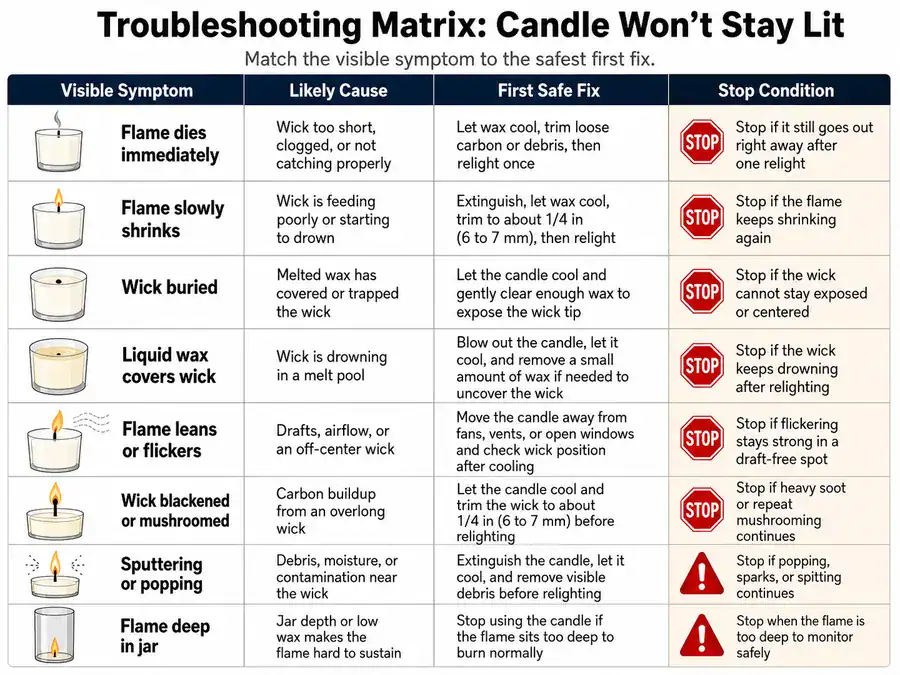
Start with what you can see. A flame that dies right away points to a different fix than a flame that slowly shrinks under a pool of wax. This table is a modeled diagnostic aid, not a manufacturer test or proof that the candle is defective.
| Visible Symptom | Likely Cause | First Safe Fix | Stop Condition |
|---|---|---|---|
| Flame dies immediately | Draft, weak ignition, or very short wick | Move the candle from airflow and confirm the wick catches | It still dies after the basic check |
| Flame slowly shrinks | Wick is too short, clogged, or drowning | Inspect wick height and wax level after cooling | Wick keeps disappearing |
| Wick is buried | Hardened wax covers the wick | Remove only minimal cooled wax around the wick | Wick breaks |
| Liquid wax covers the wick | Wick is drowning | Let wax cool, then remove a small excess only if safe | Wax floods the wick every burn |
| Flame leans, flickers, or pulls sideways | Draft, fan, vent, window, or traffic path | Move the candle to a still, open, heat-safe spot | Safe placement is not possible |
| Wick is black or mushroomed | Carbon buildup blocks a steady fuel path | Cool, then trim only if enough wick remains | Wick becomes too short |
| Candle sputters or pops | Moisture, debris, or contamination | Stop, cool, inspect, and let minor moisture dry passively | Popping continues |
| Flame sits deep in the jar | Recessed wick, tunnel, or poor air access | Check wick access and wax walls before relighting | Flame stays trapped or unstable |
A candle that “won’t light” has an ignition problem: the wick does not catch at all. A candle that “won’t stay lit” catches briefly but cannot keep a stable flame. That difference matters because repeated relighting will not fix wax flooding, a buried wick, or strong airflow.
Check these first: move the candle away from drafts, let it cool before touching wax or wick, confirm the wick is visible, remove loose debris, and stop if the container overheats, the wick breaks, or the flame stays unstable.
Fix a Wick That’s Too Short, Buried, or Drowning in Wax
Cool the candle first, expose only enough wick to relight safely, and stop if the wick breaks or keeps disappearing.
A short or buried wick cannot feed the flame well. If melted wax covers the wick, the flame may shrink because the wick is drowning rather than burning cleanly. Do not dig into hot wax or force the wick upward while the candle is burning.
Enough exposed wick means the wick is visibly above cooled wax and can catch briefly on its own without digging, forced heating, or holding a flame deep inside the jar.
Use this wick-state checklist:
| Wick State | What It Means | Safe First Action |
|---|---|---|
| Wick is visible but very short | The flame may not have enough exposed wick | Let the wax cool, then expose a little surrounding wax if needed |
| Wick is buried under hardened wax | Wax is blocking the fuel path | Remove only a small amount of cooled wax around the wick |
| Wick is covered by liquid wax | The wick is drowning | Extinguish, cool, and reduce excess surface wax only if it can be done safely |
| Wick bends into the wax pool | The flame may collapse into melted wax | Cool the candle and center the exposed wick gently if it moves without force |
| Wick breaks or flakes apart | The candle may no longer be user-fixable | Stop using it rather than trying to rebuild the wick |
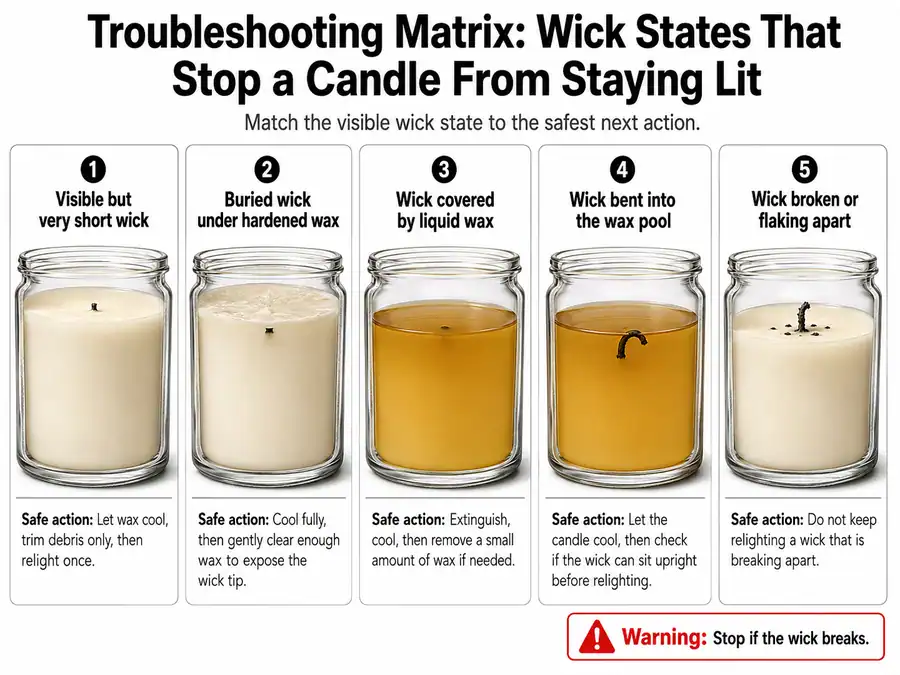
The goal is not to carve out the whole candle. The goal is to give the wick a small clear path so it can catch and feed a flame. If the wick disappears again on the next burn, the problem may be deeper than a simple rescue.
Don’t Trim Again Until You Know the Wick Isn’t Already Too Short
Do not trim again if the wick is already short; first check whether it needs exposure rather than trimming.
Trimming helps when the wick is too long, mushroomed, or producing a large uneven flame. It makes the problem worse when the wick is already too short to stay lit.
| If You See This | Do This | Do Not Do This |
|---|---|---|
| Wick is tall, blackened, or mushroomed | Cool, then trim the carboned tip | Trim while hot |
| Wick is barely above the wax | Expose a little cooled wax around it | Cut it shorter |
| Wick is buried | Clear the wax around the wick | Dig deep into the candle |
| Wick keeps drowning | Check wax level and burn conditions | Keep relighting without correction |
After the wick is visible, relight once and watch the flame. If it catches, steadies, and stops shrinking, the issue was likely wick exposure. If it sinks again, move to wax-pool diagnosis rather than trimming more.
Rule Out Drafts, Fans, Vents, and Bad Candle Placement
Yes, airflow can put out a candle even when the wick and wax are fine.
A candle can be usable but still fail if a fan, vent, open window, door movement, or walking path keeps pushing air across the flame. Check placement before you cut the wick, remove wax, or assume the candle is defective.
Use this placement checklist:
- Move the candle away from ceiling fans, desk fans, HVAC vents, doors, and open windows.
- Place it on a stable, heat-safe surface with open space around the flame.
- Keep it away from curtains, paper, shelves, and anything that can lean into the flame.
- Relight once and watch the flame for leaning, sharp flickering, or sudden blowout.
- If the flame steadies after moving the candle, the problem was airflow rather than wick or wax.
- If it still fails in a still location, return to wick, wax, clogging, or container diagnosis.
A draft problem often looks like a candle defect because the flame may die quickly after relighting. The difference is that a draft-affected flame usually leans, flickers hard, or dies when air moves through the room.
Do not solve airflow by enclosing the candle under a tight cover, placing it in an unsafe holder, or blocking air with flammable items. The safe fix is better placement, not trapping heat around the flame.
If the candle still goes out in a still, open, heat-safe location, airflow is probably not the main cause.
Clear a Clogged, Blackened, or Debris-Covered Wick
A clogged wick cannot draw melted wax consistently, so the flame weakens, sputters, or goes out.
The wick is the candle’s fuel-delivery path: it draws melted wax toward the flame. “Clogged” means that visible buildup or residue is blocking that fuel path, not that the jar simply looks dirty.
If the candle uses a wooden wick, the same symptom checks apply, but char removal and wick-height guidance can differ, so keep this page to visible symptoms and stop if the failure repeats.
Common signs of a clogged wick include:
- a weak flame that shrinks after lighting
- a blackened wick tip
- a carbon mushroom on the wick
- ash or debris near the wick
- sputtering or a dirty-looking burn
- repeated failed relighting after wick exposure and draft checks
Use this trim-clear-stop checklist:
| What You See | Likely Issue | Safe Action |
|---|---|---|
| Black cap on the wick | Carbon buildup | Cool the candle, then trim only if enough wick remains |
| Loose ash on cooled wax | Debris near the flame path | Remove loose debris without pushing it into the wax |
| Wax-coated wick | Wick fuel path is partly blocked | Let wax cool before touching the wick area |
| Sputtering after relighting | Moisture, debris, or residue | Stop, cool, inspect, and relight only if the wick area looks safe |
| Buildup returns every burn | Possible wick, wax, or additive mismatch | Stop treating it as a simple cleanup problem |
A clogged wick is different from a too-short wick. A too-short wick lacks height above the wax, while a clogged wick may have enough height but cannot move fuel cleanly because buildup blocks it.
Fragrance oil, dye, or additives may be involved when the same buildup returns after normal fixes, but that should be treated as a repeated symptom, not proof of a formula defect. Keep the user-level fix limited to cooling, trimming only when enough wick remains, removing loose debris, relighting once, and stopping if the problem returns.
If cleanup does not restore a steady flame, treat the candle as a repeated-failure case rather than cutting deeper into the wick or wax.
Trim Carbon Mushrooming and Remove Ash Only After the Candle Cools
Let the candle cool, trim only if enough wick remains, and remove loose ash without pushing debris into the wax.
Mushrooming is a carbon cap that forms on the wick tip after burning. It can make the flame unstable when the cap blocks fuel flow, drops ash near the wick, or makes the flame burn unevenly.
Use this cool-trim-remove sequence:
- Extinguish the candle if it is still burning poorly.
- Let the wax and container cool before touching the wick.
- Check whether enough wick remains above the wax.
- Trim only the carboned tip if the wick is still long enough.
- Remove loose ash from the cooled wax surface.
- Do not scrape hot wax, dig around the wick, or trim the wick into the wax.
- Relight once and watch for a steadier flame.
Do not treat mushrooming as a reason to keep cutting. If trimming the carbon cap would leave the wick too short, skip trimming and move back to wick exposure or stop using the candle.
The safe goal is a clean fuel path, not a shorter wick.
Fix Wax-Pool Problems Without Drowning or Suffocating the Flame
A candle needs melted wax as fuel, but too much wax over the wick or too little air around the flame can still put it out.
The wax pool is the melted wax around the wick. It should feed the wick, not bury it. When liquid wax rises over the wick, the flame can drown. When the flame sits too deep in a jar or wax cavity, it can struggle because air and ignition access are restricted.
| Symptom | Likely Issue | First Safe Action |
|---|---|---|
| Wick is under liquid wax | Wax drowning | Cool the candle, then remove only minimal excess wax if safe |
| Flame shrinks into the wax | Wick cannot stay exposed | Let the wax reset and check wick height |
| Flame burns weakly inside the jar | Air or access restriction | Check jar depth and open space around the flame |
| Wax wall surrounds the wick | Tunneling | Treat only the flame-blocking wax, not the whole tunnel |
| Flame stays weak after correction | Possible wick or candle mismatch | Stop if the failure repeats |
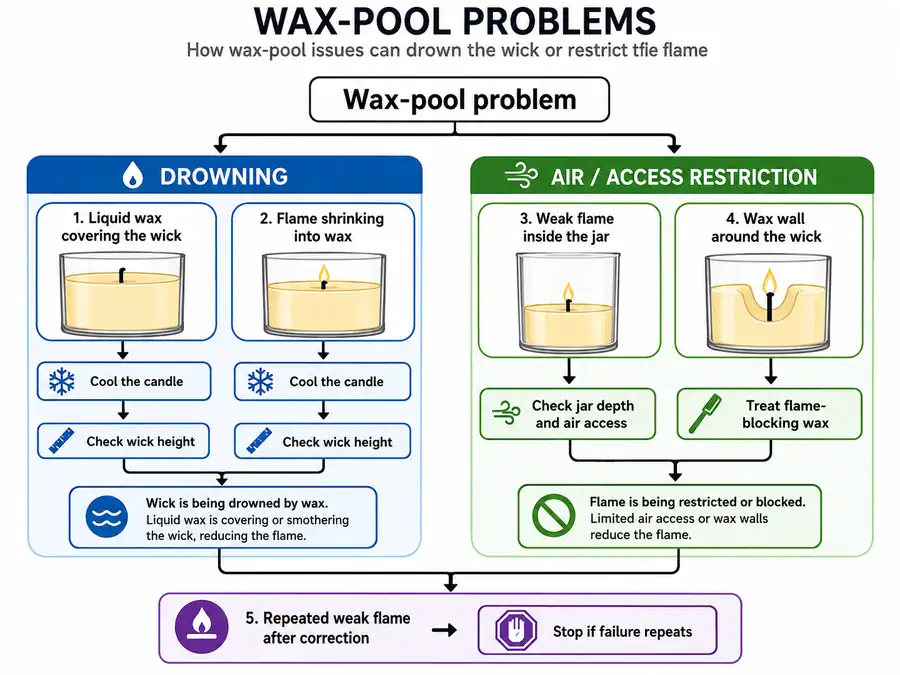
Wax drowning and flame suffocation look similar because both make the flame shrink. The difference is the cause. Drowning means liquid wax covers the wick. Suffocation means the flame does not have enough open air or access because it sits too deep, too enclosed, or behind a wax wall.
Use this safe wax-pool sequence:
- Extinguish the candle if the flame is failing.
- Let the wax and container cool before handling.
- Check whether the wick is visible above the wax.
- Remove only a small amount of cooled excess wax if the wick is buried.
- Do not pour hot wax carelessly.
- Do not heat the candle in a microwave, oven, or on a stovetop.
- Relight once and watch whether the flame stays steady.
If the wick keeps sinking under wax after normal correction, the candle may not be user-fixable.
When Tunneling Is the Reason the Flame Keeps Dying
Tunneling can make a candle go out when a wax wall traps the flame or blocks wick access.
Tunneling means the candle burns down through the center while harder wax remains around the sides. On this page, tunneling only matters when that wax wall makes the wick sit too low, blocks air, or causes the flame to die.
| Problem | What It Looks Like | What It Means |
|---|---|---|
| Tunneling | Wax wall around the wick | Flame may be trapped below the wax surface |
| Drowned wick | Liquid wax covers the wick | Wick cannot stay exposed enough to burn |
| Short wick | Wick barely rises above wax | Flame may not have enough wick to feed from |
| Deep tunnel | Wick sits below a tall wax wall | User-level fixes may not be enough |
A minor wax wall near the wick may be corrected by exposing a small, safe area around the wick after the candle cools. Do not dig deep channels, scrape hot wax, or try to restore the full candle surface while the candle is burning.
If the tunnel is deep enough that the flame sits below the wax wall, treat it as more than a quick relighting problem. Stop using the candle until the wax shape can be corrected safely, or replace it if the wick remains trapped.
Deep Jar or Recessed Wick? Check Air and Ignition Access
A deep jar or recessed wick can stop a candle from staying lit because the flame cannot catch cleanly or breathe well.
A recessed wick sits low inside the candle instead of standing clearly above the wax surface. In a deep container, that can make lighting harder and leave the flame struggling below the rim or inside a wax cavity.
Check these signs before relighting:
- the lighter barely reaches the wick
- the wick catches, then fades quickly
- the flame sits far below the jar rim
- the flame flickers weakly inside the container
- wax walls block access to the wick
- the jar feels too hot during repeated attempts
The fix is not to hold a flame inside the jar for a long time. That can overheat the container or make the relighting attempt unsafe. Let the candle cool, confirm the wick is visible, clear only minor cooled obstruction, and relight once from a safe angle.
Stop if you cannot reach the wick without tilting the jar, overheating the glass, burning your hand, or holding a flame inside the container for too long. A candle that needs unsafe access to light is not a good candidate for repeated rescue attempts.
Follow This Safe Relighting Sequence
To relight a candle that won’t stay lit, cool it, check airflow, inspect the wick and wax, clear minor blockage, relight once, observe, and stop if unsafe symptoms continue.
Use the same order each time so you do not keep relighting a candle with an unresolved wick, wax, or safety problem.
- Let the candle cool if the wax is liquid or the jar is hot.
- Move the candle away from fans, vents, windows, doors, and foot traffic.
- Confirm the wick actually catches.
- Check whether the wick is too short, buried, drowned, blackened, or broken.
- Trim only if enough wick remains above the wax.
- Clear loose ash, debris, or minor cooled wax obstruction.
- Relight from a safe angle without holding heat inside the jar for too long.
- Watch whether the flame steadies, shrinks, sputters, leans, or dies.
- Stop if the candle fails again, pops, overheats, breaks the wick, or shows unsafe material near the flame.
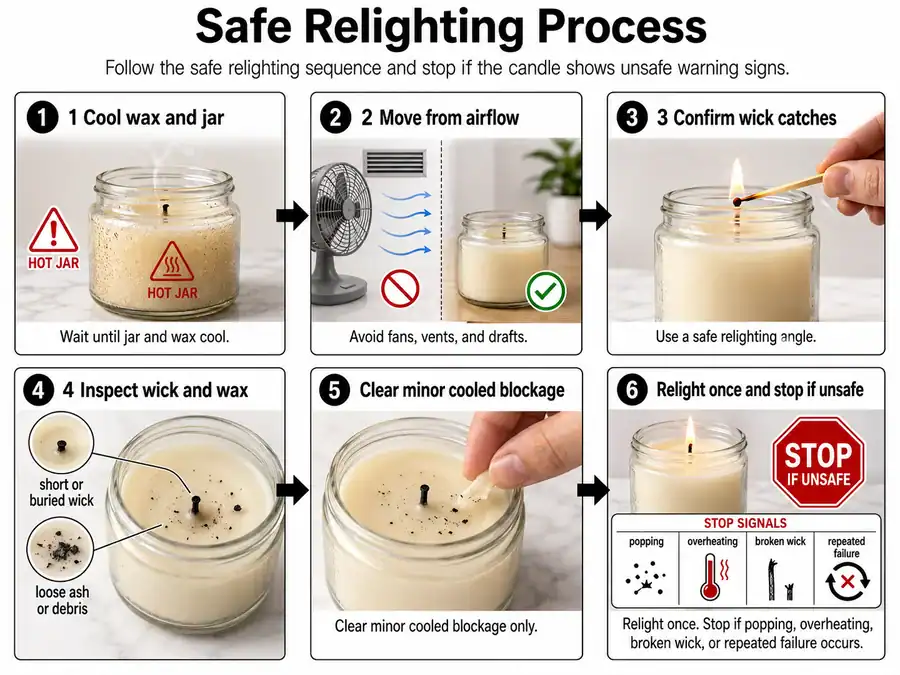
This sequence turns the candle from a guessing problem into a cause-checking problem. If the flame steadies, the issue was likely basic placement, wick access, or minor debris. If the same failure repeats, do not keep escalating the repair.
Make Sure the Wick Actually Catches Before Diagnosing the Candle
If the wick never truly catches, the first issue is ignition contact, not a candle that fails after burning.
A candle that fails to light is different from a candle that will not stay lit. “Won’t stay lit” means the wick catches, the lighter or match is removed, and then the flame cannot sustain itself.
| What Happens | What It Means | What to Do Next |
|---|---|---|
| Wick never catches | Ignition contact problem | Reposition safely and try one clean lighting attempt |
| Wick catches, then dies at once | Draft, short wick, weak ignition, or wax obstruction | Check airflow, wick height, and wax near the wick |
| Wick catches, then slowly shrinks | Wick may be drowning, clogged, or too short | Inspect the wick and wax after cooling |
| Wick catches but sputters | Moisture, debris, or contamination may be present | Stop, cool, inspect, and relight only if safe |
Do not turn this into lighter repair or match comparison. The only question here is whether the candle wick has actually ignited.
A proper wick catch means the wick tip holds a flame briefly on its own after the external flame is removed. If it does that and then dies, return to wick, wax, airflow, moisture, or container diagnosis.
If the Wick Got Wet, Dry Safely or Stop
Yes, moisture near the wick can make a candle sputter, interrupt ignition, and make relighting unreliable.
A wet wick may come from a spill, bathroom humidity, condensation, or water near the candle surface. Moisture can stop the wick from feeding melted wax cleanly, and repeated relighting can make the candle pop or sputter.
Use this dry-safely-or-stop checklist:
- Let the candle cool completely before touching the wick or wax.
- Remove any visible water from the cooled surface if it can be done without digging.
- Let the wick dry passively at room conditions.
- Do not use an oven, microwave, stovetop, hair dryer, open flame, or direct high heat.
- Do not scrape hot wax to reach a wet wick.
- Relight only once the wick area looks dry and clear.
- Stop if popping, sputtering, or wet-looking wax returns.
“Dry” means passive drying only. If the candle still pops, sputters, or goes out after passive drying, treat it as unsafe to keep forcing.
Let Cold or Hard Wax Return to Room Conditions
Yes, cold or hard wax can slow early fuel flow, so passive room-temperature conditioning is the safe first step.
A cold candle may be harder to relight because the wax near the wick takes longer to soften and feed the flame. This is a bounded temperature issue, not a full wax-type comparison.
| Condition | Safe Action | Avoid |
|---|---|---|
| Candle was stored in a cold room | Let it sit at room conditions before relighting | Forced heat |
| Wax feels very hard near the wick | Let the candle acclimate before judging the burn | Digging or scraping |
| Jar is cold to the touch | Wait before lighting, especially after storage | Sudden high heat |
| Flame still dies after conditioning | Return to wick, wax, draft, or defect diagnosis | Repeated relighting |
Do not warm the candle in a microwave, oven, stovetop, or with direct flame. Do not place the jar near high heat to force the wax to soften.
If room-temperature conditioning does not help, the problem is likely not cold wax alone. Move to the user-fixable versus defective boundary next.
Decide Whether the Candle Is User-Fixable or Defective
If safe fixes fail repeatedly, treat the candle as a replacement or maker-level problem, not a repair project.
A user-fixable candle problem is something you can correct without remaking the candle: moving it from a draft, clearing minor wax obstruction, exposing a short wick, removing carbon buildup, letting moisture dry, or correcting a small tunnel near the wick.
A defect here means a troubleshooting signal, not a legal judgment. It means the candle keeps failing after normal candle-owner fixes, so more cutting, digging, heating, or relighting is not the right next move.
Maker-level signals include:
- the wick disappears every burn
- a new candle cannot sustain a flame
- the flame self-extinguishes after normal correction
- the wick seems too small for the wax and container
- oily, clogged, or additive-heavy symptoms return every time
- the candle needs aggressive wax removal to relight
- the jar overheats during repeated attempts
If the candle was purchased, replace it or contact the seller in neutral language. If it is homemade, treat the repeated failure as a wick, wax, container, or additive mismatch rather than a quick burn-use fix.
User-Level Fixes vs Maker-Level Problems
User-level fixes correct visible use problems; maker-level problems keep returning because the candle’s build may not support a stable flame.
| Issue | User-Level Action | Maker-Level Signal | Next Step |
|---|---|---|---|
| Draft blows out the flame | Move the candle to a still, heat-safe spot | Flame fails even in still air | Stop blaming placement |
| Wick is slightly short | Expose a small amount of cooled wax around it | Wick disappears every burn | Replace or ask the maker |
| Wick is blackened | Cool, then trim carbon only if enough wick remains | Heavy buildup returns every burn | Stop repeated trimming |
| Wax covers the wick | Cool, then remove minor excess wax if safe | Wick keeps drowning after correction | Treat as mismatch |
| Minor tunnel blocks the wick | Clear only the flame-blocking obstruction | Deep tunnel traps the flame again | Stop aggressive digging |
| Candle sputters | Cool, inspect, and let minor moisture dry passively | Sputtering returns or popping continues | Stop using it |
| Scented candle keeps clogging | Rule out wick, draft, wax, and debris first | Oily residue or clogging repeats | Treat additives as suspected cause |
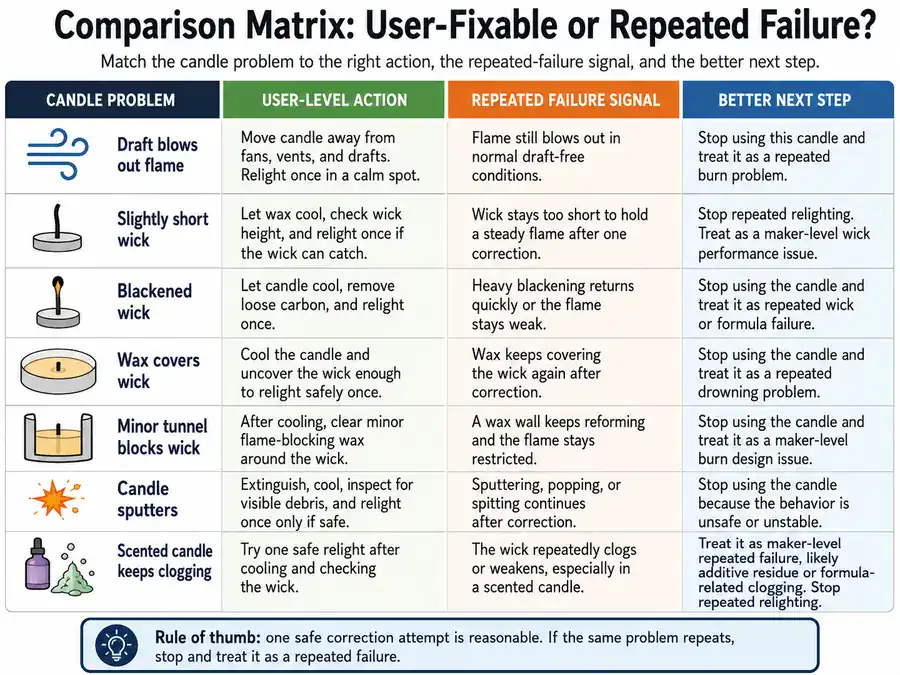
This distinction protects the candle and the user. A candle that needs the same rescue every time is not fixed; it is repeating the same failure.
When Fragrance, Dye, or Additives Might Be the Real Issue
Fragrance, dye, or additives become likely suspects only after simpler wick, wax, draft, moisture, and placement checks fail.
Additives can interfere with flame stability when they leave residue on the wick, clog the fuel path, sit too close to the flame, or make the candle burn differently from a plain burn-first candle. Do not assume the formula is wrong from one failed lighting attempt.
Signs that additives may be involved include:
- oily residue near the wick
- repeated clogging after trimming and cooling
- sputtering that returns after drying
- visible particles near the flame
- dye-heavy wax collecting around the wick
- scent-heavy candle failing after normal fixes
- embedded materials sitting close to the wick
Keep this diagnosis practical. This section is not for fragrance-load math, lab review, or full candle formula repair. The user-level decision is whether the candle can burn cleanly after normal fixes or whether it should be stopped, replaced, or handled as a maker-level issue.
Decorative or aromatherapy candles may have label, shape, embedded-material, or display-use limits. Follow the label, and stop if objects, additives, or display-first design interfere with the flame.
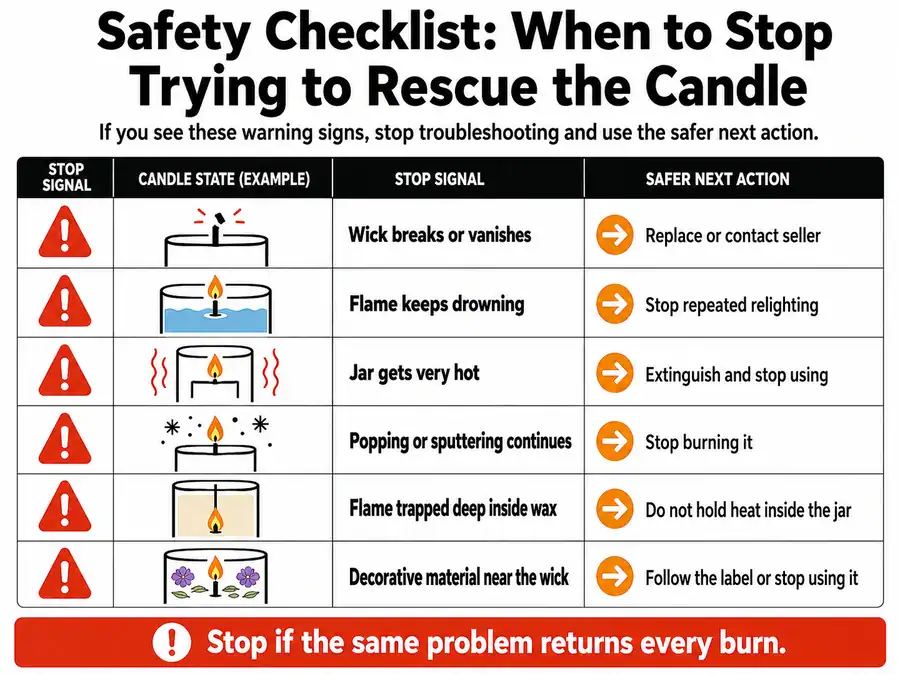
When to Stop Trying to Fix the Candle
Stop trying to fix a candle if the flame stays unstable after basic wick, wax, airflow, moisture, and placement checks.
A candle is not worth repeated rescue attempts when each fix creates another risk. The purpose is a stable flame under normal indoor burning conditions, not forcing a damaged or poorly built candle to keep burning.
Stop using the candle if you see any of these signs:
- the wick breaks, crumbles, or disappears into the wax
- the wick keeps drowning after cooled wax correction
- the flame sputters, pops, flares, or repeatedly dies
- the jar overheats during normal burning or relighting
- the flame sits trapped deep inside a tunnel or jar
- debris, botanicals, glitter, or decorative material sits near the flame
- smoke, soot, or odor gets worse after trimming
- the candle needs digging, scraping, pouring, or forced heating to work
- the same problem returns every burn
- you cannot relight it without unsafe hand, jar, or flame positioning
| Stop Signal | What It Means | Better Next Action |
|---|---|---|
| Wick breaks or vanishes | The fuel path is no longer usable | Replace the candle or contact the seller |
| Flame keeps drowning | Wax and wick are not staying balanced | Stop repeated relighting |
| Jar gets very hot | Container safety may be compromised | Extinguish and stop using it |
| Popping or sputtering continues | Moisture, debris, or contamination may remain | Stop burning it |
| Flame is trapped deep inside wax | Air and access are restricted | Do not keep holding heat inside the jar |
| Decorative material nears the wick | Burn path may be unsafe | Follow the label or stop using it |
For emergency-use candles, reliability matters more than rescue. Do not depend on a candle that repeatedly fails, sputters, drowns, or needs special handling to stay lit. Keep an unused, reliable backup instead of trying to force a failing candle to work during an outage.
If the candle was new and failed after normal use checks, treat replacement as the practical fix. If the candle was homemade, record the symptom for the next batch, but do not turn the finished candle into a high-heat repair project.