
A candle additive works best when it solves one specific problem—oil stability, surface finish, color stability, hardness, or burn behavior—without forcing unsafe wick changes.
A tiny percentage of the right additive can turn a so-so candle into a cleaner-burning, better-looking one. The trick is knowing whether you’re changing wax structure (hardness, melt point, finish) or how fragrance behaves in the wax. Some enhancers help with oil binding and scent release, while others reduce frosting, wet spots, dye bleed, or fade. Once you match the additive to your wax family and wick, you can test in small batches and repeat the result reliably.
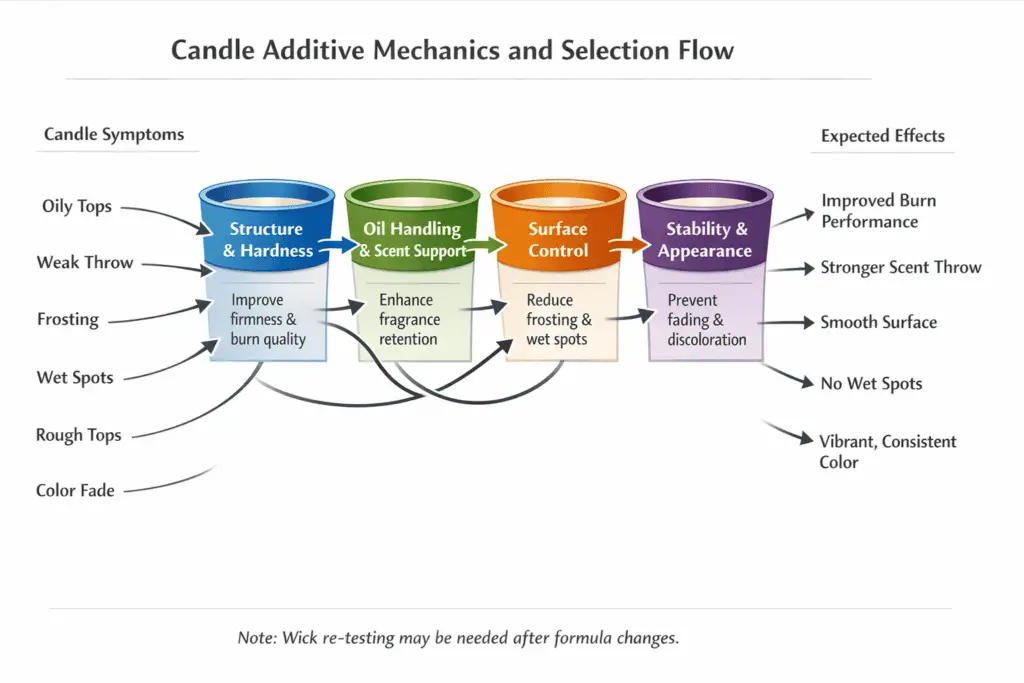
How candle additives work (dominant macro: How)
Candle additives work by changing wax structure, oil compatibility, surface crystallization, or burn chemistry—so the right enhancer is the one that fixes your specific failure mode with the smallest formula change.
In the wider candle-making process, additives are optional until your wax, fragrance, wick, and cooling routine are already close to working. Many container candles do best with no modifier at all, so start with wax fit and process consistency before you reach for a fixative or hardener; if you want that baseline first, see when candles work without additives.
Most additives fall into four practical buckets:
- Structure & hardness: raise firmness or melt point, improve pillar durability, and reduce slump in heat.
- Oil handling & scent support: help wax hold fragrance more evenly so you get less sweating and more consistent throw.
- Surface control: influence crystal growth so tops look smoother and frosting is less visible.
- Stability & appearance: help color resist fading or slow storage-related changes that show up as yellowing or off-notes.
This quick-reference table shows the main job each common additive family handles first:
| Additive family | Main job | Best first use | Watch-out |
| Vybar / polymer binders | Improve oil handling and opacity in paraffin-heavy blends | Oily tops, sweating, or uneven fragrance binding | Too much can thicken the wax and shrink the flame |
| Stearic acid | Increase hardness and melt point | Pillars, heat resistance, or firmer blends | Too much can increase shrink and glass pull-away |
| Microcrystalline wax | Add toughness and structure | Durability or a slightly higher melt profile | Can change fuel flow and require wick re-testing |
| Crystal modifiers / finish aids | Influence surface crystallization | Frosting, rough tops, or visible crystal pattern | Process still matters more than formula alone |
| UV inhibitors / stabilizers | Slow light-driven color change | Window displays or strong indoor lighting | Too much can dull clarity in light colors |
A simple sequence keeps you out of random tweaking:
- Name the symptom clearly. “Hot throw is weak” is different from “oily top” or “frosting on day 3.”
- Pick the mechanism you actually need. Weak hot throw often points to release + wick; oily tops point to oil compatibility; frosting points to crystal growth + cooling curve.
- Change one variable at a time. Same jar, same fragrance load, same wick—adjust only one additive or one dose step.
- Re-test the wick any time viscosity or melt pool changes. A small additive change can shift fuel flow and soot behavior.
- Log the batch like a recipe. Wax type, additive %, fragrance %, add temperature, pour temperature, room temp, cure days.
For a symptom-first path instead of trial-and-error, use a candle additives chooser to match the defect to the smallest useful formula change.
How to choose between Vybar and stearic acid
Choose Vybar when you need better oil binding and opacity in paraffin-heavy blends; choose stearic acid when you need higher melt point and harder wax for pillars, heat resistance, or a firmer burn profile.
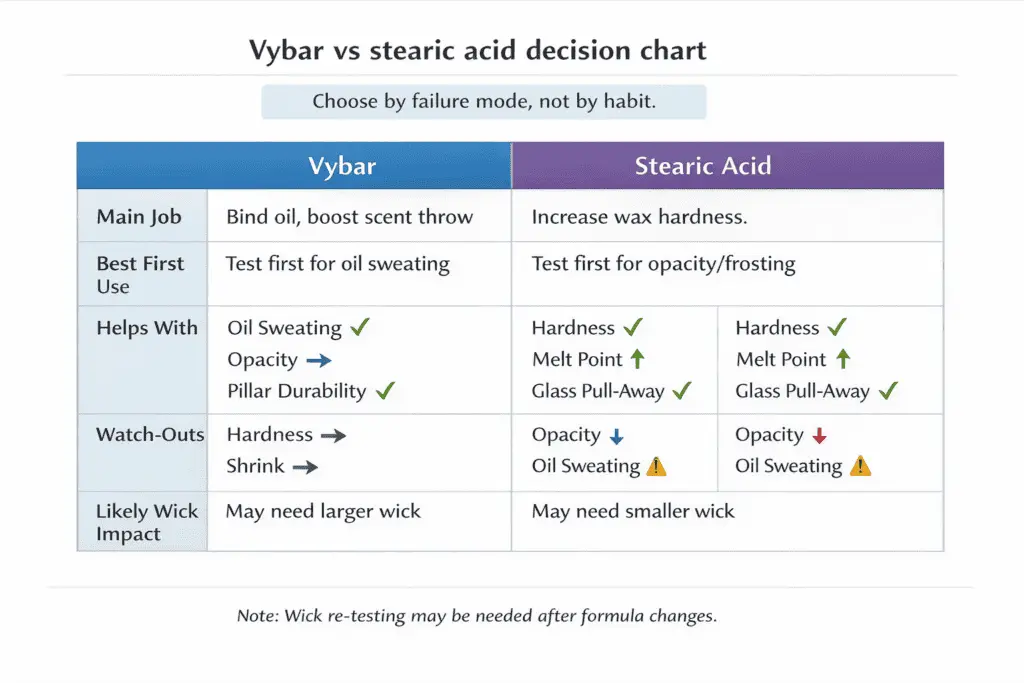
These two get confused because both can change appearance and scent handling, but they do it differently:
| If your main goal is… | Vybar is usually the better first test | Stearic acid is usually the better first test |
| Reduce fragrance oil sweating in paraffin / parasoy | Yes | Sometimes |
| Increase opacity / reduce mottling in paraffin | Yes | Sometimes |
| Increase hardness and raise melt point | Not the primary job | Yes |
| Improve mold release / pillar durability | Not the primary job | Yes |
| Keep scent stable without looking oily | Often | Sometimes (depends on wax) |
Practical trade-offs to watch: Vybar can improve oil compatibility, but too much can thicken the wax and shrink the flame. Stearic can raise firmness and melt point, but pushing it too far in containers can increase shrink and pull-away from glass. For a deeper side-by-side decision, see stearic vs. Vybar; for paraffin-heavy use cases, see how Vybar behaves in candles.
How to improve scent throw with additives
Additives improve scent throw when they help fragrance oil stay evenly dispersed in the wax and release at the right rate during cure and burn. In paraffin-heavy blends, polymers can increase oil compatibility so the candle smells stronger without looking oily. In soy/coconut blends, heavy binding can sometimes mute throw if it traps lighter notes or changes how the wick feeds.
Here’s the counterintuitive part: adding more fragrance oil can make throw worse when the wax can’t hold it cleanly, because sweating or micro-separation changes how the candle vaporizes scent. That’s why a small additive change plus a wick re-test often beats “just add more fragrance.”
Example benchmark (equal fragrance %, same jar and wick series) — use this to track direction, not “perfect” numbers:
| Additive approach | Hot throw (1–5) | Cold throw (1–5) | Finish quality (1–5) | Common risk to watch |
| Polymer throw helper (paraffin-friendly) | 4 | 4 | 4 | Can shrink flame if viscosity rises |
| Resin-style fixative (helps some blends) | 3 | 4 | 3 | Can tint wax / soften top notes |
| Natural hard wax (small %) | 3 | 3 | 5 | Can demand wick upsize |
If you’re not sure whether the issue is fragrance selection, loading, or release, review fragrance & scenting basics first. Once the basics are confirmed, compare one additive at a time and use a deeper scent-throw additives guide for the full test plan.
How to prevent frosting and wet spots with additives
Prevent frosting and wet spots by controlling cooling and crystallization first, then use a compatible modifier only when process control isn’t enough to hold the result through cure and seasonal temperature swings.
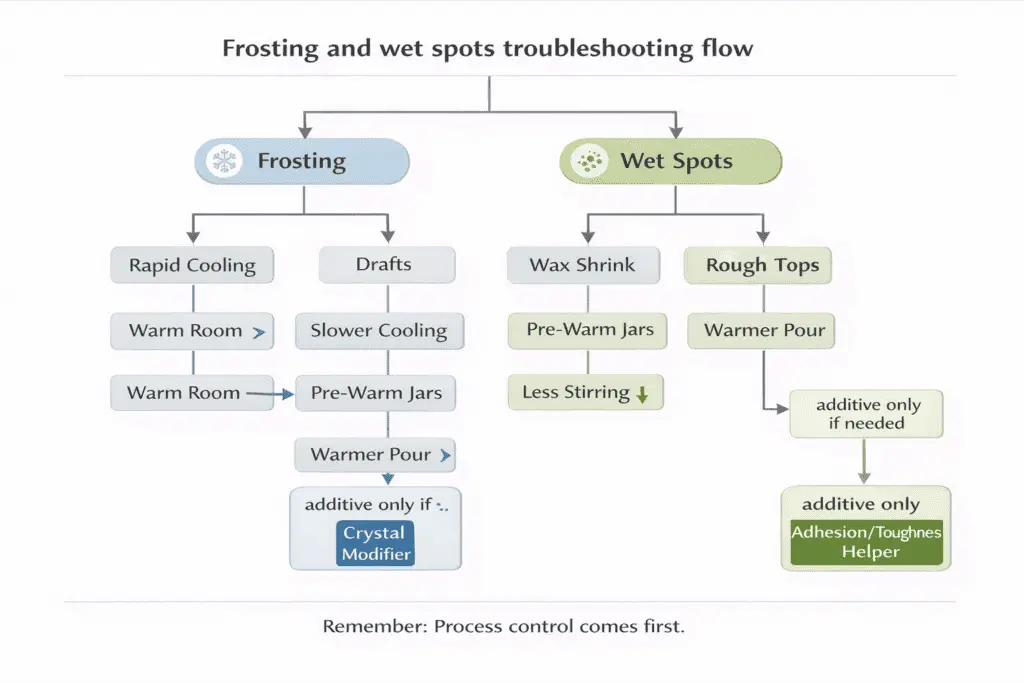
Frosting is a crystal-growth issue, while wet spots are usually a shrink/adhesion issue, but they often show up together in soy-heavy blends because the wax structure is sensitive to temperature curves.
Failure-log map (symptom → likely cause → first fix → additive only if needed)
| Symptom | Likely cause | First fix | Additive only if needed |
| White bloom on sides/top within 24–48h | Rapid cooling or drafts | Warm the room; slow cool; don’t move jars early | Small % crystal modifier |
| Grainy/rough top after pour | Too-cool pour or over-stir | Pour a bit warmer; stir less; steady cooling | Modifier that smooths crystal pattern |
| Wet spots (patchy separation from glass) | Wax shrink + cold glass | Pre-warm jars; cool slower; avoid cold counters | Small % toughness/adhesion helper |
| Frost returns after heat-gun smoothing | Cold room + wax memory | Re-melt top fully; fix cooling curve | Small % modifier + consistent cure |
Use additives here only after the room, jar temperature, and pour/cool curve are consistent. For a structured symptom-by-symptom route, open the candle additives troubleshooting guide; if the defects are mostly soy-related, see common soy-wax fixes.
How to stabilize color using UV inhibitors
UV inhibitors slow dye breakdown from light, so color stays brighter longer without looking “flat” when the dose stays low and well-dispersed. UV inhibitors address light-driven fading, while antioxidants mainly slow oxygen-driven changes that can show up as yellowing or off-notes during storage, so they solve different failure modes.
| Problem you see | More likely tool | Why it helps | Common “too much” sign |
| Bright colors fade near windows | UV inhibitor | Slows photodegradation in dyes/pigments | Color looks slightly dulled or hazy |
| Whites turn creamy in storage | Antioxidant | Slows oxidation reactions over time | Rare, but can shift tone if overdosed |
| Window display + long storage | Sometimes both (carefully) | Targets two different failure modes | Dullness + burn behavior shifts |
If your main problem is display fade, use a UV-fix guide for candle additives. If you still need to sort out dye choice or load, go to candle dye & coloring basics instead of stacking more stabilizer first.
How to harden wax and raise melt point (stearic, microcrystalline)
Small percentages of stearic or microcrystalline wax can raise hardness and melt point, but overdosing can make candles brittle and increase glass pull-away or rough tops. Start by reviewing wax types and properties: stearic tends to tighten crystal packing, while microcrystalline often adds toughness and changes flexibility between crystals.
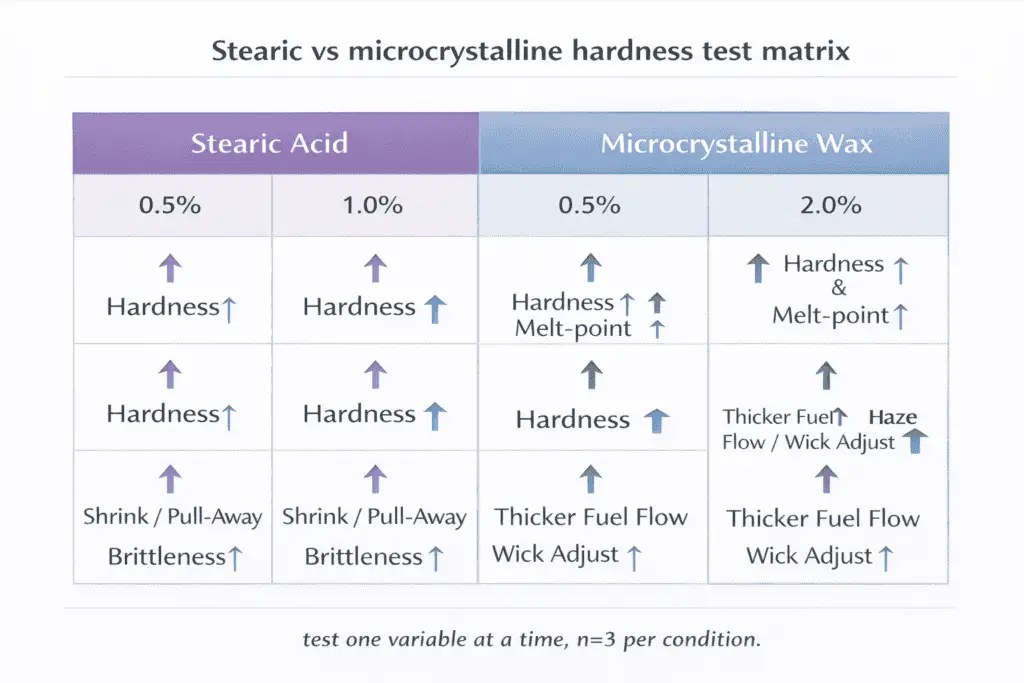
That structure shift is why the same percentage can feel “strong” in one wax and barely noticeable in another—especially across soy/paraffin blends.
Starter bands (plan your own test matrix)
| Additive | Percent | Typical melt-point direction | Common risk |
| Stearic acid | 0.5% | Slight increase | More shrink on cool-down |
| Stearic acid | 1.0% | Moderate increase | Pull-away risk in some jars |
| Stearic acid | 2.0% | Stronger increase | Brittleness/cracking in hard blends |
| Microcrystalline wax | 0.5% | Slight increase | Thickens fuel flow slightly |
| Microcrystalline wax | 1.0% | Moderate increase | May need wick adjustment |
| Microcrystalline wax | 2.0% | Stronger increase | Haze if not fully dissolved |
Methods: keep container, fragrance %, and wick constant, then change only additive % and pour/cool conditions in a controlled way (n=3 per condition). Log hardness feel, adhesion, and burn behavior at consistent timepoints. Limitations: “melt point” varies by measurement method and blend composition.
To choose your starting band, decide whether you’re solving “summer slump” (higher melt point) or “shipping durability” (toughness without cracking). If your goal is hardness and oil binding in paraffin-heavy formulas, compare the routes in stearic vs. Vybar before you increase both at once.
How additives interact with soy, paraffin, coconut, and beeswax
The same additive can behave differently across wax families because each wax crystallizes and holds oil in a different way. The fastest way to avoid “it worked in soy but ruined my parasoy” is to match additive type to wax family and to the defect you’re actually fixing.
Compatibility snapshot (use as a starting hypothesis, then test)
| Wax family | What it’s most sensitive to | Additives that often help (when used lightly) | Common gotcha |
| Soy | Crystal growth (frosting), cooling curve | Crystal modifiers, small toughness helpers | Over-structuring can mute throw or haze tops |
| Paraffin / parasoy | Oil compatibility, mottling/opacity | Polymers/binders, opacity helpers | Too much binder can shrink flame or trap top notes |
| Coconut blends | Softness, oil migration, surface haze | Small binders/stabilizers, gentle modifiers | Small changes feel big; viscosity jumps can change wicking |
| Beeswax | Natural hardness, aroma carry, adhesion quirks | Minimal additives; small finish/stability aids | Background aroma can influence delicate fragrances |
A practical interaction rule: any additive that increases viscosity can reduce fuel flow through the wick, which can shrink flame size and change soot or mushrooming. That’s why compatibility isn’t just “will it dissolve,” but “will it change the burn enough to require a wick shift.”
How to dose additives safely (percentages & order of addition)
Dose additives in small percentages, dissolve them fully, and keep your math and mixing order consistent so you don’t confuse process drift with additive performance.
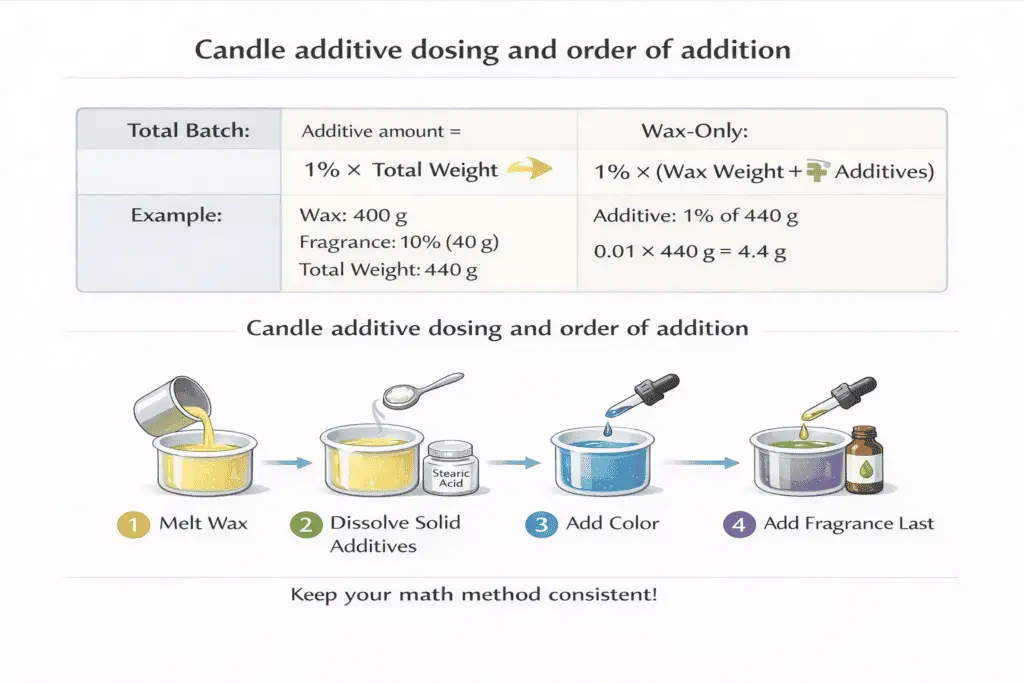
Batch math: pick one method and stick to it
- Total batch (wax + fragrance + additives): additive (g) = total batch g × target % ÷ 100
- Wax-only: additive (g) = wax g × target % ÷ 100
Example: 400 g wax with 10% fragrance → fragrance = 40 g → total = 440 g. A 1% additive dose is 4.4 g by total-batch, or 4.0 g by wax-only.
Order of addition (reduces clumps and uneven results)
- Fully melt wax to a consistent liquid state.
- Add solid additives while the wax is hot enough to dissolve them cleanly; stir until uniform.
- Add color and ensure it is fully dispersed.
- Add fragrance last, mix steadily, and pour consistently.
For consistent batches, change one variable at a time and keep the same cure window across comparisons. If you need the full workflow, use the mixing guide for candle additives instead of stacking multiple small changes in one batch.
How wicks respond to additives (soot, mushrooming, clogging)
Additives can change the way fuel moves through the wick, so even a small formula tweak can require wick resizing and a different trim routine. Soot and mushrooming still depend on wick match, trim, fragrance load, and burn conditions, so treat the additive as one possible cause—not the only one.
A quick wick troubleshooting ladder:
- Flame smaller and melt pool too shallow → fuel flow slowed → try one wick size up or a series that pulls more fuel.
- Jar rim darkening and soot trails → flame running rich/unstable → try one size down, reduce additive %, or reduce fragrance if it’s near the edge.
- Frequent mushrooming → wick tip over-fueled → downsize, change series, and tighten trim routine.
- Tunneling after additive change → wick mismatch + viscosity shift → re-test with a different series rather than stacking more additive.
Start with wick sizing basics when the formula changes, and use a wick-problems guide if the burn still looks unstable after one controlled re-test.
How to meet additive safety & compliance basics
Safe additive use means staying within supplier limits, documenting your formula, and labeling correctly for your region before you scale production. Separate two ceilings: what is physically stable in your wax, and what your fragrance documentation allows for the finished candle.
A simple workflow:
- Keep an SDS (Safety Data Sheet) for wax, additives, dyes, and fragrance.
- Keep the supplier-issued IFRA (International Fragrance Association) certificate or usage guidance for each fragrance oil and stay within the maximum use level that applies to your candle type.
- Where you place candles on the market, check the labeling and hazard rules that apply in your region; in the EU, that can include CLP (Classification, Labelling and Packaging) duties for mixtures.
- Keep batch records: weights, percentages, temperatures, cure days, and test outcomes.
Most wax modifiers are not the same thing as decorative add-ins. Treat dried botanicals, glitter, or other visible embeds as a separate fire-safety question, not as interchangeable “additives.” For the document side of scent limits and supplier paperwork, review how to read IFRA and SDS documents for candles.
Frequently asked questions about candle additives
These quick answers cover the edge cases that usually decide whether you should add a modifier, re-test the wick, or leave the formula alone.
Do you need additives for every candle?
No. If the wax, fragrance load, wick, and cooling routine are already stable, adding a modifier can create a new problem instead of solving one. Use additives when you can name the defect clearly and match it to one specific job.
What should you test again after changing an additive?
Re-test wick size, flame shape, soot, mushrooming, melt pool depth, and surface finish. Even a small change in hardness or viscosity can change how the candle feeds the wick.
Are decorative add-ins the same as candle additives?
No. Candle additives are formula modifiers used to change structure, finish, or stability inside the wax system. Decorative add-ins need their own safety review and should not be assumed safe just because a wax additive is safe.