How to Choose the Best Candle Additives


Pick additives that match your wax and goal—harder pillars, stronger throw, clearer gel, or cleaner color—then start at low percentages, confirm compatibility, and validate with a quick burn test before scaling up.

Additives can make a candle harder, smoother, clearer, or more consistent—but they can also mute fragrance, sweat oil, or cause tunneling if misused. The right choice depends on your wax, container vs pillar style, fragrance load, and the finish you’re trying to achieve. Small percentage changes can shift melt behavior, color, and burn stability more than most makers expect. A simple, repeatable test routine keeps you from “fixing” one problem by creating two new ones.

Quick decision matrix: wax × product × problem → additive starting point

Use this matrix to match the additive to the wax, the candle type, and the exact failure you are trying to fix. Start with candle additives and enhancers if you want the parent overview, review common candle additives if you want the main families in one place, and compare with candles without additives before changing a formula that already burns and looks the way you want.
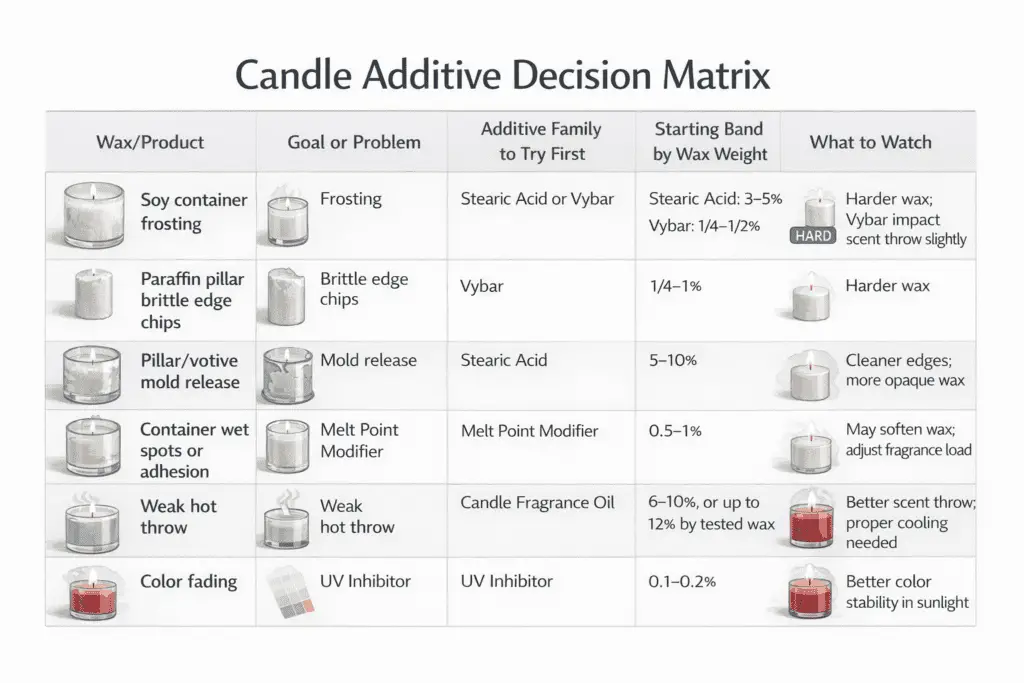
wax type and candle problem additive matrix

Wax / product

Goal or problem

Additive family to try first

Starting band (by wax weight)

What to watch (stop/adjust when…)

Soy container

Frosting

Micro-blend wax (coconut/paraffin) + cooling control

1–2% micro-blend

Frosting drops but flame shrinks or wet spots increase

Paraffin pillar

Brittle edge chips

Microcrystalline (toughness)

1–4%

Edges improve but burn gets sluggish or soot rises

Pillar/votive

Stuck in mold

Stearic (shrink/release)

2–4%

Clean release improves but chipping/brittleness appears

Any container

Wet spots / poor adhesion

Handling first, then microcrys as viscosity tweak

0.2–0.5%

Sidewall improves but wick struggles or oiliness appears

Any container

Weak hot throw

Polymer binder (Vybar-type) in micro-steps

0.2–0.5%

Throw drops (binder trapping) or flame weakens

Any

Color fading in light

UV absorber (+ antioxidant when needed)

0.05–0.20%

Haze/clarity issues, burn shifts, or color still changes in the dark

Stearic vs microcrystalline: which raises melt point and hardness?

Direct answer: Use stearic (1–5%) for sharper hardness and higher melt point; use microcrystalline (1–5%) for toughness and adhesion with smaller melt-point gains.
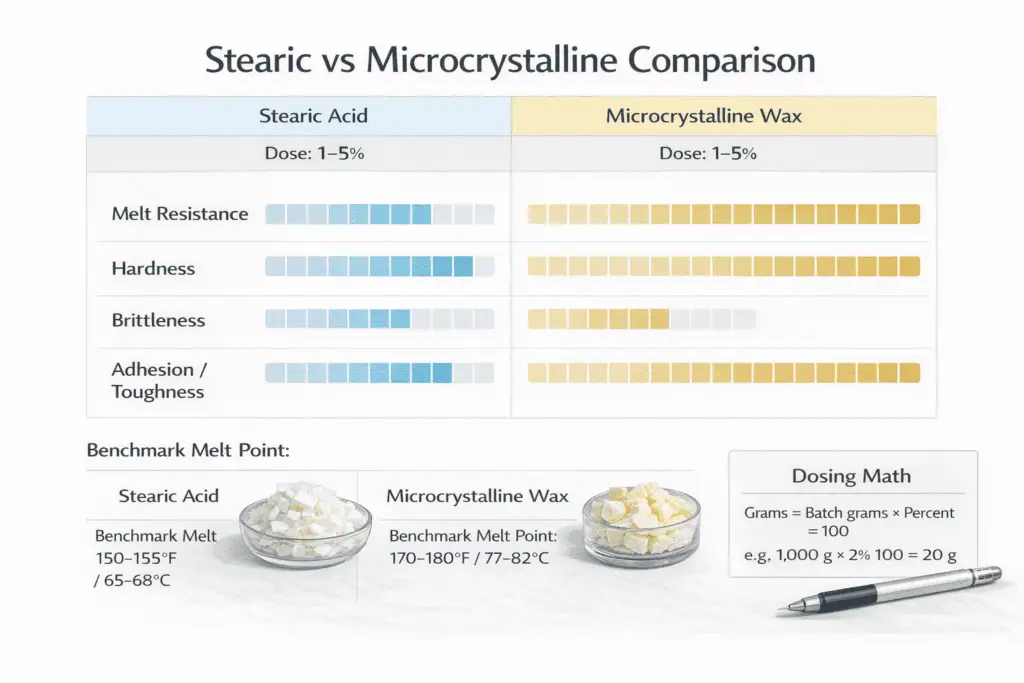
stearic and microcrystalline hardness toughness comparison


To keep the choice simple, explore additive families by deciding whether you need crisp rigidity (pillars) or flexible toughness (containers and blends).
Because hardeners can change flame behavior, start inside supplier tech-sheet ranges and validate burns using a steady-flame, low-soot, stable-melt-pool safety mindset before scaling up.
Stearic tends to “tighten” crystal structure for a firmer feel, while microcrystalline tends to add tack/viscosity that helps durability and reduces chipping.

Practical “did I break the burn?” checks (run these after any hardness change)

  • Flame stays steady without visible smoking or repeated flare-ups.
  • Wick does not drown or self-extinguish after the melt pool forms.
  • Sooting does not noticeably increase compared with your control candle.
  • Melt pool behavior stays reasonable for the vessel (no severe tunneling, no runaway overheating feel).

A practical benchmark you can run and score (1 = low, 5 = high):


Additive

Dose

Melt resistance score

Brittleness score

Adhesion/toughness score

Stearic acid

2%

3

2

2

Stearic acid

4%

4

4

2

Microcrystalline wax

2%

2

1

4

Microcrystalline wax

4%

3

2

5

Use this quick dosing math so every test is repeatable: grams additive = (batch grams) × (percent ÷ 100).
Example: a 1,000 g batch at 2% needs 20 g additive; at 4% needs 40 g.
If you harden the wax and the melt pool shrinks or the flame struggles, adjust wick after hardening before you blame the fragrance or the pour.
If your real goal is heat resistance but you also need polymer-like binding for oilier blends, compare stearic and polymers so you don’t over-harden when a small binder change would do.

Quick 3-batch test (fast, clean signal)

  • Batch A: 0% additive (control)  
  • Batch B: 2% additive  
  • Batch C: 4% additive  
  • Keep FO %, dye, wick series, jar/mold, and pour/cool conditions the same for all three.  
  • Record: unmolding/edge durability (pillars), slump at warm room conditions, and burn behavior at hours 1–4.

How vybar, microcrys or light oil affect scent throw

Direct answer: Start with a minimal polymer dose (about 0.2–0.5%), avoid mineral-oil micro-doses unless tests prove a benefit, and change in 0.1–0.2% steps while re-checking wick performance.
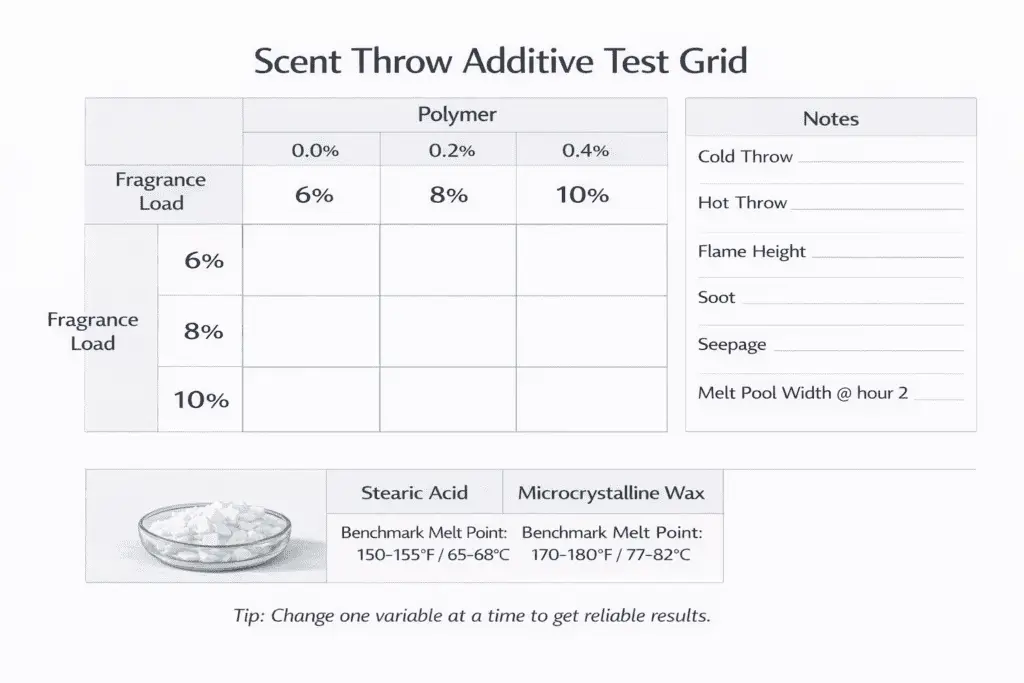
Before you tweak anything, choose additive types based on the failure you’re seeing: seepage, weak hot throw, poor adhesion, or unstable flames.

polymer dose and fragrance load scent throw grid


Vybar-type polymer binders can bind some of the fragrance “oil phase,” which can smooth performance but also slow diffusion if you overdo it.
The trade-off is predictable: too little binder can show as wet spots or seepage; too much can trap aroma and shrink the flame.

A simple test log that prevents guesswork (fill this in every time)

  • Wax + batch weight, FO name and %, additive type and %, wick series/size, jar diameter  
  • Pour temp, room temp, cure time (days), and any visible seepage or wet spots  
  • Cold throw score (0–5), hot throw score (0–5), flame height notes, soot notes, melt pool width at hour 2

Tune in this order so changes stay interpretable

  1. Set FO % inside supplier guidance and IFRA category limits (don’t “solve” throw by overdosing).  
  2. Add polymer at 0.2% and cure normally; only then decide whether to step up.  
  3. Increase polymer in 0.1–0.2% increments, re-testing the same wick and then resizing if the melt pool or flame shifts.  
  4. Treat mineral-oil micro-doses as an experiment, not a default—measure precisely and watch for seepage and weak flames.

Quick test grid (small, decisive)


Polymer %

FO %

0.0

6

0.2

6

0.4

6

0.0

8

0.2

8

0.4

8

0.0

10

0.2

10

0.4

10

If throw drops after adding polymer, reduce the polymer first, then adjust fragrance load with a controlled wick-and-cure retest instead of stacking more additives.
When you’re troubleshooting a “no scent” burn, back out the last change and re-validating flame/melt pool before you change fragrance again.

Steps to reduce or create mottling with additives

Use vybar at 0.1–0.4% with steady cooling to reduce mottling; use petrolatum in a small test ladder (0.1%, 0.3%, 0.5%) with slower cooling to create a mottled look on purpose.
For prevention, start in the low end of the range (by weight), stir thoroughly, and keep the cool-down consistent; for intentional effects, change only one variable at a time so the pattern is repeatable.
To keep changes safe and predictable, follow supplier guidance and keep burn behavior aligned with a steady-flame, low-soot, stable-melt-pool check whenever you alter a formula.

If you want the shortest decision path, understand additive roles by separating “opacity control” (vybar) from “phase-separation styling” (petrolatum).
Color matters too—adjust color load to suit finish because some dye systems show haze or banding more easily when the wax is pushed toward higher opacity.
And if you’re testing bold shades, protect colors from UV fade so you don’t confuse light-fading with a mottling change.

What UV stabilizer to use for strong colors (and safe dosing)

Use a UV absorber at a low supplier-supported dose by wax weight and add an antioxidant when needed, then limit direct light exposure to keep colors from shifting.
Weigh precisely, mix completely, and re-check flame/smoke after adding stabilizers because even small additions can change how a candle burns.
UV absorbers mainly reduce light-driven fading, while antioxidants slow oxidation-related yellowing; neither is a magic fix for every discoloration cause.

If you’re deciding what to try first, review stabilizer options by matching the problem to the tool: “fading in sunlight” points to UV absorbers, while “yellowing over storage” points to antioxidants.
To keep brightness consistent, coordinate dye load with stabilizers so deeper, more saturated colors don’t get treated the same way as pastels.
Then build storage habits that reduce fade over time—rotation, shade, and consistent conditions matter as much as the additive.

How to reduce soy frosting with small additive changes

Direct answer: Temper soy and stabilize room temperature, then micro-blend 1–2% compatible wax to reduce frosting.
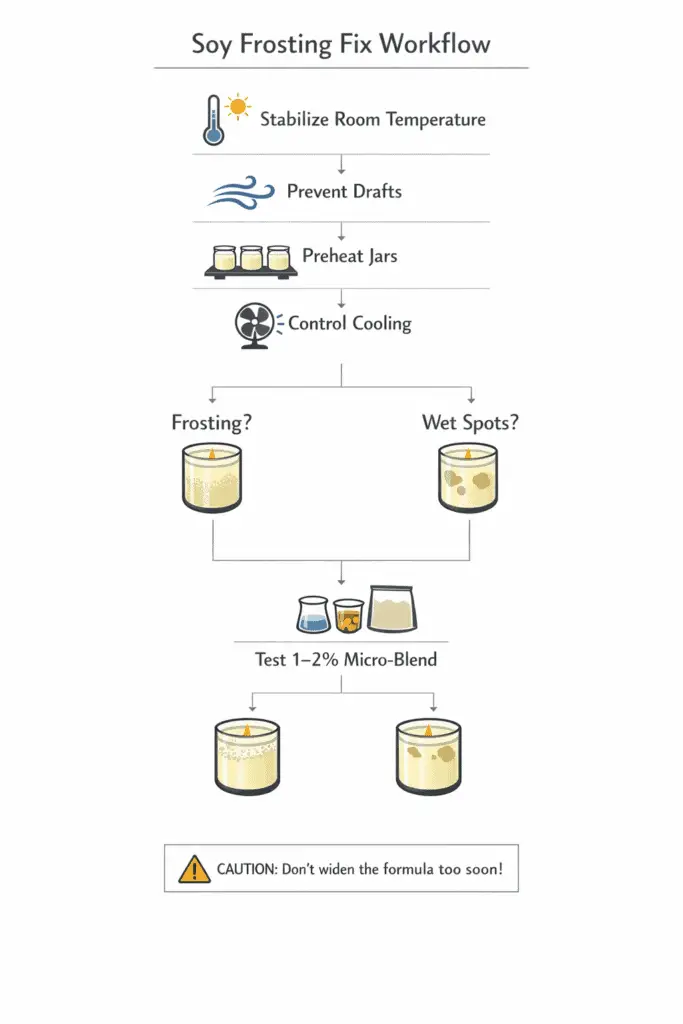
 A practical next step is to use additive micro-blends only after you lock in a steady cooling curve (no drafts, no temperature swings).

soy frosting and cooling control workflow


Frosting is a white, crystalline bloom caused by soy crystals reorganizing on the surface during cooling and cure.
Done well, you’ll get smoother tops and sides instead of speckled “snow” or rings that show up a week later.

In jars, preheat jars for better cooling so the wax doesn’t shock-cool against cold glass and trigger more surface nucleation.
Also, distinguish wet spots from frosting before changing wax, because pull-away/adhesion issues can mimic frosting in photos.

Method note: The “micro-blend” range is treated as a small, controlled variable (percent by weight) so you can isolate cooling-curve effects first. Observations are based on supplier documentation and common maker troubleshooting patterns rather than a single lab protocol. If the problem turns into a broader troubleshooting chain, use fix candle additive issues before widening the formula further.

Steps to calculate stearic % for clean mold release

Direct answer: Start pillars around 2–4% stearic, then adjust for mold material and release behavior while watching for brittleness.
choose release aids based on your mold (aluminum vs silicone) and the finish you want, not a one-size percent.
Stearic increases shrinkage so the candle pulls away from the mold, but too much can make edges chip and corners feel brittle.
The goal is clean release with minimal sinkholes, not maximum shrinkage.

Method note: Convert with grams = batch_g × (stearic_% ÷ 100). The table is “modeled” math so you can weigh accurately and keep tests comparable. Use your supplier’s SDS/handling guidance for stearic and keep batch notes consistent.

How to fix glass adhesion with micro-dose viscosity tweaks

Better glass adhesion usually comes from steadier jar temperatures and pour conditions, plus tiny viscosity tweaks (microcrys at or below 0.5%)—not from piling on polymers.
Wet spots are patches where wax pulls away from glass as it cools and shrinks, leaving a lighter-looking area that can come and go with temperature swings.
A simple order of operations is: fix handling first, then use viscosity modifiers only if the wax still releases from the sidewall after cure.
If you do add a modifier, treat it like a “micro-dose” experiment so you don’t trade wet spots for weak flame performance.

Method note: Keep the test tight—one jar size, one wick family, one fragrance, and one cure window—so the “before vs after” sidewalls actually mean something. If you need the full troubleshooting flow, use fix candle additive issues instead of stacking more variables into this chooser page.

How to mitigate vanillin discoloration realistically

Vanillin discoloration can be slowed with stabilizers, UV protection, and smart storage, but it usually can’t be eliminated when the fragrance oil contains vanillin.
The color shift often shows as tan, amber, or brown tones that deepen over days or weeks, even if the candle looked pale at pour day.
Start by evaluate stabilizer families based on what you’re fighting (light fading vs chemical browning), then build a test routine so you’re not guessing.
If your finished look matters (photos, gifts, retail), plan for “lighter now, darker later” and design around it instead of chasing a perfect zero-change promise.

UV inhibitors help when display light is the driver, but they won’t stop a vanillin-heavy fragrance from chemically darkening over time. For the dedicated color-stability path, use prevent candle discoloration instead of turning this chooser page into a full discoloration guide.

Claim discipline and compliance for additives

Make only claims you can support with your own repeatable tests, keep IFRA usage categories in mind for fragrances, and retain SDS/lot info for every additive you use.
“Cleaner burn” and “non-toxic” claims are where small brands get into trouble fast if they overreach.
A safer approach is to describe what you measured: stable flame, low soot compared with your control, consistent appearance, and documented batch records.

A claim-safe test record (what to keep)

  • Wax brand/lot, additive name/lot, fragrance name/lot, wick series/size, vessel type  
  • Your test notes and photos (day 0, day 7, and a consistent burn checkpoint routine)  
  • Any customer-facing language tied to those tests (kept consistent with what you actually observed)

Small-batch testing protocols (DOE for additive % × wick × fragrance)

Use a simple 2–3 level test matrix (low/medium/high) and change one factor set at a time so you learn faster than “one-off tinkering.” The easiest way to waste time is changing additives, wick, fragrance, and pour temp together. A small, disciplined matrix gives you answers you can reuse.

additive wick and fragrance test matrix

Once the control is stable, mix candle additives only one variable set at a time so you can still tell what actually caused the change.

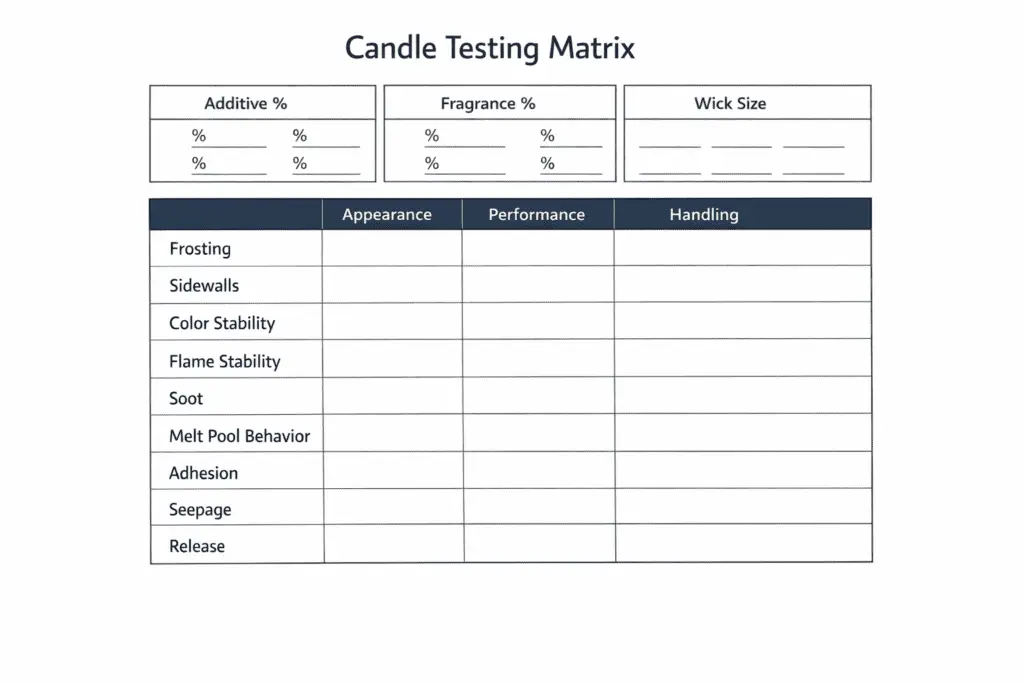
A starter matrix you can run without fancy tools

  • Additive %: 0 / low / medium  
  • Fragrance %: baseline / +2% (within safe guidance)  
  • Wick: baseline / one size up  

Score each candle the same way every time

  • Appearance: tops, sidewalls, frosting/mottling, color stability  
  • Performance: flame stability, soot notes, melt pool behavior at hour 2  
  • Handling: adhesion, seepage/sweating, release (for pillars), snap (for melts)

Keep the winning combination, then iterate only one dimension next (for example: refine additive % in smaller steps), so you don’t lose the signal you just earned.

Recent Posts