
UV-driven candle discoloration is color change caused mainly by light exposure, often seen as yellowing, fading, or a warm cast in wax that otherwise looked stable when poured. Prevent it by confirming that light is the main driver, then using a candle-rated UV inhibitor, light-stable color choices, and light-blocking storage or packaging.
This page covers UV-driven discoloration first, not every candle discoloration branch. If a fragrance-only sample browns, a vanillin-heavy blend darkens, or a colorant-only sample fades, treat those as separate fix paths before you test a UV additive.
A UV inhibitor can help when matched light and dark controls show that the candle shifts mainly under exposure. It is not the first fix when only the fragrance-only sample yellows, only the colorant-only sample fades or shifts, or the candle shows haze, streaks, or speckling from process problems.
Sunlight is brutal on candles. Whites turn creamy, bright dyes shift, and some fragrance oils push yellowing faster. UV light breaks down dyes and wax components, and heat speeds that reaction, especially in clear jars on a shelf or windowsill. The fix is a layered approach: add the right stabilizer for your wax, keep color and fragrance choices light-stable, and control exposure from curing through retail display. With a simple testing routine, you can spot a weak batch early and avoid selling candles that change color before they are burned.
Use this fast check to decide whether a UV additive is the right first fix, or whether you should change wax, fragrance, colorant, or process before you dose anything.
| What you see | Most likely driver | Will a UV additive likely help? |
|---|---|---|
| White turns warm cream across the candle | Wax oxidation plus light exposure | Sometimes, but improve wax choice, storage, and light blocking first |
| Only the fragrance-only sample yellows | Fragrance-driven discoloration | Usually not enough on its own; change FO or packaging strategy first |
| Only the colored sample fades or shifts | Colorant lightfastness or dispersion problem | Limited; change colorant family or dispersion before adding UV protection |
| Top surface or window-side yellows first | Direct UV plus oxygen at the exposed area | Yes, often as part of a layered fix with packaging and storage |
| Speckling, streaks, haze, or blotches | Poor additive or colorant dispersion | No; fix process and mixing first |
How to tell whether UV is the real discoloration driver
To tell whether UV is the real discoloration driver, compare matched wax-only, fragrance-only, and colorant-only samples before you change the full formula. This workflow keeps UV, fragrance, colorant, and process branches separate so you do not treat the wrong problem first.
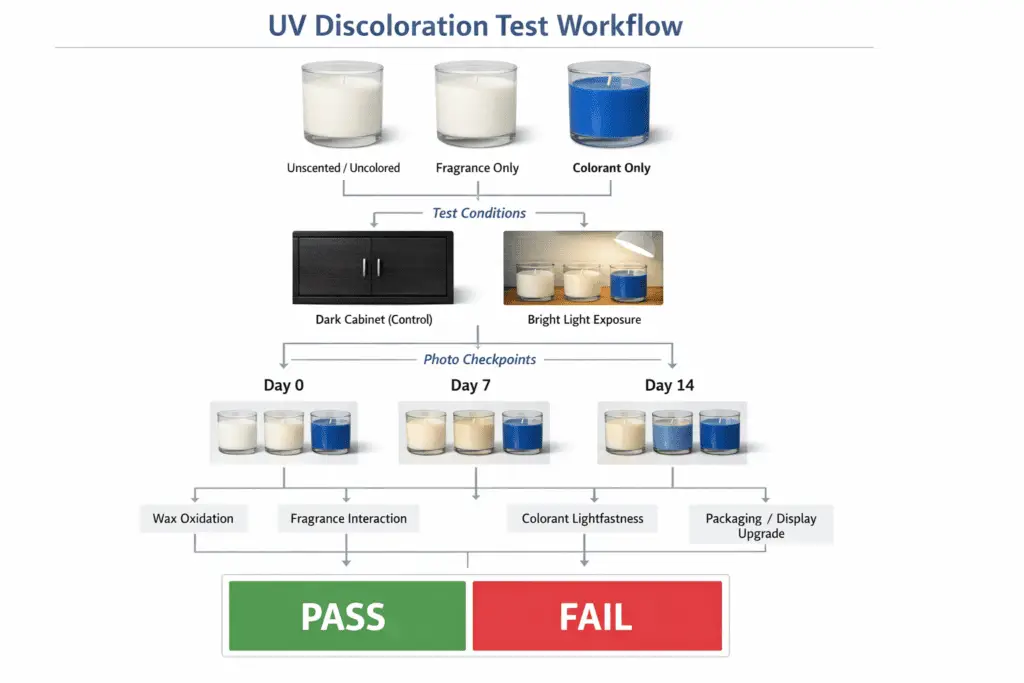
- Pour a control ladder: one unscented/uncolored, one fragrance-only, and one colorant-only sample.
- Store a matched dark control in a cabinet and a matched light sample in your real exposure spot, such as a window or retail-lighting area.
- Photograph Day 0, Day 7, and Day 14 from the same angle on the same background, then compare under neutral indoor light.
- If wax-only yellows, treat it as wax oxidation plus exposure. Prioritize light blocking and wax choice before additives.
- If fragrance-only yellows, treat it as a fragrance interaction. Change the FO, or design packaging, labels, and containers around expected drift.
- If colorant-only fades or shifts, treat it as a lightfastness or dispersion issue. Change the colorant family or improve dispersion before additives.
- Only after the driver is identified, add a UV inhibitor and rerun the same Day 0, Day 7, and Day 14 comparison.
- Upgrade packaging and display rules if the product will sit in bright storefront lighting or on windowsills.
- Lock the result by recording dose, lot numbers, and photos with each production batch.
- Retest whenever you change wax lot, fragrance lot, dye or pigment supplier, or container.
Use this simple pass/fail rule for the same shop exposure test.
- Pass: no obvious color shift at arm’s length in neutral indoor light versus the dark control after 7 to 14 days.
- Fail: a visible warm or yellow cast, fade, or hue shift that a buyer would notice on a shelf under normal room lighting.
What causes UV-driven candle discoloration?
UV discoloration happens when light and oxygen trigger chemical changes in wax, fragrance, dyes, or additives, creating yellowing, browning, fading, or ghost tint shifts over time.
If you are seeing a change within 7 to 14 days in a window A/B test, treat it as a photo-oxidation problem first and keep your batch notes alongside any additive guidance in the Supplier SDS.
What is actually changing inside the candle?
UV energy and heat speed up reactions that create new color bodies, which causes yellowing, or break existing colorants, which causes fading. Oxygen makes both worse, which is why discoloration often shows up fastest near the surface, along jar walls, or where lids do not seal tightly.
Common amplifiers that make UV discoloration show up sooner
UV discoloration shows up sooner when heat, reactive fragrance chemistry, unstable colorants, or oxidation-prone wax systems add stress to the same candle.
- Heat plus UV together: a sunny windowsill is not just bright, it is warmer, and that acceleration is real.
- Fragrance chemistry: some fragrance components are more reactive under light and air, and they can push a wax that seems fine into visible yellowing.
- Dye choice and loading: dyes can fade or shift, while pigments usually hold color better but need good dispersion.
- Wax base and additives: some waxes and blends are more prone to oxidation, and brighteners or whitening agents can also shift over time if the system is not balanced.
A fast way to isolate the cause
The fastest way to isolate the cause is to compare matched wax-only, fragrance-only, and colorant-only samples under the same light.
- Control sample: pour one candle with the same wax and wick but no dye and no fragrance. Store it in the same light. If it yellows, start with wax oxidation plus UV exposure.
- Fragrance-only sample: add fragrance but keep it uncolored. If this yellows faster, you have a fragrance interaction problem.
- Colorant-only sample: add dye or pigment without fragrance. If the hue shifts or fades, focus on lightfastness and dispersion.
Photo log that makes the problem obvious
Take a simple three-shot set, Day 0, Day 7, and Day 14, in the same spot, at the same time of day, on the same background. Then compare side by side under neutral indoor light.
Next, pick a UV additive that matches your wax, your color system, and your fragrance load, because UV resistant on a label does not guarantee it behaves well in candles.
If the fragrance-only sample yellows or a vanillin-heavy blend darkens while the wax control stays stable, treat fragrance chemistry as the first fix path and use vanillin discoloration in candles: prevention fixes before you rely on UV protection. If the colorant-only sample fades or shifts while the uncolored control stays stable, route that branch to how to prevent candle color fading or types of candle dye: liquid, chips, blocks and more before you add more UV protection.
How to choose a UV inhibitor that actually works
A UV inhibitor actually works on this page when a treated candle shows less visible UV-driven shift than a matched untreated control, without new haze, texture problems, or burn-performance issues.
Start with the Supplier SDS and technical sheet, then choose the option that matches your candle’s real stressors, including sunlight, store lighting, heat, fragrance chemistry, and color type.
If you are still deciding where UV control fits in your formula, start with candle additives and enhancers, then come back to UV testing once you have confirmed discoloration is the problem you are solving.
| What to check | What to look for |
|---|---|
| Intended use | States suitability for wax or similar nonpolar systems |
| Solubility | Mixes in clearly, with no haze, no grain, and no settling |
| Recommended use level | Given as percent or ppm-by-weight guidance you can measure |
| Temperature window | Adding temperature is compatible with your process |
| Color system | Notes on dyes, pigments, and whiteners compatibility |
| Fragrance interactions | Any warnings or known conflicts |
| Odor or appearance impact | Minimal effect on scent throw and visual clarity |
| Stability over time | Mentions heat and light stability, not just UV |
| Safety documentation | Clear handling, limits, and hazard info in SDS |
| Testing guidance | Encourages small-batch validation and comparisons |
Pick the type based on what you are fighting
Pick the additive type by the failure pattern you observed, because fading, yellowing, and oxidation do not respond the same way.
- If the issue is fading or color shift, prioritize an option described as a UV absorber for color protection and pair it with better lightfast colorants when needed.
- If the issue is yellowing that looks like oxidation, do not rely on a UV inhibitor alone. Plan for oxidation control, better storage and packaging, and fragrance choices that do not accelerate discoloration.
Wax base still matters. Paraffin often holds white longer than soy under the same light, so if your wax-only control yellows, compare the exact wax and blend guidance in using UV inhibitors in candles: rates and best practices before you add more protection.
A simple buying filter that saves money
Reject any option that lacks clear wax-fit guidance, a measurable dose range, or supplier handling documents. If you need exact rate math, wax-family detail, or mixing troubleshooting, move to the sibling pages for that work instead of stretching this page into a full product-selection guide.
Methods note for your own validation
Make two identical small test pours with the same wax, wick, fragrance, and color, and dose one inside the supplier’s range. Store both in the same light condition for 7 to 14 days, then compare under neutral indoor light and record the dose by weight with the Day 0, Day 7, and Day 14 photos.
Your pass/fail test before committing
- Pass: no new haze, no sweating or texture change, color stays closer to original, and fragrance performance does not drop noticeably.
- Fail: visible clouding, mottling, or a new off-tone that looks worse than the original problem.
For exact rate math and wax-compatibility detail, see using UV inhibitors in candles: rates and best practices. If the bigger issue is streaking, haze, or addition-point problems, use how to mix candle additives before you change the whole formula.
UV stabilizer dosing and mixing: summary before you test
Weigh UV stabilizer by mass, dissolve it completely, and blend it into fully melted wax so every pour gets the same protection.
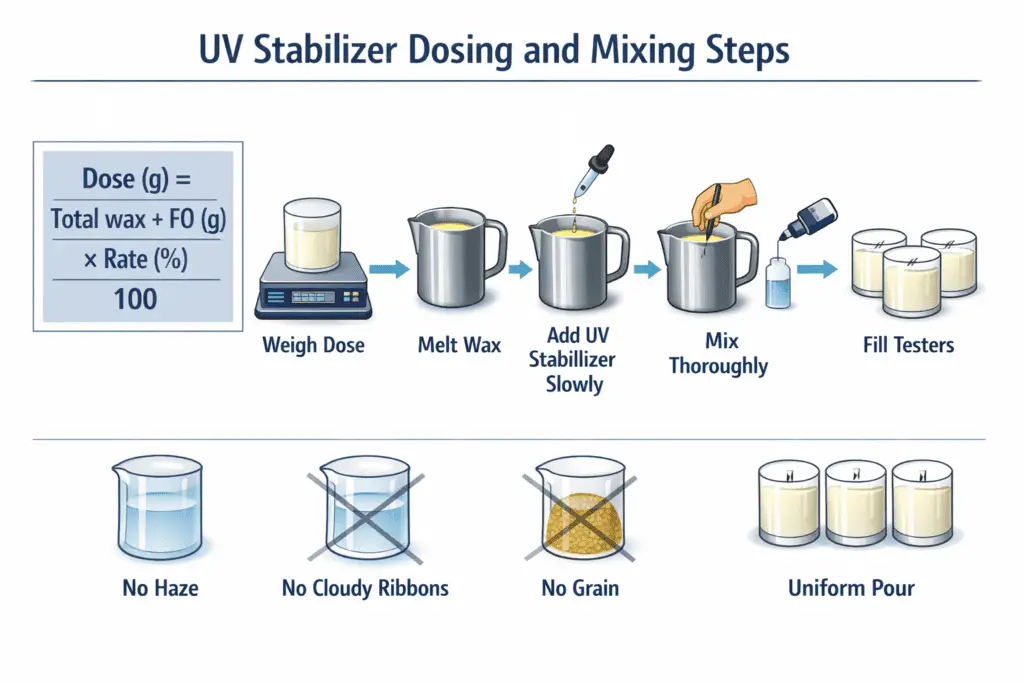
Follow the supplier’s stated use level, record the exact grams per batch, and keep the calculation weight-based from start to finish. For the full supplier-led rate range and wax-fit detail, use using UV inhibitors in candles: rates and best practices. For addition-point, dispersion, and clarity problems, use how to mix candle additives.
Quick dose math
Use weight-based math for every batch: Dose (g) = Total wax + FO (g) × Rate (%) ÷ 100.
Mixing steps that prevent hot spots and haze
Add the stabilizer only when the wax is fully melted and keep mixing until the melt looks uniform, with no cloudy ribbons, grain, or separation before you pour. If the wax turns hazy, streaked, or inconsistent, move to how to mix candle additives instead of treating this page as the full process guide.
Methods check before you scale
Pour matched testers, keep the exposure condition the same, and compare Day 0, Day 7, and Day 14 under neutral indoor light before you standardize the dose.
Troubleshoot the most common mixing failures
If the candle clouds, streaks, or still yellows, do not assume the dose is too low. Route haze and dispersion problems to how to mix candle additives, and route fragrance or vanillin discoloration back to the relevant sibling pages before you add more UV protection.
Once the formula and mix are stable, control the exposure the candle sees after pouring, because light management still matters even when the additive test passes.
Storage and packaging: light blocking as part of UV prevention
The most dependable way to reduce UV-driven discoloration after pouring is to limit light exposure with containers, sleeves, labels, boxes, and storage habits that keep wax out of direct light. Additives help, but light blocking still does the daily protection work after the candle leaves the pour pot.

Use the light-control layer that fits the product: cover exposed wax, keep finished stock boxed until sale, and treat direct sun as the worst display condition. This page keeps storage in the UV-prevention lane only, not as the full owner of every color-fading or packaging decision.
A simple shop test to validate your packaging
- Pack one candle as sold, with box, sleeve, and lid exactly as customers receive it.
- Leave an identical candle unboxed in the same bright spot.
- Compare after 7 to 14 days under neutral indoor light. If the boxed one holds color better, your packaging is doing real work.
Using UV additives safely: SDS, dose range, and burn recheck
On this page, safe means following the supplier’s SDS and technical sheet, keeping the dose inside the stated range, and rechecking burn performance after any formula change. Full labels, ASTM standards, and market-specific compliance stay on your separate safety page.
If the additive has no SDS, no clear use-level range, or no compatibility note for wax, do not put it in a sellable candle.
Any change to additives can change burn behavior, so treat it like a formula change and recheck safety performance before you ship.
Keep claims narrow. Say the additive helps reduce visible shift in your own light-exposure check, and avoid absolute wording such as UV-proof or will not discolor. For broader additive handling context, see are candle additives safe? vybar, stearic, UV, and botanicals.