
You can make candles without additives by matching the wax to your jar or mold, choosing a safe wick size, and managing pour, cool, and cure timing so test burns stay clean.
Here, additive-free means the candle relies on neat wax plus the wick, without the performance boosters covered in candle additives. Additives can smooth over weak wick choices, rushed cooling, or sloppy jar prep. When you skip them, the wax and wick have to do all the work, so small process changes show up fast. That’s why additive-free candles often look different from scented, hardened blends, more frosting in soy, more shrink in beeswax, and a narrower comfort zone for wicks.
Additive-free candles work best when you want a simpler ingredient list and you can accept more testing, more visible wax quirks, and a tighter process window. They are a weaker fit when the goal is a highly uniform finish, a very forgiving pillar wax, or the fastest path to stable results.
This quick compare shows where additive-free candles usually work well and where additive-supported blends are easier to manage.
| Decision point | Additive-free candles | Additive-supported blends |
|---|---|---|
| Ingredient list | Simpler and easier to explain | Often less simple, but more performance tuning options |
| Appearance | More likely to show frosting, wet spots, shrink, or bloom | Often easier to smooth and standardize |
| Process tolerance | Narrower room for wick, pour, and cooling errors | Usually wider tolerance for small process misses |
| Best fit | Containers, beeswax pillars, and small-batch testing | Projects that need a more polished finish or broader format flexibility |
| Testing load | Higher, because the wax and wick must do all the work | Lower, because additives can help correct weak points in the blend |
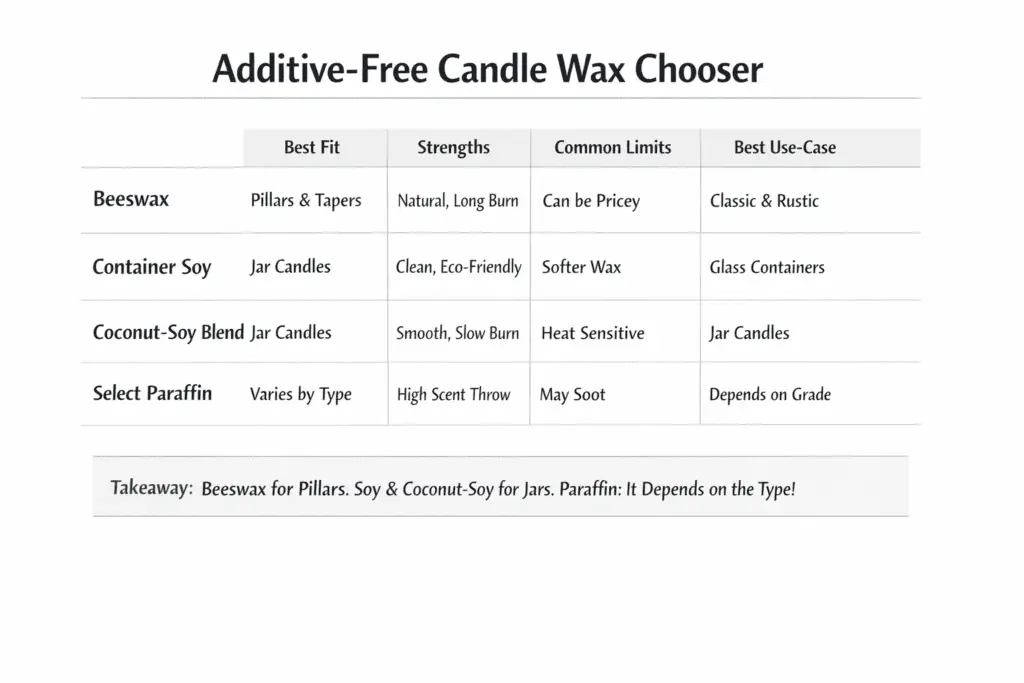
Best waxes for additive-free candles (pros, limits, use-cases)
Beeswax and container-friendly soy or coconut blends make the easiest additive-free candles, while neat soy pillars are the hardest to keep smooth and crack-free. Start by learning the basic melt, pour, and cure steps in candle making basics so you can judge wax behavior without relying on hardeners.
Beeswax usually has a higher melt point than many container soy waxes, but confirm your exact range on the supplier SDS and tech sheet. Higher melt points usually hold shape better but can feel tighter and shrink more as they cool, which affects glass adhesion and mold release.
Use choose the best candle wax to think in “container vs pillar” first, then refine by finish and burn behavior.
Here’s the simplest chooser view for truly additive-free builds:
- Beeswax (best for pillars and tapers): Naturally firm, often releases from molds well, and tends to burn steadily when wicked correctly. Expect more shrink and occasional surface bloom. Slower, draft-free cooling helps.
- Container soy (best for jars and tins): Beginner-friendly in containers and easy to source, but it can show frosting and adhesion quirks more than other waxes when room conditions swing. Neat soy pillars are the most likely to crack, crater, or cling to molds without additives.
- Coconut-soy blends (best for creamy container candles): Often smoother-looking and more forgiving in jars, with a softer feel. Softness can be a limit for freestanding shapes, especially in warm rooms.
- Select paraffin grades (best for clean-looking containers when you choose the right grade): Some grades burn clean and look glass-smooth, but “paraffin” covers a wide range. Treat it as a specification problem and rely on the SDS and supplier notes, not the label alone.
A quick way to choose without guesswork is a three-sample trial:
- Pick one pillar-leaning wax, such as beeswax, one container soy, and one coconut blend.
- Pour the same jar size and use the same wick family across all three.
- Compare adhesion after 24 to 48 hours, top finish, and first-burn stability, such as steady flame versus soot, tunneling, or overheating.
Container vs pillar without additives: what actually works
Additive-free candles work best in containers, while pillars demand firmer waxes and tighter process control to avoid cracks, sinkholes, and ugly surfaces. If you review candle making basics, the core trade-off is simple: containers can forgive minor shrink and surface changes, but pillars expose every cooling mistake.
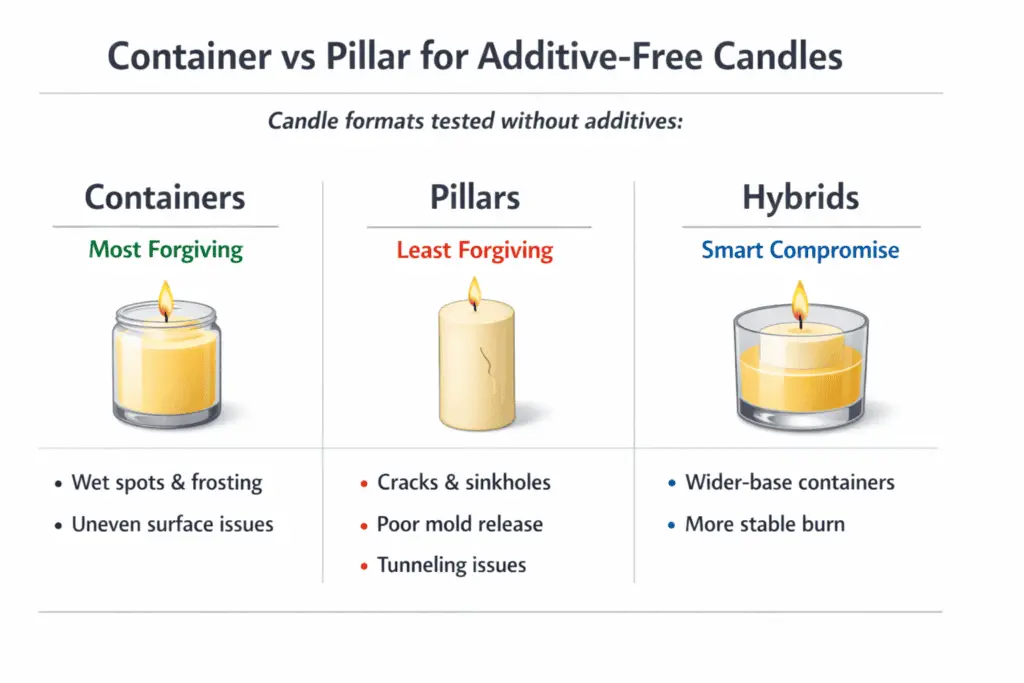
Wax type, wick, and airflow all interact, and additive-free builds narrow your options because you cannot patch the blend later. What tends to work reliably, with no hardeners:
- Containers (most forgiving): container soy, coconut-soy blends, and appropriate container paraffin grades. You may still see occasional wet spots or frosting depending on room swings, but the candle remains functional and easy to test-burn.
- Pillars (least forgiving): beeswax is the simplest neat wax choice for pillars and tapers. Some pillar paraffin grades also do well. Neat soy pillars are the most likely to crack, slump in heat, or show heavy surface bloom without additives.
- Hybrids (smart compromise): thick-walled jars, tins, or freestanding containers with a wider base can give you the pillar look while behaving like a container candle.
If your pillar sticks, tears, or refuses to release cleanly, treat it as a system issue: wax choice, mold material, pour temperature, and cooling speed. Do not muscle it out. Adjust process first, cool longer, confirm full set, and use fix candle mold release when you need a dedicated troubleshooting pass.
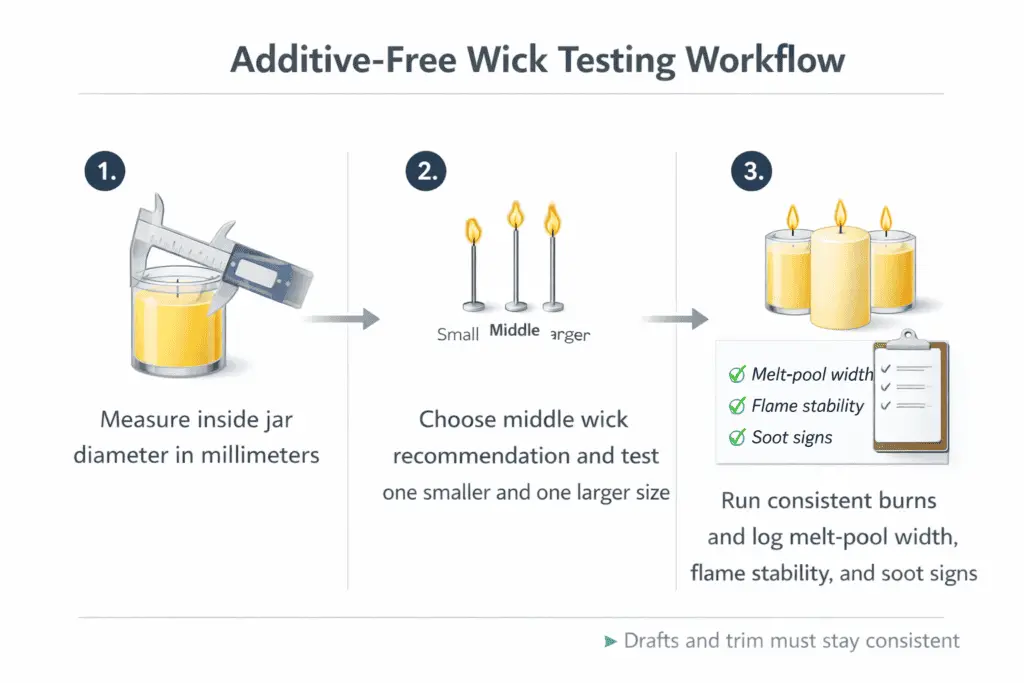
Why wick testing matters more in additive-free candles
Wick sizing starts with jar diameter, but additive-free candles need more testing because the wax has no hardeners or performance additives to widen the burn window. Start with one wick family, then test 2 to 3 nearby sizes to hit a steady flame and a safe melt pool without soot or overheating.
An unprimed wick is a wick with no added coating, which can make early ignition more sensitive to wax type and melt speed. Cotton usually lights more easily, while wood often needs more startup energy and tighter centering to stay lit.
Use choose the right candle wick first, then treat size as a short experiment, not a single correct answer. Keep fix candle wick problems in mind while you test, because the same symptom can come from sizing, trimming, or airflow. Keep prep consistent with prep and trim candle wicks so you are not changing two variables at once.
- Measure the container’s inside diameter. Use millimeters if you can, because wick charts and series steps often map more cleanly to mm.
- Start with a middle recommendation, then bracket it. Test one smaller and one larger size around your starter wick so you can see the direction of error quickly.
- Run consistent burns and record outcomes. Keep the same burn duration each session, keep drafts away, and log melt-pool width, flame stability, and soot signs.
Tunneling usually points to too little heat for the container or too much heat loss to the room. A tall, restless flame, hot jar walls, or visible soot usually points to too much heat for that setup.
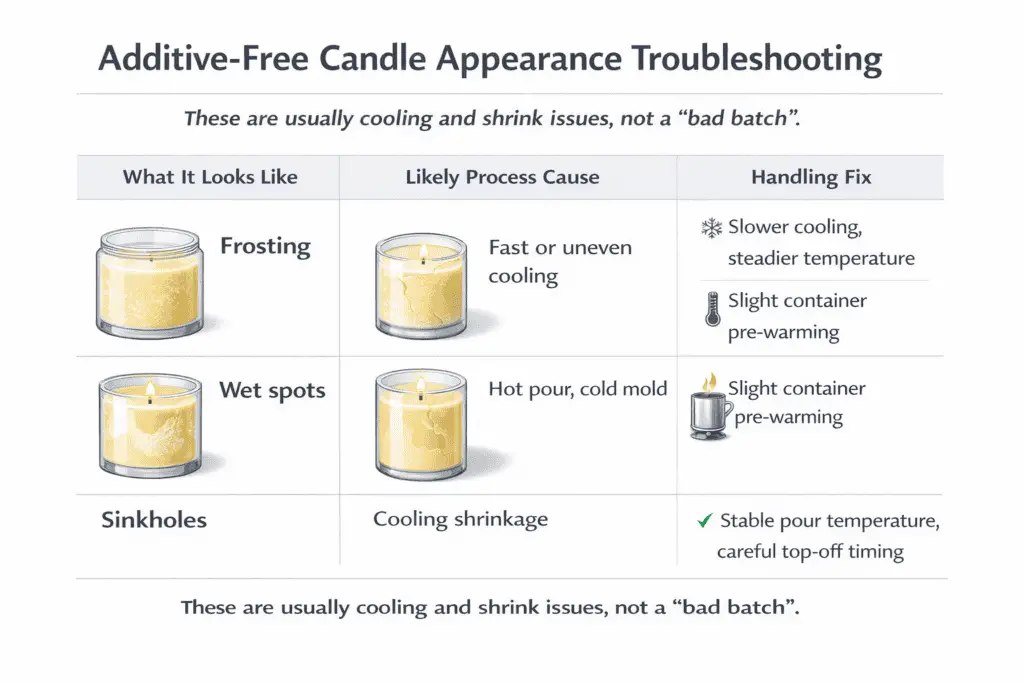
Common appearance trade-offs without additives
Most frosting, wet spots, and sinkholes in additive-free candles come from shrink and crystal changes during cooling, not from one bad batch of wax, so the fixes are mainly temperature, timing, and handling. When you skip additives, these appearance quirks are easier to see because there is less in the blend to smooth them over.
This quick symptom grid helps you separate a normal additive-free trade-off from a real process miss:
- Frosting (white, crystalline haze): common in soy. Reduce drafts, cool more slowly, and avoid big temperature drops right after pour.
- Wet spots (wax pulling from glass): pre-warm the container slightly, pour consistently, and keep the cooling curve steady for the first 12 to 24 hours.
- Sinkholes (voids near the center or top): pour at a stable temperature for your wax, avoid over-chilling, and top off only when the core is still warm enough to fuse.
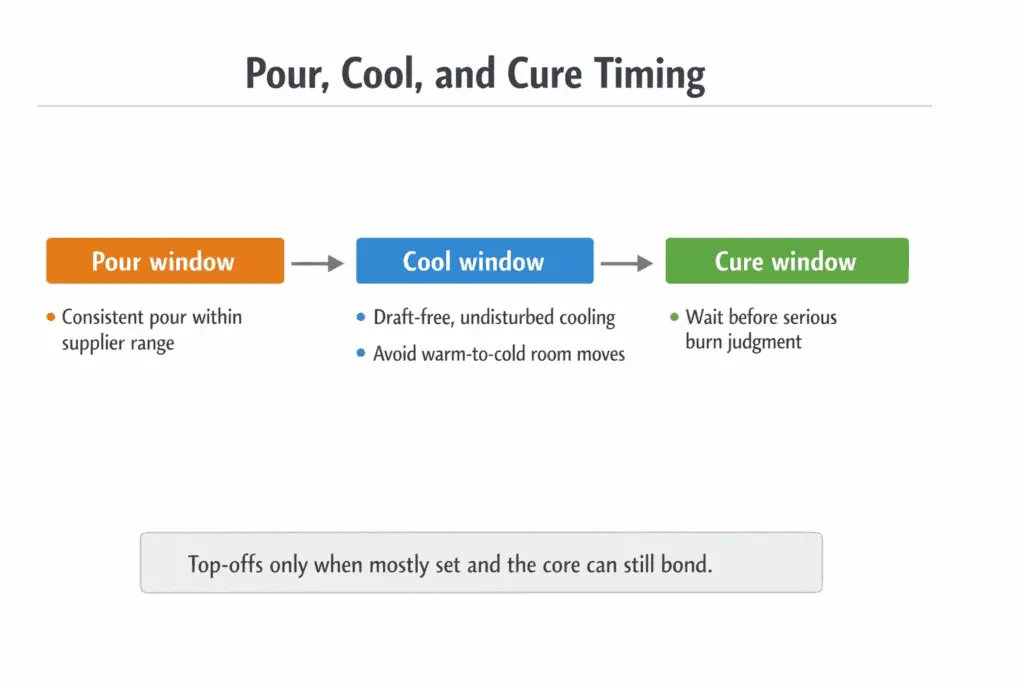
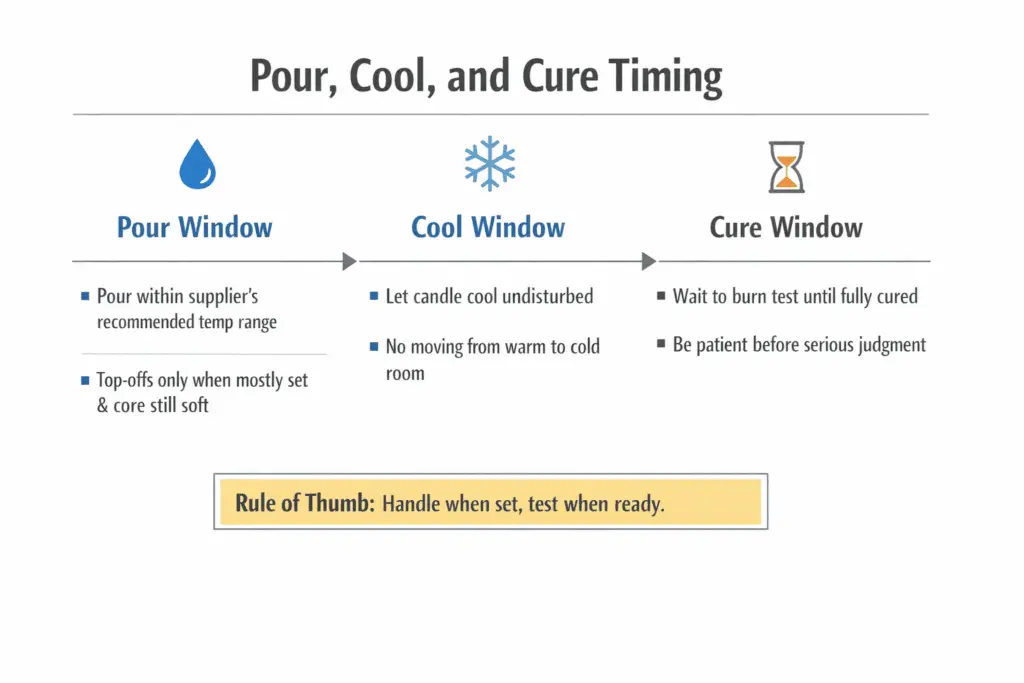
Optimal pour, cool, and cure timing when you skip additives
Pour within your wax’s recommended temperature band, cool it slowly without drafts, then cure long enough for the wax structure to stabilize before you judge the burn. Candle making basics helps here because timing mistakes often look like bad wax when they are really cooling and handling issues.
Most supplier tech sheets give a pour range rather than one magic number because room temperature and container thickness change how fast the wax sets. When you need a more specific starting point, use choose pour temperature by wax type and then test inside that range.
When you keep the cooling curve steady, you usually get fewer sinkholes, better glass adhesion, and more predictable first burns, especially important when you are not using hardeners.
Think of it as a simple three-stage timeline:
- Pour window (minutes): Heat, mix, and pour consistently, then stop fussing with it.
- Cool window (hours): Let jars or molds sit undisturbed in a draft-free spot. Rapid edge-cooling is a common cause of craters and pull-away, so avoid moving candles between warm and cold rooms.
- Cure window (days): Soy usually benefits from a longer cure, while beeswax often feels ready sooner, but both improve with time before you do serious testing.
Two practical no-additive rules of thumb:
- If you need a top-off, do it only after the candle has mostly set but the core is still warm enough to bond cleanly.
- Do not judge a wick on day one. Wait until the wax has had time to firm up and settle, then run your test burns consistently.
Clean, safe burns with unscented candles (wick, trim, airflow)
A clean, safe burn means a steady flame, a controlled melt pool over the first few hours, minimal visible soot, and no signs the container is overheating. Use candle making basics as your baseline, then treat each first light like a safety check, not a performance contest, because even unscented candles can smoke if the wick is oversized or the room is drafty.
Basic candle-safety guidance points to the same practical reality: stable setup and supervision matter more than perfect ingredients.
First-burn pass or fail checklist
- Trim: Start with a short, consistent trim before lighting and between burns. Prep and trim candle wicks so you are not accidentally upsizing the wick with a long, mushroom-prone tip.
- Airflow: Keep the candle away from vents, fans, and open windows. Flicker often is not bad wax, it is oxygen surges from airflow.
- Container heat: Warm is normal. Uncomfortably hot glass or a smoky, tall flame is a stop-and-adjust signal. Extinguish, let it cool, then try a smaller wick or shorter trim.
- Melt pool behavior: A melt pool that stays tiny for hours suggests under-wicking or heat loss. A melt pool that gets aggressive fast can indicate over-wicking.
- Between-burn consistency: If results swing wildly from one session to the next, the culprit is often trim length or drafts, not wax quality.
If your candle keeps smoking or struggling to stay lit despite consistent trimming, do not guess. Review fix candle wick problems so you can diagnose wick size, trim, and airflow one variable at a time.