
To pre-tab, prime, and trim candle wicks, crimp the wick into a tab, add a light wax coating only when you need more rigidity, and trim to 6–7 mm before lighting.
This page covers candle wick prep as a repeatable workflow for raw, pre-waxed, and pre-tabbed wicks before pouring and before lighting. It owns pre-tabbing, optional priming when raw wick needs handling stiffness for tabbing, centering, or pouring, and trim checks before a burn. Here, handling stiffness does not mean the wick is correctly sized or that it will be the best-burning option. It does not replace full wick sizing, wood-wick-specific prep, or deeper wick troubleshooting, which stay on their own pages.
Choose the Wick-Prep Path by Wick State
Use the wick state to set the prep order before you start. Raw or spooled wick may need optional priming for handling stiffness during setup, pre-waxed wick usually moves to tabbing and trim, and pre-tabbed wick usually moves straight to installation, centering, and trim.
| Wick state | Recommended order |
| Raw or spooled wick | Cut the wick, prime it only if you need extra stiffness, let it cool, tab it, install it, then trim before the first burn. |
| Pre-waxed wick | Cut the wick, tab it if needed, install it, then trim before the first burn. |
| Pre-tabbed wick | Install it, center it, and trim it before the first burn. Skip pre-tabbing and usually skip priming. |
Pre-tab Candle Wicks
To pre-tab candle wicks, cut the wick to length, crimp it firmly into a metal tab, then verify it is centered and passes a gentle pull test.
This section applies when the wick is ready to tab. If you are starting with raw spool wick and want to prime it first, coat it, let it cool, then return to these tabbing steps.
Pre-tabbing gives you a centered hardware base that is easier to secure and test, and the broader candle wick types and sizing guide covers wick families and sizing before you prep a batch.
Before you start, gather these basic tools so the workflow stays consistent from batch to batch:
- Raw or spooled wick in the series you are testing
- Wick tabs and smooth flat-jaw or tabbing pliers
- Sharp scissors or flush cutters
- Small melting pot or double boiler with a thermometer
- Tongs or a metal rod for dipping
- Paper towel or a lint-free cloth for removing excess wax
- Wick trimmer, nail clippers, or small scissors for final trims
For a wider setup overview, see our candle making guide.
Start with the candle wick types and sizing guide if you still need the bigger picture before you crimp hardware. If your wick series is not settled yet or the vessel match still looks uncertain, review how to properly size your candle wick before you tab a batch. That small bit of planning reduces wasted wicks, crooked tabs, and failed test burns later.
Choose the path that matches the wick you bought before you start. This keeps raw wick, pre-waxed wick, and pre-tabbed wick from getting mixed into one process.
| Wick state | Recommended order |
| Raw or spooled wick | Cut the wick, prime it only if you need extra stiffness, let it cool, tab it, install it, then trim before the first burn. |
| Pre-waxed wick | Cut the wick, tab it if needed, install it, then trim before the first burn. |
| Pre-tabbed wick | Install it, center it, and trim it before the first burn. Skip pre-tabbing and usually skip priming. |
Quick tab fit check: the tab should sit flat in the vessel’s true center and leave the wick exiting straight up. If you still need a jar-by-jar starting point for wick size and hardware fit, measure the flat base first, then compare it with your wick size chart by jar diameter and wax type.
Bench note: The cut and protrusion measurements below are handling starting points for manual tabbing, not fixed burn standards. Adjust them to your vessel depth, tab style, and how much wick you need to hold cleanly during setup.
Step 1 – Pre-measure and cut the wick
Measure the inside height of your vessel and add 2–3 cm so you have something to hold during priming and trimming. Cut cleanly with sharp scissors so the fibers don’t fray. If you’re batching, cut a whole bundle at once and group them by wick series and length so you don’t mix up your sizes halfway through production. Keep offcuts; they’re useful for short testers and burn tests.
Step 2 – Thread the wick into the tab
Feed one end of the wick through the hole in the metal tab from the bottom up until 5–10 mm pokes out. Make sure the wick is centered in the hole and not catching on the edge of the cup. If you’re using tabs with different neck heights, keep them in clearly labeled containers so you don’t lose track of which neck matches which jar depth. Choosing the right base diameter and neck height now reduces loose tabs and drifting wicks later.
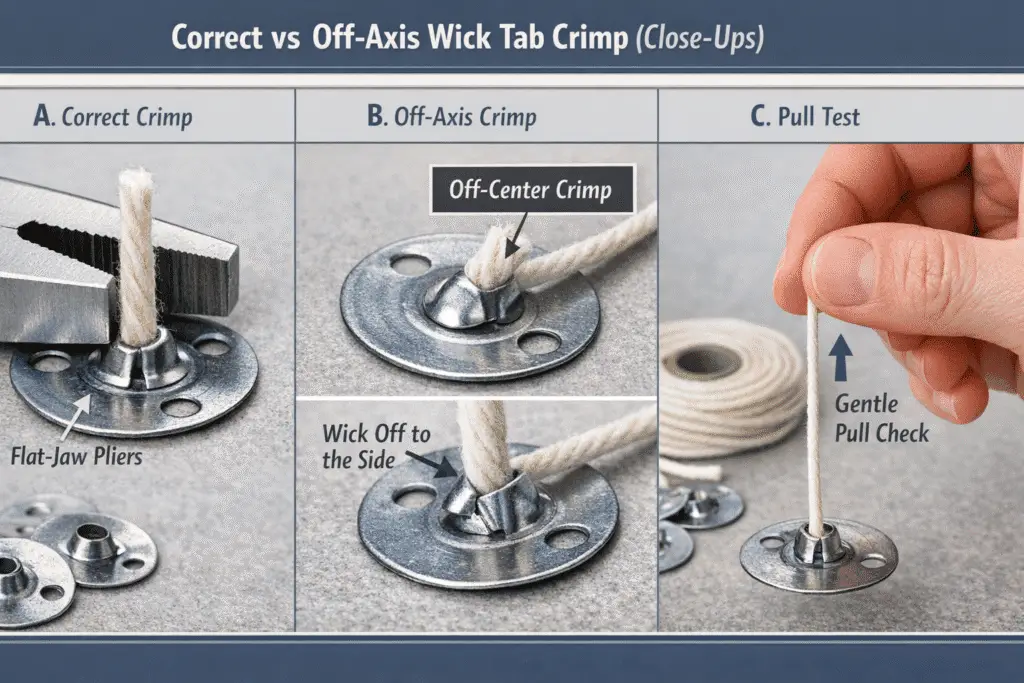
Step 3 – Crimp the tab firmly
Use tabbing pliers or a pair of smooth, flat-jaw pliers to squeeze the crimp around the wick in one firm motion. You’re aiming for tight enough that you can’t pull the wick out with a gentle tug, but not so aggressive that you cut or crush the fibers. Rotate the tab 90 degrees and give it a second light squeeze if you see any gaps in the crimp. A good crimp feels solid, with no wobble between the tab and wick.
Step 4 – Flatten and inspect the tab base
Lay the tab on your work surface and make sure the base sits flat; any rocking now will turn into a wick that leans when you glue it into the container. If the base is slightly bent, gently press it flat with your pliers instead of forcing it against the table. Check that the wick exits the cup straight up in the center of the tab and isn’t pinched at an angle. This is also a good moment to pre-sort your tabs into “A-grade” and “needs fixing” piles.
Step 5 – Perform a quick pull test and batch organize
Hold the wick above the tab and give it a gentle pull equal to what it might experience during pouring and centering. If it slips even slightly, cut the wick free, discard that tab, and re-crimp with a fresh one rather than sending a borderline piece into production. Group finished pre-tabbed wicks by size and wick series in labeled bags or trays so you always know which bundle matches which vessel. That little bit of discipline early makes your pouring days faster and your burn tests much more reliable.
Once your wicks are pre-tabbed, you can attach the tabs to your jars using wick stickers or a small dot of high-temperature glue before pouring your wax.
Prime Wicks for Consistent Ignition
To prime candle wicks, dip them into controlled-temperature wax, let the excess drip off, then hang them straight until fully cooled and rigid.
On this page, consistent ignition means more predictable initial lighting and easier setup handling with raw wick during prep. It does not mean the wick will give the best long-burn result or that priming replaces sizing and testing.
Do you always need to prime? No. If you are using pre-tabbed or pre-waxed wicks, priming is usually already done. If you are using raw or spooled wick, priming is optional unless you need extra stiffness for pouring, cooling, or testing; compare one primed batch with one unprimed batch before you standardize your process.
This section covers raw cotton-style wick and similar spooled wick when you need handling stiffness for tabbing, centering, or pouring. If you are using wood wicks for candle making, use that page for wood-wick clip setup and burn-start handling.
For the wider wick-family context, see our candle wick types and sizing guide. In practice, raw or spooled wick is usually primed before tabbing when you need extra rigidity, while pre-waxed or pre-tabbed wick usually skips priming and moves straight to installation and final trimming.
Bench note on working ranges: The dip times, temperature offsets, and cooling times below are starting-point working ranges, not universal limits. Keep your wax below the supplier’s maximum handling temperature, note the wax type and room conditions, and adjust only one variable per test batch.
Bench method: Use the same wax you plan to pour, keep the supplier sheet or Safety Data Sheet (SDS) as the heat limit, and compare one primed bundle with one unprimed bundle before you standardize the process.
Sequence depends on wick state. If you are working from raw spool wick, many makers prime first and tab after the wick cools. If you bought pre-tabbed or pre-waxed wick, you can usually skip priming and move straight to installation and final trimming.
Priming saturates the wick fibers with your actual wax blend so they light easily, stand straight, and burn more predictably from the first test. Unprimed wicks can bend, flare, or struggle to ignite because air pockets and uneven fibers interrupt capillary action. Good priming technique matters even more with dense soy blends and coconut-soy mixes, where cold-start issues are common. By using a simple dip, drip, and hang routine, you can make ignition and early burn behavior more consistent with very basic gear.
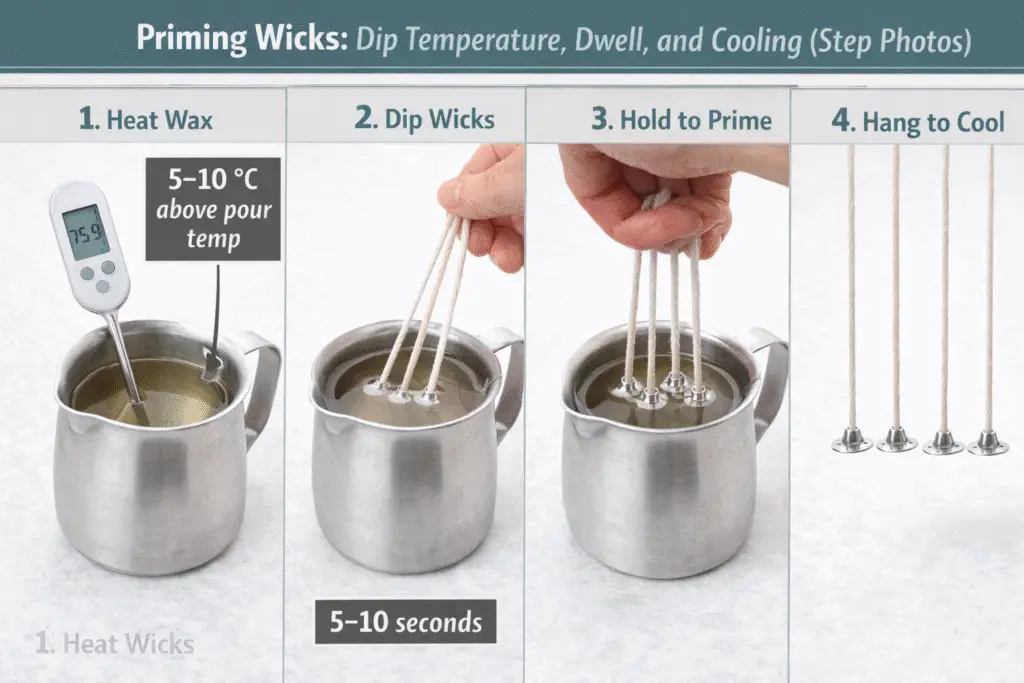
Step 1 – Prepare a small pot of priming wax
Use the same wax (or wax blend) you’ll pour your candles with so your priming matches the real burn environment. Melt a small batch in a jug or double boiler and, if your supplier allows it, start only slightly above your normal pouring temperature rather than jumping to an arbitrary high heat. Stay within the temperature range on the supplier sheet or Safety Data Sheet (SDS), and use that guidance as the hard limit for bench testing.
Step 2 – Bundle and stage the wicks you are preparing
Sort the wicks by size and series so each dip batch is uniform. Lightly comb them with your fingers to straighten any kinks and make sure there are no loose fibers at the tips, which can form “mushroom” heads later. If you are working from raw spool wick, many makers prime first and tab after cooling; if you bought pre-tabbed wicks, skip this section entirely. Stage the wicks on a tray or in a shallow container so you can handle several at a time without letting the wax cool too quickly.
Step 3 – Dip the wicks and fully saturate the fibers
Lower the wicks into the melted wax until the fibers are fully coated. Hold them submerged only long enough for the fibers to wet out and trapped air to release. For many test batches that is just a few seconds, but use the shortest dwell that gives you an even coat. Avoid swirling vigorously; a gentle up-and-down motion is enough to release trapped bubbles.
Step 4 – Lift, drip, and wipe off excess wax
Pull the wicks up slowly and let extra wax drip back into the pot for a few seconds. Then, wearing heat-resistant gloves, lightly pinch the wick between a folded paper towel or lint-free cloth and draw downward in one smooth motion. This removes big droplets and leaves a thin, even coat instead of thick blobs that will distort wick sizing. The wick should look lightly coated and slightly stiffer, not encased in a heavy shell. If the coating looks opaque and chunky, your wax is likely too cool.
Step 5 – Hang the wicks straight to cool
Clip or hang the wicks over a rod, shelf, or makeshift drying line so they do not touch each other while they cool. Give each wick its own space so they don’t fuse together as the wax sets. As they cool, keep them as straight as possible so they are easier to tab or install later. Wait until they feel fully rigid before storing or tabbing, because thicker coatings and cooler rooms can slow the set time.
Step 6 – Inspect the primed wicks and store for later batches
Once cooled, run your fingers along each wick to check for rough spots, bends, or clumps of wax. Trim away any obvious imperfections and discard pieces that look badly warped rather than trying to “rescue” them; inconsistent priming is one of the fastest ways to introduce noisy variability into your test burns. Store good primed wicks in labeled, dust-free containers or bags so they’re ready for tabbing, installation, or your next pouring day. Well-prepared wicks often give faster ignition, fewer hard starts, and a more repeatable burn profile across your candles.
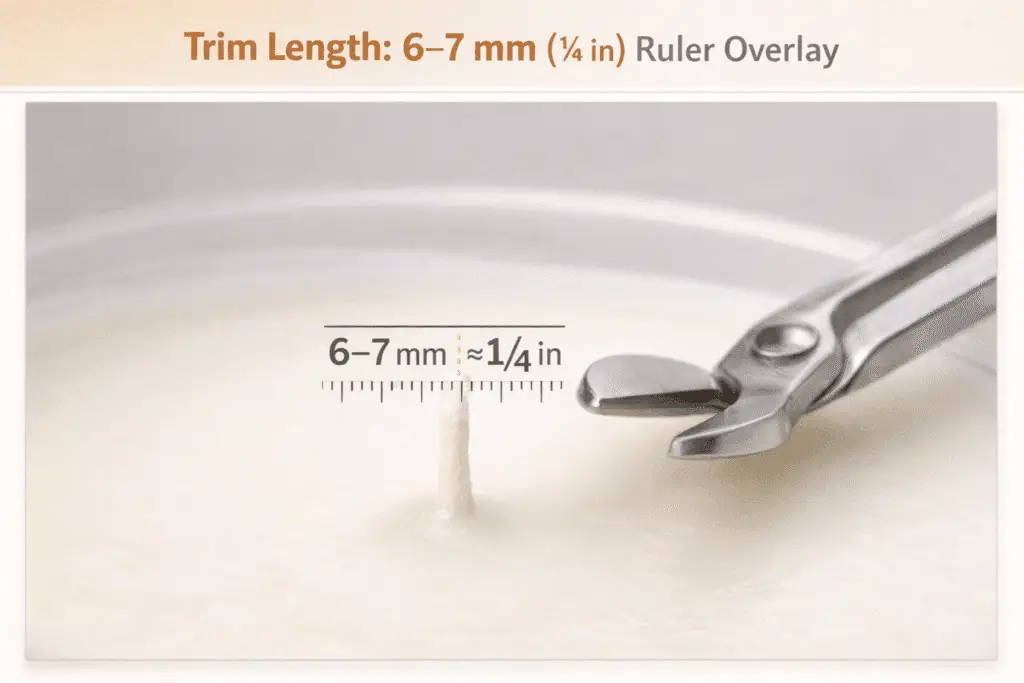
Trim Wicks to 6–7 mm for a Clean Burn
Before the first burn and before later burns, trim the candle wick to about 6–7 mm (≈1/4 in) while the candle is fully cool and the wax is firm. On this page, that trim target is a wick-prep rule that helps start the burn with a steadier flame and lower soot risk; it does not replace full wick sizing or formula testing.
This is the standard starting point for cotton-style candle wicks because it balances easy ignition with a steadier fuel supply. Once you know your wax, vessel, and wick series, you can test whether your setup behaves better closer to 6 mm or closer to 7 mm.
If you still need the wider wick-family context before you test trim length, start with our candle wick types and sizing guide. Most candle care sheets and the National Candle Association recommend this quarter-inch target because it balances easy ignition with controlled fuel supply, which reduces soot and carbon “mushroom” caps.
That quarter-inch target is the starting point for trim, not a substitute for your own wick-series notes.
Trimming is a quick pre-burn safety check, not busywork. A wick that is too long throws a big, hungry flame that can smoke, dance, and overheat the jar; a wick that is too short can struggle to stay lit. If you’re new to trimming, review your wick series notes first so you know whether your setup tends to run hot or cool and whether you should bias toward 6 mm or closer to 7 mm in your tests.
As you trim, pay attention to the last burn: soot stains on the jar, tall flames, and big carbon caps help you diagnose wick sizing problems: symptoms and fixes before you light the candle again. Use this simple routine before every burn:
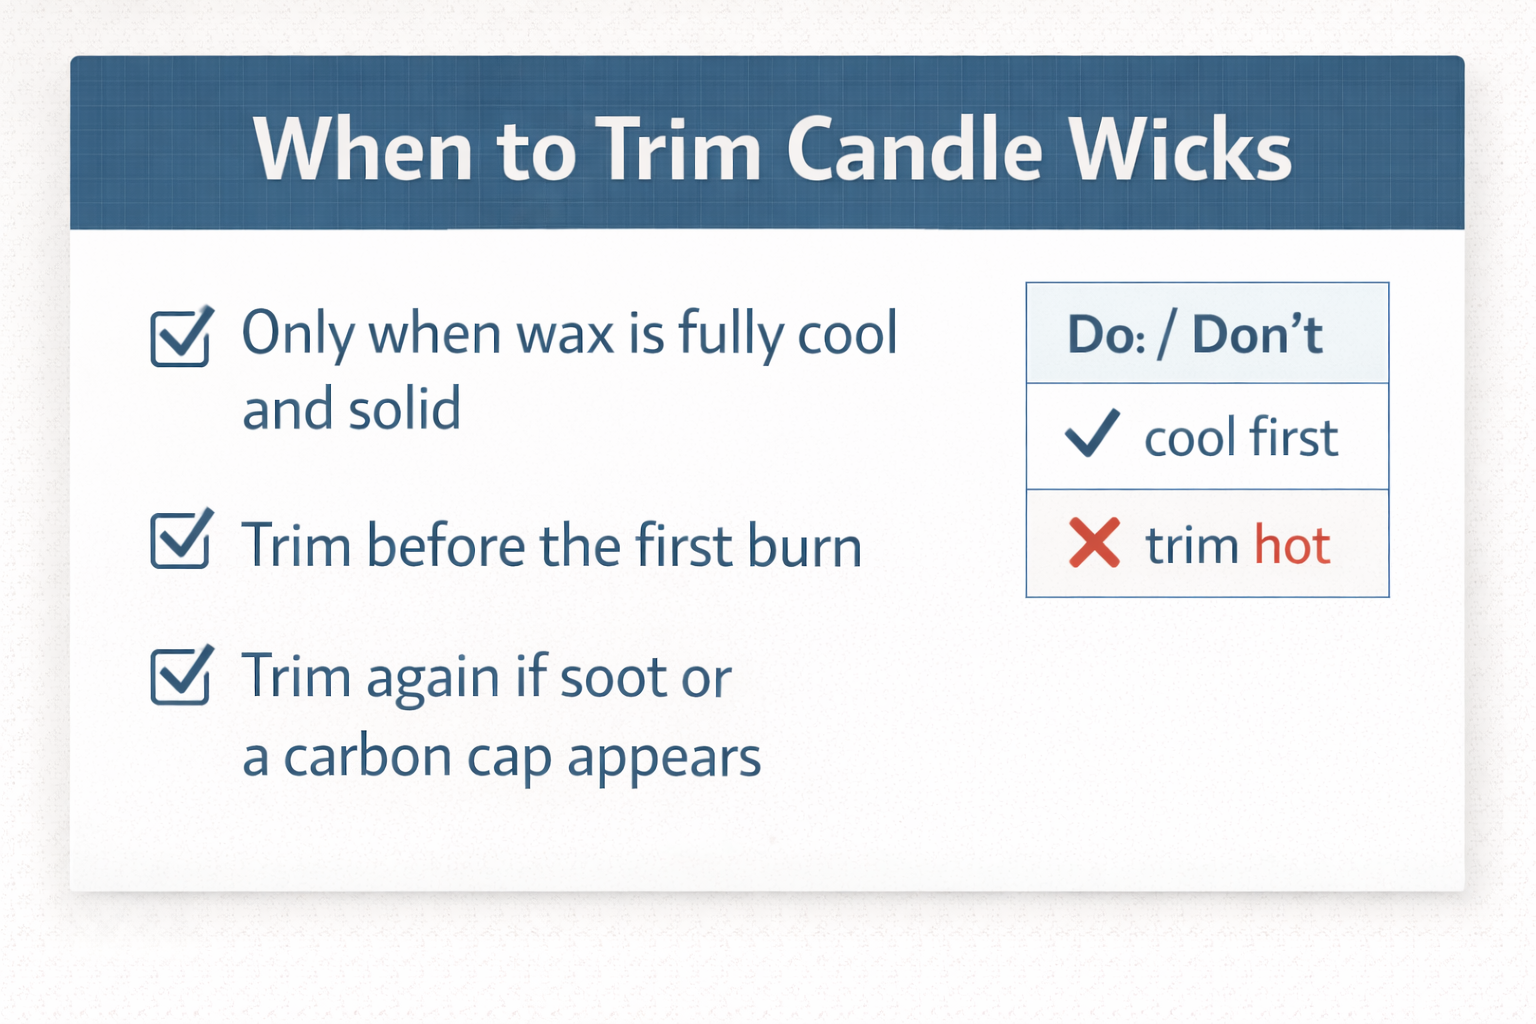
Step 1 – Let the candle cool completely
Wait until the wax is fully solid and room-temperature. Trimming a warm or soft surface smears wax, can tilt the tab, and makes it harder to measure an accurate 6–7 mm length.
Step 2 – Straighten the wick gently
Before cutting, straighten the wick between your fingers so it stands upright. This gives you a true reading of length and stops you accidentally trimming at an angle.
Step 3 – Measure and trim to 6–7 mm (≈1/4 in)
Use a wick trimmer, nail clippers, or small scissors and aim for roughly 6–7 mm from the wax surface to the tip. In deep jars, tilt the tool slightly so the cutting edge stays flat against the surface and doesn’t gouge the wax.
Step 4 – Remove loose trimmings from the wax
Lift out any wick pieces or debris you cut away. Loose fragments act like extra fuel, encouraging flare-ups and soot even when the remaining wick is the right length.
Step 5 – Re-check after the first few minutes of burn
After relighting, watch the flame for the first 5–10 minutes. You want a steady, upright flame that doesn’t touch the glass or throw obvious smoke. If you still see issues, move to wick sizing problems: symptoms and fixes for full diagnosis.
Use this quick trim comparison before lighting:
| Wick tip condition | What you see before lighting | Likely burn result |
| Trimmed to 6–7 mm (≈1/4 in) | Short, neat tip above a flat wax surface | Steady flame, less soot, controlled melt pool |
| Untrimmed or very long wick | Tall, curled, or frayed tip above the wax | Large flame, more smoke, higher risk of mushrooming |
Troubleshooting: Mushrooming, Tunneling & Soot
If your candle mushrooms, tunnels, or leaves soot, check wick trim, priming buildup, and tab alignment before moving to full wick diagnosis.
Use the symptom first, then change one prep variable at a time. This section covers only warning signs tied to trim length, priming buildup, and tab alignment. If the problem stays after those checks, move to full wick troubleshooting. Always test on a heat-safe surface, away from drafts, and never leave the flame unattended.
Use this short warning-sign matrix during test burns so you can rule out prep issues before you move to a full fix:
| Symptom | Likely cause | First correction |
| Large mushroom cap and visible smoke after 30–60 minutes | Wick is trimmed too long for the next burn | Trim to 6–7 mm on a cooled candle, then retest that prep change first |
| Wick goes out after 10–20 seconds | Heavy priming coating, drowned wick, or buried tip | Clear the tip, reduce priming buildup, and confirm the wick sits upright above the wax |
| Flame leans to one side | Tab base is off-center or airflow is uneven | Re-center the wick path from tab to rim and move the candle away from drafts |
| Ignites slowly on first light | Cold, stiff, or unevenly prepared wick | Compare a fresh trimmed wick with a lightly primed test wick using the same wax |
After you identify the symptom, change one prep variable per test burn—trim, priming, or tab alignment—so your notes stay useful. If several batches still behave badly after those first corrections, move to how to fix common candle wick problems for the full diagnostic flow. For cotton-wick carbon caps, use how to prevent mushrooming in cotton wicks for the mushrooming-specific fix path.