Candle wick problems are burn-performance symptoms that show the wick, wax, jar, or burn conditions are no longer working together as intended. Most candle wick problems come from the wrong wick size or length, poor burn conditions, too much char, or too little exposed wick.
Use this page to match each symptom to the smallest safe first fix before changing the wick size or wax formula. It covers tunneling, self-extinguishing, soot, flame problems, and carbon buildup; retire the candle if the jar overheats, cracks, or remains unstable after two careful adjustments.
Diagnose the symptom first
Start by matching the visible symptom to the smallest safe first fix before you change wick size, switch formulas, or treat the candle as unsafe. If you need the broader wick-selection workflow behind repeat failures, start with Candle Wick Types and Sizing Guide.
Use the symptom table below to pick the smallest fix that matches what you see. Change only one variable at a time: trim length, exposed wick, burn environment, or wick size and formulation. If the same symptom returns twice, stop treating it as simple candle care and treat it as a wick-size or wax-match problem.
Is this a general candle wick problem or a wood-wick-specific problem?
Start here for symptoms any candle can show, such as tunneling, soot, weak flame, a high flame, or repeated self-extinguishing. If the problem only makes sense because of wood-wick ignition, crackle, clip setup, or wood-wick sizing, use the deeper wood-wick pages after this diagnosis pass. First judge flame stability after 5–10 minutes, then judge melt-pool correction only after the burn session has had time to develop.
If the wick will not catch on first light
If a wick will not catch on first light, try one careful relight after clearing loose char and lighting from the base. If it still fails twice, stop relighting and move to the “Wick Keeps Going Out” section below; wood-wick-specific first-light setup belongs on the deeper wood-wick installation page.
Fast diagnosis: match the symptom to the first fix
| Symptom | Most likely cause | First fix to try | Stop and retire the candle when… |
| Tunneling | Wick too small, short first burn, cold room, draft | Let the next burn reach a near edge-to-edge melt pool; if needed, level excess side wax | The jar looks stressed, the flame overheats, or the tunnel keeps deepening after a proper burn |
| Wick keeps going out | Wick too long with char, wick buried in wax, weak wick size, heavy blend | Trim flat, clear char, expose a little more wick, relight in a draft-free spot | The wick keeps drowning or self-extinguishing after two careful tries |
| Heavy soot or black smoke | Wick too long, over-wicked setup, draft disturbance | Extinguish, cool, trim shorter, move away from drafts | Smoke stays heavy or the jar blackens quickly again |
| Flame too high or wild | Wick too large, excess fuel, long burn session, draft | Extinguish, cool fully, trim shorter, reduce burn time | The flame repeatedly roars, leans hard, or overheats the jar |
| Weak or tiny flame | Wick too short, wick too small, cold room, heavy blend | Expose a little more wick and retest in a calm room | The flame stays tiny and the melt pool barely grows after two tries |
| Mushrooming or carbon cap | Long burn sessions, no trimming, wick slightly too large | Cool completely, remove the carbon cap, trim flat before relighting | Mushrooming returns together with soot or an oversized flame |
Treat the first retry as basic care. A repeated symptom points to a sizing or wax-match problem. Stop immediately when the jar, flame, or smoke pattern becomes unsafe.
Use this quick check order before you change more than one variable at a time.
- Trim the wick flat and remove loose char.
- Move the candle away from drafts and relight only when fully cool.
- Watch the flame for 5–10 minutes before making a second adjustment.
- If the same symptom returns twice, stop rescuing and treat it as a wick-size or formulation mismatch.
Stop and retire the candle if…
- the flame roars, leans into the glass, or throws continuous black smoke
- the jar becomes painfully hot, cracks, or shows heat stress
- the wick shifts close to the glass wall
- about 1/2 inch (1.3 cm) of wax remains in the container
- the same problem returns after two careful fix attempts
For deeper setup help, see Candle Wick Types and Sizing Guide, Proper Wick Trimming Techniques, How to Choose the Best Wick for Candle Making, and Are Candle Wicks Safe? Lead Myths, Soot, and Overheating Explained.
For broader wick-selection follow-up, use How to Choose the Best Wick for Candle Making.
Tunneling (wax left on the sides)
Tunneling is when your candle burns straight down the middle and leaves a thick ring of hard wax around the jar. It usually means the wick is too small for the jar, the first burn was too short, or the candle is burning in a cold or drafty spot. The goal is always the same: a full, even melt pool across the top before you blow it out.
The main reasons candles tunnel are:
- Wick is under-sized for the jar diameter or wax blend.
- First burn was too short, so the wax “memorized” a narrow melt pool.
- Room is cold or drafty, so heat is lost faster than the wick can melt wax.
- Fragrance load or additives make the wax harder to melt at the edges.
You can rescue a tunneling candle you already own by following these steps:
- Let the candle cool, then gently trim the wick short and flat for the wick type you are using.
- On the next burn, keep the candle away from drafts and let it burn long enough for the melt pool to reach close to the glass all the way around.
- When there’s a deep tunnel, remove and discard a small amount of the high wax wall. A maker may instead level the top gently with a heat gun.
- Any time the flame feels too hot, the glass looks stressed, or you smell scorching, extinguish and retire the candle rather than forcing more rescue attempts.
If tunneling returns after a proper burn, treat it as a setup problem rather than repeating rescue steps. Compare jar diameter, wax blend, fragrance load, and wick size against a wick-size guide or your burn notes before you test again.
For deeper follow-up, use the guides on trimming candle wicks and choosing the right wick size for your jar and wax, then retest one variable at a time.
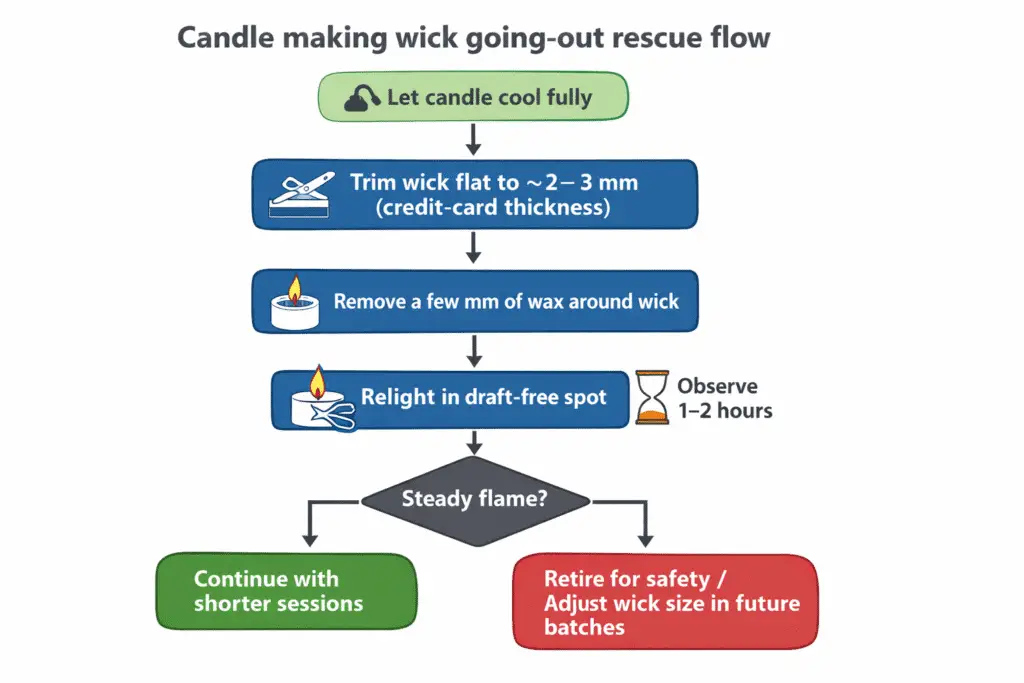
Wick Keeps Going Out (Won’t Stay Lit)
When a candle wick won’t stay lit, it’s usually telling you something about the wick itself, the wax around it, or how it’s being burned. The flame is starving because there’s too much wax, too little wick, moisture, or a heavy fragrance that’s clogging things up. The fix is to help the wick access fresh fuel first and, if the problem repeats, move from care fixes to wick-size or wick-type diagnosis.
The common reasons a candle wick keeps going out include:
- Wick is too short or buried in melted wax, so it can’t “breathe.”
- Wick is under-sized for the diameter and wax blend, producing a weak flame.
- Wick absorbed moisture during storage or shipping.
- High fragrance load, heavy color, or certain additives are clogging the melt pool.
You can rescue a candle that won’t stay lit by following these steps:
- Let the candle cool completely, then gently remove any mushrooming or char and trim the wick short and flat for the wick type you are using.
- Carefully remove a small ring of wax around the wick (just a few millimeters) so more wick is exposed, then relight and watch for a steady flame.
- Relight carefully in a draft-free area and watch the flame for several minutes before you make another change.
- If it still drowns or self-extinguishes after two careful tries, stop relighting and move to wick-size or wick-type diagnosis.
If this keeps happening across controlled burns, treat it as a repeat setup problem. Compare the wick, jar diameter, wax blend, and fragrance load. Use How to Choose the Best Wick for Candle Making before testing again.
For repeat self-extinguishing, use Candle Wick Types and Sizing Guide and How to Pre-Tab, Prime & Trim Candle Wicks. Then check How to Choose the Best Wick for Candle Making rather than treating repeated failure as a lighting problem.
Excessive soot or smoke from candle wicks
Thick black smoke, fast-darkening jar walls, or soot on nearby surfaces show that the candle wick is not burning cleanly. Faint residue alone is less serious, but repeat buildup still needs correction.
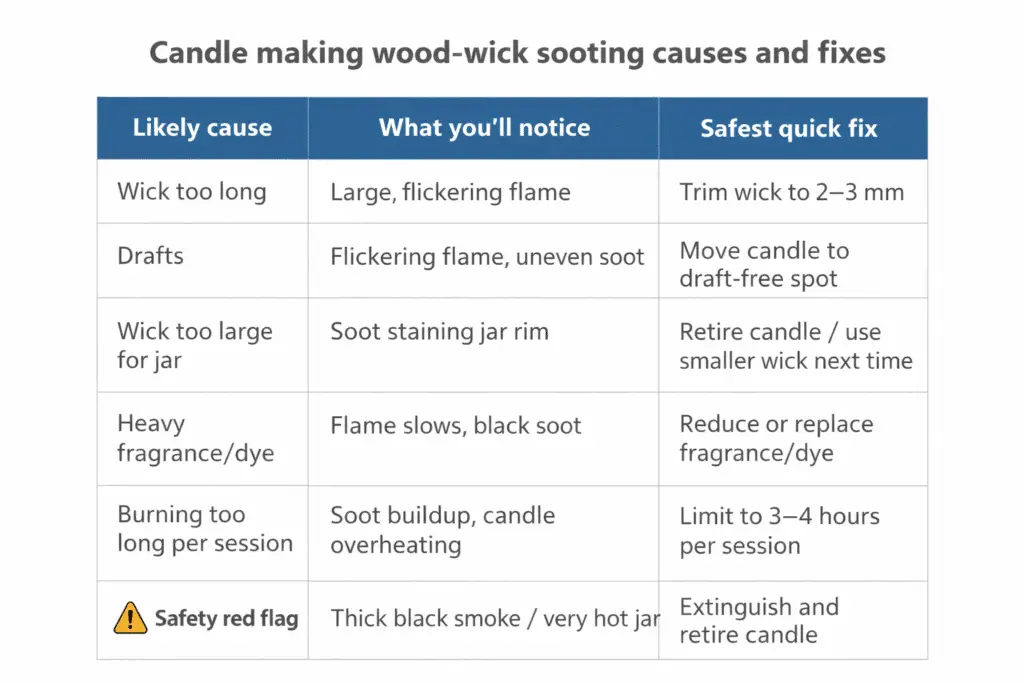
A wick that is too long or too large, heavy fragrance, and drafts can all increase soot. Most sooty candles improve with better trimming, calmer air, and careful wick or blend changes in later tests.
Quick steps if your candle is already sooty:
- Extinguish immediately if you see thick smoke, a roaring flame, or fast jar blackening.
- Let the candle cool completely, then wipe loose soot off the jar exterior.
- Trim the wick short and flat for the wick type you are using and remove loose char.
- Move away from drafts (vents, windows, fans) and relight; watch the flame for a few minutes.
- If heavy smoke continues, retire the candle and treat it as a failed test rather than forcing more burns.
What common soot patterns usually mean (quick reference):
- Dark ring near the jar top: wick too long or over-wicked → trim shorter and test a smaller size next batch.
- Plume of smoke each time you light or blow it out: trim better, use a snuffer, and avoid blowing directly into the wax.
- Soot plus very high or wild flame: treat this as a safety issue. Check wick size, fragrance load, and room conditions, then use the flame-height and trimming sections.
If soot returns after trimming and draft control, treat it as a wick-size, formula, or burn-condition problem. Compare the candle with How to Choose the Best Wick for Candle Making and Are Candle Wicks Safe? Lead Myths, Soot, and Overheating Explained rather than forcing more burns.
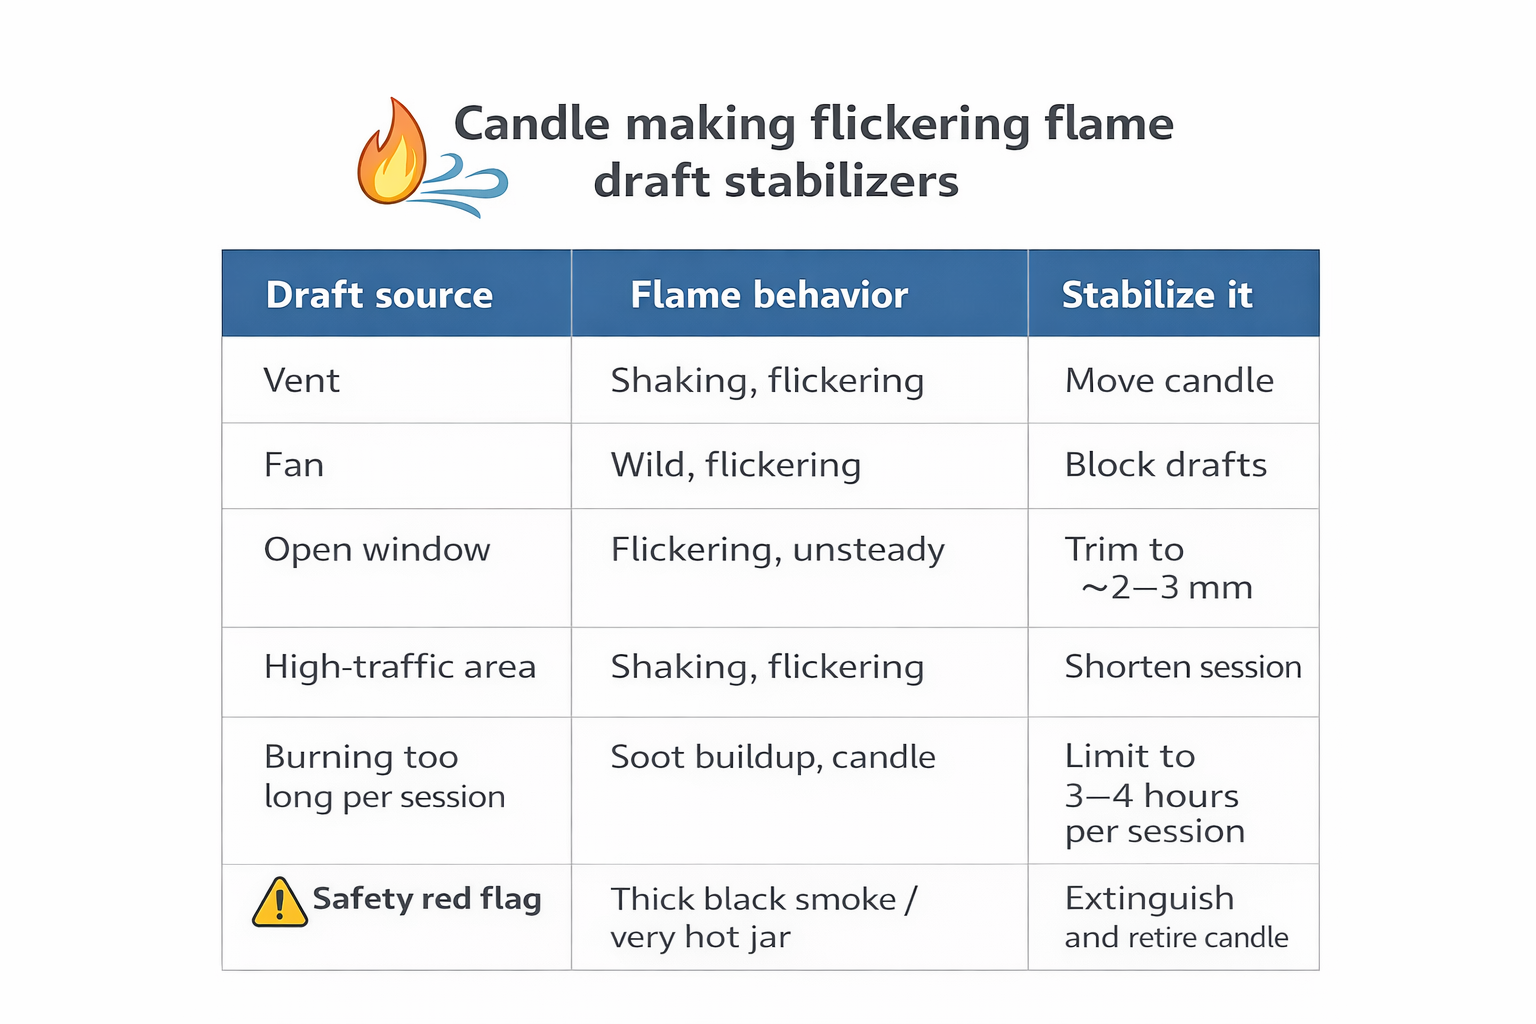
Flame too high, wild or flickering
A candle flame that is very tall, dances wildly or looks unstable is a safety flag, not just a cosmetic issue. It usually means the wick is too long, too large for the jar, or being pushed around by drafts and heavy fragrance.
Left alone, this can overheat the jar, throw soot, or stress the container glue and label. The goal is a steady, controlled flame that does not overheat the jar or produce unstable smoke.
The most common reasons for a high or wild flame are:
- Wick is over-sized for the jar and wax blend, or paired with an aggressive booster strip.
- Wick hasn’t been trimmed and has built up char or “mushrooming.”
- Drafts from vents, fans or open windows make the flame dance and lean.
- Very soft wax, high fragrance load or certain additives feed the flame too quickly, especially later in the burn.
You can take these immediate safety steps if your candle flame looks too big:
- Extinguish the candle right away using a snuffer or by gently dipping the wick into the melt pool (then lifting it back up).
- Let the jar cool fully; if the glass feels extremely hot to the touch, retire the candle for safety.
- Trim the wick back short and flat for the wick type you are using, remove loose char, then relight in a draft-free spot and watch the flame for several minutes.
- Keep later burns shorter and stop using the candle if the flame repeatedly climbs too high or produces soot after trimming.
If a high flame returns after trimming and shorter burns, treat it as an over-wicked or formula problem. Compare wick size, jar diameter, and burn notes with Candle Wick Types and Sizing Guide or How to Choose the Best Wick for Candle Making before the next test.
If the flame later becomes weak and barely melts the wax, use the weak-flame, trimming, and wick-size sections without pushing the candle into an overheated burn.
Weak or tiny flame that barely melts the wax
A weak flame usually means the wick is too small, trimmed too short, or overloaded by the wax-and-fragrance blend. It does not produce enough heat to build a normal melt pool or support steady scent release.
The most common reasons for a tiny, struggling flame are:
- Wick is too small for the jar diameter and wax blend.
- Wick has been trimmed too short, so there isn’t enough exposed wood to feed the flame.
- Wax blend is dense or heavily scented, so the flame has to work harder to melt fuel.
- Candle is burned in a cold room, which robs heat from the melt pool.
You can rescue a candle with a weak flame by following these steps:
- Let the candle cool, then check the wick height; if it’s shorter than a grain of rice, it’s probably over-trimmed.
- Carefully scrape or scoop a thin layer of wax away from the wick so enough wick is exposed for the wick type you are using.
- Relight the candle in a draft-free spot and let it burn for 1–2 hours; watch whether the melt pool slowly widens.
- If the flame stays tiny and the wax barely softens beyond the wick after two tries, retire the candle and log it as under-wicked rather than wasting more time.
If weak flame repeats, treat it as a repeat setup problem. Compare the jar diameter, wax blend, and wick size. Use How to Choose the Best Wick for Candle Making or Candle Wick Types and Sizing Guide, then retest one variable at a time.
The mini diagnostic grid below compares weak vs normal flame behavior:
| What you see | Likely cause | Try this first | What to log for later tests |
| Tiny flame, barely reaches wick width | Wick over-trimmed | Expose more wick, relight 1–2 hours | Wick height, time until flame weakens |
| Small flame, narrow melt pool, no soot | Wick under-sized | Test one size up in same wick series | Jar size, wick code, wax, fragrance % |
| Weak flame in cold/drafty room | Environment stealing heat | Move candle, reduce drafts, re-test | Room temp, drafts, surface placement |
| Weak flame plus drowning in wax | Blend too heavy or wick too small | Remove excess wax, consider larger wick | Melt pool depth, fragrance load, blend |
If your notes keep showing “weak flame” for the same jar and recipe, adjust wick size or blend instead of trimming harder. Keep one change per retest so the next result tells you whether the problem is really wick output, formula weight, or room conditions.
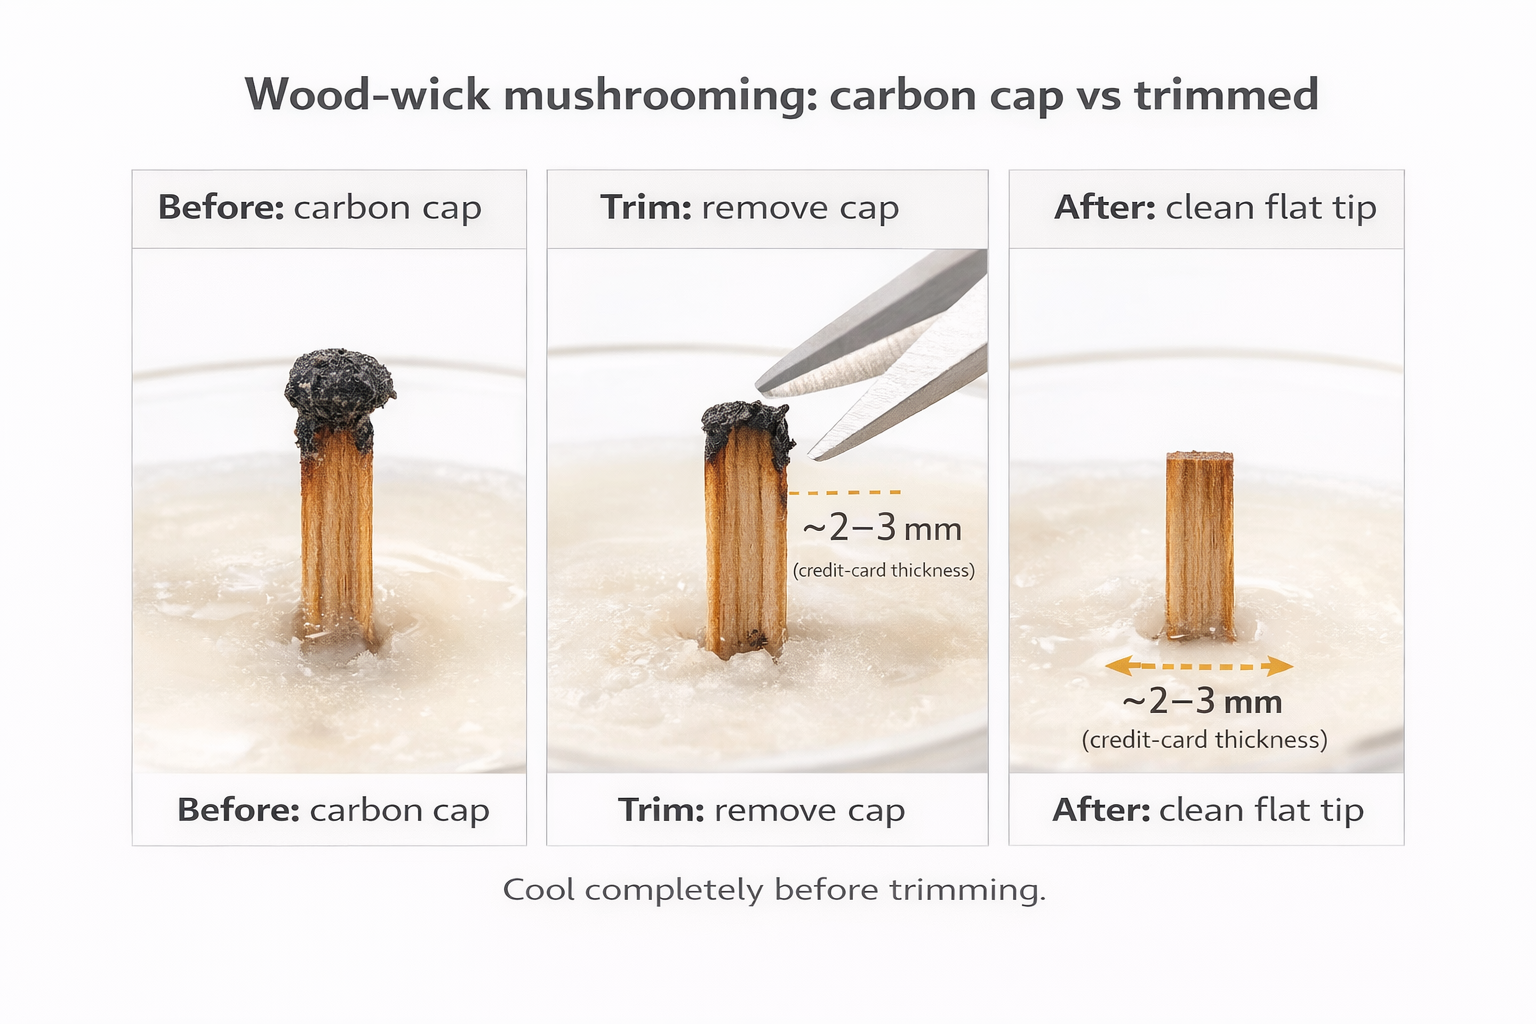
Mushrooming and carbon buildup on candle wicks
Mushrooming is when the wick tip develops a bulb-like clump of carbon that looks like a small flower or cap. This usually shows up after longer burns or repeated burns without trimming.
A little bit of buildup is normal, but heavy mushrooming can lead to extra soot, a larger flame than intended, and bits of char falling into the melt pool. The aim is to keep the wick neatly sized so it burns cleanly and does not feed extra soot back into the flame.
The main reasons candle wicks mushroom or build up carbon are:
- Wick is a bit too large for the jar and wax blend, so it’s pulling more fuel than it can burn cleanly.
- Candle is being burned too long in a single session, so carbon collects on the tip.
- No trimming between burns, so yesterday’s char becomes today’s oversized cap.
- Wax blend, fragrance load or dye are feeding extra fuel to the flame, especially with soft or heavily scented waxes.
You can fix mushrooming on a candle you’re using by following these steps:
- Blow out the candle and let it cool completely; never trim a hot, soft wick over a liquid melt pool.
- Remove the mushroom cap and loose char with a wick trimmer, nail clippers, or a tissue. Leave the wick short, clean, and suitable for its type.
- Before you relight, tap or blow away loose debris so it doesn’t fall into the wax and re-burn as soot.
- On later burns, keep sessions shorter and trim the wick before every lighting; follow the candle maker’s stated burn-time limit.
If mushrooming returns with soot or an oversized flame, treat it as a wick-size problem rather than a trimming problem. Use How to Choose the Best Wick for Candle Making or Candle Wick Types and Sizing Guide before you keep burning the same setup.
The quick do & don’t list below summarizes key habits for mushrooming candle wicks:
- Do: Trim the wick short and flat before every burn.
- Do: Stop using a candle that mushrooms and throws heavy soot or has a very high flame.
- Don’t: Flick off caps directly over the melt pool; they’ll fall in and re-burn as dirty fuel.
- Don’t: Assume mushrooming means your candle is “bad” – it’s usually a wick-size, burn-length or trimming issue you can correct in your next batch or with better care habits.
Prevent repeat candle wick problems
Prevent most repeat candle wick problems by trimming before each relight, changing wick size only after repeat symptoms, and stopping once the candle becomes unsafe. Good candle performance depends on the wick, wax, jar, and burn conditions working together. When the same symptom returns twice, switch from rescue mode to diagnosis mode.
Trim before every relight
Let the candle cool completely, remove loose char, and keep the wick short and flat before lighting again. A clean relight prevents soot, mushrooming, and self-extinguishing from building on top of yesterday’s residue.
Change wick size only after repeated symptoms
Change wick size only when the same tunneling, drowning, or weak-flame problem returns after two controlled burns. Compare the jar diameter, wax, fragrance load, and wick type. Use How to Choose the Right Wick for Your Candle when the evidence points to sizing rather than trimming.
Control the burn environment
Keep the candle away from fans, vents, and open windows. Let the first burn build a near full melt pool, and avoid overlong sessions that deepen the melt pool, increase carbon buildup, or overheat the jar.
Know when the candle is done
Stop burning when the wick shifts toward the glass, the jar shows stress, the flame stays wild, or 1/2 inch (1.3 cm) of wax remains. Major candle-safety groups use that wax threshold as a general stopping point for container candles.
For deeper setup help, see How to Pre-Tab, Prime & Trim Candle Wicks and How to Choose the Right Wick for Your Candle. The sizing reference is How to choose and size wicks for candle making.
Quick pre-relight checklist
Use this short checklist before you relight a candle with a wick problem. It helps you catch the simple causes first and keeps you from changing too many variables at once.
- wick trimmed to the correct height for the wick type, with loose char removed
- wick exposed enough to light cleanly
- candle cooled fully before relighting
- no strong drafts from fans, vents, or open windows
- jar is sound, wick centered, and more than about 1/2 inch (1.3 cm) of wax remains
- only one change is being tested on the next burn
For maker-style tracking, use the notes and test checks in Candle Wick Types and Sizing Guide.
Candle wick troubleshooting FAQ
Common wick questions are solved by matching the symptom to one safe adjustment and stopping when heat, smoke, or glass stress persists. The answers below apply that rule to wood wicks and repeated failures.
Why won’t my wood wick stay lit?
A wood wick usually goes out because char, low exposed wick, flooding, or a weak wick-to-wax match makes the flame too weak to feed itself. Clear char once, expose a little more wick, and if it still fails after two careful tries, move to Candle Wick Types and Sizing Guide instead of relighting repeatedly.
How short should I trim a wood wick?
Trim it short and flat before each relight. Here, short means enough exposed wick to relight without feeding soot or a high flame. If trimming does not stabilize the burn, use How to Choose the Best Wick for Candle Making.
Can I rescue a tunneled wood-wick candle?
Sometimes. Let the next burn build a near-full melt pool and keep the candle away from drafts. Remove only a small amount of side wax if the tunnel is deep. If the tunnel returns, use the deeper tunneling guide or Candle Wick Types and Sizing Guide.
When should I stop trying to fix it?
Stop when the jar overheats, the wick shifts toward the glass, black smoke keeps returning, or only about 1/2 inch (1.3 cm) of wax remains. At that point, more relighting usually adds risk without fixing the root problem.