
Candle tunneling is a center-down burn that wastes wax, but you can usually diagnose the cause, fix mild cases safely, and stop it from happening again.
A candle that burns down the middle leaves usable wax stranded around the jar, and the pattern often gets worse with each short session. The cause is often an incomplete first melt pool, a wick that cannot heat the full surface, or habits that weaken the flame. Mild tunnels can often be corrected with a careful, low-risk method, while deep tunnels or overheated jars are better treated as stop signs. Knowing which pattern you have makes the next step clearer and helps you avoid forcing the wrong fix.
What Candle Tunneling Looks Like
Candle tunneling is a center-down burn that leaves a ring of unmelted wax around the edge while the flame keeps sinking lower in the middle.
In a jar candle, the easiest clues are visual. The melt pool stays narrow, the outer wax wall stays high, and the wick starts to look buried below the top surface. Over several burns, the center gets deeper while the sides keep their wax. That pattern matters because a true tunnel needs a different response than a mild early-burn ring.
| What you see | What it usually means | What to do next |
| Wax melts mostly in the center, with a tall wall around the edge | True tunneling | Check severity before trying a fix |
| A shallow ring appears after one short first burn, but the wick is still easy to reach | Early memory ring | Reassess on the next full burn before treating it as a major problem |
| The flame leans, flickers, or pulls to one side | General uneven burning from wick position or airflow | Check for drafts and wick alignment first |
| Rough tops, frosting, or wet spots without a deep center pit | Mostly cosmetic surface change | Do not assume it is a tunneling problem |
A simple diagnosis starts with four checks: how wide the melt pool is, how high the wax wall stands, where the wick sits, and whether the candle keeps burning down the middle on later sessions. One short first burn can leave a mild ring that looks worse than it is. Before trying any rescue method, pay attention to safety, especially if the jar feels unusually hot, the wick is hard to reach, or the flame looks unstable. If the wick is still reachable and the ring is modest, the candle may not be a severe case yet.
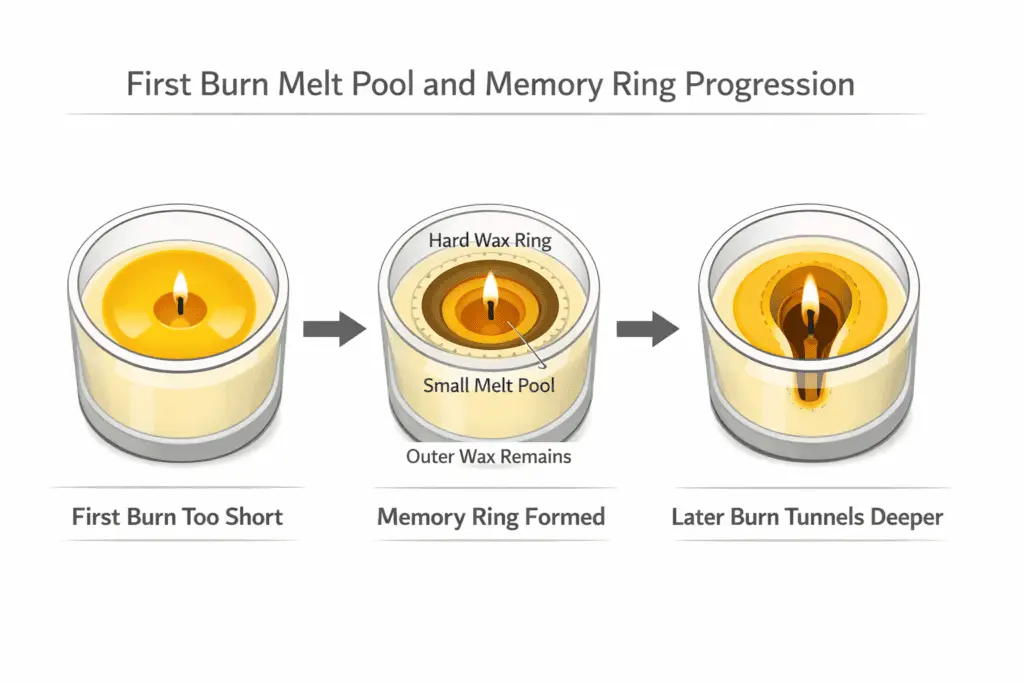
Why the First Burn Creates Candle Tunneling
Many tunneled candles start with an incomplete first melt pool because the first session ends before enough of the top surface has melted outward.
People often call this a memory ring. That does not mean the candle is locked into failure, but it does mean later burns tend to follow the same narrow path unless the top fully opens up. When the first pool stays small, the flame keeps feeding the center instead of heating the outer wax. The result is a burn path that gets deeper and more obvious with each short session.
| Container size | Common first-burn pattern | What you want to see |
| Small jar | The top usually opens faster, but it still needs an uninterrupted session | Melt pool spreads close to the edge without the jar becoming unusually hot |
| Medium jar | The surface may take longer to open, especially if the flame is weak or the room is drafty | Most of the top opens up, with only a thin outer ring at most |
| Wide jar | The candle often needs more uninterrupted burn time, and some formulas open gradually rather than all at once | A broad, even melt pool forms without forcing an overly long burn |
The best test is not the clock alone. Look at how much width the melt pool reaches, how much outer ring remains, how strong the flame is, and how hot the jar feels. The goal of the first burn is to give the candle enough uninterrupted time to establish a broad top melt. Wick trimming matters on later burns, but trimming alone cannot undo a first session that ended too early. In practice, preventing uneven melt pools starts with a strong first burn and continues with steady session length and a healthy flame on the burns that follow.
When the Wick Is Too Small for the Candle
Some candles tunnel because the wick is underpowered for the jar, wax blend, or formula, even when you burn them with reasonable care.
A wick mismatch usually shows up as a weak flame, a narrow melt pool, and a stubborn outer wax ring that keeps coming back. If the top briefly improves after a careful correction but the candle quickly starts burning down the middle again, the root issue may be the burn system itself rather than the way you used it.
| What you see | Most likely cause | What it suggests |
| Small or weak flame, limited melt-pool spread, outer wax remains after repeated normal burns | Wick too small or mismatched | The candle may not be generating enough heat for its container and wax system |
| Burn path starts narrow after an early short session, but later sessions improve when given enough time | First-burn issue | The candle likely followed an incomplete early melt pattern |
| Flame leans, one side melts faster, or the pool shifts with airflow | Draft or room-condition problem | Placement may be distorting the burn more than the wick itself |
Before assuming user error, check five things: flame strength, how much of the top actually melts, whether the wick has been cut too short, how wide the jar is for a single wick, and whether the tunnel returns soon after a careful rescue attempt. A quick relapse after a temporary correction is one of the clearest signs that the candle may be under-wicked.
The goal here is not to turn a simple burn problem into a full wick-design project. It is to recognize when the candle may be fighting its own setup.
Burn Habits and Room Conditions That Cause Tunneling
Even a well-made candle can start tunneling when short burn sessions, aggressive trimming, or moving air repeatedly prevent a full melt pool.
The most common user-controlled causes are ending sessions too soon, cutting the wick so short that the flame weakens, and burning near fans, vents, or other airflow. Cool rooms and drafty placement can also pull heat away from the top surface, which makes the candle keep burning down the middle instead of opening outward.
| Habit or condition | Visible effect on the burn | First low-risk correction |
| Repeated short sessions | Narrow center melt pool that deepens over time | Let the candle burn long enough for the top to widen naturally |
| Wick trimmed too aggressively | Small flame and slow melt-pool spread | Leave enough wick for a steady flame on the next burn |
| Fan, vent, or open-window airflow | Flame leans or melts one side faster | Move the candle to calmer air |
| Cool surface or colder room zone | Top melts slowly and unevenly | Burn in a more stable, draft-free spot |
Before lighting, check wick length, jar placement, and whether the candle will have enough uninterrupted time to open the top surface. While it burns, watch for a leaning flame, one-sided pooling, or a melt pool that stalls in the center.
Change one variable at a time. First, fix session length. Second, fix placement. Third, fix trimming habits. If those changes improve the burn, the candle likely had a routine problem rather than a true wick mismatch.
How to Fix a Tunneled Candle Safely
Mild to moderate tunneling can often be improved, but the safest fix depends on tunnel depth, wick access, and how hot the container becomes during the attempt.
Before trying anything, check three things: how deep the tunnel is, whether the wick is still easy to reach, and whether the jar already feels hotter than normal. A shallow tunnel with a visible wick and stable flame is very different from a deep crater with a buried wick and a hot, stressed container. The safest starting point is a simple severity check, not a random hack.

| Tunnel severity | What it looks like | Best first action | Stop if… |
| Mild | Shallow ring, wick easy to reach, flame stable | Let the candle complete a longer corrective burn in calm air | The flame weakens, the jar gets unusually hot, or the outer wax barely changes |
| Moderate | Deeper center pit, outer wax wall clearly higher, wick still reachable | Try a loose foil-wrap correction to reflect heat inward while monitoring closely | The flame becomes unstable, soot increases, or the container heat rises too fast |
| Severe | Deep tunnel, wick buried or hard to relight, repeated relapse after prior attempts | Stop rescue attempts and treat it as a retire-or-repurpose case | The wick is inaccessible, the jar feels concerningly hot, or the candle keeps collapsing back into a tunnel |
- Let the candle cool fully, then check tunnel depth, wick access, and whether the jar showed unusual heat on the last burn.
- If the tunnel is shallow and the wick is easy to reach, try one longer corrective burn in calm air before using any more aggressive fix.
- If the tunnel is deeper but the wick is still reachable, the flame is stable, and the jar stays within its normal heat range, try a loose foil-wrap correction while monitoring it the entire time.
- If the outer wax softens and the top starts to level, stop the correction once the surface catches up instead of forcing extra heat.
- If the wick is buried, the flame becomes unstable, or the jar gets unusually hot, stop rescue attempts and move to the retire-or-repurpose decision.
For a foil correction, trim only obvious excess carbon, keep the wrap loose rather than tight, leave an opening at the top for the flame, and monitor the candle the entire time. The goal is to help the outer wax soften and catch up, not to trap heat aggressively.
A second option is careful top leveling only after the outer wax has already softened and only when the surface is uneven while the candle is otherwise stable. It can help tidy a top that is partly collapsed or ridged after the main correction, but it is a follow-up step rather than a primary rescue method. It should not replace the foil method when the real problem is that the outer wax never caught up.
Some fixes fail because they only correct the shape of the top for one burn. If the candle starts tunneling again right away, the root cause may still be a too-small wick, repeated short sessions, or poor placement near moving air.
When to Stop Trying to Save the Candle
Sometimes the smartest fix is to stop trying to fix the candle.
If the wick is buried, the tunnel is very deep, the jar keeps getting concerningly hot, or the candle relapses after careful rescue attempts, the return on one more fix is usually poor. At that point, you are no longer correcting a mild burn pattern. You are forcing a candle that is not recovering well.
| Warning sign | What it means | Better decision |
| Wick is hard to reach or disappears below the wax line | Reliable burning is unlikely | Stop rescue attempts |
| Tunnel stays deep after a monitored correction | The problem is persistent, not temporary | Retire the candle from normal use |
| Jar heat keeps rising during fixes | Safety margin is shrinking | End the attempt immediately |
| Candle improves once, then quickly tunnels again | Root cause is still active | Focus on prevention habits for future burns |
A candle is not automatically a lost cause because it has one rough session, but repeated relapse is a strong sign that more rescue will not solve the real issue. In that situation, it is better to preserve safety and use the experience as a prevention lesson for the next candle.
How to Prevent Candle Tunneling on Future Burns
The best way to prevent tunneling is to let the candle establish a wide enough early melt pool, then repeat good burn timing, wick care, and steady placement every time you use it.
The easiest prevention plan is a simple routine you can repeat from the first burn onward. Instead of waiting for the candle to misbehave, check the setup before lighting, watch the melt pattern during the burn, and reset the wick properly before the next session.

| Burn stage | What to do | Why it helps |
| Before lighting | Place the candle in calm air, on a stable surface, with a properly prepared wick | Gives the flame a fair chance to heat evenly |
| During the burn | Let the top melt broadly enough for the container size and avoid cutting the session short | Prevents repeated center-only burning |
| Before extinguishing | Check whether a wide melt pool formed and whether the flame stayed steady | Helps you spot problems early instead of after a deep tunnel forms |
| Next-burn reset | Re-trim only as needed and return the candle to a draft-free spot | Supports a healthy flame on the next session |
Think of prevention as a repeatable routine rather than a one-time trick. Rescue methods are helpful when a candle has already gone wrong, but prevention works earlier and usually works better. If a candle still tunnels after you improve session length, wick care, and placement, the issue may be built into the wick-to-container match rather than your routine.