
This page covers candle mold release problems in the narrow sense: a molded candle that sticks in the mold during demolding after cooling, not a buying guide for release sprays or mold types.
On this page, the safest next step means the lowest-damage move: the option least likely to crack the candle, damage the mold, or raise burn or cut risk. Most demolding failures come down to timing, mold material, wax behavior, or trapped suction, so classify the pattern first and then match it to the next move instead of forcing the candle out.
If your candle is stuck right now, run this quick triage before you dive into the sections:
- Check mold type: soft silicone vs rigid metal or hard plastic.
- Feel temperature: still warm and rubbery, room-temp firm, fridge-cold, or frozen.
- Test for vacuum lock: does it “suck” back when you press, or feel glued in one zone only?
- Look for geometry problems: tall/narrow tubes, deep containers, complex rims, or heavy inclusions near the wall.
- Decide the next move: gentle flex (silicone), brief exterior warm (metal), vent/shim (vacuum lock), or simply more cooling time.
Use that ladder together with the H2 sections below.
Use this pattern map to match the sticking problem to the next move:
| Sticking pattern | Likely cause | Safest next step |
|---|---|---|
| Still warm, rubbery, or smearing | Under-cured core | Wait longer at room temperature before trying again |
| Stuck mostly at the base and springs back | Vacuum lock | Vent or shim the seal instead of pulling harder |
| Silicone grips all around after full cooling | Early demold or tacky wax blend | Flex and peel the mold, then use a short fridge step only if needed |
| Rigid metal mold feels tight all around | Surface grip or limited contraction | Use mild exterior warmth and tapping, then support the base on release |
| One seam, lip, or choke point keeps catching | Geometry, seam, or burr problem | Stop forcing it and inspect the mold before the next attempt |
If you need the broader mold map before you troubleshoot, see candle molds and shape customization.
Quick answers about stuck candle molds
The fastest safe fix depends on identifying whether the candle is still warm, vacuum-locked, or gripping because of mold and wax mismatch before you use more force.
These four quick answers give the first routing points before you troubleshoot mold material, wax behavior, timing, or geometry in detail.
- Should you freeze a stuck candle? Start with room-temperature cooling or a short fridge step first. A very brief freezer step can help some rigid molds, but longer freezing raises the risk of cracks, frosting, or sudden release damage.
- Do silicone molds need release spray? Usually no. Clean silicone often self-releases, and a very thin compatible release only helps when one specific mold keeps grabbing after you fix timing and wax choice.
- What wax works best for molded candles? A pillar-capable or harder wax usually releases better than a soft container blend because it contracts more as it cools and stays less tacky against the wall.
- How long should you wait before demolding? Wait until the candle is firm through the core and the mold is back near room temperature. Exact time depends on wax type, mold material, and candle size.
Fix sticking in silicone molds (step-by-step)
Free stuck candles from silicone molds by letting them cool to a firm core, then flexing and peeling the mold gently instead of yanking the wick.
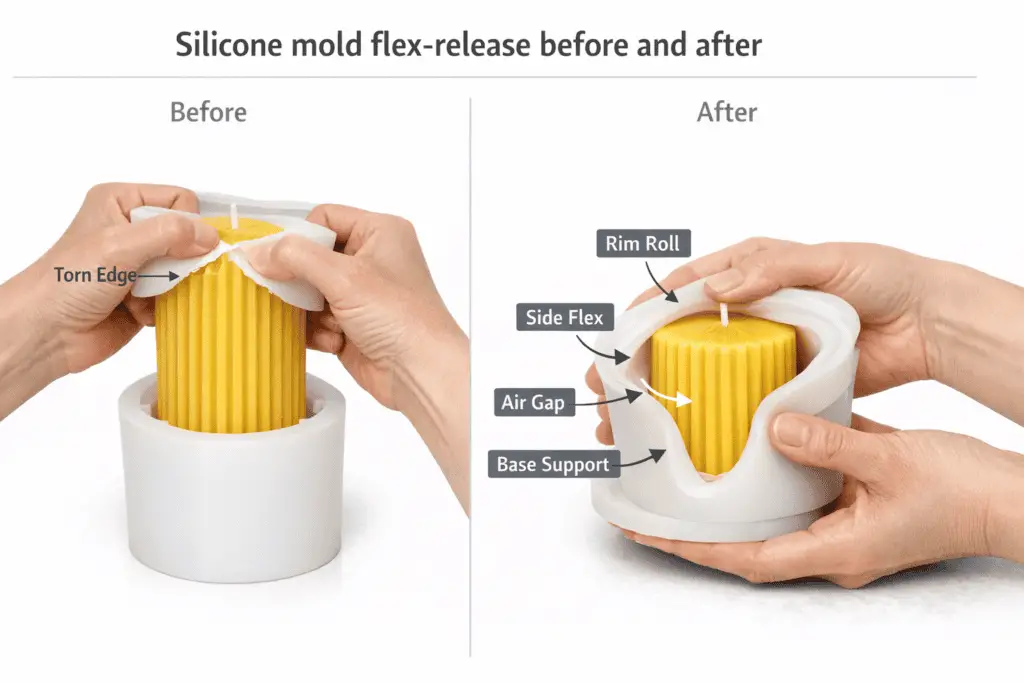
Silicone molds usually release well because the wax shrinks away as it cools, but soft soy pillars and heavily fragranced blends can still grab the walls. Trying to pull the candle straight out by the wick often stretches the top, tears edges, or leaves white stress marks on the surface. The safest method is to cool the candle into the right temperature window, then treat the mold like a flexible shell you peel off rather than a rigid tube you pull from.
Use this sequence for silicone molds:
- Let the candle reach room temperature plus at least 1–2 hours so the core has time to contract.
- For soy blends, many makers test demolding when the outside feels cool but not fridge-cold; a surface in the mid-20s °C (mid-70s °F) is a common starting check, then adjust by mold size and wax blend.
- Loosen the top edge first by gently rolling the rim away from the wax with your thumbs.
- Work your way down in sections: press the silicone away from the candle in a wave, allowing tiny air gaps to form.
- Only once the sides move freely should you gently push from the base, supporting the wick with your fingers instead of pulling on it.
If the candle still clings after careful flexing, use a short “cool and flex again” cycle:
- Place the mold in the fridge for 10–15 minutes, not a long freezer session, to reduce grip without shocking the wax.
- Remove it, let the exterior warm for a couple of minutes, then repeat the peel-and-push routine.
- If you see any hairline cracks starting, stop and move to the safety thresholds section before trying again.
Intricate molds with deep undercuts can keep catching at the same choke point. That pattern usually points to mold geometry, not weak demolding technique, so a two-part mold or a built-in release slit works better than harder pulling. For a broader material and design comparison, see types of candle molds and how to use silicone candle molds properly.
If you fix the bulk of your silicone sticking here but keep seeing stubborn bases or matte scuffing on glossy molds, move on to diagnosing why candles stick for a wider root-cause checklist.
Fix sticking in rigid molds (metal, aluminum, hard plastic)
Release stuck candles from rigid molds by using gentle warming for metal when needed, then tapping and supporting the base instead of freezing hard or hammering.
Rigid molds behave differently from silicone because they hold shape instead of peeling away. In metal molds, wax often contracts away from the wall as it cools, but under-cured cores, rough interiors, or slight bends can make pillars feel welded in place. Hard plastic molds can show similar sticking, but they respond better to patience and light cooling than to direct heat.
Use this safer release protocol:
- Confirm the candle is fully set; the base should feel firm, not rubbery, and the mold should be at room temperature.
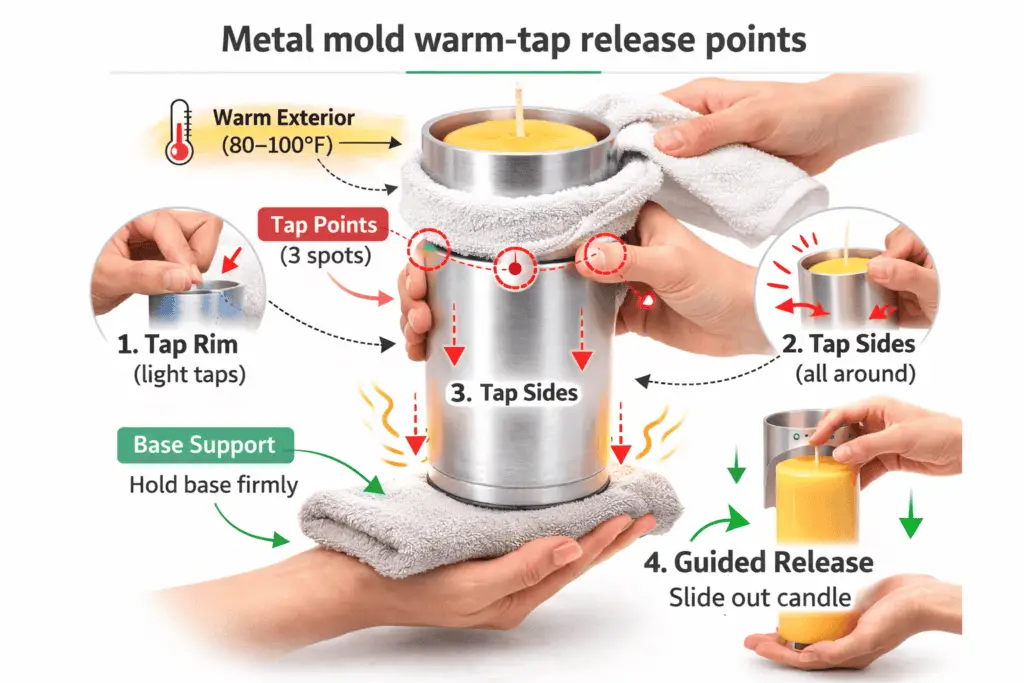
- For metal molds, wrap the outside with a warm, not hot, towel for 30–45 seconds or use a hair dryer on low while you keep it moving. For hard plastic, skip direct heat and rely on a short room-temperature rest or brief cooling instead.
- Invert the mold over a padded, heat-safe surface so the candle base rests on your palm or the padding, not hanging from the wick.
- Tap around the rim and sides with a wooden spoon or nylon tool, listening for a change in tone as air gaps form.
- When you feel the candle slide slightly, guide it out with minimal force, supporting its weight the whole way.
Use these starting tests:
- For paraffin pillars in metal molds, many makers start with the exterior only gently warm, not hot enough to soften the outer wax layer.
- For harder waxes and tall molds, use shorter warming bursts and more tapping cycles rather than longer heating.
- For hard plastic or acrylic-style molds, avoid high direct heat and focus on clean surfaces, patience, and brief cooling instead.
- For the next batch, lightly pre-warm a clean rigid mold before pouring so the first wax contact is not against a cold wall. Warm means slightly above room temperature, not hot.
If dents and ring scratches keep appearing near the base even after careful tapping, jump ahead to the section on wax variables that increase adhesion to adjust shrinkage and wax choice. If you are deciding between rigid and flexible tools, compare silicone vs metal candle molds before you change your process again.
Diagnose why candles stick (quick checklist)
Diagnose mold release problems by matching where and how the candle sticks with a short checklist of mold type, wax blend, timing, geometry, and surface condition.
When a candle refuses to leave its mold, your first job is to classify the failure instead of randomly changing wax, wicks, and temperatures all at once. A quick diagnostic checklist reduces guesswork and helps you see patterns across batches. Pay attention to where the candle is tight, how the surface looks after you finally get it out, and whether the problem repeats only with specific molds or recipes.
Run through this checklist:
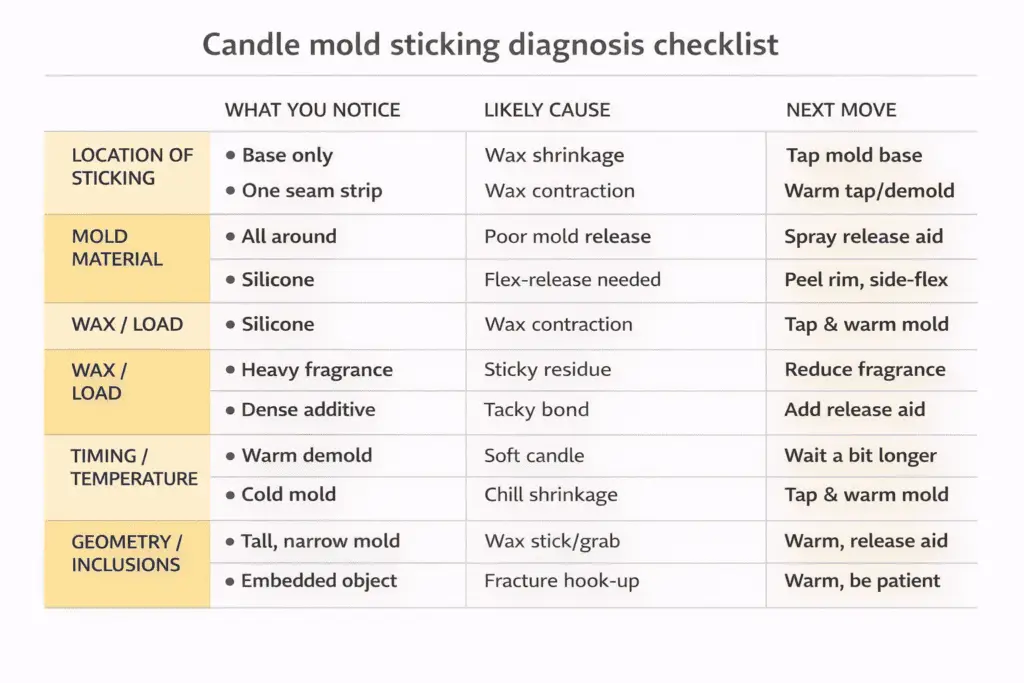
- Location of sticking
- Only at the base → check vacuum lock, under-cured cores, and rough base edges.
- One vertical strip or seam → check mold seams, burrs, and wick alignment.
- All around → check timing, wax shrinkage, and heavy fragrance or dye loads.
- Only at the base → check vacuum lock, under-cured cores, and rough base edges.
- Mold material
- Soft silicone → more sensitive to over-full pours and surface tension from heavy fragrance.
- Metal or rigid plastic → more sensitive to surface scratches, polish, and lack of contraction; these molds respond best to clean interiors, light pre-warming, and waxes that shrink slightly on cool.
- Soft silicone → more sensitive to over-full pours and surface tension from heavy fragrance.
- Wax and load
- Soft solo soy at high fragrance loads → tends to stay rubbery and tacky at normal demold temperatures.
- Paraffin or pillar-capable blends with hardness additives → usually shrink more cleanly but can still grab on scratches or bent seams.
- Heavy dye loads or deeply colored layers → can feel slightly “chewy” against the mold.
- Soft solo soy at high fragrance loads → tends to stay rubbery and tacky at normal demold temperatures.
- Timing and temperature
- Sticks when demolded warm but releases clean after an extra few hours → timing issue.
- Still stuck after overnight cooling or gentle fridge time → geometry, vacuum, or surface issue.
- Sticks when demolded warm but releases clean after an extra few hours → timing issue.
- Geometry and inclusions
- Tall, narrow tubes and deep containers → prone to vacuum lock and friction.
- Botanicals or charms near the wall → create micro-hooks that snag.
- Tall, narrow tubes and deep containers → prone to vacuum lock and friction.
When sticking happens only at a color band or around an embedded object, treat that as a separate technique problem rather than a generic mold-release failure. Use Making Multi-Layered Candles with Mold Techniques for seam-specific issues and embedding botanicals & objects safely in candles when objects near the wall are doing the damage..
Use the pattern you see here to decide whether you should head next to release timing and temperature control, wax variables, or vacuum lock and look-alikes. For a broader map of related mold choices, see candle molds and shape customization.
Release timing & temperature control (cool, reheat, freeze)
Use room-temperature rest first, a brief fridge step only as a limited aid, a freezer step only as a short exception for some rigid molds, and exterior warmth only for rigid metal molds while you set clear demold timing and temperature windows for each wax.
For this page, room-temperature rest is the default next move for under-cured or generally warm candles; brief fridge time is secondary; freezer time is exceptional rather than routine; and exterior warmth belongs to rigid metal molds, not silicone or hard plastic.
Many release failures come from demolding too early, when the core is still warm and elastic, or too late, after the candle and mold have settled into a high-friction grip. Instead of guessing, give each wax type a basic timing and temperature band, then refine it with a few test batches. You do not need a lab thermometer to benefit from this; even a simple infrared thermometer and consistent room conditions can make your results far more repeatable.
Use these conservative starting windows as test bands, not fixed rules:
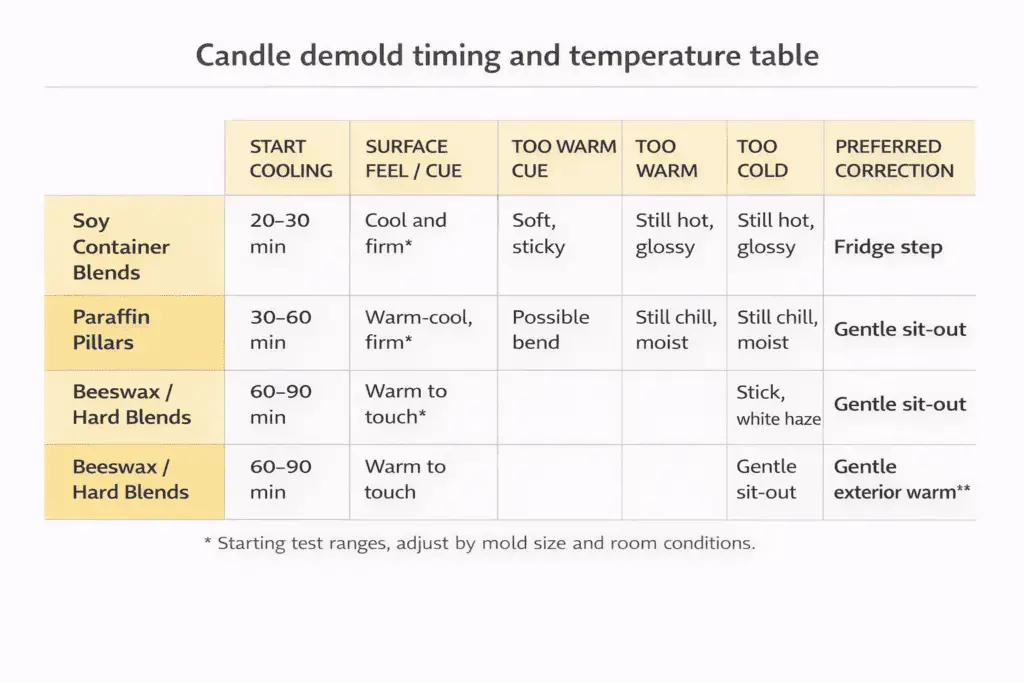
- Soy container blends
- Many home makers start with 12–24 hours of room-temperature cooling before demolding.
- A common starting check is a cool-to-touch surface in the mid-20s °C (mid-70s °F), with the candle firm at the core and not rubbery at the edges.
- Too warm: edges dent or smear when lightly pressed.
- Too cold: the candle can squeak against the mold and may frost more easily after aggressive chilling.
- Many home makers start with 12–24 hours of room-temperature cooling before demolding.
- Paraffin pillars
- Many makers start with 4–8 hours for small pillars and 8–12 hours for taller ones, then adjust for mold size and room temperature.
- A useful starting check is a surface that still feels slightly warm but firm, not soft.
- Too warm: edges tear or pull, and the wick area can sink on release.
- Too cold: loud pops on release can signal higher crack risk.
- Many makers start with 4–8 hours for small pillars and 8–12 hours for taller ones, then adjust for mold size and room temperature.
- Beeswax or very hard blends
- These waxes often need longer cooling windows, and 12–24 hours is a common starting test band.
- Demold when the candle feels fully rigid and solid but the mold still feels only slightly warmer than the room.
- These waxes often need longer cooling windows, and 12–24 hours is a common starting test band.
Use cooling and warming gently:
- Prefer extended room-temperature cooling plus short fridge time first.
- Some makers use a very brief freezer step with rigid molds, but longer freezing increases the chance of cracks, frosting, or abrupt release damage.
- If you overshoot and the candle feels stuck everywhere, try a brief exterior warm for metal or a short sit-out at room temperature for silicone before your next attempt.
- Keep a simple notebook with wax type, room temperature, cure time, and whether demold felt easy or tight.
If you’re hitting the right timing windows and the candle still feels glued to the walls, focus on prep molds correctly for release agents, dusting, polishing, and surface condition.
Prep molds correctly: release agents, dusting, polishing
Prep molds with minimal, material-safe release agents and smooth surfaces so the candle shrinks away cleanly instead of fighting residue or scratches.
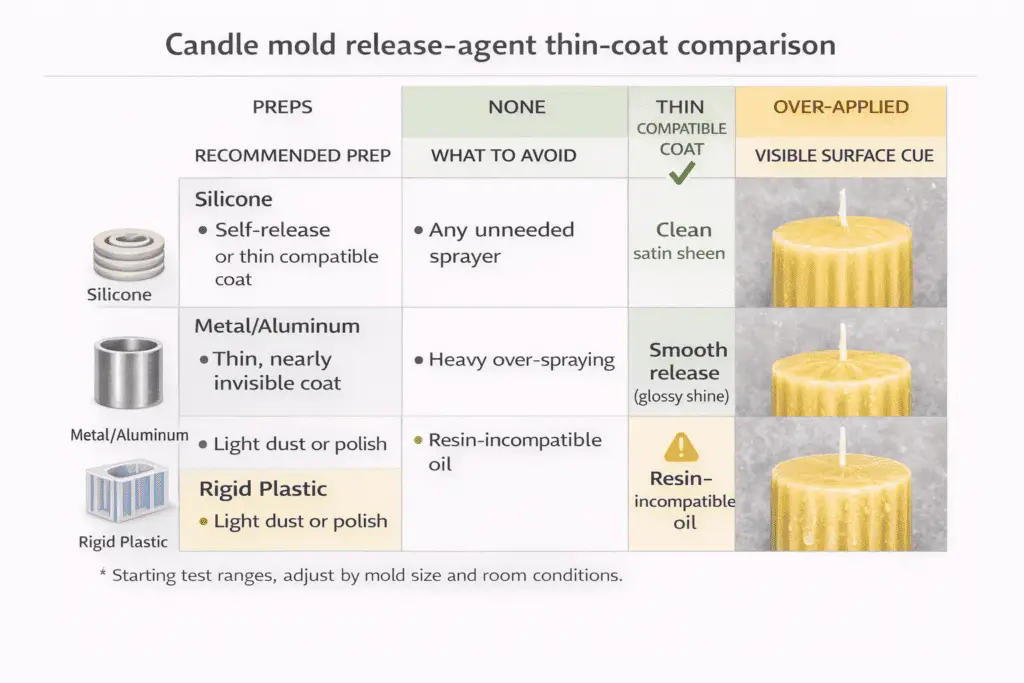
Release agents are a thin, conditional aid on this page, not the main fix. Heavy coats of spray or powder can leave residue, print onto wax, and make sticking worse, so keep surfaces clean and smooth first and use only a nearly invisible compatible layer when one mold still grabs after timing and wax choice are corrected.
Follow these setup rules:
- Silicone molds
- Start with no release agent; many high-quality silicone molds are designed to be self-releasing.
- Wash new molds with mild soap, rinse thoroughly, and air-dry to remove manufacturing residues.
- If one mold keeps grabbing after you fix timing and wax choice, test only a whisper-thin compatible dusting or release layer and tap out all excess.
- Avoid heavy oils or thick films that can leave residue, dull candle surfaces, and change release behavior.
- Start with no release agent; many high-quality silicone molds are designed to be self-releasing.
- Metal/aluminum molds
- Polish interiors with a soft cloth before first use and after any visible build-up.
- For stubborn molds, use a thin, even mist of candle-safe mold release spray only if you already know it is compatible, then wipe until almost dry; the layer should be nearly invisible, not dripping.
- Inspect for burrs, scratches, or dents at seams and rims. Any raised metal edge can act like a hook that catches wax.
- Before future pours, lightly pre-warm a clean rigid mold so the wax does not hit an unusually cold wall. Keep that pre-warm mild, not hot.
- Very old molds with micro-pitting may never release as smoothly; they’re good candidates for simple shapes or heavily textured candles.
- Polish interiors with a soft cloth before first use and after any visible build-up.
- Rigid plastic molds
- Handle them like a cross between silicone and metal: avoid high heat, keep surfaces scratch-free, and use only compatible releases in micro-thin layers.
- Handle them like a cross between silicone and metal: avoid high heat, keep surfaces scratch-free, and use only compatible releases in micro-thin layers.
When cleaning, avoid abrasive pads and harsh solvents that haze or scratch the mold interior. Gentle cleaners and lint-free cloths take longer but preserve release behavior much better over time. If the same mold also traps pits or voids, review how to prevent air bubbles when using candle molds because bubbles and sticking often share the same prep and pour issues.
If your surfaces are polished and you’re using only thin, appropriate release agents yet candles still feel glued, go next to wax variables that increase adhesion to tune shrinkage and fragrance loads.
Wax variables that increase adhesion (type, melt point, additives)
Reduce sticking by choosing waxes, melt points, additives, and load levels that shrink slightly away from the mold instead of staying soft and tacky against it.
Wax choice often decides demolding before your release spray or timing ever gets involved. Soft container blends stay tackier in molds, while pillar-capable blends and harder waxes usually contract more cleanly as they cool.
Work through these variables:
- Wax type and firmness
Harder pillar-capable waxes and some paraffin blends usually pull away from the mold more easily than soft container waxes. Straight container-style soy waxes are more likely to stay tacky, so a pillar-capable soy blend often releases better in molded candles. - Additives and load
Use hardening additives only within supplier guidance. Small tests can improve shrinkage in some pillar recipes, but pushing them too far can make candles brittle or crack-prone. - Fragrance and dye
High fragrance loads and heavy dye use can make candles feel softer and grabbier against the mold wall. If release gets worse as you push load levels up, step back to a simpler test batch before changing several variables at once.
Keep a few test pours using your usual molds but slightly different wax, additive, and load combinations, then note which ones glide out. For a broader wax decision before you reformulate, see how to choose the best wax for candle making. If changing wax behavior improves release but you still see tight spots at the base or along seams, move on to vacuum lock and look-alikes for mechanical fixes.
Vacuum lock & look-alikes: diagnose and fix without damage
Break vacuum lock by introducing small air paths and adjusting geometry instead of relying on brute force or extreme temperature swings.

Vacuum lock is mild suction that forms when cooling wax and the mold trap air, especially in tall, straight-sided pillars and deep containers. The candle may feel fine at the top but refuses to budge near the bottom, and you’ll often hear a soft thunk or feel a bounce as it pulls back into place after gentle pushing.
Use these clues to spot vacuum lock:
- Sticking is worst at the base or in a single deep band, not evenly all around.
- You can feel the candle move a millimeter and then spring back.
- After a successful release, you may hear a brief whoosh or pop as air rushes in.
Use this sequence to release a vacuum-locked candle safely:
- Confirm the candle is fully cooled and set; vacuum lock is a geometry problem, not a cure-time shortcut.
- For rigid molds, slip a very thin, blunt shim like a plastic strip down one side to open a narrow air path.
- Gently rock the candle while keeping the shim in place; you’re trying to trade suction for sliding, not carve the wax.
- For silicone, flex and slightly “burp” the mold at the base to break the seal, then peel as described in the silicone section.
- If a small amount of fridge time sharpens the suction effect instead of helping, bring the mold back to room temperature and try again with more venting, not more cold.
Prevent vacuum lock in future pours with a few geometry checks:
- Leave a tiny bit of headspace below sharply inturned rims.
- Choose slightly tapered molds instead of perfectly straight tubes for tall pillars when possible.
- Avoid very tight-fitting lids or caps during cool unless they include vents.
If vacuum lock is under control but you still have repeat snags at seams, a narrow decorative lip, or a single choke point, treat that as a mold-shape limitation before you add more force. That is often the point where a different mold style solves more than another round of chilling or heating.
Prevent future sticking with simple mold care and setup
Prevent recurring sticking by treating mold care and setup as a simple routine instead of an occasional emergency fix.
Residue, dust, old fragrance, dye build-up, and cleaning films become small grab points over time, so routine cleaning and storage matter as much as wax and timing.
Use this basic prevention routine:
- After each pour session
- Wipe warm, not hot, molds with a lint-free cloth to remove surface residue.
- For silicone, rinse occasionally with mild soap and lukewarm water, then air-dry completely before storage.
- For metal, dry immediately and thoroughly to avoid water spots and corrosion.
- Wipe warm, not hot, molds with a lint-free cloth to remove surface residue.
- Before the next pour
- Set molds on a level surface so the candle cools straight up and down.
- Use wick bars, centering discs, or clothespins to hold the wick straight without pulling it off-center.
- Leave a little headspace below the rim so wax doesn’t mushroom over and form a hook.
- Keep thick layers, embeds, and objects away from seams, decorative lips, and other choke points.
- Set molds on a level surface so the candle cools straight up and down.
- Storage
- Store molds in a dust-free area, ideally covered or in bins, so lint and debris don’t settle inside.
- Keep silicone away from sharp tools that might nick or cut the surface.
- Avoid stacking heavy objects on top of flexible molds to prevent warping.
- Store molds in a dust-free area, ideally covered or in bins, so lint and debris don’t settle inside.
When a mold repeatedly causes sticking even after thorough cleaning and careful setup, mark it and use it only for less demanding shapes or heavily textured designs. For deeper setup around rigid molds, second pours, and finishing, see how to make pillar candles.
Safety thresholds: when to stop forcing a release
Stop trying to demold the candle the moment you feel bending, cracking, or creaking and switch to temperature and venting fixes instead of more force.
Every maker needs clear safety thresholds for stuck candles so a stubborn release doesn’t turn into burns, broken glass, or destroyed molds. Pushing past those limits is tempting when you’re tired or rushed, but it’s also the fastest way to snap a pillar, warp silicone, or shatter a container. A good rule is simple: once you hear or feel distress in the wax or mold, pause and change conditions instead of pulling harder.
Stop immediately when you see any of these red-light signals:
- The candle body visibly bows or bends as you push.
- You hear faint cracking, ticking, or creaking from wax or mold.
- The wick stretches, thins, or threatens to rip out of the candle.
- A glass or thin plastic mold gives off sharp ping sounds or shows tiny lines.
Use this response when you hit any of these signals:
- Set the mold on a stable, heat-safe surface and take your hands off.
- Reassess timing and temperature: is the candle under-cured, over-chilled, or warmed unevenly?
- Choose a gentle corrective: extra room-temperature rest, brief fridge cool, mild exterior warmth, or venting for suspected vacuum lock.
- Try again using small, controlled movements only.
If you cycle through two or three gentle corrections and the candle still refuses to move, call it. At that point, detailed notes on what went wrong matter more than saving that one candle.