
The main types of candle molds are silicone, metal, polycarbonate, plastic clamshells, votive, tealight, pillar, taper, novelty/figurine, lock-and-key seam, textured pattern, and food-grade specialty molds.
Choosing the right mold shapes how your candles look, how they burn, and how easy they are to demold and clean. Beginners often start with simple silicone or metal molds, then branch into polycarbonate, clamshell, and novelty designs as their skills and product lines grow. Each material and style has trade-offs in detail, durability, cost, and speed, so it helps to know where each mold shines and where it struggles. This guide helps you compare the main types quickly, then route to deeper pages when you need setup, troubleshooting, or technique details.
Candle Mold Types at a Glance
The main candle mold types are silicone, metal, polycarbonate, clamshell, votive, tealight, pillar, taper, novelty, seam, textured, and specialty food-grade molds.
| Mold type | Best for | Main trade-off | Finish | Reuse | Skill level |
|---|---|---|---|---|---|
| Silicone | Figurines, undercuts, textured candles | Slower cooling and more matte finish | Detailed, often softer-looking | High with gentle care | Beginner to advanced |
| Metal | Smooth pillars, votives, repeat production | Less forgiving with undercuts and seams | Very smooth and glossy | High | Beginner to intermediate |
| Polycarbonate | Polished pillars and clear-wall quality control | Can scratch and does not flex | Smooth and glossy | Moderate to high | Intermediate |
| Plastic clamshell | Wax melts with built-in packaging | Limited reuse and heat tolerance | Packaging-first rather than premium finish | Low | Beginner |
| Votive / tealight | Testing, samplers, low-wax batches | Small format is sensitive to wick choice | Clean and simple | Varies by mold or cup | Beginner |
| Pillar / taper | Classic freestanding candles | Needs straighter setup and cleaner demold | Ranges from smooth to decorative | High | Beginner to intermediate |
| Novelty / seam / textured | Sculptural or specialty candles | More setup, venting, or cleanup | High visual impact | Varies | Intermediate to advanced |
- Silicone molds: Best for detailed, textured, novelty, and figurine candles. Easy to demold, slower to cool, and ideal when detail matters more than production speed.
- Metal molds: Best for smooth pillars, votives, and repeat production. They cool quickly, hold shape well, and usually give the glossiest finish.
- Polycarbonate molds: Best when you want a rigid mold with clear walls so you can monitor bubbles, wick alignment, and pull-away during cooling.
- Plastic clamshell molds: Best for wax melts, not freestanding candles. They are cheap, fast, and packaging-friendly, but limited in reuse and heat tolerance.
- Votive and tealight molds: Best for small test batches, sampler candles, and wick testing with low wax use.
- Pillar and taper molds: Best for classic freestanding candles where shape consistency and cleaner presentation matter.
- Novelty, seam, and textured molds: Best for sculptural candles and specialty designs, but they usually require more setup, venting, and demold care.
How to Choose the Right Type of Candle Mold
The right type of candle mold depends on the shape, finish, speed, and reuse you need.
- Choose silicone if you want deep texture, figurines, undercuts, or limited-edition novelty shapes.
- Choose metal if you want fast cooling, repeatable production, and smooth glossy pillars or votives.
- Choose polycarbonate if you want rigid walls plus visibility during cooling, especially for polished pillars and specialty shapes.
- Choose plastic clamshells if you are pouring wax melts and want built-in packaging, not long-term reusable molds.
- Choose votive or tealight molds if you are testing waxes, fragrances, dyes, or wick combinations with low wax use.
- Choose pillar or taper molds if your goal is classic freestanding candles with consistent dimensions and cleaner shelf presentation.
- Choose novelty, seam, or textured molds only when the visual shape is the selling point and you are willing to trade some speed for setup, venting, and demold care.
For a deeper step-by-step, see choose the right mold. If you are just starting out, a short list of the best candle molds for beginners can help narrow your first purchase.
Silicone Candle Molds – What They Are, Pros, Cons & Best Uses
Silicone candle molds are flexible, heat-tolerant forms that capture fine detail and release easily, best for intricate shapes, embeds, and small-batch pours in home studios.
For a quick mental map of where silicone fits among other options, picture it after you see a mold shapes overview that lays out pillars, containers, trays, and figurines side by side. Silicone is usually poured around a master shape to create a soft but dimensionally stable mold. The walls bend instead of the wax, so complex shapes and undercuts pop free without prying or whacking. That makes silicone the go-to choice for figurines, seasonal designs, and detailed decorative pieces where a stuck candle could ruin the finish.
Silicone’s biggest strengths show up when you want deep textures, delicate features, or shapes that would be frustrating to cast in rigid molds. The trade-offs are mostly cycle time, cost, and finish: silicone often cools more slowly than metal or polycarbonate, and some waxes look slightly more matte in it. For many makers, that is a worthwhile trade if the candle design depends on detail and easy release.
Common maker mistakes with silicone include yanking candles out too soon and storing molds crushed under heavy supplies. If you are learning how to use silicone candle molds consistently, move into the dedicated how-to once you’ve chosen silicone as the right mold family for your design.
Metal Candle Molds (Aluminum/Tin) – What They Are, Finish & Speed
Metal candle molds are rigid, highly conductive forms that set wax quickly and give smooth, glossy pillars and votives when preheated and sealed correctly.
If you start from an overview of mold shapes, think of metal as the classic straight-pillar and votive workhorse: clean cylinders, squares, and simple tapers built for speed and shine. Aluminum and tin pull heat from the wax quickly, which helps support tidy, repeatable shapes and consistent dimensions from batch to batch.
When you’re deciding between silicone vs metal molds, speed and finish usually decide the winner. Metal excels at straightforward production pillars, votives, and some tapers where you repeat the same diameters over and over. Silicone usually wins for elaborate shapes and deep undercuts; metal wins for tall, straight molds that need crisp edges and a glossier finish.
The weaknesses show up when designs get fancy or prep gets sloppy. Seams and hardware points can become leak paths, and rigid walls are less forgiving with sculptural shapes. If bubbles or leaks keep showing up in rigid molds, move into the deeper troubleshooting page on how to prevent air bubbles in molds instead of turning this overview into a full repair guide.
Polycarbonate Candle Molds – What They Are & When to Use Them
Polycarbonate candle molds are rigid, clear plastic molds that cool wax quickly and excel at smooth, glossy pillars and specialty shapes when you want fast production and visual quality control.
Think of clear polycarbonate candle molds as the halfway point between metal and silicone: they’re stiff like metal, but you can see straight through them to watch for bubbles, wet spots, and pull-away as the candle cools. That transparency makes troubleshooting much easier, especially when you’re dialing in new wax blends, dyes, or fragrances and want to see exactly how the wax behaves.
In practice, these are rigid candle molds for pillars and specialty styles where you care about finish and repeatability but don’t need complex undercuts. The plastic conducts less heat than metal but more than silicone, so you get reasonably quick set times with less risk of dramatic chill marks than a very cold metal mold. Polycarbonate often delivers a bright, glossy surface with paraffin and many pillar blends, especially if you keep your pour temperature and room conditions steady.
There are trade-offs. Polycarbonate can scratch if you scrub aggressively or use abrasive tools, and those scratches will eventually imprint onto the candle surface. Because the mold doesn’t flex, release depends more on shrinkage and careful mold prep than it does with silicone, so many makers add polycarbonate after they already know the shapes and waxes they want to repeat.
From a budgeting perspective, polycarbonate often lands in the middle: more expensive than basic metal pillars but cheaper than high-end, hand-poured silicone for complex shapes. Many makers pick one or two core sizes, then expand their library slowly as certain candles prove popular with customers.
Plastic Clamshell Molds (PET/PP) – What They Are & Reuse Limits
Plastic clamshell molds are thin PET or PP trays designed mainly for wax melts, giving quick, low-cost pours with built-in packaging but limited reuse and heat tolerance.

Most people meet clamshells when they pour wax melts rather than freestanding candles. These lightweight trays combine mold and package in one piece, which keeps costs low and speeds up batching for melt lines.
PET is usually clearer, while PP is often more heat tolerant. In both cases, clamshells are best treated as limited-life or single-use packaging instead of a long-term reusable mold category.
If a clamshell warps, cracks, clouds badly, or stops snapping closed cleanly, retire it from production use. That makes clamshells useful for speed and convenience, but not the best choice when reuse and long-term durability are the main goal.
Votive Candle Molds – Sizes, Wick Pins & Clean Release
Votive candle molds are small, usually cylindrical molds sized to fit standard votive holders, and they rely on wick pins, proper prep, and cooling to release cleanly without dents or residue.
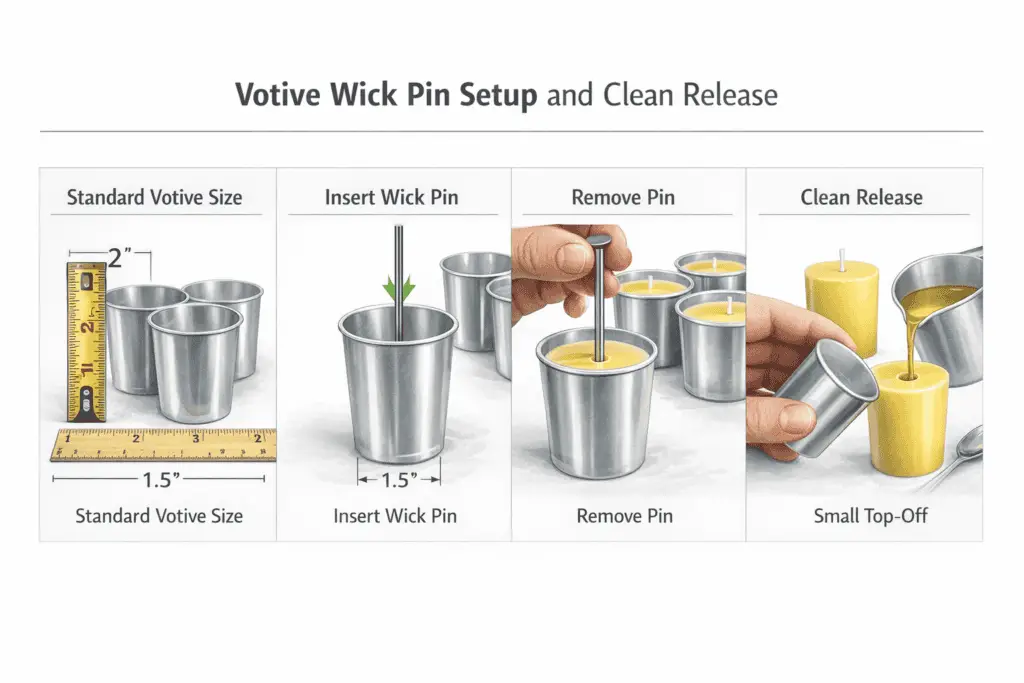
A good starting point is understanding standard votive candle sizes, because the mold must line up with the holders people already own. Most makers work in the rough range of about 1.5 inches (38 mm) in diameter and 1.5–2 inches (38–50 mm) tall so the finished candle fits common votive cups cleanly.
Votive molds come in metal, polycarbonate, and silicone; metal is a classic for smooth, glossy sides, while silicone excels at fun shapes and textures. Wick pins are common in metal and rigid molds because they speed up centering and repeatability, while patient cooling and clean mold walls matter most for easy release. In a types guide, the main takeaway is simple: votive molds are a small-format category built for holders, testing, and repeatable short candles, not for deep sculptural detail.
Tealight Molds & Cups – Types, Wicks & Pouring Basics
Tealight molds and cups are tiny containers or forms, usually metal or plastic, designed for fast-poured, low-wax candles that rely on correct cup choice, wick size, and pouring technique to burn safely and evenly.
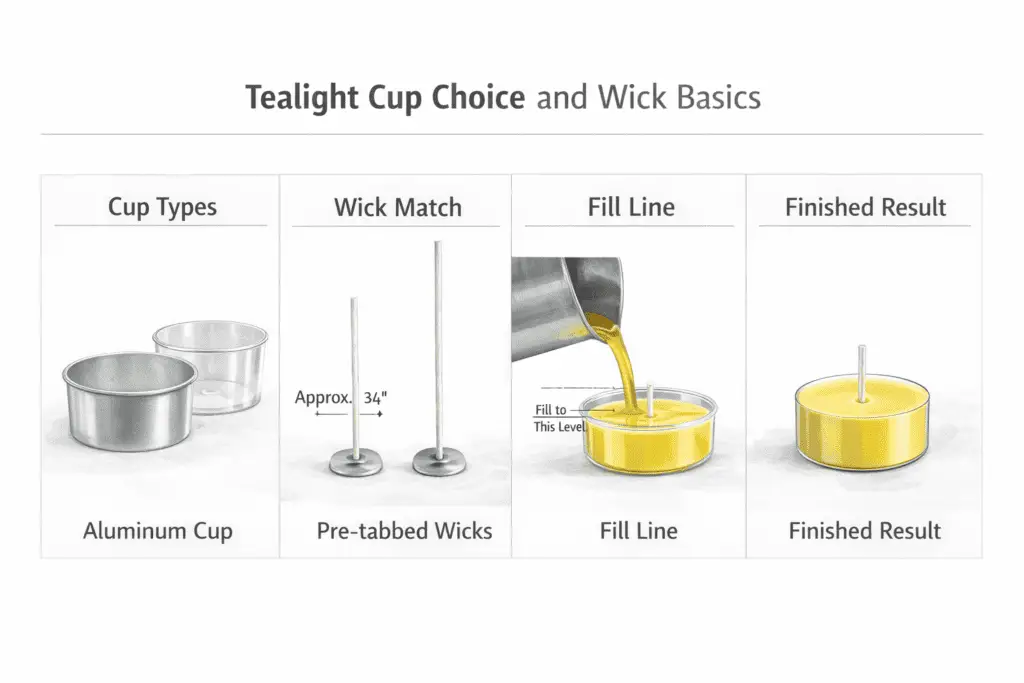
When you look at the common types of tealight cups, you’ll see three big categories: thin aluminum, clear polycarbonate, and heavier metal or specialty cups. Aluminum is inexpensive and common for big batches, while clear cups show off color and let you see the wax as it burns.
Tealights are especially sensitive to wick size because the wax pool is shallow and the cup is small. In practical terms, that makes this mold family ideal for sample packs, testing, and low-wax candles, but it also means cup choice and wick choice matter more here than they do in larger mold categories.
They are perfect for trialing new fragrances and color ideas because they use so little wax and cure quickly. As a type, tealight molds are best when you want tiny candles, quick tests, or replaceable inserts rather than a freestanding decorative shape.
Pillar Candle Molds – Smooth vs Textured, Best Uses and Material Trade-Offs
Pillar candle molds come in smooth and textured designs, and you pick between them based on your wax type, brand style, and how much finishing work you’re willing to do.
If you zoom out and look at pillar molds in the family of all candle molds, they’re the backbone for classic, freestanding candles: simple cylinders, squares, and columns that burn without a separate container. Smooth pillars are ideal when you want a minimalist, hotel-style look and fast production, while textured molds add carved patterns, ridges, or faux stone effects that stand out on a market table.
A key decision is how you balance silicone vs metal pillars. Metal pillar molds, often aluminum or tin, excel at smooth, high-gloss finishes and rapid cooling, which is perfect for classic pillars poured in paraffin or pillar blends. Silicone pillar molds trade a bit of speed for flexibility and detail, making them great for bark textures, ribbed columns, and organic shapes that would be difficult to demold from rigid metal. Polycarbonate pillars sit between those extremes, with transparent walls that let you watch for bubbles and sinkholes while still giving a clean, polished surface.
If your next step is process rather than comparison, move into the dedicated guide on how to make pillar candles. On this page, the key point is simply that pillar molds are the classic freestanding category, with smooth molds leaning toward speed and gloss and textured molds leaning toward visual impact.
Taper Candle Molds – Materials, Seam Cleanup & Straightening
Taper candle molds are long, narrow forms, usually metal, silicone, or polycarbonate, that need careful setup, seam cleanup, and cooling to give straight, elegant candles without bends or voids.
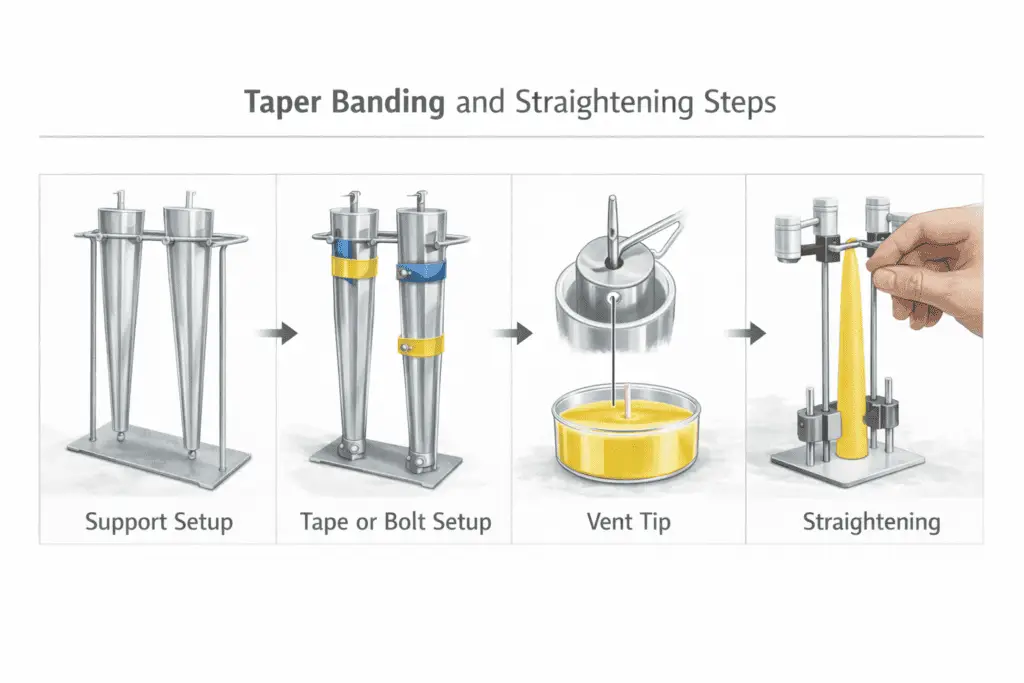
Within taper molds in the family of candle molds, these are the most sensitive to gravity, heat, and tiny alignment mistakes. Classic metal taper molds are rigid and durable, ideal for smooth, formal dinner tapers with crisp lines, while silicone tapers work better for unusual shapes or sculpted bases that would stick in rigid molds. Polycarbonate taper molds give you a clear view of the wax as it cools, which helps you spot bubbles and tip voids early.
Two-part rigid taper molds also bring seam management into the decision. They can produce beautiful straight candles, but they need better alignment and cleaner setup than simpler open molds. That makes taper molds a strong choice for classic freestanding candles, but not always the easiest first mold family for sculptural experimentation.
If you need the full workflow, move into the dedicated guide on how to make taper candles. For this overview, the main takeaway is that taper molds reward straight setup, clean seams, and material choices that match the level of polish you want.
Novelty & Figurine Candle Molds – Detail, Undercuts & Venting
Novelty and figurine candle molds are detailed forms, usually silicone, engineered to capture fine features and undercuts, using careful venting and flex to release complex candles without breakage or trapped air.
When you work with novelty candle molds, you’re aiming for faces, fur, clothing folds, or geometric patterns that look more like a sculpture than a basic candle. The flexible walls peel back from noses, ears, wings, and tiny fingers instead of forcing the wax to bend, which is why silicone dominates this category.
The biggest technical challenge is undercuts, along with high points that can trap air. In a types guide, that matters mainly because it explains why novelty molds favor flexible materials and slower, more careful demolding than basic pillars or votives do.
These molds are best when visual detail is the selling point. If your priority is speed, smooth sides, and easy repeat production, a simpler pillar or votive mold is usually the better fit.
Two-Part Lock-and-Key Seam Molds – Alignment, Banding & Leak Control
Two-part lock-and-key seam molds are multi-piece candle molds whose keyed edges, even banding, and leak checks keep seams aligned so they pour complex shapes cleanly without wax spills or warped profiles.
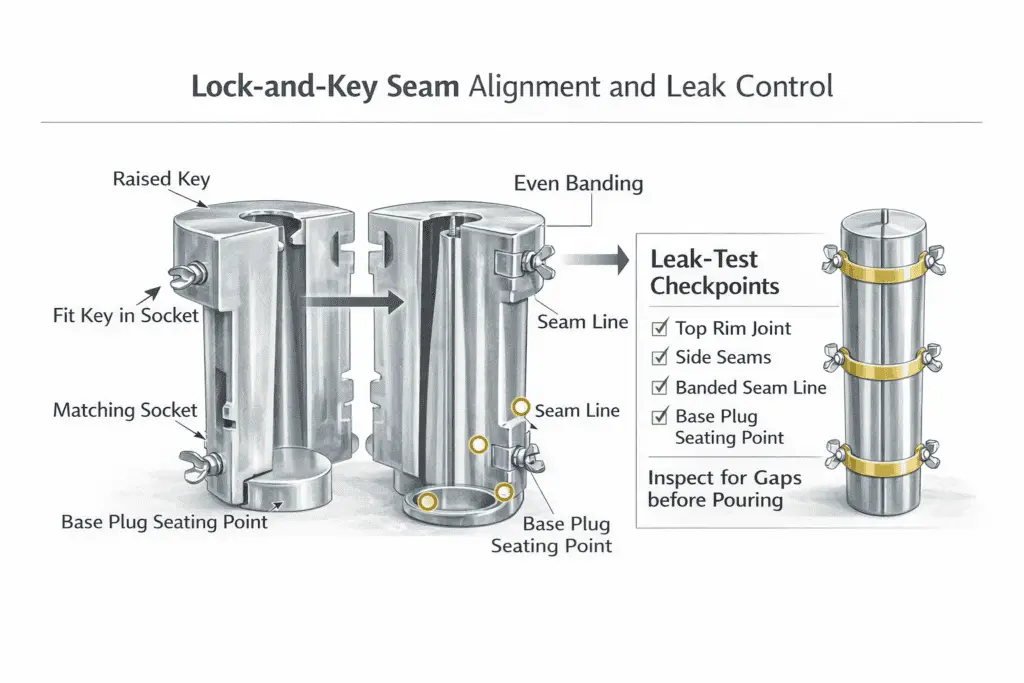
Think of two-part lock-and-key seam molds as a structured way to handle shapes too complex for a single open-top form. The pieces nest together in one correct orientation so patterns line up and wall thickness stays more consistent than it would in a loosely matched multi-piece mold.
They are most useful when sharp detail and repeatable alignment matter more than speed. The trade-off is extra setup: seams, bands, plugs, and leak checks become part of the mold choice itself, which is why seam molds sit closer to specialty production than to beginner-friendly everyday molds.
Textured Pattern Molds – Detail Capture, Bubble Control & Finish Tuning
Textured pattern molds use carved or embossed surfaces to imprint designs into candles, and they demand careful wax choice, pour temperature, and demold timing to keep detail crisp without bubbles or tearing.

When you zoom out and look at textured molds in the family of candle molds, they’re the dramatic cousins of smooth pillars: honeycomb, knit, bark, lace, geometric grids, and faux stone. Most are silicone, because flexible walls peel away from tiny ridges and recesses instead of forcing the wax to bend.
A lot of success comes down to matching pattern depth to mold material. Silicone shines with deep, intricate patterns and undercuts, while metal or polycarbonate work better when the texture is shallower and the goal is a crisper, glossier surface. The deeper the pattern, the more this category starts to behave like a novelty mold rather than a basic pillar mold.
That makes textured molds ideal when the surface is part of the product story. If you mainly want fast, glossy, repeatable candles, smooth pillars or simple metal molds usually stay easier to manage.
Food-Grade vs Craft-Grade Molds – Safety, Labeling & When It Matters
Food-grade molds are manufactured and certified for direct food contact, while craft-grade molds are not, and once a mold has been used for candles it should be treated as candle-only, never returned to food use.
Before you dive into brands, it helps to keep one distinction clear: food-contact claims are material- and use-specific, while craft molds are designed for candles, resin, soap, or other non-food projects. In a candle studio, the practical rule is simple: choose the mold for candle performance first, then keep food and candle gear strictly separate.
If a mold is sold for candles or other craft use, treat it as non-food-contact. If a mold is sold for food, keep it dedicated to food only. Once fragrance oils, dyes, soot, or candle additives touch a mold, it should stay in candle duty permanently.
For candle makers, this is mostly a safety boundary rather than a performance category. It matters when you are shopping across suppliers, but it should not override the more basic question of whether silicone, metal, polycarbonate, clamshell, pillar, or novelty construction is actually the right mold type for the candle you want to make.
Quick Answers About Candle Mold Types
The quickest answers focus on beginner ease, surface finish, reuse, and detail.
What is the best candle mold for beginners?
Silicone and basic metal votive or pillar molds are the easiest starting point. Silicone is forgiving for demolding, while simple metal molds help you learn clean setup and repeatable results.
Which candle molds give the smoothest finish?
Metal and polycarbonate usually give the smoothest, glossiest surfaces when pour temperature and cooling conditions are controlled.
Are plastic clamshell molds reusable?
They can sometimes be reused for studio tests, but they are better treated as limited-life or single-use packaging for wax melts.
Which mold is best for detailed novelty candles?
Silicone is usually the best option because it flexes around undercuts and fine detail during demolding.