
The best candle molds for beginners are simple, easy-release molds that make first pours easier to demold, easier to center, and easier to repeat. In practice, that usually means medium-firm silicone or simple metal shapes with stable walls and prices that fit a starter budget.
If you’re just starting candle making, the first mold decision should reduce avoidable friction instead of adding more variables. Pick the wrong shape or material and you can end up with stuck candles, torn edges, warped sides, or wasted wax on early test pours. The criteria that matter here are material, size, finish, heat rating, wick support, and ease of release.
This page helps you choose a first mold, not replace deeper material comparisons, silicone-use instructions, or mold-fix guides. As a beginner, avoid intricate shapes, narrow necks, deep undercuts, and vague material specs on your first purchase.
Silicone vs metal vs polycarbonate: best beginner candle mold material
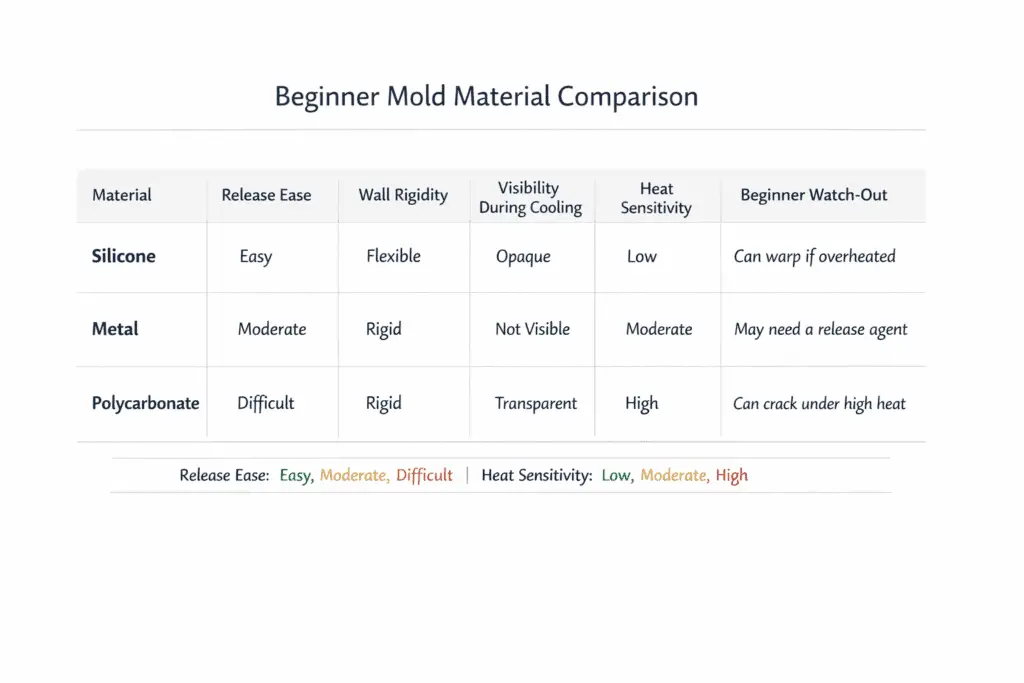
Silicone molds are the best first choice for most beginners because they release easily, tolerate small mistakes, and work with many simple pillar waxes. In the broader candle molds and shapes topic, they are the safest place to start. Metal molds make straighter walls, and polycarbonate helps you see bubbles and wick drift, but both demand more careful prep.
Use material choice to answer three beginner questions first: how easily the candle comes out, how straight the walls stay, and how much setup the mold needs before pouring. Silicone is flexible and forgiving, but very soft molds can bow on taller pillars. Metal is rigid and excellent for straight edges, yet it usually needs more careful release prep and slower cooling. Polycarbonate gives you visibility during cooling, but you need to respect the supplier’s stated temperature limit and avoid cheap, thin plastic with vague specs.
| Material | Best beginner use | Main strength | Main watch-out |
| Silicone | First molds, simple pillars, blocks, light texture | Easy release and gentle demolding | Very soft walls can bulge unless supported |
| Metal | Straight pillars and crisp geometry | Sharp edges and firm walls | More prep and patience during release |
| Polycarbonate | Watching bubbles, wick alignment, clean simple shapes | Visibility during cooling | Needs careful heat control and good build quality |
A medium-firm silicone mold is usually the easiest beginner balance because it flexes for release without collapsing during cooling. If it feels floppy, place it in a support sleeve such as a straight-sided mug, can, or snug cardboard tube while the wax cools.
For first-buy purposes, keep wax pairing simple. Softer blends usually pair well with silicone, paraffin works in most well-rated materials, and beeswax often behaves cleanly in smooth metal pillars. For a deeper side-by-side on the two most common choices, see silicone vs metal candle molds.
Best beginner candle molds by scenario
The best beginner candle mold is a one-piece silicone cylinder about 6–8 cm wide with straight walls and a flat base. That shape gives you the easiest demold, the simplest wick setup, and the lowest chance of broken edges on early pours. It also keeps your first tests focused on wax and wick behavior instead of fighting the mold.
| Beginner goal | Best first pick | Why it works | Main watch-out |
| Easiest first success | One-piece silicone cylinder | Simple release, forgiving shape, low setup friction | Support very soft walls on taller pours |
| Sharpest edges | Straight metal pillar mold | Rigid walls help hold clean geometry | Needs more release prep and patience |
| Best visibility while cooling | Thick-walled polycarbonate pillar mold | Easy to spot bubbles and wick drift | Only buy with a clearly stated heat limit |
| Best value | One simple silicone mold plus one wick bar or clip | Keeps cost low while covering the main beginner job | Do not overbuy extra shapes too early |
These are the safest first picks for common beginner goals:
- Best overall first mold – A one-piece silicone cylinder, about 6–8 cm in diameter, with smooth straight walls.
- Best easiest-demold option – A medium-firm silicone block or cylinder with no undercuts, narrow necks, or deep texture.
- Best for sharp edges – A straight metal pillar mold once you are comfortable with basic release prep and patient cooling.
- Best for checking bubbles and wick drift – A thick-walled polycarbonate pillar mold with a clearly stated temperature limit.
- Best tight-budget start – One simple silicone cylinder plus a wick bar or clip, then one second mold only after you know what size you actually use.
If two options still look close, use this shortlist first and then compare the details in how to choose the right candle mold. That keeps the page focused on beginner-safe picks instead of turning your first purchase into a full research project.
Choose your first mold size & shape (fail-safe picks)
For a first candle, a short, wide cylinder mold around 7×7 cm is more forgiving than tall or intricate shapes when you’re learning how wax cools and shrinks.
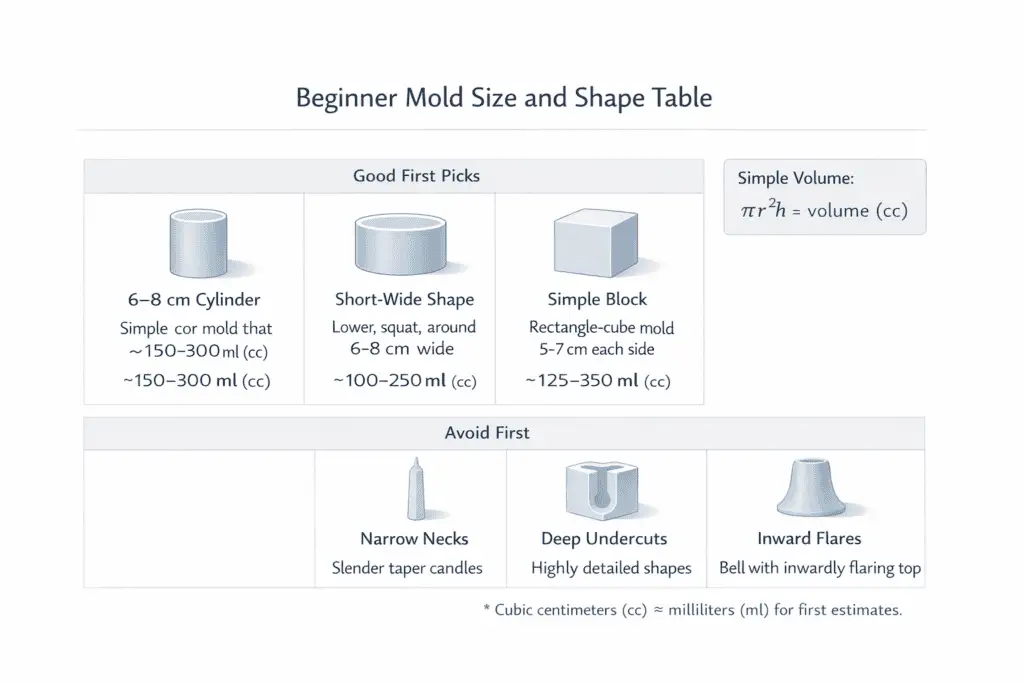
Use this section to choose mold shapes that behave predictably and leave room for small mistakes instead of punishing every temperature or wicking error. A simple cylinder with a diameter in the 6–8 cm range keeps the flame more stable, makes wick trimming easier, and avoids the fragile look of skinny pillars. Straight walls and a wide base also make demolding more reliable than shapes with narrow necks, deep grooves, or inward flares.
For most beginners, the safest “starter family” of molds looks like this:
- Short cylinder, roughly 6–8 cm in diameter and similar height, with smooth, straight walls.
- Simple rectangles or blocks with gently rounded edges, not razor-sharp corners that chip or tear.
- Basic tins or cups where the sides go straight up instead of flaring inward or forming deep undercuts.
Once you know your target diameter, route wick sizing to the chart from your supplier or to a dedicated guide such as how to size your candle wick correctly rather than turning this first-buy decision into a full wick lesson. Avoid shapes with delicate tips, narrow necks, or very deep textures until you’re comfortable fixing sinkholes and surface flaws.
A simple way to estimate wax volume is to measure the internal diameter and height and treat volume in cubic centimetres as roughly equal to millilitres of wax for most pillar blends. Start your test pour a little below the full height, note how much wax you used, and then top up on the second test once you’ve seen how much the wax actually shrinks.
Mold temperature ratings: what’s safe for hot wax?
Most beginner-friendly candle molds work best when your wax pour temperature stays comfortably within the mold maker’s stated limit and you avoid pouring very hot wax into a very cold mold.
Here, safe means staying within the mold maker’s stated temperature limit with some margin, not making a broader fire-safety, toxicology, or child-safety claim. Check the wax supplier’s pour range and the mold supplier’s maximum temperature side by side before you pour. A cautious beginner approach is to leave some headroom instead of planning around the edge of either number. Silicone usually handles everyday soy and paraffin pillar pours well, polycarbonate needs closer attention to stated limits, and metal tolerates heat well but can cool wax quickly enough to change the surface if the mold starts very cold.
Three habits keep molds safer and more consistent. Warm very cold molds slightly before pouring so the surface is not hit with a sudden temperature jump. Let each mold return close to room temperature between batches instead of stacking heat across repeated pours. Recheck the mold specs whenever you change wax type, especially when moving to blends that pour or cool differently.
Here’s a simple wax and mold snapshot you can use while planning a first batch:
| Wax type | Heat profile | Mold notes for beginners |
| Soy blend pillars | Usually moderate pour temperatures | Very mold-friendly; pairs well with quality silicone and most well-rated plastics or metals. |
| Paraffin pillars | Usually moderate pour temperatures | Shrinks well; works in silicone, metal, or polycarbonate when the mold has a clear rating. |
| Beeswax pillars | Can call for more temperature caution | Prefer higher-rated silicone or metal; be more cautious with thin or low-rated plastics. |
| Coconut or palm blends | Varies by blend and fragrance load | Check the mold limit closely and allow extra cooling time before demolding. |
Wick holes, bars, or clips: which keeps the wick centered?
For beginners, simple crossbars or wick clips usually keep the wick centered more reliably than a bare bottom hole.
As a buying criterion, the easiest molds are the ones that keep the wick visibly centered with the least setup friction. Bars and clips usually do that more reliably than a bare bottom hole, while a bottom wick hole adds one more place for leaks and alignment mistakes on a first pour.
Here’s a quick comparison of the three common setups:
- Wick hole only – Clean look, but the highest leak risk and the least beginner forgiveness.
- Crossbar – The easiest first choice for visible top alignment and light setup.
- Clip or holder – Useful when you want repeatable positioning on the same mold size.
If wick support keeps causing trouble, route the full setup problem to centering and securing wicks tools and methods or, if trapped air is part of the issue, to how to prevent air bubbles in molded candles.
Which candle molds work best with soy, paraffin, beeswax, or coconut blends?
For most beginners, soy and coconut blends do best in flexible silicone molds, paraffin is happy in almost any mold, and beeswax often releases cleanly from metal molds.
Treat wax pairing as a first-buy filter, not a full process guide. Softer soy and coconut blends usually release more easily from flexible silicone, paraffin works in most well-rated materials, and beeswax often behaves cleanly in smooth metal pillars.
That does not mean one wax belongs in only one mold material. It means beginners usually get easier early results when softer waxes meet flexible molds and cleaner-releasing waxes meet rigid simple shapes. Do one small test pour before a larger batch and use the result to confirm release, surface finish, and shape stability.
Here’s a quick wax × mold pairing snapshot you can use as a starting point:
| Wax type | Best starting mold choice | Also works | Riskier for beginners |
| Soy blends | Soft silicone pillars or blocks | Quality polycarbonate | Very intricate rigid molds with deep textures |
| Paraffin | Any well-rated material (silicone/metal/PC) | Multi-cavity rigid pillar sets | Poorly rated plastics with unknown heat limits |
| Beeswax | Smooth metal pillars | Thick-walled silicone | Thin, low-rated plastics used near their limit |
| Coconut or mixed blends | Quality silicone with a clear heat rating | Metal pillars or tins | Thin, cheap plastic molds that may warp or cloud |
What to check before you buy a candle mold
For candle molds, clear heat ratings, stable materials, and clean manufacturing details matter more than impressive-looking badges or vague marketing claims.
The most useful buying signal is a product listing that states the material and the maximum recommended temperature in plain language. Vague claims such as “high-heat safe” do not tell you enough to match the mold to your wax. Good listings also make it easy to tell whether the mold is silicone, metal, or rigid plastic instead of hiding behind generic wording.
These are the practical checks that matter most before you buy:
- A clear material description, not just “plastic” or “premium mold.”
- A stated maximum temperature or usage range.
- Even wall thickness and clean seams in the product photos.
- No reports of harsh odor, chalky residue, or warping after normal pours.
- Basic care instructions that match repeated hot-wax use.
When the product page hides the material, the temperature limit, or the care instructions, treat that as a warning sign. A small set of molds with clear specs is more useful than a drawer full of cheap mystery plastics that force you to guess every time you pour.
Budget starter kits vs à la carte molds: best value for beginners
For beginners, best value means the lowest-friction path to successful early pours, not the lowest sticker price or a seller-style return calculation.
A starter kit can save time when it includes a reliable mold, wick support, and materials that match the type of candle you want to make. The problem is that many kits pad the price with extra shapes or tools that never become part of your regular setup. A slow à la carte approach avoids that waste, but it only works well when you choose beginner-safe shapes first instead of buying decorative molds too early.
For most beginners, the best value strategy is a hybrid one. Buy a simple first mold that you know you will use, then add a second mold only after two or three successful pours tell you what size, wax, and finish you actually like. That keeps your shelf practical and stops “budget” shopping from turning into a pile of unused specialty pieces. If seasonal or sculpted shapes tempt you early, save them for later and compare them against novelty candle molds once basic demolding feels routine.
To make decisions easier, these starter setups keep cost and complexity in proportion:
- Tight-budget basics
- One silicone cylinder mold around 7×7 cm.
- One wick bar or clip sized for that mold.
- One second mold only after the first shape is releasing cleanly every time.
- Balanced beginner setup
- Two silicone molds: one short cylinder (6–8 cm diameter), one simple block or loaf.
- One rigid polycarbonate pillar mold if you want sharper edges and a visibility option.
- Wick bars or clips plus a small pack of stoppers or putty for sealing holes.
- Beeswax-focused starter setup
- One simple metal pillar mold with straight walls.
- One silicone cylinder mold in a similar size for easier comparison and backup.
- Wick bars or clips you can reuse across both molds.
Quick answers to common beginner questions
Why did my candle stick in the mold?
Most sticking comes from rigid molds that were under-prepped or from shapes that catch the wax during release. If it keeps happening, read how to fix common mold release issues instead of changing wax, wick, and mold type all at once.
Why is my wick off-center even though I used a bar or clip?
A bar or clip can hold the top steady, but the wick can still drift during pouring or cooling. Recheck alignment from two angles while the wax is still movable, and use the wick-centering help linked earlier in this page if the problem keeps repeating.
Why did my mold leak at the seam or wick hole?
Leaks usually come from small gaps in the seam, plug, or wick hole rather than from the wax itself. Test the assembled mold with water first, then fix only the point that actually weeps before you pour wax again. If leaking keeps repeating, use how to fix common mold release issues for a deeper troubleshooting path.
Should I start with matte or glossy molds?
Matte or lightly textured molds are usually easier for beginners because they hide small surface marks better than glossy ones. Save glossy finishes for later, when your cooling and demolding routine is already steady. If you are still deciding between finish, material, and shape together, go back to how to choose the right candle mold.
Do I really need silicone, or can I start with metal?
You can start with either, but silicone usually gives you more first-try success because it flexes away from the candle. Metal becomes more attractive when you want straight pillars, sharper edges, or cleaner beeswax releases.