
Use silicone candle molds properly by cleaning and supporting the mold, setting the wick straight, pouring at the right temperature, then cooling and demolding slowly.
This page covers using ready-made silicone candle molds for molded candles, not making silicone molds from scratch or replacing separate pages for repeated defect fixes.
Silicone molds hold detail well, but they show setup mistakes fast. Wrong prep, wick placement, or wax temperature can cause leaks, bubbles, frosting, and torn edges. This guide walks through the job in the order most makers actually do it. It also shows which extra steps matter only for special cases, such as split molds or stubborn releases.
For this workflow, silicone molds usually pair with mold-suitable pillar waxes or firmer blends, while very soft container-only waxes can make release and shape retention harder.
- Measure the mold and confirm whether it is a one-piece or two-piece design.
- Wash, dry, and support the mold so the walls stay straight during the pour.
- Thread, seal, and center the wick before any wax goes into the cavity.
- Use the wax maker’s temperature range, then pour in a thin stream against the mold wall.
- Let the candle cool fully, then demold by peeling the silicone away from the wax.
- Troubleshoot only the result you actually see, such as bubbles, sticking, seam leaks, or sinkholes.
Check Mold Size, Volume, and Stability Before You Pour
Check that the silicone mold fits your planned candle, holds the right wax volume, and stays stable enough to keep the wick centered while the candle sets.
Cavity volume is the amount of wax the mold can hold up to your fill line. Getting that volume and the mold’s stability right makes wick testing and fill planning much easier.
Getting size right is what lets you use silicone candle molds properly instead of fighting leaning wicks, weak sidewalls, or a candle that ends up shorter than planned. Diameter affects wick testing, height affects stability, and cavity volume tells you how much wax to prepare.
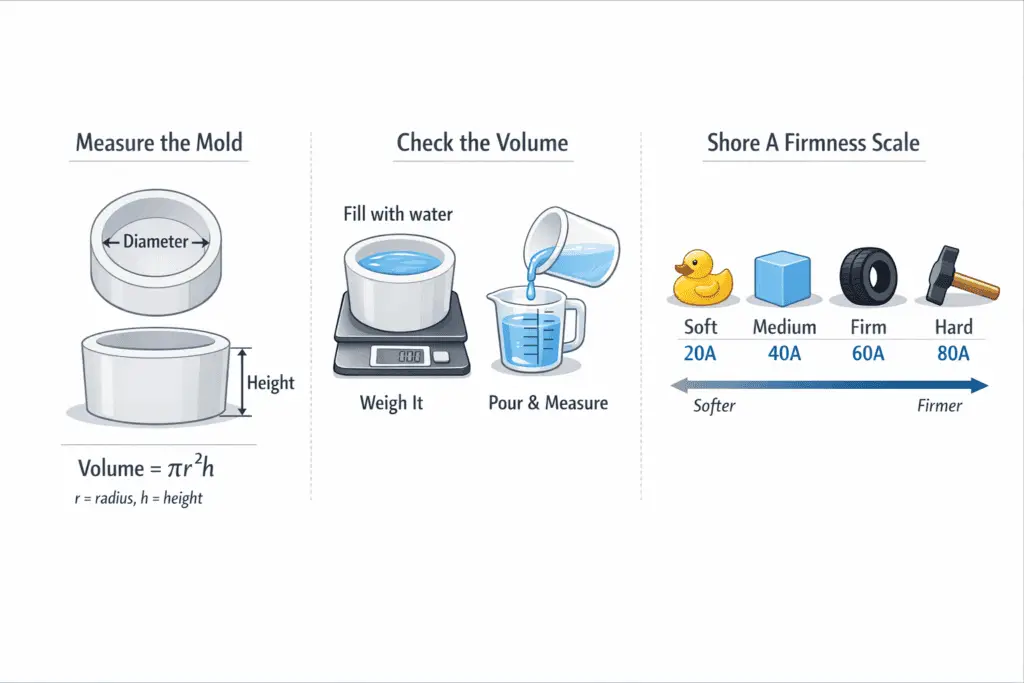
Start with diameter because it sets your first wick and shape checks. Measure the internal diameter at the top and near the base; if they differ, work from the smaller number, then use a quick cavity check only to confirm that your planned fill line leaves headspace and matches the candle size you want. For exact capacity work, use How Much Wax Will My Candle Mold Hold? (Size, Height, Fill Formula).
Use your wick size chart as a starting reference, but keep this page focused on mold setup rather than full wick testing. If your diameter sits near a chart boundary or the finished candle burns unevenly, confirm the final wick with separate wick testing instead of expanding that decision here.
Wall stability matters most when the mold is tall, soft, or heavily loaded with hot wax. If the sides bow when empty or flex heavily once the mold is filled, brace it before you pour instead of hoping the wax will hold the shape for you.
Here’s a simple measuring routine you can follow every time:
- Measure internal diameter at the rim and base with a ruler or caliper.
- Measure internal height up to the intended fill line.
- Calculate or water-test the cavity volume and compare it with your target candle volume.
- Check that your diameter sits comfortably inside the wick range suggested by your chart.
- Confirm that the mold’s walls feel stable enough for the planned height, or set up external support before you pour.
If you still need help comparing mold styles, see Types of Candle Molds (Silicone, Metal, Plastic, and More) or How to Choose the Right Mold for Candle Projects. For the broader cluster view, see Candle Molds and Shape Customization.
Prepare and Support Silicone Molds Properly Before Pouring
Wash, dry, inspect, and support silicone molds before pouring so wax wets the surface cleanly and the walls keep their intended shape.
Support means holding a soft or tall mold upright so hot wax does not bow the walls or drag the wick off center. Clean prep and stable support do more for final detail than most last-minute fixes.
Clean prep is what lets you use silicone candle molds properly instead of discovering pits, fish-eyes, or hazy patches after the candle sets. Factory residue, skin oils, and stray lint can all interfere with how molten wax wets the surface, and unstable support makes those problems harder to fix later.
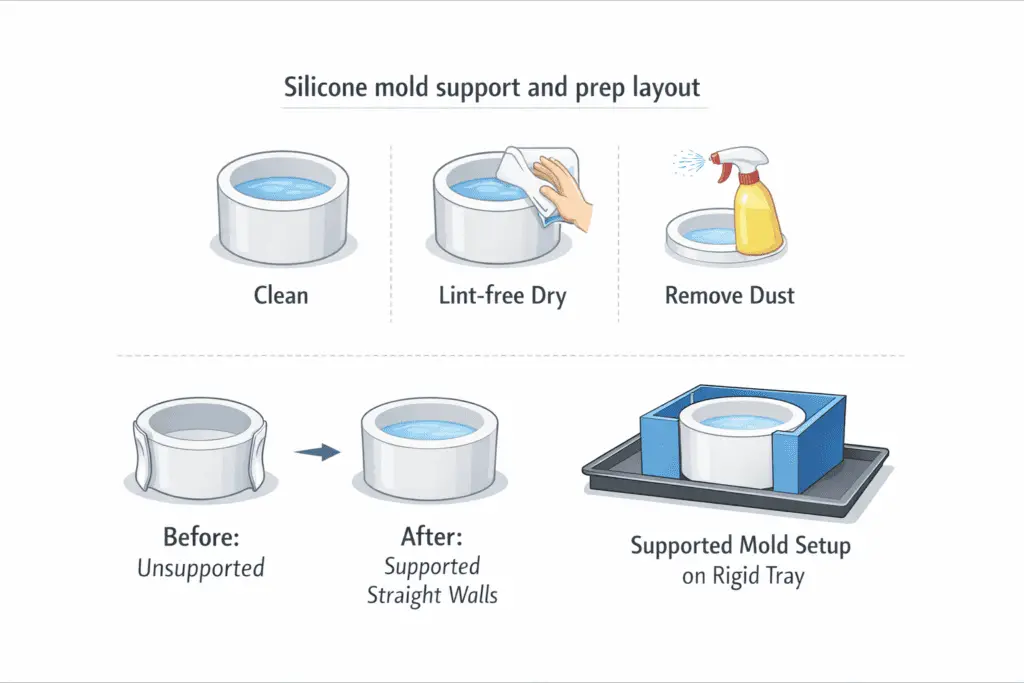
New molds benefit from a gentle degreasing cycle before their first pour. A small amount of fragrance-free dish soap in warm water is usually enough to lift processing oils and dust. Rinse thoroughly so no soap film remains, because residual surfactant can encourage voids. Shake off excess water, then let the mold air-dry upside down on a rack or towel until no droplets or water spots remain in the details.
Once dry, focus on lint and dust. A single stray fiber can imprint a ridge in a glossy pillar. Use a truly lint-free cloth or compressed air on a low setting, and for stubborn bits, a loop of painter’s tape or a clean lint roller works well on the outside. Any recurring pits or shallow craters you keep seeing will show up again unless you treat inspection as part of the routine instead of an afterthought.
Support comes next. Set tall, soft, or top-heavy molds in a snug box, a bowl of rice, or a bed of sand so the walls stay straight when hot wax pushes outward. Two-piece molds also need even pressure along the seam, not random squeezing at one point. A level, heat-safe surface keeps the mold steady and makes wick centering easier to hold.
Here’s a simple five-step checklist you can repeat before each batch:
- Wash the mold in warm, mildly soapy water to remove oils and storage dust.
- Rinse thoroughly, paying attention to corners and deep texture.
- Air-dry upside down on a rack until the interior is completely free of water.
- Inspect in good light, then remove any visible lint or dust with tape or a lint-free wipe.
- Seat the mold in its support so it feels stable before you thread the wick or pour wax.
Avoid harsh solvents, abrasive pads, or very hot water that could weaken the silicone over time. If you ever see hazing, a cloudy patch, or a tacky feel after cleaning, pause and clean more gently before pouring again. Combined with sensible support, this routine reduces small surface defects and keeps the mold closer to its intended geometry.
Set Up the Wick Hole, Seal the Mold, and Center the Wick
Set up the wick by creating or using the base hole, sealing it so wax cannot leak, then pulling the wick straight and centering it from base to top.
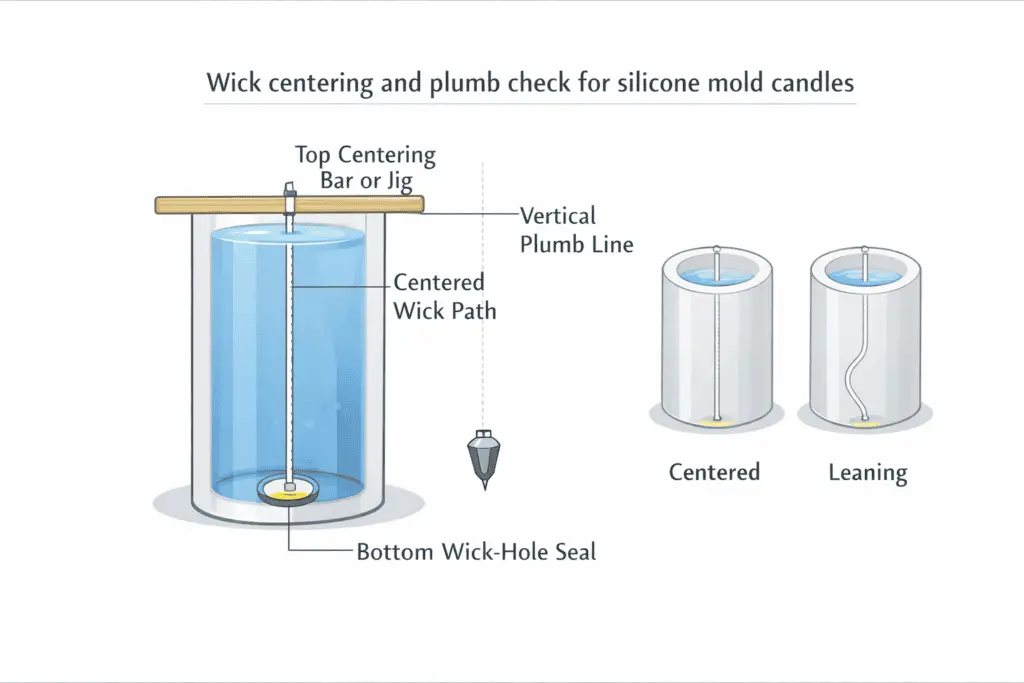
A wick path is the route the wick takes through the mold from the base to the top of the candle. The path has to stay straight, sealed, and centered or the finished candle will burn unevenly.
For one-piece molds, the base hole usually does most of the setup work. For split or two-piece molds, seam alignment and even pressure matter just as much as the wick path itself.
One-piece silicone molds usually have a small base point where you pierce or reopen the wick hole. Thread the wick from the bottom, seat the tab or knot firmly, and seal the exit with mold putty or heat-resistant tape before you pour. Two-piece molds need the halves aligned first, then the wick held in line with the center of the cavity so the seam does not push it off course. In both cases, pull the wick snug without stretching the silicone.
Choose wick size from the candle’s measured diameter and wax family, then confirm the final wick outside this page if later burn tests show tunneling, overheating, or an uneven melt pool. This section stays focused on keeping the wick path straight inside the mold; for the broader molded-candle process, see How to Make Pillar Candles (Molds, Second Pour, Finish).
Once the wick is threaded, anchor the top to a wick bar, chopstick, or skewer laid across the mold. Check from two angles to confirm the wick sits exactly over the center, because even a few millimeters of lean will show up as a lopsided melt pool later. For very tall or flexible molds, recheck the wick after pouring in case wall pressure has shifted it slightly.
Best Pour Temperatures for Soy, Paraffin & Blends in Silicone Molds
For silicone molds, the best starting pour temperature means the most reliable starting range for clean release, surface finish, and defect control in that mold. Start with your wax maker’s recommended range; as a rough starting point, many molded soy waxes land around 140–170 °F (60–77 °C), paraffin pillars often around 155–185 °F (68–85 °C), and blends somewhere in between.
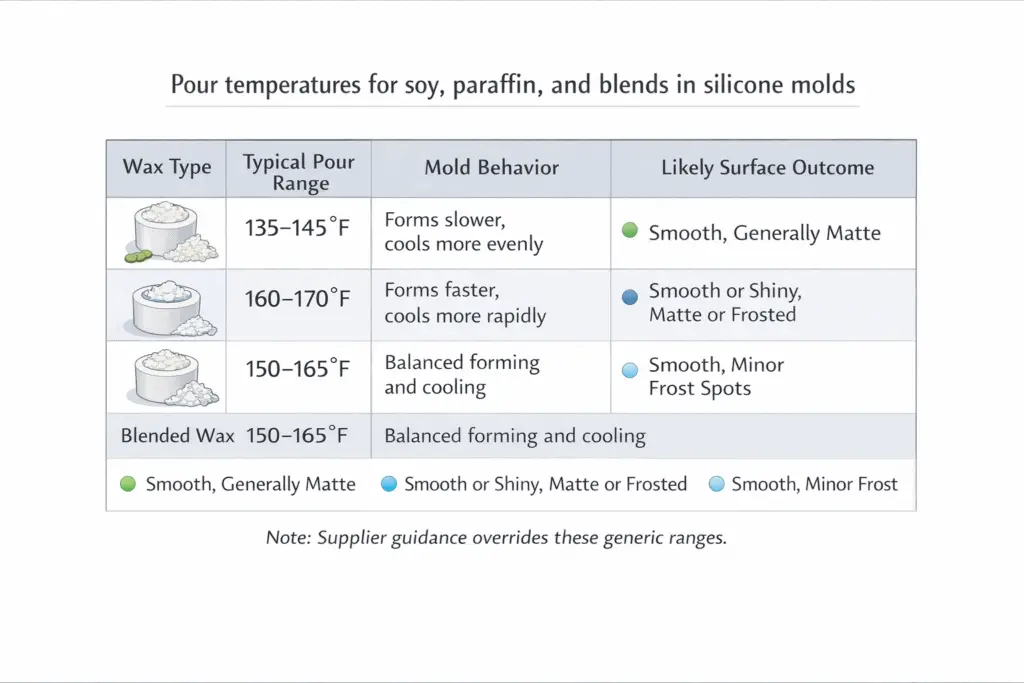
Pour temperature is the wax temperature at the moment it enters the mold. It affects surface smoothness, shrinkage, bubble release, and how quickly the candle skins over.
Think of pour temperature as the main control for surface smoothness, adhesion to the silicone, and how much frosting or sinkholes you see. Freestanding molded candles usually perform best with pillar blends or other waxes formulated to release and stand on their own, not very soft container-only waxes.
Use your wax supplier’s documentation as your primary candle wax temperature guide, especially for silicone molds that show defects easily. If the supplier gives a range, start near the middle, pour one test candle, then adjust up or down by 5–10 °F (3–5 °C) until you get the finish and defect profile you want in that specific mold.
Mold temperature and room conditions change what “best” looks like. A very cold mold or workspace will shock hot wax and can cause jump lines, bubbles, or small surface cracks. Gently pre-warming silicone molds until they feel just above room temperature helps the wax wet the surface and release tiny bubbles more easily. In warmer rooms you can often pour slightly cooler, which reduces frosting in soy and gives the wax more time to relax.
Size of the piece matters too. Small, thin cavities like wax melts or mini figures can often be poured at the lower end of the range because they set quickly; big, thick pillars usually benefit from a slightly hotter pour so the center does not trap voids as it cools. Avoid overheating beyond the wax maker’s melt limit, use a thermometer, and test one mold at a time.
Pour Without Bubbles: Stream, Side-Wall Pour & Fill Level for Silicone Molds
To pour silicone mold candles without bubbles, pour in a slow, thin stream against the mold wall, pause to release trapped air, and stop at a consistent fill level just below the rim.
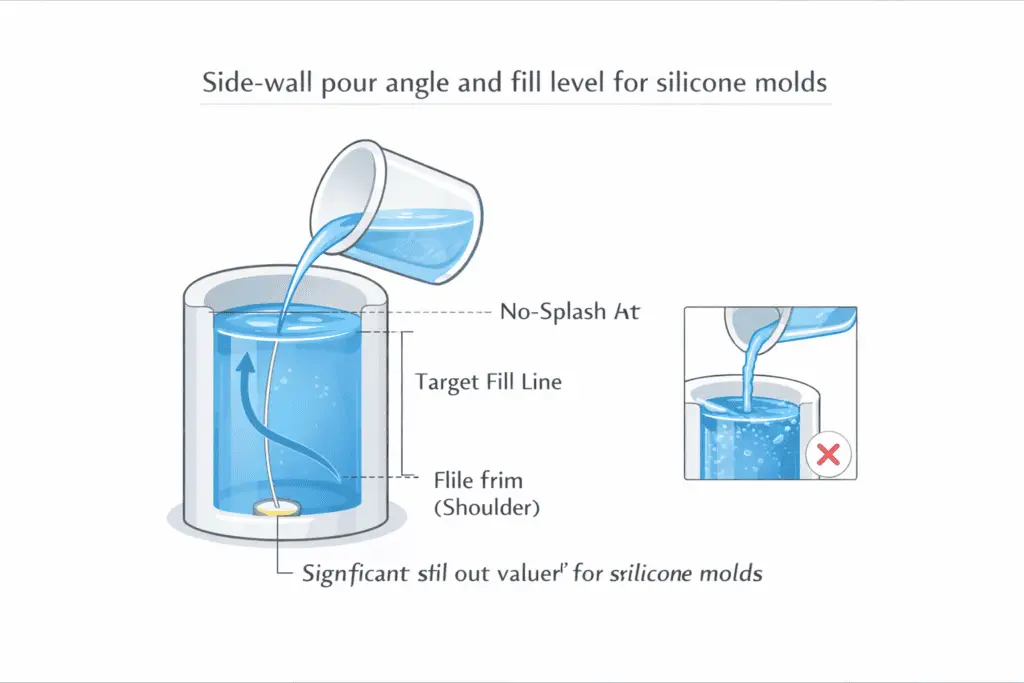
A side-wall pour sends wax down the mold wall instead of dropping it into the center. That slower entry gives trapped air more time to escape before the wax closes over it.
Think of bubbles in pillars and shaped candles as small pockets of air that never found a way out. The more carefully you control how wax enters the mold, the easier it becomes to avoid air bubbles in candles. Start by letting freshly melted wax rest for a few minutes off the heat so large air pockets and vigorous stirring bubbles can rise and pop before you pour.
When you begin pouring, aim for a gentle side-wall pour technique instead of dumping straight into the center. Tilt the pour spout slightly and let the wax run down one side of the silicone cavity in a pencil-thin stream. This slows the flow, helps air escape ahead of the liquid, and minimizes splashing, which is a common cause of random voids. For deep or complex shapes, pause every few centimeters of height so trapped air from details has time to rise along the wall.
Fill height matters more than it seems. A correct candle fill level means stopping a few millimeters below the top edge to leave room for minor shrinkage and topping up if needed. Overfilling encourages wax to climb and dome, trapping air just under the surface; underfilling can leave a visible step or ridge if you have to do a big top-off. If your wax shrinks heavily, pour in two stages: a steady main pour and a small, careful refill onto semi-set wax to avoid craters.
Right after pouring, gently tap the mold on a stable surface or lightly flex the silicone near detailed areas to nudge remaining bubbles upward. Stop once you see the surface settle; overworking the mold can introduce new voids or tilt the wick. Then leave the molds alone while they set so the wax can cool in a calm, undisturbed state.
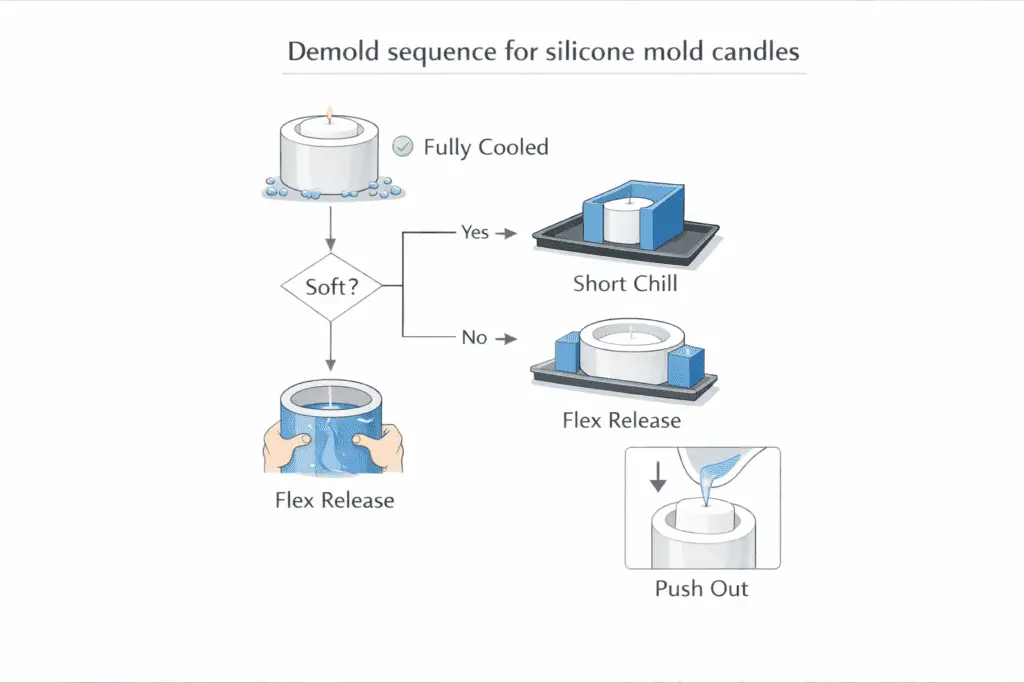
Cool, Cure & Demold at the Right Time (No Tears, No Warping)
Cool molded candles to room temperature, give them time to cure, then demold by peeling the silicone away from the wax instead of forcing the candle out.
Cure is the rest period that lets wax harden and stabilize after it first looks set. A candle can feel firm on the surface while the center is still settling.
Think of cooling and curing as their own stage, not an afterthought. If you rush this step, you can warp your candle, tear fine details, or lock in internal stresses that show up as cracks later. Most pillar and shaped candles benefit from a slow, even cool at room temperature on a level, heat-safe surface away from direct drafts or sunlight. Once the wax reaches room temperature, many waxes still need another day or more for internal crystallization and fragrance binding.
As a broad rule of thumb, some paraffin pillars release cleanly the same day, while soy and many natural blends often need longer before demolding cleanly. Check your wax supplier’s guidance first, then run a small timing test for your specific molds and room conditions so you have a reliable local baseline.
A brief chill can help with stubborn shapes once the wax is already mostly cooled, but deep or prolonged chilling risks condensation on the silicone and can dull the surface or create micro-cracks. Use that step sparingly and test it on a single piece before you make it part of the routine.
Use touch and appearance as your early cues. The mold should feel cool and the wax surface firm before you think about release. A safe demolding point is when the candle feels the same as the surrounding air, not faintly warm. If the sides wobble when you press them or the top feels rubbery, wait longer. Rushing this stage is one of the fastest ways to stretch thin silicone areas or pull detail out of alignment.
To demold, start by peeling the silicone away from the candle, not the other way around. Loosen the edges and any deep details first, then gently invert or push from the base while supporting the mold so it does not tear at thin points. For tall pillars, slowly roll the silicone down the length like removing a tight sleeve. If you feel strong resistance, stop and let the candle sit a bit longer; forcing it usually leads to warping, split edges, or fine surface tears.
Once out of the mold, place the candle on a level surface to finish curing. Keep it away from dust, extreme heat, or direct sunlight while it hardens internally and fragrance settles. A calm, consistent curing routine makes burn testing more meaningful and makes silicone mold results more repeatable from batch to batch.
Fix Common Problems Without Turning This Page Into a Full Troubleshooting Hub
Fix the specific defect you see by changing one variable at a time, keeping release aids minimal, and using seam or climate adjustments only when the mold or room actually needs them.
A sinkhole is a crater or hidden cavity caused by shrinkage as the wax core cools. Frosting, bubbles, sticking, seam leaks, and sinkholes have different causes, so one blanket fix rarely works.
Start with the result, not with a full recipe rewrite. Frosting in soy usually points to crystal structure and cooling conditions. Bubbles usually come from trapped air, over-stirring, or a rough pour. Sinkholes come from uneven shrinkage as the center cools. Sticking often means the candle is not ready to release yet, the mold has deep drag points, or additives and residue are changing how the wax behaves. If bubbles are the main issue, use How to Prevent Air Bubbles When Using Candle Molds. If the candle keeps sticking, use How to Prevent Mold Sticking in Candle Making.
Keep the room steady, avoid strong drafts, and gently pre-warm molds only when they feel noticeably cool to the touch.
Silicone molds do not usually need release spray by default, so treat it as an exception step rather than part of every pour.
Use release spray only when the mold is deep, highly detailed, or consistently difficult to demold. If you do use a release agent, apply a light coat, let it dry fully, and compare the finish against an unsprayed test pour.
Two-piece silicone molds need extra seam and vent attention, but only for that subset of molds. Dry-fit the halves, clean the seam faces, lock the registration keys, and use even pressure from bands or a support shell instead of squeezing one point hard. Put small vents at real high points where air can trap, then watch for a slight wax dribble during the pour to confirm that displaced air has somewhere to go. A quick leak check with warm water or scrap wax is often enough to catch seam problems before you waste a full batch.
Here’s a simple “if you see X, try Y” ladder you can follow:
- If you see heavy frosting on soy pillars: retest slightly warmer and cool the mold more evenly.
- If you see clusters of bubbles or pinholes: stir less, let the wax rest briefly, pour in a thinner side-wall stream, and tap the mold lightly once.
- If you see repeated sinkholes or hidden cavities under the top: plan a small top-up pour instead of changing the whole process at once.
- If the candle drags or sticks during release: wait longer before demolding and peel the silicone away from the candle before you test other aids.
- If a two-piece mold leaks at the seam: clean the seam faces, realign the keys, and leak-test before the next full pour.
Keep a small defect log so patterns emerge instead of blending together. When you see the same issue three times in a row, change one variable at a time—pour temperature, cooling environment, support, or demold timing—rather than changing everything at once.