
To make multi-layered candles with molds, pour in sequence, wait for a matte-warm surface, and keep each seam clean, slightly tacky, and centered on the wick.
Multi-layered molded candles use stacked wax pours to create crisp color bands or staged scent changes in one pillar. Clean seams come from compatible wax, controlled pour temperatures, and patient cooling between layers. Most working temperatures and wait times depend on the wax supplier’s instructions, your mold size, and room conditions, so treat all example numbers here as starting points to test. This guide shows the straight workflow: plan the layers, pour each band, reinforce adhesion, handle shrinkage, and demold without separation.
How to Plan a Multi-Layered Molded Candle Before You Pour
Plan the full candle before you melt wax by fixing the mold size, number of layers, color order, and wax amount per layer.
A clear plan stops mid-project mistakes like uneven bands, overfilled molds, and temperature guesswork. For a first test, use one straight-sided pillar mold, keep the layer count low, and write down the pour order and cooldown cue before you heat the wax.
- Choose one mold size and keep the design simple, such as three or four equal bands in a straight-sided pillar.
- Mark the outside of the mold with the planned layer heights so you do not rely on guesswork while pouring.
- Measure your total wax for the mold using your normal fill method, then divide that amount into one portion for each layer.
- Set the color order from light to dark when you want sharper visual contrast and less visible bleed.
- Write a simple pour ladder based on your supplier’s pour range, with each later layer poured slightly cooler than the last.
- Decide the readiness cue in advance: the next layer goes in when the surface is matte, warm, and firm enough to resist a fingerprint.
This page focuses on one mold-specific method, not every mold style. For broader setup choices, see Candle Molds & Shapes before you scale the design up.
Required Tools & Materials for Molded Layered Candles
Gather reliable melting equipment, accurate measuring tools, safe pillar molds, and pillar-grade wax so you can pour layered candles without mid-project surprises.
A small layered-candle kit needs steady heat, accurate temperature checks, clean molds, and simple tools for wick control and seam repair. Add one skewer or relief-hole tool to the setup so you can manage shrinkage before the final second pour.
Essential tools and materials
- Melting and measuring: double boiler or wax melter, heat-safe pouring jug, digital thermometer that reads at least up to 100 °C (212 °F), a small scale for weighing wax and fragrance, and a skewer or similar tool for relief holes.
- Molds and wicks: pillar molds rated for your pour temperatures, mold sealer or putty for any base holes, pillar-grade wax, wick tabs, straight wicks suited to your chosen diameter, and a wick centering bar or similar support.
- Safety and workspace: heat-resistant mat or tray, paper towels or rags for spills, and simple protection like cotton gloves and eye protection if you are working with larger batches.
Helpful but optional upgrades
- A low-setting heat gun for surface smoothing and bonding layers.
- Spare “test” molds for experimenting with new wax blends or dyes.
- An extra thermometer so you can double-check readings if something seems off.
Keep the kit simple and repeatable. If your molds tend to grip the candle or trap bubbles, review How to Prevent Mold Sticking in Candle Making and How to Prevent Air Bubbles When Using Candle Molds before you start a full batch.
Steps to Prep Molds & Pour the Base Layer
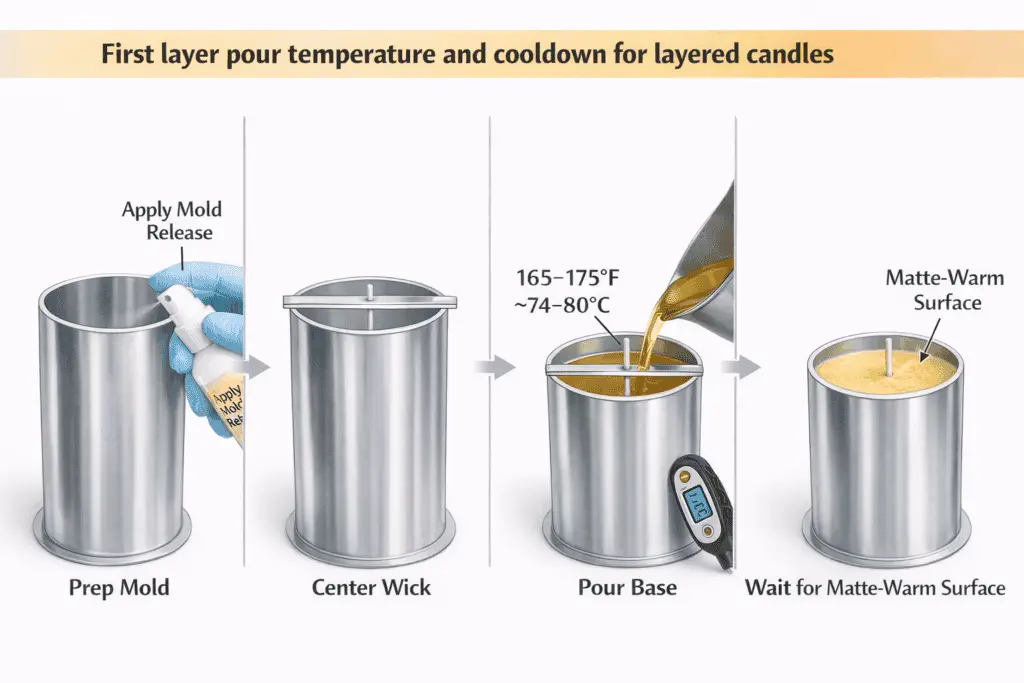
Clean, release, and pre-wick the mold; then pour a level base at your wax supplier’s recommended pour temperature and let it cool to a matte-warm surface.
The first layer sets the line for every band above it. A straight wick, a clean mold, and a level base reduce tilt, trapped bubbles, and weak seams later in the project.
Start by cleaning your mold so you can prep it without hidden dust or residue causing bubbles or drag lines in the base. Wipe the interior with a lint-free cloth, check seams for gaps, and confirm the mold material can handle your expected pour temperatures. If you use mold release, apply a very thin, even coat and give it a few minutes to flash off so it does not pool in corners.
Before you melt wax, check the supplier’s data sheet for the wax you are using and note both the melting and pour ranges. Heat your wax in a double boiler or melter that allows precise temperature control, and stir gently to avoid air bubbles. Pre-warm the mold lightly only if your mold and wax system benefit from it, because the goal is a stable base layer, not a hot mold.
Use these steps to prep your mold and pour a stable base layer:
- Clean the mold interior and inspect seams, base plate, and wick hole for cracks or gaps.
- Thread, center, and secure the wick tab so it sits flat on the mold base without tilt.
- Apply a small amount of mold release if needed, then set the mold on a level, heat-safe surface.
- Pour wax slowly down the side of the mold until you reach your target base depth of roughly 10–15 mm (0.4–0.6 in).
- Tap the mold gently to release trapped air and leave it undisturbed until the surface turns dull and “matte-warm” to the touch.
As the base cools, watch for clean shrinkage and a steady wick line instead of rushing to the next pour. When the surface looks fully matte rather than glossy and no longer feels hot through the mold wall, you are ready to build the next band.
Once your base is secure and level, the next step is to choose a wax and wick setup that stays compatible across every layer.
How to Choose Wax & Wick for Layered Pillars
Select compatible wax and wick size so each layer bonds cleanly and the finished pillar burns without tunneling, soot, or severe bleed.
The safest starting point is one pillar wax family across all layers and one wick family sized to the candle’s diameter. Large changes in melt point, additive load, or wick behavior make the seams harder to manage and the burn harder to predict.
Start with a pillar wax that the supplier already supports for molded candles, then keep adjacent layers close in composition instead of mixing extremes. For your first layered mold project, a single tested pillar blend is usually easier to control than stacking very different wax systems in one candle.
Choose the wick from the candle diameter and the wax family, then confirm it with single-color test burns before you move to layered pours. Use How to Properly Size Your Candle Wick for the sizing method, then confirm the broader pillar workflow with your usual single-color tests before building the layered version.
Keep the selection process simple:
- Choose one main pillar wax that fits your mold, color plan, and fragrance load.
- Select one starting wick size from a reputable chart for that wax family and diameter.
- Run a single-color test burn and adjust within the same wick family before you build the layered version.
Once your wax and wick choices behave well in a simple pillar, you can move on to the pour ladder that keeps the bands crisp and bonded.
Steps to Control Pour Temperature & Cool Between Layers
Pour each later layer slightly cooler than the last and wait for a matte-warm surface before continuing.
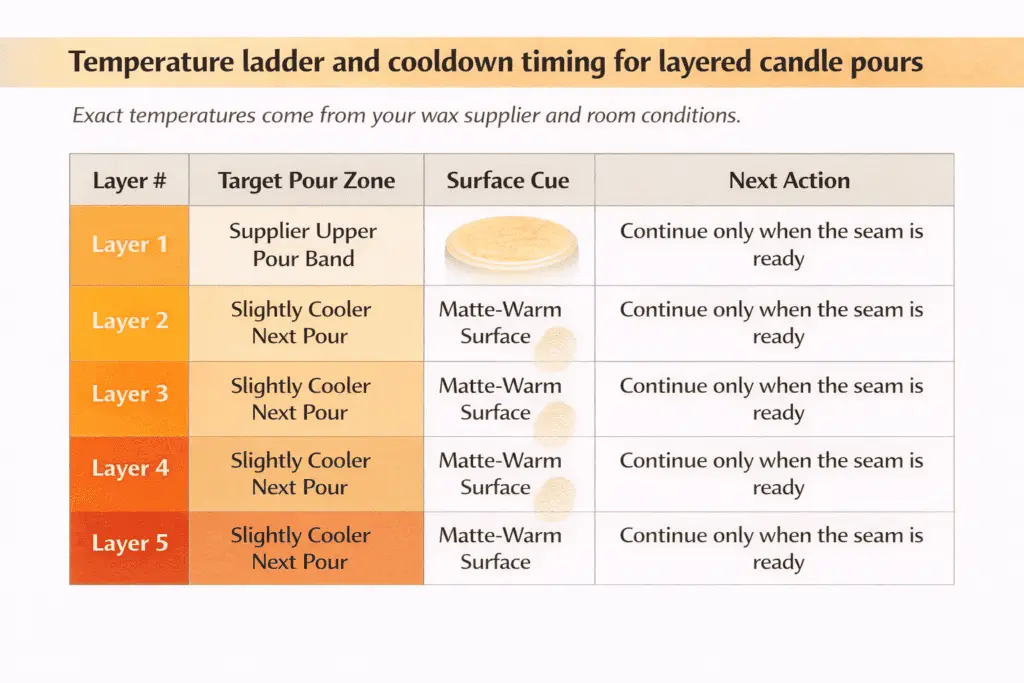
A simple temperature ladder keeps each fresh pour from remelting the layer below. The exact ladder depends on your wax sheet, but a common pattern is to start within the supplier’s pour band and step down a few degrees with each new band.
- Start with your wax’s recommended pour temperature and write that number down before the session begins.
- Use that number as the first rung and plan the next two or three rungs slightly lower so later pours are gentler on the seam below.
- After each pour, let the layer cool on a stable rack until the surface turns matte, feels warm but not hot, and does not take a fingerprint when you tap it lightly.
- If the surface is still shiny or your finger leaves a dent, wait a few more minutes; pouring too early encourages bleed and can warp the layer below.
- Keep notes on room temperature and drafty spots, because cooler rooms lengthen the time between layers while warmer rooms shorten it.
Stable room conditions make this timing easier to repeat. A draft-free room around 21–23 °C (70–73 °F) is a practical starting point for many pillar pours, but your wax supplier’s instructions still take priority.
The goal is a repeatable pattern: set the temperature, pour, wait for matte-warm firmness, and then move to the next rung. When you keep that rhythm, the bands stay straighter and the seams stay stronger.
How to Prevent Color Bleed & Migration Between Layers
Use low-bleed dyes, moderate fragrance load, cooler pours, and clean interfaces to stop migration between layers.
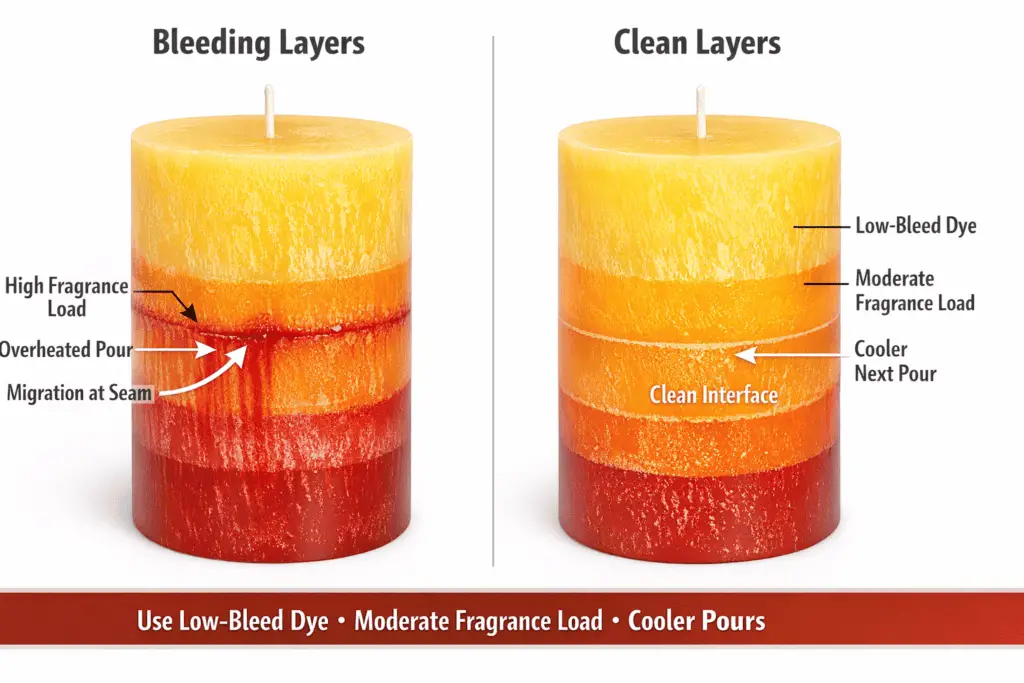
Dark dye and high fragrance load both make bleed harder to control, especially when a hot layer lands on a pale one. The cleanest bands usually come from low-bleed colorants, restrained fragrance, and a seam that is warm enough to bond but not soft enough to smear.
Choose candle dyes made for wax, stay within the manufacturer’s dosage range, and avoid dark-over-white combinations unless you have already tested them in that wax system. Keep fragrance at the lower end of the supplier’s allowed range when you need crisp visual separation, because extra solvent load can soften seams and pull color across the boundary.
Practical rules of thumb:
- Pour lighter colors first, then medium, then dark when you want sharper visible edges.
- Keep each layer’s fragrance load consistent so one band does not stay softer than the next.
- Wipe and lightly warm the surface before the next pour so the interface is clean, slightly tacky, and ready to bond.
- Store finished pillars away from direct sun and heat sources so slow migration does not blur the bands over time.
For a deeper troubleshooting path on this one issue, see Preventing Color Bleeding Between Candle Layers. On this page, the key rule is simple: keep solvent load moderate and the seam cool enough to hold its line.
Steps to Time the Next Pour Using the Matte-Surface Test
Begin the next pour when the previous layer turns matte and warm to the touch without indentation.
In many rooms, that stage appears within minutes rather than hours, but the true cue is the surface condition, not the timer. A matte top with gentle warmth and no fingerprint gives the next layer a seam that bonds without heavy remelt.
The goal of the matte test is to help you time the next pour correctly using what you see and feel, not an arbitrary timer. Look for a fully dull surface with no glossy “wet” patches, then press very lightly with a finger pad or knuckle; the wax should feel warm and firm, and it should spring back without leaving a dent. If you see a shine or your touch leaves a mark, the interface is still too soft for the next layer.
Check your wax supplier’s technical sheet before you lock in a wait window, because higher-melt pillar blends can behave differently from softer soy-heavy systems. If your room runs cooler or warmer than usual, adjust the wait window and recheck the surface instead of forcing the next step by the clock.
Here is a simple matte-surface timing sequence you can follow:
- Pour the layer at your chosen temperature and set the mold on a level, draft-free surface.
- Start a timer, but treat it as a reminder, not a command.
- At your first planned check based on the supplier sheet or your notes, inspect the surface under good light; if it is still shiny, wait and re-check every few minutes.
- When the top is fully matte, tap lightly with a fingertip; if there is no visible dent and only gentle warmth, the layer is ready.
- If you misjudge and leave a faint print, let it firm a little longer so you do not trap that mark under the next pour.
Keep notes on room temperature, mold size, and your actual wait times so the matte test becomes a repeatable system. That record matters more than any universal minute count.
Once your timing feels reliable, the next challenge is keeping the wick centered so the flame tracks straight through every band.
How to Keep Wicks Centered and Aligned Across Layers
Fix the wick with a centering tool and light tension, then re-center it after each pour while the surface is still pliable.
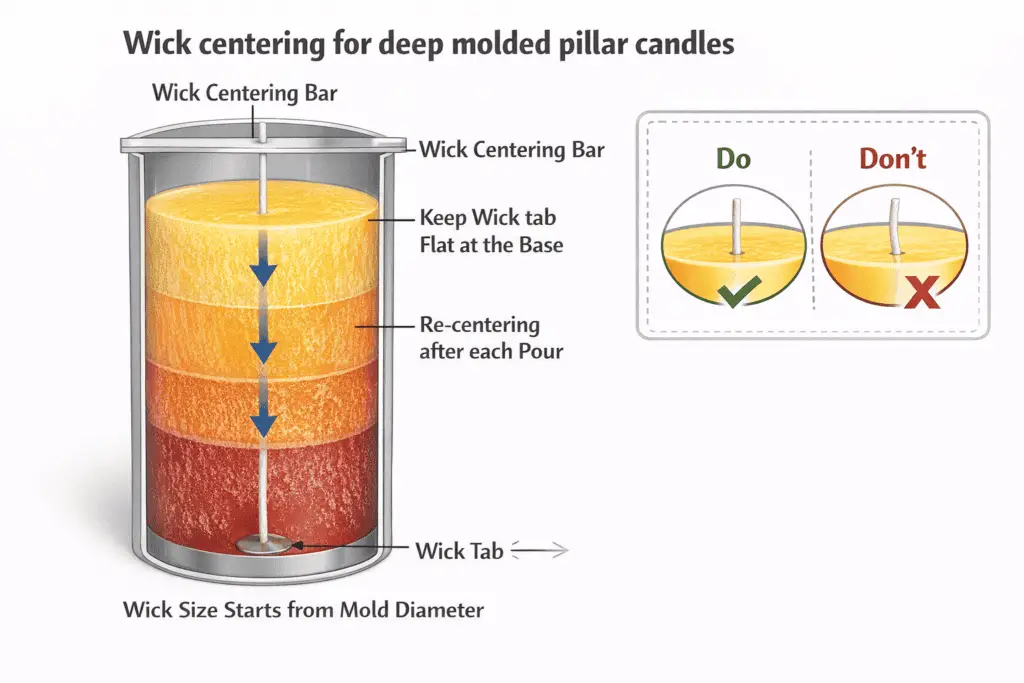
A straight wick keeps the burn path centered through the full height of the pillar. The wick should stay vertical from the tab at the base to the support at the mold rim without pulling the tab upward.
Your main objective is to keep one clean wick line from base to tip, even after several pours and cooldowns. Start by threading the wick through the mold’s base hole, attaching a metal tab, and pulling it taut. Secure the tab so it cannot tilt, then run the wick through the slot of a centering bar, bamboo skewer, or similar support laid across the mold rim.
Use a wick size you have already tested for this diameter and wax family rather than troubleshooting wick family differences mid-project. If you still need to confirm sizing, use your usual wick-sizing method before you scale up the layered version.
During layering, alignment becomes a habit:
- Before each pour, confirm the top of the wick is straight and still centered in the centering bar.
- Pour slowly so the flowing wax does not push the wick sideways.
- As the layer cools, watch for drift; if the wick leans slightly, nudge it back with a clean tool while the surface is still soft.
- When the layer reaches matte-warm firmness, gently retighten the wick in the centering bar so it stays vertical before the next pour.
Keep the tension firm but not extreme. You want the wick straight, not bowstring-tight, so the tab stays flat and the seam around it does not distort as the candle cools and shrinks.
Once the wick stays straight from the first pour to the last, you can focus on strengthening each seam before the candle is topped off and demolded.
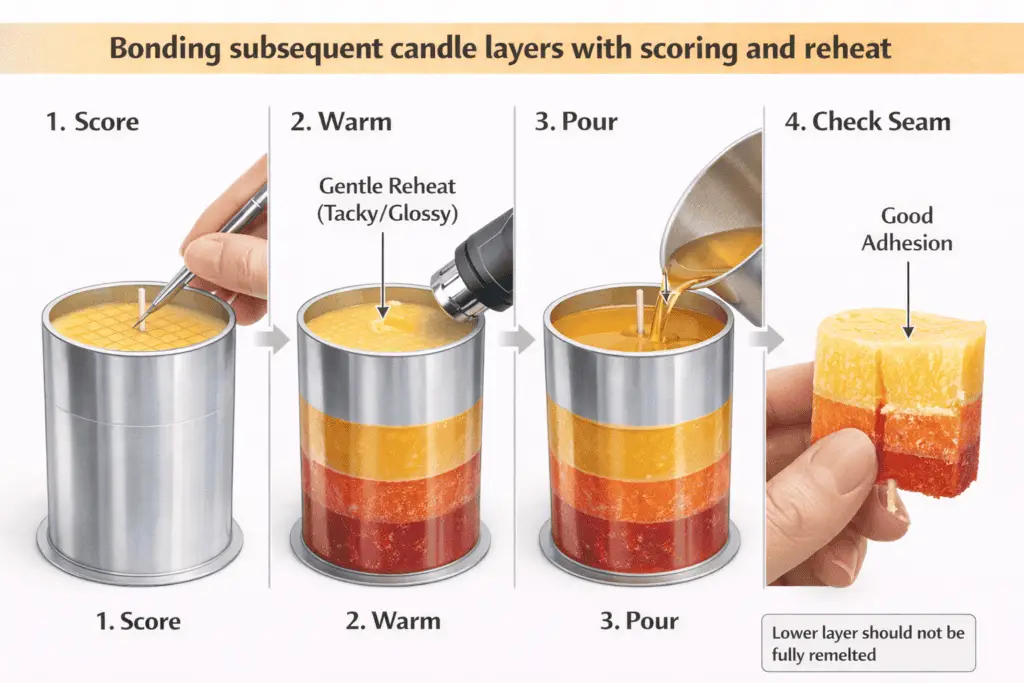
Steps to Bond Subsequent Layers: Score, Reheat and Adhesion Tests
To bond subsequent layers, lightly score the surface, warm it just enough to turn tacky, then pour the next layer and confirm the seam on a test piece if your wax system is new.
This method gives the next pour a better grip than a fully smooth, fully cooled surface. Use it as a controlled bonding aid, not as an excuse to remelt the whole layer below.
Start by planning where you will score and reheat the layer. After confirming the previous band has passed the matte-surface test, use a clean, blunt tool to lightly cross-hatch the top. Keep the marks shallow so you roughen the interface instead of carving trenches, and stay clear of the wick line.
Next, apply gentle, controlled heat. A quick pass with a heat gun on its lowest setting, held at a safe distance, softens the very top of the layer without turning it into a pool. The surface should look slightly glossy and tacky, not fully liquid.
Before adding full height on a large batch, test the same seam-prep method on a short practice pour if your wax system is new. Well-bonded layers should behave like one column, while weak seams can split where the pours met.
A practical sequence for each new band:
- Confirm matte-warm surface and wick alignment.
- Lightly score the surface in a shallow cross-hatch pattern.
- Gently reheat until just tacky and slightly glossy.
- Pour the next layer at your planned, slightly lower temperature.
- Allow to cool and set, then repeat for subsequent bands.
When each interface is lightly roughened, slightly tacky, and tested on a small practice piece when needed, the finished pillar is less likely to separate at the seams.
Steps to Manage Shrinkage, Relief Holes, and a Second Pour
Manage shrinkage by watching for a sink around the wick, poking relief holes when needed, and topping off the mold only after the interior voids have opened.
Most molded pillars pull inward as they cool, and layered candles are no exception. If you skip shrinkage control, the candle can look full on top while still hiding a cavity that weakens the seam and distorts the burn.
Watch the top after the upper layers set. When the wax starts to sink around the wick or pull from the mold wall, poke a few narrow relief holes near the wick so trapped voids can vent, then fill those cavities with a controlled second pour once the candle has settled. This is the same molded-pillar logic used in How to Make Pillar Candles (Molds, Second Pour, Finish), but the key here is to keep the second pour hot enough to level the top without disturbing the layered bands below.
- Let the upper structure cool until the top is firm enough to show the true sink around the wick.
- Poke a few narrow relief holes close to, but not touching, the wick so hidden voids can connect to the surface.
- Warm a small amount of matching wax and top off only the depressed area instead of flooding the whole top.
- Let that second pour cool fully before trimming or demolding.
Do not force the candle out of the mold before this stage is stable. A clean second pour supports the pillar from the center out and reduces hidden seam failure later.
Steps to Demold Without Layer Separation
To demold multi-layered candles without separation, cool them fully, loosen the mold gradually, and support the pillar as it slides free.
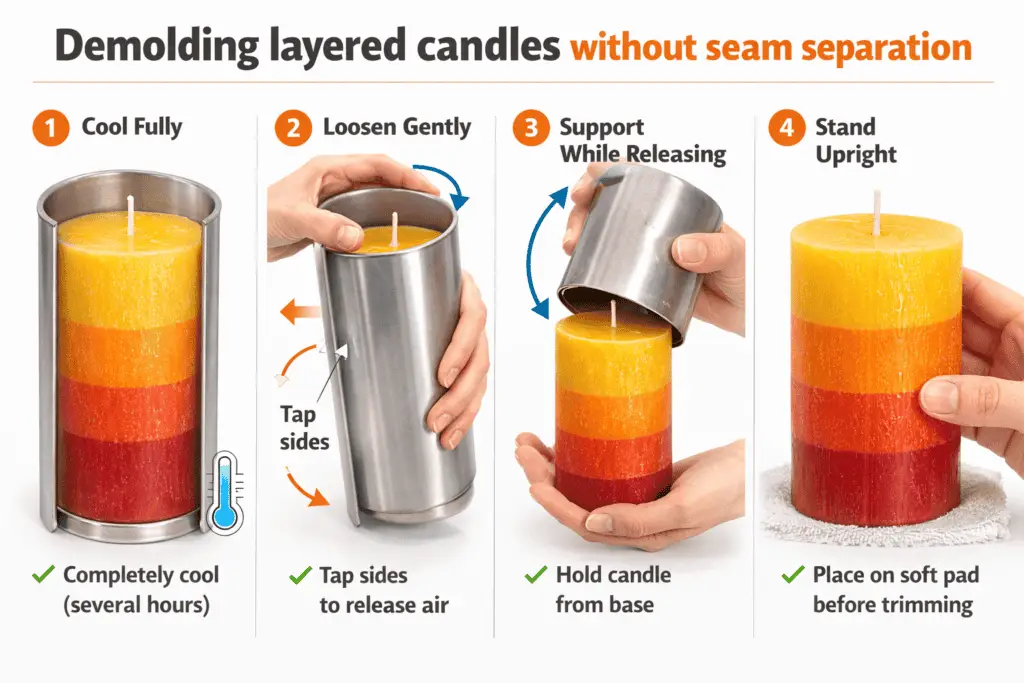
Demolding only works when the candle is fully cool through the center, not just firm on the surface. Many pillar candles need several hours or an overnight rest in the mold, and some blends benefit from even more time before handling or serious burn testing.
Before you release the candle, check for hidden separation lines around the exposed base and sides. Look for faint gaps between layers, unusual frosting bands, or hairline cracks. If you spot them, extend the rest time and review your seam prep before you force the candle out.
When you are confident the candle is fully cool, prepare a gentle release. Flex silicone molds slightly to break surface tension, or tap rigid molds firmly but carefully on a padded surface to loosen the sides. If you need a broader cure reference after demolding, use Cure Time by Wax Type (Chart) as a planning guide and then confirm your own wax system with test burns.
As the candle begins to move, always support the candle during release with one hand underneath while the other guides the mold away. Never let a tall pillar drop out onto a hard surface; the sudden impact can shear layers even if adhesion was good.
A simple demold checklist:
- Confirm the candle is fully cool to the touch on all accessible surfaces.
- Examine seams and exposed areas for visible gaps or cracks.
- Gently flex or tap the mold to loosen the sides.
- Invert and support the candle with your palm while easing the mold away.
- Set the candle upright on a flat, padded surface as soon as it is free.
Handled with patience and support, your pillar comes out cleanly with its stripes intact instead of leaving a ring of broken layers behind in the mold.
Fixing Layer Problems Fast: Bleed, Cracks, Sinkholes and Frosting
Fix layered candle defects by matching the visible symptom to the stage that caused it, then correcting temperature, solvent load, cooling speed, or top-off technique.
A quick lookup works better than a long troubleshooting essay when a batch goes wrong. Use the table below to connect the defect to the most likely cause and the fastest safe fix.
| Symptom | Most likely cause | Fastest useful fix |
|---|---|---|
| Color bleed at the seam | Pours are too hot, dye load is too high, or fragrance load is softening the boundary. | Lower the next pour slightly, reduce dark-dye dosage, keep fragrance closer to the lower end of the supplier range, and rebuild the edge with a clean, lighter repour if needed. |
| Seam split or layer separation | The previous layer was too cold, too smooth, or contaminated before the next pour. | Lightly score the seam, warm it to a tacky surface, and retest on a short sacrificial piece before pouring a full-height candle again. |
| Jump lines or visible step marks | Uneven cooling, a pour that started too late, or a mold that shifted while the layer was setting. | Keep the mold level, standardize the pour height marks, and use the same matte-warm cue for every transition instead of relying on the clock alone. |
| Sinkholes near the wick | Normal pillar shrinkage left a hidden cavity under the top surface. | Poke relief holes, let the void open, and use a controlled second pour to fill the depression without flooding the whole top. |
| Surface frosting | Wax crystals formed during cooling, often after temperature swings or drafty curing conditions. | Cool the next batch more steadily and use a very light heat-gun pass only to tidy the surface, not to remelt the design. |
Steps to Finish and Polish: Trim Edges, Level Base, Restore Sheen
Refine the look and stability of finished pillars by trimming, leveling, and lightly smoothing the surface after the candle has fully cooled.
Finishing should clean up the candle without cutting into the design bands. Work slowly, remove small amounts at a time, and stop as soon as the pillar sits flat and the edges look intentional.
Start with the top and edges. Use a sharp craft knife or heated blade to shave away uneven rims or leftover overpour. Work in thin slices rather than big chunks so you do not cut into the color transitions you just built.
Next, level the base so the candle stands safely. Set the pillar on a sheet of fine sandpaper laid on a truly flat surface, then rotate the candle in small circles and check often so you do not grind past one color band into another.
Finish the surface with restraint. A soft cloth can tidy light scuffs, and a very quick pass with a heat gun can relax minor marks, but too much heat can blur the bands and undo the seam work.