A candle surface finish is the visible outer appearance of set wax, especially its shine level, smoothness, texture, and defect visibility after pouring, cooling, handling, and burning.
Glossy candle finishes look smooth and reflective while matte finishes look soft and velvety, and you steer the look with wax choice, temperature control, and defect prevention.
A candle’s surface can look like polished glass or soft stone, and the difference comes from how wax cools and crystallizes. If you want shine, you’ll usually chase smoother tops, tighter temperature control, and waxes that set with a satin finish. If you want matte, you’ll lean into wax families and cooling profiles that naturally scatter light and hide micro-flaws. Either way, a simple test log beats guessing and helps you match finish to the vibe you’re building.
Glossy vs matte candle finishes: what they are and how they compare
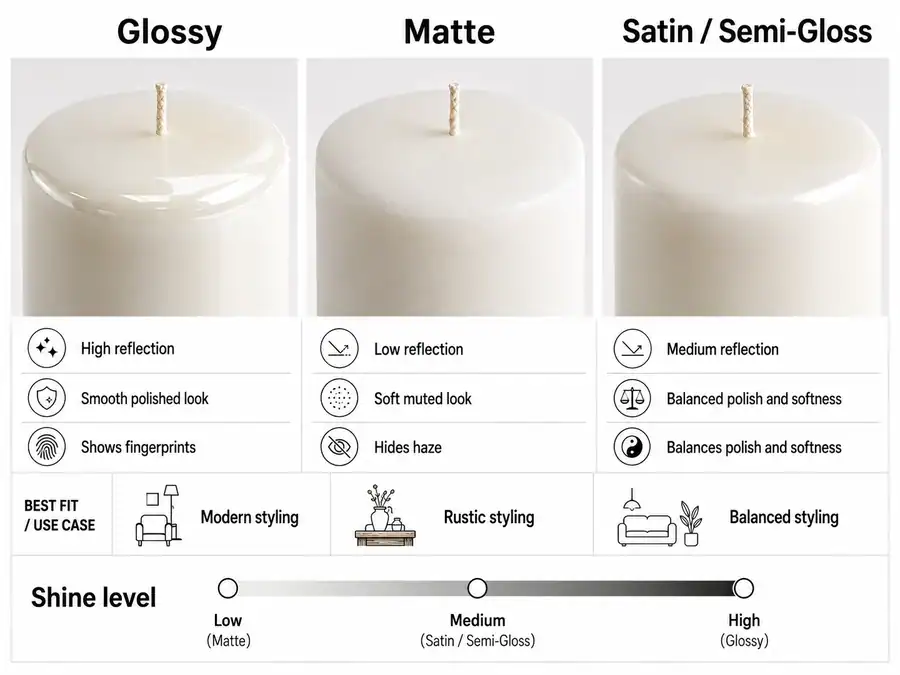
Glossy candle finishes look smooth and reflective, while matte finishes look velvety and low-sheen, and both are shaped by wax, cooling, and handling. Gloss usually fits sleek, modern styling; matte suits rustic, cozy pieces and photographs well.
Satin or semi-gloss sits between glossy and matte: it reflects some light without looking mirror-shiny, so it often works as the practical middle ground when a candle should look polished but not slick.
If you’re starting from scratch, see Candle Making 101, then browse Candle Molds & Shapes to understand how vessel and shape influence the final look.
| Finish | What you notice at a glance | What it tends to show off | What it tends to hide | Common “gotchas” |
| Glossy | Smooth, glassy shine | Clean lines, color depth | Minor texture in darker wax | Fingerprints, scuffs, uneven sheen |
| Matte | Soft, low-sheen surface | Cozy, “natural” vibe | Handling marks (sometimes) | Frosty haze, chalky patches, rough tops |
| Satin / semi-gloss | Gentle sheen, not mirror-like | Balance of polish + softness | Small swirls | Can look “in-between” if the rest of the design is strongly rustic or strongly luxury |
If you’re chasing shine, the biggest levers live in wax choice and blends (see How wax type and blends push your candles toward glossy or matte finishes) and your temperature/cooling choices (see Pour temperature and cooling: how they control a glossy vs matte candle surface). If the surface looks patchy or blotchy, jump to Surface defects that ruin your finish (and how to prevent or fix them).
When glossy tends to be the better call
- You want a crisp, “store-bought” look (especially in clear glass or sleek dark jars).
- Your brand style is modern, minimal, or luxury-leaning.
- You’re making pillars or overdipped styles where a smooth outer shell is part of the point.
When matte tends to be the better call
- You like a soft, cozy, handmade look that feels relaxed rather than polished.
- Your style is rustic, earthy, or “natural,” and a little visual texture won’t bother you.
- You’re working with waxes that naturally read softer and you’d rather embrace that than fight it.
A simple way to compare finishes (without changing everything at once)
- Pick one jar or mold and keep it the same for both tests.
- Use the same fragrance and the same wick type/size for both tests.
- Change just one variable that pushes finish (for example, wax system or cooling conditions).
- Let both candles fully set, then compare in the same lighting: sheen, smoothness, and any haze.
How wax type and blends push your candles toward glossy or matte finishes
Different wax families naturally lean glossy or matte, so choose your base wax by the finish you want before you tweak temperature, wicks, or additives. Paraffin often reads shinier; soy usually reads softer and more matte.
Soy candles can still look satin or lightly glossy with the right blend, vessel, pour temperature, and cooling control, but soy usually leans softer and more matte than paraffin. Paraffin can also be made less glossy through cooler-looking textures, blends, surface handling, or deliberate matte styling, but it naturally has higher gloss potential than most soy systems.
For a deeper overview of wax behavior, see Candle wax types & performance.
| Wax family | Natural “look” tendency | Gloss potential | Matte potential | What commonly affects the surface |
| Soy | Soft, muted | Medium (with good process) | High | Haze/frosting look, room swings, cooling speed |
| Paraffin | Clear, crisp | High | Medium | Shows handling marks; can look “too shiny” if you want rustic |
| Beeswax | Warm, natural | Medium | High | Texture can read as character, or as roughness |
| Coconut / specialty blends | Often smooth, creamy | Medium–High | Medium | Depends heavily on blend and container choice |
| Soy-paraffin blends | Balanced | Medium–High | Medium | Can reduce some “soft” looks while staying less glassy than pure paraffin |

Once your base wax is close, you can fine-tune with fragrance, dye, and additives (see Fragrance load, dyes & additives as gloss/matte modifiers below) and by adjusting Pour temperature and cooling: how they control a glossy vs matte candle surface to push the surface toward a cleaner shine or a softer, velvety look.
Container vs pillar makes the same wax look different
- Containers often make surfaces read flatter because you’re looking at a top and a wall, not a fully exposed pillar.
- Pillars and free-standing shapes make every ripple, scuff, and sheen change more obvious, great for glossy goals, unforgiving for rushed cooling.
How blending changes finish (in plain terms)
- Adding a harder, clearer component often increases how “polished” the surface reads.
- Adding a softer, more opaque component often increases the “cozy” matte feel.
- Blends can also change how visible flaws are: a finish that looks perfect in one wax can suddenly show haze or micro-texture in another.
Quick selection steps for a finish-first wax shortlist
- Decide the look you’re aiming for: mirror-like shine, soft matte, or something in between.
- Pick two candidate wax systems that naturally lean that way (don’t fight physics).
- Run small test pours in the same vessel, in the same room, and compare after full set.
- Keep notes on what you see (sheen, smoothness, haze, and any patchiness) so you can repeat the winner.
Fragrance load, dyes & additives as gloss/matte modifiers
Fragrance load, dyes, and additives can quietly change surface finish by altering how wax crystallizes, how opaque it looks, and whether it stays stable over time. The safest rule is simple: stay within your wax supplier’s recommended fragrance range and treat every “finish helper” as a trade-off you test, not a guarantee.
Fragrance load (FO%) and surface finish
- Higher fragrance loads can make tops look more “wet” or uneven and can increase sweating, seepage, or soft tops if the wax can’t hold the oil.
- Lower loads can make tops set more cleanly, but you still need to confirm the candle performs (hot throw, burn, and melt pool behavior).
- Many wax systems are commonly tested with fragrance loads like 6–10% for some container blends, but the only number that matters is your supplier’s recommendation for your specific wax and application.
Decision-grade approach
- If your top looks oily, sticky, or blotchy after cure, reduce fragrance load within supplier limits and retest before changing temperatures.
- If your candle looks fine but smells weak, do not automatically add more oil; first confirm cure time, wick, and burn conditions, then adjust within the wax’s stated range.
Dyes and perceived gloss
- Darker dyes make haze, frosting, and micro-texture look more obvious, so “matte-looking” wax can appear even flatter in deep colors.
- Very heavy dye loads can change how the wax sets and can make the surface read duller or patchier, especially when the dye isn’t fully incorporated.
- If you’re chasing a clean glossy look, start with lighter dye loads and scale up slowly while keeping the rest of the recipe fixed.
Additives (only if your wax system supports them)
- Hardness/opacity modifiers can change finish: harder, clearer systems often look more polished; softer, more opaque systems often look more matte.
- Some additives are used to improve fragrance binding or opacity in certain wax families, but they can also increase brittleness or change how defects show up.
- If you add anything, change one variable at a time and log the outcome, because additives can “solve” one surface issue while creating another (like cracking, sinkholes, or increased frosting).
One-variable test method (fast and reliable)
- Keep wax, vessel, and wick constant.
- Make three testers with only one change: fragrance load, dye load, or additive percentage (within supplier guidance).
- Cure them the same way and compare in the same lighting after set and again after a burn cycle.
- Record finish notes (glossy / semi-gloss / matte) plus defects (frosting, wet spots, rough top) so you can repeat the winner on purpose.
If finish problems persist even when you’re inside supplier limits, it’s usually a cooling or vessel issue next, see Pour temperature and cooling: how they control a glossy vs matte candle surface and How molds and containers shape a glossy or matte candle finish.
Pour temperature and cooling: how they control a glossy vs matte candle surface
Pour temperature and cooling control whether a candle surface sets smoother and shinier, softer and more matte, or visibly flawed with haze, ripples, sinkholes, or rough tops.
In practice, pour temperature and your cooling profile decide whether wax sets into a smooth, light-reflecting surface or a slightly cloudy, textured one. Supplier-style troubleshooting generally works best when you adjust in small steps, about 5–10°C (or 10–20°F), and then judge the surface after it fully sets.
If you’re diagnosing several variables at once, see Candle troubleshooting to narrow down what changed and why.
Pour-temperature ladder test (a repeatable way to find your “sweet spot”)
- Use the same wax, fragrance, dye, container, and batch size for every tester.
- Pick a temperature ladder (example: four pours, each 5–10°C apart).
- Cool all testers in the same spot, away from drafts and cold windows.
- Log what you see after set and again the next day: shine level, haze, roughness, sink, and any frosting.
- Keep the best-looking temperature as your starting SOP, then refine one step at a time.

Melt temp vs pour temp vs room temp (quick clarity)
- Melt temperature is just “fully liquid.” It’s not automatically the best pouring point.
- Pour temperature is the moment that most strongly shapes the top’s smoothness and the way crystals form.
- Room temperature (plus drafts) decides how evenly the candle cools; uneven cooling often shows up as swirls, ripples, or dull patches.
“Cool and slow” vs “warm and fast” cooling strategies
- Cool and slow (stable room, gentle insulation) often reduces rough tops and helps a consistent sheen form, especially in waxes prone to visible crystallization.
- Warm and fast (hotter pour, cooler room, or strong airflow) can create a skin too quickly, trapping sinkholes or creating a dull, pebbly surface.
A good middle ground is controlling the environment first: steady room temp, no fan blowing across the tops, and consistent placement on a shelf or rack.
Small process levers that change surface finish quickly
- Pre-warm containers so the sides don’t chill the wax on contact; this can reduce abrupt cooling and help tops level out.
- If you need to rescue a minor flaw, use a gentle reheat pass instead of blasting the surface; too much heat can turn “smooth” into “wavy.”
- If your candle looks cratered or tunnels after burning, wick and flame behavior may be the real lever, not pour temperature.
Wick size and flame profile: how they change your candle’s top surface
Sometimes the top looks great after pouring, then gets ugly after the first few burns. Under-wicking can cause tunneling and a sunken center; over-wicking can cause craters, soot marks, and a rough rim. If your finish problems appear after burning rather than right after set, treat it like a burn-performance issue first, then circle back to pour temperature.
When you want repeatable results, treat your batch notes like a lab notebook: a simple log that includes wax, pour temp, room conditions, and observed finish is enough to stop the “why is this batch different?” cycle. For a reusable structure, see Tools and testing templates to dial in your candle’s surface finish.
How molds and containers shape a glossy or matte candle finish
The same wax can look glossy in one vessel and matte in another because mold and container materials change cooling, release, and how light hits the surface.
Rigid, smooth molds tend to produce cleaner lines and a more polished look, while flexible or textured molds can imprint micro-lines that read as matte. Containers also “filter” what you see: clear glass highlights every detail, while frosted or opaque vessels soften the look. If you’re choosing or troubleshooting vessels, see Candle molds & jars.
| Mold / container type | Typical gloss/matte tendency | Defect visibility | Handling notes |
| Silicone mold | Often softer / more matte-leaning | Medium–High | Flexible walls can create tiny drag lines; keep molds clean and fully dry |
| Metal mold | More polish / higher gloss potential | High | Rigid and smooth, but shows flaws clearly; careful demolding matters |
| Polycarbonate mold | Clean lines / can look glossy | High | Great for detail, but any bubbles or lines stand out |
| Clear glass container | “Amplifies” whatever the wax is doing | Very High | Shows wet spots, frosting, and side-wall texture easily |
| Frosted glass container | Softens shine, reads more matte | Medium | Diffuses light; minor surface variation looks more intentional |
| Matte ceramic container | Often reads matte and cozy | Low–Medium | Hides side-wall issues; top surface becomes the main visual |
| Textured jar / vessel | Pushes the look toward matte | Low | Texture can disguise minor flaws but can clash with a high-gloss goal |

How to choose vessels for glossy goals vs matte goals
- For a glossy look, pick smoother, more rigid molds and vessels that don’t hide what’s happening, then focus on perfecting your pour and cooling so the clarity works in your favor.
- For a matte look, frosted or opaque containers can make a softer finish feel intentional, even when the wax is naturally satin rather than mirror-shiny.
If you’re still deciding which aesthetic fits your products, revisit Glossy vs matte candle finishes: what they are and how they compare and choose the default look first, then let the vessel support it instead of fighting it.
Prep steps that reduce surface blemishes
- Wash molds/containers to remove dust, oils, and residue, then let them dry completely.
- Pre-warm vessels when your workspace is cold so the wax doesn’t shock-cool on contact.
- Pour steadily to reduce air pockets and avoid scraping the mold walls.
- Demold only after the candle is fully set; rushing release often creates scuffs or drag lines.
A quick way to test a new container line
- Pour the same wax at the same temperature into 2–3 vessel styles.
- Cool them in the same place and compare the finish after set and the next day.
- Keep the winner, and note it as your “finish-friendly” vessel for that wax.
Once you’re comfortable with basics, shape and vessel choice becomes part of design: sculptural pillars and highly detailed molds can look stunning, but they magnify tiny flaws and may benefit from advanced finishing methods later on (see Advanced finishing techniques: overdips, buffing, glazing and texturing).
Surface defects that ruin your finish (and how to prevent or fix them)
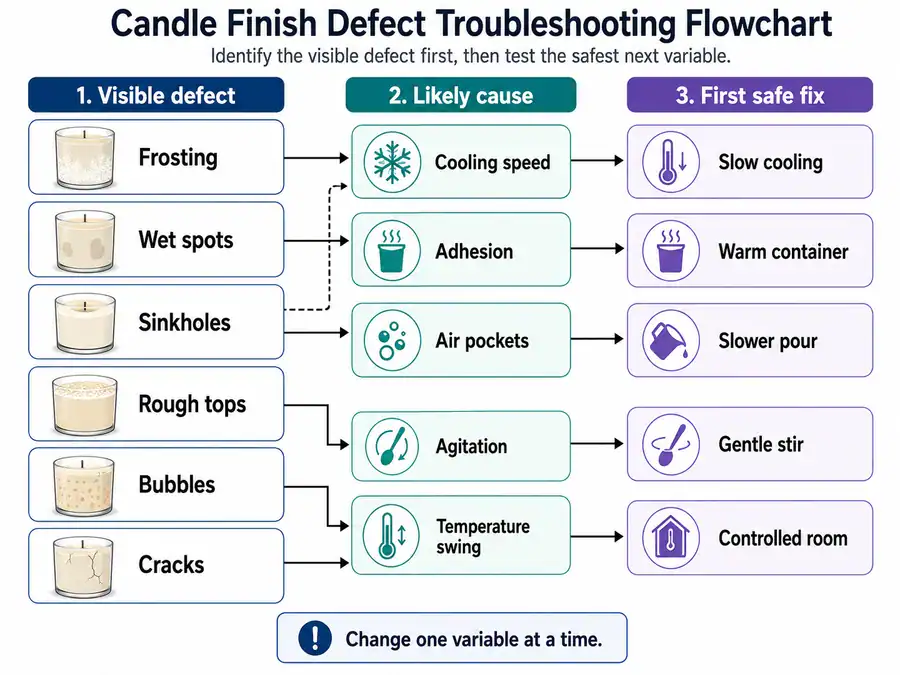
Frosting, wet spots, sinkholes, and rough tops can wreck gloss and make matte look dirty, but most improve with small, repeatable changes. Identify the defect first, then adjust one variable, wax, temperature, container prep, or fragrance, before trying a cosmetic fix.
Yes, defects like frosting and wet spots are common (especially with natural waxes), and you can often reduce them by tightening up cooling, fragrance load, and vessel prep. The aim isn’t perfection; it’s a finish that looks intentional and stays stable over time.
Keep a running troubleshooting log (see Candle troubleshooting); this is where most “why does it look like that?” problems belong.
| Defect | What you see | Most likely cause | First safe fix to try | Escalate when… |
| Frosting | Chalky white crystal haze (often on sides) | Wax crystal structure + cool/uneven cooling | Slow cooling, reduce drafts, try a slightly warmer pour within your wax’s range | It returns every batch in the same wax/FO combo |
| Wet spots | Clear patches where wax pulled from glass | Shrinkage, adhesion, temp swings | Warm the container slightly, pour in a steadier room temp, avoid rapid cool-down | Spots spread with storage temp changes |
| Sinkholes | Dip or crater around the wick | Uneven cooling, air pockets, too-fast set | Pour slower, allow full cool before moving, use a small top-off pour if needed | The crater grows during burns or exposes wick base |
| Rough top | Bumpy, rippled, or “orange peel” surface | Pour temp/cooling mismatch, micro-bubbles | Adjust pour temp, reduce stir/agitation, warm vessel | You keep heat-gunning every batch to “save” it |
| Bubbles | Pinholes or trapped air | Over-stirring, pouring too high, cold vessel | Pour closer to the surface, stir gently, tap container lightly | Bubbles repeat even with gentler handling |
| Cracks | Split lines on top or sides | Rapid cooling, large temp delta | Insulate for slower cool, avoid cold counters | Cracks reappear after repours or storage |
Frosting vs wet spots: which kills “gloss” faster?
Frosting usually kills gloss faster because it dulls the wax surface itself, while wet spots mostly change how the candle looks through the container.
- Frosting tends to flatten shine and can make a clean gloss look cloudy, especially noticeable on darker dyes or smooth containers. If you’re already working through How wax type and blends push your candles toward glossy or matte finishes, frosting is often the “this wax wants to be more matte” signal.
- Wet spots don’t always change the wax surface itself, they change how the candle looks through the container. Clear glass makes them loud; frosted glass can hide them.
A practical rule: when the defect is mostly visual in the container, revisit Pour temperature and cooling: how they control a glossy vs matte candle surface first (room temp stability and cooling speed often matter more than one “magic trick”).
Rough tops vs sinkholes: fix order matters
Fix sinkholes before cosmetic roughness because sinkholes can hide structural voids, while rough tops are usually a surface-setting problem.
- Rough tops are usually a surface set issue. If you “melt it smooth” every time, you may be masking a pour temp or cooling mismatch rather than fixing it.
- Sinkholes are more structural. If the wax contracts and leaves a void, smoothing the top can hide the problem until a later burn reveals it again.
When a defect repeats, treat it like a pattern, not a one-off. That’s where Tools and testing templates to dial in your candle’s surface finish earns its keep, because you can prove whether it’s wax, temperature, vessel, wick, or scent driving the defect.
A calm troubleshooting flow (change one thing at a time)
- Name the defect in plain language (what you see, where it is, when it appears).
- Re-check inputs: wax, vessel, and Fragrance load, dyes & additives as gloss/matte modifiers.
- Re-check conditions: room temperature, drafts, and how fast the candle cools.
- Make one targeted change for the next test (not three).
- Decide the outcome: sellable, seconds, or discard, based on your own standards and customer expectations.
- If the defect hints at burn behavior (deep craters, odd melt pool, soot, jar overheating), jump ahead to Safety and performance limits when you’re chasing a perfect finish before you keep experimenting.
A lot of maker frustration comes from stacking fixes: heat-gun + repour + new FO + new wick, all in the same batch. One change per test is slower, but it tells you the truth.
Tools and testing templates to dial in your candle’s surface finish
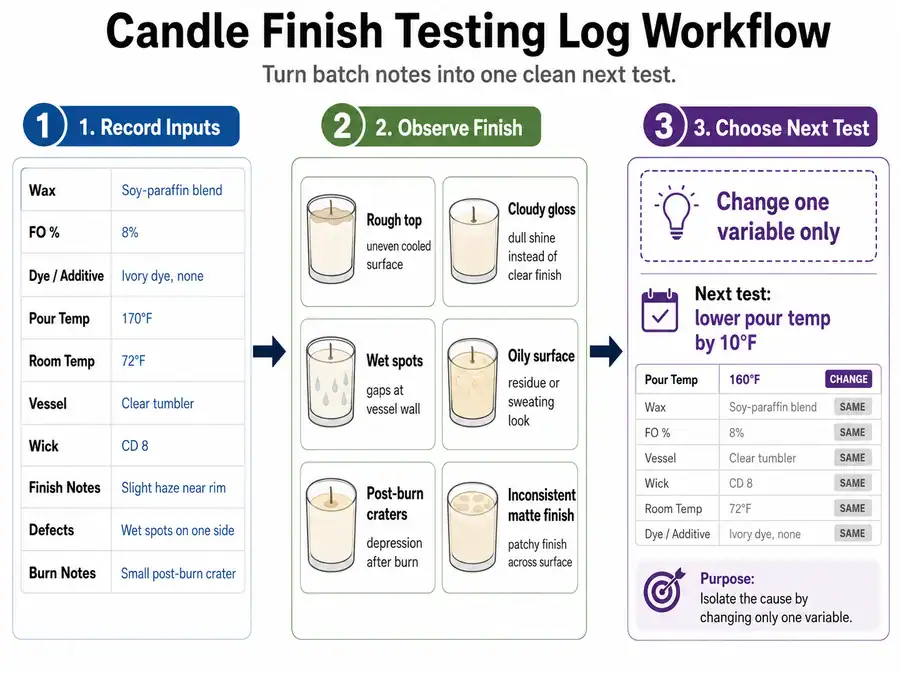
A good testing log captures your wax, additives, temperatures, vessel, wick, and finish notes so you can repeat a glossy or matte result on purpose. Add a pour-temperature ladder and a short burn checklist to spot patterns instead of guessing.
A solid log is simple: it records what you did (inputs + conditions) and what you got (finish + defects + burn notes). If you already keep shop notes, think of Candle testing & safety as the same notes, but in a format you can compare next month.
Core log fields (copy as-is into a notebook or spreadsheet):
| Field | Example entry | Why it matters for finish |
| Date / Batch ID | 2026-01-07 / Batch 03 | Lets you compare seasons and room conditions |
| Wax | Soy blend | Some waxes frost more than others |
| FO % | 8% | Higher load can push sweating/dullness (within supplier limits) |
| Dye/Additive | none | Color and additives can shift sheen |
| Pour temp | 135°F (or 57°C) | A key driver of smooth vs textured tops |
| Room temp | 70°F (or 21°C) | Cold rooms can exaggerate defects |
| Vessel | clear glass | Makes wet spots and haze more visible |
| Wick | size X | Changes melt pool and top re-melt behavior |
| Finish notes | semi-gloss, slight haze on side | Your output for this topic |
| Defects | minor frosting | Links directly to troubleshooting |
| Burn notes | stable flame, clean melt pool | Tells you if “pretty” is also safe |
After you record the batch, use the result to choose only one next test. This keeps finish work controlled instead of turning every batch into a mix of wax, fragrance, wick, and temperature changes at the same time.
| Logged finish result | Likely next variable to test | One-change rule for the next batch | Do not change yet |
| Top is rough, rippled, or pebbly after set | Pour temperature or cooling speed | Run the same wax and vessel again with one small pour-temperature adjustment or steadier cooling. | Do not change wax, fragrance load, wick, and vessel in the same test. |
| Gloss looks cloudy or frosted | Wax behavior, room temperature, or cooling conditions | Keep the recipe fixed and test slower, more even cooling away from drafts. | Do not assume dye or fragrance is the cause until cooling is controlled. |
| Wet spots show through clear glass | Container temperature, adhesion, or cooling swing | Repeat the same formula with cleaner, slightly warmed containers and steadier room conditions. | Do not treat wet spots as the same problem as surface frosting. |
| Surface looks oily, sticky, or blotchy | Fragrance load or formula compatibility | Retest within the supplier’s fragrance range and reduce only the fragrance variable first. | Do not add more heat or extra additives before checking fragrance load. |
| Finish looks good before burning but craters or soots after burning | Wick and flame behavior | Keep the finish process fixed and test wick performance before changing the surface recipe. | Do not keep chasing shine if the candle is failing burn behavior. |
| Matte finish looks intentional but inconsistent between batches | Repeatability of cooling, vessel prep, and handling | Repeat the same process with tighter notes on room temperature, vessel prep, and handling marks. | Do not redesign the recipe until the process is repeatable. |
If two rows seem to fit, choose the row that matches when the problem first appears: after pouring, after full set, after handling, or after burning. The earlier timing usually points to wax, temperature, cooling, or vessel prep; problems that appear after burning usually point back to wick and flame behavior.
This table does not prove the cause of a finish problem. It only chooses the cleanest next test. Keep supplier limits, burn testing, and safety checks above appearance, especially when changing fragrance load, additives, coatings, or wick behavior.
If the same defect repeats after one controlled test, route the problem to a dedicated candle troubleshooting guide rather than adding more finish variables to the same batch.
Manual notes vs structured template
A notebook can work, but a template helps you compare batches without rewriting your whole process.
- A manual log captures stories (“looked weird, fixed it”).
- A structured template captures variables (“same wax, FO %, and jar, only pour temp changed”), which makes cause-and-effect clearer.
This also keeps your finish work tied to the technique levers: How wax type and blends push your candles toward glossy or matte finishes (recipe), Pour temperature and cooling: how they control a glossy vs matte candle surface (process), and wick behavior (see Wick size and flame profile: how they change your candle’s top surface).
A pour-temperature ladder that actually teaches you something
Instead of “one test candle,” run a tiny ladder:
- Pick one wax + one FO % + one container + one wick.
- Pour 3–4 candles at different pour temps inside the wax’s suggested window (small steps like 5–10°F / 3–6°C).
- Keep cooling conditions steady (same room, same surface, same distance from drafts).
- Photograph the top and sides at the same time point (for example: 24 hours after pour).
- Record finish descriptors the same way every time (glossy / semi-gloss / matte; smooth / hazy / frosted).
That single-batch guess tells you almost nothing; a controlled ladder gives you a direction.
A basic burn checklist (finish + safety together)
A candle can look perfect and still burn poorly, so pair appearance notes with burn notes. Safety groups like the National Candle Association emphasize following standard safety practices and paying attention to candle safety labeling/standards.
- Wick trimmed to the same length each time
- Flame behavior noted (steady vs dancing, soot present or not)
- Melt pool shape and depth noted
- Container heat checked carefully (especially near the rim)
- Top surface after cool-down noted (did it crater, frost, or stay smooth?)
If a finish change increases cratering, soot, or jar heat, treat that as a stop sign and fold the lesson into Safety and performance limits when you’re chasing a perfect finish before you keep pushing the look.
How the log ties defects to fixes
When a defect shows up, your log turns “maybe it was the weather?” into a real clue:
- If frosting spikes only on cooler room days, you have a cooling control issue.
- If wet spots track with one jar line, it’s likely vessel/adhesion behavior.
- If rough tops appear only with one fragrance, it points back to Fragrance load, dyes & additives as gloss/matte modifiers.
When you need a quick diagnosis reference, pair this with Surface defects that ruin your finish (and how to prevent or fix them) so you can record “what fixed it” next to “what it was.”
Safety and performance limits when you’re chasing a perfect finish
A perfect candle finish is never worth exceeding fragrance limits, overheating wax, or ignoring jar heat and flame behavior during burn tests. Follow supplier max load guidance, reheat gently, and verify with a logged burn test.
Here, “safe” means the candle still burns within acceptable performance limits: controlled flame behavior, no repeated soot problem, no unsafe container heat, no unstable coating behavior, and no formula change that exceeds supplier guidance. It does not mean the candle is automatically non-toxic, legally compliant in every country, or suitable for sale without testing.
When in doubt, treat Candle safety & compliance as the floor you don’t step below. Use the burn-test checklist you already set up in Tools and testing templates to dial in your candle’s surface finish so “safe” and “pretty” get evaluated together, not separately.
| Guardrail | What can go wrong when you push for finish | What to do instead (and log) |
| Supplier max fragrance load | Sweating, poor burn, higher soot risk, unstable wax texture | Stay at or below the supplier limit; record FO %, wax, and any surface changes |
| Flashpoint awareness (wax + fragrance) | Risky heating habits and false confidence about “safe temps” | Use supplier data sheets as references; avoid overheating and open-flame heating for wax |
| Reheating and “fixing” tops | Over-thinning the top, creating sinkholes, or scorching wax | Use minimal, gentle surface smoothing; note the method and outcome so you don’t repeat a bad fix |
| Wick and flame behavior | Tall flames, mushrooming, sooting, and overheating containers | Adjust wick choice rather than “forcing” the recipe for gloss; record flame notes alongside finish notes |
| Container heat | Hot-to-touch containers, label damage, and unsafe handling | Treat excessive jar heat as a hard fail; change wick, vessel, or formulation before scaling |
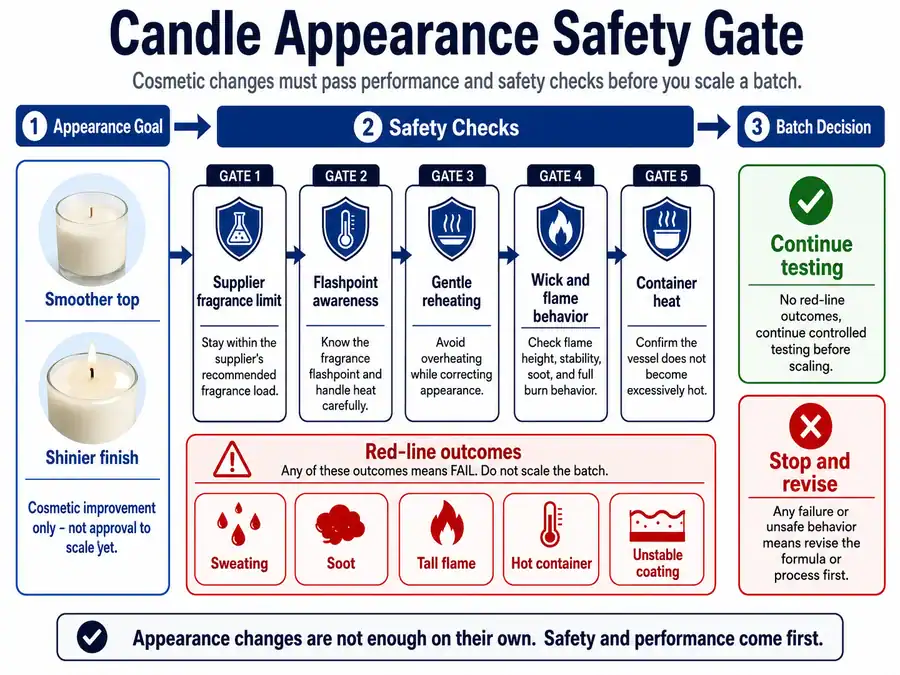
A key mindset shift: surface finish is a cosmetic target, but it lives inside performance. If you see repeat sooting, very high flames, or container overheating, the candle has failed, no matter how smooth the top looks.
What a safe burn test looks like at a high level
- Set up on a stable, heat-safe surface with clear space around the candle and no drafts.
- Burn in consistent sessions, checking the melt pool shape, flame stability, and container heat each time.
- Let the candle cool fully between sessions, then inspect the top surface again (cratering, frosting, rough rims).
- Document every change you make, wax, FO %, wick, vessel, pour conditions, so you can trace which tweak caused the improvement or the failure.
Some “finish defects” are purely cosmetic, but some are smoke signals for performance issues. If a rough rim turns into cratering, tunneling, or soot after a few burns, return to Surface defects that ruin your finish (and how to prevent or fix them) and treat it like a burn-behavior problem first.
Red lines to write into your own log
- Never exceed the supplier’s fragrance recommendations to chase stronger scent or a shinier top.
- Never ignore signs of unsafe burning (soot, very high flames, overheating containers) just because the candle photographs well.
- If you sell candles, learn the candle fire-safety standard landscape in your region; in the US, ASTM F2417 is a key reference standard for candle fire safety requirements and testing.
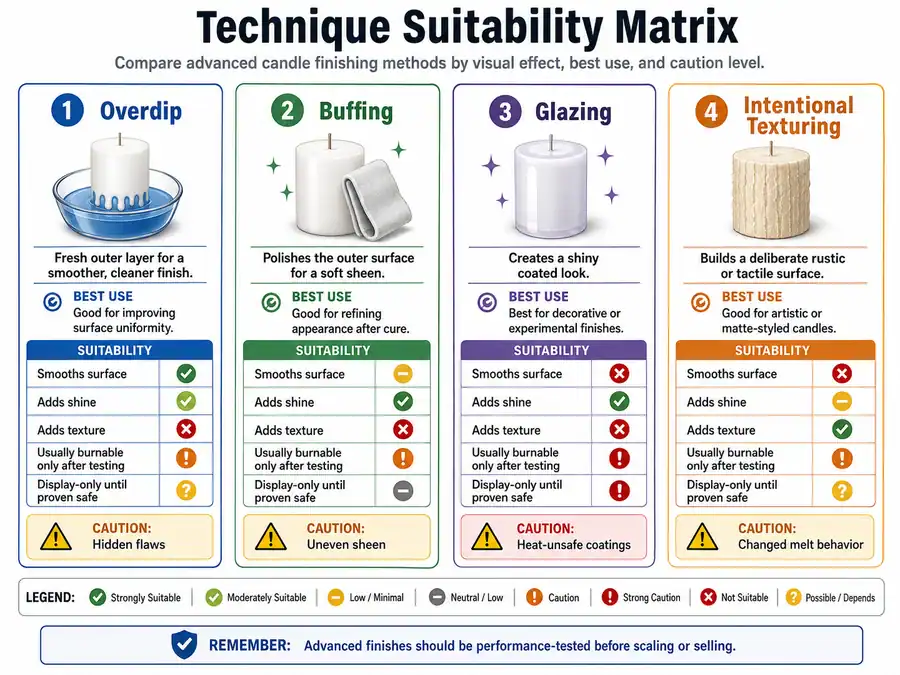
Advanced finishing techniques: overdips, buffing, glazing and texturing
Advanced finish tricks can increase gloss or texture, but they only belong on a stable recipe that still burns safely. Start with small batches, choose techniques that match your candle type, and treat any coating as display-only until proven safe.
Keep your experiments organized under Advanced candle design & finishes so you can compare durability, appearance, and burn performance without relying on memory.
| Technique | Best for | Burn vs display suitability | Key cautions |
| Overdip (clear wax dip) | Pillars, sculptural candles | Usually burnable if the base candle is already safe | Can hide flaws but also hide problems; confirm wick performance after dipping |
| Buffing / polishing | Pillars and hard waxes | Usually burnable if you don’t add coatings | Easy to overdo and create uneven sheen; work gently and evenly |
| Glazing / varnish-style finish | Decorative pillars, display pieces | Often best treated as display-only until proven safe | Use only products intended for the purpose; many coatings are not heat-safe |
| Deliberate texturing | Pillars, rustic styles, artistic finishes | Depends on technique and materials | Texture can change melt behavior and drip patterns; test before repeating |
A useful rule: if the technique adds a new material to the outside of the candle, assume it changes both safety and burn behavior until testing proves otherwise. That’s why Safety and performance limits when you’re chasing a perfect finish stays “in the room” for every advanced method.
Overdips: how they smooth and shine
Overdipping can give pillars a cleaner silhouette and a more uniform sheen by creating a fresh outer shell. It’s most effective when the candle is already close to smooth and you’re using the dip to refine, not to rescue a fundamentally flawed pour.
If you’re overdipping to disguise blemishes, check the root cause first in Surface defects that ruin your finish (and how to prevent or fix them); otherwise you may keep repeating the same underlying issue.
Buffing and micro-sanding: controlled polishing, not “scraping”
Buffing can lift the finish from dull to satin or glossy on certain hard waxes, especially on pillars with shallow marks. Start gentle, work evenly, and stop early, because aggressive abrasion can create patchy sheen that looks worse than the original flaw.
Glazing and coating products: treat as high risk by default
Coating availability and labeling vary by region, and product instructions always override generic tips. If you use any glaze, lacquer, or spray, follow the manufacturer’s directions exactly and treat the result as display-only until you’ve verified safe behavior with careful testing.
The easiest way to stay organized is to log advanced methods like any other variable in Tools and testing templates to dial in your candle’s surface finish, what you used, how you applied it, and what changed after curing, handling, and (if applicable) burning.
Intentional texture: making “matte” look designed
Texture can make a candle feel artisanal and can visually hide minor flaws, but it also changes what a customer sees up close and how the candle behaves as it melts. When texture is the goal, aim for repeatable patterns rather than accidental roughness.
Storing, handling and packaging to protect your candle’s finish
Even a perfect pour can lose its look through fingerprints, dust, and temperature swings. Glossy surfaces tend to show handling marks and scuffs faster, while matte surfaces can pick up rub marks or look cloudier if they’re repeatedly touched.
Practical habits that protect both finishes:
- Handle candles with clean, dry hands and avoid rubbing the surface.
- Keep finished candles covered to reduce dust and micro-scratches.
- Store in a stable, cool area away from direct sun and rapid temperature changes.
- For products that ship, protect the candle so it can’t rotate and scuff against packaging.
Choosing glossy vs matte finishes for your brand and product line
Choose glossy when you want a sleek, high-end, polished impression, and choose matte when you want a soft, natural, or handcrafted impression, then make the finish consistent across your line (or consistent by collection). A practical way to decide is to match finish to your brand story, your vessel and label choices, and how the candle will be seen in photos and on shelves.
If you want a broader plan beyond one product, keep a simple reference page like Branding & positioning for candle businesses so new launches don’t drift into a different look by accident.
| Brand style / archetype | Suggested finish | Typical vessels | Label / packaging cues | Example photo style |
| Luxury / premium | Gloss or high satin | Clear glass, metallic, sharp-edged forms | Foil accents, clean typography, minimal clutter | Strong contrast, reflective props (stone, metal) |
| Natural / eco | Matte or soft satin | Ceramic, frosted glass, earthy tones | Uncoated paper feel, muted colors, ingredient restraint | Diffused daylight, linen/wood props, soft shadows |
| Rustic / cozy | Matte | Stoneware, textured vessels, warm neutrals | Hand-drawn cues, kraft tones, simple wrap | Warm indoor light, lived-in setting, cozy styling |
| Minimalist | Satin-leaning matte or controlled gloss | Simple cylinders, monochrome | High whitespace, tight type system | Clean backdrop, low clutter, consistent angles |
| Playful / bold | Either (choose one rule) | Colorful glass, novelty shapes | Bright color blocking, strong icons | High-saturation styling, crisp lighting, fun props |
Once you pick a direction, test it like a buyer would: photograph two mockups in your actual listing lighting, then compare which one reads more intentional at thumbnail size and at arm’s length. Research on surface gloss and product perceptions shows that gloss vs matte can influence “premium” impressions in some contexts, so it’s worth testing with your audience and your photography style rather than assuming one is always better.
Finally, keep claims separate from aesthetics: if you plan to use terms like “eco,” “natural,” or “non-toxic,” verify local rules and labeling expectations where you sell, because finish alone doesn’t support those claims.
