Mix candle additives by melting wax, cooling to the right add-in temperature, weighing doses, stirring for 60 to 120 seconds, and pouring at the wax’s pour temperature to prevent separation, specking, and scent loss.
On this page, candle additives means formula-level ingredients mixed into wax, such as fragrance, color, and performance additives, and safety means heat, ventilation, and ignition handling during mixing, while decorative embeds and broader toxicology, labeling, or compliance topics stay outside scope.
The biggest additive problems, oil sweating, dye specks, and weak throw, usually come from adding at the wrong temperature or mixing too briefly. Wax changes fast as it cools, so a few degrees too hot can mute delicate notes while a few degrees too cool can leave streaks and poor binding. A thermometer, a scale, and a simple timing habit make batches easier to repeat. Below you’ll see practical temperature windows, ratio math, order of operations, and safety checks that keep fragrance, dyes, and other enhancers dispersed.
How to hit add-in temperatures by additive type (°C/°F chart)
Add each additive within its recommended temperature window, then stir long enough to fully disperse it before you pour.
If you want a quick way to organize your process, start by grouping additives, oil-based, solid colorants, and performance additives, so you can see additive families that behave similarly in wax and compare them on the candle additives and enhancers hub.
For a quick additive-family reference before you adjust your formula, review common additives used in candle making so the process stays tied to the additive’s actual job.
A common mistake is treating flash point like an add temperature, when it is really a safety data point and not a mixing instruction.
In practice, the goal is simple: hot enough for solubility and binding, cool enough to protect delicate scent notes and avoid streaking.
Here’s a practical starting-point chart. Supplier guidance wins if it conflicts.
| Additive type | Typical add-and-mix range | Notes |
|---|---|---|
| Fragrance oil (FO) | 55 to 85°C / 130 to 185°F | Add cooler when you’re chasing top notes, add warmer when wax is thicker |
| Essential oils (EO) | 50 to 75°C / 120 to 170°F | Often benefit from the lower end to reduce aroma loss |
| Liquid dye | 60 to 85°C / 140 to 185°F | Too cool can leave faint swirls or uneven color |
| Dye chips / blocks | 75 to 95°C / 170 to 205°F | Need more heat to fully dissolve, stir longer |
| UV inhibitor / polymers | 80 to 95°C / 175 to 205°F | Dissolve best hotter, add before cooling too far |
Calculate additive ratios by wax weight, not by volume. Multiply your wax weight by the supplier’s recommended rate, then weigh that amount on a scale before you add it.
- Weigh the wax only, before you add fragrance, dye, or performance additives.
- Convert the supplier percentage to a decimal and multiply it by the wax weight.
- Example: if a supplier recommends 6% fragrance oil for 500 g of wax, add 30 g of fragrance oil.
- Keep dyes and performance additives within their own supplier ranges instead of copying the fragrance percentage.
If you are still deciding scent type and behavior, it helps to choose scenting approach, FO vs EO vs blends, before you lock in temperatures.
If sweating or weak throw keeps showing up, understand fragrance load so you are not trying to temperature-fix an over- or under-dosed batch.
A simple way to stay consistent is to re-check temperature right after adding a room-temperature oil, because it can drop the wax a few degrees fast.
As a mixing baseline, aim for steady stirring for 90 to 120 seconds, scraping the sides and bottom so nothing rides on the surface.
If you see dye specks or mica clumps later, the fix is usually slightly hotter plus longer stir, not more color.
How to time additives by wax family (soy, paraffin, beeswax, coconut)
Time additives after the wax fully melts, then add during a brief cooling phase so they bind before crystals set.
For a clean workflow, review additive timing as a melt → temper → add → stir → pour rhythm rather than a single magic temperature.
Soy, paraffin, beeswax, and coconut blends all thicken and crystallize differently, so the same additive can behave perfectly in one wax and separate in another.
That is why a short tempering pause matters. It brings the wax into a narrower viscosity zone where additives disperse instead of floating or streaking.
Use this cheat sheet to pick a reliable timing window:
| Wax family | Best stage to add FO/color | What goes wrong if too early | What goes wrong if too late |
|---|---|---|---|
| Soy | After a short cool-down | Frosting and muted top notes | Streaks, jump lines, poor bind |
| Paraffin | Slightly hotter than soy | Volatile loss, possible shrink issues | Surface mottling, uneven color |
| Beeswax | Warm, but not scorching | Darkening and aroma loss | Poor dispersion, bloom-like haze |
| Coconut blends | Often earlier than soy | Overheating can thin scent profile | Patchy color and separation |
If wax family is changing your results, use when to add fragrance by wax type for deeper timing guidance and how to fix additive problems in candle appearance when the result looks wrong after cure.
Steps: melt → temper → add → stir → pour
Follow a consistent sequence, melt, temper briefly, add, stir, then pour at your target temperature, so additives dissolve, bind, and stay evenly distributed as the candle sets.
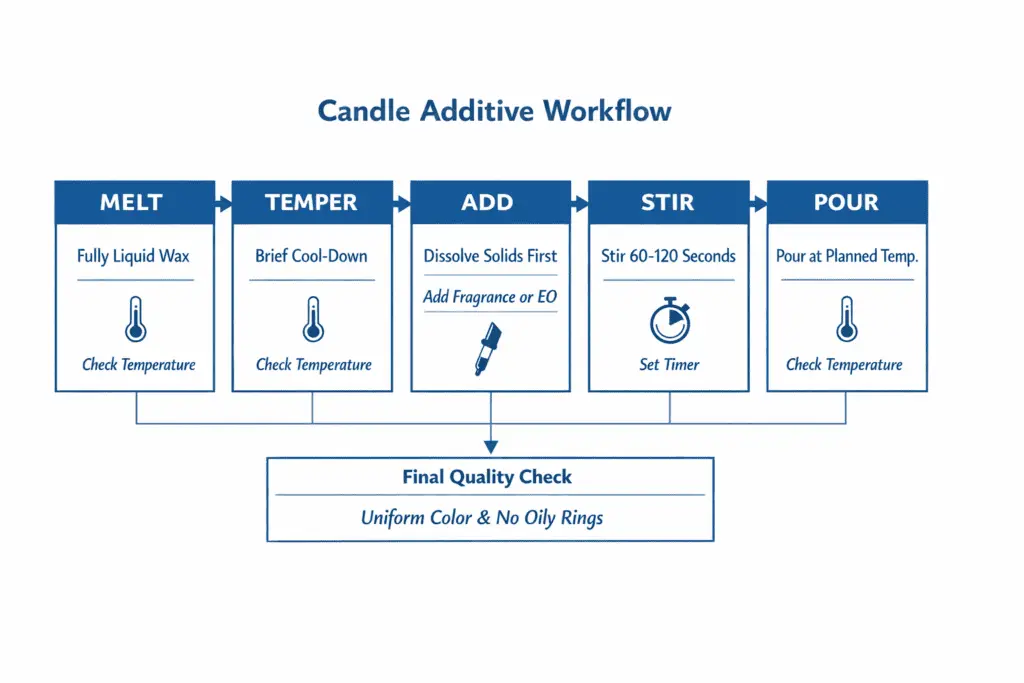
It helps to see additive workflow as a repeatable chain, because most mystery defects come from skipping a step or swapping the order when you are in a rush.
To stay on the safe side, follow your wax and additive supplier instructions, often summarized in their SDS and tech sheets, and keep heat, ventilation, and ignition control consistent from batch to batch.
Once you treat order as non-negotiable, you will get fewer surface surprises and more consistent scent and color from batch to batch.
When you are using more than one additive type, add what needs the most heat to dissolve first, then add fragrance or essential oil later in the cooling curve before you pour.
Melt to a fully liquid working state
Melt the wax until it is completely liquid and visually uniform before you add any additive that needs full contact with the wax.
- Heat until all flakes or pastilles are completely melted and the pot looks uniformly clear, with no soft islands stuck to the bottom.
- Stir once or twice during melting so the temperature is even throughout the pot.
Temper with a short, controlled cool-down
Temper the wax by letting it cool into the add window so additives enter fluid wax without the excess heat that can mute scent or raise streaking risk.
- Remove from heat and let the wax fall into your add window rather than adding everything at peak heat.
- Tempering is the moment where wax becomes friendlier to mixing. It is fluid enough to dissolve, but not so hot that you drive off delicate scent notes or encourage streaks later.
Add what must dissolve first, when relevant
Add solids or performance additives that need more heat first, while the wax is still fluid enough to dissolve them evenly.
- If you are using dye chips, blocks, or performance additives that need extra heat to dissolve, add them while the wax is still comfortably fluid and mix until the wax looks uniform.
- Liquid dyes and fragrance usually perform better a bit later in the cooling curve.
Add fragrance, or EO, and mix for full incorporation
Add fragrance oil or essential oil later in the cooling curve, then stir until the surface and color stay uniform with no oily ripples.
- Pour additives slowly down the side of the pot, not splashing onto the surface, then stir long enough to fully bind.
- Watch the surface. A smooth, consistent sheen beats swirls or oily ripples.
- If cold fragrance oil is noticeably thick, warm the sealed bottle briefly in lukewarm water, dry it, and add it at your normal add-in window instead of heating it directly.
Pour at your planned pour temperature
Pour only after the additives are fully incorporated and the wax has reached your planned pour temperature.
- Container pours and pillars do not behave the same. If you plan pillar molds, expect different pour timing and cooling behavior than jars.
- Pour steadily to reduce trapped air and uneven cooling.
Quick quality checks before you commit the pour: the wax looks uniform edge to edge, color is even, and you do not see oily rings clinging to the pot walls. If something looks off, adjust before you pour. Re-warm slightly and mix again is often easier than trying to fix additive-related defects after the candle has set.
How to stir, and how long, for proper binding
As a practical baseline, stir gently for 60 to 120 seconds, longer for bigger batches, scraping the sides and bottom, and avoid forming a deep vortex that pulls air into the wax.
If you want a reliable baseline, see mixing guidance as steady fold plus scrape rather than fast whisk, because speed can add bubbles without improving dispersion.
Under-mixing leaves pockets, dye specks and scent streaks, while over-aggressive mixing can trap air and slightly dull delicate top notes.
The goal is even distribution with minimal aeration. Think smooth, controlled movement, not froth.
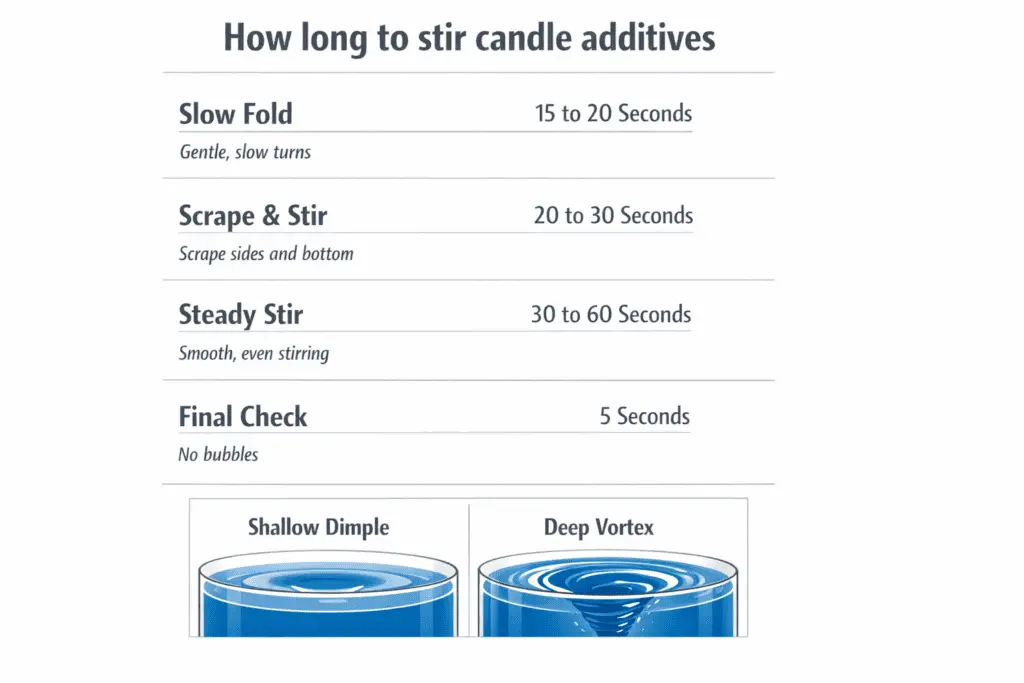
A simple gentle-stir standard: the surface should show a shallow dimple, not a funnel. If you can see a whirlpool down into the pot, slow down.
Treat the mix as fully incorporated only when the wax looks uniform edge to edge, with no oily shimmer, color marbling, or particles clinging to the sides or bottom.
Try this repeatable hand-stir routine:
- Start with a slow fold for 15 to 20 seconds to pull additives through the wax without splashing.
- Scrape the sidewalls and base for 20 to 30 seconds so nothing clings where it can later streak.
- Steady stir to finish for 30 to 60 seconds while keeping the surface calm.
- Final check for 5 seconds. The wax should look uniform, with no oily shimmer or color marbling.
Tool choice matters mostly for consistency, not power. A silicone spatula gives excellent wall contact, while a spoon can miss the corners. If you are unsure what fits your pot and batch size, choose mixing tools based on whether they can scrape the base cleanly.
If you use a stir plate, keep RPM low enough to prevent a vortex. The best setting is the one that moves the whole pot gently.
If bubbles appear, pause for a couple of minutes, then do a short scrape-and-fold finish. Do not beat the bubbles out.
When you are troubleshooting, match additive to workflow. Powders and pigments need a different incorporation strategy than oils, and thick wax needs more contact time than thin, hot wax.
How to ensure solubility and pre-dissolve dyes, micas, and powders
Pre-slurry powders in a compatible carrier, add them while wax is still fully fluid, then stir gently until the wax looks perfectly uniform to prevent clumps, specks, and settling.
A reliable pre-slurry method
Make a smooth slurry before the powder touches the wax so the colorant wets evenly instead of forming dry clumps.
- Put the powder in a small cup or beaker.
- Add just enough fragrance oil or a compatible liquid carrier to make a smooth, pourable paste with no dry pockets.
- Smear the paste against the cup wall with a spatula to crush any remaining grains.
- Add the slurry slowly into the wax and stir with steady folds, scraping the bottom and sidewalls.
If you need deeper color-specific troubleshooting, learn how to color candle wax without clumps instead of expanding this page into full dye or mica problem diagnosis.
What to know about flash point vs add temperature (safety and volatility)
Flash point tells you when vapors can ignite under test conditions. It is not the temperature you should add fragrance to wax.
On this page, safety means controlled heat, ventilation, and ignition handling during mixing, not broader toxicology or labeling questions. Use supplier add-temperature guidance for mixing decisions, then see what flash point means in candle making for the full SDS-based handling explanation.