
Embedding botanicals and objects is safest when decorations stay outside the flame and melt pool, you choose stable formats like container shells or wickless designs, and you burn-test every new design before gifting or selling.
On this page, “safe” means lower fire and burn-behavior risk during normal candle use. It does not mean every embed is fireproof, legally approved for sale, covered by insurance, safe for every container, or safe without full burn testing.
Here, embedded objects means decorative inclusions placed in or on candle wax, such as dried flowers, herbs, petals, crystals, stones, shells, charms, glitter, paper, wood, or similar add-ins. It does not mean fragrance oil, dye, wax additives, wicks, containers, labels, or normal candle-making supplies.
Do not gift or sell an embedded candle design just because one sample looked fine once. Treat every new embed layout as a new burn system that must pass repeated full-life testing before it is shared with anyone else.
Botanicals and little objects can make a candle look like a tiny terrarium, but they also change how flame, heat, and wax behave. Even a fully dried petal can scorch once it drifts into the melt pool, and some “cute” add-ins can crack glass or create a second flame. Safer designs keep decorations in a stable outer zone, rely on the simplest burn core possible, and treat every new idea as a prototype that must earn its burn time. With a few rules, the right format, and disciplined testing, you can get the look without gambling on unpredictable burns.
- Core Fire-Safety Principles for Embedded Botanicals and Objects
- Choosing Safe Candle Types and Waxes for Embedded Designs
- Preparing Botanicals and Porous Materials Safely
- Placing Botanicals and Objects Safely Around the Wick and Melt Pool
- How to Burn-Test Embedded Candles Safely
- Safety & Testing Tools for Embedded Candles
- Troubleshooting Problems with Embedded Botanicals and Objects
Core Fire-Safety Principles for Embedded Botanicals and Objects
The safest embedded-candle designs keep anything flammable or heat-reactive out of the flame path and out of the melt pool for the entire burn.
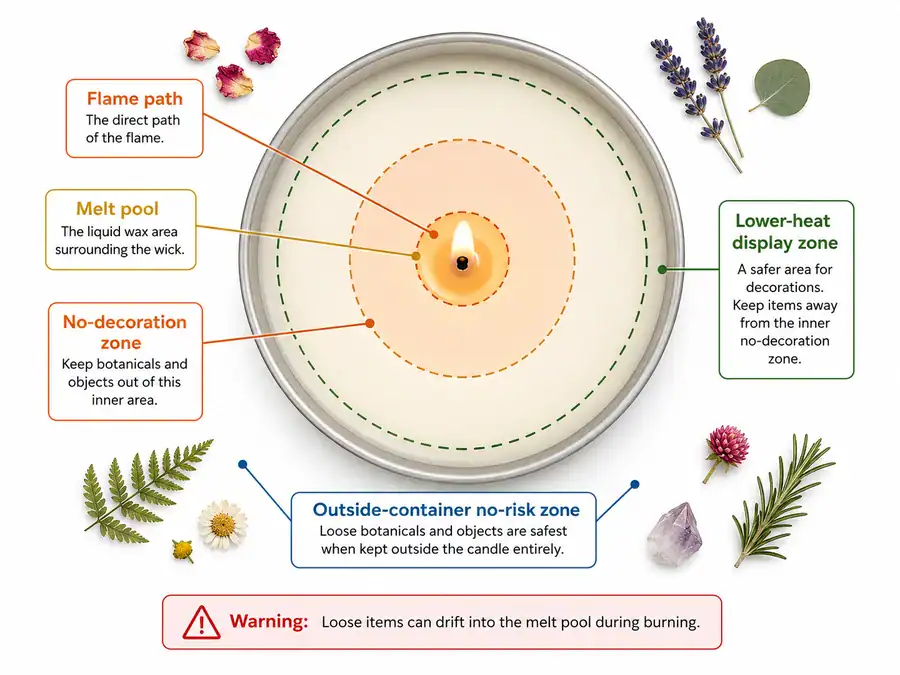
Think in zones: the wick-and-melt-pool area is the no-decoration zone, the upper jar walls are a lower-heat display zone, and everything outside the container is the no-risk zone. If an add-in can drift, float, tip, or fall, assume it will eventually reach the no-decoration zone. That’s when scorching, extra smoke, or a sudden flare-up becomes likely.
Use three simple rules before you ever light a test candle:
- Keep the burn core boring. One centered wick, clean wax, and no loose bits anywhere near the wick.
- Choose structure over sprinkles. Fixed outer shells and sidewall bands beat “confetti” botanicals that can migrate.
- Prototype like you mean it. Burn-test every new combination of wax, wick, container, fragrance load, dye, and embed style across multiple sessions, watching for soot, overheating, or movement.
If you want a broader foundation for safe habits, start from Candle Safety 101: Safe Home Fragrance Basics and apply those same fundamentals here with stricter keep-out boundaries. Because embeds can change airflow and fuel, wick choice matters more than usual – cross-check against Wick Size & Flame Height Guide before you decide a candle is “fine.” And because decorative elements can trigger late-stage failures, treat your final review like a launch checklist using General Container Candle Safety Checklist.
A pretty candle is a bonus; a predictable burn is the requirement.
Use this quick decision gate before choosing a wax, wick, mold, or decoration layout. If an idea fails here, do not try to rescue it with a different pour temperature or shorter burn time.
| Decision question | If yes | If no | Next action |
| Is the item flammable, porous, oily, papery, woody, leafy, herbal, or unknown? | Treat it as unsafe for the burnable melt zone. | Continue to the next question. | Use decorative-only, outer-shell, outside-container, or wickless placement. |
| Can the item drift, float, slide, tip, fall, or loosen as wax melts and cools? | Do not use it in a burnable candle. | Continue to the next question. | Redesign for fixed sidewall placement or a separated shell/core format. |
| Will the future full-life melt pool be able to reach the item? | Fail the burnable design. | Continue to the next question. | Move the item farther out, reduce the design complexity, or switch to wickless. |
| Can the item heat unevenly, conduct heat, stress glass, crack, spark, melt, smoke, or release unknown fumes? | Keep it outside the candle or in a non-heated display. | Continue to the next question. | Do not rely on “non-flammable” as proof of safety. |
| Has this exact wax, wick, vessel, fragrance, dye, embed type, placement, and pour method passed repeated full-life burn testing? | Keep notes and repeat before gifting or selling. | Do not gift, sell, or scale the design. | Test again or reclassify as decorative-only. |
If the design fails any row, the repair is not to hope harder. The safer response is to simplify the burn core, move decoration outside the future melt pool, switch to a separated outer display layer, or make the item wickless or decorative-only.
This decision gate does not prove that a candle is safe for sale, legally compliant, insured, or suitable for every user. It only helps reject obvious embedded-candle risks before burn testing. Full burn testing still decides whether a specific design survives real use.
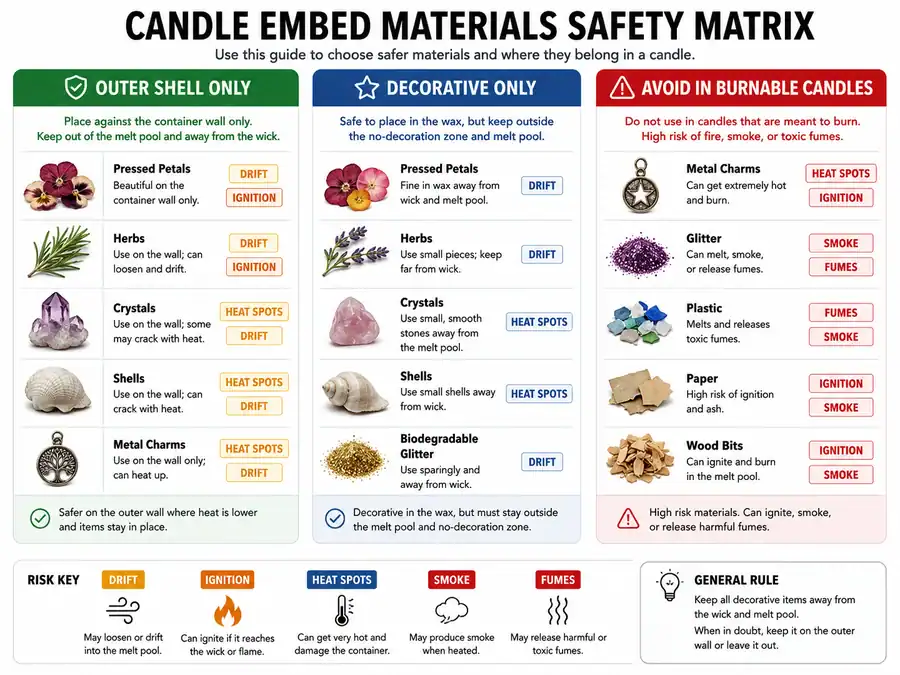
Safe vs Unsafe Botanicals and Objects in Candles
Only thin, fully dried botanicals used as decorative outer-shell elements, and heat-stable non-combustible objects that cannot shift, overheat the vessel, block the wick, or enter the melt pool, are even candidates for decorative candle designs.
If you’re searching “Can I put dried flowers / crystals / herbs / coffee beans in candles?” this matrix is the quick decision tool. “Safer” here does not mean “fireproof” – it means “less likely to create a second fuel source, contaminate the wick, or migrate into the melt pool,” provided your placement and burn testing still prove it stays out of the hot zone for the candle’s full life.
| Material (common examples) | Best classification (most makers) | Why it behaves that way near a flame | Safer way to get the look |
| Thin, pressed dried petals (rose, calendula) | Decorative-only (outer shell/sidewall only) | Can char if the melt pool reaches it; can drift if loose | Fix to outer sidewalls or a shell layer; avoid loose pieces |
| Dried herbs (lavender buds, rosemary, sage) | Avoid as burnable embeds | Small pieces float and ignite easily; adds “kindling” behavior | Use as styling outside the jar; switch to wickless designs |
| Whole buds / chunky botanicals | Avoid as burnable embeds | Bulk holds oils/air pockets; scorches; more likely to ignite | Press/thin for display-only or keep outside the candle entirely |
| Dried citrus slices / dried fruit | Avoid as burnable embeds | Sugars/oils brown fast and smoke; can pop from trapped moisture | Decorative-only (unlit) or use wickless warmers |
| Coffee beans / whole spices | Avoid as burnable embeds | Hard pieces can float, crackle, smoke, and feed a secondary flame | Style around the candle, not inside wax |
| “Crystal” chips, tumbled stones | Decorative-only (not in burnable melt zone) | Won’t ignite, but can heat, shift, and create hot spots or stress glass | Keep outside the container or in a separate, unlit display |
| Seashells | Decorative-only (not in burnable melt zone) | Can heat unevenly; may stress glass; edges can create hot spots | Display outside the candle or on non-heated surfaces |
| Metal charms/objects | Decorative-only (not in burnable melt zone) | Conducts heat; can overheat nearby wax/glass; may shift | Tie externally or use removable décor |
| Glass pieces / “glass shards” | Avoid entirely | Sharp hazard plus hot-spot and vessel-stress risk | Don’t use in candles; choose a non-heated display instead |
| Glitter / “eco glitter” | Avoid as burnable embeds | Can spark/smoke or contaminate wick; messy burn behavior | Use label art/external décor or non-flame projects |
| Plastic, acrylic, unknown polymers | Avoid entirely | Can melt, smoke, or release fumes; unpredictable ignition | Never use in burnable candles |
| Paper, dried moss, wood bits | Avoid as burnable embeds | Readily combustible; can ember and flare | Keep outside the candle; use safer styling elements |
Choosing Safe Candle Types and Waxes for Embedded Designs
The safest way to get an “embedded” look is to pick a candle format that physically prevents decorations from reaching the wick and melt pool.
Start by choosing a format that separates the decorative area from the burn core. Container candles can be more forgiving than pillars for decorative effects because the walls can act like a boundary—especially when decoration is fixed to the sides or held in an outer layer that never becomes part of the melt pool. Pillars and tapers are less forgiving because anything on the surface is exposed to open air, radiant heat, and direct flame movement.
Then match wax behavior to the structure you’re building. Waxes that support clean side adhesion can help keep decorative layers in place, while softer, more mobile wax behavior can encourage floating or shifting pieces if they aren’t structurally contained. If your goal is clarity (seeing flowers or objects through wax), treat that as a separate design problem from “normal candle-making” and prioritize stability over aesthetics—because clear-looking designs often tempt makers to suspend loose items where they can eventually drift.
A safer decision pattern is:
- Pick the format first (how you’ll physically isolate the decoration).
- Pick the wax second (how it supports that structure).
- Choose the wick last (after wax + vessel + fragrance are locked).
When in doubt, use a design that keeps decorations fully outside the burn zone rather than relying on “it should stay put.”
Embedding Techniques for Different Molds and Shapes
The safest embedding technique is the one that creates a stable outer display layer while keeping the wick’s burn core simple and clear.
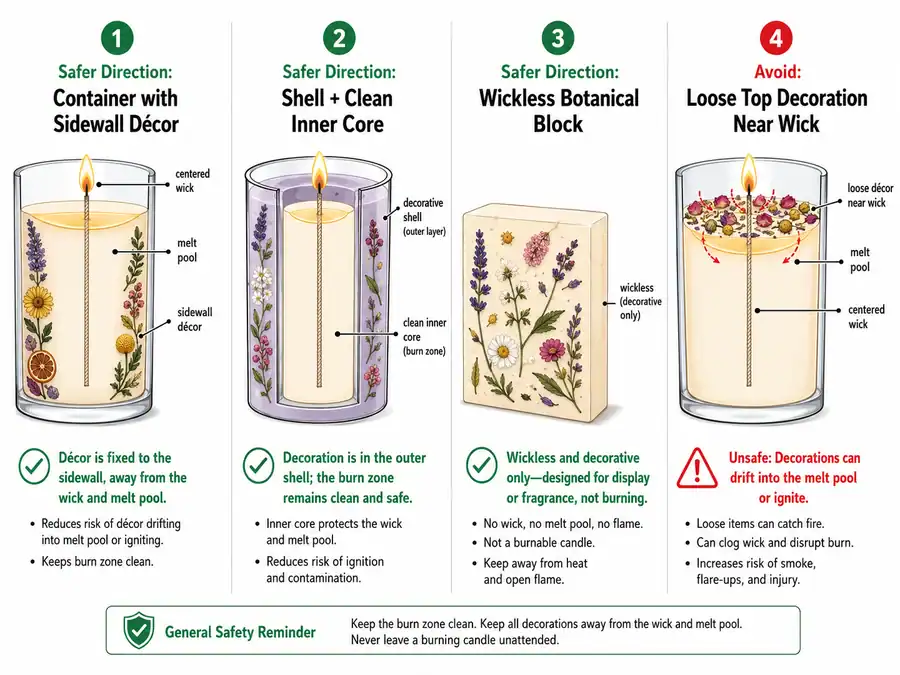
For containers, the most conservative approach is a clean burn core with any decoration confined to a sidewall band or outer shell zone. For molded shapes, decorative elements are harder to control because the surface is exposed and the flame path changes as the candle burns down. If a mold design encourages decoration on top or along the flame’s future path, treat that as a strong signal to switch formats or go wickless.
Use technique to enforce separation:
- Sidewall set: decorative pieces fixed against the container wall, away from the planned melt pool edge.
- Outer shell + inner core: a decorative outer layer that is not meant to melt into the wick zone, paired with a clean inner candle core.
- Wickless blocks/melts: the aesthetic lives in the wax without an open flame.
If a technique depends on loose pieces “staying where you sprinkled them,” it’s not a technique—it’s a gamble.
Pour Temperature and Timing When Adding Embeds
Pour timing matters because it controls whether embeds sink, drift, scorch, or stay locked where you intended.
Rather than chasing a single “magic temperature,” focus on repeatable cues:
- Too hot: embeds can sink, drift inward, or get pulled into convection currents.
- Too cool: you may get poor adhesion, layers separating, or visible lines.
- Right stage: the wax is still within the wax maker’s recommended range but firm enough to support placement without letting pieces migrate.
Stay within your wax maker’s recommended ranges, then test small adjustments while changing only one variable at a time (pour stage or embed weight or placement method). If you’re trying to keep sidewall embeds from sliding down or drifting inward, starting closer to the cooler end of the recommended range is often more controllable—but only burn testing can confirm whether the final design stays out of the melt pool for the candle’s full life.
Safer Shell, Double-Pour, and Clear-Wax Methods for Embeds
Shell and double-pour methods reduce risk by moving decorative material away from the flame path, but they don’t turn unsafe materials into safe ones.
A useful way to think about these methods is “visual layer vs burn layer”:
- Standard container: everything that melts eventually joins the burn behavior.
- Shell + core: the decoration lives in an outer zone; the inner core is designed to burn cleanly.
- Double-pour: you create an outer aesthetic layer and a cleaner inner burn layer, in stages.
- Wickless decorative blocks: the decoration is showcased without an open flame.
These methods can help you build separation, but they still require conservative placement and full burn testing. If burn tests show the melt pool eventually reaches the decorative layer, the correct response is redesign or reclassification—not “just shorter burn times.”
Preparing Botanicals and Porous Materials Safely
Properly prepared botanicals are fully dried, thinned, and heat-checked pieces that stay decorative and never enter the wick zone or melt pool.
“Preparing” does not make botanicals non-flammable—it makes them more predictable. If you want the bigger picture of what belongs near home fragrance at all, Using Botanicals in Home Fragrance and Candle Additives & Enhancements support the same mindset: reduce variables, keep combustibles away from flame, and accept that some looks belong in wickless formats.
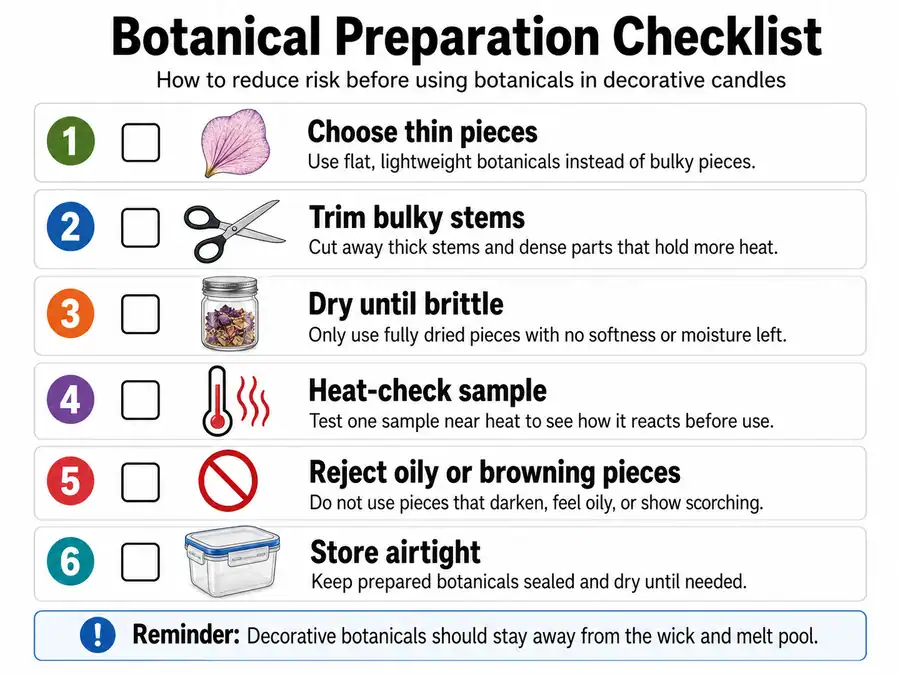
Botanical Prep Checklist
- Choose the thinnest version of the material you can (pressed petals beat whole buds; thin peel beat thick citrus slices).
- Trim stems, thick midribs, and bulky knots that hold moisture.
- Dry or press until pieces feel papery and brittle, not cool, bendy, or tacky.
- Heat-check a sample away from customers: warm one piece near a safe heat source and watch for smoke, bubbling oils, or harsh off-odors.
- Skip anything that sweats oil, feels resinous, or browns quickly under gentle heat.
- Store finished pieces airtight, dry, and dark so they don’t re-absorb moisture.
This same prep logic applies to other porous materials like dried fruit, coffee beans, potpourri, untreated wood, and paper labels. Porous just means it can hold moisture, oils, or air pockets—which can lead to odor changes, discoloration, or popping/crackling when heated.
If you want botanical aesthetics without an open flame, park your best-looking pieces in Wickless Botanical Wax Melts and Warmers rather than forcing them into a burnable candle. If you keep losing batches to dampness, scent changes, or mystery browning, tighten your storage routine with Storing Candle Supplies and Finished Candles Safely before blaming your wax.
Placing Botanicals and Objects Safely Around the Wick and Melt Pool
To place botanicals or objects safely, keep them outside the flame path and outside the future full-life melt pool, fixed in a stable outer zone that burn testing proves cannot drift, float, slide, tip, or fall toward the wick.
Before you place anything, picture the candle as a moving heat map: the hottest zone grows as the melt pool widens, and the “safe” edge on day one might not be safe on day four.
Quick zone sketch (text version)
- Flame area: the air space above the wick where heat and movement are strongest
- Melt pool: the liquid wax that expands outward each burn
- No-go core: the wick, the immediate wax around it, and anything that could drift into the melt pool
- Outer display zone: the far edge of the wax and the cooler sidewalls where décor can be fixed and kept away from heat
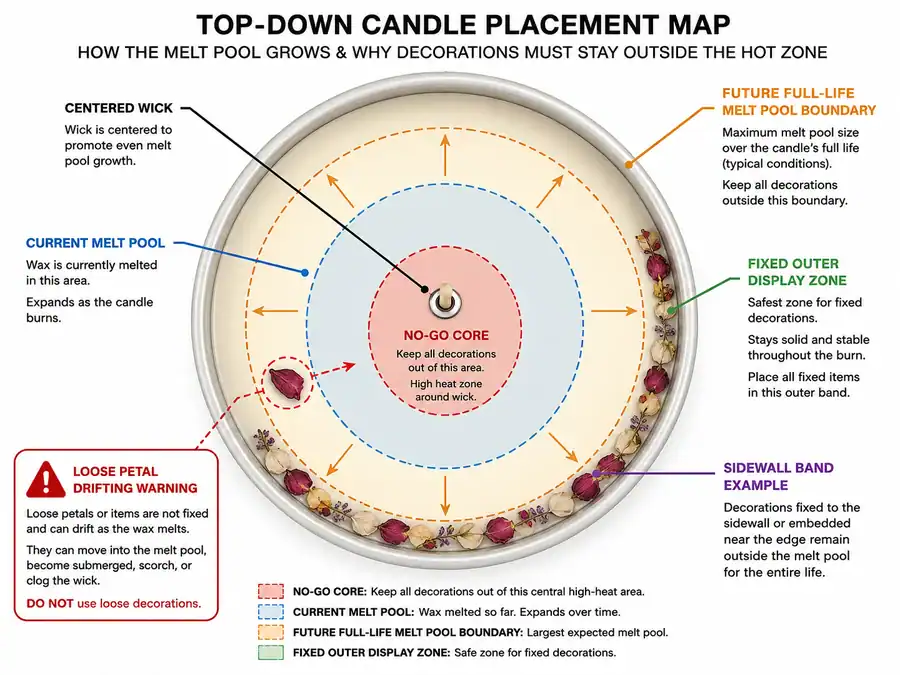
That last part—fixed—is the hard one. Loose petals can float. Small charms can tip. Dried slices can shift as wax contracts and expands. So the safest placement patterns are the ones that physically prevent migration: décor pressed into a sidewall band, a separate outer shell layer, or decorations that stay outside the container entirely.
A placement micro-workflow that prevents “wishful safety”
- If the embed is loose, sprinkled, or floating → don’t place it in a burnable candle.
- If the embed is fixed in an outer shell/sidewall zone → it’s only acceptable if burn tests prove it never reaches the melt pool across the candle’s full life.
- If the melt pool reaches the embed at any stage → scrap the design as burnable and redesign or reclassify.
- If you can’t reliably stop drift (floating/tipping/sliding) → assume it will reach the wick zone eventually.
If your idea requires “pretty bits” on top, treat it as a decision point: either remove the loose pieces before burning, or reclassify the design so it’s never meant to be lit. When you’re unsure, revisit Candle Safety 101 and Wick Selection & Flame Control with a placement mindset—your goal is a predictable flame path with nothing new to feed it.
Wick behavior is also a placement tool. A wick that’s oversized can create a larger melt pool and pull décor into trouble faster, so align wick choice with your intended no-go radius using Choosing the Right Wick Size. If you see early warning signs—soot, a growing mushroom, a deep tunnel, or a wandering melt pool—pause and diagnose with Troubleshooting Tunneling, Soot, and Mushrooms before you keep burning “to see what happens.”
How to Burn-Test Embedded Candles Safely
Burn-test embedded candles with a supervised, repeatable schedule that tracks flame behavior, melt pool growth, and whether any embed ever reaches ignition risk.
Immediate stop / fail signals (don’t “see if it settles”)
- A second flame or sustained ignition on an embed
- Sustained charring/browning on an embed that’s getting closer each burn
- Heavy smoke/soot, popping sparks, or sudden flare-ups
- Any embed drifting into the melt pool or toward the wick
- Container distress (overheating patterns, stress lines, cracking, warping)
What to Do If an Embed Ignites During a Test Burn
If an embed ignites during a test burn, treat the design as failed, stop the test safely, do not move the candle while wax is liquid, and do not use water on burning wax. Smother the flame only if it is safe to do so, use appropriate fire-safety equipment, and call emergency services if the fire is not immediately controlled.
Start by treating every embedded design like a prototype, not a finished product. Consistency is what makes your results trustworthy: same room conditions, same burn cycles, same note-taking cadence. If you want an organizing mindset, Candle Testing & Compliance Basics is the right mental model even for small-batch makers.
A simple, repeatable embedded-candle burn-test protocol
A repeatable embedded-candle burn-test protocol uses the same setup, burn cycle, observation points, and fail criteria each time so embed movement and flame behavior can be compared instead of guessed.
- Pre-check (before lighting): Wick centered, vessel stable, embeds intentionally kept out of the future melt pool zone you expect after several burns.
- Safe test area: Heat-safe surface, no drafts, no clutter, constant supervision.
- Controlled burn cycles: Use consistent burn sessions and cooling periods. Many safety labels—consistent with National Candle Association guidance—recommend burning for no more than about 4 hours per session before cooling, and embedded designs deserve the conservative end of that habit.
- Record at set intervals: Flame stability, soot/smoke, melt pool width, wick mushrooming, and whether any botanical/object shifts or chars.
- Repeat into later-life behavior: Embedded candles can look fine early, then fail later as the melt pool widens and reaches decorative material.
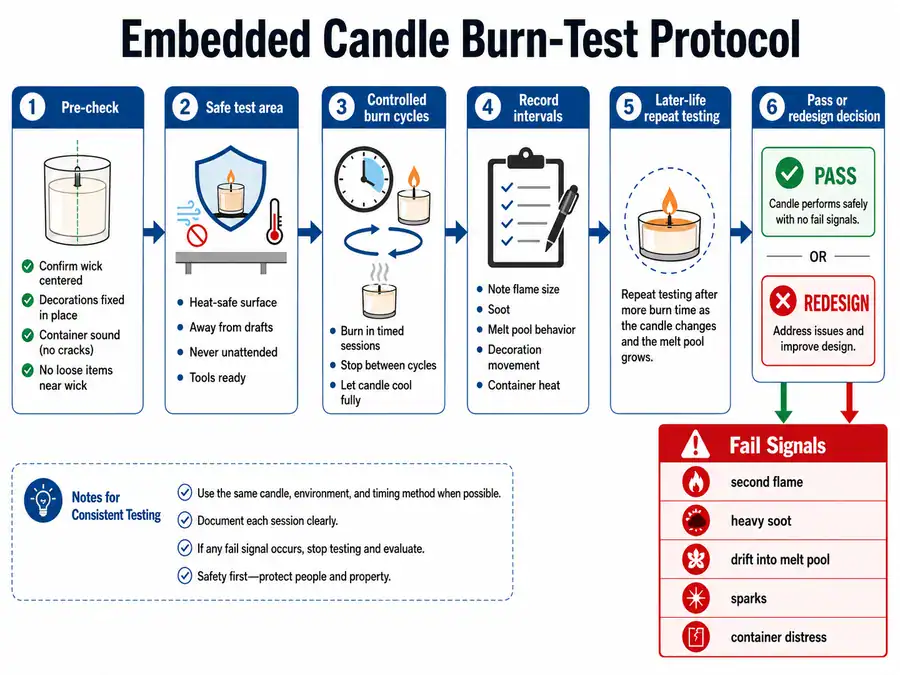
Keep notes like you mean to learn from them. A basic log is what stops you from accidentally repeating a failed “pretty” design weeks later under a new label.
Clear fail criteria (stop, redesign, or reclassify)
Clear fail criteria mean the design stops as soon as embeds ignite, migrate, scorch progressively, smoke heavily, spark, or stress the vessel.
- Any sustained flame on an embed (not just a brief flicker)
- Embeds drifting into the wick’s path or melt pool no-go zone
- Heavy soot/smoke, popping sparks, or secondary flames
- Container distress (overheating patterns, cracking, warping, unstable base)
If you want your method to resemble industry-style thinking without drowning in jargon, an ASTM-Inspired Test Methods Overview mindset is simple: consistent conditions, consistent logs, conservative decisions.
Safety & Testing Tools for Embedded Candles
Use these tools to choose a safer format, control placement conditions, and record burn-test results consistently across embedded candle prototypes.
This section is a practical toolkit, not a second safety guide. Use it to make format, pour-stage, and burn-log decisions after the core risk rules are already understood.
1) Format + wax decision matrix (starter-safe vs advanced vs avoid)
Starter-safe in this matrix means lower-complexity and easier to test, not automatically safe without burn testing.
| Format / concept | Starter-safe (with testing) | Advanced-only (with strict controls) | Avoid as burnable (decorate/wickless instead) |
| Simple container candle with minimal side-wall embeds | ✅ | ||
| Container with heavy top decoration | ✅ | ||
| Shell or double-pour (decorative outer + safer inner core) | ✅ | ||
| Tall pillar packed with botanicals | ✅ | ||
| Novelty / intricate molded shapes with embeds | ✅ | ||
| Wickless melts/blocks showcasing botanicals (no open flame) | ✅ |
How to use it: if your idea lands in “avoid,” don’t try to “test your way into safety.” Convert the design to wickless or decorative-only and move on.
2) Pour-stage reference cues (use your wax’s datasheet range)
Rather than hunting for one perfect temperature, use pour stage to control whether embeds sink, drift, or stay locked. Stay within the wax maker’s recommended range, then test small adjustments.
| Wax family / style | What you’re trying to prevent | Starting approach (then test) | Visual cue to watch |
| Soft container blends | Embeds drifting inward | Pour closer to the cooler side of the recommended range | Wax looks slightly thicker/less “glassy” |
| Hard pillar waxes | Cracks, separation lines | Stay within the recommended range; consider shell methods | Surface starts to skin lightly |
| Clear/gel-style looks | Hot spots and unpredictable movement | Treat as advanced-only and test aggressively | Any swirl/movement after placement |
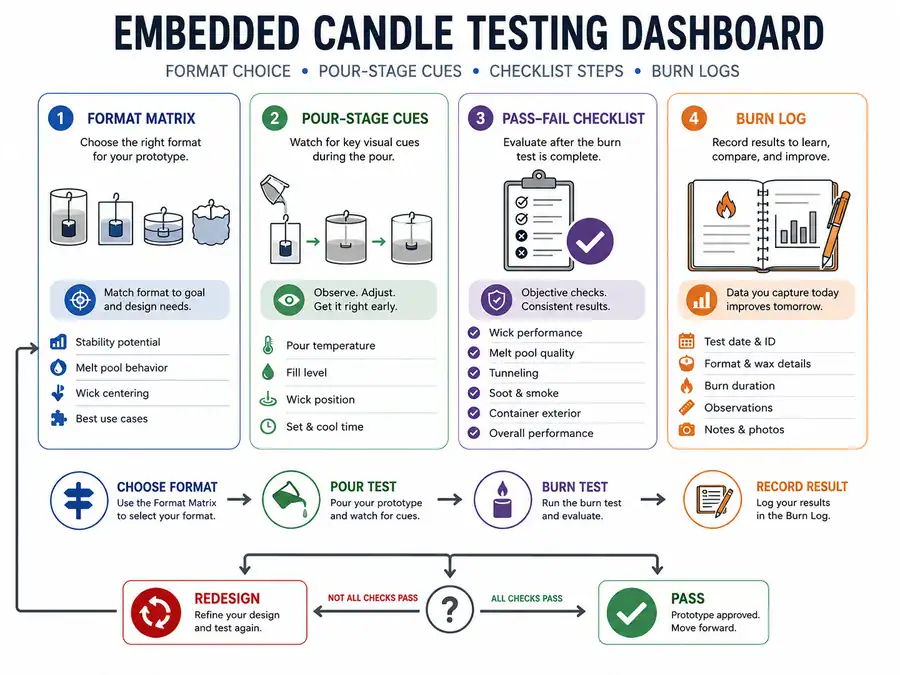
3) Burn Test Checklist & Log (copy for every new design)
A burn-test checklist and log help prove whether the exact design stayed stable across repeated burn cycles, not just whether it looked acceptable once.
Burn Test Checklist (quick pass/fail scan)
- Candle is stable; wick is centered; container is intact
- Embeds are placed outside the planned melt pool zone
- Burn area is draft-free and supervised
- Notes taken on flame, soot/smoke, melt pool, embed movement
- Any sign of embed ignition → fail and redesign/reclassify
Burn Test Log (template)
| Date | Candle ID | Wax / wick | Embed type + placement | Burn cycle (time) | Observations | Pass/Fail + next step |
| Flame / soot / melt pool / embed shift |
How to use it: fill one row per burn cycle. If you change anything (wick size, embed density, pour stage), create a new Candle ID so you don’t mix results.
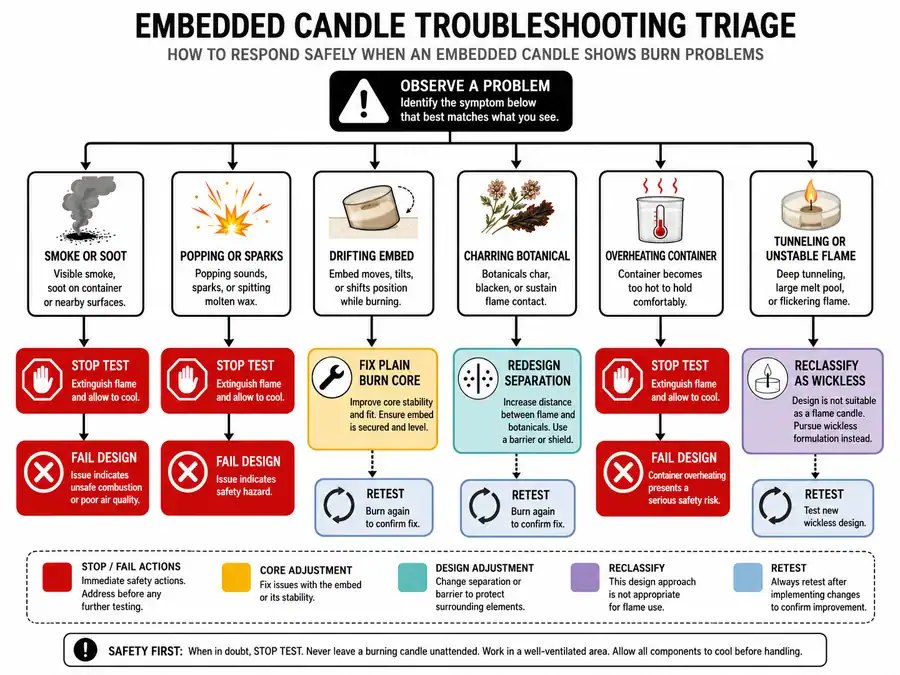
Troubleshooting Problems with Embedded Botanicals and Objects
When an embedded candle misbehaves, the safest fix is usually to remove the variable (the embed), simplify the burn core, and redesign the look so decorations can never reach the flame or melt pool.
1) Smoking, sooting, or a “dirty” flame
What you’ll notice: dark smoke, soot on the jar rim, a wavering flame, or a strong burnt note.
Most likely causes: wick too large, wick struggling with extra fuel (dye/fragrance plus debris), or an embed scorching at the edge of the melt pool.
Safer fixes:
- Stop the test and trim the wick; restart only if the candle is otherwise stable and clean.
- Reduce variables: try the same wax/wick/container without embeds to confirm the burn core is sound.
- Move all decoration farther from the melt pool boundary, or convert the design to a sidewall-only display where nothing can float inward.
2) Crackling, popping, or tiny sparks
What you’ll notice: audible snaps, little flickers, or pinpoint sparks near the melt pool.
Most likely causes: trapped moisture in botanicals, air pockets in porous materials, resin/oils heating rapidly, or debris contacting the wick.
Safer fixes:
- Fail the design for burnable use and redesign the look so botanicals are purely decorative and never heated by the melt pool.
- Switch to thinner, fully dried, pressed pieces—and treat “fully dried” as a storage problem as much as a prep problem.
- Avoid porous add-ins that you can’t keep consistently dry and stable.
3) Embeds drifting, floating, or sliding toward the wick
What you’ll notice: petals migrate inward, charms tilt, or pieces “walk” as wax warms and cools.
Most likely causes: embeds are loose, wax movement is carrying them, or the melt pool is wider than planned.
Safer fixes:
- Redesign placement so embeds are physically trapped in an outer display zone (not sitting loose on top or sprinkled in).
- Reduce melt pool reach by correcting wick size, then re-test from the start.
- Choose a format that enforces separation—an inner burn core with an outer decorative area—rather than hoping pieces stay put.
4) Charring or browning on botanicals (even without visible flame)
What you’ll notice: edges turn brown, candle smells toasted, petals look “cooked.”
Most likely causes: embed too close to hot zone, melt pool climbing higher than expected, botanical oils/resins darkening under heat.
Safer fixes:
- Treat any charring as a warning that the design is too close to ignition conditions later in the candle’s life.
- Move decoration farther from the melt pool path, or relocate it to a place that never heats (above the wax line as purely visual).
- If the look depends on botanicals sitting in wax, switch to a wickless format instead of a flame.
5) Container overheating, stress lines, or cracking
What you’ll notice: vessel feels excessively hot, shows stress patterns, or develops cracks.
Most likely causes: oversized wick, concentrated hot spot from heavy dye/fragrance, or heat retention from objects (especially metal or thick glass) near the wall.
Safer fixes:
- Stop the test immediately and do not re-light that unit.
- Downsize the wick and re-test in a more heat-tolerant container.
- Keep any non-botanical objects out of the jar unless they are proven not to create hot spots and cannot shift.
6) Tunneling, drown-outs, or unstable flame height after adding embeds
What you’ll notice: wax doesn’t melt evenly, wick struggles, flame grows and shrinks unpredictably.
Most likely causes: burn core no longer balanced because embeds changed airflow, wax flow, or fuel delivery.
Safer fixes:
- Verify the candle burns properly with the same wax/wick/container without embeds first.
- Reintroduce embeds only in a zone that cannot interfere with wick performance.
- Change one variable at a time and keep notes so you can identify the cause instead of guessing.
A fast triage method when something looks off
- If anything is scorching, sparking, or drifting inward: stop and redesign for separation rather than tweaking tiny details.
- If the vessel is overheating or distressed: fail the design and change wick/container before doing anything else.
- If the burn core is messy even without embeds: fix the plain candle first; decorative layers come later.