Measure liquid candle dye accurately and repeatably by choosing drops, graduated volume, or mass to match the dose, then controlling the tool, temperature, angle, pressure, and recording method.
Liquid candle dye is a candle colorant that can be dosed by controlled drops, graduated volume, or mass. This page helps beginner and intermediate candle makers choose a suitable tool, control dispensing conditions, and record the amount actually delivered. Here, accuracy means closeness to a declared reference mass or volume, while repeatability means obtaining similar results under the same conditions. These terms must be separated before comparing droppers, pipettes, syringes, and gram scales.
What Is the Difference Between Accuracy and Repeatability When Measuring Liquid Candle Dye?
Accuracy is closeness to a declared reference mass or volume, while repeatability means obtaining similar liquid candle dye measurements under the same controlled conditions.
Precision describes how closely repeated results cluster, and display resolution is the smallest increment a measuring device shows rather than proof that its readings are accurate.
| Accuracy | Repeatability | What the result means | Practical interpretation |
|---|---|---|---|
| High | High | Results stay close together and close to the declared reference. | The recorded dye-and-tool method performs consistently for that stated reference and condition set. |
| High | Low | The average may be close to the reference, but individual results vary. | The method sometimes reaches the intended amount but does not deliver it consistently. |
| Low | High | Results cluster closely but remain away from the reference. | The method is consistent, but it repeatedly delivers the wrong amount for that reference. |
| Low | Low | Results vary and remain away from the reference. | The tool, procedure, operating conditions, or measurement basis needs review. |
A measured result can therefore be repeatable without being accurate. For example, repeated grouped-drop measurements may cluster closely while remaining away from the selected reference mass. That finding applies only to the recorded dye, dispenser, temperature, angle, pressure routine, and procedure.
Accuracy cannot be judged without naming the reference being used. A bottle marking, scale display, or repeated drop count may support a comparison, but none proves laboratory calibration or universal performance across other dyes and tools.
Why Do Liquid Candle Dye Drops Vary in Size?
Liquid candle dye drop size changes with dye viscosity and temperature, tip geometry, residue, dispenser angle, squeeze or plunger pressure, delivery speed, and the dispenser’s condition.
Because these factors interact, a counted drop belongs to one recorded dye-and-tool setup and cannot be treated as a universal unit.
| Source of variation | How it can change delivery | Condition to control or record |
|---|---|---|
| Dye viscosity | Thicker or thinner flow can alter how liquid forms and detaches from the tip. | Identify the dye and keep its working temperature within a recorded range. |
| Dye temperature | Temperature can change flow behavior and therefore the way a drop develops. | Measure under comparable temperature conditions. |
| Tip geometry | Different openings and tip shapes form liquid differently. | Use the same identified tip or dispenser for every comparison. |
| Residue | Dried or wet residue can narrow the opening or change the surface from which the drop detaches. | Inspect the tip before use and record its condition. |
| Dispenser angle | Vertical, tilted, and horizontal delivery can change how liquid gathers at the opening. | Hold the dispenser at the same recorded angle. |
| Pressure | Different squeeze force or plunger force changes flow rate and drop formation. | Use the same pressure routine without sudden pulses. |
| Delivery speed | Rapid dispensing may produce a different sequence from slow, separated drops. | Keep the dispensing rhythm consistent. |
| Tool condition | Wear, leaks, loose parts, trapped air, or deformation can change delivery. | Check the dispenser and replace damaged tools before comparison. |
A simple failure log helps separate tool behavior from dye behavior without assigning an unsupported numerical cause.
| Observed pattern | First condition to check | Bounded interpretation |
|---|---|---|
| Drops become larger during one run | Pressure and delivery speed | The dispensing routine may have changed during the sequence. |
| Drops become smaller or fail to detach | Residue, tip opening, and angle | The outlet condition or orientation may be restricting drop formation. |
| Delivery alternates between liquid and air | Tool seal, filling method, and trapped air | The dispenser may not contain a continuous liquid column. |
| Results differ after the dye warms or cools | Dye temperature and flow behavior | The comparison was not made under equivalent temperature conditions. |
| A new dispenser gives different drops | Tip geometry, capacity, and manual control | The new tool creates a different measurement system and needs its own repeatability check. |
Visible differences can identify what to inspect, but they do not quantify drop mass or volume. Any numerical comparison needs the dye, tool, temperature, orientation, pressure routine, sample method, provenance, and limitations recorded beside the result.
Should Liquid Candle Dye Be Measured in Drops, Milliliters, or Grams?
Use the liquid candle dye measurement method that can resolve and deliver the intended dose repeatably under the available conditions.
Drops count separate releases from one dispenser, so they need a local repeatability check for that dye, tool, temperature, angle, and pressure routine. Graduated volume measures liquid against marked milliliter divisions, so the markings must be readable at the intended dose. Mass records the net mass of liquid candle dye added, so the scale must show a stable change within its useful working range.
| Measurement basis | What it records | Best fit | Main control | Main limitation |
|---|---|---|---|---|
| Drops | Number of releases from one dispenser | Repeated small doses from a locally tested dye-and-tool setup | Same dye, tip, angle, pressure, temperature, and delivery rhythm | Drop size is not universal and may change when any operating condition changes |
| Graduated volume | Liquid level against marked milliliter divisions | Doses large enough to read clearly against the tool’s markings | Correct reading position, suitable capacity, controlled plunger or squeeze movement | Fine printed markings do not prove that the marked amount was delivered |
| Mass | Net mass added to a tared vessel | Doses that create a stable scale change | Stable surface, suitable vessel, correct tare, and sufficient sample mass | Display resolution does not prove accuracy, and very small doses may not register reliably |
Use drops only when repeated tests show acceptably similar results for the same setup, and use graduated volume when the intended dose is large enough to read without estimating between unclear markings. Use mass when the delivered dye produces a stable change that exceeds the scale’s observed display fluctuation under the same setup.
Do not convert drops, milliliters, and grams as though they were interchangeable. A drops-to-mass or volume-to-mass relationship needs measured data for the identified dye, dispenser, conditions, and procedure.
Record the selected basis, tool identity, intended dose, operating conditions, and delivered amount in the Liquid Candle Dye Measurement Worksheet. The best method is the one that makes the intended dose readable, repeatable, and traceable without relying on an assumed universal conversion.
Is a Dropper, Pipette, or Syringe Best for Liquid Candle Dye?
The best dispenser is the one whose capacity, useful range, graduation spacing, reading position, tip behavior, and manual control fit the intended liquid candle dye dose.
A tool’s useful range is the portion of its capacity that can be filled, read, and delivered consistently for the planned amount. Graduation spacing is the difference between adjacent markings, while the reading position is the point where the liquid level is compared with those markings. Fine markings alone do not prove delivered accuracy.
| Tool | Useful features | Reading method | Delivery control | Main limitation |
|---|---|---|---|---|
| Dropper | Simple dispensing and separate drop formation | Usually counted drops rather than graduated volume | Squeeze pressure, angle, and release rhythm | Drop size can change with tip shape, residue, viscosity, temperature, and pressure |
| Graduated pipette | Visible capacity and marked volume divisions | Read the liquid level at the specified position | Finger pressure or bulb control | Flexible walls, coarse markings, tip retention, and inconsistent pressure can affect delivery |
| Needle-free syringe | Defined capacity, plunger control, and visible graduations | Read the plunger reference edge against the scale | Slow plunger movement supports controlled delivery | Dead space—liquid retained in the syringe hub or tip—plus seal friction, trapped air, and retained liquid can reduce the delivered amount. |
A larger-capacity tool may be difficult to read for a very small dose because the intended amount occupies too little of its scale. A very small tool may require several fills, increasing transfer steps and the chance of inconsistent delivery.
Inspect the tip opening, markings, seal, and liquid-retention areas before comparing tools. Use each dispenser only for its intended non-medical craft purpose and keep the same identified tool throughout a repeatability check.
Choose the dispenser by dose fit and controlled delivery, not by the number of printed divisions alone.
Is a 0.01 g Scale Accurate Enough for Liquid Candle Dye?
A 0.01 g display shows 0.01 g increments; it does not prove accuracy within 0.01 g, and the dye sample must produce a stable change larger than the scale’s observed display fluctuation under the same setup.
Display resolution is the smallest increment shown on the screen. Tare resets the displayed vessel weight to zero so the reading represents the liquid candle dye added afterward. Neither feature proves that every displayed result is correct.
Place the scale on a stable surface, use the same tare vessel, and follow the scale maker’s instructions for stabilization, capacity, and minimum useful sample. Air movement, vibration, an off-center vessel, low battery power, or a changing tare can make a small reading difficult to interpret.
| Check | Possible display behavior | Interpretation | Action |
|---|---|---|---|
| One drop | Display stays unchanged | The drop may be smaller than the scale can resolve reliably in that setup | Use a fixed grouped-drop sample rather than assigning the drop a zero mass |
| One drop | Display changes but does not settle | The result is unstable relative to normal variation | Check the surface, vessel, tare, drafts, and scale condition |
| Repeated single drops | Changes alternate between different increments | Individual drops or display response may be too variable for a useful single-drop reading | Test equal grouped samples under fixed conditions |
| Fixed grouped sample | Net mass settles and repeated groups remain similar | The grouped amount may be suitable for a local repeatability comparison | Record every condition and divide only within that tested setup |
| Fixed grouped sample | Net mass remains unstable or groups differ beyond the chosen tolerance | The scale, dispenser, sample size, or procedure does not support the planned comparison | Increase the grouped sample or select another measurement basis |
For a grouped check, dispense the same fixed number of drops into a tared vessel and record the settled net mass. Repeat the same group under unchanged conditions.
A local average may be calculated as:
Local average mass per drop = grouped net mass ÷ number of drops in that group
This calculation describes only the recorded liquid candle dye, dispenser, temperature, angle, pressure routine, sample size, and scale setup. It must not be published as a universal drops-to-grams conversion.
A 0.01 g scale is suitable only when the grouped sample produces stable, repeatable changes that remain meaningful under the same recorded setup.
How Do You Measure Liquid Candle Dye Consistently?
Measure liquid candle dye consistently by keeping the dye, tool, measurement basis, temperature, orientation, pressure, tare, transfer method, and record fields unchanged, then record the amount actually delivered.
A measurement basis is the recorded unit used for the dose, such as counted drops, graduated milliliters, or grams. Tare removes the vessel’s displayed weight so the scale shows only the liquid candle dye added afterward.
Follow this procedure for each test batch:
- Identify the liquid candle dye by product name, color, concentration description, and lot or bottle ID when available.
- Select one measurement basis: drops, graduated volume, or mass.
- Assign one dispenser or scale an ID so the same tool can be used throughout the comparison.
- Inspect the dispenser for residue, damage, trapped air, loose parts, or leaks.
- Bring the dye and tools into the recorded working temperature range without improvised heating.
- Place the scale on a stable surface and tare the same clean, dry receiving vessel when mass is used.
- Hold the dispenser at the same recorded angle and reading position.
- Use the same squeeze or plunger-pressure routine and delivery speed.
- Deliver the liquid candle dye into the receiving vessel without changing the transfer technique.
- Record the amount actually delivered, not only the amount drawn into the dispenser.
- Note spills, residue, retained liquid, unstable readings, bubbles, or interrupted drops.
- Repeat the same procedure when comparing results.
Use this checklist before accepting a recorded measurement:
- The same liquid candle dye and identified tool were used.
- The measurement basis and units were recorded.
- The dispenser was inspected before use.
- The dye temperature stayed within the recorded range.
- The dispenser angle and reading position stayed unchanged.
- The pressure and delivery-speed routine stayed consistent.
- The same tare vessel and scale position were used.
- The delivered amount was recorded separately from the amount drawn.
- Any residue, leak, trapped air, spill, or unstable reading was noted.
- The result was not treated as a universal conversion.
Liquid Candle Dye Measurement Worksheet
The worksheet keeps method selection, dose-to-tool fit, grouped-drop calculations, transfer differences, and measurement records in one place.
| Field | Entry |
|---|---|
| Date and time | |
| Dye product and color | |
| Dye bottle or lot ID | |
| Measurement basis | Drops / milliliters / grams |
| Tool ID and capacity | |
| Tool condition | |
| Scale model and display resolution | |
| Tare vessel | |
| Dye temperature | |
| Dispenser angle | |
| Pressure routine | |
| Intended amount | |
| Amount drawn or initially weighed | |
| Amount delivered | |
| Retained residue or leak observed | |
| Trial number | |
| Notes or deviations |
A consistent measurement process improves repeatability, but it does not guarantee identical finished candle color. Wax, dye concentration, mixing, candle size, and other production variables belong to separate testing procedures.
Why Is Less Candle Dye Delivered Than Was Drawn Into the Pipette or Syringe?
Less liquid candle dye may be delivered because some remains on the tool or vessel wall, stays in dead space, leaks, or fails to detach as the final drop.
Transfer loss is the measured difference between the amount drawn or initially weighed and the amount that reaches the receiving vessel. Visible residue suggests where liquid may remain, but it does not quantify the loss by itself.
When both amounts are measured on the same basis, calculate:
Transfer difference = amount drawn or initially weighed − amount delivered
When a percentage is useful and the starting amount is greater than zero:
Transfer difference percentage = transfer difference ÷ amount drawn or initially weighed × 100
Do not mix units in either formula. A value drawn in milliliters cannot be subtracted directly from a value delivered in grams without a measured conversion basis for that identified dye.
| Observed issue | Possible transfer point | What to check | What the observation proves |
|---|---|---|---|
| Dye remains inside the tip | Tip or outlet dead space | Tip shape, orientation, and final delivery method | Liquid is visibly retained, but its quantity is unknown until measured |
| Dye coats the barrel wall | Internal tool surface | Tool material, filling position, and waiting time | Some liquid has not reached the receiving vessel |
| Plunger reaches its endpoint but dye remains | Syringe hub or tip space | Tool design and stated delivery position | The drawn amount and delivered amount may differ |
| Dye appears around a seal | Leak point | Seal condition, tool fit, and pressure | Liquid may have escaped outside the intended transfer path |
| Final drop does not detach | Tip surface and angle | Orientation, pressure, and delivery rhythm | The last visible amount was not delivered |
| Scale reading changes during transfer | Vessel, scale, or environment | Tare, drafts, vibration, and vessel position | The delivered amount cannot yet be interpreted reliably |
| Dye touches another surface | Tool exterior or vessel rim | Transfer path and hand position | Some dye may have left the intended measurement path |
A quantified transfer-loss record needs controlled starting and delivered measurements. Record the same dye, tool, units, temperature, angle, technique, and scale conditions beside both values.
Do not compensate for apparent residue by adding an estimated extra drop. Either measure the delivered amount directly or establish a local transfer result through repeated controlled trials.
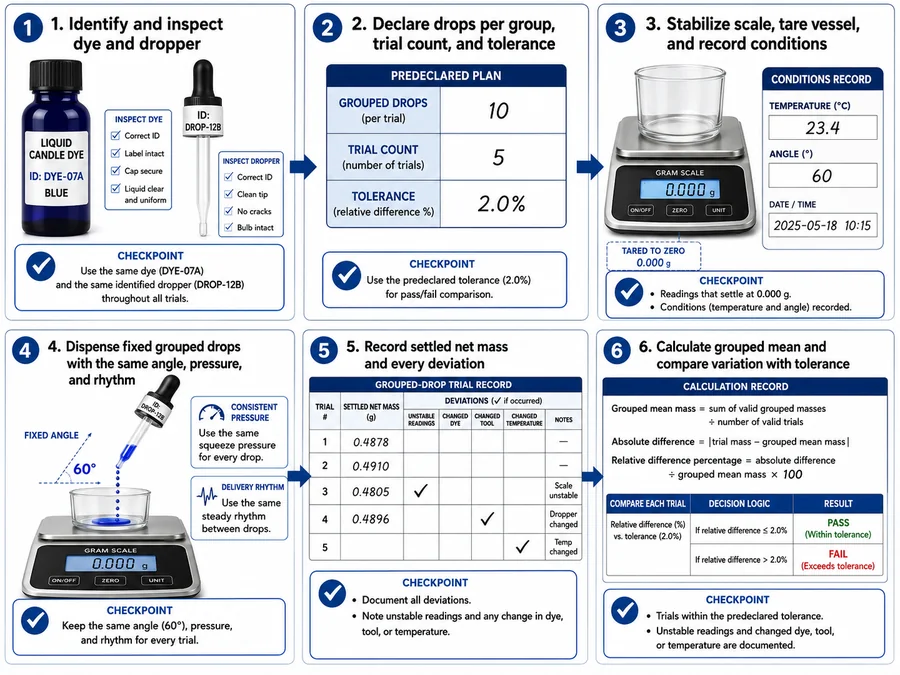
How Do You Test Whether a Liquid Candle Dye Dropper Is Consistent?
Test one liquid candle dye dropper by weighing repeated grouped-drop samples under fixed conditions and comparing their variation with a process tolerance selected before testing.
Local repeatability means that one recorded dye-and-dropper setup produces acceptably similar grouped results under the same procedure. A process tolerance is the maximum variation you decide is acceptable before viewing the test results.
Methods mini-box
Complete these fields before testing:
- Dye product, color, bottle ID, and condition
- Dropper ID, capacity, tip type, and condition
- Scale model and display resolution in grams
- Tare-vessel identity
- Recorded dye temperature
- Dispenser angle
- Squeeze or pressure routine
- Delivery rhythm
- Drops per grouped sample
- Number of trials
- Calculation method
- Process tolerance selected before testing
- Data provenance: who recorded the results, where, and when
- Limitations and any deviations from the planned procedure
Use the following ordered test:
- Choose one liquid candle dye bottle and one identified dropper.
- Inspect the dropper and record its condition.
- Select the number of drops in each grouped sample.
- Select the number of repeated trials.
- Choose the acceptable process tolerance before collecting results.
- Stabilize the scale and tare the receiving vessel.
- Record the dye temperature and dispenser angle.
- Dispense the fixed number of drops using the same pressure and delivery rhythm.
- Wait for the scale reading to settle, then record the grouped net mass in grams.
- Empty or replace the receiving vessel without changing the planned tare method.
- Repeat the procedure for every trial.
- Record every spill, interrupted drop, bubble, leak, unstable reading, or procedural deviation.
- Calculate the local grouped mean and variation only after all planned trials are complete.
- Compare the recorded variation with the predeclared process tolerance.
Record the grouped-drop dataset in this table:
| Trial | Dye ID | Dropper ID | Drops in group | Net mass, g | Temperature | Angle | Pressure routine | Deviation or observation | |
|---|---|---|---|---|---|---|---|---|---|
| 1 | |||||||||
| 2 | |||||||||
| 3 | |||||||||
| 4 | |||||||||
| 5 |
Calculate the local grouped mean as:
Grouped mean mass = sum of valid grouped masses ÷ number of valid trials
Calculate each trial’s absolute difference from the grouped mean as:
Absolute difference = |trial mass − grouped mean mass|
A relative difference may be calculated when the grouped mean is greater than zero:
Relative difference percentage = absolute difference ÷ grouped mean mass × 100
Use the predeclared tolerance to interpret the results:
| Result pattern | Local decision | Next action |
|---|---|---|
| Every valid trial falls within the predeclared tolerance | The recorded dye-and-dropper procedure is locally repeatable for that grouped sample | Keep the same tool, conditions, and written procedure |
| Most trials cluster, but one trial contains a documented deviation | The procedure may be repeatable, but the affected trial cannot be treated as equivalent | Repeat only according to the predeclared handling rule and retain the deviation record |
| Trials exceed the tolerance without one clear deviation | Drop counting is not sufficiently repeatable for the selected process | Review the tool and controls or use graduated volume or mass |
| Scale readings do not settle | The measurement setup cannot support the planned comparison | Increase the grouped sample or change the measurement setup |
| Results shift after the tool, dye, or temperature changes | A new measurement system has been introduced | Start a separate local test |
| The tolerance was chosen after viewing the results | The decision rule is biased by the observed data | Repeat the test with a tolerance declared in advance |
The grouped mean applies only to the recorded liquid candle dye, dropper, temperature, angle, pressure routine, sample size, scale, and procedure. It is not a universal drop mass, supplier conversion, or certified calibration result.