
Start with a low dye band based on format, then judge the cooled sample before you increase the amount.
Choosing a starting dye amount gets tricky because liquid dye, chips, and blocks do not behave the same in wax. The safest path is to begin with a low test band, judge the color after the wax cools, and adjust in small steps. Shade goal, wax weight, and format changes affect how much dye you should add next. A repeatable first-test method cuts waste and makes the same color easier to match again.
Start With a Conservative Dye Range by Format
A safe candle dye start range depends on format, so begin low with liquid, chips, or blocks and confirm the shade with a cooled test.
Supplier directions from CandleScience and NorthWood Distributing support starting with a narrow one-pound (454 g) band that matches the dye format instead of copying one formula across all three. For a medium-first test, a workable band is about 4 to 8 liquid drops, 1/4 to 1/2 dye chip, or 1/32 to 1/16 of a shaved dye block, because the goal is a readable first sample, not a final color.
Do not reuse the same starting count across liquid dye, chips, and block shavings.
The Candle Dye & Coloring Hub helps you keep the full color process straight before you lock a formula.
| Format | Start band for 1 lb (454 g) wax | First-test control | If the cooled sample is too light |
|---|---|---|---|
| Liquid dye | 4 to 8 drops | Easiest to adjust in small steps | Add 1 to 2 drops in a fresh test |
| Dye chips | 1/4 to 1/2 chip | Medium control | Add 1/8 chip in a fresh test |
| Shaved dye block | 1/32 to 1/16 block | Fast to overshoot | Add a very small extra shaving in a fresh test |
- Pick one wax weight and stay with it for the full test.
- Dose by the format’s own unit style instead of forcing a 1:1 swap.
- Cool the sample fully before you decide on the second test.
In maker forums, beginners often get a dark first batch by copying a liquid count into chips or block shavings. That is why Convert Liquid Dye, Chips, and Blocks Safely matters before you reuse a formula that worked in another format.
Liquid dye gives the smallest first-test adjustment steps, so it is usually the easiest format for beginner control. Once your one-pound band looks right, Scale Candle Dye for Any Batch Size keeps the same ratio from test pours to larger batches.
If the second sample already looks darker than planned, stop adding color and move to a new test. Avoid Over-Coloring and Know When to Stop is the next check when more dye stops helping and starts wasting wax.
How these start bands were set
These start bands use first-test amounts for 1 lb (454 g) of wax as the working metric. They were modeled from supplier-style per-weight guidance for liquid dye, dye chips, and shaved blocks, then kept low on purpose so the first sample stays readable instead of overshooting.
The setup assumes one wax, one dye format, and a fully cooled sample before any retest. Units stay in drops, chip fractions, and block fractions, and the ranges are start bands rather than exact brand-to-brand matches.
Match the Start Range to Your Shade Goal
Light shades need a lower start band, while deeper shades need smaller step-up tests instead of one big increase.
Supplier-style color testing from CandleScience and Lonestar Candle Supply points to a shade ladder for one pound (454 g) of wax: light often starts near 2 to 4 liquid drops, medium near 4 to 8, and deep near 8 to 12, with chip and block formats moving up in equally small steps. Hot wax can look darker than the finished candle, so judge the result after cooling before you add more.
The Candle Dye & Coloring Hub is the place to keep the larger color path clear while you pick the right depth for one batch.
| Shade goal | Liquid dye for 1 lb (454 g) | Dye chips for 1 lb (454 g) | Shaved dye block for 1 lb (454 g) | Next move after the cooled check |
|---|---|---|---|---|
| Light | 2 to 4 drops | 1/8 to 1/4 chip | 1/64 to 1/32 block | Stop if the tint is visible and even |
| Medium | 4 to 8 drops | 1/4 to 1/2 chip | 1/32 to 1/16 block | Add one small step only if still pale |
| Deep | 8 to 12 drops | 1/2 to 3/4 chip | 1/16 to 1/8 block | Cool, compare, then add one more small step only if needed |
A light shade should still look soft after cooling. A medium shade should read clearly in normal room light without needing a second glance. A deep shade should look strong and even, but it should still come from small repeat tests rather than one large jump.
Use a fresh sample when you move up a level. Verify Color With a Small Cooled Test Batch keeps the comparison fair because you can line up the cooled results instead of guessing from the melt pot.
A simple next-step rule works well: if the cooled sample is close but still too light, add 1 to 2 liquid drops, 1/8 chip, or one tiny block shaving to a new one-pound test. After a shade band works, Scale Candle Dye for Any Batch Size is the right next move.
Very dense black, navy, or red goals are where waste climbs fast and repeatability drops. Leave those to an ultra-dark candle shades guide instead of forcing a deep-shade test past the point where the color is already close.
How this shade ladder was set
This shade ladder uses light, medium, and deep first-test bands for 1 lb (454 g) of wax as the metric. It was modeled from supplier-style start ranges, then spaced so each retest can move in a small step instead of one large jump.
The ladder assumes the same wax, the same dye format, and a cooled-sample check before more dye is added. Units stay in drops, chip fractions, and block fractions, and deep shades do not rise in a clean straight line across all dye brands.
Scale Candle Dye for Any Batch Size
Once you have a tested dye band, scale it by wax weight in one unit system and retest the cooled result before you pour a larger batch.
CandleScience and NorthWood Distributing frame dye use by wax weight, so “per pound” means the amount that fits 1 lb (454 g) of wax, not a fixed amount for every batch size. If your approved medium band is 4 to 8 liquid drops per pound, 8 oz (227 g) uses half that band and 2 lb (907 g) uses double it. The Candle Dye & Coloring Hub keeps that process clear when you move from a small test to a larger pour.
| Wax weight | Liquid dye | Dye chips | Shaved dye block | What the scale means |
|---|---|---|---|---|
| 8 oz (227 g) | 2 to 4 drops | 1/8 to 1/4 chip | 1/64 to 1/32 block | Half of a 1 lb start band |
| 1 lb (454 g) | 4 to 8 drops | 1/4 to 1/2 chip | 1/32 to 1/16 block | Baseline test band |
| 2 lb (907 g) | 8 to 16 drops | 1/2 to 1 chip | 1/16 to 1/8 block | Double the 1 lb band |
Worked example: if your approved medium band is 6 liquid drops for 1 lb (454 g) of wax, start at 3 drops for 8 oz (227 g) and 12 drops for 2 lb (907 g). Once batch size gets large enough that drops or fractions become awkward, keep the tested per-pound ratio and switch to weighed measurement for repeatability.
Use one baseline first. Start With a Conservative Dye Range by Format gives you that baseline. Then keep the same weight unit for the whole calculation, label the batch, and compare only cooled samples. That is why Verify Color With a Small Cooled Test Batch should happen before you trust a scaled formula.
A simple rule works well in practice. Halve the dye band when the wax weight halves, and double it when the wax weight doubles. Do not mix “drops per pound” with “chips per ounce” in the same calculation, because clean scaling only works when the starting band was already verified.
How these scaling examples were set
- Metric: scaled start bands for 8 oz, 1 lb, and 2 lb wax weights.
- Method: each row keeps the same tested band and scales it by wax weight only.
- Conditions: one dye format at a time, one wax at a time, and cooled-sample checking before reuse.
- Units: oz, g, drops, chip fractions, and block fractions.
- Limits: a clean calculation still needs a cooled retest before production.
Convert Liquid Dye, Chips, and Blocks Safely
There is no exact 1:1 conversion across liquid dye, chips, and blocks, so switch formats with a lower first test and a fresh cooled check.
General Wax & Candle Company and CandleScience separate dye guidance by format rather than promise a universal swap chart. That matters because the unit style changes with the product, and the control you get from one extra drop is not the same as one extra chip piece or one more block shaving. The Candle Dye & Coloring Hub helps keep format changes tied to a test habit instead of guesswork.
| Format | Control level | Unit style | Best first use | Conversion confidence |
|---|---|---|---|---|
| Liquid dye | High | Drops | Small tests and fine changes | Best for cautious switching |
| Dye chips | Medium | Chip fractions | Simple repeat batches | Moderate, needs retest |
| Shaved dye block | Lower | Block fractions or shavings | Larger color moves once tested | Lowest, easiest to overshoot |
The safest switch is to match the old result, not the old unit count. Go back to Start With a Conservative Dye Range by Format, choose the new format’s low test band, and then compare the cooled result against the old candle. After that, Scale Candle Dye for Any Batch Size can carry the new band to a different wax weight.
This three-step habit keeps conversions practical. First, pick the shade you already know works. Second, start slightly low in the new format instead of trying to match the old number. Third, cool the sample fully, log the result, and only then decide whether the next test needs a small increase.
Liquid dye gives the smallest first-test adjustment steps, so it is usually the easiest format for beginner control. Chips and blocks can still work well, but they need more care because each added piece or shaving can move the color faster than expected. When a switch makes the sample too dark or muddy, Avoid Over-Coloring and Know When to Stop is the right next check.
How this format comparison was set
This comparison uses control level, unit style, and conversion confidence as the working metric for each dye format. It was built from supplier-style guidance that measures and adjusts liquid dye, chips, and blocks in different unit systems rather than as equal swaps.
The comparison assumes conservative first tests, one format at a time, and cooled-sample judging before any increase. Units stay in drops, chip fractions, and block fractions, and the table does not claim brand-to-brand parity or exact conversion math.
Verify Color With a Small Cooled Test Batch
Test candle color with a small cooled pour, not the melt pot, then adjust the next batch in controlled steps.
The fastest way to avoid waste is to judge the finished shade from a cooled sample instead of the melted wax. Candle Dye & Coloring Hub gives the full color path, but this section is the working method that keeps each test honest. Use the same wax, the same dye format, and the same container style for each sample. Then compare the cooled results side by side before you change anything.
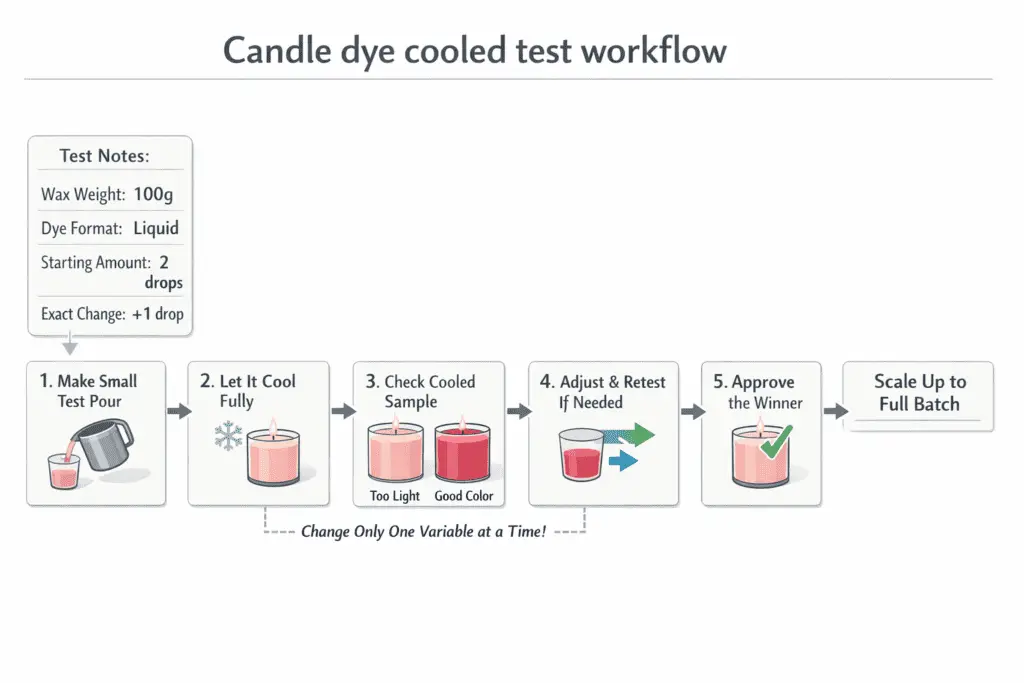
| Step | What to do | What to record | Next move |
|---|---|---|---|
| 1 | Make a small test pour | Wax weight, dye format, starting amount | Let it cool fully |
| 2 | Check the cooled sample | Light, close, or too dark | Do not judge from hot wax |
| 3 | Run a second sample only if needed | New amount and exact change | Keep every other variable the same |
| 4 | Compare both cooled samples together | Which one matches the target best | Pick the cleaner match |
| 5 | Approve the winner | Final test amount and result | Move to Scale Candle Dye for Any Batch Size |
A clean routine is simple.
- Pick one starting band from Match the Start Range to Your Shade Goal.
- Pour one small sample and let it cool all the way.
- If it is too light, raise the amount by one small step in a new sample.
- If it is too dark, lower the amount in a new sample instead of trying to rescue the same batch.
- Keep labels on each sample so the comparison stays fair.
In maker discussions, the most common mistake is trusting the melt pot because the hot wax looks richer than the cooled candle. Another common mistake is changing the dye amount and wax at the same time, which makes the next result harder to read.
Small test workflow checks
- Judged while hot: likely cause, melted wax looked darker than the finished candle.
- Changed two variables at once: likely cause, the test no longer proves which change mattered.
- Used a spoon smear only: likely cause, the sample did not cool like a real pour.
- Forgot labels: likely cause, the better result cannot be repeated.
How this workflow was set
- Metric: small-pour test order and next-step rule.
- Method: test, cool, compare, then adjust one variable at a time.
- Conditions: same wax, same format, same sample style, cooled comparison only.
- Units: drops, chip fractions, or block fractions.
- Limits: this method validates a start band; it does not replace a fresh test after wax or formula changes.
Candle Dye Start-Range Calculator
Use this calculator logic to turn wax weight, dye format, and shade goal into a conservative start band and a small next-test move.
This section is a utility, not a promise of an exact final formula. Candle Dye & Coloring Hub gives the full map, but the calculator works best after you have already reviewed Start With a Conservative Dye Range by Format and know the shade target. It then uses the same logic from Scale Candle Dye for Any Batch Size and points you to Avoid Over-Coloring and Know When to Stop when the next move should be smaller, not darker.
| Input | Choose one | What the calculator does |
|---|---|---|
| Wax weight | oz, lb, or g | Scales the start band to the actual batch size |
| Dye format | Liquid, chips, or shaved block | Uses the correct unit style |
| Shade goal | Light, medium, or deep | Sets a conservative starting band |
| First cooled result | Too light, close, or too dark | Suggests the next small move |
Worked example: for 1 lb (454 g) of wax, liquid dye, and a medium shade goal, start at 4 to 8 drops. If the first cooled sample is close but still light, move to a fresh test with one small increase instead of a large jump.
Use the output this way: if the cooled sample is too light, add one small step in a new sample; if it is close, stop and keep that band; if it is too dark, back down to the last lighter band before retesting.
Manual calculator guide
| Wax weight | Format | Shade goal | Conservative start band | Next move after the first cooled check |
|---|---|---|---|---|
| 8 oz (227 g) | Liquid | Light | 1 to 2 drops | Too light: add 1 drop in a new sample |
| 1 lb (454 g) | Liquid | Medium | 4 to 8 drops | Too light: add 1 to 2 drops |
| 1 lb (454 g) | Chips | Medium | 1/4 to 1/2 chip | Too light: add 1/8 chip |
| 1 lb (454 g) | Shaved block | Deep | 1/16 to 1/8 block | Too light: add one small shaving |
| 2 lb (907 g) | Liquid | Medium | 8 to 16 drops | Too dark: back down before retesting |
Use the calculator in this order.
- Pick the format-specific band.
- Match it to the target shade.
- Scale it to the wax weight.
- Pour a cooled sample.
- Make one small change only if the cooled result calls for it.
If you switch formats, reset low instead of forcing an exact conversion. If the first cooled sample already looks dark enough, stop there and do not keep adding color just because the melt pot looked lighter.
How this calculator logic was set
This calculator logic uses wax weight, dye format, shade goal, and next-test direction as the working inputs. It scales supplier-style one-pound start bands into simple start ranges rather than treating one result as a guaranteed final formula.
The logic assumes one format at a time, cooled-sample judgment, and conservative retests after the first pour. Units stay in oz, lb, g, drops, chip fractions, and block fractions, and the output is a start range rather than a guaranteed brand-to-brand match.
Avoid Over-Coloring and Know When to Stop
Too much candle dye can waste wax and hide the real problem, so cut the amount and retest instead of pushing darker.
Once a candle formula passes its useful color range, adding more dye usually creates a harder correction rather than a better finished shade. Supplier-backed guidance in the brief treats a too-dark result as a cue to reduce the next test band, cool the sample again, and compare it against an earlier winner instead of adding more color to chase depth. The Candle Dye & Coloring Hub helps with the wider color path, but this section is where you decide when a darker test has already gone far enough.
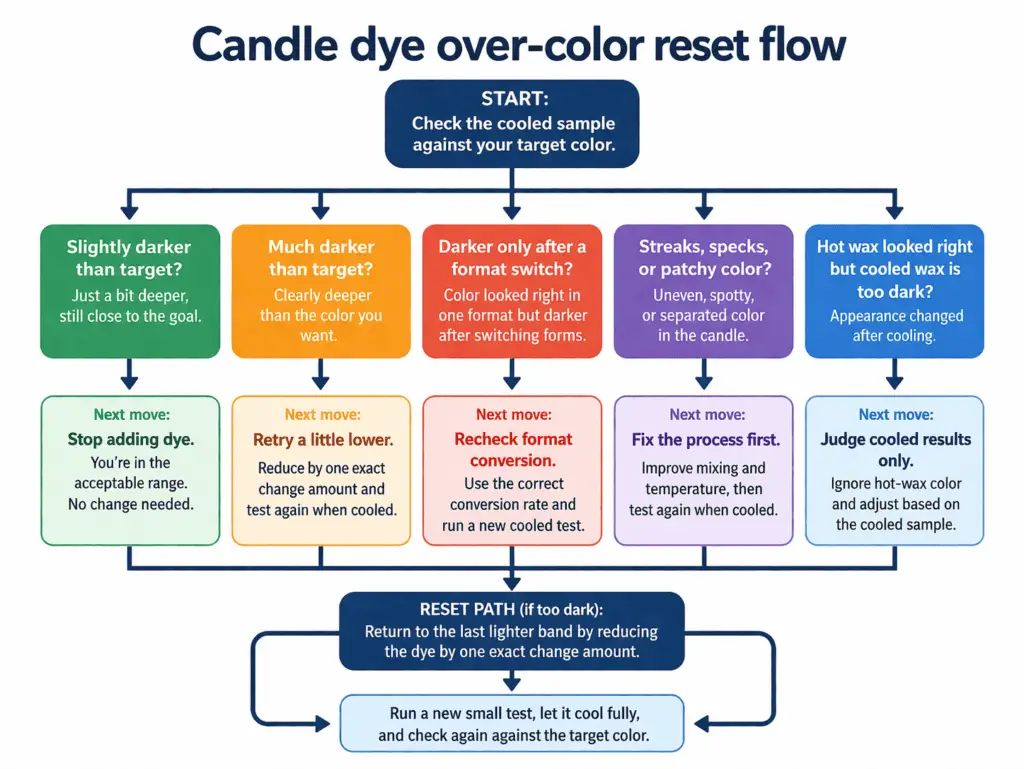
| What you see after cooling | What it usually means | Best next move |
|---|---|---|
| Slightly darker than target | You are near the useful ceiling | Stop adding dye and retry a little lower |
| Much darker than target | The test moved past the target band | Reset with a reduced band in a fresh sample |
| Darker only after a format switch | The swap may be the real problem | Recheck Convert Liquid Dye, Chips, and Blocks Safely before raising or lowering more |
| Streaks, specks, or patchy color | The issue may be mixing, not amount | Fix process first, then retest |
| Hot wax looked perfect, cooled wax looks too dark | The melt pot gave a false read | Judge only the cooled result next time |
Over-coloring means the added dye no longer improves the result in a useful way. The candle may already be darker than the target, the correction steps may get larger and messier, or the sample may start hiding whether the real issue was amount, process, or a bad format swap. When that happens, return to Start With a Conservative Dye Range by Format and rebuild from the last band that gave a clean cooled result.
Use this reset order after a cooled sample goes too dark.
- Stop adding dye to the current formula.
- Pull the next test back to the last lighter band that was still close.
- Compare the cooled retry against the earlier approved sample, not the melt pot.
- If the problem started right after a format change, recheck Convert Liquid Dye, Chips, and Blocks Safely before changing the amount again.
- If you need a lower retry band fast, use the Candle Dye Start-Range Calculator as a reset helper, not as proof that the darker batch was right.
In maker discussions, a common miss is treating a dark melt as proof that the final candle is finally “there,” then finding the cooled sample overshot the goal. Start the next retry from the last lighter sample that was still close.
How this retry matrix was set
- Metric: cooled-result pattern, likely read, and next move.
- Method: the matrix follows the brief’s modeled retry logic for over-colored samples and its stop-retest behavior by shade goal.
- Conditions: one format at a time, cooled-sample judging, and fresh retests instead of rescue dosing.
- Units: drops, chip fractions, and block fractions when the next band is reduced.
- Limits: this matrix shows reset logic, not a universal salvage rule for every dye brand.
Related pages for this topic: