
This page helps you fix a candle that cured lighter or darker than intended by diagnosing the real cause first, then correcting one variable at a time in small test remelts.
On this page, “too light” or “too dark” means the fully cured candle’s shade misses your intended target when you compare it in the same lighting and against the same reference. For broader context, see candle coloring. This page covers true dye-load misses, apparent misses caused by jar or surface effects, and nearby causes such as temperature, fragrance discoloration, fade, or soot only far enough to route you to the matching fix path.
Start with the diagnosis table, then test the matching fix on 100 g batches only after full cure confirms the color miss is real. For the main guide, see candle making. That keeps you from changing dye when the real issue is opacity, discoloration, flame soot, or glass appearance.
Fast diagnosis: what changed, and what to test first
The fastest way to fix an off-color candle is to match the visible symptom to the likely cause before you remelt anything. Start with the table below, then test one variable at a time after full cure.What you see after full cure Most likely cause First test to run Color looks too light everywhere Low dye load, weak dye, or naturally opaque wax Run a 100 g remelt ladder and increase dye in small measured steps Color looks too dark everywhere Overdosed dye or too much opacity Pastelize a 100 g remelt with a very small white-toner or dilution test Color is patchy, streaky, or speckled Dye not fully dissolved or temperature drift during mixing or pouring Re-test with hotter add-temp, longer stirring, and a steadier pour window Color turns beige, yellow, or muddy over days Fragrance discoloration or oxidation Test the fragrance in white wax and compare it against an unscented control Color looks darker mainly after burning Soot, mushrooming, or a wick mismatch Clean the jar, trim the wick, and test a smaller wick or different wick series Color fades near windows or on display Light and UV exposure Move the candle out of direct light and compare a stored control against the display sample Color looks wrong mainly when cold or through the glass Frosting, wet spots, or jar optics rather than a true dye problem Check the candle after melting and compare the wax in a plain clear test cup before changing dye
Before you choose a fix path, compare the candle cold, through the melt pool, and in a plain clear test cup so you do not mistake jar optics or surface effects for a true color miss.
A true color miss stays off-target after full cure in the same lighting and still looks wrong when you compare the candle cold, through the melt pool, or in a plain clear test cup. If the color only looks wrong through glass, on a frosted surface, or while the candle is cold, treat that as an appearance issue first rather than a dye-load error.
If more than one row fits, use this order so you do not misdiagnose the candle:
- Wait for full cure, then check the candle in daylight and again through the melt pool or a plain clear test cup.
- If the color looks wrong only when cold, frosted, or through tinted glass, treat it as a surface or jar-appearance issue before changing dye.
- If the candle is evenly too light or too dark everywhere, run a 100 g remelt ladder and change dye in small measured steps.
- If the color is patchy, streaky, or speckled, retest add temperature, stirring time, and pour window before changing the formula.
- If the wax yellows over days or looks darker mainly after burning, test fragrance, light exposure, and wick behavior before adding more colorant.
Why candle color changes after curing (24–72 hours) and what to expect
Candle color often shifts during curing because wax crystallises, fragrance settles, and dyes finish dispersing, so the shade you see while it’s warm is not the final color.
Most wax looks a little darker when hot and lighter after it cools, so do not judge the final shade from the pour pot or a warm jar. Wait through your normal cure window and compare the candle in the same lighting before you adjust dye.
A simple photo log at pour, full cool, and after two or three days is usually enough to separate normal settling from true defects like sharp patches, heavy marbling, or odd gray tones.
If the candle changes dramatically after full cure, re-check fragrance discoloration, add temperature, pour temperature, and mixing before you add more dye.
Cure-time color checklist:
- Photograph at least one tester at three points: freshly poured, fully cooled, and after 2–3 days, under the same lighting.
- Note room temperature, drafts, and cure length on your batch card alongside any visible changes.
- Wait for your typical cure window to pass before deciding a shade is too light, too dark, or “wrong”.
- Treat sudden patches, strong marbling, or odd gray tones after full cure as a sign to revisit fragrance, dye load, and add/pour temperatures rather than immediately adding more dye.
Fix candle color that’s too light — adjust dye load (g per 100 g wax)
To safely darken a too-light candle, re-melt a test batch and increase dye load in grams per 100 g wax, then confirm the wick burns clean.

There is no single ASTM or NCA dye-dose rule for fixing pale candles. In practice, dye usage depends on the exact wax, dye format, and supplier guidance for that product, then on whether your finished candle still burns clean in its real jar and wick setup.
Before you tweak any numbers, use the full guide to candle dye and coloring to separate dye-load problems from wax tint and fragrance discoloration. That keeps you from chasing a dye problem when the real culprit is an off-white wax or a discoloring fragrance.
Work on 100 g test portions instead of reheating the full batch so you can adjust ratios step by step. Weigh both wax and dye; grams give you repeatable ratios, while drops from bottles vary with viscosity and tip size.
Methods note: Treat the grams-per-100 g ladder in this section as a conservative shop testing method, not a formal industry standard. Start with your colorant supplier’s recommendation, increase in small measured steps, and stop as soon as burn quality drops, the flame weakens, or soot and mushrooming appear.
On this page, a clean-burn pass means a steady flame in the real jar with no visible soot, no heavy mushrooming, no drowning, and no new wick struggle after the color adjustment.
Use this micro-batch ladder to darken a too-light candle without wrecking wicks:
- Record the original batch: wax type, fragrance load, initial dye amount, cure time, and how pale the candle looks after curing.
- Weigh 100 g of the same wax blend and add dye at your original ratio so the test batch matches the main pour.
- Add a small increment, such as +0.05 g dye per 100 g wax, and stir slowly until the dye is fully dissolved and no streaks remain.
- Pour three swatches at slightly increasing dye loads (for example, original +0.05 g, +0.1 g, +0.15 g per 100 g) so you can compare color and burn in a simple 3-swatch ladder.
- Cure the swatches for the same time you used before, then burn-test each one, watching for soot, mushrooming, or drowning flames.
- Pick the darkest swatch that still burns clean, then scale that grams-per-100 g ratio up to your full batch size and repour.
Before you pour the main batch again, use your notes or a simple calculator to calculate additional dye for a remelt so your re-dosed wax follows the same ratio that worked in the test ladder. Planning the math first keeps “just one more pinch” experiments from turning into wasted wax and smoky jars.
These common failure patterns show up when makers try to recolor candles too aggressively:
- Misdiagnosis: assuming dye is wrong when fragrance or wax is turning the candle beige; pause and check vanillin %, discoloration notes, and low-discoloration options before adding more colorant.
- Skipping cure time: judging darkness while wax is still warm; always compare after a full cure so you do not over-dose based on a temporary shade.
- Over-dosing: chasing a deep color by pushing past your safe band, which often leads to wick clogging, heavy mushrooming, and jars that soot fast.
When wax opacity is the real limit
If higher dye loads still leave the candle pale, the wax itself may be muting the shade. Opaque soy blends, off-white wax, and strong surface frosting can make the same dye ratio look softer than it would in clearer wax.
At that point, stop adding more colorant just to force darkness. If repeated 100 g retests still miss the shade even with correct temperatures and clean mixing, stop adjusting dose and check the dye format itself. Move to the types of candle dye guide before the next production run, because the right fix may be a different dye system rather than more colorant in this batch.
Once you have a stable dye load that burns clean, the next big lever is temperature, because where you add dye and where you pour controls how smooth and saturated the color looks in the finished candle.
When temperature is the real cause of the color miss
If the candle is patchy, streaky, dotted, or darker in one zone than another, treat temperature as the first retest variable before changing dye load.
Add the dye near the top of your wax supplier’s safe melt window so it fully dissolves, then pour inside the supplier’s normal pour range instead of improvising with a much hotter or cooler pour.
Use the detailed pour temperature chart for blend-specific numbers. On this page, the goal is narrower: confirm whether temperature caused the off-color result.
- Remelt 100 g of the same wax with the same fragrance and the same original dye load.
- Add the dye at the hot end of the supplier’s process range and stir until the wax looks fully uniform, with no dots or streaks.
- Pour one tester in your normal pour band and a second tester with only a small temperature adjustment.
- After full cure, compare color smoothness, not just darkness. If the streaks disappear without changing dye load, temperature—not formula strength—was the real problem.
If the candle is evenly too light or too dark everywhere, go back to the dye-load sections instead of continuing to chase temperature.
Why fragrance oils turn candles yellow or muddy—and how to prevent it
Fragrance oils can turn candles yellow or muddy when they contain discoloring ingredients like vanillin, heavy resins, or unstable colorants, but you can prevent most of it with careful fragrance selection and control testing.
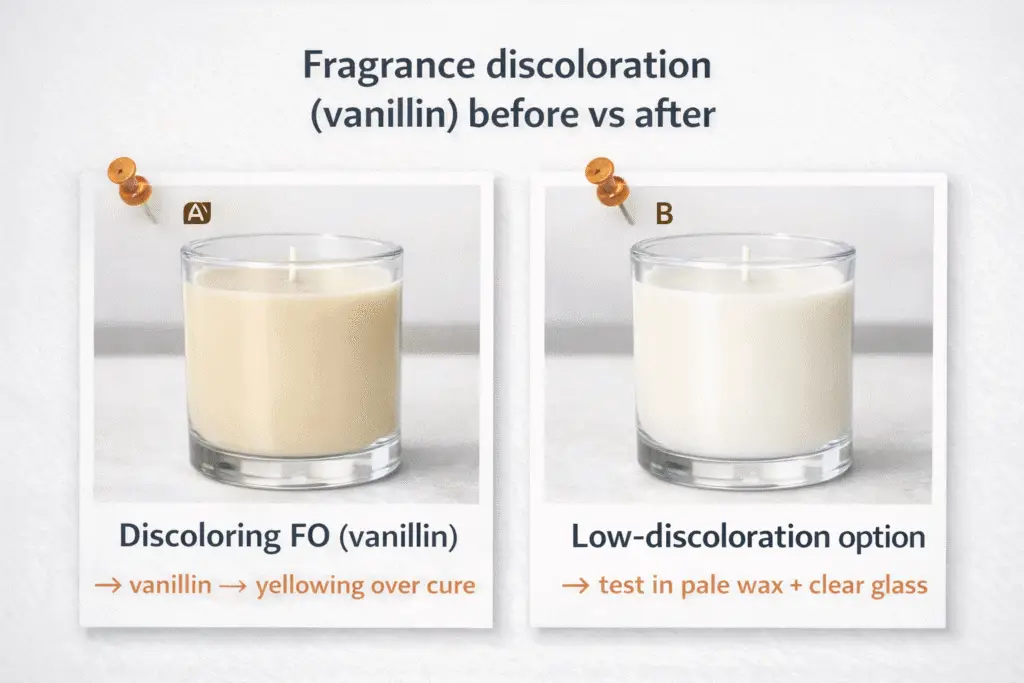
Start by checking the fragrance sheet for vanillin %, discoloration notes, or dark natural ingredients before you change dye. Vanilla, bakery, caramel, amber, and other resin-heavy scents often warm pale wax over time, especially in white wax and clear glass.
For this page, the first test is simple: pour an unscented white control and a fragranced tester in the same wax, then compare them after 24 hours and again after a longer cure. If the fragranced sample keeps warming while the control stays cleaner, route the deeper fix work to vanillin and similar compounds instead of adding more colorant.
If fragrance is the confirmed cause, match the shade to the scent or change the fragrance on the next pour. Do not keep adding cool-toned dye to a fragrance that will continue warming the wax.
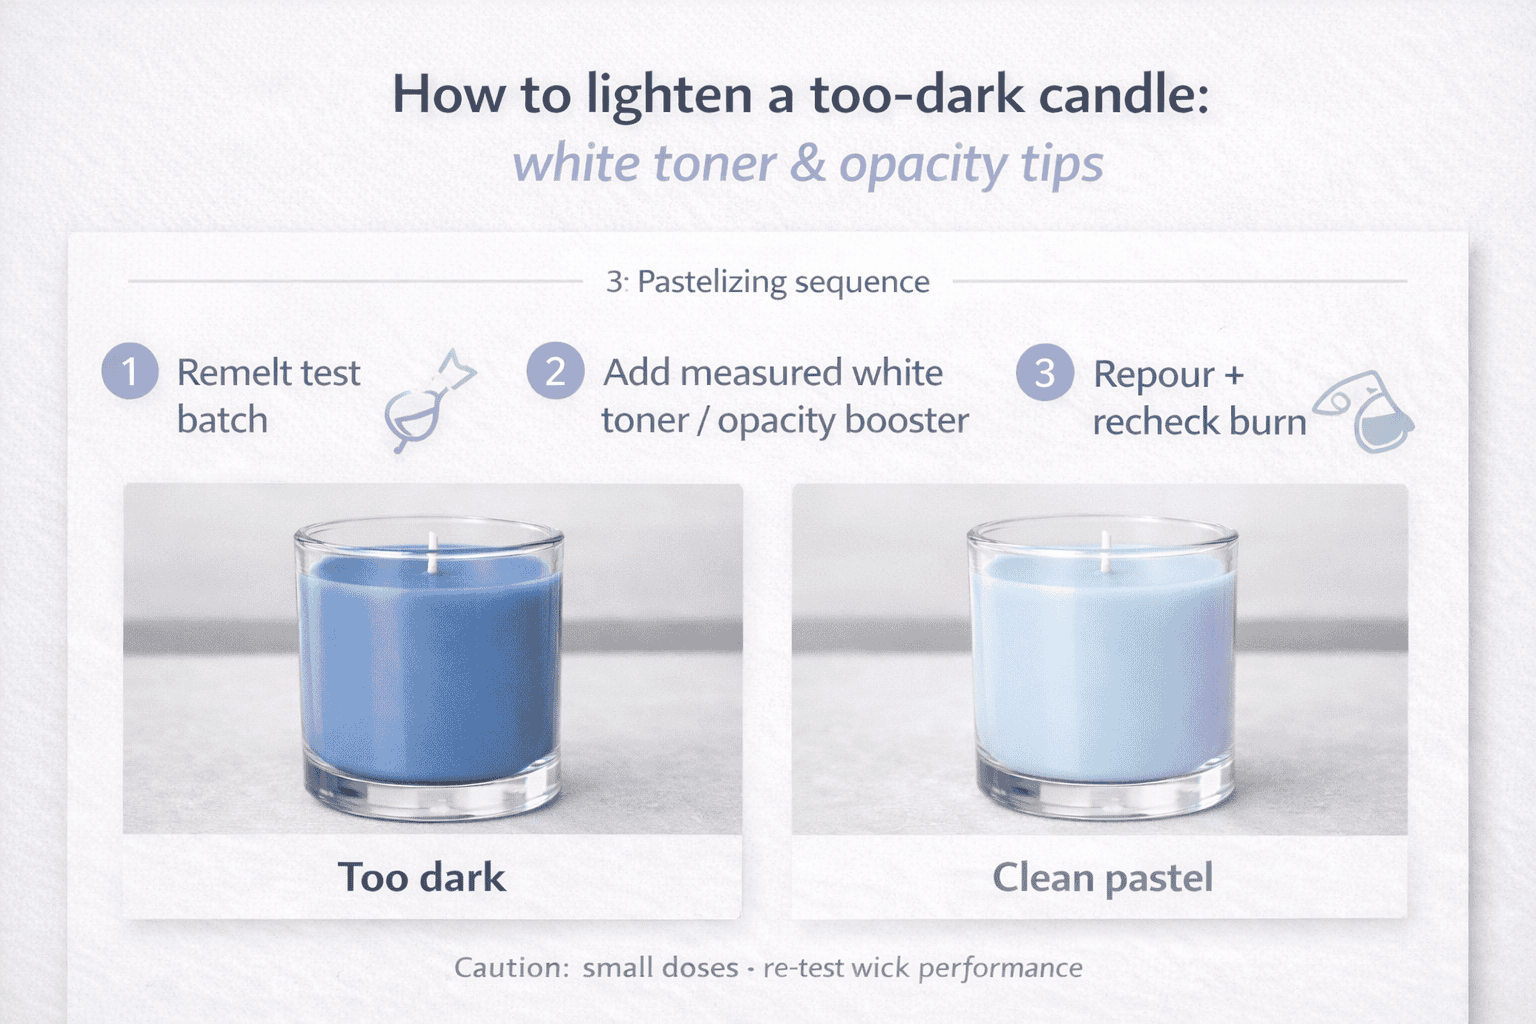
How to lighten a too-dark candle: white toner & opacity tips
To lighten a too-dark candle safely, remelt small test batches, add measured doses of white toner or titanium dioxide, then re-pour until you hit a clean pastel that still burns well.
Before you touch the wax again, review dye math before altering ratios so you do not overload colorants and choke the wick. White toner (white liquid dye) and titanium dioxide work by adding opacity and “white” to the mix, which makes the original shade look lighter and more pastel. Because they count toward your total dye load, they must stay within the ranges your wax supplier and SDS list, just like any other colorant. A small digital scale and even a simple dye calculator tool quickly pay for themselves if you sell candles or run frequent experiments.
Methods note: Treat the white-toner or titanium-dioxide ladder here as a cautious shop testing method, not a formal standard. Start with your supplier’s guidance for that colorant, increase in very small measured steps, and stop if opacity, burn quality, or soot behavior worsens.
On this page, a clean-burn pass means a steady flame in the real jar with no visible soot, no heavy mushrooming, no drowning, and no new wick struggle after the pastelizing or dilution test.
A practical micro-batch method:
- Record the original formula, including wax type, fragrance load, and all dyes in grams per 100 g wax.
- Remelt 100 g of the too-dark candle wax in a pour pitcher, keeping temperature inside your normal melt range.
- Use a simple calculator or spreadsheet to compute white grams for pastelizing, starting with something like 0.05–0.1 g white dye or TD per 100 g wax, well under any manufacturer maximum.
- Split the remelt into three 100 g test cups if you can and ladder the white dose upward in small, even steps, such as +0.05 g each level.
- Stir each cup slowly for at least one to two minutes so the white disperses evenly, then pour and cure as usual.
- After curing, compare swatches under daylight and burn-test the cleanest one to confirm the flame stays steady and the jar stays free of soot or heavy mushrooming.
Before you scale any winning swatch to the full batch, pour one more confirmation cup in the real jar and burn-test it after full cure so the lighter shade still burns clean.
If you are working with titanium dioxide specifically, treat it like a finicky guest. It lightens beautifully but can clump, streak, or make the wax look chalky if it is not fully dispersed. To fix streaks caused by titanium dioxide, pre-disperse it in a small amount of hot wax before adding to the main pot, stir longer than you think you need, and avoid pouring at very cool temperatures where it can drag into swirl marks. If streaks are extreme, remelt, strain through a fine mesh or filter, and re-pour at a slightly higher temperature so the particles stay in motion until the surface levels out.
When plain-wax dilution is better than white toner
If the batch is only a little too dark, plain uncolored wax of the same type can be a cleaner fix than more white toner. Dilution lowers the overall color strength without adding extra opacity that can turn the shade chalky or flat.
Use white toner or titanium dioxide when you want a pastel shift, not just less strength. Use plain-wax dilution when you want the same hue family with less saturation.
Mini FAQ for salvaging too-dark batches:
- Can you lighten a candle without remelting? Not reliably; painting or over-dipping changes the look but not the bulk color.
- Will adding more fragrance help? No; more fragrance usually darkens and can destabilise the burn.
- Is it cheaper to rebrand? Sometimes yes—if the color is attractive and burn-safe, renaming the shade can be more economical than chasing a perfect pastel.
Stop remelting when the batch still looks muddy, needs another heavy white correction, or burns worse after the last change. At that point, rebrand or repurpose the wax instead of chasing a cleaner pastel.
If you document your pastel ladder tests and keep the best ratios in a notebook or app, future “oops, too dark” batches become predictable re-tone jobs rather than stressful surprises.
Prevent color fade: UV inhibitors, display choices, and storage
Color fade usually points to light exposure, fragrance interaction, or both, so start by confirming the display conditions before you change the formula.
Pastels, blues, and white candles tend to show fading and warming fastest, especially in clear glass near windows or strong retail lighting. Compare a stored control against the display sample first, then move any deeper additive or storage work to the dedicated how to keep candle color from fading guide so this page stays focused on diagnosis and salvage.
Soot made my candle look darker—fix wick size and flame behavior
If soot is making your candle look darker, you likely have a wick problem rather than a dye problem.
A gray film on the inside of clear jars, dark haze above the wax line, smoking, flickering, or heavy carbon “mushrooms” on the wick usually points to wick behavior rather than a dye issue. If that pattern fits, compare your setup with a wick size chart by jar diameter and wax type and test one smaller size or a different series before you recolor anything.
Keep wicks trimmed, limit burn sessions, and retest in the real jar after the candle fully cools between burns. If the jar keeps sooting, treat the batch as a wick problem first and a color problem second.
If the problem is actually fading, soot, temperature, or bleeding, use the matching fix page
If the real problem is fading, soot, wick mismatch, vanillin discoloration, temperature-related streaking, or color bleeding between candle layers, use the matching page already linked above instead of stretching this troubleshooting note into a broader color guide.
Candle color FAQ
Can I fix a pale candle without remelting it?
Surface tricks like painting or over-dipping can change how the outside looks, but they do not change the bulk color or dye load. For a true fix, treat the pale candle as wax stock, remelt a small portion into micro-batches, and adjust dye load or jar choice based on the methods in the “too light” and diagnosis sections.
How do I verify the fix worked before scaling from a test cup to the full batch?
Check the winning swatch cold, in the real jar, and after a short burn test in the same wax, fragrance, and wick setup. If the shade still looks right after full cure and the flame stays clean, you can scale that ratio to the larger remelt with more confidence.
When should I stop remelting and rebrand the batch instead?
Stop when another correction would push the color farther from the target, add too much opacity, or make the candle burn worse. If the batch looks attractive and stays burn-safe, renaming the shade is usually a better choice than forcing one more remelt.
How much testing do I really need when I only change color, not fragrance or wick?
Even “just” color tweaks can affect burn if you push dye or pigment levels higher, change opacity, or switch jar styles. At minimum, plan for a full cure-time check, one or two burn tests per new shade in its real jar, and a quick comparison to your master swatch so you can catch soot, tunneling, or unexpected hue shifts before releasing a new batch