
Fix damaged candle packaging by checking safety risks first, repairing only cosmetic defects, then re-checking labels, seals, and odor neutrality before you list or ship the product.
Cosmetic dings happen in transit, but not every scuff is worth saving. If a vessel is cracked, a seam leaks, or a box smells strongly of spilled fragrance, the safest choice is to remove it from sale. When damage is only aesthetic, the goal is to restore a clean, shelf-ready look without rubbing off finishes, warping tins, or compromising warning labels. Start by sorting each unit into resell, rework, or scrap so every repair has a clear endpoint.
Method in one glance
- Triage safety and contamination first, then presentation
- Repair with the least aggressive method first
- Verify integrity, label legibility, and odor neutrality after the fix
- Disclose condition clearly if the repair remains visible
| What you find first | Outcome | Next step |
|---|---|---|
| Structural risk or contamination | Scrap or remove from sale | Do not repair for resale |
| Cosmetic packaging damage | Rework | Clean, reshape, relabel, or replace packaging |
| Minor mark only | Resell as-is | Confirm labels, odor neutrality, and presentation |
How to triage damaged candle packaging for sell-or-scrap decisions
Sort each unit by safety first. Scrap any cracked glass, leaking seams, or strong contamination. Rework only cosmetic damage that can pass final checks.
For the broader system behind labels, inserts, and presentation checks, see candle labels and packaging.
The fastest way to stay consistent is to think in three gates:
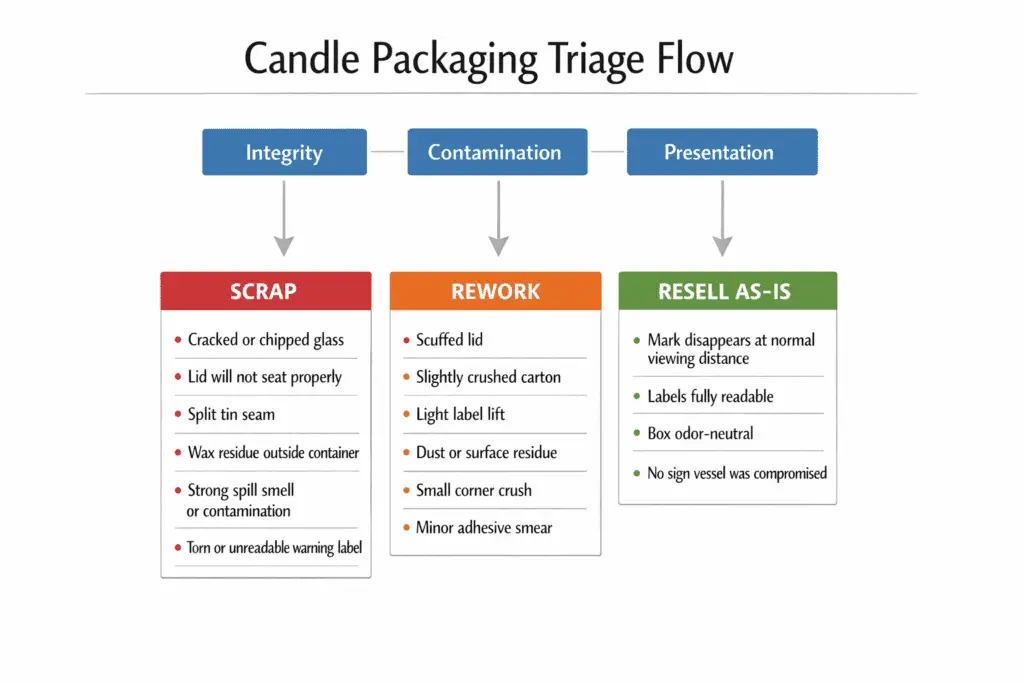
- integrity
- contamination
- presentation
Choose the outcome based on the first failure you find.
Fast triage flow
Remove from sale immediately if you find:
- cracked or chipped glass
- a lid that will not seat properly
- a tin seam that looks split
- wax residue on the outside of the container
- a strong spill smell or obvious contamination
- a torn, missing, or unreadable warning label
Rework if the issue is cosmetic and limited, such as:
- a scuffed lid
- a slightly crushed carton
- light label lift
- dust or surface residue
- a small corner crush
- a minor adhesive smear
Resell as-is only if:
- the mark disappears at normal viewing distance
- labels are fully readable
- the box is odor-neutral
- there is no sign the vessel was compromised
The key distinction is simple. Cosmetic damage changes how the item looks. Functional damage changes how it contains heat, wax, or fragrance, or how safely it can be handled. If you are unsure which type of damage you are looking at, quarantine the unit and slow down instead of forcing it into the sell pile.
A simple way to keep decisions consistent is to assign one reason code before doing anything:
- glass risk
- seam risk
- odor contamination
- label readability
- carton crush
That forces you to fix the actual problem instead of just the visible symptom.
When to replace packaging instead of repairing it
Replace packaging when a fresh box, sleeve, or insert will restore a clean, truthful presentation faster than repair. Choose replacement for oil-stained cartons, crushed sleeves that stay warped, loose inserts that no longer hold the candle steady, or odor that lingers after isolation. Scrap the unit if replacement packaging still cannot restore readable warnings, odor neutrality, or a shelf-ready appearance.
Steps to clean smudges, dust, and residue without damaging finishes
Use the least aggressive method first. Remove dust dry, lift adhesive with a finish-safe method, and deodorize by isolating the packaging, not by adding fragrance.
Always identify the material before cleaning. Carton, varnished wood, coated tin, glass, and frosted glass all react differently. Test any cleaner in an unseen area if you are unsure.
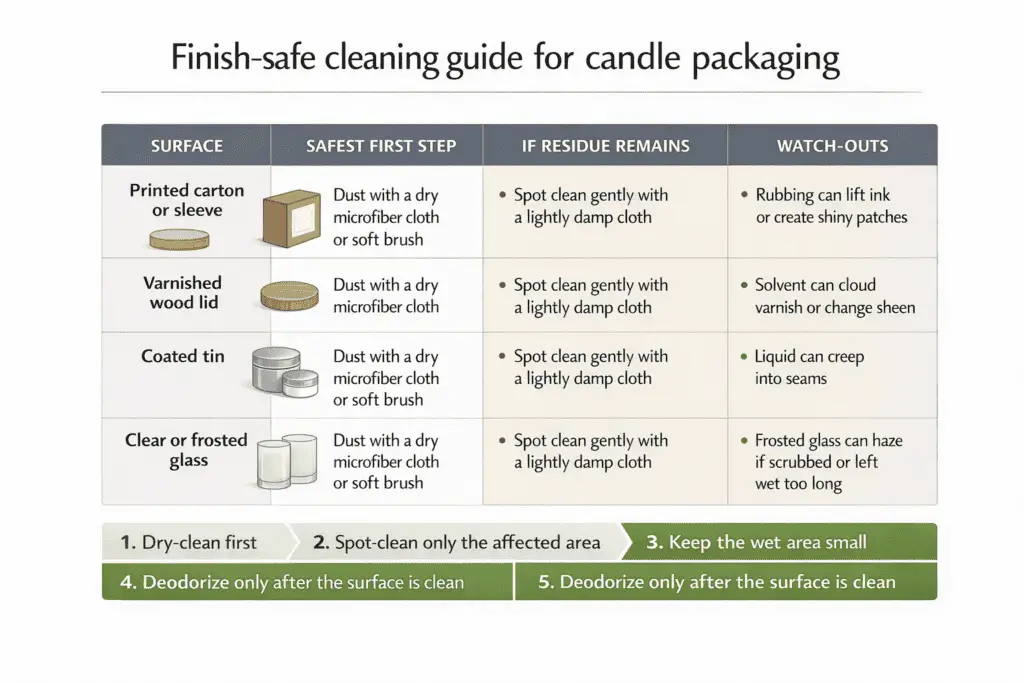
Surface cleaning guide
| Surface or finish | Safest first step | If residue remains | Watch-outs |
|---|---|---|---|
| Printed carton or sleeve | Dry microfiber, soft brush | Minimal dabs of finish-safe adhesive remover on a cloth | Rubbing can lift ink or create shiny patches |
| Varnished wood lid | Dry microfiber | Mild cleaner on cloth, then dry immediately | Solvent can cloud varnish or change sheen |
| Coated tin | Dry microfiber | Small amount of adhesive remover on a cloth | Liquid can creep into seams |
| Clear or frosted glass | Dry microfiber | Isopropyl alcohol on cloth for smears, adhesive remover only if tested | Frosted glass can haze if scrubbed or left wet too long |
Safe cleaning sequence
- Dry-clean first so you do not grind dust into the surface.
- Spot-clean only the affected area with a cloth, not a soaked pad.
- Keep the wet area as small as possible.
- Deodorize only after the surface is clean.
For odor removal, isolate the packaging from inventory and use an absorbent like charcoal. Do not spray fragrance into the box to hide odor. That can cause scent transfer and misrepresent the product.
If a faint scuff or softened print remains after a mild cleaning attempt, stop there. Trying to perfect it often makes the damage more obvious.
Relabel vs cover-up: what is safer and what is not
Relabeling is usually safer than covering up because it keeps required information readable and avoids hiding warnings or product identity.
Choose relabeling when the original label is:
- torn
- smeared
- lifting
- oil-stained
- no longer easy to read
How to relabel cleanly
- Remove the old label gently by peeling low and slow.
- Clean the surface lightly and let it dry fully.
- Align the new label once.
- Press from the center outward.
- Press the edges firmly.
- Re-check adhesion after 10 minutes and again after a few hours.
When a cover-up may be acceptable
A cover-up can work only for decorative elements such as:
- a dinged belly band
- a gift tag
- an outer sleeve
It is not a safe fix if it:
- hides any warning text
- hides product identity
- creates duplicate information
- looks like damage concealment instead of a clean correction
If a relabel remains visible, disclose it plainly. A simple line such as “label replaced due to shipping scuff; candle is unused” is usually enough.
How to square crushed cartons and reinforce corners cleanly
Square a crushed carton by restoring the original shape first, reinforcing weak points from the inside, then checking rigidity so it does not collapse again in transit.
Most boxes fail twice. They look fixed, then bulge or crush again once the candle goes back in. The goal is to restore shape and support without creating visible lumps or pushing the walls outward.
Four-step carton squaring flow
- Empty the box completely.
- Reset the original folds gently by working along the existing crease lines.
- Press the carton around a flat insert or clean guide so opposite walls become parallel again.
- Reinforce from the inside with thin corner strips or a snug inner sleeve.
What to check before reboxing
- corners sit close to 90 degrees
- walls do not bow outward
- the carton sits square on a flat surface
- printed areas are not wavy or shiny from over-handling
Common repair mistakes
- adding too much material inside, which causes bulging
- using too much moisture, which weakens the board
- creating new crease lines instead of restoring the old ones
If the box is still visibly imperfect after reasonable rework but remains safe, list it as open-box or route it to seconds instead of overworking it.
Steps to deodorize packaging and stop scent transfer
Isolate the packaging, add an absorbent in a breathable setup, then re-check smell before repacking. Never cover odor with added fragrance.
Odor usually lives in porous materials such as cardboard, paper inserts, and tissue. If the smell is intense, oily, or clearly linked to a spill, replacing the packaging is usually cleaner than trying to save it.
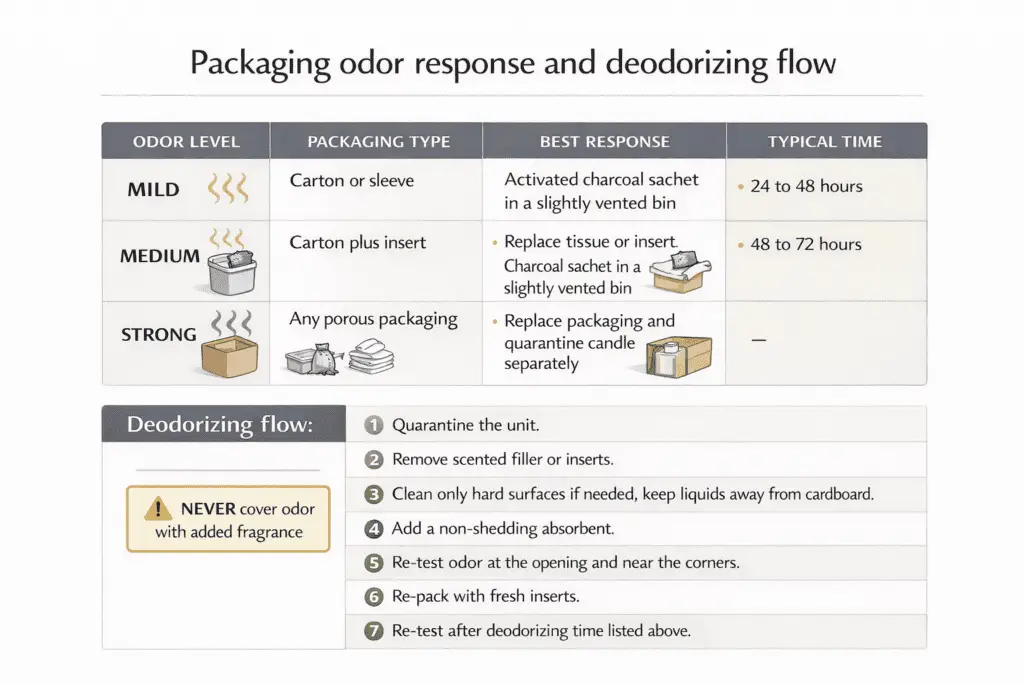
Practical odor response table
| Odor level | Packaging type | Best response | Typical time |
|---|---|---|---|
| Mild | Carton or sleeve | Activated charcoal sachet in a slightly vented bin | 24 to 48 hours |
| Medium | Carton plus insert | Charcoal plus replace tissue or insert | 48 to 72 hours |
| Strong | Any porous packaging | Replace packaging and quarantine candle separately | Do not attempt odor masking |
Clean deodorizing flow
- Quarantine the unit away from finished inventory.
- Remove scented filler or inserts.
- Clean only hard surfaces if needed.
- Keep liquids away from cardboard.
- Add an absorbent that will not shed dust.
- Re-test odor at the opening and near the corners.
- Re-pack with fresh inserts.
If the box passes but the candle still smells like nearby inventory, your storage system may be causing cross-scent transfer.
How to document repairs with photos and lot traceability
Assign a repair lot ID, tag each unit, photograph the repair, and log the fix under a searchable record tied to inventory.
A repaired unit should be traceable from “damage found” to “approved to sell” without guesswork.
Useful repair log fields
| Repair log field | What to record |
|---|---|
| Repair lot ID | Date plus batch or lot plus short sequence |
| SKU or scent | Exact product name and variant |
| Defect code | Crushed corner, label lift, scuffed lid, odor contamination, and so on |
| Action taken | Reboxed, relabeled, cleaned, deodorized, downgraded |
| Approver | Name or initials plus approval date |
| Photo set | Before, after, and close-up of repaired area |
Best photo set
- front view
- top-down view showing lid or centerline
- close-up of repaired area under bright light
Store the record where it is searchable by:
- lot ID
- SKU
- defect code
If the repair remains visible, make sure your listing condition matches the actual item.
Final QA before relisting or shipping
Run one last QA pass after any repair so the packaging matches the item, required information stays readable, and the unit is ready to list or ship without a surprise.
Can you still sell it if only the outer packaging was repaired? Yes, if the candle is unused, the container and closure are intact, required information is readable, and the repaired area is disclosed when it remains visible.
Before relisting or shipping, confirm:
- warnings are readable
- the container and closure are intact
- packaging is odor-neutral
- the replacement box, sleeve, or insert fits cleanly
- repaired spots are clearly photographed or described
Avoid phrases like “brand new packaging” if you repaired or replaced the carton, label, sleeve, or insert. Clear condition language beats clever wording every time.
Final takeaway
Not all damaged candle packaging should be saved. The blunt rule is simple:
- scrap anything structurally risky or contaminated
- rework only cosmetic defects that can be fixed cleanly
- disclose anything visible that remains after repair
The correct order matters:
- triage safety first
- clean gently
- repair only what is worth saving
- re-check labels, seals, and odor neutrality
- list honestly
That keeps you out of the stupid zone, where a cheap cosmetic rescue turns into a safety problem, a refund, or a trust problem.