
Use a snug inner carton with shock-absorbing wrap and a right-sized outer shipper, then add clear handling labels and tamper evidence so your candles arrive intact and look premium on delivery.
This guide is for makers who need one packaging system that ships cleanly and still looks worth opening. You will be able to choose the box, fit, and finish that match your vessel, sales channel, and brand goal. The main choice is not just style. It is how box structure, inserts, clearance, and presentation work together around the candle. Start with the decision framework below, then pressure-test the fit before you standardize anything.
Broken glass and scuffed labels can turn a five-star scent into a one-star review. The goal is to keep the jar from moving, keep the lid from taking hits, and keep the outside clean enough to feel gift-ready. Small makers need packaging that is fast to pack and consistent across batches, not a one-off craft project. When you choose materials based on real hazards like drops, vibration, heat, humidity, and scanning, your brand look and your damage rate improve together.
Choose Packaging by Sales Channel, Vessel Type, and Brand Goal
Choose the packaging setup by sales channel, vessel type, and brand goal first, then fine-tune inserts, clearance, and finish around that decision.
Ecommerce orders need a ship-safe structure first, while retail and gift sets can justify a stronger presentation layer. The best choice is the one that keeps the jar stable, keeps the outside clean, and still fits your packing speed and shipping budget.

This table shows the fastest first-pass packaging choice for common selling setups.
| Scenario | Start With | Add This | Brand Priority | Main Risk to Control |
|---|---|---|---|---|
| Single-jar ecommerce order | Double-wall mailer | Snug insert and base pad | Clean exterior and readable label | Corner drops and internal movement |
| Retail shelf sale | Rigid or printed carton | Centered insert | Front-panel clarity | Scuffs, tilt, and off-center presentation |
| Gift order that ships | Rigid gift box | Outer shipper | Premium reveal after delivery | Glass damage during parcel handling |
| Subscription or repeat-ship 4-pack | Corrugated multi-pack mailer | Divider grid | Fast, repeatable packout | Jar-to-jar contact |
| Heavy glass jar | Stronger corrugated mailer | Denser base and corner protection | Restraint over decoration | Base-rim chips and box failure |
| Mixed vessel gift set | Outer shipper | Individual cavities | Neat presentation across formats | Mismatch gaps and lid tapping |
Box Type and Wall Strength, Mailer vs. Rigid Gift Box
For most shipping, a double-wall corrugated mailer gives the best protection for the cost, while rigid gift boxes trade higher cost and bulk for premium presentation.
A mailer is usually the safer shipping shell because corrugated flutes spread impacts and rebound after corner drops. A rigid box can transmit sharp hits straight to glass unless it is protected inside a shipper. Pick the smallest mailer that prevents internal movement, then reserve rigid boxes for true gift moments where you can add an outer shipper without increasing damage risk.
A practical way to decide is to score the box against the abuse you expect:
- Daily parcel handling: Choose a mailer first, use a rigid box only inside a shipper.
- Retail shelf and gifting: Use a rigid box for the inner experience, but do not skip the shipper.
- Heavier jars: Prioritize wall strength and corner protection over premium finishes.
- Small-batch packing: Choose the style you can reorder consistently.
Do You Need a Gift Box, a Shipper, or Both?
Use both when the customer needs a premium reveal and the parcel still has to survive carrier handling.
A gift box is the presentation layer, and a shipper is the protection layer. Use only a shipper for routine ecommerce orders, use only a gift box for hand-to-hand retail sale, and combine both when the gift experience matters after transit.
These rules keep the choice simple.
- Direct-to-customer shipping: Shipper first.
- Retail shelf only: Gift box or printed carton first.
- Gift order that ships: Gift box inside a shipper.
Insert and Void-Fill Fit, Die-Cut Inserts, Foam, Crinkle
A snug insert prevents breakage when it stops the jar from moving and cushions the base so the lid never takes the hit.
Movement is the real problem. When the jar gains speed inside the cavity, the first impact often lands on a lid edge or base rim and turns into chips, dents, or label scuffs. Aim for a fit that seats smoothly, closes without bulging, and produces no hard clack in a 10-second shake.
Fast Fit Check
- Seat test: The jar drops in without buckling the insert walls.
- Shake test: No hard clack, only a muted rustle at most.
- Rub test: The label face shows no scrape lines where it contacts edges.
- Tip test: Tilt the box 45 degrees and return upright, the jar should not slide to a new position.
What Each Material Really Does
- Die-cut corrugated tray: Best for repeatable side control and packing speed.
- Foam: Best for sharp impacts, but watch for label grab on cut edges.
- Molded pulp: Best recyclable cradle, but it demands consistent vessel sizing.
- Crinkle paper: Fine as a space filler, weak as a glass-movement stopper by itself.
How to Validate a Packaging Choice Before Rollout
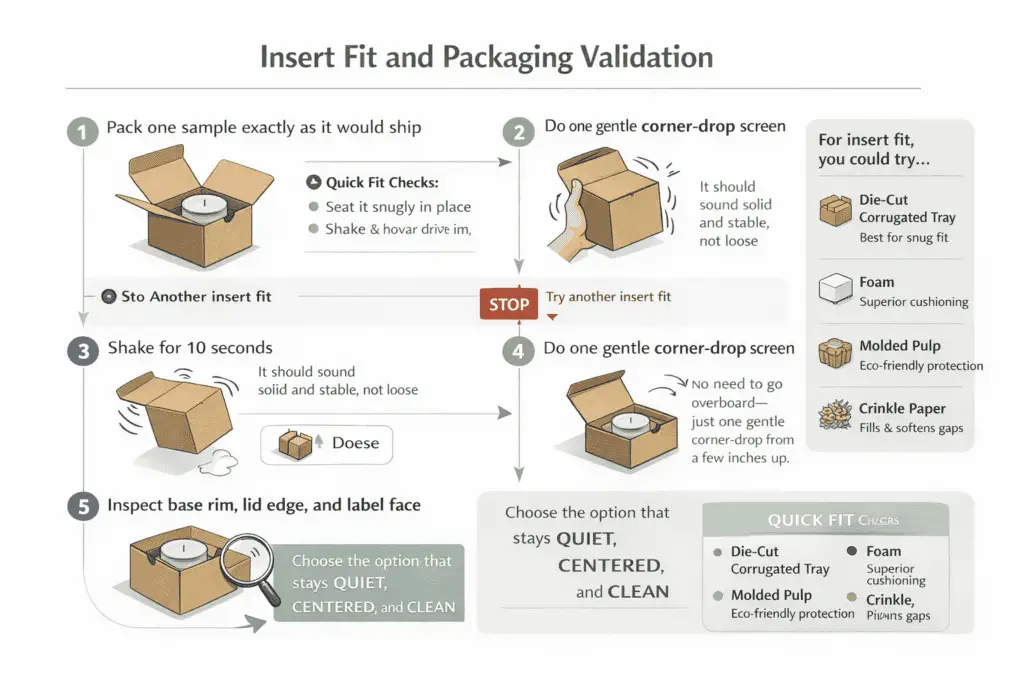
Validate the packaging choice with a short repeatable screen before you order a full batch.
The point is to catch clacks, rub points, and corner impact before you lock the insert and box size. Run the same quick screen on every candidate pack so you compare like with like.
These steps keep the screening short enough to repeat across options.
- Pack one sample exactly as it would ship.
- Shake it for 10 seconds and stop if you hear a hard clack.
- Do one gentle corner-drop screen and inspect the base rim, lid edge, and label face.
- Choose the option that stays quiet, stays centered, and comes back clean.
Jar Clearance and Movement Tolerance
Keep clearance tight enough that the jar cannot build speed, and keep lid headspace small enough that it cannot tap the box walls.
As a conservative starting point, hold lateral play to about 1 to 2 mm and design top space so you cannot hear any lid tap during a shake test. If you hear a hard clack in 10 seconds of shaking, the jar has enough run-up to chip glass or dent lids on the next corner drop.
Methods note: The 1 to 2 mm range and the no-clack check are working fit targets for a first pass, not legal limits or lab values. Use them to screen a sample pack quickly, then repeat the same shake, tip, and gentle corner-drop checks after any change in jar, wrap, insert, liner, or lid guard.
Starter Tolerance Targets
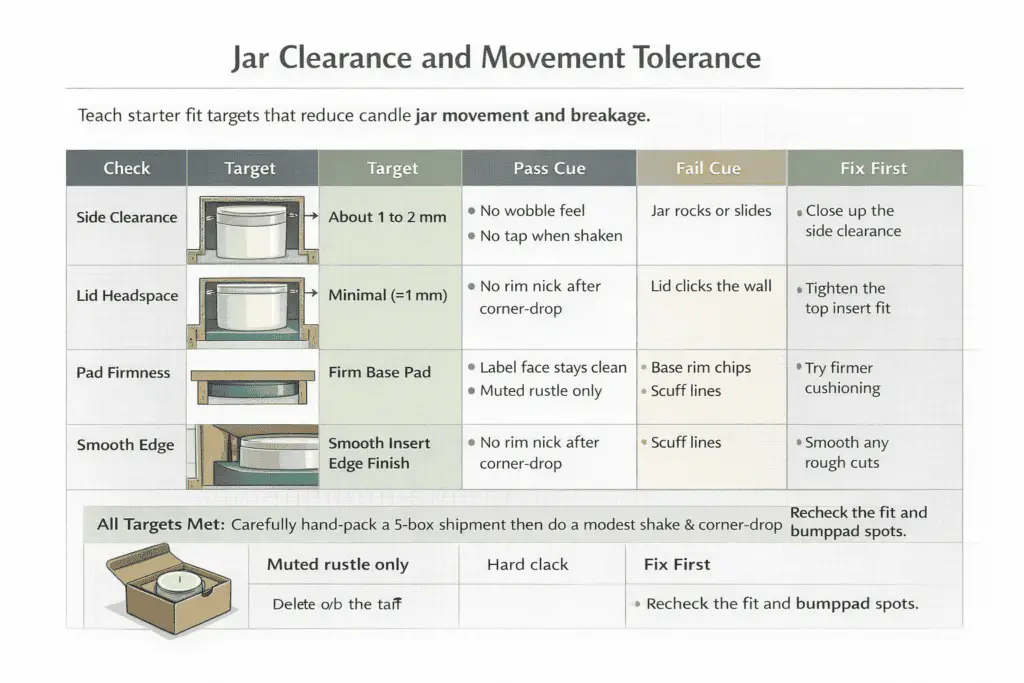
| Check | Target | Pass Cue | Fail Cue | Fix First |
|---|---|---|---|---|
| Side clearance | ~1 to 2 mm | No wobble feel | Jar rocks or slides | Tighten cutout or add a smooth wrap |
| Lid headspace | Minimal | No tap when shaken | Lid clicks the wall | Add a top pad or lid guard |
| Base protection | Firm pad | No rim nick after corner drop | Base rim chips | Densify base pad before adding side fill |
| Insert edge finish | Smooth | Label face stays clean | Scuff lines | Bevel or line the edge |
| Rattle level | None | Muted rustle only | Hard clack | Reduce movement before adding thickness |
Cushioning Thickness, Wrap, Bubble, Foam
Choose cushioning thickness by jar weight and label sensitivity so impacts spread across layers and glass edges never take point pressure.
A practical starting point is one layer of thin foam or one layer of medium bubble for light jars, then more layers as jar weight and drop risk rise. Prioritize a firm base pad and a small top pad over simply adding more fluff. Your goal is not thickness alone, it is even compression around the jar so it cannot shift and no hard ridges press into corners or label seams.
Use low-lint tissue and a dust cap only when transit rub shows up on labels or jar tops. Fix movement first, then add those surface-protection layers.
Quick Layer Guide
- 8 to 9 oz jar, normal shipping lanes: Start light, prioritize base and top pads.
- 10 to 16 oz jar, longer shipping lanes: Add a layer and increase base-pad density.
- Soft-touch or matte labels: Favor foam contact and keep seams off label faces.
- Still rattles: Fix fit first, then add wrap.
DIM Weight and Package Size Optimization
DIM weight charges you for volume, so the cheapest safe box is the smallest one that still prevents jar movement.
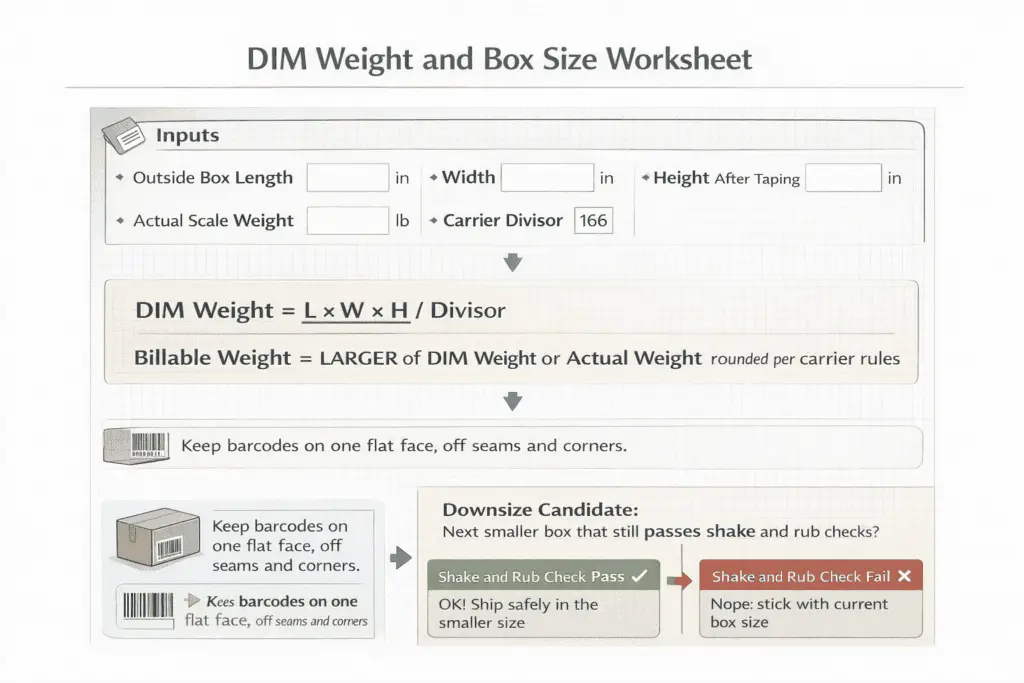
Right-sizing works only when you downsize without reintroducing movement. A smaller box lowers billed volume, but only if your insert and pads still prevent clacks and rubbing. Treat empty air as paid-for risk, not just wasted space.
DIM and Billable Weight Worksheet
Inputs:
- Outside box length, width, and height after taping
- Actual scale weight
- Carrier divisor
Outputs:
- DIM weight = (L × W × H) ÷ divisor
- Billable weight = max(DIM weight, actual weight), rounded per carrier rules
- Downsize candidate = the next smaller box that still passes shake and rub checks
Check the next smaller box against carrier thresholds before you standardize it. A small increase in length or height can erase the savings from a tighter packout.
Keep scan-safe label placement simple: use one flat face, keep barcodes off seams and corners, and keep tape out of barcode quiet zones.
Retail Branding and Unboxing
Premium feel comes from restraint, one strong finish, a window only when it helps the product, and inserts that center the jar immediately.
Windows reduce uncertainty when the jar is visually distinctive, but they can add glare, weaken panels, and increase scuff risk in shipping. A snug insert is what makes simple packaging feel intentional, with a centered jar, level lid, and clean edges.
The outside should communicate the brand name, scent, and candle format first, then let finish, color, or a window support that message. Use a window only when the product itself helps the sale and you can keep glare, scuffs, and off-center drift under control; if unopened status matters, use the smallest tamper cue that does not clutter the front panel.
Fast Premium Check
- Open the package in daylight and indoor light, does glare hide label text?
- Take two phone photos, one front-on and one at 45 degrees. If reflections dominate, reduce gloss.
- Look from arm’s length for two seconds. If the jar looks off-center, fix the insert cutout.
Keep sustainability decisions short on this page: choose claims your supplier can document and packages that recycle cleanly, then handle deeper eco-versus-premium tradeoffs on a separate packaging-material page.
Candle-Type-Specific Packaging
Match packaging to shape. Pillars need edge and side support, tins need lid security, and melts need rigid cavities that resist crushing.
A single one-box-fits-all approach breaks down because each candle type fails differently. Pillars chip and scuff, tins pop lids or dent, and melts deform and crack when cavities flex. Pick the simplest pack that prevents the dominant failure for that format, then standardize sizes so reorders stay consistent.
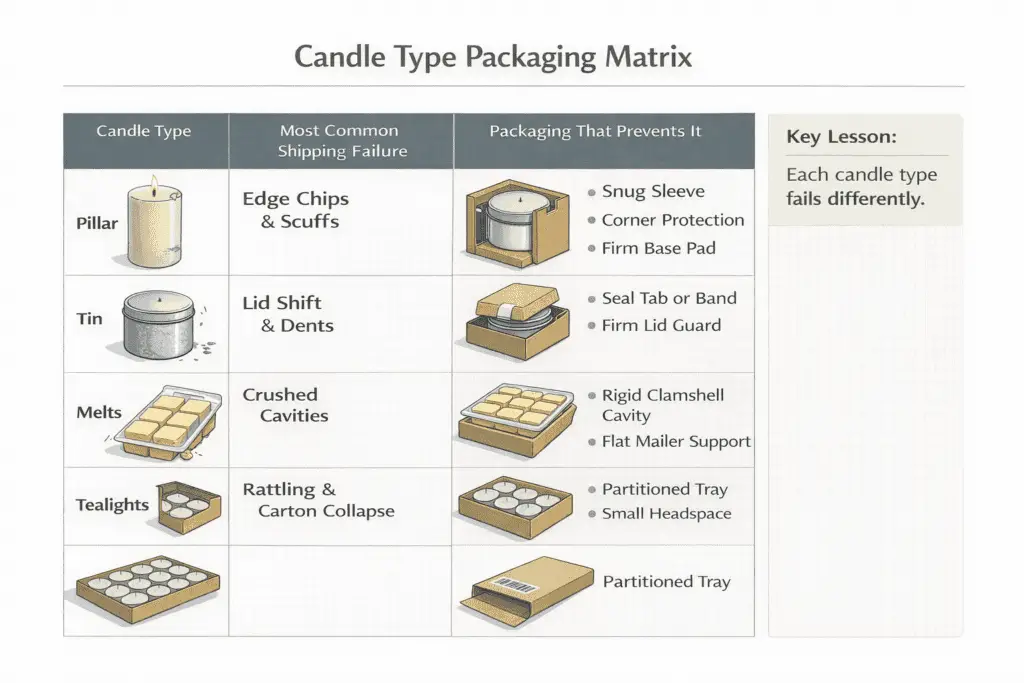
| Candle Type | Most Common Shipping Failure | Packaging That Prevents It |
|---|---|---|
| Pillar | Edge chips and scuffs | Snug sleeve, corner protection, and base pad |
| Tin | Lid shift and dents | Seal tab or band, lid guard, and tight cavity |
| Melts | Crushed cavities | Rigid clamshell cavity and flat mailer support |
| Tealights | Rattling and carton collapse | Partitioned tray and small headspace |
Multi-Pack Carriers and Dividers
Use dividers when the goal is to stop glass-to-glass contact, and use individual cavities when you need a premium, clean presentation.
Shared walls reduce material and weight, but they only work if each jar has enough side control to prevent tapping during vibration. Design multi-packs around the worst-case jar, meaning the largest diameter and tallest lid, not the average.
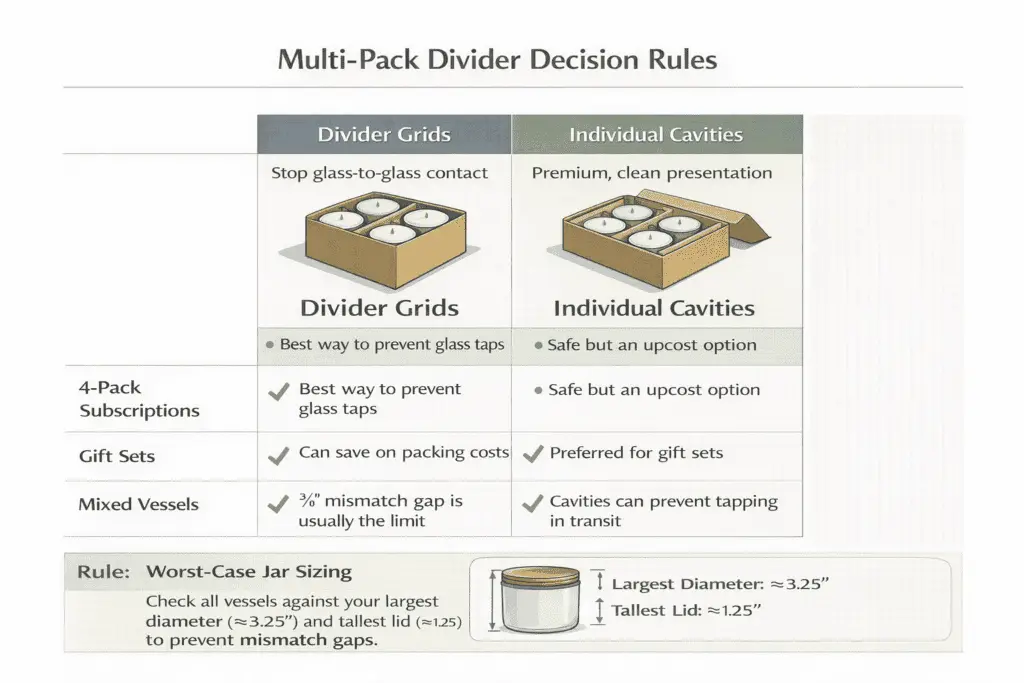
Divider Decision Rules
- 4-pack subscriptions: Divider grids reduce materials and speed packing.
- Gift sets: Individual cavities reduce scuffs and look more premium.
- Mixed vessels: Individual cavities prevent mismatch gaps and clacks.
Final Packaging Rule
The best candle packaging is not the prettiest sample on a desk. It is the packaging that survives real handling, protects the jar from movement, keeps labels clean, controls costs, and still makes the candle feel worth opening. If the jar clacks, shifts, rubs, or arrives looking tired, the packaging failed, no matter how nice it looked in mockups.
Choose the structure that matches the sales channel first, lock the fit second, and spend on surface details only after the pack stays quiet, clean, and centered in testing.