To size a candle wick correctly the first time, match your jar diameter and wax to a wick chart, then verify with a clean two-to-three-hour burn test.
This page is for container-candle makers who need a dependable starting wick range without guessing across too many codes. It shows how to choose a first test range from jar diameter, wax system, and the recipe changes that matter most. The main sizing variables are inner diameter, wick family, wax base, and the burn-test signals that confirm or reject a candidate. Start with the first test range below, then tighten the choice with the same controlled workflow.
On this page, a correctly sized wick means the smallest wick in your tested family and range that reaches near-edge melt coverage by about hour two or three without early soot, severe mushrooming, self-extinguishing, or sharply overheated glass. It does not mean a universal safety certification, the best wick across every vessel or wax system, or a final answer that carries over unchanged when the jar, wax, fragrance, dye, or additives change.
Start here: choose your first test range
Choose your first test range by matching container diameter to one wick family, then treating wax type, fragrance load, and vessel factors as adjustment variables. The chart gives you a starting point, not a final answer. Keep the recipe steady for the first round so the wick is the only variable you are really testing.
For the parent overview of wick families and sizing logic, use the wick types and sizing guide.
| Input to record | What it changes | First action |
| Inner diameter at the wax fill line | How much surface area the wick must melt | Choose one wick family and 2–3 adjacent sizes that match that diameter |
| Wax type or blend | How much heat the candle needs to keep a stable melt pool | Keep the same container range, then bias slightly hotter for harder blends and slightly cooler for softer blends |
| Fragrance load, dye, and additives | Whether the same wick runs weak, balanced, or too hot in the finished recipe | Test the same baseline wick first, then move only one size at a time |
| Vessel shape and material | Whether heat is trapped, lost, or concentrated at edges and corners | Treat these as adjustment factors after your first baseline burn, not as the main sizing input |
Example: If a straight-sided soy jar measures about 3 inches (7.5 cm) at the wax fill line, stay within one soy-friendly wick family, shortlist 2–3 neighboring sizes from the chart or estimator, and burn-test only those candidates before you change fragrance, dye, or additives.
Once you have those four inputs, follow this order so you reach a usable starting range before you light the first test candle.
- Measure the inner diameter at the wax fill line.
- Choose one wick family that fits your wax system.
- Shortlist 2–3 neighboring sizes from the wick size chart or wick size estimator.
- Confirm the winner with a controlled burn test before you change fragrance load, dye, or additives.
Measure container inner diameter and geometry for wick sizing
To size a wick for any container, start by measuring the true inner diameter at the wax fill line, then match that number to a wick chart for your chosen wick series. Use the wick types and sizing guide to narrow the family before you test sizes.
If you’re unsure which series code suits that diameter, see wick types and sizing so you understand how different wick families behave at the same jar width.
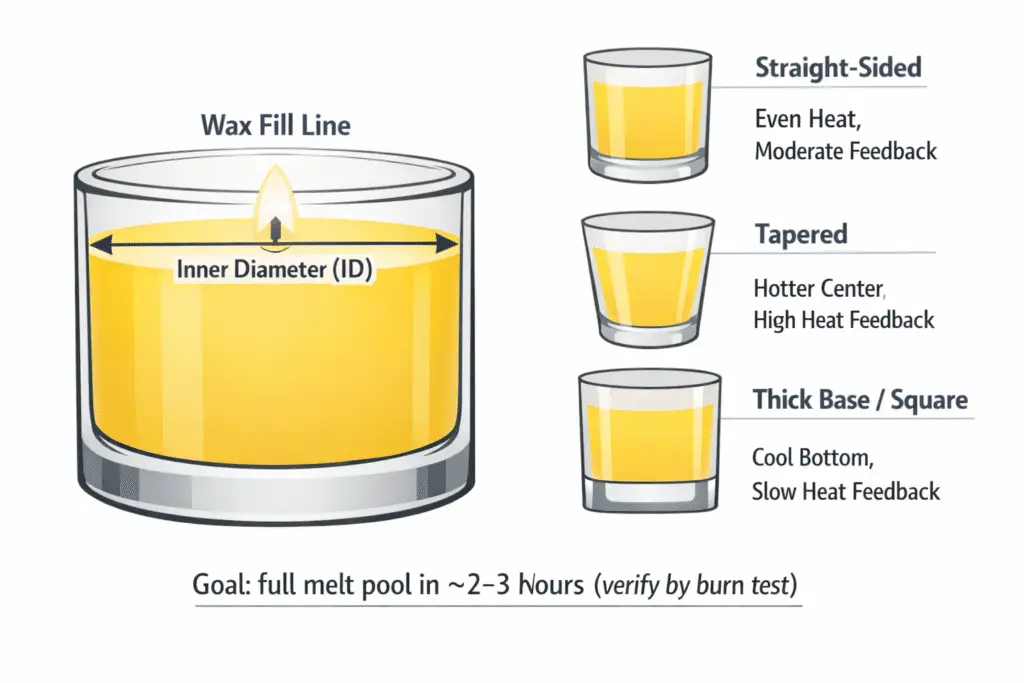
Wick sizing starts with the inner diameter at the wax fill line, because that measurement sets the first size range for most straight-sided jars.
Measure at the intended fill line, not the rim, and note whether the vessel is straight, tapered, square, or unusually thick. When the vessel is not a clean cylinder, measure the narrowest burn zone and watch corners or long walls during testing.
Here’s a quick reference for how common jar shapes behave and where to focus your measurements:
| Jar shape | Where to measure first | What to watch in tests |
| Straight-sided glass | Inner diameter at wax fill line | Even melt to edge, moderate wall temperature |
| Tapered tumbler | Narrowest inner diameter near typical burn zone | Hotter base, faster melt near bottom |
| Square/rectangular | Shortest inner side and longest diagonal | Unmelted wax in corners, hot spots on long walls |
| Wide, shallow bowl style | Full usable width across center | Very fast melt, risk of over-wicking and big flame plumes |
A quick top-view sketch can still help when the listed rim width does not match the real burn area.
Here’s a quick measuring checklist you can reuse for any new vessel:
- Measure inner diameter at the wax fill line in centimeters or inches.
- Note whether the walls are straight, tapered, or square/rectangular.
- Record wall thickness, base thickness, and whether the jar is single- or double-walled.
- Decide on two or three adjacent wick sizes that match that inner diameter, then mark them on the container’s testing sheet.
- During test burns, watch for a full melt pool without excessive sidewall heat, and adjust up or down one size based on what you see.
Over time, your measurement notes plus burn results become a small library of “known good” jar profiles. That log makes new vessels far less intimidating, because you can quickly spot which ones are close cousins of jars you’ve already dialed in.
Match wax base and blend behavior to wick size
When wax or blend ratios change, keep the jar and wick family steady first, then retest one size at a time because different wax bases melt and flow differently.
As you swap recipes, focus on how hotter or cooler wick series behave across soy, paraffin, coconut, and beeswax systems.
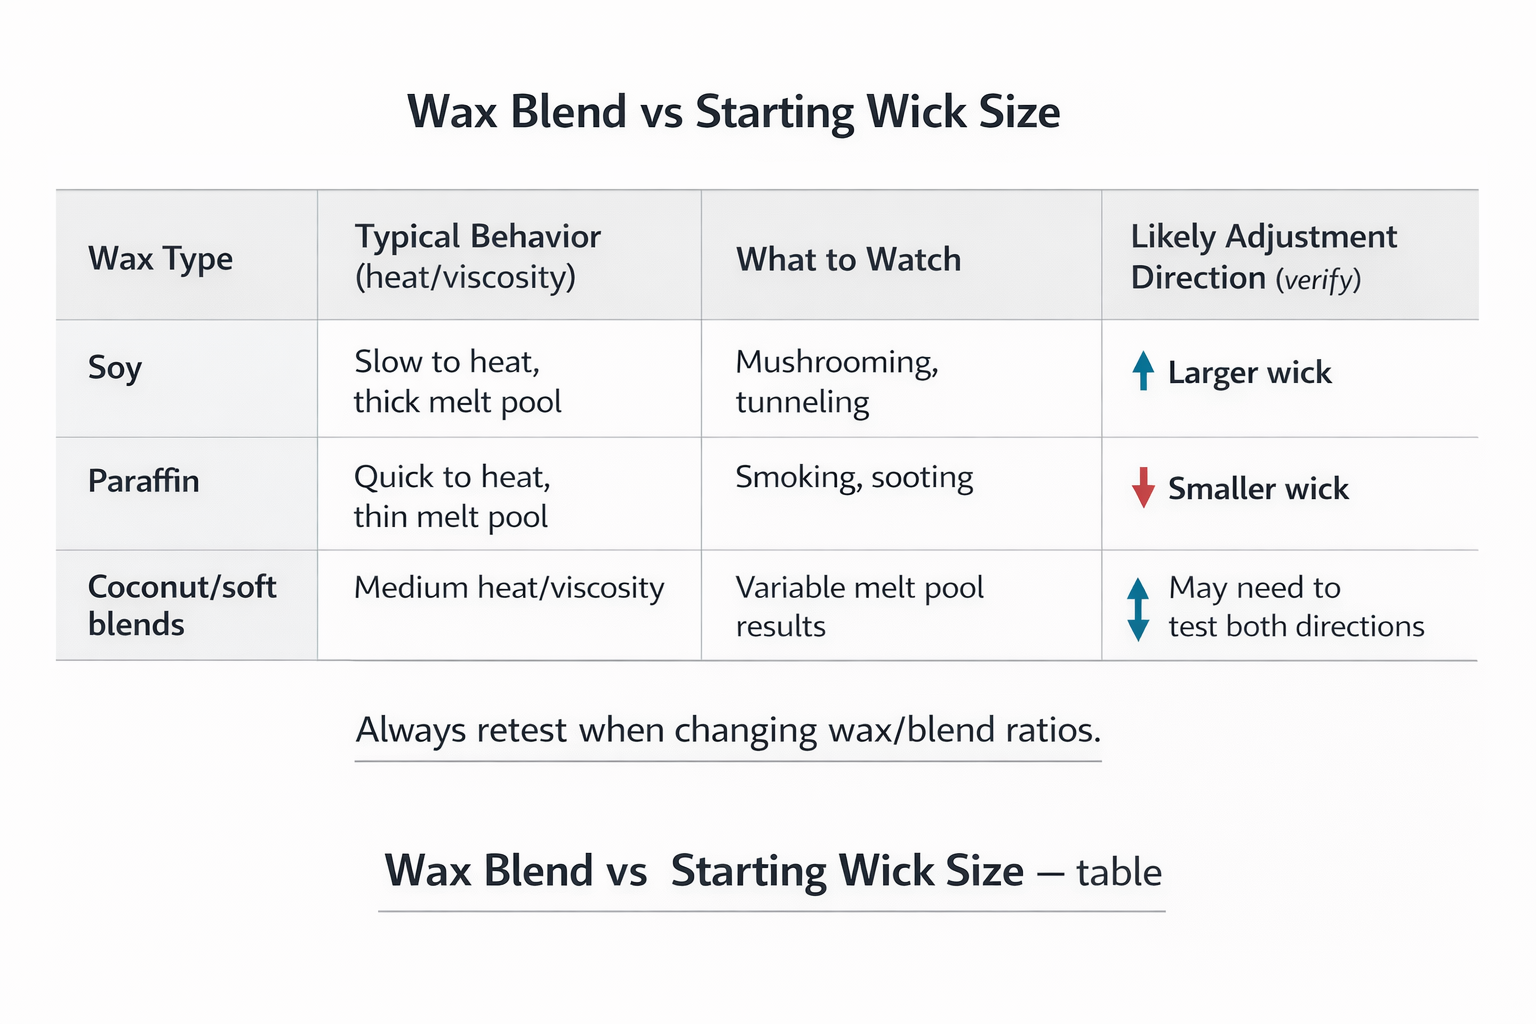
At a high level, soy tends to burn cooler and more viscous than paraffin, so it often needs either a slightly larger wick or a design that runs a bit hotter to achieve a full melt. Coconut and other soft blends can lower the melt point and thin the wax, so a wick that behaved perfectly in pure soy might suddenly run too hot once you introduce more of those softer components. Beeswax, with its higher melt point, frequently demands a more robust wick than paraffin in the same jar size. A wick that works in paraffin may drown or tunnel when you shift to soy, yet feel harsh and sooty if you move the same code into a soft coconut blend without adjustment.
Use wax traits as adjustment signals, not as a separate sizing system. Higher-melt, stiffer blends usually need more heat, while softer, lower-melt blends often need less. Keep the jar and wick family steady, then move one size at a time when the blend changes so you can see what the wax is actually doing.
A simple notebook matrix helps. Log one starting row for each blend family, then refine it after each round of tests instead of guessing from scratch every time.
Here’s how that kind of starting matrix might look in practice:
| Wax or blend | Example jar ID | Relative traits vs paraffin | Typical wick direction to test first |
| 100% soy container wax | 8 cm | Cooler, more viscous | Same series, 1 size hotter than paraffin |
| 70/30 soy–coconut blend | 8 cm | Lower melt point, thinner melt | Same series as soy, 1 size cooler |
| Paraffin container blend | 8 cm | Hotter, easier to melt | Cooler-running series at similar size |
| Beeswax or high-beeswax blend | 8 cm | Higher melt point, stiff structure | Hotter series or 1–2 sizes up from paraffin |
To turn that table into a repeatable process, compare melt point and flow behavior for your main waxes, shortlist one or two likely series, and then run the same burn-test protocol for each candidate. Cure each batch for the same number of days, burn for consistent two- to three-hour sessions, and record flame height, melt-pool width, and any soot or mushrooming. Build those habits into your test plan instead of treating recipe changes casually.
Over a few cycles, that combination of trait notes, tiny datasets, and consistent testing will show you clear patterns. You’ll know, for your jars, how far you usually move when you add coconut, raise beeswax content, or tilt a blend back toward paraffin—and wick sizing for new formulas will feel much more predictable.
Choose a wick family or series for your jar and wax
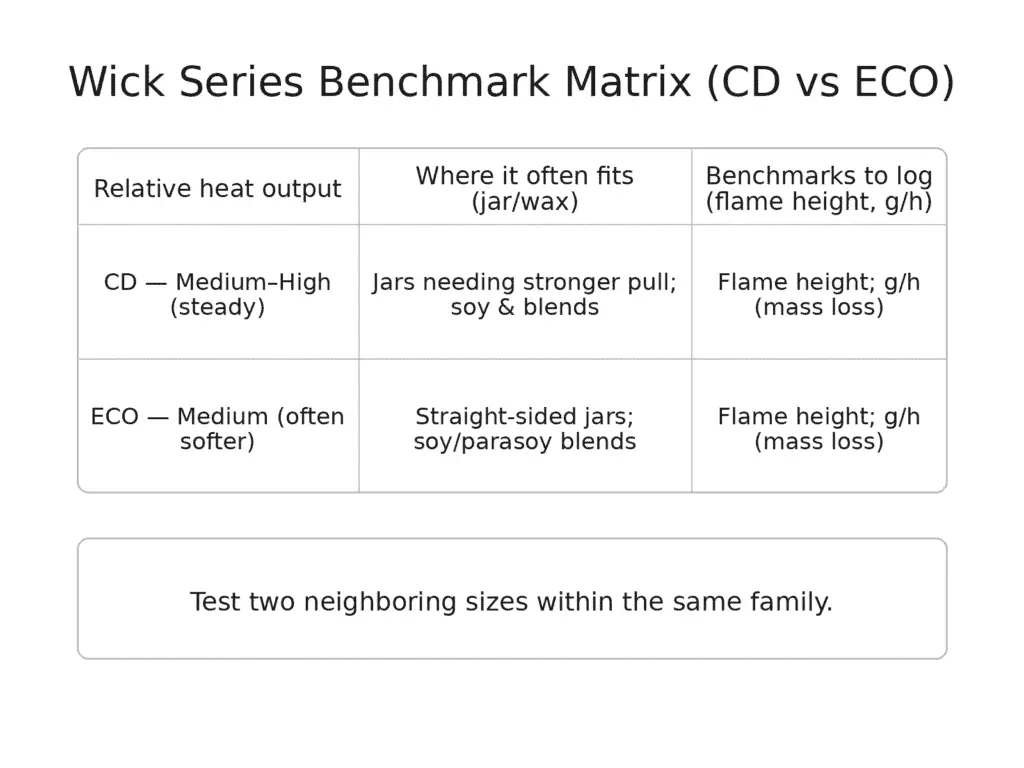
To choose a wick family or series for your jar and wax, match your container diameter and wax type with a short list of series that run cooler, moderate, or hotter, then test two neighboring sizes.
Before you dive into individual codes, zoom out and compare how flat-braid, cored, and wooden wicks differ in heat and behavior.
Start with one family that matches your wax class and vessel style, then move up or down within that family first. Switch families only after adjacent sizes fail in opposite directions.
Use choose the right wick for the broader family-first chooser page, then return here to test adjacent sizes inside that family.
Use this shortcut matrix when you want a faster first choice before you compare individual codes.
| Wax system | Vessel situation | Family profile to test first | Why | First next move if weak or too hot |
| Paraffin or easy paraffin-heavy blend | Small to medium straight-sided jar | Cooler or moderate family | The wax is easier to melt and usually needs less aggressive heat | If weak, move up one size in the same family; if too hot, stay in family and size down |
| 100% soy or soy-heavy blend | Straight-sided glass | Moderate family built for vegetable wax | Soy usually needs steadier heat to reach a full melt pool | If weak, move up one size first; if still weak, test a hotter family |
| Soy blend with heavy fragrance load or stubborn additives | Medium to wide jar | Hotter family | The recipe resists full melt more than a simple soy blend | If too hot, step down one size before abandoning the family |
| Wide container near the limit of a single wick | Wide, shallow, or heat-holding vessel | Moderate or hotter family as a last single-wick test | You need to learn whether the width or the wick family is the real limit | If one size up overheats while the smaller size tunnels, test a double-wick layout |
For deeper family comparisons, use the CD vs ECO wick comparison after you narrow the family on this page.
Adjust wick size for fragrance load and oil characteristics
To adjust wick size for fragrance load and oil characteristics, start from a safe baseline wick at a modest fragrance load, then step one size up or down as you increase load and watch flame height, melt pool width, and soot.
For a quick refresher on how scent recipes behave overall, revisit fragrance and scenting fundamentals so you can separate oil issues from wick issues. If you’re unsure whether the wick family itself is appropriate, cross-check your series choice before you start changing sizes.
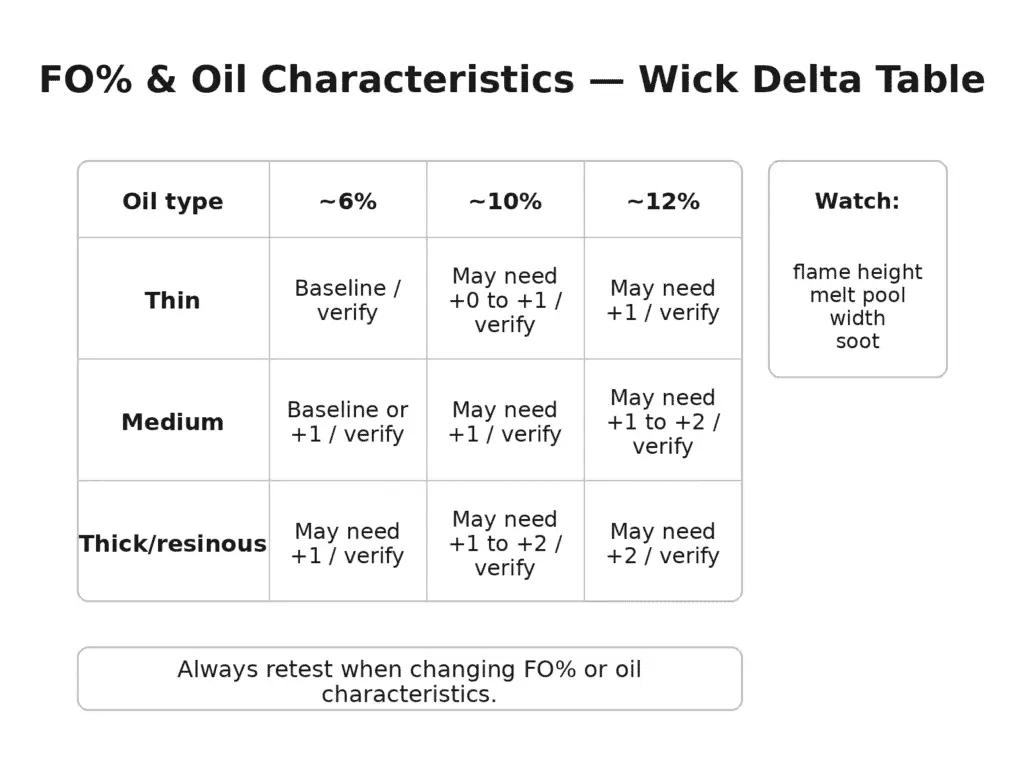
Fragrance oils change how the wick feeds the flame, so start from a stable baseline wick at a modest load, then change only FO% or oil style one step at a time. Compare flame height, melt-pool width, and soot against that baseline before you size up, size down, or switch to a cooler or hotter family.
Here’s a small example ladder connecting FO% and oil type to your next wick move:
| FO load and oil style | What often happens | First wick action to test |
| Lower load, light citrus | Easy melt, fast capillary action | Try the same wick; if flame runs tall, size down |
| Balanced everyday load | Baseline behaviour | Use your normal “reference” wick size |
| Higher load, heavy gourmand or vanilla | Thicker melt, risk of tunneling | Test 1 size hotter in the same series |
| Very high load, resinous or complex blends | Hot glass, potential soot and mushrooming | Try a cooler series or 1 size smaller |
Log wax, jar, FO%, scent family, wick code, burn rate, and flame height so you can see whether a fragrance change really needs a size change or a different family.
Factor in colorants and additives when sizing a wick
When you add strong dyes or burn-changing additives, treat them as a new recipe by testing at the same wick code and adjusting up or down one size based on soot, tunneling, and flame height.
Start from the wick you’ve already dialed in, then treat colorants and additives as recipe changes that can shift how that wick behaves. Heavy dye loads and additives like stearic or vybar can change how quickly the candle reaches a full melt pool. Even if your jar, wax base, and fragrance load are identical, a heavily colored holiday line can push the same code into either tunneling or sooting if you don’t retest.
Use this decision block when color or additive changes are the only variables you are changing.
| Change to the recipe | What to expect | First wick move to test |
| Light pastel dye, no additive change | Little or no meaningful shift in burn behaviour | Keep the same wick and verify across two controlled burns |
| Medium to dark dye load | More heat retention and a higher chance of soot or early mushrooming | Test the same wick and one size hotter only if the candle starts tunneling |
| Very dark dye, black dye, or heavy pigment load | Faster jar heating and a narrower safety margin | Retest the baseline wick first, then try one size hotter only if melt coverage is clearly weak |
| Stearic or another hardener | Stiffer wax and a slower full melt | Test the same wick, then move up one size if the candle stays under-melted |
| Vybar or similar polymer additive | Thicker melt and changed fuel flow | Keep the same wick for the first burn, then upsize only if tunneling shows up consistently |
Dyes are usually the biggest variable, so treat dye load almost like a second fragrance load. If you’re not confident eyeballing what counts as “light” versus “heavy,” stay within the manufacturer’s suggested percentages for your wax system. Additives matter in quieter ways, but the rule stays the same: keep the old wick as your control, change only one variable, and let the burn test tell you whether the recipe now needs more or less heat.
Color and additive tweaks also change how closely you need to watch soot. Dark jars or heavily dyed wax can hide early warning signs, so rely on trim habits, flame checks, and burn notes rather than color alone. Alongside wick sizing, train yourself and your customers to use proper trim techniques to control soot, keeping wicks around 5–6 mm before lighting and stopping tests that smoke persistently or throw off carbon chunks. General candle-safety guidance supports close flame monitoring and sensible trim length, but it does not replace recipe-specific wick testing.
Steps to burn-test a wick and confirm a full melt pool (~2–3 h)
To burn-test a wick properly, run two or three supervised sessions of about 2–3 hours, logging melt pool width, flame height, and burn rate, then adjust wick size until the candle passes all checks consistently.
Once you’ve picked a candidate code from wick types and sizing, cure your candle fully, level the surface, and trim the wick to about 5–6 mm before the first light. Place the jar on a heat-safe, level surface away from drafts, curtains, and direct sunlight. Weigh the candle (container plus wax) on a scale and note that starting mass along with wax blend, FO%, dye load, and wick code—this is your baseline for every future test with the same setup.
Before you strike a match, test in still air on a heat-safe surface and supervise every session from start to finish. General candle-safety guidance supports the broad guardrails here—keep candles away from combustibles, never leave them unattended, and trim the wick before lighting—but it does not replace recipe-specific testing for your jar, wax, and fragrance. Treat the 2–3 hour session here as a working development window for comparing candidates, not as a universal legal standard. If your supplier instructions or product label require different burn handling, follow those first.
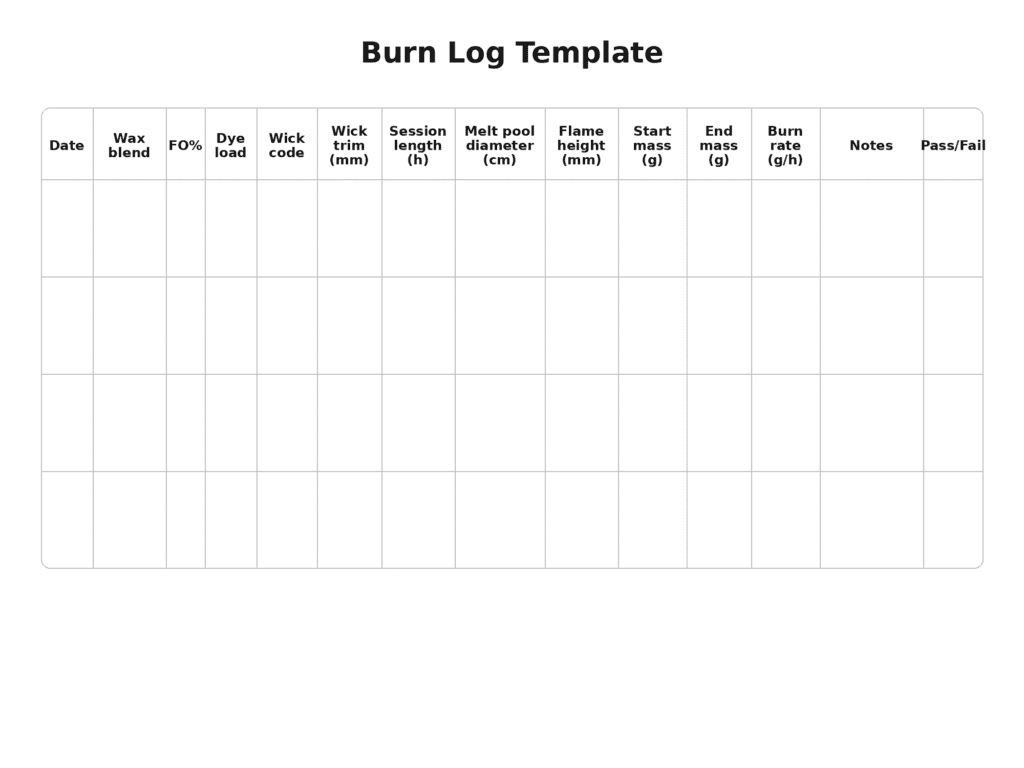
To keep results objective instead of going by “vibes,” create or download the wick performance log as a simple table. Give yourself columns for date, batch ID, wax blend, jar type, wick code, fragrance name and percentage, dye load, session start mass, end mass, burn time in hours, calculated burn rate g/h, maximum flame height, melt-pool diameter, jar wall temperature feel (cool/warm/hot), and notes. After each 2–3 hour session, extinguish the candle, let it cool slightly, then reweigh and measure flame height and pool width from the side. Burn rate is just (start mass − end mass) ÷ hours, which quickly shows which codes are wildly too hot or too weak.
A bare-bones version of that log might look like this:
| Date | Batch ID | Wax / blend | Jar type & ID | Wick code | FO% & scent family | Dye/additives | Session # | Burn time (h) | Start mass (g) | End mass (g) | Burn rate (g/h) | Flame height (mm) | Melt pool width (cm) | Jar wall feel | Notes |
Methods note: The numbers on this page are working test ranges, not pass-or-fail legal limits. Keep the jar, wax blend, FO%, dye load, cure time, wick trim, room conditions, and session length the same for every comparison so the results are actually comparable. Use burn rate, flame height, and melt-pool width as relative development signals, not as proof that one wick is universally safe in every setup. When any major variable changes, reset the baseline and test again.
What a correctly sized wick looks like after the first confirmation burn
A correctly sized wick gives you a near-edge melt pool by about hour two or three, a steady flame, and glass that feels warm rather than sharply overheated near the top. The wick should stay lit without drowning, the jar should stay largely free of soot, and carbon build-up should stay minor. When one candidate reaches that state and the next size up looks hotter or dirtier, keep the smaller passing wick as your baseline.
Over two or three sessions, you’re looking for a clean, even melt pool that reaches near the jar edge by roughly hour two or three, with a steady flame that’s lively but not towering, and a jar that is warm but still comfortable to touch near the top. If the melt pool never approaches the edge, or tunneling deepens between burns, your wick is underpowered; if glass feels very hot, the flame mushrooms heavily, or soot marks appear, you’re over-wicked. Use your log to compare candidates at a glance and—when in doubt—pick the code that meets your visual criteria with the lowest acceptable burn rate, since that usually gives the safest margin for real-world use.
Troubleshooting: common wick problems and adjustments
Use the symptom table below to decide whether to size up, size down, change family, or stop forcing a single-wick layout.
| What you see in the candle | Likely cause | First wick action to test |
| Deep tunneling after several burns | Wick too small or too cool a series | Move up 1 wick size; if still weak, try a hotter series |
| Full melt never reaches edges but flame looks healthy | Vessel too wide for chosen wick | Try a larger size; consider a double-wick setup |
| Heavy mushrooming and carbon build-up | Wick too large or FO/dye too heavy | Step down 1 size or use cooler series; trim more often |
| Persistent soot on jar rim | Over-wicked, drafts, or over-loaded FO/dye | Size down, reduce FO/dye, and test in calmer air |
| Jar top feels very hot or uncomfortable to touch | Excess heat from wick or high-conductivity jar | Step down 1 size or switch to cooler series |
| Flame drowns or self-extinguishes in melt pool | Wick under-powered, especially with thick FO | Increase wick size or move to hotter series |
| Weak scent despite full melt pool | FO mismatch or under-loaded formula | Keep wick, adjust FO type/load rather than wicking hotter |
Use this as a starting map, then refine it with your own snapshots—photos, log entries, and notes about which fixes actually solved each symptom in your specific wax system.
After your baseline works, check these edge cases
Check drafts, vessel heat behavior, and wick prep only after one clean baseline burn works in still air. If a candle behaves differently near vents, in heavy ceramic, or with inconsistent centering and tab adhesion, retest the same wick in that exact setup before deciding the wick size is wrong. Fix the build or environment first when those variables are obviously unstable. Use the dedicated troubleshooting page and the pre-tab, prime, and trim candle wicks guide for deeper diagnostics instead of turning this page into a second cluster hub.
When a single wick is no longer the right tool
Switch from one wick to two only when a safe single-wick range fails in both directions: one candidate tunnels while the next size up overheats, mushrooms, or soots. Treat that result as the handoff point to the dedicated double-wicking guide rather than solving spacing and layout on this page.