
Cloudiness and cracking from wrong additives usually clears when you re-melt, reduce the additive load, fully dissolve at the right temperature, and cool slowly.
Start by matching the defect pattern to the likely additive mistake, then choose the least-invasive fix first. Surface haze and shallow top defects can often be repaired in place, while full-body haze, deep cracks, or recurring marbling usually means you need a full re-melt and a small formula change.
Diagnose cloudiness vs cracking caused by additives
You can usually identify the additive mistake in under five minutes by matching the defect pattern, haze versus crack type, to a short set of tests, then choosing the least-invasive fix first.
Use this table as a router: confirm with one quick test, then jump to the matching fix section.
| What you see | Most likely additive cause | Quick test | First fix to try |
|---|---|---|---|
| Milky haze through the whole candle, not just the top | Fragrance oil load too high, or additive stack over the wax’s solubility limit | Warm the jar slightly. If it clears, then re-hazes when cool, you are often over the “holds-in-wax” limit | Lower total load and re-pour a test jar, see “fragrance oil overload” and “solubility limit” |
| Cloudy “lid” on top only | Additives added too cool, insufficient dissolve or hold, draft-chill at the surface | Melt just the top. If it clears, you are likely looking at a surface precipitation issue | Reheat top and hold, then cool calmly, see “added too cool” and “dissolve additives properly” |
| Fine crack ring near the rim or radial cracks in a container | Too much hardener, stearic or beeswax, or stacked stiffeners | Compare a wide jar versus narrow. Wide jars often crack sooner when stiffness is too high | Dilute hardener and slow cooling, see “excess hardener” |
| Spiderweb cracks, crazing, across the surface | Stabilizer or polymer plus rapid cooling, or polymer overdose | If cracks worsen in a cool room or on stone counters, cooling stress is likely involved | Lower stabilizer or polymer, slow the cool-down, see “spidering cracks” and “vybar/polymer” |
| Swirls, marbling, or patchy opacity | Total solute over cap, FO + additives, or partial dissolution | Hold a flashlight to the melt. Streaks or flecks often mean incomplete dissolution | Reduce total solute or improve dissolve or hold, see “solubility limit” and “dissolve additives” |
| Soft fog or veil in a clear jar, especially with shimmer | Mica or pigment scattering light | Let a sample sit warm. Pigments stay hazy even when hot-clear dyes would dissolve | Lower load, use finer particles, improve dispersion, see “mica/pigment veil” |
If you need a refresher on where each material fits in a formula, start with candle additives and enhancers before you change the batch.
When to re-melt and reformulate vs surface repair
Use surface repair only when the defect is cosmetic and shallow. Re-melt and reformulate when the wax chemistry or additive load is the real cause, or when cracks run deep.
This decision ladder keeps you from polishing a problem that will just come back after the next cool-down.
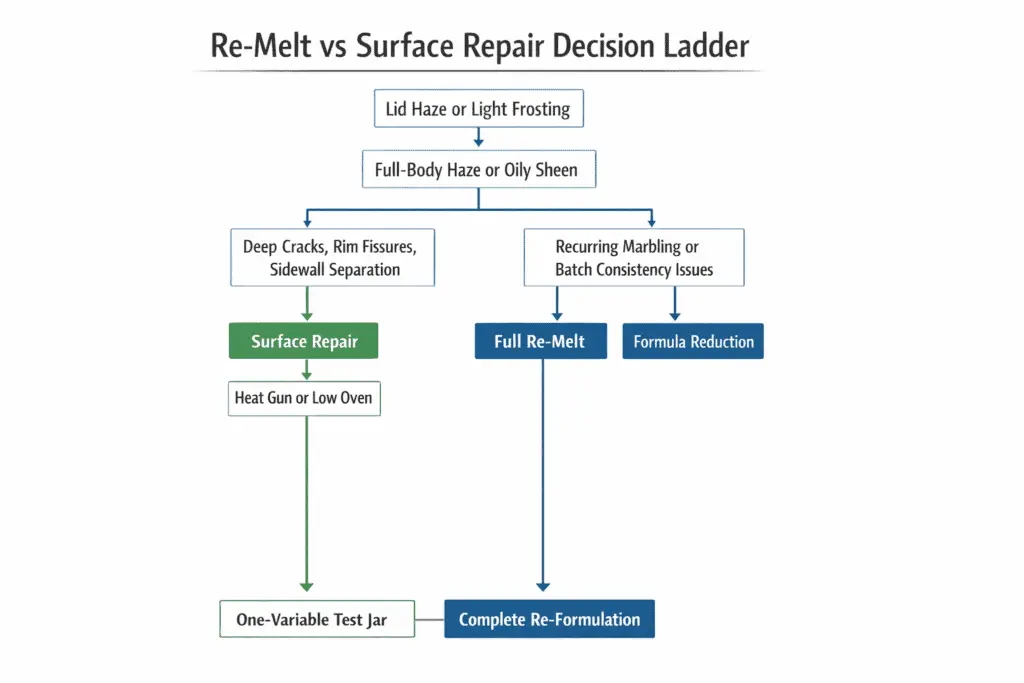
Start here, fast decision ladder
- Surface-only lid haze, small dips, light frosting: try a controlled heat-gun pass or low-oven warm, then slow-cool. If it stays clear after full cool plus 24 hours, you are done.
- Persistent haze through the whole candle, oily sheen, or recurring marbling: re-melt the entire candle and reduce load, fragrance and or additive stack, then re-pour a test jar first.
- Deep cracks, rim fissures, sidewall separation, or spidering that returns: re-melt and reformulate, lower stiffeners and slow cooling, because surface work will not remove internal stress.
- Repeated issues across batches with the same wax: treat it as a formulation problem. Change one variable per test jar, dose, add temperature and hold, cooling setup, until the defect stops.
When surface repair is enough
- The candle burns safely and evenly, and the defect is only a top-surface appearance issue
- Heating the top fully liquid makes the defect disappear and it does not return after the candle cools fully
When reformulation is the right move
- You see recurring haze after cooling even when the melt looked clear
- You are over the wax’s stated fragrance or additive limits, or stacking multiple stiffeners
- Cracks widen after 24 hours, or you get pull-away that grows during cure
How to fix cloudy soy candles from fragrance oil overload
Cloudy soy from fragrance overload usually clears only after you lower the fragrance load, fully re-dissolve, and re-pour a small test jar.
If you are unsure what else is competing for room in the wax, review common candle additives so you can spot when the problem is total solute, not just scent.
When fragrance exceeds what the wax can hold, it behaves like an undissolved solute: it scatters light, can separate during cooldown, and shows up as a milky cast or oily sheen after curing.
A hotter add temperature can make the pour look clear at first, but the haze often returns once the candle cools if you are still above the wax’s solubility limit, the maximum a wax can keep dissolved at room temperature.
If you are relying on polymers to “lock in” scent, understand Vybar’s role in candle performance before you push the load higher, because the wrong grade or dose can trade throw for clarity.
Quick diagnosis, before you re-melt
- Cloudiness shows up 12 to 48 hours later, not immediately after pouring
- A faint oily sheen or tiny wet-looking patches appear on the surface
- Warming the jar slightly makes it look clearer for a moment, then haze returns when cool
- The scent is strong in the jar, but the wax looks milky instead of glassy
Mini clarity trend chart
| Fragrance load | Many soy containers tend to look like | What usually happens next |
|---|---|---|
| Moderate, often tested around the supplier’s lower to middle range | Mostly clear | Stays clearer through cure if dissolved well |
| High, often near the top of the supplier range without reformulation | Hazy or milky | Separation or persistent cloudiness is more likely |
Add a simple decision rule to your testing: if your supplier max is A%, and you are stacking additives, polymer, UV inhibitor, hardener, start clarity tests at A-1% to A-2% fragrance before you work back upward.
When you use numbers, treat your exact wax supplier’s data sheet and SDS as the source of truth, especially for fragrance load and any total-additive ceiling.
5-step salvage, lowest drama to highest effort
- Confirm your math. If you weigh by wax weight: FO grams = wax grams × FO%. Example: 500 g wax at 8% uses 40 g fragrance.
- Re-melt gently. Bring the whole batch back to fully liquid, then hold a few minutes so everything is truly uniform.
- Reduce the load. Pour off a portion of the scented wax and dilute it with unscented wax until you are back inside the wax’s tested range.
- Mix properly. Stir steadily, without whipping air, and scrape the sides and bottom so no concentrated fragrance pockets remain.
- Re-pour a test jar first. Let it cool normally, then judge clarity after it is fully cool. Do not decide while it is still warm.
Why cloudiness happens
Wax is a solvent only up to a point. Once you pass the solubility limit, the extra fragrance cannot stay in solution, so it forms micro-droplets or separates into a thin phase that makes the candle look cloudy.
When haze turns into marbling or swirls
Marbling clears when total solute stays under your wax’s cap and you re-pour after reducing load.
Compute total = FO_% + additives_%
Target total ≤ cap_% from your supplier
When the system cools, extra solute drops out and forms swirls, veils, or cloudy marbling.
If marbling shows up within 24 to 48 hours, calculate total solute. If total is over cap, reduce load and re-pour a test jar. If total is under cap, focus on dissolution temperature, stir and hold time, and cooling stability.
Quick math method
- Write down FO_% and each additive_% you used, polymer, UV inhibitor, hardener, and so on.
- Add them: total_solute_% = FO_% + additives_%.
- Compare total_solute_% to cap_% listed for your wax, or confirmed by the supplier.
- If you are over, reduce in priority order, usually FO first, then re-pour a single test jar before fixing the whole batch.
Worked example
FO_% = 9%
additives_% = 1.5% combined
total_solute_% = 10.5%
If your wax cap_% is lower than 10.5%, you are likely to see marbling until you dilute or reformulate.
Batch-log template
| Wax | Supplier cap (%) | Total solute % | Clarity score (1 to 5) |
|---|---|---|---|
6-step reduction ladder
- Reduce FO_% first in small steps, because it is usually the biggest solute.
- Remove or lower nice-to-have additives next, extra hardener, extra UV, extra polymer.
- Re-check your add temperature and hold time so everything is fully dissolved.
- Pour into one test jar and cool without drafts. Judge only when fully cool.
- If marbling persists, dilute the whole batch with plain wax to bring total_solute_% down.
- Once clear, rebuild upward slowly, one variable at a time, to find the highest stable load.
FAQ
What’s the true max fragrance load for my wax?
Use the supplier’s tested recommendation for that exact wax and adjust downward if you are stacking other additives that also need room in the wax.
Can I fix it without re-melting?
If it is true overload, warming the surface may temporarily hide haze, but it rarely fixes the underlying separation.
Is soy always cloudier than paraffin at the same load?
Often, soy shows haze sooner at higher loads, but blends vary. Judge by your wax’s published limits and a small test pour.
How to fix cloudy tops when additives were added too cool
Cloudy tops from “added too cool” fix fastest when you reheat just above the additive’s melting point, hold long enough to re-dissolve, then cool without drafts.
If haze is only a surface lid, start here. If the whole candle stays hazy after a full reheat or re-pour, the seed-crystals subsection is usually the better match.
Start by checking your temperature bands and your process. Use how to mix candle additives for optimal results so you are not guessing where your wax and additive actually stay dissolved.
When additives go in below their dissolution window, they can crystallize early, or precipitate, and leave a hazy cap, grainy film, or frosted ring right on top.
You will usually see a clearer top if you add around melting point plus a small margin, when the supplier sheet supports it, then hold briefly before pouring, versus a stubborn cloudy cap when everything gets rushed at a cooler temperature.
If a UV stabilizer is part of the formula, compare the result against preventing candle discoloration with UV additives before you assume the top haze is only a cooling problem.
Example workflow, verify your wax and additive SDS
- Heat a container wax fully liquid in the supplier’s recommended melt band
- Add polymer or UV inhibitor while still in the supplier’s dissolve band, stir, and hold briefly until the melt looks uniform
- Add fragrance next, mix thoroughly, then pour at your wax’s recommended pour temperature
The make-or-break point is the hold. If you pour as soon as it looks glossy, you can freeze in haze.
5-step re-melt SOP, surface-first
- Warm the top evenly. Use gentle heat and keep it moving so you do not scorch one spot.
- Go a little past just shiny. Aim for fully liquid across the top layer, not just a glossy skin.
- Hold briefly. Give it time to re-dissolve the precipitated solids instead of letting them re-freeze in place.
- Cool calmly. Move the candle away from drafts and sudden temperature drops.
- Prevent the repeat on the next pour. Add the additive at the right band, stir, then hold before you pour.
Heat-gun pass vs low-oven method
| Method | Best for | Main risk | How to reduce the risk |
|---|---|---|---|
| Heat gun | Small cloudy patches, quick fixes | Overheating one spot | Keep distance, keep moving, stop once fully liquid |
| Low oven | Whole-top haze, multiple jars | Over-softening labels or containers | Use low heat, monitor closely, remove as soon as the top clears |
Dissolve additives fully before you pour
Cloudy tops from undissolved additives go away when you add them hot enough, stir well, then hold the wax briefly before pouring.
Preheat wax to the supplier SDS dissolve range, add the additive gradually while stirring, hold until the melt looks uniform, and inspect against a bright light before you pour. If you still see flecks or streaks, keep heat steady and mix longer rather than pouring and hoping it clears.
- Warm the wax fully. Do not add powders or polymers while the pot wall is cooler than the center.
- Add slowly, not all at once. Sprinkle or stream the additive while stirring so it does not clump.
- Hold and stir. Keep the wax at dissolve temperature until it looks uniform under strong light.
- Check for full dissolution. Shine a flashlight through the melt. Full dissolution means no glittery points, no worms, and no cloudy ribbons.
When seed crystals keep coming back
To clear seed crystals, reheat above the additive’s melting point by a small supplier-supported margin, hold while stirring until the melt is fully uniform, then cool slowly away from drafts.
High-melt additives like stearic or some microcrystalline components can form nucleation sites if they are added too cool. Those tiny crystals act like seeds, and the wax rebuilds around them as it cools, which shows up as cloudiness even if the melt looked mostly clear.
- Reheat the full melt until it is completely liquid and visually uniform.
- Raise temperature only as far as needed for that additive and wax system.
- Stir steadily and hold until the crystals actually dissolve.
- Pour and cool in a stable room with minimal drafts, drafts can trigger fast surface crystallization.
- If crystals return, dilute the additive slightly and re-pour a single test jar before fixing the whole batch.
If you are trying to swap additives to avoid seeding altogether, review stearic vs Vybar so you understand how hardener behavior differs from polymer binder behavior in the same wax.
Small thermometer reality tip
If your thermometer reads even a little off, you can land below the dissolution band without realizing it. A quick check in known-temperature conditions helps you avoid repeating the same cloudy-top mistake.
FAQ
How long should I hold after re-melting the top?
Long enough that the surface is fully liquid and uniform. If you still see grains, you have not dissolved them yet.
Why does the top haze more than the sides?
The surface cools first and is most exposed to drafts, so it is where premature crystallization shows up fastest.
Will a second pour hide it?
It can, but if the underlying layer is still seeded with crystals, haze can telegraph back through. Re-dissolving is more reliable.
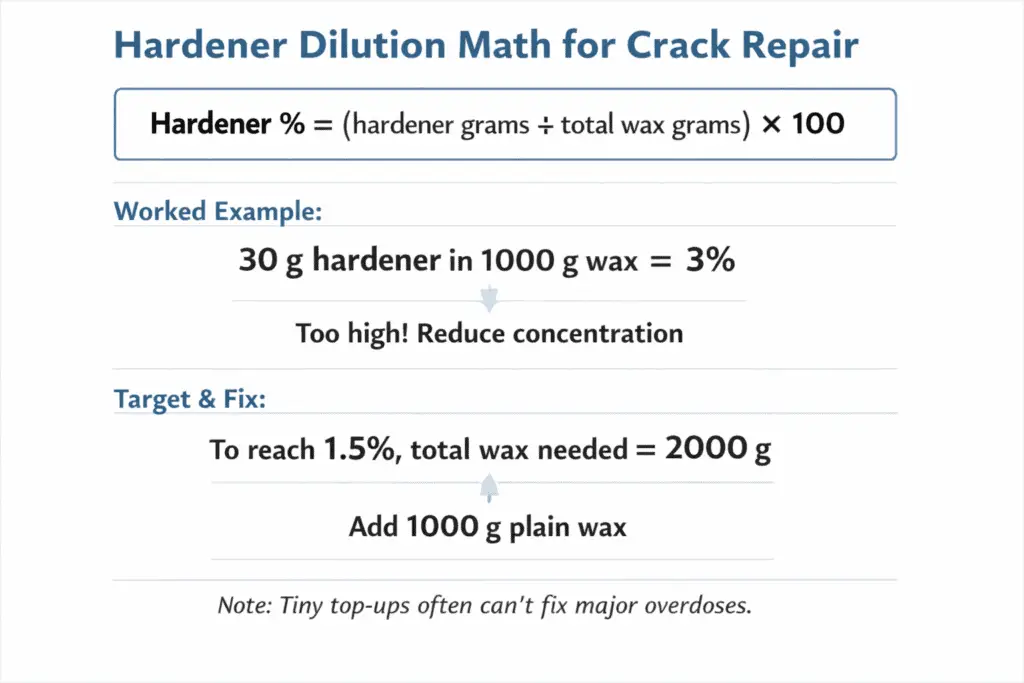
How to stop cracks from excess hardener (stearic/beeswax) in containers
Stop hardener-caused cracks by lowering the hardener percentage, re-melting and diluting with plain wax, then cooling more slowly to reduce shrink stress.
Start by reviewing your wax maker’s additive dose bands before changing anything else, because the right number depends on your exact wax and container size.
Too much stearic or beeswax pastilles makes the wax set harder and contract more as it cools.
That extra contraction builds hoop stress against the glass, so you get rim fissures, radial cracks, and sometimes a chalky stress-whitening look.
Fast diagnosis
- Cracks appear as the candle finishes cooling, or within the first day, not weeks later
- The wax feels unusually hard or snappy for a container blend
- Cracks get worse in larger-diameter jars or in a chilly room
5-step salvage, dilute and re-pour
- Re-melt the batch gently until fully liquid and uniform. Follow safe heating practices from your supplier SDS.
- Weigh the batch so you know the total wax mass you are correcting.
- Dilute by adding plain wax to bring the hardener percentage down toward the low end for your wax.
- Stir thoroughly, scraping sides and bottom, then pour at a steady, controlled temperature.
- Cool slowly. Avoid drafts, cold countertops, and sudden temperature swings.
The math that prevents guessing fixes
Hardener % = (hardener grams ÷ total wax grams) × 100
If you have 30 g hardener in 1000 g wax, 3%, and you want 1.5%, you would need:
30 ÷ 0.015 = 2000 g total wax
That means you must add 1000 g plain wax.
That is why tiny top-up additions often do not stop cracking when the dose is far over target.
Prevention mini-chart
- Container waxes usually tolerate less hardener than pillar blends because the glass restricts shrink.
- Wider jars usually need lower stiffness, or slower cooling, than narrow jars for the same formula.
- If you want more hardness, test slower-cool changes first before raising percentage again.
How to choose a safer additive percentage for your wax
The right additive percentage is the wax maker’s tested range, then adjusted with a simple adhesion check. Going past the recommended window often increases pull-away and crack rings.
Add a test rule you can actually run: adjust in 0.25 to 0.5% steps, and stop if the sidewall gap widens or a rim crack appears after 24 hours.
Additives change how the wax shrinks as it cools, and containers amplify that stress because glass does not flex.
- Soy container blends often need smaller changes before adhesion shifts
- Paraffin container blends may tolerate slightly wider additive windows
- Pillar blends can handle higher stiffness additives than containers
| Wax type, container | If you are using a polymer binder | If you are using a hardener |
|---|---|---|
| Soy | Start low and increase slowly within supplier guidance | Use very small amounts or skip if cracks start |
| Paraffin | Many makers test within the supplier’s working polymer range | Use cautiously, hardness can increase shrink |
| Blends | Treat as new wax and test from the low end | Stacking hardener plus polymer raises crack risk |
How to run a quick adhesion test, 10-minute setup, 24-hour read
- Pour two small test jars with the same wax and fragrance load.
- Keep everything the same except additive percentage, for example low end versus mid range.
- After 24 hours, look for a clear sidewall contact line. Strong adhesion looks tight and even, not gapped or scalloped.
- Lightly tap the jar and watch the sidewall. Pull-away often shows as shifting edges or a widening air gap.
- Repeat once after full cure. Some cracks show up late when the candle finishes contracting.
Why overdosing causes cracks and pull-away
Overdosing stiffens the wax matrix. A stiffer matrix contracts more as a unit instead of relaxing, which increases shrink stress at the glass interface. That stress can show up as a side gap, adhesion loss, a fracture ring near the rim, or fine micro-cracks that look like a dull veil.
A simple grams calculation
Additive grams = wax grams × additive %
800 g wax at 1% uses 8 g additive. At 2% it uses 16 g.
Small, controlled jumps, like 0.25 to 0.5% steps, make it easier to spot the tipping point.
After-cure maintenance checklist
- Hold room temperature steady during the first cool-down
- Do not stack multiple stiffening additives at once while troubleshooting
- Change one variable per test, additive percentage, pour temperature, cooling conditions, so the fix is repeatable
How to fix micro-cracks and opacity from too much vybar/polymer
Fix Vybar or polymer haze and micro-cracks by reducing the dose, re-melting and blending back with base wax, and letting the candle cool more gently.

Start by learning polymer basics so you can spot when more polymer is making the wax brittle instead of clearer. If you need the deeper polymer explainer, use Understanding Vybar’s Role in Candle Performance instead of forcing that whole comparison into this troubleshooting page.
Too much polymer stiffens the wax matrix and encourages micro-crazing, tiny fracture lines that scatter light and read as dullness or opacity.
The surface can look smooth at first, then turn chalky and fine-cracked after full cooldown and early cure.
- Vybar at the low end of the supplier range is often enough to help bind oil while staying clearer in many container-style blends
- Above the supplier’s working range, the risk of dull tops, opacity, and micro-cracks rises
Add a clean test rule to keep you out of the haze zone: start at your supplier’s low end, increase in small steps, and stop as soon as haze or micro-cracking appears after full cool.
Repair steps, batch-safe approach
- Re-melt fully until the wax is completely clear and uniform.
- Dilute with plain wax to bring the polymer back toward the low end, then stir steadily until there are no streaks or unmelted bits.
- Pour and cool slower than usual, stable room temperature and minimal drafts, so the wax does not lock in stress.
Why opacity happens
Polymer overdose creates a stiffer structure that can form micro-voids and tiny fracture networks as it contracts. Those microscopic features bounce light instead of letting it pass through, so the candle reads milky or dull.
Maintaining clarity after you fix the batch
- Keep polymer low until you have proven clarity across full cure time
- Change one variable at a time, polymer percentage, pour conditions, fragrance load, so you know what actually worked
- If you need more throw, adjust fragrance strategy and wicking rather than pushing polymer upward again
Special-case haze: UV inhibitor and colorant issues
How to fix a milky cast from UV inhibitor and dye interactions
A milky cast from UV inhibitor and dye usually clears when you lower the UV dose and re-melt until the mix stays transparent.
Start by weighing your UV inhibitor dose and checking the supplier sheet for the dissolve temperature for that additive in your wax. Then re-melt, fully blend, and test clarity before you commit to a full re-pour.
A milky look is often light scattering from micro-separation: the stabilizer is not staying dissolved, or it is reacting with the dye carrier and creating haze. If you need the full UV workflow, use preventing candle discoloration with UV additives.
- If you are currently hazy, reduce your UV inhibitor by 25 to 50%, re-melt, and pour one test jar
- If haze remains, reduce again in small steps and retest
- Stop reducing once the candle stays clear after full cool plus 24 hours, then rebuild in small steps only if you still see fading
Compare two jars with everything held constant except UV dose. If the lower-dose jar clears, you have confirmed a UV-dye interaction rather than a random cooling issue.
How to prevent a cloudy veil from mica or pigment in container candles
Prevent a cloudy veil by keeping mica or pigment at the low end, using finer particles, and fully dispersing before pouring.
For critical clarity, switch from suspended particles to liquid or chip dyes designed to dissolve rather than float.
Suspended particles scatter light, so even evenly mixed mica can create a soft fog in a clear jar, especially at higher loads or with coarser grades.
- Start at the supplier’s low-end dose for that pigment or mica, then step up only if clarity holds after full cool.
- Pre-disperse by making a small slurry in hot wax, then add that concentrate back to the main pot while stirring.
- Control particle size. Choose finer grades when clarity matters more than shimmer.
- Strain when needed. If you already poured a veiled batch, re-melt and strain out larger particles before re-pouring a test jar.
- Choose the right tool for the job. If you need transparent color in a container, use dyes designed to dissolve rather than suspend.
| Variable | Lower-veil choice | Higher-veil risk |
|---|---|---|
| Particle size | Finer | Coarser |
| Dose | Low-end, stepped up slowly | Heavy dose early |
| Dispersion | Pre-dispersed concentrate | Dumped straight in |
| Color system | Dye, dissolves | Pigment or mica, suspends |
How to stop spidering cracks from stabilizer plus rapid cooling
Spidering cracks stop when you reduce stabilizer to the low end and slow the cool-down so the wax does not lock in stress.
Start by reviewing your stabilizer guidance on the supplier sheet before changing multiple variables at once.
Spidering is a radial crack network that often starts near the wick zone and spreads outward as the center cools faster than the edges.
When you combine a stiffening stabilizer with a fast cooldown, you create bigger internal stress gradients, so the surface cannot relax and it fractures instead.
| Container diameter | Cooling setup | Target cooling rate | Stabilizer dose | Spidering risk |
|---|---|---|---|---|
| Small, about 55 to 65 mm | Open room, drafts | Fast | Mid to high | High |
| Small, about 55 to 65 mm | Calm room, light insulation | Moderate | Low end | Low to medium |
| Medium, about 70 to 80 mm | Open room, drafts | Fast | Low end | Medium to high |
| Medium, about 70 to 80 mm | Calm room, insulation box | Slow | Low end | Low |
| Wide, about 85 to 95 mm | Open room, cold surface | Fast | Any | High |
| Wide, about 85 to 95 mm | Warm room plus insulation | Slow | Low end | Low to medium |
Treat these as modeled starting targets based on common maker outcomes and basic heat-loss logic. Validate with 2 to 3 test jars per diameter and your own room conditions.
Cooling control matters as much as dose: keep jars off cold stone or metal, reduce drafts, and give wider jars a slower, calmer set than small ones.
5-step fix, repair and prevention
- Lower the stabilizer first. Reduce toward the low end and keep everything else unchanged for the next test jar.
- Slow the cooling curve. Move jars off cold counters, block drafts, and use a simple insulated box, or a warmer room, so the top does not chill too quickly.
- Match the approach to jar size. Wider jars generally need slower cooling than small jars to avoid stress radiating from the center.
- Repair safely if needed. For light surface spidering, gently re-melt just the top layer and let it cool slowly.
- Re-pour when cracks are deep. If the crack network is thick or reaches the sidewalls, a full re-melt and re-pour with the corrected dose and cooling setup is more reliable than surface work.