
Vybar is a polymer wax additive used mainly in paraffin-heavy candles to improve opacity and hardness and help fragrance oil stay distributed more evenly; the right starting dose depends on the Vybar grade, your wax, and your supplier’s guidance.
If your candles look translucent, sweat fragrance, or show mottling, Vybar is one of the more targeted common candle additives people reach for. It works by tightening the wax structure, which changes how light scatters, how oils sit in the wax, and how the surface sets as it cools. Used lightly, it can give a smoother, more opaque finish and steadier performance, but too much can create a plastic sheen, muted top notes, and brittle edges. A simple dose-by-wax approach plus consistent temperature and burn testing is the difference between “helpful” and “why did I ruin this batch?”
What does Vybar do in candles?
Vybar is a structurant in the broader group of candle additives and enhancers that makes many paraffin-heavy candles look more opaque and feel harder, and it can reduce surface oiling so fragrance stays distributed more evenly through the wax.
What you’ll typically notice (when it’s a good fit for the wax system):
- A drier, smoother top with less “smear” or oily shine
- More opacity (less see-through wax), especially at the edges
- A more uniform surface set (fewer random finish changes between jars)
- More consistent fragrance release during the burn, especially in paraffin blends
Use it when:
- Your paraffin or paraffin-forward blend looks translucent, mottles in an unwanted way, or shows surface oiling
- You want a cleaner, more porcelain-like finish without changing the base wax
Skip it (or keep it optional) when:
- You’re trying to “solve” soy frosting or wet spots as the main problem
- Your scent throw drops or the wax starts to look plasticky/brittle as you increase dose
How to test Vybar in your wax (3-batch ladder)
A simple three-batch ladder is the fastest way to see whether Vybar helps your exact wax, fragrance, vessel, and wick without fooling yourself with multiple changes at once.
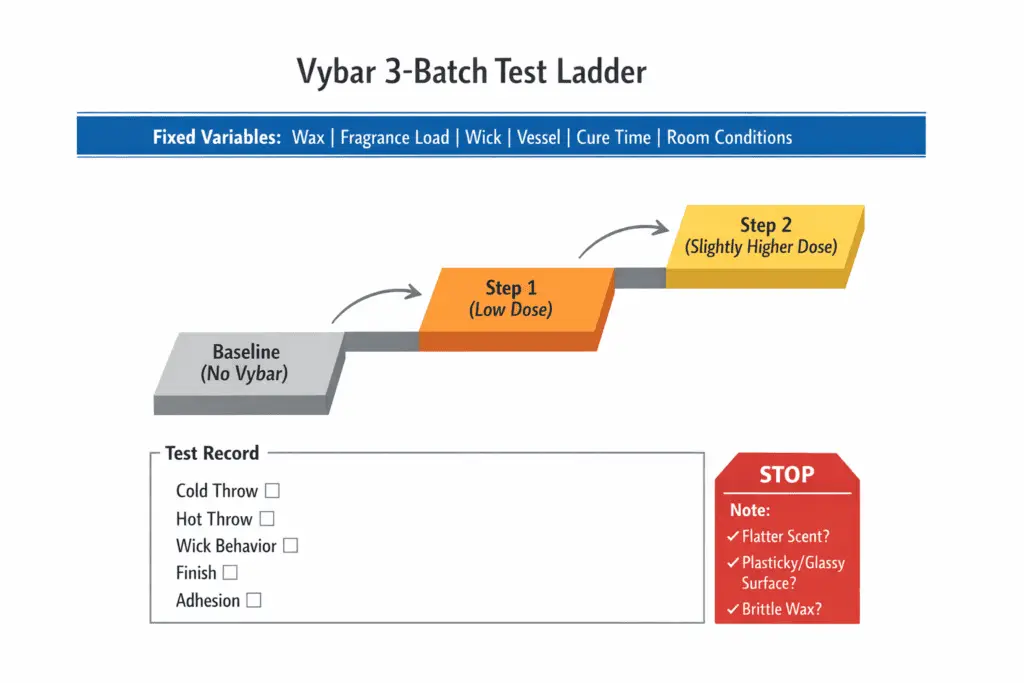
Method: keep the wax, fragrance load, wick, vessel, cure time, and room conditions the same, and change only the Vybar level from batch to batch.
- Baseline: pour your standard formula (no Vybar) and record cure time, room conditions, and burn notes.
- Step 1: repeat the same candle with a low test dose that matches the lower end of the supplier guidance for your exact Vybar grade and wax system.
- Step 2: repeat again with a slightly higher dose in the same system, keeping everything else identical.
What to record each time:
- Cold throw after your normal cure
- Hot throw during the first 2–3 burns
- Wick behavior (mushrooming, relight smoke), soot, and jar haze
- Finish (opacity, mottling, gloss), plus any oiling on the top or glass line
- Adhesion changes after 24 hours and after 7 days
Stop increasing the dose if scent becomes flatter, the surface looks plasticky/glassy, or the wax turns brittle—those are common “over-structured” signals.
What does Vybar do to hot and cold scent throw?
Vybar can steady hot throw (smell while burning) and cold throw (smell unlit) by reducing surface oiling and evening fragrance evaporation. In paraffin-heavy blends, a tighter crystal network can keep fragrance from pooling at the surface, so the melt pool releases it in a more consistent wave. For fair testing, keep wick, vessel, and fragrance load the same and follow your fragrance supplier’s usage guidance and normal safe burn-testing habits. If you want to compare other scent-focused options, see best candle additives for scent throw. If throw is still soft, troubleshoot one variable at a time before you change another ingredient.
These quick signals help you separate “helpful structuring” from “too much Vybar” during test burns:
- Helpful: the top looks drier and smoother, and the scent rises in a steady way as the candle warms.
- Too much: the wax can look plasticky or overly glossy, and the scent can feel flatter even though the candle is burning normally.
Cold throw is easiest to judge after your usual full cure, because a freshly set candle can smell “off” in either direction. Vybar tends to feel most noticeable with heavier fragrance styles that like to weep or smear on top (many gourmands and spices), while airy florals can seem muted if the blend ends up over-structured. Vybar can reduce sweating, but it doesn’t replace supplier usage guidance for fragrance oils, so treat supplier documentation as the ceiling. Once throw is under control, the next thing to watch is how Vybar changes the candle’s look—especially opacity and color saturation.
How Vybar changes opacity and color saturation
Vybar can raise opacity (less see-through wax) and deepen color saturation (richer dye look) by changing how wax crystals scatter light. In many paraffin blends, that shows up as cleaner whites, less translucent edges, and a more even “body color” from top to sidewall.
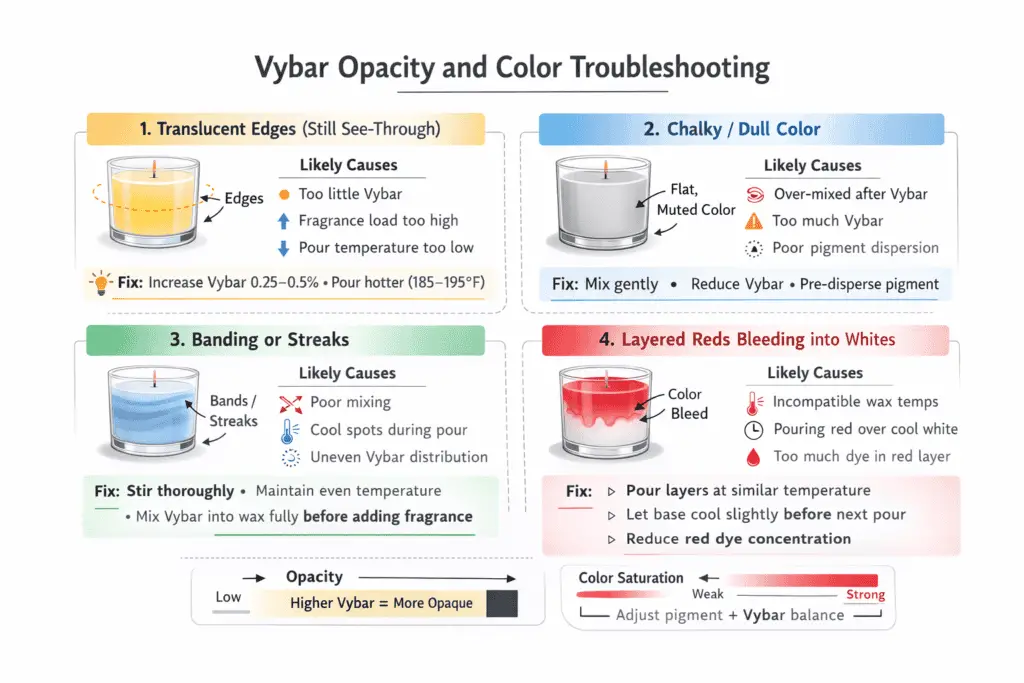
Without enough structure, you get the antonym effect: a glassier, more translucent look that makes color seem thinner. Results improve fastest when the dye system already fits the wax. If the real problem is yellowing or sun fade, Vybar won’t solve it alone, so handle that separately with preventing candle discoloration with UV additives.
Use this short checklist to diagnose why a candle still looks see-through even after adding Vybar:
- If the edges are translucent: the wax system may be too soft for the goal, or the cooling conditions may be too warm/uneven.
- If the color looks chalky: the dye may be overdone for the new opacity level, or the formula may be over-structured.
- If you see banding or streaks: the dye didn’t disperse evenly (often timing, mixing, or temperature), not an “opacity” issue.
- If layered reds bleed into whites: it’s usually dye family plus fragrance polarity and pour timing, even if the base wax looks more opaque.
After you like the visual finish, the next question is whether Vybar is actually helping the wax hold fragrance oil uniformly without sweating.
What Vybar does for oil binding and fragrance load tolerance
Vybar can reduce surface oiling in paraffin-heavy candles by helping fragrance oil stay distributed in the wax, but it does not replace supplier fragrance limits. In paraffin-dominant systems, the wax network tightens so liquid oil has fewer easy paths to migrate to the top or glass line. In soy-heavy blends, the benefit can be inconsistent, so temperature control, mixing, and wick choice may matter more than the additive. Pick your fragrance within supplier guidance so you’re not using Vybar to prop up an over-limit formula. If your candle suddenly smells flatter after adding it, stop changing variables and re-test because overdosing can over-structure the wax and mute lighter notes.
Here’s a simple test-batch log format you can use to spot oil seep and keep decisions grounded:
| wax_system | FO_pct | vybar_pct | oil_seep_incidence_pct | cure_days |
|---|---|---|---|---|
| paraffin blend | 8 | record actual % | record % | 7 |
| paraffin blend | 10 | record actual % | record % | 7 |
| paraffin blend | 10 | record actual % | record % | 7 |
Method: make 3–4 small jars per row, cure the same number of days, then check for visible oiling on the top and at the glass line at the same room temperature. If you change one thing (FO% or Vybar%), keep everything else fixed: wax, wick series, vessel, pour temp, and cooling location.
A common r/candlemaking question is whether “10% FO is realistic with Vybar in paraffin jars.” The honest answer is that it depends on the specific oil, wax, and process—and the only reliable way to know is to log oiling and burn performance together, because a dry-looking top isn’t helpful if the burn gets smoky or the throw drops.
How Vybar affects wax texture and surface finish (gloss, mottling)
In paraffin pillars and paraffin-leaning blends, Vybar can reduce mottling and create a glossier, more porcelain-like finish, but pour temperature and cooling rate still control most surface outcomes. Mottling is the patchy crystal pattern on pillar sides, pits are small surface voids, and ring lines are visible bands that often show up when cooling is uneven. Vybar shifts crystal growth and shrink behavior, which can smooth the surface when the candle cools steadily.
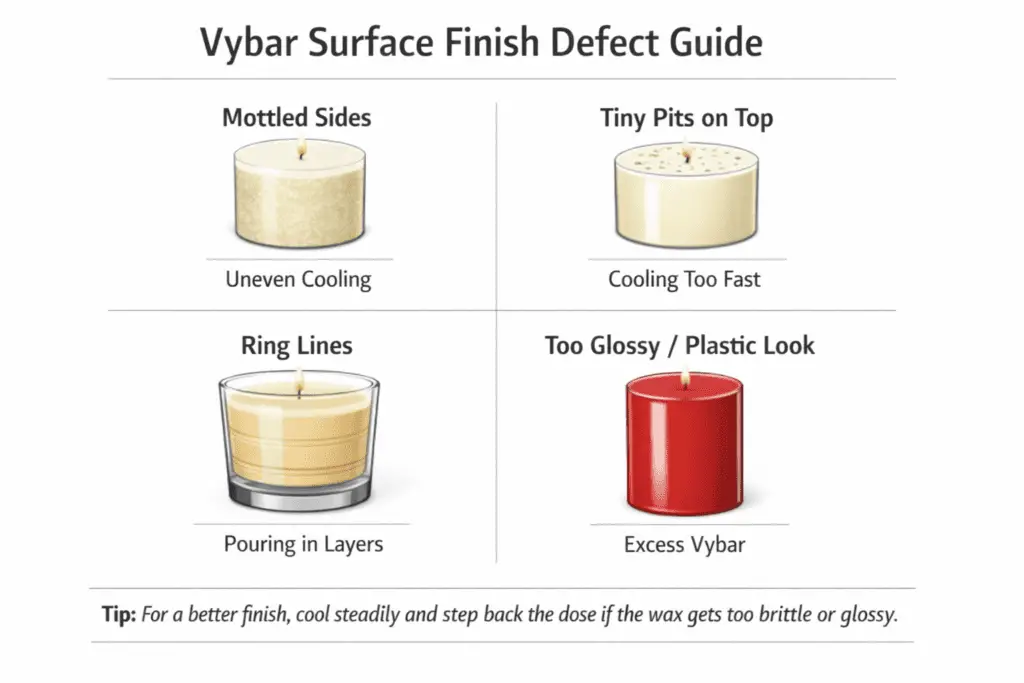
Quick defect gallery (symptom → most likely cause):
- Mottled sides → cooling too fast, high fragrance load, or wax that mottles easily
- Tiny pits on top → poured too cool, surface disturbed while setting, or trapped air from over-stirring
- Ring lines → temperature swings during set-up or moving the mold/jar mid-cool
- Overly glassy/plastic look → too much additive for the wax system
Practical tuning tends to work better than chasing a single “perfect” pour temperature: pre-warm the work area if it’s cold, avoid drafts, and keep cooling conditions repeatable from batch to batch. If you see the finish getting brittle or too glossy, step back the dose slightly and retest—your goal is a stable crystal structure, not a hard plastic shell.
How Vybar influences wick mushrooming and soot
Vybar can change melt-pool viscosity enough to shift soot and wick mushrooming in some candles, but wick size and airflow still decide the result.
Wick mushrooming is a carbon “cap” that forms on the wick tip; soot is the black smoke or residue that can haze a jar and nearby surfaces.
A small viscosity shift can change how fuel feeds the flame, which can change the look of the wick tip and how clean a relight feels.
When you want repeatable results, choose the wick family and size first, then re-test with and without Vybar using the same vessel, fragrance, and pour conditions.
If you see a cap forming early or smoke on relight, make one change at a time and log what improves the flame.
Troubleshooting order of operations (before you blame Vybar):
- Airflow and environment (drafts, fans, high shelves, tight corners)
- Wick series and size (including wick priming and tab fit)
- Fragrance load and fragrance type (within supplier guidance)
- Additive level (Vybar dose, then any other structurants)
A practical A/B burn check looks like this:
- Pour two identical candles (same wax, FO, dye, vessel, wick), changing only Vybar level.
- Burn each on the same surface and in the same room conditions, and take a clear photo of the wick tip after extinguishing.
- Note whether the flame flickers, whether the jar edge darkens, and whether the wick builds a cap quickly.
- Relight once and watch for visible smoke in the first minute, then compare the two wick tips again.
- If both versions soot, treat it like a wick-and-fragrance problem first; Vybar is rarely the only cause.
In maker discussions, people often report that Vybar can make the melt pool feel “thicker,” which can change how quickly the pool spreads; tunneling and sinkholes still trace back to wick size, vessel diameter, pour/cool profile, and fragrance behavior.
Steps to dose Vybar by wax type (paraffin, soy, blends)
Start with the low end of the supplier guidance for the exact Vybar grade and wax system you are using, then adjust with burn tests; paraffin-heavy systems are where Vybar is most at home, while soy-heavy blends often show smaller or inconsistent benefits.
Method: treat Vybar as a percent-by-weight ingredient, weigh it on a scale that reads 0.01 g, and use the technical sheet for the exact grade you bought as the controlling reference. A simple conversion keeps you honest: vybar_grams = batch_mass_g × target_pct/100 (for 2,000 g at 0.2%, that is 4 g).
| Wax system | How to start | What to watch |
|---|---|---|
| Paraffin containers | Start at the low end of the supplier’s range for your grade | Opacity, oiling, wick behavior, and relight smoke |
| Paraffin pillars/votives | Start low and increase only in small test steps | Hardness, brittleness, finish, and shape retention |
| Paraffin-forward blends | Test cautiously because response varies with the blend ratio | Finish, fragrance retention, and burn cleanliness |
| Soy-heavy blends | Treat as optional and test only if you have a specific reason | Whether the additive actually improves anything at all |
A clean setup process:
- Pick a target percent for the wax system and batch size, and write it down before you weigh anything.
- Weigh Vybar in grams from your percent target, then confirm the number once before adding to the pot.
- Heat wax to the supplier’s add window, add Vybar before fragrance, and stir until the wax looks uniformly clear.
- If you are combining additives, keep the order consistent and follow how to mix candle additives for optimal results instead of changing multiple variables at once.
- Pour, cure as you normally do, then re-test wick behavior and throw with the new formula.
Signs you overshot usually show up as muted throw, a plasticky-looking surface, or a candle that feels brittle; the fastest fix is dilution with more base wax, then a re-test with the same wick.
Vybar 103 vs Vybar 260: which one should you use?
Vybar 103 and Vybar 260 are used in different paraffin-heavy applications, so picking the right one matters more than trying to “force” performance with a higher dose.
In supplier practice, Vybar 103 is typically associated with lower-melt container-style paraffin applications where you want better fragrance retention and a smoother, more opaque finish, while Vybar 260 is more often associated with higher-melt paraffin systems such as pillars and votives where hardness and shape retention matter more. Always defer to the technical sheet for the exact grade you’re buying, because “103 vs 260” only helps when the source is clear.
A practical selection shortcut:
- Choose Vybar 103 when your main goal is a cleaner, more opaque container look and steadier surface behavior in paraffin-heavy jars.
- Choose Vybar 260 when your main goal is a harder, more durable paraffin pillar/votive that holds shape and resists dents.
Whatever grade you choose, treat dose the same way: start low, test-burn, and stop increasing if throw drops, brittleness rises, or the surface starts to look plasticky.
What to know about Vybar compatibility by wax system (paraffin, soy, beeswax blends)
Vybar is primarily built for paraffin systems; in soy-heavy or beeswax blends it can be inconsistent—sometimes doing little, sometimes making issues like brittleness or adhesion worse—so small A/B tests are the safest path.
- Paraffin containers and pillars: usually the most responsive place to test Vybar.
- Paraffin-forward blends: often worth testing, but results vary with the blend ratio.
- Soy-forward blends: benefits can be minor, cosmetic only, or negative.
- Beeswax blends: test cautiously, because the response can be unpredictable.
If you mainly need a side-by-side hardening comparison, see stearic acid vs Vybar. If you are testing any additive, keep the wax, vessel, wick, cure time, and room conditions the same so you can tell whether the additive helped or whether the result was just a process change.
Fixing issues from too much Vybar (weak throw, mottling, sinkholes)
If you added too much Vybar, the most reliable fix is dilution with plain wax, then re-testing wick and scent because overdosing can mute throw and push the finish toward brittle or plasticky. Start by reviewing the symptoms in your own batch notes so you know what changed before you correct the batch.
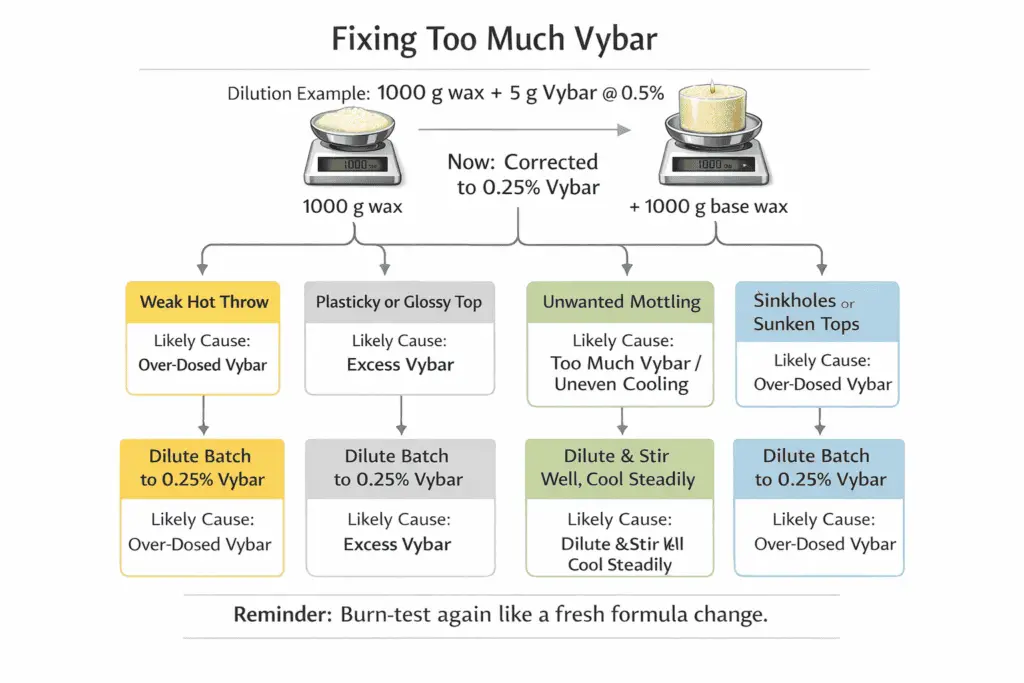
Over-structured wax can trap or slow fragrance release, and it can also shift how the surface sets as the candle cools. After dilution, don’t assume performance is restored—re-test because changing structure changes how fuel feeds the flame and how fragrance releases. If the problem keeps repeating, step back and review fixing additive problems in candle appearance before you add another variable.
Method: rework gently, avoid overheating, and keep the correction simple so you can tell whether dilution solved the issue.
A fast dilution calculation (so you don’t “double-fix” the batch):
- If you have 1,000 g wax that contains 5 g Vybar (0.5%) and you want 0.25%, you need a total of 2,000 g wax to make 5 g equal 0.25%.
- That means adding 1,000 g of the same base wax (no additional Vybar), then fully melting and mixing.
Symptom → likely cause → practical correction:
- Weak hot throw → wax over-structured or FO not rebalanced → dilute, cure normally, then re-test throw with the same wick before changing anything else.
- Plasticky/glossy top → too much additive for that wax → dilute, then cool more evenly and avoid drafts.
- Mottling you didn’t want → cooling too fast or formula now crystallizes differently → slow the cool and test a slightly lower Vybar level after dilution.
- Sinkholes/sunken tops → shrink behavior + cooling gradient (often worsened by formula changes) → repour at the right time, keep room temp stable, and avoid moving jars during set.
After you correct the batch, burn-test like a fresh formula change: controlled room conditions, consistent burn intervals, and careful notes.
Is Vybar safe? Ingredient basics & handling
Vybar is generally handled like other wax additives: follow the supplier SDS, avoid dust inhalation, and keep clean storage and batch records. In practice, the main shop risks come from hot-wax temperatures, slips/spills, and breathing fine particles if you’re weighing small pellets or shavings. Good habits are simple: ventilate, keep lids on containers, and don’t eat/drink at the bench where you weigh additives. For finished candles, make sure your warning language, labels, and documentation match the applicable candle safety requirements for your market.
A practical SDS-to-workbench checklist (neutral, not legal advice):
- Find the SDS sections for hazards/first aid and write a one-line “what to do if” note for skin contact, eye contact, and inhalation
- Store Vybar cool and dry in a sealed, clearly labeled container to reduce clumping and mix-ups
- When weighing sub-percent amounts, minimize dust: pour slowly, wipe surfaces with a damp (not wet) cloth after weighing, and wash hands after handling
- Keep a version-controlled SDS copy with your batch records so you can prove what guidance you followed at the time
Vybar FAQ (maker questions)
Can Vybar increase max fragrance load?
It can reduce surface oiling in some paraffin blends, but it doesn’t change supplier limits; treat supplier guidance as the ceiling and test for burn cleanliness.
Why did my throw drop after adding Vybar?
Over-structuring can flatten lighter notes; reduce the dose (or dilute a batch) and re-test with the same wick before you change FO%.
Do I need to re-wick after adding Vybar?
Often yes—any change in structure can shift melt-pool behavior, so re-check flame stability, mushrooming, and soot.
Will Vybar fix soy frosting?
Not reliably; wax selection and controlled cooling usually do more than additives.
Vybar 103 vs 260—what’s the difference?
They’re commonly used for different paraffin-heavy applications, so the best choice depends on the candle type and your supplier’s grade sheet.
Can I use Vybar in soy-only candles?
You can test it, but results are often minor or inconsistent; treat it as optional and focus on wax system and cooling control first.
How do I know I used too much Vybar?
Watch for muted throw, plasticky/glassy surfaces, or brittleness; the fastest correction is dilution and a controlled re-test.
Conclusion
If Vybar is going to help your candle, you’ll usually see it in three places: a drier, more opaque top, less surface oiling, and a steadier “release curve” for fragrance during the burn. The fastest way to get there is to start low, keep every other variable fixed, and judge results after a full cure with the same wick, vessel, and room conditions.
A simple, repeatable decision flow:
- If the candle looks translucent or smears oil at the top: try a small Vybar step-up and re-check both cold throw and burn cleanliness.
- If the candle fails mechanically (pull-away, cracking, brittleness): adjust the base wax or blend strategy before chasing additives.
- If scent feels flatter after adding Vybar: step the dose back (or dilute a batch), then re-test with the same wick before changing fragrance load.
- If you’re fighting soy frosting or wet spots: prioritize wax selection, stable cooling, and jar prep—Vybar is rarely the main lever.
When your notes clearly show a small dose improves finish and consistency without muting scent or dirtying the flame, you’ve found the “useful zone” for your wax system.