To color candles evenly, use purpose-made candle dye, measure a supplier-qualified amount for a small wax batch, add it under the selected material instructions, mix until no particles or concentrated streaks remain, and approve a cooled test before the full pour.
Candle dye is a colorant made for wax, and this guide is for first-time, hobby, and small-batch makers using common candle waxes. Here, “avoid” means reducing preventable failures through correct dye choice, measured dosing, suitable temperature, thorough mixing, testing, and storage—not promising perfect results in every formula. Clumps are undissolved or poorly dispersed colorant, bleeding is unwanted color movement, and fading is visible color loss after cooling, curing, burning, light exposure, heat exposure, or storage. This is a beginner candle-coloring process rather than a complete candle-making course.
Use this six-step candle-coloring sequence:
- Select a purpose-made candle dye that matches the wax and supplier instructions.
- Measure a supplier-qualified starting amount for a small wax batch.
- Add the dye after the wax has melted and entered the stated processing range.
- Stir steadily, scrape the pot and tool surfaces, and inspect for particles or concentrated streaks.
- Cool or cure a documented sample and evaluate it under consistent conditions.
- Approve the result or correct one variable in the next test before making the full pour.
What candle dye should a beginner use?
A beginner should use a colorant intended for candle wax and follow the selected product’s candle-use instructions.

Candle dye is a colorant formulated for use in melted candle wax under documented processing conditions. “Candle-safe” here means the supplier identifies the product for candle use; it does not guarantee compatibility with every wax, fragrance, wick, or production method.
Food coloring, crayons, paint, soap colorants, and unidentified pigments are not interchangeable with candle dye. Their carriers, binders, additives, or particle behavior may prevent even dispersion or alter the finished candle.
| Colorant type | Beginner decision | Reason |
|---|---|---|
| Purpose-made candle dye | Use when the instructions cover candle wax and the selected format | The intended application, measuring method, and processing directions are documented |
| Food coloring | Do not substitute for candle dye | Many food colorants contain water or carriers that do not mix evenly with wax |
| Crayons | Do not substitute for candle dye | Crayon wax, pigments, and additives are not supplied as a measured candle-color formula |
| Paint, ink, or soap colorant | Exclude unless the supplier documents the exact candle application | A colorant made for another material may behave differently in melted wax |
| Unidentified powder or pigment | Hold until its intended use is confirmed | Appearance alone does not establish wax compatibility or processing requirements |
Mica and other particulate pigments disperse as particles rather than dissolving like many candle dyes. Do not treat mica as interchangeable with candle dye in a wicked candle unless the selected product documents that exact application.
Follow the selected product’s instructions for handling, storage, spill cleanup, and protective equipment.
Method. This boundary table classifies materials by documented intended use. It does not rank brands, certify universal safety, or replace product-specific testing in the selected wax.
Liquid dye vs chips vs blocks
The easiest candle-dye format depends on the wax, batch size, shade goal, measuring method, and ability to record small adjustments.
No format is universally best. The better beginner choice is the format that can be measured consistently, dissolved under the supplier’s directions, and repeated without treating drops, pieces, or weights as interchangeable.
| Dye format | Measuring approach | Adjustment pattern | Handling and dispersion | Repeatability condition |
|---|---|---|---|---|
| Liquid dye | Measure by mass when possible; use drop counts only for the same product and dispenser | Small additions may be easier to make | Follow the stated shaking, storage, and mixing directions | Record the exact product, dispenser, amount, and wax mass |
| Dye chips | Use a documented portion or weigh the chips | Pre-portioned pieces may produce larger adjustment steps | Add under the stated processing conditions and inspect for remaining pieces | Do not assume equal-sized chips from different products have equal strength |
| Dye blocks | Weigh or divide the block by a recorded method | Shaved or weighed portions allow controlled changes | Allow enough processing time for the measured portion to disperse | Record the block product, portion mass, wax mass, and handling method |
Equal numbers of drops, chips, or block pieces do not represent equal dye amounts across suppliers. Concentration, carrier, portion size, and dispenser output can change the result.
Compatible candle dyes can be mixed, but record the exact products, amounts, wax mass, and cooled result. A shared color name or equal drop count does not create a transferable formula.
Method. Compare formats using the same wax, batch mass, shade target, and evaluation state. The comparison records handling and measurement differences without converting one supplier’s format directly into another.
Why the same dye looks different in different waxes
The same candle dye can look different because wax opacity, translucency, and untreated base color alter the visible shade.
A dye does not create color on a neutral background. The wax remains part of the visible result, so a transparent wax, an opaque white wax, and a cream-toned wax can show different shades from the same measured dye.
| Controlled wax condition | Variable held constant | Common visible tendency |
|---|---|---|
| More translucent wax | Dye product, dye amount, wax mass, production steps, sample state, and lighting | The color may appear clearer or deeper because more light passes through the wax |
| More opaque white wax | Dye product, dye amount, wax mass, production steps, sample state, and lighting | The color may appear lighter, softer, or more pastel |
| Cream or yellow base wax | Dye product, dye amount, wax mass, production steps, sample state, and lighting | The base tone may shift the visible hue toward warmer tones |
These tendencies are not fixed outcomes. Wax blends, additives, fragrance, cooling, and the dye product can change the finished appearance.
Method. Prepare matched samples with the same measured dye amount and wax mass. Record each wax identity, compare the samples after the same cooling or curing period, and use the same background and lighting.
Choose the dye format only after confirming that the colorant is intended for candle wax and can be measured repeatably in the selected wax.
How much candle dye should you start with?
Choose a starting amount from the dye supplier’s guidance, calculate it for a small measured wax batch, and treat it as a test value.
A dye dose is the measured colorant amount tied to an exact dye product, unit, wax weight, and supplier rate. A drop count, percentage, chip portion, or block piece should not be copied across products or formats.
Use this formula when the supplier states the rate as a percentage:
Starting dye mass = wax mass × (supplier rate ÷ 100)
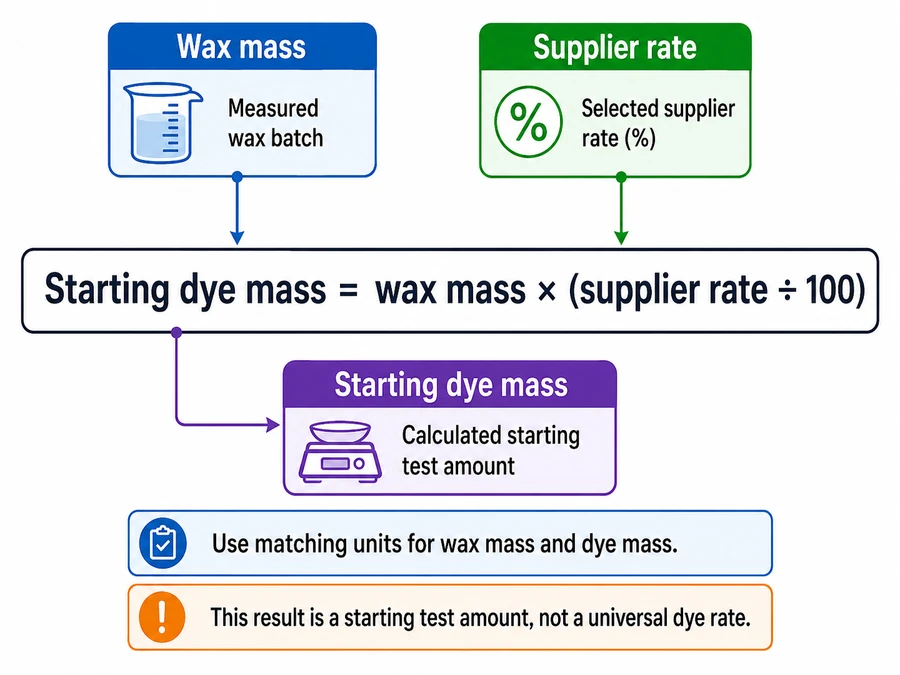
The wax mass and dye mass must use matching units. The result is a starting test amount rather than proof that the shade, dispersion, or finished-candle performance has passed.
| Test-batch field | Record before measuring |
|---|---|
| Dye supplier and product | Exact name shown on the packaging or technical instructions |
| Lot or batch identifier | Record when available |
| Dye format | Liquid, chip, block, or another documented candle-dye format |
| Supplier starting rate | Copy the stated value and unit without converting it to another product |
| Wax identity | Record the wax or blend used for the test |
| Test wax mass | Enter the measured wax amount with its unit |
| Calculated dye amount | Apply the supplier rate to the measured wax mass |
| Actual measured amount | Record what was added rather than the planned value alone |
| Cooled or cured result | Describe shade, uniformity, particles, and visible change |
| Next action | Approve, hold, or adjust one variable in another small test |
Do not insert a universal dye-rate default into the formula. Supplier instructions can differ by concentration, format, wax, and intended shade.
Changing the dye amount can affect finished-candle performance, so repeat the relevant finished-candle tests after changing the color formula. Here, “excess” means an amount beyond the product guidance or one that fails the relevant candle test; a dark shade alone does not prove excess dye.
Method. The formula uses the selected supplier’s rate as its only starting-rate source. Each test records product identity, units, wax mass, calculated amount, actual amount, and cooled result before any larger batch is considered.
A supplier, product, format, or lot change requires a small controlled retest before scaling because equal names or amounts do not prove equal concentration. Keep the wax, batch mass, production steps, cooling state, and viewing conditions unchanged while testing the changed material.
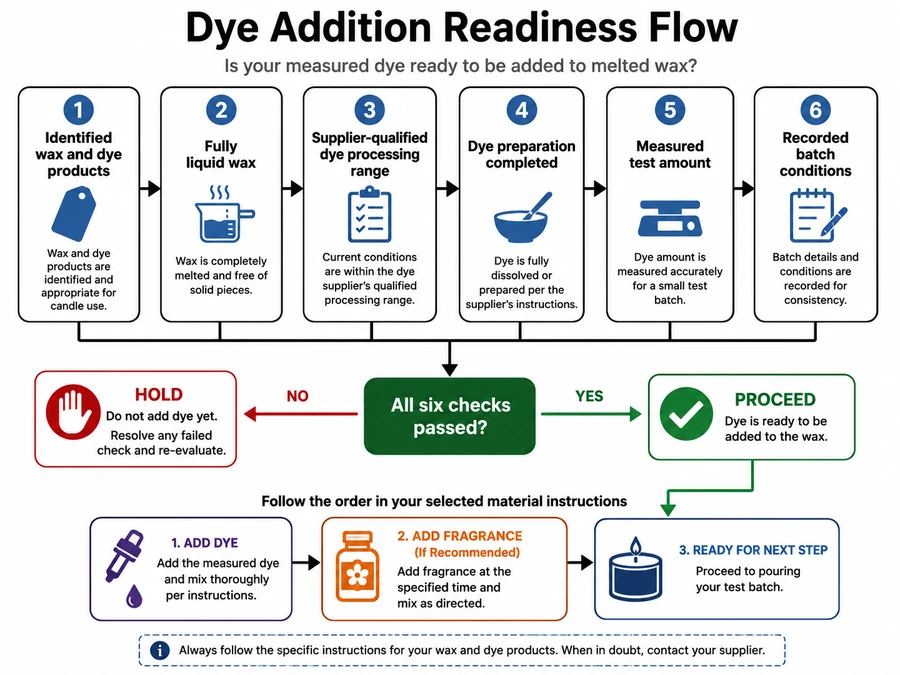
When should you add dye?
Add candle dye after the selected wax is fully melted and while the wax and dye are within their supplier-qualified processing range.
“Fully melted” means the wax is liquid and ready for the dye procedure stated by the wax and dye suppliers. Wax-melting, dye-add, fragrance-add, and pour temperatures are separate production points; do not replace them with one universal number.
| Readiness check | Ready condition | Hold condition |
|---|---|---|
| Material identity | The wax and candle dye products are identified | The product, format, or instructions are unknown |
| Wax state | The selected wax is fully liquid | Solid pieces or an unmelted layer remain |
| Processing range | The wax is within the stated range for adding the selected dye | The wax is outside the stated range or the instructions are unclear |
| Dye preparation | The liquid, chip, or block has been prepared as directed | A required shake, portioning, or measuring step was skipped |
| Dye amount | The supplier-qualified test amount has been measured | The amount is estimated from another product or format |
| Recording | Wax, dye, amount, batch size, and production condition are documented | The batch cannot be repeated from the notes |
Method. Treat each readiness check as a pass-or-hold decision rather than relying on one temperature copied from another formula. Record any failed check before changing the procedure so the next small batch tests one defined variable.
A wax may be melted but still outside the dye’s stated working condition. Conversely, a temperature suitable for adding dye may not be the stated fragrance-add or pour temperature.
Dye before or after fragrance
Many candle procedures dissolve dye before fragrance, but the correct order follows the selected wax, dye, and fragrance instructions.
Adding dye first can make its dissolution easier to inspect before fragrance changes the mixture. That common sequence is not a universal rule because material instructions may assign another order or processing condition.
| Instruction condition | Sequence decision | Action |
|---|---|---|
| Wax, dye, and fragrance instructions agree on dye first | Add the measured dye first | Complete the dye-mixing check before adding fragrance |
| The dye instructions specify another sequence | Follow the dye’s stated procedure while checking the other material limits | Do not replace the documented sequence with a general rule |
| One product requires preparation before addition | Complete the stated preparation first | Shake, portion, or condition the material only as directed |
| The instructions omit the order | Treat the sequence as unconfirmed | Test a small measured batch and record the order used |
| The supplier instructions conflict | Do not combine incompatible directions | Hold the full pour and compare small batches under separately documented sequences |
Decision rule. Follow a shared supplier sequence when the instructions align; when they conflict or omit the order, use a small documented test rather than inventing a universal sequence.
Add the dye only after the material-readiness checks pass and the dye–fragrance order has been documented.
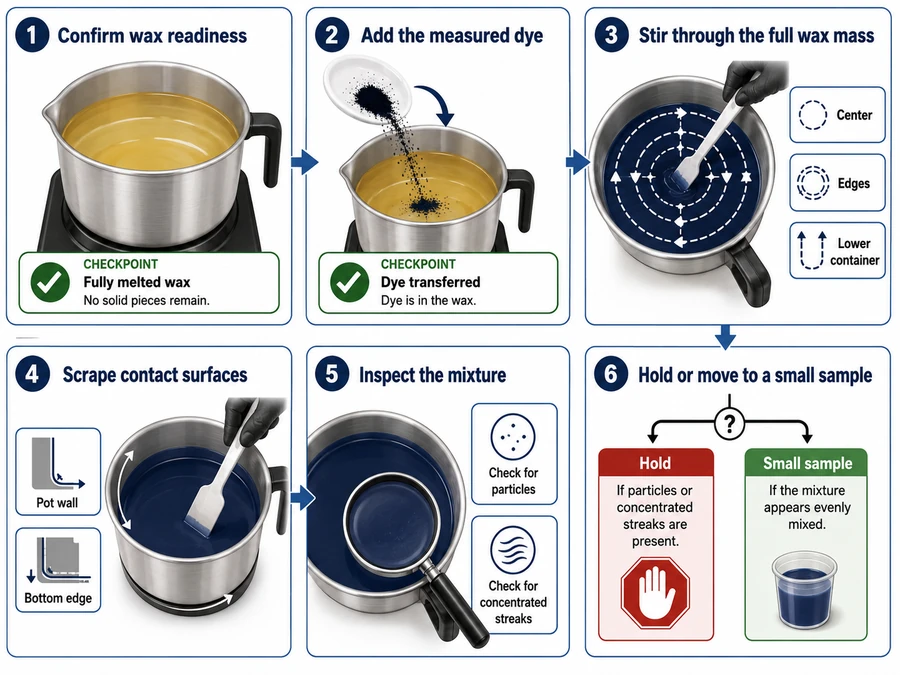
How to dissolve and mix dye evenly
Add measured candle dye to ready wax, stir steadily, scrape surfaces, inspect for particles or streaks, and pour only after the visual check passes.
Dissolution means visible undissolved dye material is no longer present. Dispersion means the color is distributed evenly through the wax rather than concentrated in one area.
- Confirm wax readiness. Verify that the wax is fully melted and within the selected dye’s stated processing condition.
- Add the measured dye. Transfer the recorded test amount without estimating or substituting another product’s measurement.
- Stir through the full wax mass. Move the stirrer through the center, edges, and lower portion of the container.
- Scrape contact surfaces. Release dye caught on the pot wall, bottom edge, stirrer, or pouring-tool surface.
- Inspect the mixture. Look for visible particles, dark trails, pale zones, settled material, or color concentrated around the tool.
- Hold when the check fails. Continue only under the material instructions; do not treat extra dye as the first correction.
- Move to a small sample. A uniform molten mixture passes the mixing check, but the cooled result still requires separate approval.
Clean tools. Residual dye on a pitcher, stirrer, dropper, seam, rim, or weighing surface can enter the next batch and create specks, streaks, or an unintended hue.
| Visual stage | Pass sign | Hold sign |
|---|---|---|
| Immediately after addition | The measured dye enters the wax without remaining on the measuring surface | Dye remains on the tool, rim, or container wall |
| During stirring | Color moves through the whole wax mass | Dark trails or pale zones remain in the same areas |
| After scraping | Released material blends into the mixture | Concentrated color returns from the wall or bottom |
| Final molten inspection | The wax appears uniform with no visible dye pieces or concentrated streaks | Particles, sediment, bands, or unexplained specks remain |
| Tool inspection | Contact surfaces match the current batch and show no old residue | A previous color remains on a seam, dropper, stirrer, or rim |
A visible particle does not automatically prove a dye clump. Record where it appeared and check for tool residue, debris, crystals, sediment, or contamination before changing the dye amount.
Method. This sequence uses observable completion signs rather than a universal stirring time. Record the dye format, wax identity, processing condition, measured amount, inspection result, and any failed step so the test can be repeated.
Proceed to a small color test only when the mixture is visually uniform and the recorded conditions can be repeated.
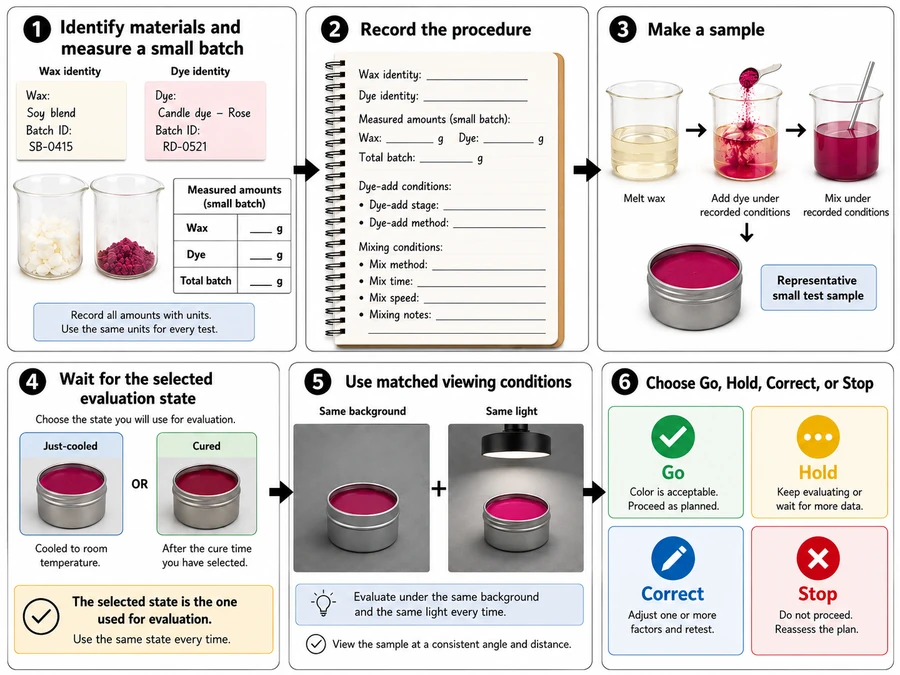
How to test candle color
Color a small measured wax batch, cool or cure a documented sample, evaluate it under matched viewing conditions, and approve the result before committing to a full pour.
A passing molten-wax inspection proves only that the dye appears dispersed at that stage. Final approval comes from a cooled or cured sample made with identified materials, recorded measurements, and repeatable processing conditions.
- Identify the materials. Record the exact wax, dye product, dye format, supplier, and lot when available.
- Measure a small batch. Record the wax mass, planned dye amount, actual dye amount, and units.
- Record the procedure. Note the dye-add condition, mixing method, fragrance condition, and any visible particles or streaks.
- Make a sample. Pour or remove a sample that represents the tested batch.
- Wait for the selected evaluation state. Mark whether the sample is just cooled, cured for a recorded period, or viewed after storage.
- Use matched viewing conditions. Compare samples against the same background, under the same light, and at the same elapsed stage.
- Choose one status. Mark the result Go, Hold, Correct, or Stop before changing the formula.
Molten, cooled, and cured colors
Molten dyed wax often appears darker or more saturated than the finished cooled candle, so the melt should not be the final approval reference.
Wax opacity, crystallization, surface texture, sample thickness, lighting, and elapsed time can change the visible result. Compare samples by state rather than treating one view as the permanent shade.
| Sample state | What it can show | What it cannot prove | Record before comparing |
|---|---|---|---|
| Molten wax | Visible dispersion, streaks, particles, and the working color | Final shade after cooling or curing | Wax and dye identity, amount, processing condition, and viewing light |
| Just-cooled sample | Early solid color and obvious unevenness | A stable cured or stored shade | Cooling time, sample thickness, background, and light |
| Cured sample | The shade after a documented resting period | Permanent resistance to heat, light, fragrance effects, or storage changes | Elapsed time, storage conditions, and fragrance condition |
| Alternate-light view | Whether the shade appears different under another named light source | A formula defect by itself | Light source, viewing distance, background, and sample orientation |
Do not compare one sample in warm indoor light with another in daylight and treat the visible difference as a dye-formula change.
Method. Use samples from the same batch or matched batches. Keep the sample shape, thickness, background, light, viewing distance, and elapsed time the same. Change only the state or viewing condition named in the comparison.
Dye test card
A candle-dye test card needs six records: material identity, measurements, addition and mixing conditions, fragrance condition, cooled result, and the next decision.
| Test-card field | Record |
|---|---|
| Wax and dye identity | Exact wax, dye product, dye format, supplier, and lot when available |
| Wax mass and dye amount | Measured wax mass, planned dye amount, actual dye amount, and units |
| Addition and mixing conditions | Dye-add condition, mixing method, and the observed completion sign |
| Fragrance condition | Fragrance product and measured amount, or none |
| Cooled or cured result | Shade, uniformity, particles, sample state, background, lighting, and elapsed time |
| Decision | Approve, hold, or change one named variable in another small test |
This checklist approves the color test only. It does not approve wick choice, burn behavior, labeling, regulatory status, or commercial release.
How to prevent clumps, bleeding, fading, and discoloration
Prevent candle-color failures by matching each failure to its first control: improve dye dispersion for clumps, control migration for bleeding, limit exposure for fading, and compare material conditions for discoloration.
Clumping creates undissolved or poorly dispersed particles, bleeding moves color, fading weakens color, and discoloration shifts the candle toward another hue.
Classify the visible change before altering the dye amount. These four failures occur through different actions and need different first checks.
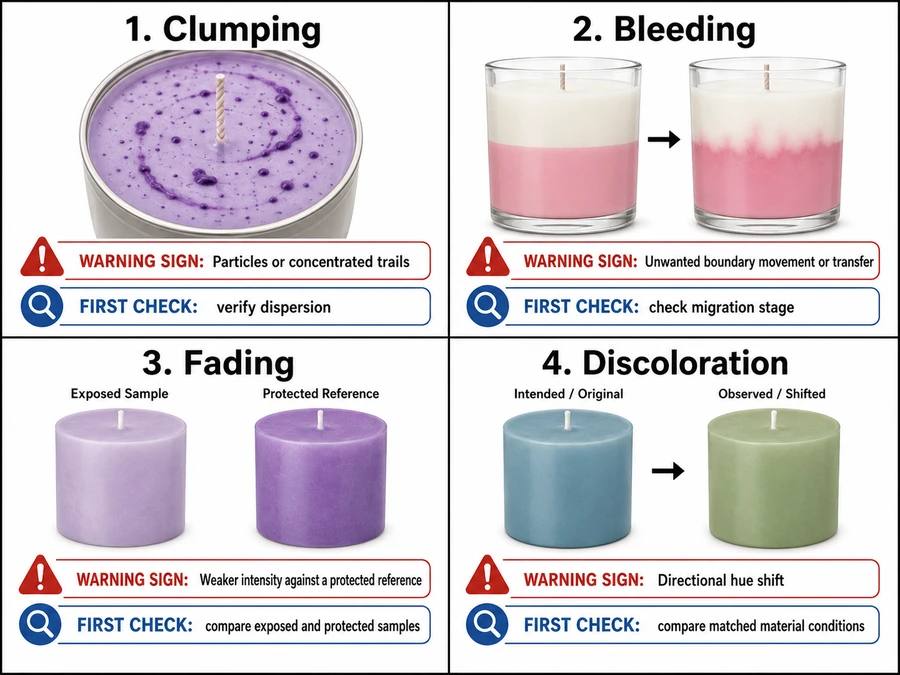
| Failure | Meaning | Common stage | Warning sign | Evidence to collect | First action |
|---|---|---|---|---|---|
| Clumping | Undissolved or poorly dispersed colorant | Addition or mixing | Specks, fragments, dark particles, or concentrated trails | Particle location, dye format, processing condition, mixing record, and clean-tool check | Hold the batch and verify the add–stir–scrape–inspect sequence |
| Bleeding | Unwanted color migration or transfer | Layering, cooling, storage, or surface contact | A boundary spreads, one color enters another, or color transfers on contact | Layer conditions, timing, storage position, contact surface, and dye level | Separate hot-pour mixing, delayed migration, and contact transfer |
| Fading | Loss of color intensity | Cooling, curing, light exposure, heat exposure, burning, or storage | A shade becomes visibly weaker than its earlier or protected reference | Protected control, exposed sample, dates, storage conditions, and matched viewing setup | Compare exposed and protected samples |
| Discoloration | Directional hue change | Curing, fragrance interaction, heat exposure, burning, or storage | Yellowing, browning, greening, or another shift rather than simple weakening | Fragranced sample, fragrance-free control, elapsed time, and matched viewing setup | Compare matched fragranced and fragrance-free samples |
Method. Assign a failure class from the observed action: particles, movement, intensity loss, or hue shift. Do not classify from the color name alone. Record the stage, warning sign, control sample, and first action before changing the formula.
Prevent candle-dye clumps
Dye clumps are undissolved or poorly dispersed colorant; prevent them through material matching, suitable processing conditions, accurate measurement, and the full add–stir–scrape–inspect sequence.
Not every particle is a dye clump. Debris, crystals, wax sediment, surface frosting, tool residue, and contamination can resemble one, so verify the evidence before adding dye or reheating the batch.
Hold the full pour when particles remain unidentified, then check the dye preparation, wax condition, mixing reach, scraped surfaces, and tool cleanliness before changing the dye amount.
Prevent color bleeding
Unwanted color bleeding can be reduced by controlling dye level, adjacent wax conditions, layer temperature, timing, and storage contact.
Bleeding means unintended migration or transfer. Planned gradients, swirls, marbling, and decorative blending are different effects and are not failures under this definition.
When a boundary changes, record whether the colors mixed during pouring, migrated after cooling, or transferred during storage before correcting the dye level or layer conditions.
Keep candle color from fading
Fading risk can be reduced through an appropriate dye, controlled light and heat exposure, stable storage, and comparison testing, but permanent color cannot be guaranteed.
Fading is a loss of intensity. A shift from white to yellow, red to brown, or another directional hue change belongs under discoloration unless a matched comparison shows intensity loss.
Color alone cannot prove that fragrance caused a hue shift. Compare matched fragranced and fragrance-free samples with the same wax, dye amount, processing steps, sample state, storage, and viewing conditions.
Use a protected sample from the same batch when testing light, heat, or storage exposure, and compare both samples at the same elapsed stage under the same lighting.
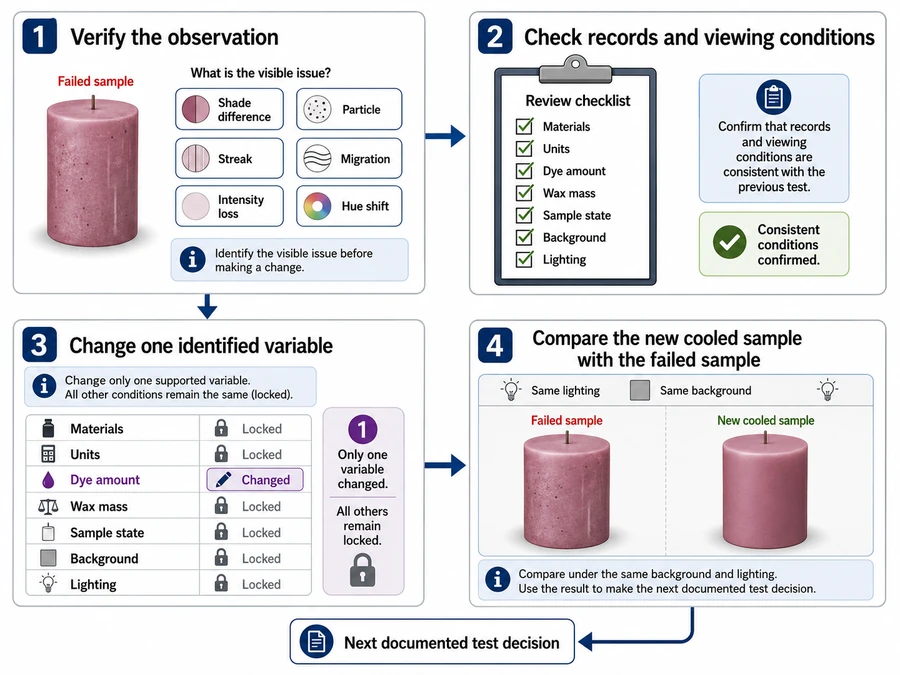
How to correct the next candle-color test
Choose one correction for the next candle-color test only after confirming measurement, dispersion, wax conditions, contamination, sample state, and viewing conditions.
A correction changes one recorded variable in a new small test. It does not mean adding more dye automatically or changing several parts of the formula at once.
- Verify the observation. Classify the result as a shade difference, particle, streak, migration, intensity loss, or hue shift.
- Check the records and viewing conditions. Confirm the materials, units, actual dye amount, wax mass, sample state, background, and lighting.
- Change one identified variable. Adjust only the measured dose, preparation step, mixing step, material condition, exposure, or viewing condition supported by the evidence.
- Compare the new cooled sample with the failed sample. Keep the other identified materials and test conditions unchanged so the result can be attributed to the selected correction.
Make the next test only after the failed result has been classified and one test variable has been named.