A candle flame gets too high when the wick, airflow, fuel load, or jar heat feeds more flame than the candle can burn safely.
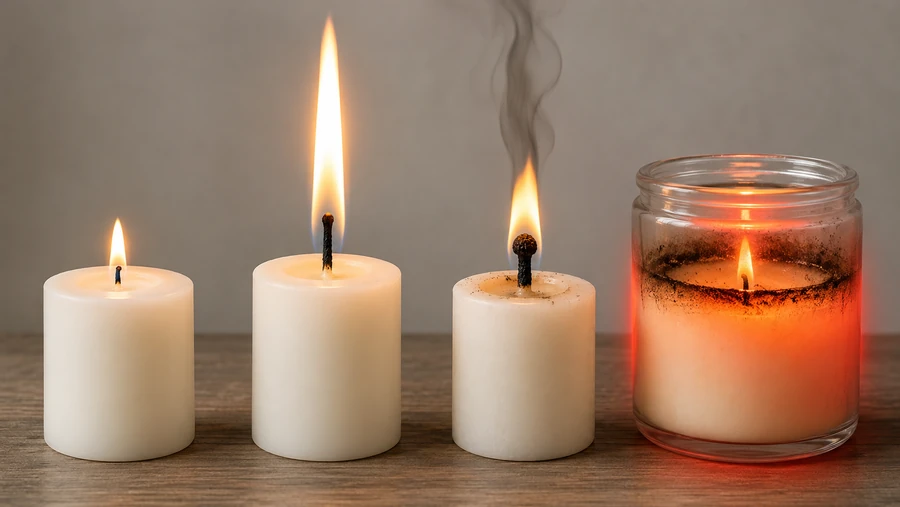
On this page, candle burning and usage means what you see during a normal home burn and what to do when the flame looks unsafe. Here, “too high” means a flame that flares, smokes, soots, smells scorched, leans hard in moving air, or makes the container feel unsafe to touch. Start by putting safety first: extinguish the candle if the flame surges, the jar overheats, or nearby items could catch. Then diagnose one cause at a time, beginning with visible warning signs before moving to wick, airflow, fuel, and container shape.
Candle flame too high: quick diagnosis + safety first
A candle flame is too high when it flares, smokes, soots, leans hard, or makes the jar feel unsafe.
Treat a tall flame as a burn-control problem, not a normal candle feature. Extinguish the candle, let the wax cool, trim the wick to ¼ inch, clear debris, and relight only away from drafts. The National Candle Association says trimming to ¼ inch helps prevent high flames and soot, and it also advises avoiding drafts near open windows, fans, and vents.
| Symptom | Likely cause | First fix |
|---|---|---|
| Tall flame with no smoke | Wick is too long | Extinguish, cool, trim to ¼ inch |
| Tall flame with black smoke | Wick length, soot buildup, or fuel imbalance | Extinguish and reset before relighting |
| Flame leans or flickers hard | Draft, fan, vent, window, or foot traffic | Move the candle before relighting |
| Flame jumps after a black bulb forms | Wick mushrooming | Cool, remove the carbon cap, trim |
| Jar feels dangerously hot | Overwicking, long burn, or late-jar heat | Stop burning and let it cool fully |
| Flame grows again after trimming | Oversized wick or formula issue | Do not keep testing unattended |
| Flame surges near the bottom | Low wax level and trapped heat | Retire the candle if safety margin is gone |
A normal candle flame should look steady and controlled. A risky flame usually shows at least one extra sign: repeated flickering, black smoke, a burnt smell, a fast-growing melt pool, or a container that becomes too hot to handle. Keep lit candles at least 12 inches from anything that can burn, and blow them out before leaving the room, leaving home, or going to bed.
IMAGE-PLACEHOLDER: Close-up safety comparison image showing a calm candle flame beside warning signs: tall flame, smoke, mushroomed wick, and overheated jar label.
Triage checklist: what to do right now (in order)
For a too-high candle flame, start with the safest action, then test one correction at a time.
The right order is extinguish, cool, trim, clear, relocate, relight, and observe. Do not add water to a burning or hot candle, because candle-safety guidance warns that water can splatter hot wax.
- Extinguish the candle. Use a snuffer or blow gently from the side if no snuffer is available.
- Let the wax cool. Do not move the candle while the wax is liquid.
- Check the wick. Trim it to ¼ inch before the next burn.
- Clear the melt pool. Remove wick trimmings, match heads, dust, and loose debris.
- Move the candle. Keep it away from fans, vents, open windows, curtains, books, bedding, and shelf overhangs.
- Relight for a short check. Watch the flame during the first few minutes instead of leaving it.
- Stop if the flame repeats the same warning sign. A repeat flare after trimming and draft control points to wick size, fuel load, or jar heat.
Use this reset only when the container is intact, the wax is clean, and the candle has enough remaining wax to burn safely. If the jar is cracked, scorched, bulging, or too hot to touch, skip relighting and let the candle cool on a heat-safe surface.
If the jar is overheating: warning signs + what to do
An overheating jar means the flame-height problem has become a safety issue, so extinguish the candle and let it cool fully.
Stop burning if the glass is painfully hot, the flame is close to the container wall, the wax pool looks unusually deep, or the jar shows cracks, chips, popping sounds, or soot-darkened hot spots. The U.S. Fire Administration treats candles as open-flame fire risks and says candles should sit in stable holders where they cannot be knocked down easily.
| Jar warning sign | What it may mean | Safe action |
|---|---|---|
| Glass is too hot to touch | Heat is building faster than expected | Extinguish and let it cool fully |
| Flame is close to the jar wall | Wick may be off-center or too strong | Stop using if the flame keeps leaning |
| Deep liquid wax covers much of the jar | Burn rate is too aggressive | Shorten future burns or retire the candle |
| Cracks, chips, or popping sounds appear | Container integrity may be compromised | Do not relight |
| Heavy soot ring forms on glass | Combustion is dirty or too hot | Extinguish, cool, and reassess |
| Flame grows near the bottom | Low wax level is raising heat risk | Retire the candle if little wax remains |
A hot jar is not a reason to test longer. Longer burning can add heat to the same container problem. Let the candle cool where it is, keep children and pets away, and do not move it until the wax is solid.
Fix an oversized wick: choose the right wick size/series
If the flame stays tall and sooty after trimming and burning in still air, the wick is likely too large or too strong for the jar.
An oversized wick feeds the flame faster than the candle system can manage. In candle burning and usage, that means the wick strength is mismatched with the wax blend, container diameter, fragrance load, or jar shape. The right wick size or series gives a steady flame, a controlled melt pool, low soot, and safe jar temperature in the same wax, fuel load, and container. Diagnose wick strength separately from wick length, mushrooming, airflow, fuel load, and jar heat because each path needs a different fix.
| Symptom after trimming | Likely cause | Next action |
|---|---|---|
| Flame stays tall in still air | Wick is too strong | Stop using as a normal burn; test a smaller wick if you are the maker |
| Flame is tall and sooty | Wick strength or fuel load is too high | Compare against fuel-load signs before changing two variables |
| Melt pool gets deep quickly | Wick is driving too much heat | Shorten the burn session and discontinue if heat keeps rising |
| Jar gets hot with a centered flame | Wick may overpower the container | Treat as a safety issue, not a cosmetic flaw |
| Flame improves after trimming | Wick length was the main issue | Keep trimming before each burn |
| Flame improves only after moving the candle | Draft was the main issue | Keep the candle away from vents, fans, and windows |
| Smaller wick causes tunneling in tests | Wick change went too far | Makers should test one wick step or series change at a time |
For a home user, an overwicked candle is usually not worth forcing through repeated burns. If the flame remains high after the wick is trimmed, debris is removed, and the candle is moved away from drafts, stop treating it as a quick maintenance problem.
For a candle maker, change one variable at a time. Test wick size or wick series before changing fragrance load, dye, container shape, or wax blend. A smaller wick can lower flame height, but it can also cause tunneling if it no longer gives enough heat for the jar.
| Test field | What to record |
|---|---|
| Wick series and size | Exact wick used |
| Wax blend | Wax type and supplier batch if known |
| Container | Inner diameter, shape, and material |
| Fuel load | Fragrance, dye, additives, and known percentages |
| Flame behavior | Tall, steady, flickering, smoky, or flaring |
| Melt pool | Shallow, even, deep, or fast-growing |
| Jar heat | Normal warmth, too hot, or unsafe signs |
| Result | Keep, wick down, change series, retest, retire, or discard |
Does a tall flame after trimming prove the candle is overwicked?
Not by itself. It becomes a stronger sign when the candle still burns tall and sooty after trimming, clearing debris, and testing in still air.
What should change first if wicking down causes tunneling?
Change one variable at a time. Try a nearby wick option or series change before changing fragrance load, wax blend, and container shape together.
Wick trimming: step-by-step (before and during the burn)
Trim only after the candle is extinguished and cool enough to handle, then clear debris and run a short monitored relight test.
Trimming reduces flame height because less exposed wick is available to pull wax into the flame. The National Candle Association recommends trimming the wick to ¼ inch before each use to help prevent high flames and soot.
- Extinguish the candle first. Do not trim a lit wick.
- Let the wax cool enough to work safely. The wax does not need to be rock-hard for every trim, but it should not be sloshing or splattering.
- Trim the wick to ¼ inch. Use a wick trimmer, scissors, or nail clippers if that is all you have.
- Remove loose debris. Wick pieces, match heads, and dust can catch fire in the melt pool.
- Check wick position. A leaning wick can push heat toward one side of the jar.
- Relight briefly in still air. Watch whether the flame settles lower.
- Stop if the same tall flame returns. A repeat problem points to wick strength, fuel load, or container heat.
| Trimming moment | Best use | Risk if skipped |
|---|---|---|
| Before each burn | Normal care | Tall flame, soot, mushrooming |
| After a flare-up | Reset after cooling | Repeat flare on relight |
| During an active burn | Do not do this | Burns, falling debris, wax splatter |
| After debris falls in wax | Clean before relighting | Debris can ignite or smoke |
| Before a test burn | Cleaner comparison | Bad data from old carbon buildup |
Debris in the melt pool: do and don’t
| Do | Don’t |
|---|---|
| Extinguish first | Pick debris out while the candle is burning |
| Use tweezers after cooling | Drop wick pieces back into the wax |
| Remove match heads | Add water to hot wax |
| Relight only when clean | Leave loose carbon near the flame |
How often should I trim a candle wick?
Trim before each burn. That keeps the exposed wick shorter and lowers the chance of high flames, soot, and mushrooming.
What if debris falls into the wax?
Extinguish the candle, let it cool enough to handle, remove the debris, then relight only if the flame path is clean.
What if the wick is buried or drowned?
Do not dig into hot wax. Let the candle cool, expose the wick gently if safe, and stop using it if the wick cannot stand and burn cleanly.
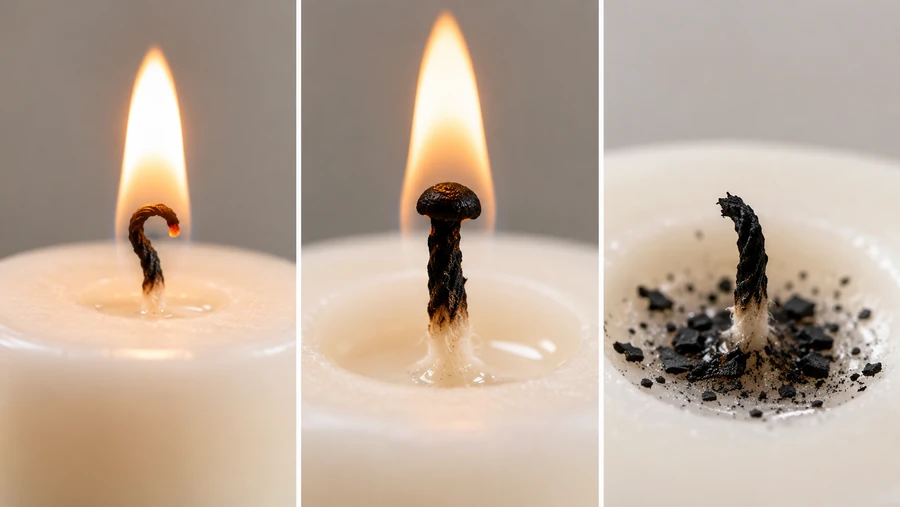
Wick mushrooming / carbon cap: what it means + how to stop flare-ups
A mushroom-shaped carbon cap can fuel flare-ups; extinguish, cool, trim the cap, clear debris, and retest.
Wick mushrooming means a black carbon bulb has formed at the wick tip. A small amount of carbon can appear during use, but a large repeated cap can feed sudden flame spikes and soot. Separate a mushroom flare from a draft flare and overwicking because each warning sign points to a different correction.
| Wick appearance | What it means | What to do |
|---|---|---|
| Slight curl, steady flame | Normal wick behavior in many candles | Keep normal trimming routine |
| Black bulb on wick tip | Carbon cap / mushrooming | Extinguish, cool, trim, clear debris |
| Large cap returns every burn | Wick or fuel load may be wrong | Treat as repeat failure |
| Cap plus black smoke | Dirty combustion | Stop and reset before relighting |
| Cap plus tall flame | Flare risk | Do not keep burning unattended |
| Cap falls into wax | Debris in melt pool | Remove after cooling |
A mushroom flare is not the same as a draft flare. A draft flare usually leans, flickers, or surges as air moves around it. A mushroom flare often appears after carbon has built up on the wick tip, then the flame jumps or smokes as that cap feeds the burn.
- Extinguish the candle.
- Let the wax and wick cool enough to handle safely.
- Trim off the carbon cap.
- Remove loose carbon from the melt pool.
- Relight in still air for a short check.
- Stop if the cap and tall flame return.
Repeated mushrooming should not be treated as normal maintenance only. If the carbon cap comes back after good trimming habits, check the overwicking path first, then compare fuel-load signs such as excess fragrance, dye, additives, or a wax blend that burns differently than expected.
IMAGE-PLACEHOLDER: Simple side-by-side visual showing normal wick curl, mushroom-shaped carbon cap, and carbon debris in the melt pool.
Drafts & airflow: stop the “blowtorch” effect
A draft-driven candle flame usually leans, flickers, or surges moment-to-moment, while wick-driven flame height is steadier.
In candle burning and usage, airflow can make a candle look overwicked when the real problem is placement. Hidden drafts include HVAC vents, ceiling fans, open windows, doorways, shelf gaps, and people walking past the flame.
| Flame behavior | Likely cause | What changes moment to moment? | Fix |
|---|---|---|---|
| Leans hard to one side | Draft or air current | Direction changes with room movement | Extinguish, cool, relocate, retest |
| Flickers fast and smokes | Draft plus dirty burn | Smoke may pulse with airflow | Move away from vents, fans, and windows |
| Tall but steady | Wick too long or too strong | Height stays more stable | Trim first, then assess wick strength |
| Tall after trimming in still air | Wick or formula mismatch | Problem repeats without airflow | Stop normal use or retest as a maker |
| Flame calms after relocation | Placement problem | Better in still air | Keep the new burn spot |
Candle-safety guidance says to avoid placing candles near drafts from open windows, fans, or air vents; the U.S. Fire Administration also says to keep candles at least 12 inches from anything that burns. Treat that spacing as a safety baseline, not a draft test by itself.
Draft-source checklist
- Check for moving curtains, papers, towels, or loose décor near the flame.
- Look for vents above, behind, or beside the candle.
- Turn off ceiling fans before relighting.
- Avoid doorways, walkways, and narrow shelves where air moves fast.
- Let the candle cool before moving it.
- Relight briefly in a still location and watch the first few minutes.
A draft fix should make the flame steadier quickly. If the flame still burns high, smoky, or hot in still air, stop blaming the room and move back to wick strength, wick length, fuel load, or jar heat.
Too much fuel: fragrance load, additives, and overheating
If smoke or soot persists after trimming and still-air burning, the candle may be over-fueled or mismatched with the wick.
Fuel load means the fragrance oil, dye, additives, and wax blend that feed or change the burn. These materials can alter fuel flow, flame cleanliness, and jar heat, especially when the wick is already strong for the container.
| Lane | What you can check | Best next action |
|---|---|---|
| Home user | Smoke remains after trimming and moving away from drafts | Stop burning if smoke, soot, or overheating persists |
| Home user | Strong burnt smell appears with a tall flame | Extinguish, cool, and do not keep “burning it off” |
| Home user | Jar gets too hot during repeated smoky burns | Treat it as unsafe and discontinue use |
| Maker | Fragrance, dye, wax, and wick all changed together | Retest with only one changed variable |
| Maker | Same wick behaves differently in a new formula | Compare fuel load and wax blend before blaming airflow |
| Maker | Smoke improves after reducing formula stress | Continue controlled burn tests before production |
Extra combustible material or a wax blend that flows differently can shift the fuel-air balance. That does not mean every scented candle is unsafe. It means a candle that keeps smoking after basic maintenance needs a formula or wick diagnosis, not longer unattended burning.
Methods mini-box: one-variable retest
For maker testing, keep the container, wax, wick, cure time, and room conditions fixed whenever possible. Change only one variable per retest, such as fragrance load, dye, additive, wick size, or wick series. Use supplier IFRA or SDS guidance before setting any fragrance-use limit; do not copy a percentage from another formula. The CPSC says candles containing a hazardous substance under the FHSA must carry cautionary labeling, which is why material guidance matters for makers.
| Test variable | Keep locked | Watch for |
|---|---|---|
| Fragrance load | Same wax, jar, wick, dye, cure time | Smoke, soot, flame height, hot jar |
| Dye level | Same wax, jar, wick, fragrance | Dirty flame, residue, uneven melt |
| Wax blend | Same jar, wick, fragrance, dye | Faster melt pool, wick overperformance |
| Wick size | Same full formula and jar | Flame height, tunneling, heat buildup |
| Wick series | Same size target and full formula | Cleaner burn or repeat flare |
| Additive | Same wax, wick, jar, fragrance | Smoke change or melt pool change |
Can I safely burn off excess fragrance oil?
Do not rely on “burning it off” when the candle smokes, soots, flares, or overheats. Stop, document the symptom, and correct the formula before another normal burn.
Does smoke after fragrance always mean the fragrance load is too high?
No. It can be fragrance, dye, wax, wick strength, cure, airflow, or several variables interacting. The cleanest test changes one variable.
What tool helps most for maker retesting?
A scale is useful because it keeps wax and fragrance measurements consistent, but safety signs still decide whether a test continues.
Persistent smoke after trim, still air, and clean wax is a stop signal for home users and a controlled retest signal for makers.
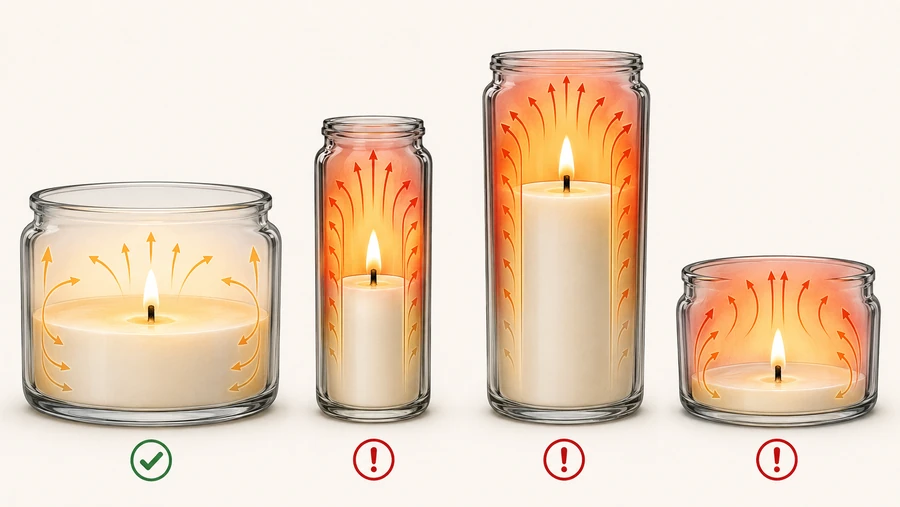
Jar geometry: wide vs narrow containers (how shape drives flame height)
Jar shape changes how heat gathers around the flame, so the same wick can burn differently in a wide, narrow, deep, or nearly empty container.
A wide jar may need more wick strength to reach the edges, while a narrow or deep jar can trap more heat near the flame. Near the bottom of a container, the remaining wax and surrounding walls can raise heat buildup, which may make a flame grow even when the wick has been trimmed. Compare wide-vs-narrow containers, end-of-jar behavior, and normal warmth-vs-overheating before blaming the wick alone.
| Container condition | How it can affect flame height | What to do |
|---|---|---|
| Narrow jar | Heat can concentrate around the wick | Watch for late-burn flare-ups and hot glass |
| Wide jar | Maker may choose a stronger wick | Check whether the flame is too tall after trimming |
| Deep jar | Airflow and trapped heat can shift as wax drops | Stop if the flame grows near the bottom |
| Nearly empty jar | More heat can collect around less wax | Retire the candle before unsafe low-wax burning |
| Off-center wick | Flame may sit too close to one wall | Stop using if the jar overheats on one side |
| Thin or damaged glass | Less margin for heat stress | Do not relight if cracked, chipped, or popping |
A container problem can look like a wick problem. The clue is where the heat goes. If the flame is tall and centered, the wick or fuel load may be too strong. If the flame leans toward one wall, scorches one side, or heats one side of the jar, container geometry and wick position become part of the diagnosis.
For home users, the safest fix is not to reshape the candle or dig into the wax. Trim the wick, burn in still air, keep the candle on a heat-safe surface, and stop if the jar becomes too hot or the flame grows again.
For makers, container testing should be tied to the exact inner diameter, wax blend, wick series, fragrance load, and fill level. A wick that looks acceptable early in the jar may become too aggressive later, so late-burn behavior matters.
| Question | Safe interpretation |
|---|---|
| Is the flame taller than it was earlier in the candle? | Stop and check low-wax heat buildup |
| Is the jar hotter than usual? | Extinguish and let it cool fully |
| Is the flame close to the glass? | Do not continue normal burning |
| Is soot collecting near one side? | Wick position, airflow, or container heat may be involved |
| Is there very little wax left? | Retire the candle instead of forcing another burn |
IMAGE-PLACEHOLDER: Simple diagram comparing a wide jar, narrow jar, deep jar, and low-wax jar, with arrows showing heat buildup around the flame.
When to retire/discard/rewick: go/no-go rules + burn test notes
Retire the candle when trimming, still-air placement, and debris removal do not return the flame to a calm, controlled burn.
A candle is no-go when it repeatedly flares, smokes, soots, overheats, cracks, smells scorched, or burns too close to the container wall. Rewicking is a maker repair path, not a normal home-user fix for an unsafe finished candle.
| Situation | Go or no-go? | Reason |
|---|---|---|
| Flame lowers after trimming and stays steady | Go, with normal care | Wick length was likely the main problem |
| Flame lowers only after moving from a draft | Go, only in still placement | Airflow was the main trigger |
| Tall flame returns after trimming and still-air testing | No-go for normal use | Wick strength, fuel load, or jar heat may be wrong |
| Jar becomes too hot to handle | No-go | Heat risk is more important than saving wax |
| Glass cracks, chips, pops, or changes shape | No-go | Container integrity is compromised |
| Wick cap keeps forming with smoke and flare-ups | No-go until tested | Repeat carbon buildup points to a deeper burn issue |