Remove candle wax from walls by hardening and lifting the raised wax first, then using cold, gentle heat-and-blot, or lift-only cleanup based on paint, wallpaper, or plaster sensitivity.
This guide is for renters and DIY homeowners removing candle wax from painted walls, wallpaper, or plaster without turning a small drip into surface damage. Safe removal here means protecting paint sheen, wallpaper seams, plaster porosity, and older finishes while taking off bulk wax, residue, and light stains.
Start by identifying the surface, testing a hidden spot, and lifting the hardened wax before using moisture, cleaner, or heat. If the finish softens, bubbles, darkens, powders, or changes sheen, stop and switch to a lower-risk method or professional help.
Identify your wall type + test spot (paint, wallpaper, plaster)
Identify the surface first, then test a hidden spot before scraping, heating, or cleaning candle wax from a wall.
Wax removal is safest when the method matches the wall. Painted walls can lose sheen, wallpaper can bubble or lift at seams, and plaster can darken if it absorbs moisture.
Use these quick checks before touching the wax:
| Wall clue | What it usually means | Removal risk |
|---|---|---|
| Flat or matte paint | Low-sheen painted wall | Burnishing means shiny rub marks from pressure, and it shows easily here. |
| Satin, eggshell, or glossy paint | More washable painted finish | Heat and rubbing can still soften or mark the coating. |
| Plastic-like wallpaper face | Vinyl-coated wallpaper, a wipeable wallcovering with a plastic-feeling surface | Safer than paper wallpaper, but seams can still lift. |
| Soft, fibrous, or printed paper face | Paper wallpaper | Moisture, heat, and rubbing can stain or tear it. |
| Hard wall that darkens when damp | Porous plaster, plaster that absorbs moisture instead of shedding it | Water and oily wax residue can sink in. |
| Hard wall that beads slightly when damp | Sealed plaster or painted plaster | Safer than bare plaster, but still test first. |
Test a small hidden area with the gentlest planned step: a wrapped ice pack, a barely damp cloth, or brief low heat through absorbent paper. Wait until the surface looks dry again, then check for sheen change, color lift, bubbling, tacky paint, chalky transfer, or raised wallpaper edges.

Stop and switch to a gentler method if wax smears, the wall softens, paper lifts, plaster darkens, or paint transfers to the cloth.
Before you start
| Task | Safer items | Avoid at this stage |
|---|---|---|
| Protect the area | Drop cloth, paper towel, painter’s tape on nearby trim only | Taping fragile wallpaper or loose paint |
| Lift wax | Plastic putty knife, old plastic card, wooden craft stick | Razor blades, metal scrapers, hard pressure |
| Chill wax | Wrapped ice pack, sealed bag of ice | Unwrapped ice that wets the wall |
| Absorb softened wax | Brown paper, plain paper towel, white cotton cloth | Printed paper, dyed cloth, wiping motions |
| Clean later residue | Mild dish soap, microfiber cloth, barely damp sponge | Strong solvents before a test spot |
When the wall type is uncertain, treat it like fragile wallpaper or porous plaster: cold-first, low moisture, no hard scraping.
Wax Removal Method Picker (Paint vs Wallpaper vs Plaster)
Pick the wax-removal method from the wall surface, finish sensitivity, wax state, and nearby seams or texture.
Use this picker before removing candle wax from paint, wallpaper, or plaster:
| Situation | Start here | Avoid |
|---|---|---|
| Unknown wall type | Harden the wax with a wrapped ice pack, then lift gently with plastic. | Heat, solvents, soaking, or hard scraping. |
| Flat or matte painted wall | Cold-first for thick wax; gentle heat-and-blot only for thin film. | Rubbing, melamine sponge pressure, and metal blades. |
| Satin or glossy painted wall | Lift hardened wax, then use gentle heat-and-blot for remaining film. | Holding heat in one place or wiping melted wax. |
| Vinyl-coated wallpaper | Cold-first near seams; brief blotting only after a test spot. | Steam, wet scrubbing, and heat near loose edges. |
| Paper wallpaper | Harden and lift only what releases easily. Use very little moisture. | Solvents, repeated heat, abrasive pads, or soaking. |
| Sealed plaster | Lift bulk wax, then use cold or light heat depending on residue. | Scraping through the sealer or over-wetting. |
| Porous or older plaster | Cold-first, lift lightly, and stop if the plaster darkens or powders. | Liquid cleaners, oil-spreading heat, and repeated rubbing. |
| Wax in texture or grooves | Chill first, chip carefully, then use controlled heat-and-blot only where needed. | Forcing a blade into the texture. |
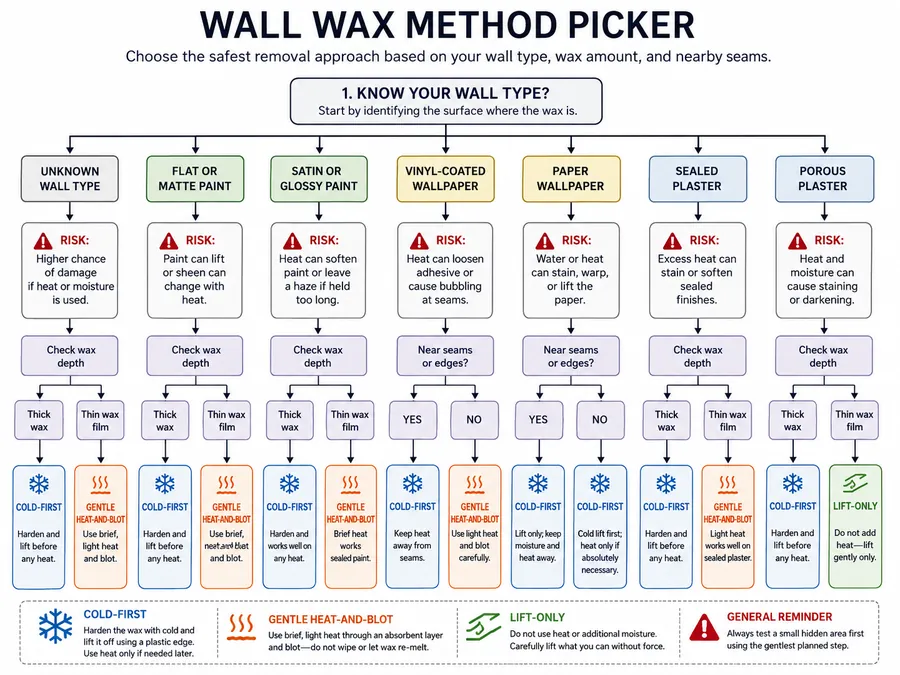
Start cold when wax is thick, close to wallpaper seams, stuck in texture, or on an unknown surface.
Use gentle heat-and-blot when only a thin wax film remains after bulk removal and the test spot stays stable.
Use lift-only when the wall is fragile, the finish is already loose, or the area reacts during the test spot.
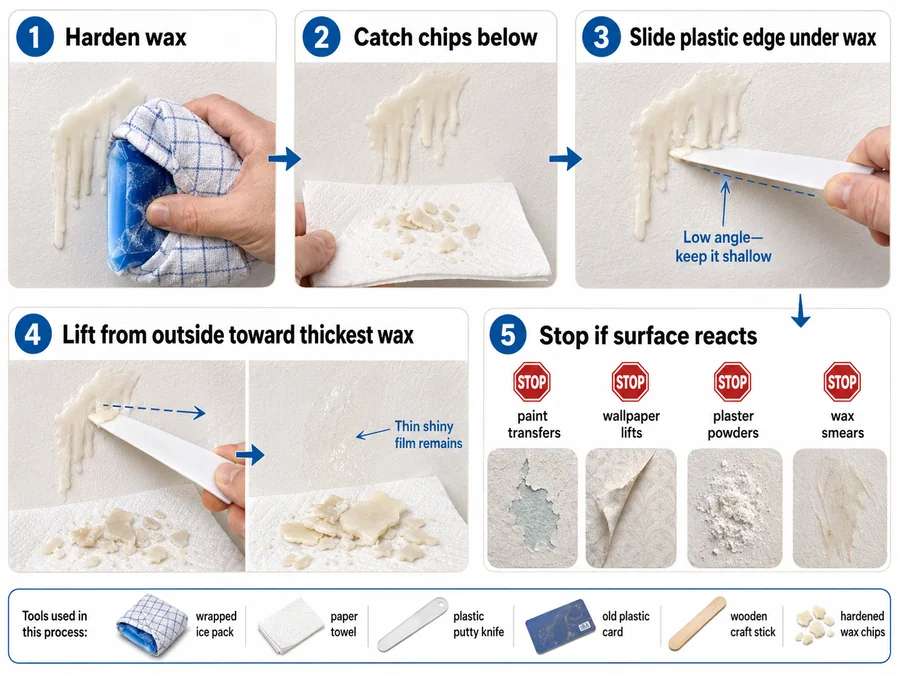
Lift off the bulk wax first (no damage)
Remove the raised wax before using heat, cleaner, or stain treatment.
Bulk wax is the thick, raised layer sitting on top of paint, wallpaper, or plaster. Taking it off first keeps melted wax from spreading into a larger oily mark.
Let the wax harden completely. If it still feels soft, press a wrapped ice pack against it for a few minutes, keeping the wall dry. Then slide a plastic putty knife, old plastic card, or wooden craft stick under the wax edge.
Work from the outside of the drip toward the thickest part. Lift more than you scrape. If the tool catches, lower the angle and use smaller movements.
| What happens | What it means | Do this |
|---|---|---|
| Wax chips off cleanly | The bulk layer is ready to lift | Keep lifting with light pressure. |
| Wax smears | It is too warm or too thin | Chill it again or move to blotting later. |
| Paint transfers to the tool | The finish is soft or weak | Stop scraping and use lift-only removal. |
| Wallpaper edge lifts | Adhesive or seam is reacting | Stop near the seam and use cold only. |
| Plaster powders or crumbles | The surface is fragile or unsealed | Stop and avoid pressure or liquid cleaner. |
| A thin shiny film remains | Raised wax is gone, residue remains | Treat the film separately after bulk removal. |
Do not use a razor, utility knife, metal putty knife, or hard scraper unless repainting or repair is already planned. A sharp edge can turn wax removal into gouged paint, torn wallpaper, or scratched plaster.
For wax near trim, corners, or outlet plates, place a folded paper towel below the drip before lifting. This catches chips and keeps small pieces from being pressed back into texture or seams.
Choose cold or heat-and-blot removal
Use cold for thick wax and fragile surfaces; use gentle heat-and-blot for thin film on stable surfaces.
Cold makes wax brittle, so it releases in chips. Heat softens wax so absorbent paper can pull it away, but too much heat can soften paint, loosen wallpaper adhesive, or drive oil into porous plaster.
| Method | Best for | Higher-risk on | Main mistake |
|---|---|---|---|
| Cold method | Thick drips, textured walls, unknown surfaces, wallpaper seams | Very brittle old plaster if pressure follows | Chilling with wet ice and soaking the wall |
| Heat + blot | Thin wax film, glossy painted walls, sealed plaster | Paper wallpaper, flat paint, porous plaster | Wiping melted wax instead of blotting |
| Lift-only | Loose paint, fragile wallpaper, crumbly plaster | Heavy residue that needs later repair | Forcing off wax that does not release |
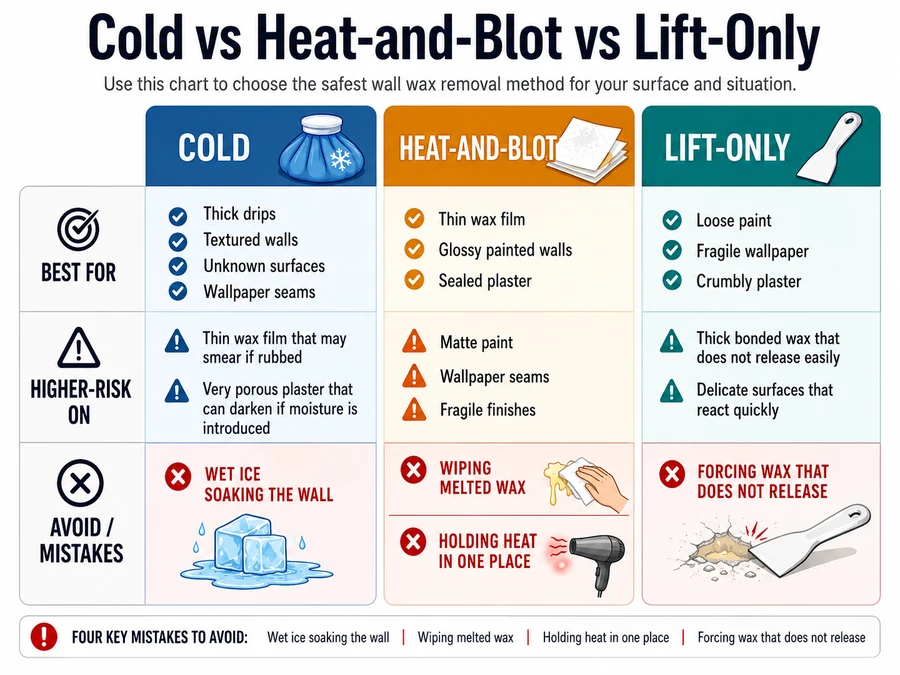
Choose cold first when the wall type is uncertain, the wax is raised, or the surface already looks delicate. Choose heat only after most wax is gone and the test spot shows no bubbling, tackiness, color transfer, darkening, or sheen change.
Never combine heat with rubbing. Warm wax moves easily, and wiping can spread it sideways into a larger greasy stain.
Cold method (ice pack → chip off)
Use the cold method when you want wax to crack away instead of melting into the wall.
Wrap an ice pack or sealed bag of ice in a thin towel. Hold it against the wax until the wax feels firm and brittle, not damp. Keep the towel between the ice and the wall so condensation does not wet paint, wallpaper, or plaster.
Follow this order:
- Place a towel or paper below the wax to catch chips.
- Hold the wrapped ice pack on the wax for a few minutes.
- Test one edge with a plastic card or plastic putty knife.
- Lift small pieces away with light pressure.
- Re-chill if the wax bends or smears.
- Wipe loose crumbs away with a dry microfiber cloth.
Cold works well on bumpy paint, knockdown texture, thick drips, and wallpaper edges because it reduces smearing. It does not always remove the last oily film, so a separate residue step may still be needed.
Stop the cold method if the wall becomes wet, paper fibers raise, plaster darkens, or the surface starts flaking under light pressure.
Heat + blot method (hair dryer / iron through paper)
Use gentle heat only after the raised wax is gone and the test spot stays stable.
The heat-and-blot method softens thin candle wax so paper can absorb it. It is safer when you warm a small area, blot straight into the wax, and replace the paper as it picks up residue.
For a hair dryer:
- Place plain paper towel, brown paper, or a white cotton cloth over the wax film.
- Set the hair dryer to low or warm, not high.
- Keep the dryer moving several inches from the wall.
- Warm for short bursts.
- Press the paper into the softened wax.
- Lift the paper straight away and replace it once it looks oily.
- Repeat only while the wall surface stays unchanged.
For an iron-through-paper method, use the lowest heat setting and no steam. Put brown paper or a plain paper towel between the iron and the wall, touch the paper briefly, then lift and check. Do not slide the iron across the wall.
| Surface | Safer heat choice | Stop if you see |
|---|---|---|
| Flat painted wall | Hair dryer, low heat, short bursts | Shine, tacky paint, color transfer |
| Glossy painted wall | Hair dryer or very brief iron-through-paper | Soft paint, blistering, streaks |
| Vinyl wallpaper | Hair dryer away from seams | Bubbling, seam lift, adhesive smell |
| Paper wallpaper | Avoid heat unless the test spot passes cleanly | Darkening, wrinkling, raised fibers |
| Sealed plaster | Gentle heat-and-blot after bulk wax removal | Darkening, softened coating |
| Porous plaster | Usually avoid heat | Oily shadow spreading into the wall |
Blot instead of wipe. Wiping warm wax spreads it across the wall and pushes oil into paint pores, wallpaper fibers, or plaster texture.
Stop heating if the area smells hot, bubbles, turns glossy, gets tacky, or the paper sticks to the surface.
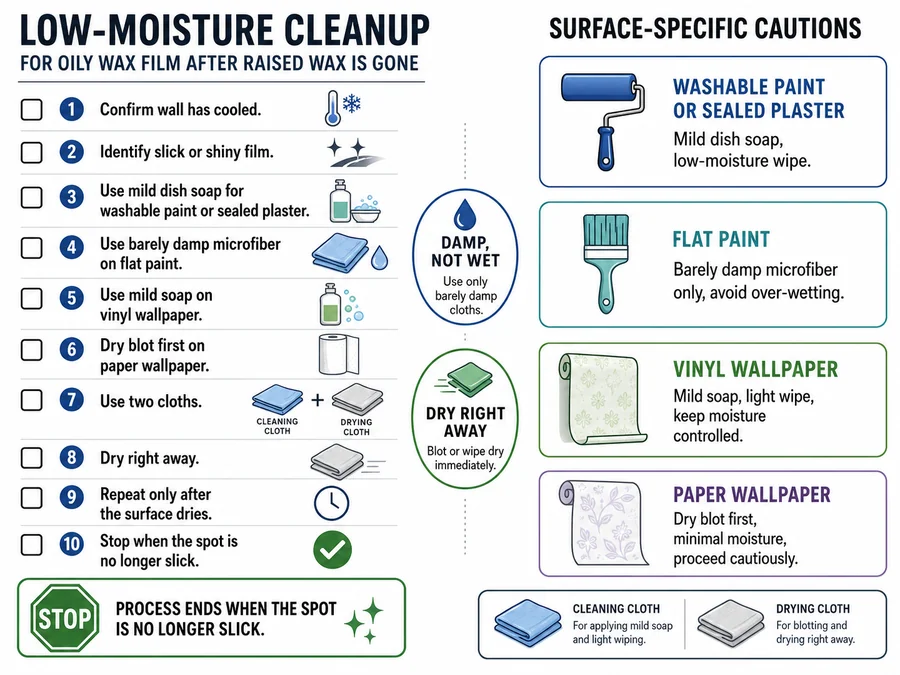
Remove the oily film after wax is gone
Clean the wax film after the raised wax is removed and the wall surface has cooled.
The oily film is the thin residue left by candle wax, fragrance oil, dye, or soot. It often feels slick, looks shiny, or attracts dust even after the solid wax is gone.
Start with the mildest cleaner that matches the wall:
| Wall surface | First cleaner | How to apply | Avoid |
|---|---|---|---|
| Washable painted wall | A few drops of dish soap in warm water | Dampen microfiber, blot, then wipe lightly | Soaking, hard scrubbing |
| Flat painted wall | Barely damp microfiber with mild soap | Dab and lift, then dry right away | Melamine sponge pressure, repeated rubbing |
| Vinyl wallpaper | Mild soap on a barely damp sponge | Clean from the wax edge inward | Wet seams, hot water |
| Paper wallpaper | Dry blotting first; minimal damp cleaning only after testing | Dab once, then dry | Degreaser, solvent, repeated passes |
| Sealed plaster | Mild soap on a damp cloth | Blot, rinse cloth, dry the area | Flooding the surface |
| Porous plaster | Dry removal first; very limited damp contact | Test before any cleaner | Liquid cleaner on unsealed plaster |
Use two cloths: one lightly damp cloth for cleaning and one dry cloth for drying. The wall should never look wet. If the residue improves but does not disappear, repeat after the surface dries instead of scrubbing longer.
For washable paint only, a small amount of low-odor mineral spirits on a white cloth may help with stubborn wax film after a hidden test spot. Keep it away from wallpaper, unsealed plaster, fresh paint, and delicate finishes.
A remaining shadow may be stain, not wax. If the wall is no longer slick but still looks discolored, move to stain treatment rather than more cleaning.
Colored wax / soot marks: clean vs prime & paint
Treat leftover color or gray marks as stains once the wall no longer feels waxy.
Colored candle dye and soot can stay behind after the solid wax and oily film are gone. More rubbing may damage the surface without removing the stain.
Use this decision guide:
| Mark left behind | Likely cause | Best next step |
|---|---|---|
| Slick, shiny patch | Wax or oil film remains | Clean lightly with the residue method. |
| Pink, red, blue, or dark tint | Candle dye stained the finish | Blot-clean once, then consider primer and touch-up paint. |
| Gray or black haze | Soot mixed with wax residue | Dry wipe first, then mild soap on washable paint. |
| Shiny rub mark on flat paint | Burnishing from friction | Repaint or touch up; more cleaning may worsen it. |
| Brown or dark patch on plaster | Oil absorbed into porous material | Stop wet cleaning and use stain-blocking primer before paint. |
| Wallpaper discoloration | Dye or oil entered the paper face | Avoid solvents; replacement or professional repair may be safer. |
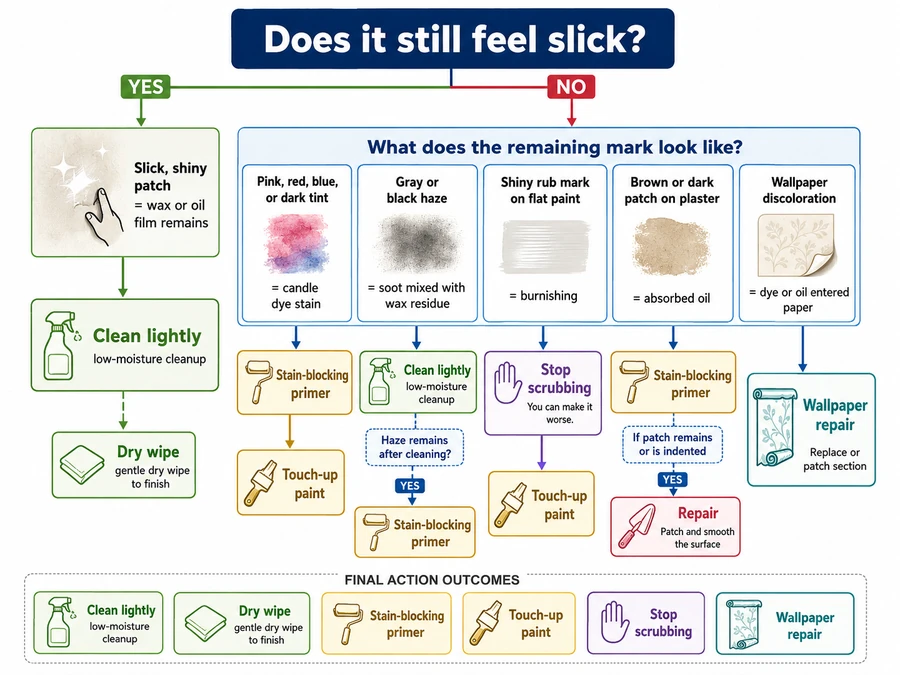
On painted walls, a stain-blocking primer is often faster than repeated cleaning once the surface is clean and dry. Prime only the affected patch if the stain is small, then touch up with matching paint.
Use a melamine sponge only on durable painted walls and only after testing. It can remove marks, but it can also dull flat paint and leave a polished-looking patch.
Stop cleaning when the surface is no longer slick. At that point, the problem has changed from wax removal to stain coverage or surface repair.
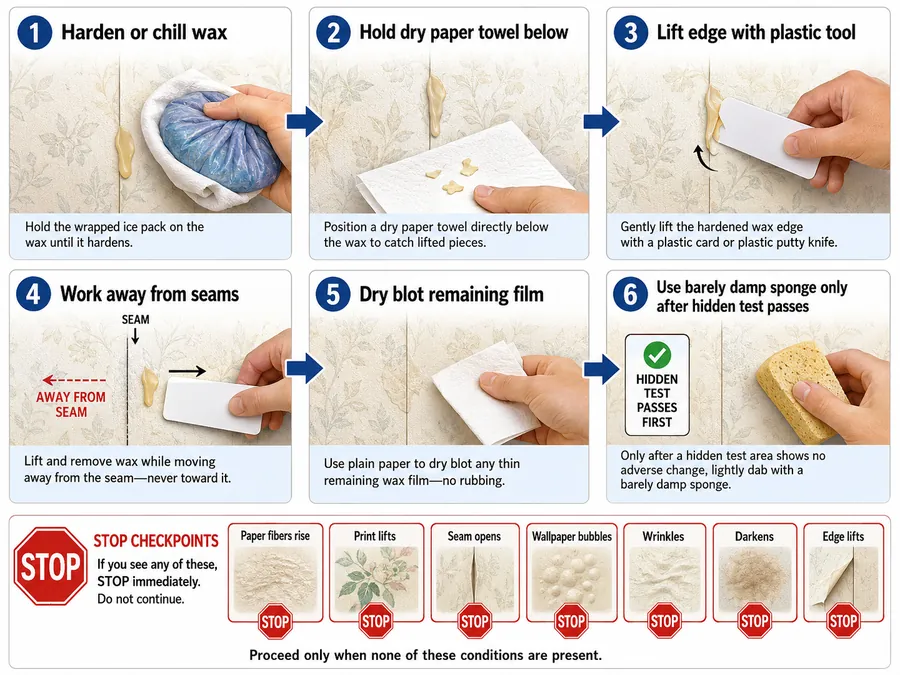
Wallpaper: safest wax removal (avoid bubbles & seam lift)
Remove wax from wallpaper with cold-first lifting, very low moisture, and no heat near seams unless a test spot passes.
Wallpaper is more vulnerable than paint because wax can pull the printed face, heat can soften adhesive, and moisture can loosen seams. The safest goal is to remove what releases cleanly, not force the wallcovering back to perfect condition.
Use this order:
- Let the wax harden, or chill it with a wrapped ice pack.
- Hold a dry paper towel under the drip to catch chips.
- Lift the wax edge with a plastic card or plastic putty knife.
- Work away from seams, not toward them.
- Stop if paper fibers rise, the print lifts, or the seam opens.
- Blot any remaining film with plain paper before adding moisture.
- Use a barely damp sponge only after a hidden test spot stays unchanged.
| Wallpaper type | Safer wax approach | Avoid |
|---|---|---|
| Vinyl-coated wallpaper | Cold lift, then brief blot-cleaning with mild soap | Wet seams, steam, hard scrubbing |
| Paper wallpaper | Cold lift only; dry blotting for residue | Solvent, repeated heat, soaking |
| Peel-and-stick wallpaper | Cold lift and light pressure | Heat near edges, which can loosen adhesive |
| Older wallpaper | Lift only what releases easily | Pulling flakes, wet cleaning, strong cleaner |
| Wallpaper near seams | Chill, lift away from the seam, stop early | Heating or rubbing across the seam |
If thin wax remains on vinyl wallpaper, place plain paper over the mark and warm it briefly with a hair dryer on low. Blot straight into the paper, then lift it away. Do not wipe sideways.
For paper wallpaper, a faint oil mark may be safer to leave than to chase. Solvents and repeated damp cleaning can spread dye, raise fibers, or leave a larger patch than the original wax drip.
Specialty wallpapers: grasscloth, fabric, peel-and-stick, designer papers
Treat specialty wallpaper as fragile unless the maker’s care instructions clearly allow cleaning.
Grasscloth wallpaper is a natural-fiber wallcovering with visible woven texture. Fabric wallpaper has a textile face. Both can trap wax, absorb oil, and show water rings.
Use this rule: remove only the raised wax that comes off cleanly, then stop before oil or dye spreads into the material.
| Specialty surface | Safer action | Stop trigger |
|---|---|---|
| Grasscloth | Chill, lift loose wax with a plastic edge, dry brush crumbs | Darkening, fraying, oil spreading |
| Fabric wallpaper | Chill, pick off hardened pieces, dry blot only | Pilling, fuzzing, dye transfer |
| Peel-and-stick | Cold lift; very mild cleaning after testing | Edge curl, adhesive loosening |
| Metallic or printed designer paper | Cold lift and dry blot | Finish dulling, print transfer |
| High-value or discontinued paper | Minimal removal, then professional restoration | Any visible change during testing |
Do not use an iron on grasscloth, fabric, or delicate designer papers. Heat can move wax deeper into the fibers, while pressure can flatten texture or mark the finish.
For peel-and-stick wallpaper, avoid heat near corners and seams. Adhesive-backed papers can release when warmed, especially if the wall was not perfectly clean during installation.
Plaster: sealed vs porous (minimal moisture cleanup)
Clean wax from plaster based on whether the surface sheds moisture or absorbs it.
Sealed plaster has paint, primer, or another coating that slows absorption. Porous plaster absorbs moisture and oil more easily, so wax residue can sink in and leave a darker patch.
Do a small water-bead check in a hidden spot. Touch the wall with a barely damp cotton swab. If the spot darkens quickly, treat the plaster as porous. If moisture sits on the surface briefly, it is more likely sealed.
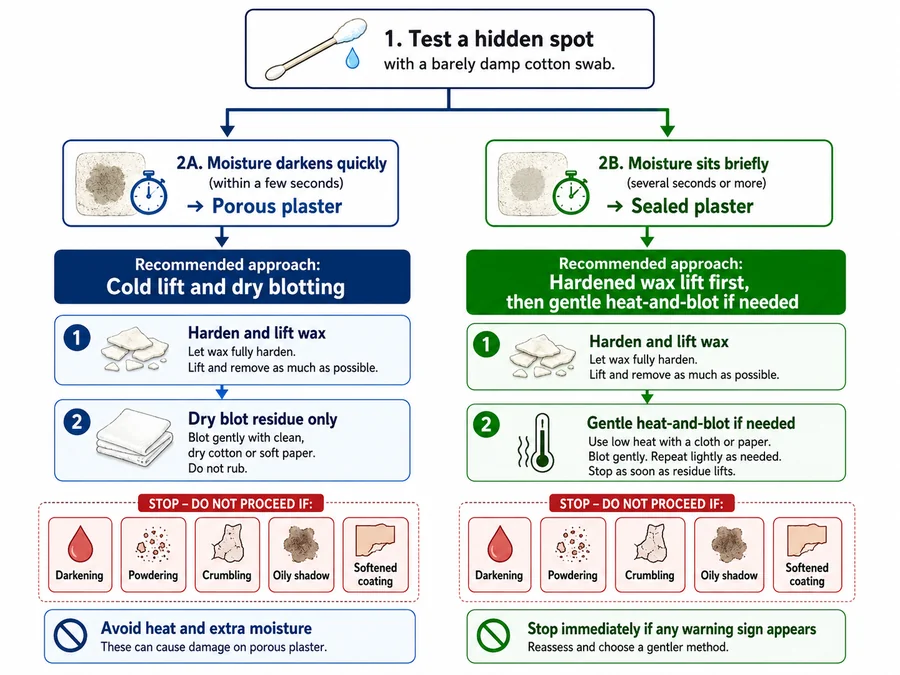
| Plaster condition | Wax removal method | Avoid |
|---|---|---|
| Painted or sealed plaster | Lift hardened wax, then use gentle heat-and-blot if needed | Scraping through the coating |
| Porous plaster | Cold lift only, then dry blotting | Liquid cleaner, solvent, repeated heat |
| Older lime plaster | Very light lifting and dry cleanup | Pressure, soaking, abrasive pads |
| Crumbly plaster | Stop and repair the surface before cleaning further | Picking, brushing hard, wet wiping |
| Plaster with oily shadow | Let it dry, then use stain-blocking primer before repainting | More cleaning once wax is gone |
For sealed plaster, clean remaining film with a barely damp cloth and mild dish soap, then dry it right away. Keep the cloth damp, not wet.
For porous plaster, do not chase the last shadow with water. Once wax and loose residue are gone, a remaining mark is usually a stain-control or repainting issue, not a cleaning issue.
Repairs & tricky situations
Repair the wall only after the wax, oil film, and loose debris are gone.
Wax removal can expose weak paint, loose wallpaper, rough plaster, or wall texture that was already fragile. Fix the surface problem separately instead of scraping harder at the wax spot.
| Problem after wax removal | Likely cause | Best next move |
|---|---|---|
| Paint lifted with the wax | Weak paint bond or hard scraping | Feather, prime, and touch up. |
| Shiny patch on flat paint | Rubbing changed the sheen | Repaint the patch or full wall section. |
| Small gouge | Scraper pressure cut the surface | Fill, sand lightly, prime, and paint. |
| Wallpaper seam lifted | Heat, moisture, or tool pressure reached adhesive | Press flat only if clean and dry; use seam adhesive if suitable. |
| Plaster has a dark shadow | Oil entered porous material | Let dry, then prime before painting. |
| Texture lost its shape | Scraping flattened raised texture | Patch texture before painting. |
Do not repair over waxy residue. Primer, spackle, seam adhesive, and paint need a clean, dry surface to bond.
Paint touch-up if you lifted paint
Touch up lifted paint by smoothing the edge, sealing the spot, and repainting only after the wall is clean and dry.
Use this order:
- Let the area dry fully.
- Remove loose paint flakes without widening the patch.
- Fill small gouges with lightweight spackle.
- Sand only after the filler dries.
- Wipe dust with a dry microfiber cloth.
- Prime stained or patched areas.
- Touch up with matching paint.
Flat paint is hardest to touch up invisibly because sheen differences show under side light. If the spot flashes, looks shinier, or remains visible after drying, repainting from corner to corner may look cleaner than adding more touch-up layers.
If colored wax stained the paint, use a stain-blocking primer before the finish coat. Paint alone may let dye or oily residue show through.
Textured walls: wax stuck in grooves
Remove wax from textured walls by chilling first, then lifting small pieces from the raised texture.
Textured walls trap wax in low spots, so flat scraping often misses residue and damages high points. Work in small areas and use tools that flex or bend before the wall texture does.
| Texture issue | Safer tool | Method |
|---|---|---|
| Thick wax on raised texture | Plastic card or plastic putty knife | Chill, then lift across the surface lightly. |
| Wax in grooves | Wooden skewer, toothpick, or soft nylon brush | Pick loose wax only after chilling. |
| Thin wax film | Paper towel plus low hair-dryer heat | Blot straight into the texture. |
| Oily residue | Mild soap on barely damp microfiber | Dab, then dry right away. |
| Damaged texture | Patch texture product | Repair after wax and oil are gone. |
Do not force a blade into orange peel, knockdown, plaster texture, or interior stucco. The tool can shave off the raised pattern and leave a smooth scar.
If wax remains in the lowest grooves after cold lifting, use a hair dryer on low and press plain paper towel into the warmed area. Lift the paper straight away. Repeat with clean paper until no more oil transfers.
Older homes / fragile finishes: stop rules + when to call a pro
Stop wax removal when the wall finish reacts, the surface is historically sensitive, or the cleanup could release unsafe dust.
Older paint, delicate wallpaper, and crumbly plaster can fail faster than modern washable surfaces. In these cases, removing every trace of wax may cause more damage than leaving a faint mark or planning a controlled repair.
| Stop trigger | What it can mean | Safer next move |
|---|---|---|
| Paint flakes, chips, or powders | Weak coating or possible old paint hazard | Stop scraping and avoid sanding. |
| Wallpaper print transfers | Fragile paper face or water-sensitive ink | Stop wet cleaning and use dry blotting only. |
| Wallpaper bubbles | Heat or moisture reached adhesive | Stop heat and let the area dry. |
| Plaster darkens quickly | Porous or unsealed plaster | Stop liquid cleaning. |
| Plaster crumbles or powders | Weak surface layer | Stop pressure and plan repair. |
| Wax stain grows larger | Oil is spreading into the wall | Stop heat and solvent use. |
| Unknown old paint is present | Possible lead-based paint risk | Avoid scraping, sanding, or heat that creates dust or fumes. |
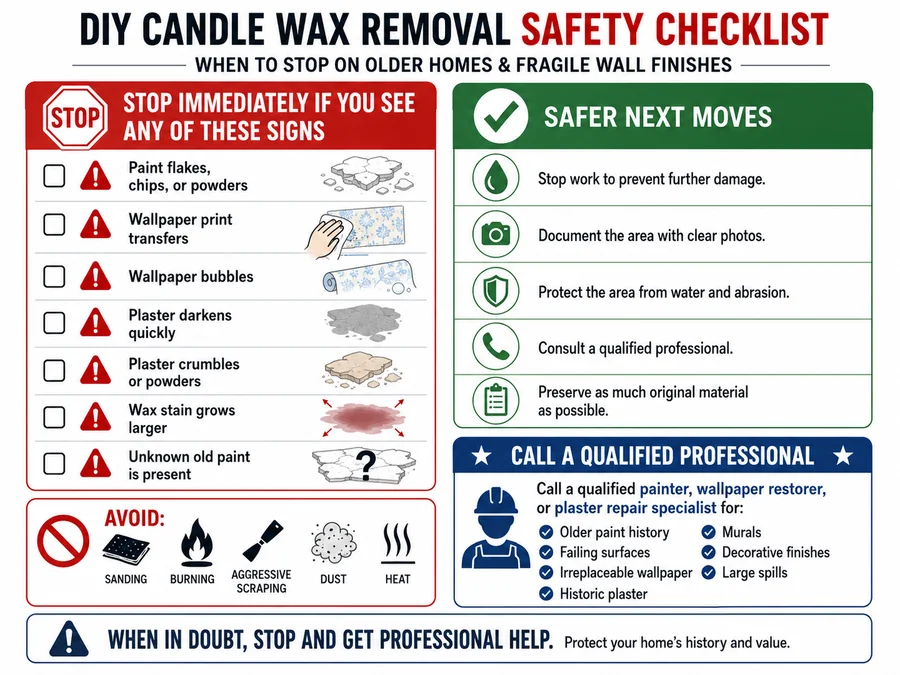
Do not sand, burn, or aggressively scrape old paint to remove wax. If the home is older, the paint history is unknown, or the surface is already failing, use lift-only removal and call a qualified painter, wallpaper restorer, or plaster repair specialist.
For irreplaceable wallpaper, historic plaster, murals, decorative finishes, or large wax spills, professional restoration is usually safer than repeated DIY cleaning. A small wax mark is easier to manage than torn paper, opened seams, or a widened plaster stain.
Quick FAQs
Can you remove candle wax from a painted wall without repainting?
Yes, you can often remove candle wax from a painted wall without repainting if the paint stays firm, the wax lifts cleanly, and no dye stain remains.
Start by hardening the wax, lifting it with plastic, then cleaning the remaining film with mild soap on a barely damp cloth. Repainting becomes more likely when flat paint turns shiny, paint lifts, or colored wax leaves a stain.
Is ice or heat better for wax on walls?
Ice is better for thick wax, fragile wallpaper, textured walls, and unknown surfaces. Heat is better for thin wax film on stable, tested surfaces.
Cold reduces smearing because wax chips away. Heat can remove residue faster, but it can also soften paint, loosen wallpaper adhesive, or push oil into porous plaster.
Can I use a hair dryer to remove wax from wallpaper?
You can use a hair dryer on wallpaper only after a hidden test spot passes and the wax is not near a loose seam.
Use low heat, keep the dryer moving, and blot through plain paper. Stop if the wallpaper bubbles, wrinkles, darkens, smells like adhesive, or lifts at the edge.
What removes the greasy mark after candle wax?
Mild dish soap on a barely damp microfiber cloth removes many greasy wax marks from washable paint and sealed plaster.
For wallpaper or porous plaster, use far less moisture. If the spot no longer feels slick but still looks discolored, it is probably a stain rather than removable wax.
Why is there still a colored stain after the wax is gone?
Colored candle dye, fragrance oil, or soot can stain the wall after the solid wax has been removed.
If the wall is clean and dry but color remains, stop scrubbing. Painted walls may need stain-blocking primer and touch-up paint, while stained wallpaper may need repair or replacement.
Can I scrape wax off with a razor blade?
Do not use a razor blade on painted walls, wallpaper, or plaster unless you already plan to repair the area.
A razor can gouge paint, slice wallpaper, scratch plaster, and create a larger repair. Use a plastic putty knife, old plastic card, or wooden craft stick instead.
What should I do if paint comes off with the wax?
Stop removing wax with pressure, let the area dry, then treat it as a paint repair.
Remove loose flakes only, fill small gouges if needed, prime stained or patched areas, and touch up with matching paint. Do not paint over waxy residue.