
Candle soot is fine, black, carbon-rich residue from incomplete candle combustion that settles on nearby painted walls and ceilings.
This guide covers candle soot cleanup on painted walls and ceilings, not candle wax removal, wallpaper restoration, or active smoke and fire-damage remediation. Here, “remove” means lifting visible soot residue with minimal smearing and minimal finish damage, not reversing every stain without primer or repaint. The safe path starts dry, then matches the cleaner to the paint finish or ceiling texture before you decide whether more cleaning still makes sense.
What candle soot is vs wax residue vs smoke damage
Candle soot is dry black combustion residue, not melted wax or a room-wide smoke-damage problem.
Candle soot usually appears as a gray-black film, streak, halo, or haze near the candle’s smoke path. A black mark above a candle is not automatically wax, and it is not automatically a repaint job.
[IMAGE PLACEHOLDER: side-by-side comparison photos showing candle soot haze, wax residue, and broader smoke staining on painted surfaces]
FAQ
What does candle soot look like on painted walls?
It often looks like a dry gray-black haze, streak, or halo above or near the candle.
How is soot different from wax?
Soot is a fine surface film. Wax is usually raised, slick, shiny, or hardened.
When is it more than candle soot?
If staining spreads across several surfaces, smells smoky, or remains deep after gentle cleaning, treat it as broader smoke residue rather than a small candle mark.
| Mark type | What it looks like | What it suggests | Best next action |
|---|---|---|---|
| Candle soot | Dry black or gray film, halo, streak, or haze | Loose combustion residue may still sit on the paint | Start with dry lifting |
| Wax residue | Raised, slick, shiny, or hardened deposit | Melted wax needs a different removal method | Do not treat it as soot cleanup |
| Broader smoke staining | Wide spread, deeper shadowing, several surfaces affected | Cleaning may be only part of the repair | Stop broad DIY washing and assess escalation |
Methods note: These distinctions rely on visual pattern, feel, location, and spread. Borderline marks still need a small test area before the full wall or ceiling is cleaned.
Correct identification keeps the first cleaning step from sending you down the wrong repair path.
Before cleaning, cover the area below the mark, keep dry sponges and clean cloths within reach, and wear eye protection when working overhead. Keep the soot area dry until loose residue has been lifted.
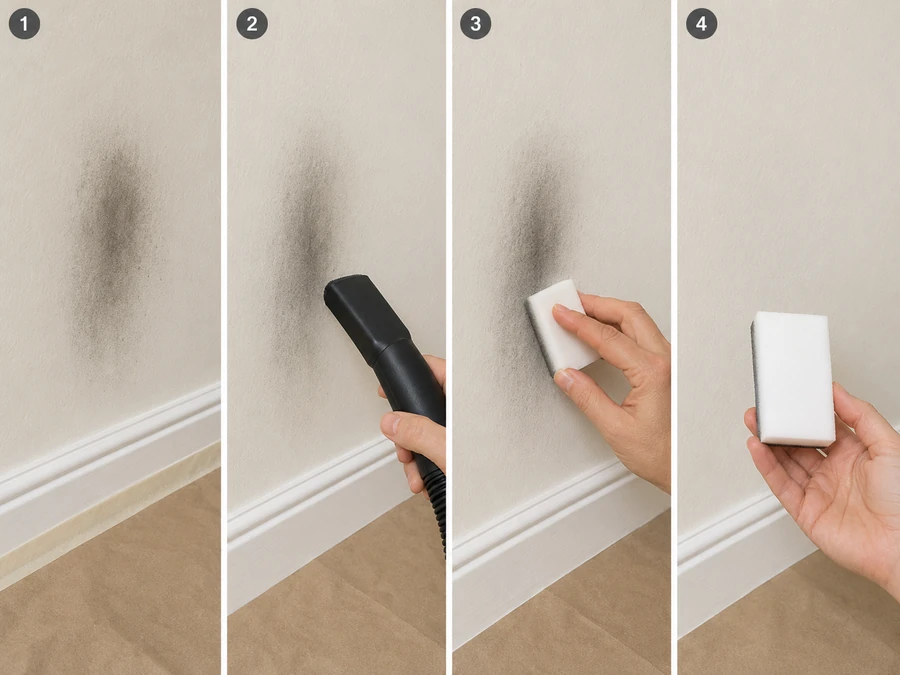
Steps to remove loose candle soot before it smears
Lift loose candle soot dry before any damp cloth, soap, or cleaner touches the wall or ceiling.
Loose soot sits on the surface. Water, soap, and pressure can drag that black residue sideways before the residue load has been reduced.
- Keep the area dry. Do not spray cleaner onto the soot mark.
- Protect the floor, trim, and nearby fabric from falling residue.
- If loose soot is dusty or widespread, hold a vacuum nozzle slightly away from the surface to capture loose particles without brushing or rubbing the paint.
- Use a dry cleaning sponge or clean soot-safe sponge on the darkest area first.
- Press lightly and lift in short passes.
- Do not scrub in circles.
- Turn to a clean sponge face as soon as it darkens.
- Stop the dry pass when the sponge picks up much less black residue.
- Test a small damp wipe on a less visible edge.
- If the paint tolerates it, blot or wipe gently with a barely damp cloth.
- Dry the area with a clean cloth and inspect after the surface dries.
| Mistake | Why it causes smearing | Better correction |
|---|---|---|
| Wet wiping first | Water turns loose soot into a wider gray-black smear | Dry-lift the residue first |
| Scrubbing hard | Pressure can burnish paint or push residue into the finish | Use light passes |
| Reusing a dirty sponge face | Loaded soot transfers back to cleaner paint | Rotate, trim, or replace the sponge face |
| Cleaning too large an area | The halo spreads before residue is reduced | Work in small zones from the darkest area outward |
Methods note: This sequence uses cleanup-failure patterns and controlled wipe-order guidance. Already-smeared residue may still improve, but repeated heavy washing can make delicate paint look worse.
What if I already used soapy water first?
Do not keep scrubbing the wet smear. Let the surface dry, dry-lift any remaining loose residue, then test a gentler damp step on a small edge.
A clean first pass is less about stronger cleaner and more about reducing loose soot before moisture moves it.
Candle soot cleaner by paint finish and ceiling texture
There is no single best cleaner for every wall or ceiling finish.
For this job, the best cleaner is the least aggressive option that lifts remaining residue after a test spot without dulling, wetting, abrading, or softening the finish.
Paint sheen, washability, and ceiling texture change what “gentle” means. Flat paint, matte paint, and many textured ceilings need lighter moisture and less pressure than satin, semi-gloss, or gloss paint.
[IMAGE PLACEHOLDER: photo series showing a dry sponge, small damp test patch, cloth rotation, and dried surface check on painted wall]
Test first on a low-visibility edge of the soot mark. If the test patch dulls, lifts paint, leaves a water mark, or changes the surface feel, stop before cleaning the full area.
| Surface type | Safer first choice | Use with caution | Avoid as the first move |
|---|---|---|---|
| Flat or matte painted wall | Dry cleaning sponge, then barely damp cloth if needed | Mild dish soap diluted in water after a test spot | Wet scrubbing, strong degreasers, abrasive pads |
| Eggshell painted wall | Dry sponge, then light damp blotting | Mild soapy water on a small tested area | Heavy pressure or repeated passes over one spot |
| Satin painted wall | Dry sponge, then mild soapy water if the finish holds | Slightly firmer wiping after soot is reduced | Spraying cleaner directly onto the wall |
| Semi-gloss or gloss painted wall | Dry sponge, then damp cloth with mild soap | Wider wipe area after a spot test | Abrasive cleaners that can scratch shine |
| Smooth painted ceiling | Dry sponge, then controlled damp wiping | Working overhead in small zones | Soaking the ceiling or letting cleaner drip |
| Textured or popcorn ceiling | Dry dabbing with minimal pressure | Very limited damp blotting only if stable | Rubbing, rolling, or dragging a wet cloth across texture |
A mild soap solution can help after loose soot is lifted, but it should not replace the dry pass. The cleaner removes remaining film; it does not fix embedded staining, damaged paint, or texture that breaks down when touched.
Do not treat TSP, bleach, or strong degreasers as the normal first cleaner for a small candle soot mark. Reserve stronger cleaners for tested surfaces, severe residue, or repaint/restoration decisions.
Methods note: This cleaner map follows surface-tolerance logic: flatter finishes and textured surfaces tend to show moisture, pressure, and sheen changes sooner than harder, glossier finishes.
Gentle cleaner does not mean the same thing on flat paint, satin paint, and textured ceilings.
Steps to clean candle soot in small sections without spreading it
After loose candle soot has been dry-lifted, clean remaining residue from the darkest area outward in small sections, using clean tool faces for each pass.
A smear-free process controls three variables: moisture, pressure, and residue transfer. Work slowly enough that the soot leaves the wall or ceiling instead of moving into the next clean area.
[IMAGE PLACEHOLDER: photo sequence showing section size, wipe direction, cloth rotation, and dried inspection angle]
- Divide the soot mark into small working zones.
- Start where the residue is darkest.
- Use a clean sponge face or cloth edge for each pass.
- Press lightly, lift, and move in one direction.
- Do not scrub in circles.
- Replace or rinse the cloth before it looks heavily gray or black.
- Blot the cleaned zone with a barely damp clean cloth if soap remains.
- Dry the surface with a clean towel.
- Step back and inspect from an angle after the area dries.
- Repeat only where residue remains visible.
For ceilings, keep the cloth barely damp so liquid does not run across the surface. For walls, control the bottom edge of the cleaned area so dirty water does not create vertical streaks.
| Cleaning signal | What it means | Next move |
|---|---|---|
| Black residue transfers to the sponge | Loose soot is still lifting | Keep dry-lifting with clean faces |
| Gray smear grows wider | Moisture or pressure is moving residue | Stop, let dry, return to dry lifting |
| Paint looks dull or rubbed | The finish is being damaged | Stop cleaning that spot |
| Residue fades but shadow remains | Surface soot is removed, but staining may be set | Let dry before deciding on another pass |
| Texture loosens or flakes | The ceiling surface is not tolerating contact | Stop wiping and reassess |
FAQ
Should I clean from the outside of the soot mark inward?
For candle soot, start with the darkest residue first so the loose soot load is reduced before the lighter halo is touched.
Can I use a magic eraser on candle soot?
Use caution. Melamine foam can abrade paint, especially flat or matte finishes, so it should not be the first tool on a visible wall or ceiling.
Why does the wall still look gray after cleaning?
The visible soot may be gone while a stain remains in the paint film. Let the surface dry before deciding whether another gentle pass is safe.
Small-section cleaning protects the finish because every pass has a clean target, clean tool face, and limited moisture.
Reduce candle soot on textured or popcorn ceilings without damaging the finish
Textured and popcorn ceilings need dry dabbing, not wet rubbing, because soot can sit inside surface texture.
Set lower expectations before cleaning textured ceilings. The goal is to reduce visible soot without flattening, shedding, or softening the finish.
- Cover the floor and nearby furniture below the mark.
- Check whether the texture feels firm before cleaning.
- Dab the soot with a dry cleaning sponge.
- Use short lift-and-release motions.
- Do not drag a damp cloth across the texture.
- Rotate to a clean sponge face as residue transfers.
- Stop if texture loosens, crumbles, dusts, or flattens.
- Test a barely damp blot only on a stable edge if dry dabbing leaves a light shadow.
| Ceiling condition | Safer action | Stop signal |
|---|---|---|
| Light soot on stable texture | Dry dab with a clean sponge face | Texture begins to crumble or flatten |
| Dark soot in grooves | Repeat dry dabbing in small zones | Black residue spreads into nearby texture |
| Slight gray shadow after dry lifting | Test a barely damp blot on one edge | Water mark or surface softening appears |
| Loose popcorn texture | Avoid rubbing or scraping | Any shedding, dusting, or flaking |
| Old or unknown ceiling material | Limit contact and assess risk first | Material breaks apart when touched |
Do not scrape old or unknown popcorn texture as a soot-removal step. If the ceiling material may be hazardous or will be disturbed beyond light cleaning, stop and assess the material before repair.
For overhead work, protect the room below the mark before starting. Falling soot can land on floors, upholstery, counters, shelves, or trim, then transfer back to clean surfaces.
FAQ
Can I wash candle soot off a popcorn ceiling?
Only test a tiny area first. Many popcorn textures do not tolerate wet wiping, so dry dabbing is safer than washing.
Should I vacuum soot from a textured ceiling?
Only use a gentle approach that does not scrape the texture. Strong suction, brush pressure, or dragging can loosen the surface.
What if the texture starts falling off?
Stop cleaning. At that point, the issue is no longer only soot removal; the ceiling surface is failing under contact.
Textured ceiling cleanup succeeds when the surface keeps its shape while the loose soot load is reduced.
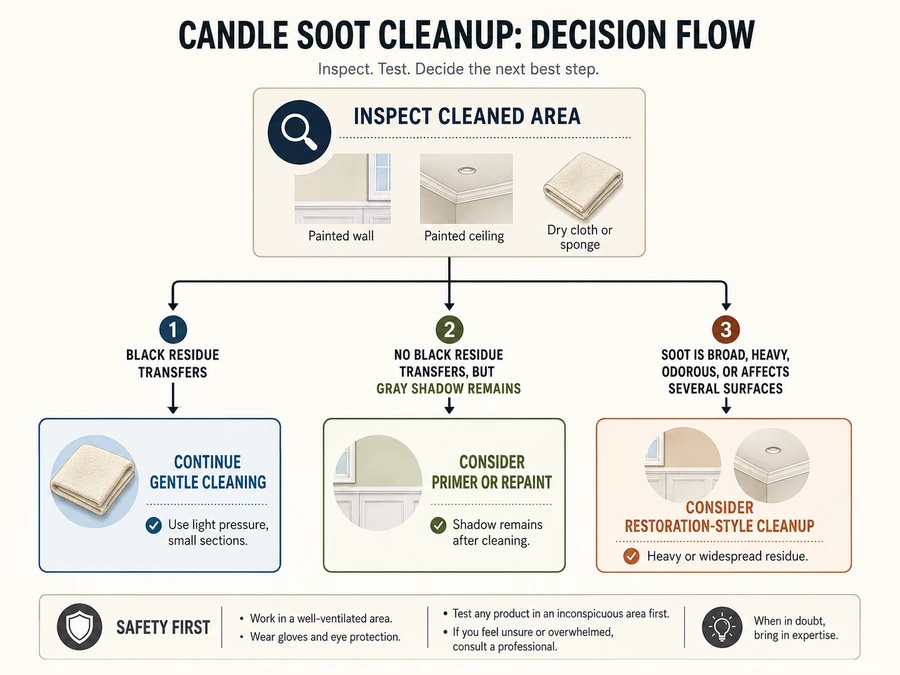
Clean more or prime? When candle soot needs repaint or restoration
Stop cleaning when more passes start damaging the finish or the stain remains after the surface dries.
Cleaning removes surface residue. It does not always reverse pigment change, embedded staining, dull paint, or a shadow that has settled into a porous finish.
If no black residue transfers after cleaning but a gray mark remains, treat the mark as possible staining in the paint film rather than loose soot on the surface.
| After-cleaning result | What it means | Better next step |
|---|---|---|
| Black residue still transfers lightly | Some surface soot remains | Continue gentle dry-first cleaning |
| No residue transfers, but a gray shadow remains | Stain may be set into paint or texture | Let dry, then decide on primer or repaint |
| Paint looks shiny, dull, or rubbed | The finish is being changed by cleaning | Stop cleaning that spot |
| Texture flakes or softens | The ceiling surface cannot tolerate more contact | Stop and reassess repair options |
| Soot covers several walls or room surfaces | This is beyond a small candle mark | Consider restoration-style cleanup |
| Odor, heavy staining, or smoke spread remains | Residue may be deeper than surface soot | Escalate rather than keep washing |
Let the cleaned area dry fully before judging the result. Wet paint can look darker, cleaner, or more uneven than it will after drying.
Primer or repaint becomes more likely when the soot has been removed from the surface but a shadow remains in the finish. Restoration becomes more likely when residue is broad, heavy, old, or tied to larger smoke exposure rather than one candle location.
Methods note: The cutoff here is based on cleaning-response signals: residue transfer, finish change, texture behavior, and stain persistence after drying.
The right stopping point is when cleaning no longer improves the soot mark faster than it harms the surface.
Setup checklist to keep candle soot cleanup from spreading
Set up the room before cleaning so soot does not fall, smear, or transfer onto nearby surfaces.
The cleanup zone is larger than the stain itself. The wall or ceiling may be the visible problem, but tools, floor coverings, cloths, and hands can carry residue back onto clean paint.
[IMAGE PLACEHOLDER: room-prep photo set showing covered floor, protected trim, clean sponge stack, used-tool bag, and overhead cleanup area]
- Move small items away from the wall or candle area.
- Cover floors, counters, shelves, and upholstery below the mark.
- Keep dry sponges, clean cloths, and a disposal bag within reach.
- Wear gloves if soot transfers easily.
- Work with clean hands and clean tool faces only.
- Fold cloths inward after use so the dirty side does not touch clean surfaces.
- Replace loaded sponges instead of rubbing with a blackened face.
- Keep damp cloths separate from dry soot tools.
- Bag used cloths, sponge pieces, and floor coverings before moving them through the room.
| Transfer risk | How it spreads | Control step |
|---|---|---|
| Falling residue | Soot drops from ceiling or upper wall | Cover the area below before cleaning |
| Dirty sponge face | Black residue moves onto cleaner paint | Rotate or replace the sponge face |
| Wet cloth | Damp soot transfers across a wider area | Use only after dry lifting |
| Hands or gloves | Residue moves to trim, doors, or furniture | Clean or replace gloves during the job |
| Used floor covering | Soot lifts into the air or onto flooring | Fold inward and bag before removal |
Do not shake dirty cloths or coverings indoors. That can move fine residue back into the room and onto surfaces you already cleaned.
Good setup turns cleanup into a controlled removal job rather than a room-wide transfer problem.
Maintain soot-free walls and ceilings after cleanup
Prevent candle soot by controlling flame size, wick length, airflow, placement, and extinguishing smoke.
Once the wall or ceiling is clean, the next goal is to reduce the residue that reaches the paint. Repeated soot marks usually point to burn conditions, not only a cleaning problem.
- Place candles away from walls, shelves, curtains, vents, and ceiling corners.
- Trim the wick according to the candle’s care instructions before relighting.
- Keep the flame steady; move the candle if it flickers, dances, or smokes.
- Stop burning if the jar, wax pool, or flame produces visible black smoke.
- Extinguish the flame gently to reduce smoke after the burn.
- Let smoke clear before placing the candle back near a wall or shelf.
- Check the wall or ceiling after the next few burns for early gray haze.
| Recurring sign | Likely burn condition | Prevention move |
|---|---|---|
| Black smoke during burn | Flame is too large or unstable | Trim wick and remove drafts |
| Soot above one candle spot | Candle is too close to wall or ceiling path | Move candle into open space |
| Dark residue near shelves | Airflow carries smoke into a blocked area | Change placement |
| Soot after extinguishing | Smoke lingers after the flame goes out | Extinguish more gently and ventilate |
| Fast return after cleaning | Burn habit is still creating residue | Adjust wick, airflow, and placement together |
FAQ
Why does candle soot keep coming back?
It usually returns when the candle still burns with a long wick, unstable flame, poor placement, or draft exposure.
Can any candle leave soot on walls?
Yes. Any candle can create soot if combustion is incomplete, the flame is unstable, or smoke reaches a nearby surface.
How soon should I check for new soot?
Check after the next few burns. Early gray haze is easier to remove than a dark, repeated buildup.
Clean paint stays cleaner when the candle burns steadily and smoke has less chance to reach the wall or ceiling.