

Candle ghosting is gray-black soot film from candle smoke that settles on walls, ceilings, corners, and cooler surfaces. On this page, candle ghosting means candle-sourced soot film only, not every type of wall ghosting or moisture staining.
Candle ghosting can look strange because it may show up as streaks, shadowy wall film, or dark lines near corners, vents, ceilings, and studs. This guide explains candle-caused soot film in home candle use, not mold, moisture damage, fireplace residue, cooking grease, tobacco staining, HVAC dust, or every black wall mark. You’ll learn how to tell likely candle soot from lookalikes, prevent the source, and clean residue without smearing it deeper into paint.
What is candle ghosting (soot film on walls)?
Candle ghosting is gray-black soot film from candle smoke that settles on walls, ceilings, corners, vents, and cooler painted surfaces.
You’ll usually recognize it as a faint haze, streaks above the burn area, dark edges near ceilings, or shadow-like lines where airflow and cold surfaces collect particles. This page treats candle ghosting as candle-caused soot film, not mold, nicotine stains, cooking grease, fireplace residue, or a full building-science problem.
| Pattern you see | What it can suggest | First check |
|---|---|---|
| Light gray film near upper wall | Fine soot settling over time | Wipe once with a dry white cloth |
| Dark streaks above candle area | Smoke plume or draft path | Check wick length and flame movement |
| Lines near corners or studs | Cooler surface attracting residue | Compare nearby rooms and vents |
| Black cloth after dry wipe | Loose soot particles | Stop wet scrubbing until you identify the source |
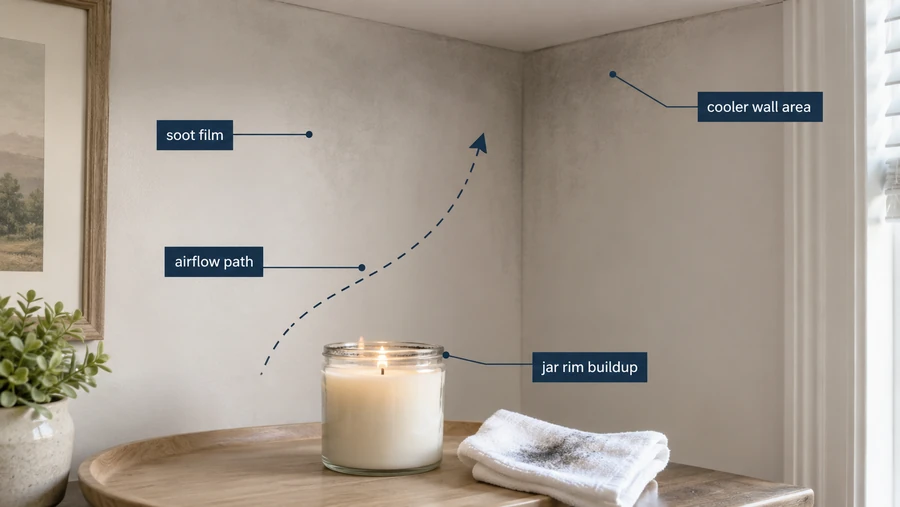
Likely candle soot clues:
- The mark darkens after candle-heavy evenings.
- The residue smears black on a dry wipe.
- The candle jar has a black ring or smoky rim.
- The flame flickers, leans, or smokes during use.
- The marks sit near airflow paths, ceilings, or cooler wall areas.
A wick trimmer, snuffer, and better burn setup can reduce the source, but the first job is confirming whether the residue is soot or a lookalike.
How do you tell candle ghosting from mold or thermal tracking?
Use wipe behavior, texture, odor, moisture clues, and pattern logic to separate candle soot from mold or thermal tracking.
This is triage, not a diagnosis. Thermal tracking is dark residue that follows temperature differences, airflow paths, or framing lines on walls and ceilings. Candle soot often feels dry and powdery and leaves a dark smear on a dry cloth. Mold can look like spots in different colors and may smell musty. If mold is present, EPA and CDC guidance centers on cleaning it up and fixing the moisture problem.
| Clue | Candle soot is more likely when… | Mold or moisture is more likely when… |
|---|---|---|
| Wipe test | Dry cloth picks up gray-black powder | Area feels damp, fuzzy, slimy, or raised |
| Smell | Smoky or waxy odor | Musty odor |
| Pattern | Near candle area, airflow, ceiling edge, or cool wall | Near leaks, condensation, bathrooms, damp corners |
| Timing | Worse after candle use | Worse after moisture, humidity, or leaks |
| Surface | Flat film or haze | Spots, patches, staining, or growth-like texture |
Safe first check:
- Do a dry wipe test in a hidden spot.
- Check odor, texture, and moisture.
- Compare the mark with candle location and airflow.
- Stop if the surface is damp, musty, fuzzy, or spreading.
- Treat uncertain, widespread, or moisture-linked marks as more than a candle issue.
Do not scrub hard or spray residue into the air during the test. A small, gentle dry wipe gives the safest first clue.
Candle vs incense vs other sources: which one is leaving residue on your walls?
Candle residue is likely when dark film follows candle use, candle placement, airflow paths, and black buildup on the jar rim.
Do not assume every gray-black wall mark is from candles. EPA lists candles, fireplaces, tobacco products, heating appliances, and cooking appliances as indoor sources of particulate matter, so the right fix depends on matching the residue to the activity that produces it.
| Possible source | Clues on walls or ceilings | What to change first |
|---|---|---|
| Candle smoke | Film near candle area, black jar rim, smoky wick, flickering flame | Trim wick, move from drafts, shorten long burns |
| Incense | Film near incense station, stronger smoke trail, ash nearby | Reduce use, ventilate, keep away from walls |
| Cooking | Greasy film near kitchen ceiling, cabinets, range hood | Clean filters, use exhaust fan, reduce smoke |
| Fireplace or wood stove | Darker residue near hearth, smoke smell, ash dust | Check draft, chimney, damper, and seal issues |
| Tobacco smoke | Yellow-brown or gray film, smell in fabrics, wide room spread | Remove smoke source and clean porous surfaces |
| HVAC dust | Dark streaks near vents or return grilles, dust on registers | Replace filters, clean grilles, check duct leaks |
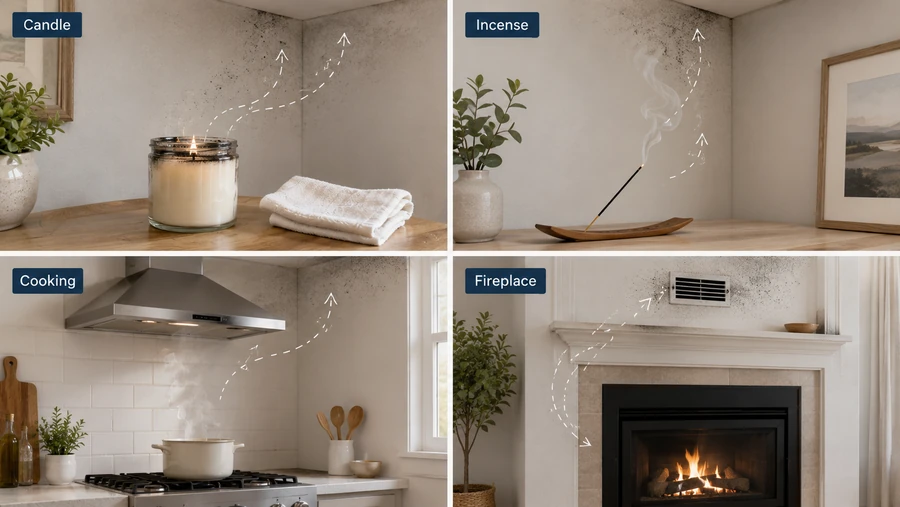
A simple source log works better than guessing. For one week, note when candles, incense, cooking smoke, fireplace use, or smoking happen in the room. Then compare that log with when new residue appears on a white cloth test.
| Mistake | Why it fails | Better move |
|---|---|---|
| Blaming the candle immediately | Other indoor combustion sources can leave similar particles | Match residue to timing and location |
| Wet-wiping every dark mark | Soot can smear into paint | Dry test first in one hidden spot |
| Repainting before source control | New paint can stain again | Stop the smoke source before sealing |
| Buying “clean” candles without changing habits | Any candle can smoke if burned poorly | Fix wick length, drafts, and burn time |
Choose candle-care tools only when the pattern points back to candle use. A wick trimmer or snuffer helps if the wick smokes, but it will not fix fireplace backdraft, cooking grease, tobacco residue, or HVAC dust.
Why does candle ghosting happen?
Candle ghosting happens when an unstable or over-fueled flame makes soot that air carries onto nearby surfaces.
Incomplete combustion means wax vapor burns poorly, leaving carbon-rich particles instead of converting cleanly into heat, light, water vapor, and gases. In a candle, this usually happens when the wick is too long, the flame flickers in a draft, the melt pool feeds too much fuel, or the candle is burned past its safe working range.
| Cause | What it does to the flame | Wall result |
|---|---|---|
| Long wick | Pulls too much melted wax into the flame | Bigger flame and more soot |
| Mushroomed wick tip | Creates carbon buildup at the top of the wick | Smoke, black jar rim, wall haze |
| Draft from fan, vent, or open window | Makes the flame lean and flicker | Soot follows airflow paths |
| Too much fragrance, dye, or additive load | Can make the flame harder to balance | More smoke in poor burn setups |
| Narrow or poorly matched container | Traps heat and changes airflow near flame | Jar soot and uneven smoke |
| Long unattended burn | Heat and wick shape drifts over time | Heavier residue and safety risk |
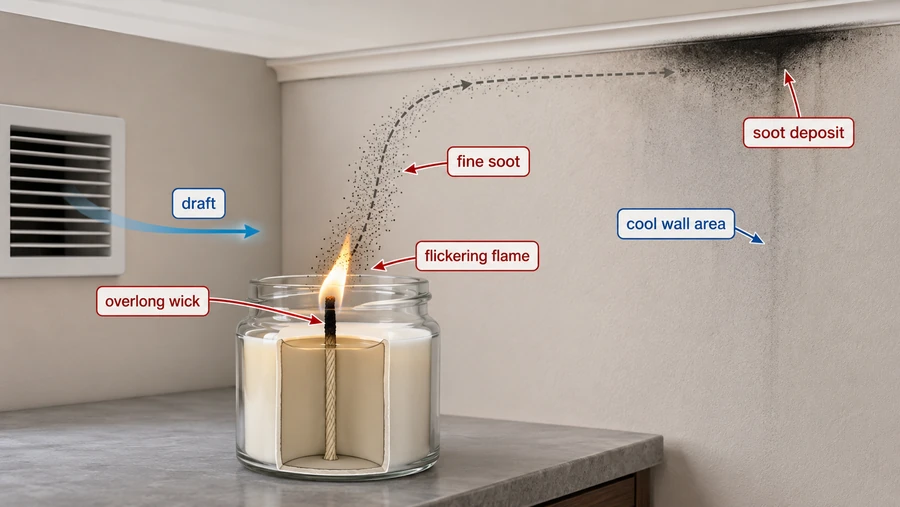
The National Candle Association advises trimming the wick to ¼ inch before each use to prevent high flames and soot, keeping candles away from fans, vents, and open windows, and burning candles in well-ventilated rooms.
Fast cause check:
- Look at the flame for 30 seconds.
- Check whether the wick is long, curled, or mushroomed.
- Check the jar for a black ring near the rim.
- Move the candle away from vents, fans, doors, and open windows.
- Stop a burn session when the candle starts smoking, overheating, or changing flame shape.
If a candle keeps smoking after the wick is trimmed and the draft is removed, stop using it. That points to a candle design or fuel-match problem, not a wall-cleaning problem.
Steps to prevent candle ghosting (clean-burn checklist)
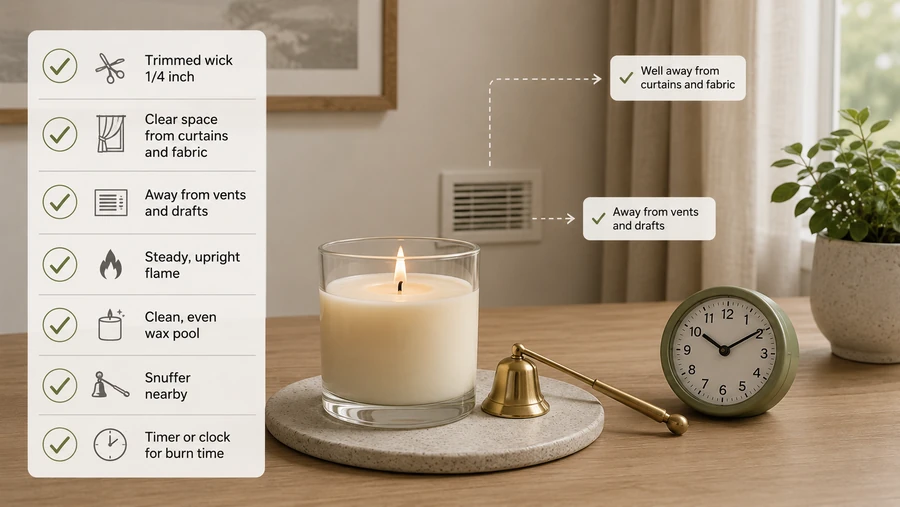
Prevent candle ghosting by cutting soot at the source: trim the wick, remove drafts, limit smoke, and stop any candle that keeps smoking.
The clean-burn routine is simple: prepare the candle before lighting, watch the flame during the burn, and extinguish it before the wick or jar starts producing soot. The National Candle Association recommends trimming wicks to ¼ inch before lighting, keeping candles away from drafts, and placing candles on stable, heat-resistant surfaces away from flammable items.
| Step | What to do | Why it reduces wall soot |
|---|---|---|
| 1 | Trim the wick to ¼ inch before each burn | A shorter wick helps control flame height and carbon buildup |
| 2 | Remove wick “mushrooming” before relighting | Carbon clumps can smoke and darken the jar rim |
| 3 | Keep the candle away from vents, fans, doors, and open windows | Drafts bend the flame and push soot into wall paths |
| 4 | Burn on a stable, heat-safe surface | A level candle burns more evenly |
| 5 | Keep debris out of the melt pool | Wick trimmings and matches can feed smoke |
| 6 | Use a snuffer or wick dipper instead of blowing hard | Hard blowing can create smoke and wax splatter |
| 7 | Stop the burn if the flame grows tall, flickers, or smokes | Continued burning adds soot faster than cleaning can fix |
| 8 | Replace candles that smoke after trimming and draft control | The wick, wax, fragrance, or container may be poorly matched |
Fast diagnosis flow:
- Light the candle only after trimming the wick.
- Watch the flame for 30 seconds.
- Move the candle if the flame leans or dances.
- Extinguish it if the jar rim turns black during the burn.
- Let the wax cool before trimming or relighting.
- Retire the candle if the same smoke pattern returns.
Prevention checklist:
- Keep candles out of direct airflow.
- Do not burn near curtains, paper, shelves, or wall art.
- Keep the wax pool free of matches, dust, and wick pieces.
- Use a snuffer when the wick smokes during blowout.
- Clean black jar rims only after the candle is cool.
- Avoid long burn sessions that make the jar hot or the flame unstable.
- Do not leave a burning candle unattended.
- Stop using a candle that smokes after basic care.
A wick trimmer is the best first accessory because it fixes the most common user-controlled soot trigger. A snuffer or wick dipper helps at extinguishing time, while a candle hurricane or shade only helps when it is designed for that candle and does not trap unsafe heat.
Which candles are most likely to leave soot film?
Candles are more likely to leave soot when the wick, wax, fragrance load, dye, container, or burn setup makes the flame unstable.
No common candle wax is soot-proof. Paraffin, soy, coconut, beeswax, and blends can all smoke if the wick is too long, the flame is in a draft, or the candle is overloaded for its design. EPA lists burning candles among indoor particulate matter sources, so “low-soot” should mean lower smoke risk under proper use, not zero particles.
| Candle signal | Lower-soot buying clue | Higher-soot warning sign |
|---|---|---|
| Wick fit | Wick stays centered and flame remains moderate | Flame is tall, smoky, or repeatedly mushrooms |
| Fragrance strength | Scent is balanced, not overpowering | Heavy scent with frequent smoking |
| Dye level | Light or moderate colorant | Very dark dye plus smoky burn behavior |
| Container design | Even melt pool, enough room above wax | Black jar rim early in the burn |
| Label and care guidance | Clear trim, burn-time, and safety directions | No care instructions or vague burn advice |
| Brand behavior | Consistent burn across uses | Same candle smokes after wick trimming |
Buyer rule: choose candles that burn with a steady flame, give clear care instructions, and do not leave black residue on the jar during normal use.
Avoid assuming:
- “Natural wax” means no soot.
- “Soy” means a candle cannot smoke.
- “Luxury” means the wick is correctly sized.
- “Strong scent” is worth black jar buildup.
- “One bad burn” can be ignored if wall film has already started.
For cleaner home use, buy fewer high-quality candles and maintain them better. A simple care kit with a wick trimmer, snuffer, and microfiber cloth usually does more for soot control than switching wax types while keeping the same poor burn habits.
Drafts, vents, and fans: why they make candle ghosting worse
Drafts make candle ghosting worse because moving air bends the flame, disrupts combustion, and carries soot toward walls, ceilings, and vents.
A steady candle flame burns cleaner than a flame that leans, flutters, or stretches. When a candle sits near a fan, HVAC vent, open window, doorway, or return grille, the flame can pull uneven fuel into the burn zone. That unstable burn makes more smoke, then airflow spreads the particles across nearby surfaces. The National Candle Association specifically says to avoid placing candles near open windows, fans, or air vents.
| Airflow source | What it does to the flame | What you may see |
|---|---|---|
| Ceiling fan | Makes the flame dance or lean | Wider gray haze on upper walls |
| HVAC supply vent | Pushes the flame sideways | Streaks in the direction of airflow |
| HVAC return vent | Pulls particles across the room | Darkening near grilles or corners |
| Open window | Creates changing drafts | Uneven smoke and flicker |
| Doorway traffic | Repeated air movement | Soot marks near candle station |
| Bathroom fan or kitchen exhaust | Pulls room air toward one route | Film along the air path |
Fix the placement first:
- Put the candle on a stable, heat-safe surface.
- Move it away from vents, fans, open windows, and busy doorways.
- Watch the flame for a steady shape before leaving it in place.
- Extinguish the candle if the flame keeps leaning or smoking.
- Try the same candle in a calmer location before blaming the wax.
Do not solve drafts by enclosing the candle in a tight container, shelf, or unsafe cover. Hurricanes, shades, and toppers only belong with candles designed for that use, because trapped heat can create a separate safety problem.
Why ghosting shows up on cold walls, corners, and “stud lines”
Candle soot often shows on cold walls and corners because cooler surfaces and airflow patterns collect fine particles unevenly.
This is why candle ghosting may look like a building defect even when the candle is the particle source. Soot can settle more visibly where wall temperature, insulation gaps, air leaks, or room airflow create collection paths. Corners, ceiling edges, exterior walls, and lines over studs or joists often show marks before the middle of the wall.
| Pattern | Likely reason | What to check |
|---|---|---|
| Dark corners | Low air movement and cooler surfaces | Candle use, humidity, and dust buildup |
| Lines on walls or ceilings | Temperature difference over framing | Exterior walls, insulation gaps, airflow |
| Marks near vents | Air movement carrying particles | Filter, grille dust, and candle placement |
| Haze above candle shelf | Smoke plume rising from the flame | Wick length, draft, and burn time |
| Reappearing marks after cleaning | Source still active | Candle smoke, cooking smoke, or HVAC dust |
What this means in practice:
- A cold-wall pattern does not prove the candle is innocent.
- Candle soot can reveal existing airflow or insulation patterns.
- Cleaning the wall will not last if the candle keeps smoking.
- If marks are damp, musty, fuzzy, or spreading without candle use, treat moisture as the first suspect.
For prevention, handle the source and the surface pattern together. Move the candle out of airflow, trim the wick, reduce smoke, then monitor the same wall area with a dry cloth test after a few burn sessions.
Candle Soot Setup Checker (Wick + Draft + Burn Setup)
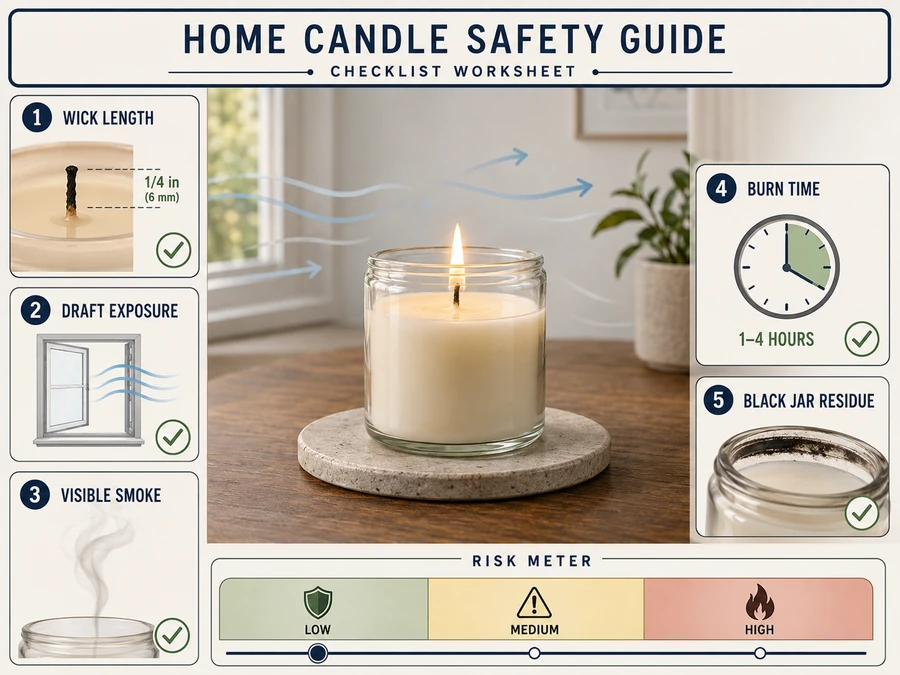
Use the candle soot setup checker to estimate whether wick length, drafts, smoke, burn time, or jar residue are likely adding soot film.
Use this lightweight checker before cleaning. If the soot source stays active, the same wall film can return after you wipe it away.
| Input | Low-risk answer | Higher-risk answer |
|---|---|---|
| Wick trimmed before lighting? | Yes | No / unsure |
| Visible smoke during burn? | No | Yes |
| Draft sources within the burn zone? | 0 | 1 or more |
| Near vent, fan, doorway, or window? | No | Yes |
| Burn session length | Short, watched, stable flame | Long session, hot jar, changing flame |
| Jar rim after burn | Clean | Black ring or smoky residue |
Score it:
- Low risk: 0–1 higher-risk answers
- Medium risk: 2–3 higher-risk answers
- High risk: 4+ higher-risk answers, or any candle with visible smoke after trimming
| Risk result | What it means | Top fixes |
|---|---|---|
| Low | The setup is probably not the main soot source | Keep trimming, watch airflow, check other residue sources |
| Medium | One or two habits may be creating soot | Trim wick, move away from airflow, shorten the burn |
| High | The candle setup is likely adding soot film | Extinguish, trim, relocate, use a snuffer, stop using it if smoke returns |
| Setup | Result | Fix order |
|---|---|---|
| Long wick + ceiling fan + black jar rim | High risk | Trim, turn off fan, move candle, retire it if smoke returns |
| Trimmed wick + no smoke + clean jar | Low risk | Keep routine, check incense, cooking, HVAC, or fireplace residue |
| Trimmed wick + vent nearby + flame leans | Medium risk | Move away from vent, retest flame, shorten burn session |
Do not use the checker to justify burning a smoky candle longer. A candle that keeps smoking after trimming and draft control is a source-control failure, not a cleaning problem.
Steps to remove candle soot film from walls without smearing it
To clean soot film, start dry to lift loose particles, then wash gently only after the soot layer is reduced.
Cleaning is the second half of the fix. Sherwin-Williams advises using a soft cloth or sponge with mild, soapy water, gentle pressure, a clean damp rinse cloth, and drying after washing painted walls.
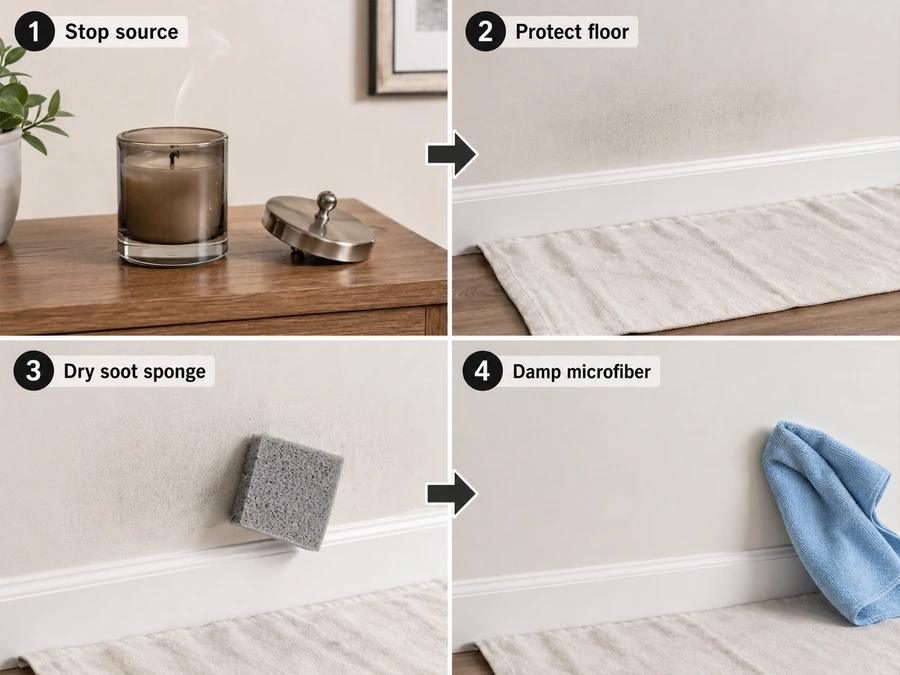
Cleaning sequence:
- Stop the soot source first.
- Protect the area with a cloth and remove nearby décor.
- Start dry with a soot sponge or dry-cleaning sponge.
- Wipe lightly in one direction.
- Switch sponge sides often so blackened residue is not redeposited.
- Spot-test wet cleaning in a hidden area.
- Wash gently with warm water and a small amount of mild soap.
- Rinse with a clean damp cloth.
- Dry with a soft towel.
- Stop if the surface becomes patchy, shiny, or smeared.
| Mistake | Symptom | Fix |
|---|---|---|
| Wet-wiping soot first | Gray smear gets wider | Go back to dry sponge removal |
| Scrubbing flat paint | Shiny or patchy wall spot | Stop, dry, reassess before more cleaning |
| Using too much water | Softened paint or damp drywall | Use a wrung cloth and dry quickly |
| Mixing cleaners | Strong odor or surface reaction | Stop and rinse with clean water only |
| Cleaning before source control | Stain returns after new burns | Fix wick, draft, and candle choice first |
Methods note: This sequence is a practical home-cleaning protocol based on paint-care guidance and soot behavior, not a lab-certified removal test for every paint, soot load, or wall material.
Stop DIY cleaning if soot covers ceilings, returns across multiple rooms, appears with moisture or musty odor, or remains after the candle source is fixed. At that point, the problem may need surface-specific cleaning, repainting with proper prep, or source attribution beyond candles.
How to clean soot film without damaging paint
Paint finish changes soot cleanup because flat paint absorbs and burnishes faster, while glossier paint tolerates gentle washing better.
Do not treat every painted wall the same. Candle soot is fine, dark residue, and aggressive wet scrubbing can push it into porous paint or leave shiny patches. Start with dry removal, then use the mildest wet step your paint finish can handle.
| Paint finish | Cleaning risk | Best first move | Avoid |
|---|---|---|---|
| Flat / matte | High risk of smearing, burnishing, or color change | Dry soot sponge, very light pressure | Scrubbing, soaking, strong cleaners |
| Eggshell | Moderate risk; more washable than flat | Dry sponge, then mild soap spot-test | Abrasive pads and repeated rubbing |
| Satin | Moderate-low risk if paint is cured and sound | Dry removal, then gentle damp wipe | Excess water near seams or damaged paint |
| Semi-gloss / gloss | Lowest wall-paint risk, still not damage-proof | Mild soap wash after dry soot lift | Solvents unless the paint maker allows them |
| Textured paint or ceiling | High risk because residue sits in texture | Dry sponge and vacuum brush with care | Wet wiping before dry removal |
Safe paint-cleaning order:
- Test a hidden spot before treating the visible wall.
- Lift loose soot with a dry soot sponge first.
- Use a clean, well-wrung microfiber cloth for wet cleaning.
- Wash with warm water and a small amount of mild soap.
- Rinse with a separate damp cloth.
- Dry the wall with a soft towel.
- Stop if paint color transfers, sheen changes, or the mark spreads.
For flat paint, “less cleaning” can protect the wall better than repeated wiping. If the soot stain remains after gentle dry removal, repainting with proper surface prep may be safer than grinding the residue into the finish.
Rentals & apartments: how to prevent soot damage and document it safely
In a rental, prevent candle soot first, then document stains, cleaning attempts, and candle changes before repainting or making repairs.
This section is practical, not legal advice. Lease terms, local rules, deposits, and move-out standards vary, so treat candle ghosting as a condition to record clearly and handle early. The goal is to show what appeared, what source-control steps you took, and whether the marks returned after safer candle use.
| What to document | Why it matters | How to record it |
|---|---|---|
| Date marks first appeared | Shows timing | Dated photo or note |
| Candle location | Helps identify the source path | Wide room photo plus close-up |
| Wick and jar condition | Shows whether the candle smoked | Photo of black rim, long wick, or mushrooming |
| Vent, fan, and window position | Shows airflow factors | Photo or short room note |
| Cleaning method | Shows you avoided damage | Note “dry sponge first,” “spot-tested,” or “mild soap” |
| Recurrence after changes | Shows whether the source is controlled | New photo after several burn sessions |
Apartment prevention checklist:
- Stop using any candle that smokes after trimming.
- Do not repaint, seal, or use strong cleaners without checking lease or landlord rules.
- Report widespread, damp, musty, or unexplained dark marks before treating them as candle soot.
If wall film is minor and clearly from a smoky candle, source control plus gentle cleaning may solve it. If marks appear around vents, across several rooms, or along damp corners, do not frame the issue as “just candles” until other sources are checked.
Indoor air quality: when candle soot is a concern and what to do first
Candle soot becomes an indoor-air concern when candles smoke visibly, leave black residue, or bother sensitive people in the home.
EPA says burning or combusting almost anything produces particulate matter, and indoor sources include candles, fireplaces, tobacco products, heating appliances, and cooking appliances. That does not mean every candle burn is an emergency. It means visible smoke, black jar buildup, wall film, or symptoms in sensitive households should trigger source control first.
| Situation | Risk signal | First action |
|---|---|---|
| Visible smoke from candle | Active particle source | Extinguish, trim wick, remove draft, relight only if stable |
| Black ring on jar | Soot forming during normal use | Clean cool jar, shorten burn, stop if it returns |
| Wall haze near candle area | Particles settling on surfaces | Fix wick, placement, and candle choice before cleaning |
| Asthma, COPD, infants, or sensitive pets in the home | Lower tolerance for smoke or particles | Reduce or avoid burning smoky candles |
| Musty odor, damp marks, or colored spots | Possible moisture or mold issue | Do not treat as candle soot alone |
| Headache, irritation, coughing, or discomfort during candle use | Poor fit for the space or household | Extinguish candle and ventilate |
What to do first:
- Stop burning any candle that smokes.
- Ventilate the room without placing a burning candle in a draft.
- Trim the wick before any later test burn.
- Move the candle away from vents, fans, windows, doors, and walls.
- Switch to fewer candles, shorter sessions, or flameless alternatives if smoke returns.
- For asthma, COPD, infants, or medical sensitivity, ask a qualified clinician about personal exposure concerns.
A clean-burn candle routine should not leave black film on nearby walls. If it does, the answer is not stronger fragrance, harder cleaning, or a longer burn. The answer is less smoke: better wick care, calmer placement, safer burn limits, and retiring candles that keep producing soot.