Use finished candles safely by trimming the wick, choosing a stable draft-aware spot, supervising the flame, and ending sessions before heat or smoke builds.
Finished-candle use starts after a candle is made or purchased and focuses on how it burns in normal home conditions. Safe candle use here means supervised, stable, trimmed, spaced, draft-aware burning, not product certification, medical air claims, or fire-code compliance. This guide covers the use cycle: first burn, session length, wick trimming, placement, extinguishing, smoke control, scent throw, wax-pool behavior, holders, multiple candles, and maintenance tools. It keeps wax formulation, full burn-memory repair, calculators, legal safety, and product roundups outside the main article so each burn decision stays practical and clear.
How to Do the First Burn So the Candle Starts Evenly
Do the first burn by placing the candle safely, trimming any long wick, and letting the wax pool spread evenly without forcing an unsafe session.
The first burn is the first controlled lighting session that sets the initial melted wax pattern for a finished candle. This section covers finished-candle use, not wax formulation, wick sizing, jar testing, or manufacturing quality control.
Proper first burn means a supervised first session that encourages an even wax pool. It does not guarantee that every candle will avoid tunneling, because wick size, container shape, wax blend, fragrance load, and room conditions can still affect later burns.
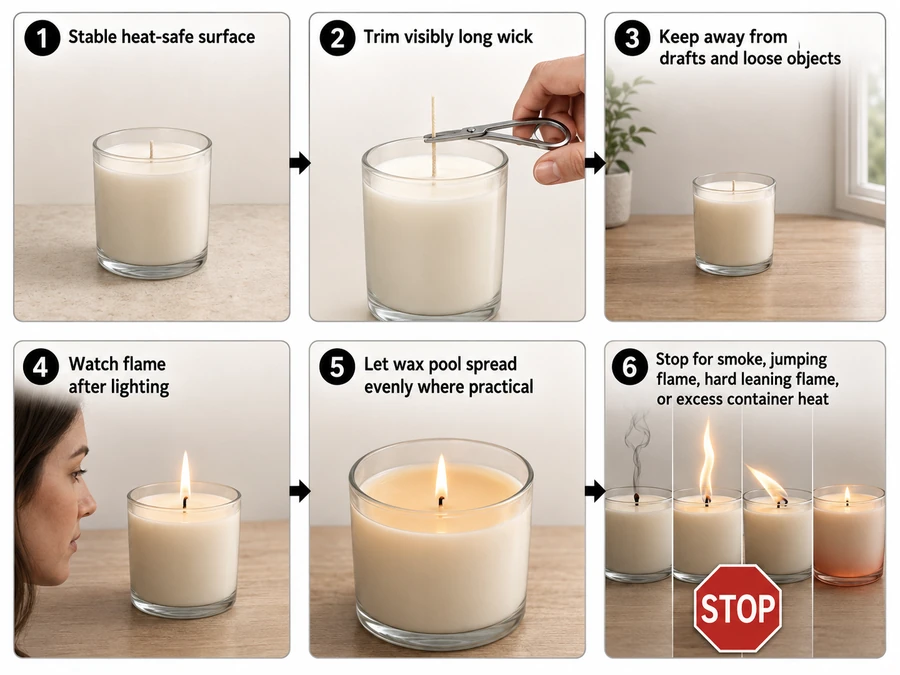
To do the first burn:
- Place the candle on a stable, heat-safe surface before lighting.
- Trim the wick if it is visibly long, curled, or mushroomed.
- Keep the candle away from drafts, vents, curtains, shelves, and loose objects.
- Light the wick and watch the flame during the first few minutes.
- Let the wax pool spread evenly across the surface where practical.
- Stop the session if the flame smokes, jumps, leans hard, or the container becomes hotter than normal handling allows.
A healthy first-burn wax pool looks like an even melted layer around the wick, spreading outward instead of drilling straight down. If the candle cannot reach the outer wax before the session becomes too long or too hot, treat that as a burn-behavior signal rather than forcing the candle to keep burning.
Burn memory belongs in a deeper explanation of wax-pool behavior, while detailed timing belongs with duration guidance; this section only sets the first safe use pattern.
Start the candle on a stable surface, build an even wax pool where practical, and stop before the flame or container shows stress.
How Long Should You Burn a Candle at One Time?
Burn a candle only long enough to form a stable melt pool and useful scent, and do not exceed the maker’s limit or the common four-hour safety cap.
For candle burning and usage, a normal session should last long enough to form a stable melt pool and useful scent release, then stop before heat, soot, or wick mushrooming builds. As a general safety limit, the National Candle Association says candles should not burn longer than four hours and should cool for at least two hours before relighting.
Long enough means the wax has time to melt evenly near the active burn area. Too long means the flame, wick, container, or room conditions start creating avoidable heat, smoke, soot, or instability.
| Burn situation | Practical session choice | Stop sooner if |
|---|---|---|
| First burn of a new container candle | Let the wax pool spread evenly where practical, while staying under the maker’s limit | Flame jumps, smoke appears, or the jar overheats |
| Routine scented-candle use | Burn until scent is noticeable and the melt pool is stable | Wick mushrooms, flame grows tall, or soot appears |
| Small candle or narrow container | Use a shorter supervised session | Wax liquefies quickly or the container heats fast |
| Large candle or wide container | Allow more time for surface melt, but keep the general four-hour cap in mind | The edge does not melt before heat or soot problems start |
| Drafty room | Shorten the session or move the candle before relighting | Flame leans, flickers hard, or burns unevenly |
| Relighting after a previous session | Let the wax cool and reset first; the NCA gives two hours as a general cooling interval | Wax is still liquid, wick is off-center, or debris is in the wax |
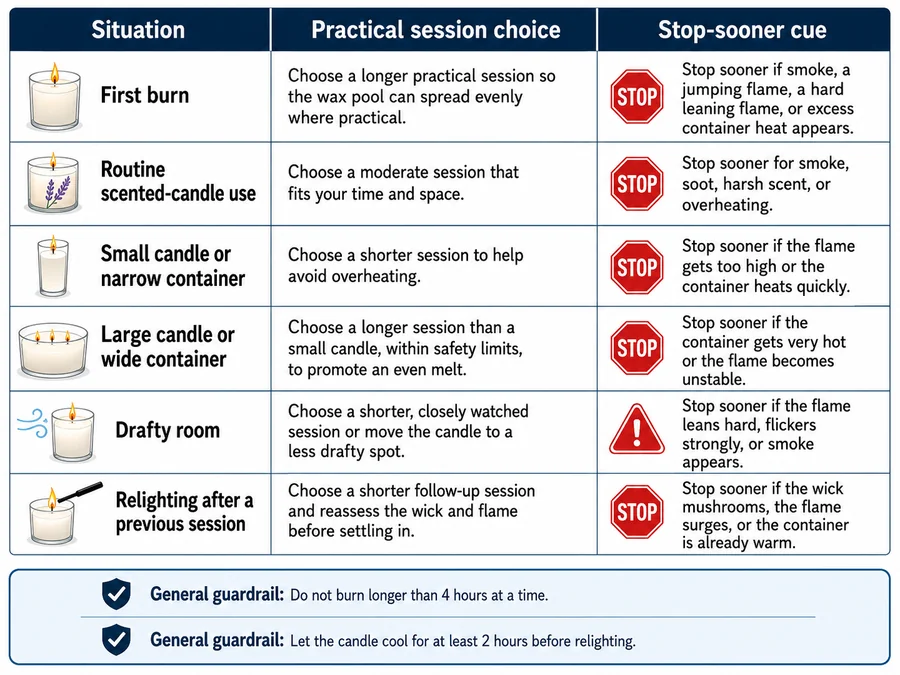
Methods mini-box: These session choices combine common label-first candle-use practice with the National Candle Association’s general four-hour burn and two-hour cooling guidance. Treat them as usage guardrails, not lab performance claims or guaranteed burn-time numbers. Always follow the candle maker’s label when it is stricter.
A session-duration mistake often starts when users treat total candle life and one lighting period as the same thing. One session is the time between lighting and extinguishing; total burn time is the candle’s lifespan across many separate sessions.
Estimate Total Candle Burn Time Elsewhere
Total candle burn time means the estimated lifespan of the candle across many sessions, not the length of one supervised burn session. This article explains how long to burn a candle during one normal use period. Use a separate burn-time estimate or testing guide when the question changes to candle lifespan, runtime formulas, burn-rate testing, or product performance.
Choose session length by wax-pool behavior, flame stability, container heat, and label limits rather than trying to use one session as a total-life estimate.
Trim the Wick Before Relighting for a Cleaner Flame
Trim the wick to about ¼ inch before relighting so the flame stays smaller, steadier, and less likely to smoke or soot.
A wick is the candle’s fuel-delivery part that pulls melted wax into the flame. Trim it before relighting so the flame stays smaller, steadier, and less likely to smoke or leave black soot.
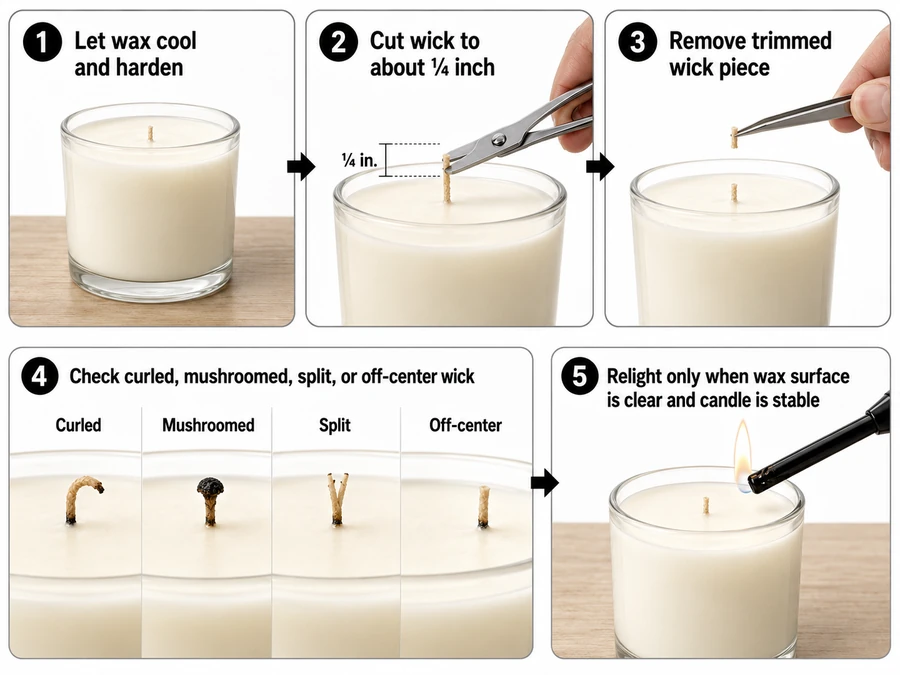
The National Candle Association advises trimming the wick to ¼ inch before each use to reduce high flames and soot. A trimmed wick is not a wick cut as low as possible; it is a controlled wick height that still lets the candle relight cleanly.
Use this relighting check:
- Let the wax cool and harden before trimming.
- Cut the wick to about ¼ inch.
- Remove the trimmed wick piece from the wax.
- Check for a curled, mushroomed, split, or off-center wick.
- Relight only when the wax surface is clear and the candle is stable.
| Wick condition before relighting | What it means | What to do |
|---|---|---|
| Tall straight wick | Flame may grow too large | Trim before lighting |
| Mushroomed black tip | Carbon has built up on the wick | Trim the tip and remove debris |
| Curled wick | Flame may lean or heat one side | Trim and watch the first minute |
| Very short wick | Flame may drown in wax | Do not cut lower; clear excess wax only if safe |
| Wick debris in wax | Debris can affect the next burn | Remove loose pieces before relighting |
Scissors can work when the jar opening is wide. A wick trimmer is easier when the candle is deeper because its angled head can reach the wick and catch the trimmed piece.
Trim the wick before relighting, remove debris, and keep the wick tall enough to burn without creating a large or smoky flame.
Place and Supervise the Candle Safely Before Lighting
Safe candle placement means a stable, watched flame away from drafts and burnable materials.
For normal home candle use, safe means supervised, stable, clear, and draft-aware. It does not mean a legal fire-code claim, a medical air-quality claim, or proof that every candle design has passed lab testing.
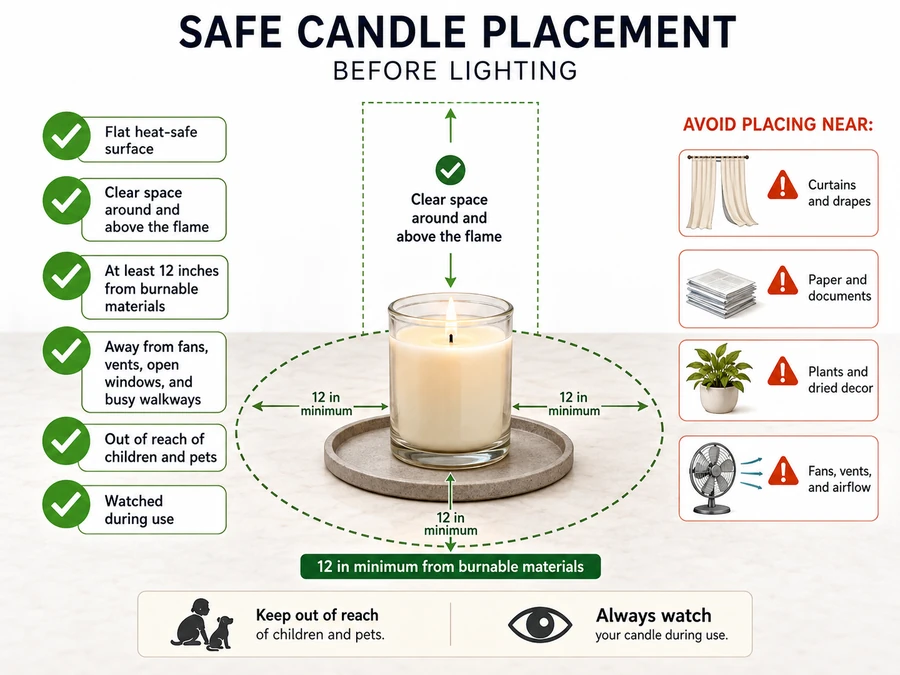
The National Candle Association says candles should be placed on stable, heat-resistant surfaces, kept away from flammable items, kept out of reach of children and pets, and kept away from open windows, fans, and air vents. Treat these as practical minimums, not permission to burn near loose fabric, shelves, paper, or crowded décor.
Keep the flame at least 12 inches from anything that can burn, including curtains, books, paper, plants, bedding, towels, and seasonal décor.
Use this placement check before lighting:
- Put the candle on a flat, heat-safe surface.
- Keep it away from curtains, bedding, books, paper, plants, towels, and decorations.
- Move it out of air paths from fans, vents, open windows, and busy walkways.
- Keep it where children and pets cannot reach it.
- Leave room above and around the flame.
- Watch the flame during use, especially in the first few minutes.
| Placement factor | Safer choice | Riskier choice |
|---|---|---|
| Surface | Flat, heat-resistant tray, plate, or holder | Wood edge, plastic surface, cloth, or unstable shelf |
| Airflow | Still room air | Fan, vent, open window, or doorway draft |
| Clearance | Open space around and above the flame | Curtains, books, towels, paper, or hanging décor nearby |
| Supervision | Someone awake and nearby | Leaving the room, sleeping, or relying on memory |
| Movement | Leave the candle in place while wax is liquid | Carrying it while hot or melted |
Draft control matters because airflow can make the flame lean, flicker, smoke, melt wax unevenly, or heat one side of the container. If the flame keeps bending toward one side, put it out, let the wax cool, and move the candle before relighting.
A supervised candle on a stable, heat-safe, draft-aware surface burns more evenly and carries lower fire, soot, and overheating risk than a candle placed near airflow or loose materials.
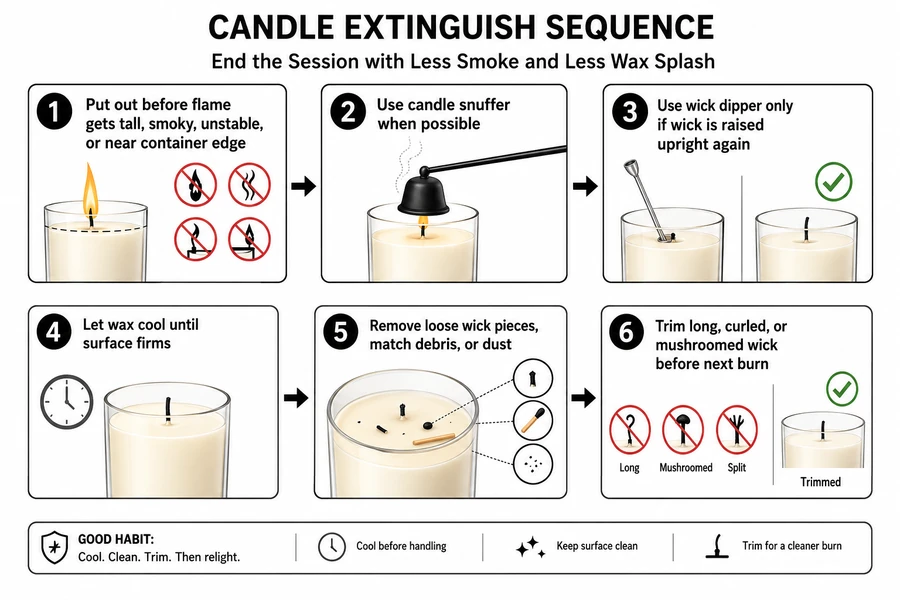
Put Out, Cool, and Relight the Candle Without Smoke or Wax Splash
Put out the candle gently, let the wax firm again, remove debris, and relight only after the wick and surface are ready.
A clean extinguish means ending the flame with less smoke, less wax splash, and a clearer wax pool for the next burn. It does not mean the candle will preserve fragrance strength forever or fix a wick, wax, or container problem.
Use this end-of-session sequence:
- Put the candle out before the flame grows tall, smoky, unstable, or too close to the container edge.
- Use a candle snuffer when possible to cover the flame without blowing wax outward.
- Use a wick dipper only if you can lift the wick back upright and keep debris out of the wax.
- Let the candle cool until the wax surface firms again.
- Remove loose wick pieces, match debris, or dust before relighting.
- Trim the wick before the next burn if it is long, curled, or mushroomed.
| Extinguishing method | Best use | Watch out for |
|---|---|---|
| Candle snuffer | Lower-smoke flame ending | Do not press it into melted wax |
| Gentle blowing | Quick extinguishing when no tool is available | Can spread smoke, wax droplets, or wick debris |
| Wick dipper | Reducing smoke by dipping the wick into wax | Wick must be raised upright again |
| Lid | Only when the maker allows it | Heat, soot marks, trapped smoke, or unsafe lid materials |
Cooling matters because liquid wax can splash, shift the wick, trap debris, or relight unevenly. Relighting while the wax is still fully liquid can turn a normal candle session into a hotter, smokier, less stable burn.
End the flame gently, let the wax reset, clear the surface, and relight only after the candle is cool, stable, and trimmed.
Stop Soot, Smoke, and Mushrooming During Normal Candle Use
Stop soot, smoke, or mushrooming by extinguishing the candle, cooling it, trimming the wick, clearing debris, and correcting airflow before relighting.
Soot is visible combustion residue that can appear as smoke, black wick buildup, or dark marks near the container. A cleaner burn means less visible smoke and soot during normal use, not a toxin-free, medical-safe, or air-purifying claim.
Common use-related causes include an untrimmed wick, a drafty room, a flame that is too tall, debris in the wax pool, or a session that runs too long. Manufacturing and formulation defects can also cause problems, but this section covers normal use habits first.
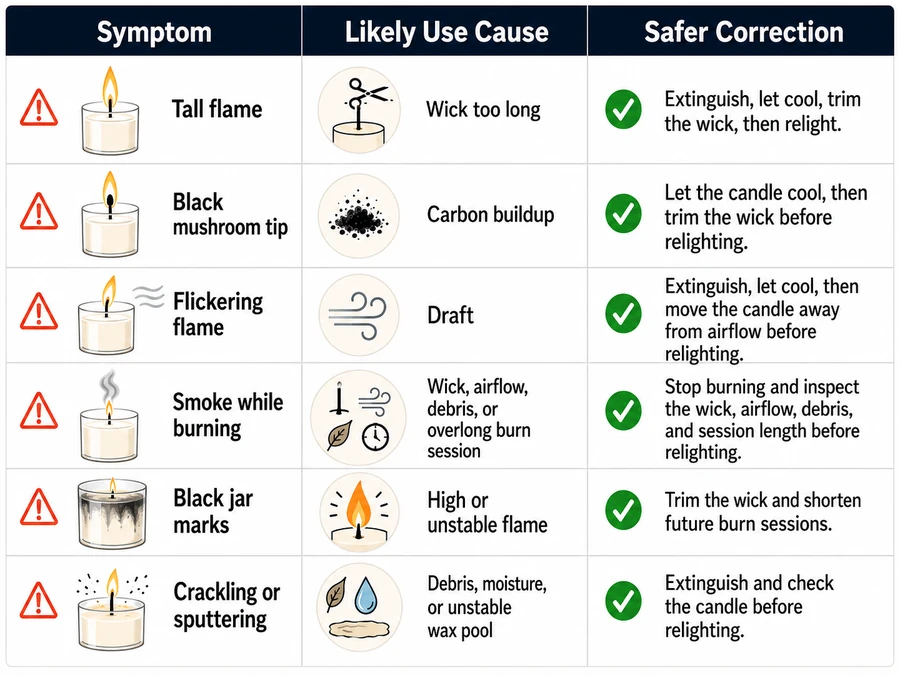
| Symptom during use | Likely use cause | Safer correction |
|---|---|---|
| Tall flame | Wick is too long | Extinguish, cool, trim, and relight |
| Black mushroom tip | Carbon has built up on the wick | Trim the mushroomed tip after cooling |
| Flickering flame | Draft from fan, vent, window, or movement | Move the candle after extinguishing and cooling |
| Smoke while burning | Wick, airflow, debris, or overlong session issue | Stop the session and inspect before relighting |
| Black marks on jar | Flame is too high, too close, or unstable | Trim wick and shorten future sessions |
| Crackling or sputtering | Debris, moisture, or unstable wax pool | Extinguish and do not relight until checked |
Do not scrape soot back into the wax or keep burning through a smoky session. That can worsen debris, scent distortion, and flame instability. If trimming, placement, and shorter sessions do not reduce soot, treat the candle as a problem candle rather than forcing normal use.
Stop the flame, cool the wax, trim the wick, remove debris, and correct airflow before relighting; if soot keeps returning, the issue may sit beyond normal usage habits.
Improve Scent Throw While the Candle Is Burning
Scent throw is the perceived fragrance a candle releases into a room, especially while the wax pool is warm during burning.
Hot throw is the scent you notice while the candle is lit and the wax pool is warm. Cold throw is the scent you notice before lighting, when the candle is unburned or cooled.
To improve scent throw during use, let a stable wax pool form, burn the candle in a room that fits its size, reduce disruptive drafts, and avoid expecting burn habits to fix every weak formula. Strong scent means noticeable fragrance in an appropriately sized room, not maximum fragrance oil, whole-house scenting, therapy, or air purification.
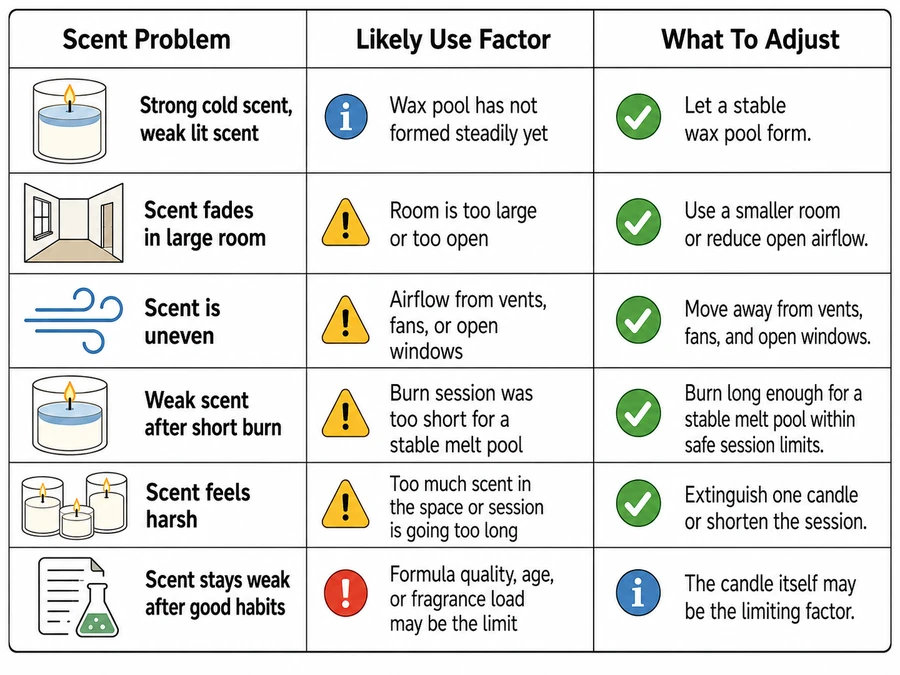
| Scent problem during use | Likely use factor | What to adjust |
|---|---|---|
| Candle smells strong cold but weak when lit | Cold throw is stronger than hot throw | Let a stable wax pool form, then judge again |
| Scent fades in a large room | Candle may be too small for the space | Use the candle in a smaller room or reduce open airflow |
| Scent is uneven or disappears quickly | Drafts may push fragrance away from the burn area | Move the candle away from vents, fans, and open windows |
| Candle smells weak after a short burn | Wax pool may not be developed enough | Burn long enough for a stable melt pool, within safe session limits |
| Scent feels harsh or crowded | Room may be too small or candles may be too many | Extinguish one candle or shorten the session |
| Scent stays weak after good use habits | Formula quality, age, or fragrance load may be the limit | Treat it as a candle-quality issue rather than a burning issue |
Methods mini-box: Scent perception depends on candle size, room size, airflow, wax-pool development, burn-session length, and formula quality. This table separates what a user can adjust during burning from making-side factors such as fragrance load, wax chemistry, oil choice, and formulation.
A candle warmer can change fragrance release because it warms wax without the same flame, wick, and wax-pool behavior. That comparison belongs outside this usage section because it changes the method of use, not just the burn habit.
When Storage or Shelf Life Affects Candle Use
Storage affects candle readiness before burning. A candle that smells weak before lighting, looks visibly changed, has a dusty surface, or burns differently after long storage may have a pre-use quality issue. Keep this as a readiness clue, not a full expiration diagnosis. Detailed shelf-life, wax bloom, fragrance degradation, and storage chemistry belong in a separate storage or expiration guide.
For better scent during burning, control wax-pool development, room fit, and airflow first; if those are already reasonable, the scent limit may come from the candle itself.
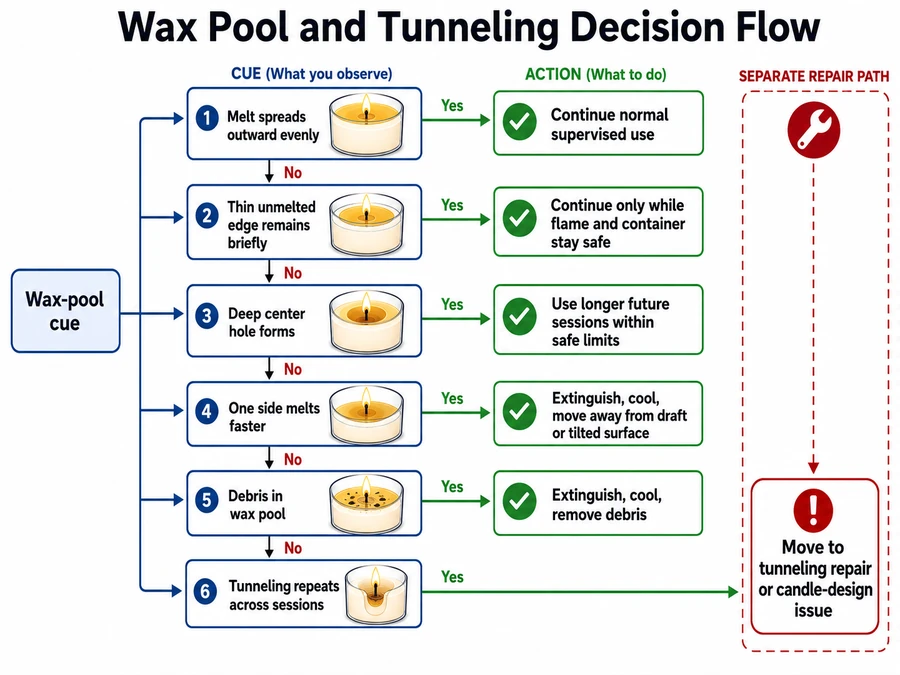
Keep the Wax Pool Even and Know When Tunneling Needs a Separate Fix
Keep the wax pool even by using long enough supervised sessions, but treat repeated tunneling as a separate repair problem.
A wax pool is the melted wax around the wick while the candle burns. Tunneling happens when the candle repeatedly burns down the center while leaving a ring of unmelted wax around the edge.
An even wax pool forms when melted wax spreads broadly and consistently during burning. Repeated short burns can leave edge wax and increase tunneling risk, but not every uneven surface is a full repair problem.
| Wax-pool cue | What it suggests | What to do during normal use |
|---|---|---|
| Melt spreads outward evenly | Burn pattern is stable | Continue normal supervised use |
| Thin unmelted edge remains briefly | Candle may need more time | Let the session continue only while flame and container stay safe |
| Deep center hole forms | Tunneling may be starting | Use longer future sessions within safe limits |
| One side melts faster | Draft, tilted surface, or off-center flame may be affecting burn | Extinguish, cool, move to a stable draft-free spot, and relight later |
| Wax pool fills with wick debris | Burn surface is contaminated | Extinguish, cool, and remove debris before relighting |
| Tunneling repeats across sessions | Use adjustment may not be enough | Treat it as a tunneling repair or candle-design issue |
| Failure signal | First usage check | Boundary |
|---|---|---|
| Candle keeps burning down the middle | Were sessions too short? | Full burn-memory science belongs outside this overview |
| Edge wax never melts | Is the room cold, drafty, or the session too short? | Wick-size diagnosis belongs outside this page |
| Flame is tall and jar is sooty | Is the wick too long? | Soot troubleshooting starts with use, not formula claims |
| Wax pool overheats or looks too deep | Has the candle burned too long? | Stop the session; do not force edge melt |
| Jar gets very hot | Is the candle on a safe surface and within session limits? | Jar heat testing is not covered here |
Methods mini-box: Wax-pool cues are visual use signals, not proof of manufacturing quality. This section uses observable patterns—edge wax, center burn, side melt, debris, and heat—to decide whether normal burn habits are enough or whether the problem should move to a repair-focused guide.
Prevent tunneling by giving the candle enough supervised burn time to form a usable wax pool, trimming the wick before relighting, avoiding drafts, and stopping before heat or soot signals appear. If a tunnel is already deep, do not turn this usage routine into a foil repair tutorial or wick-sizing diagnosis.
An even wax pool is a useful burn goal, but repeated tunneling needs a separate fix when normal session length, wick trimming, and placement do not correct the melt pattern.
Match the Candle to a Heat-Safe Holder or Surface
Match each candle to a level, heat-safe holder or surface before lighting so the base stays stable and nearby materials stay protected.
For candle burning and usage, a heat-safe setup means the candle sits level, resists tipping, catches normal wax or soot marks, and keeps heat away from weak surfaces. It does not mean every tray, jar, lid, or decorative stand is safe for every candle.
Use the candle’s own label first, then match the support to the candle type.
| Candle type | Better support | Avoid |
|---|---|---|
| Jar candle | Flat heat-resistant plate, tray, or stable holder | Cloth, plastic, paper, uneven shelves |
| Pillar candle | Wide candle plate or holder that catches melted wax | Narrow bases that let wax spill or the candle lean |
| Taper candle | Proper taper holder with a snug fit | Loose holders, oversized openings, or makeshift bottles |
| Tea light | Nonflammable cup, dish, or approved warmer area | Bare wood, fabric, or crowded décor |
| Votive candle | Votive holder sized for liquefied wax | Burning without a holder |
| Decorative shaped candle | Heat-safe dish larger than the melt area | Surfaces that cannot catch wax runoff |
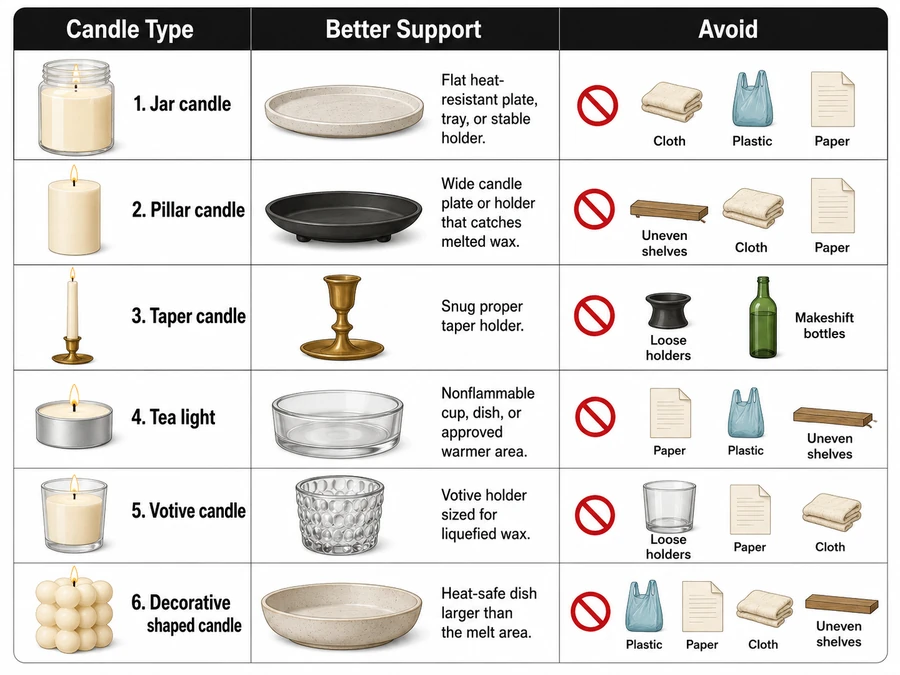
Container candles can still transfer heat downward, especially near the end of a burn or during a long session. Do not treat glass as automatic protection for the table below it.
A lid is not always a burning surface or extinguishing tool. Use it only if the candle maker says it is safe for that purpose, because some lids trap heat, mark with soot, or use materials not meant for flame heat.
A heat-safe holder or surface protects the candle’s base, nearby materials, and the next burn session by keeping the candle stable, level, and separated from weak surfaces.
Set Up Multiple Candles Without Heat, Draft, or Scent Problems
Multiple candles change room heat, airflow, flame spacing, and fragrance strength.
Using more than one candle is not just repeating a single-candle setup. Each extra flame adds heat, scent, movement risk, and more ways for drafts to pull flames sideways.
For safer multi-candle use, place each candle on its own stable heat-safe area, keep flames from heating nearby containers, and avoid clustering candles where one flame affects another.
| Multi-candle issue | What can happen | Better setup |
|---|---|---|
| Candles placed too close | Containers heat each other or flames interfere | Leave open space between candles |
| Mixed candle heights | Tall flames may heat nearby décor or jars | Keep taller flames away from lower objects |
| Different scent types | Fragrances can clash or feel too strong | Use fewer scents in one room |
| Draft across a group | Flames lean together and burn unevenly | Move the group away from vents, fans, and windows |
| Crowded tray display | Heat, wax, and décor compete for space | Use a larger nonflammable tray with clear gaps |
| Pets or children nearby | More flames mean more contact points | Use fewer candles and place them out of reach |
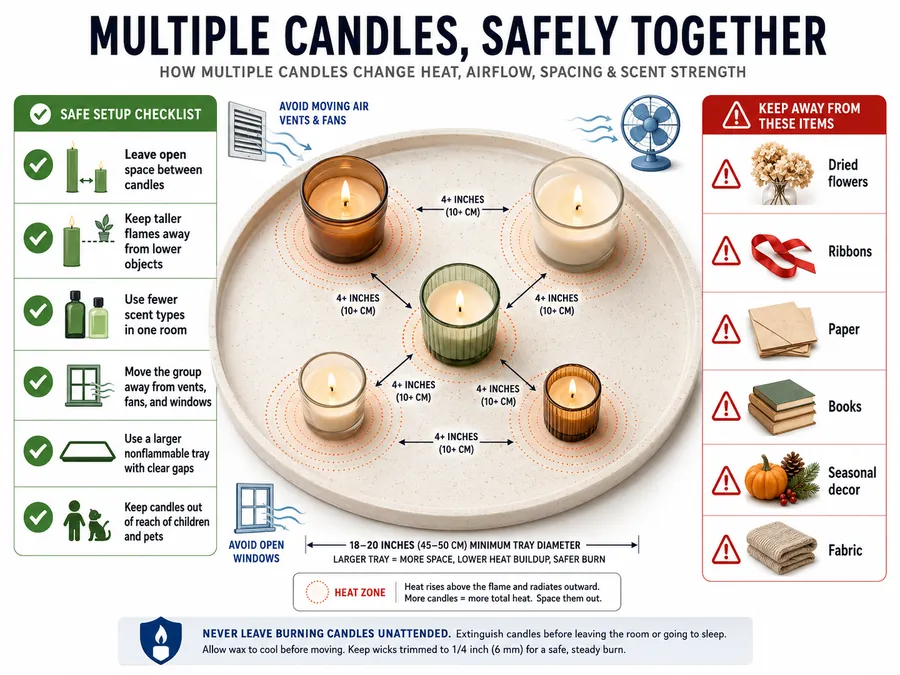
Do not use a decorative cluster as a substitute for safe spacing. Dried flowers, ribbons, paper labels, books, seasonal décor, and fabric can turn a candle display into a flame-contact risk.
Scent also changes when several candles burn at once. A room can feel stronger, harsher, or less pleasant even when each candle smells fine alone. If the scent feels heavy, extinguish one candle rather than extending the burn session.
Use fewer candles, more spacing, stable surfaces, and still air so a multi-candle setup stays manageable instead of becoming a heat, draft, or fragrance problem.
Use Candle Maintenance Tools at the Right Moment
Use candle tools by stage: trim before relighting, stabilize before burning, snuff or dip when extinguishing, and cover only after cooling.
Maintenance tools are useful when they solve a specific burn-stage problem. They are not required for every candle, and they do not replace supervision, label directions, stable placement, or session limits.
| Tool | Best moment to use it | What it helps prevent |
|---|---|---|
| Wick trimmer | Before relighting, once wax is cool | Tall flame, soot, mushrooming, wick debris |
| Candle snuffer | At the end of a burn session | Smoke bursts, wax splash, blown wick debris |
| Wick dipper | When used carefully to extinguish and re-center the wick | Smoke, leaning wick, messy flame ending |
| Heat-safe tray | Before lighting | Heat marks, wax spills, unstable placement |
| Long lighter or matches | At lighting, especially in deeper jars | Burned fingers or tilted lighting angle |
| Candle lid | After the candle is fully cool, if suitable | Dust on the wax surface |
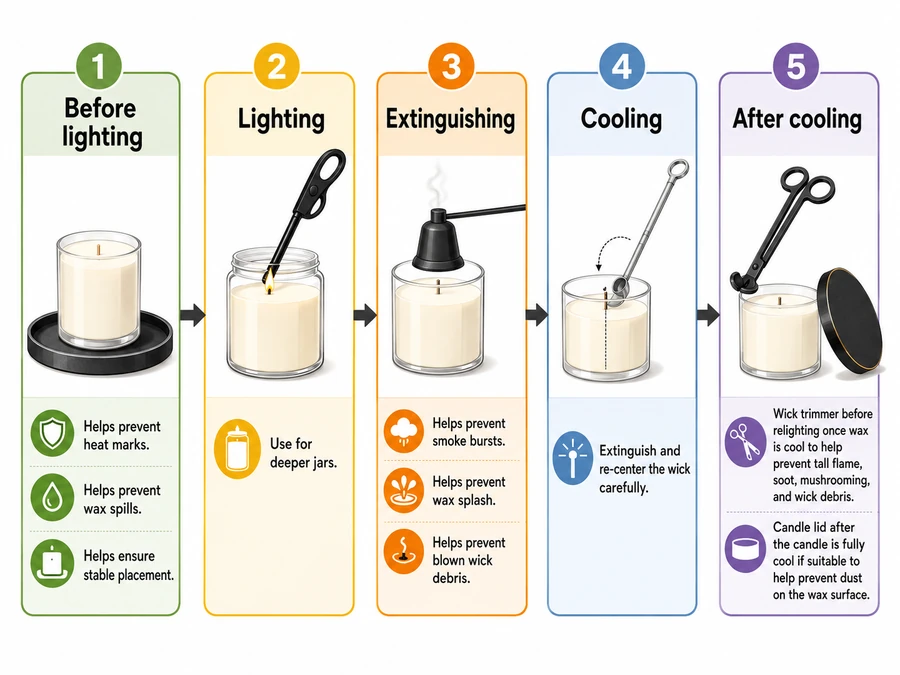
A wick trimmer is most useful when the candle jar is too deep for scissors. A snuffer is most useful when blowing out the flame sends smoke or wax movement across the surface. A tray is most useful before lighting, not after heat has already transferred into a table, shelf, or countertop.
Do not use tools to force a candle through unsafe behavior. If the flame is large, the jar is very hot, the wax pool is contaminated, or the candle repeatedly smokes, end the session and reassess after cooling.
The right tool supports one stage of use: trim before lighting, stabilize before burning, extinguish gently, cool fully, then clear the wax surface before the next session.
What to Do When the Candle Is Finished
A finished candle is no longer safe to burn when the remaining wax, wick, container, or label guidance no longer supports controlled use. Stop before the flame burns too close to the base, the container overheats, the wick tab becomes exposed, or the candle behaves unpredictably.
Do not keep burning a candle only to use every bit of wax. The last stage can create more heat at the base, less stable wax behavior, and a higher chance of container stress. Let the candle cool fully before handling, cleaning, reusing, or discarding the container.
If the jar is being reused, clean it only after the candle is cold and the remaining wax can be removed safely. Reuse belongs to container handling, not active candle burning.
Candle Burning Routine Recap
Good candle use follows the same cycle each time: prepare, place, burn, watch, extinguish, cool, and reset.
Start with a trimmed wick, a stable heat-safe surface, clear space around the flame, and still room air. During the session, watch the flame, wax pool, scent strength, smoke, jar heat, and nearby materials. End the session before heat, soot, or instability builds.
A simple candle-use routine:
- Trim the wick before relighting.
- Place the candle on a stable, heat-safe surface.
- Keep it away from drafts and burnable materials.
- Burn long enough for useful wax-pool and scent performance, without extending the session beyond safe behavior.
- Extinguish gently.
- Let the wax cool and firm.
- Remove loose debris before the next burn.
- Stop using the candle when the remaining wax or container condition no longer supports controlled burning.
This page stays focused on finished-candle use. Full candle-making instructions, wax formulation, wick sizing, burn-memory science, tunneling repair, candle lifespan estimates, legal compliance, and product comparisons require their own focused treatment.
A candle lasts longer and behaves more predictably when each burn session begins with a trimmed wick, stable placement, steady supervision, clean extinguishing, full cooling, and a clear decision to stop when the candle is no longer safe to use.