
Clean candle containers after use by removing wax first, washing with warm soapy water, then tackling soot, adhesive, and lingering scent with material-safe methods before drying and storing.
A used candle jar looks simple until you meet the hidden mess: wax in corners, oily fragrance film, and a wick tab glued like it means it. The safest clean-up starts with softening or popping out the wax, not scraping hard enough to chip glass or gouge tins. From there, a little heat control, the right solvent for labels, and a final streak-free wipe can reset the container without leaving rust, haze, or off-smells behind. If you plan to pour again, drying and storage matter as much as washing—especially around seams, lids, and any porous ceramic.
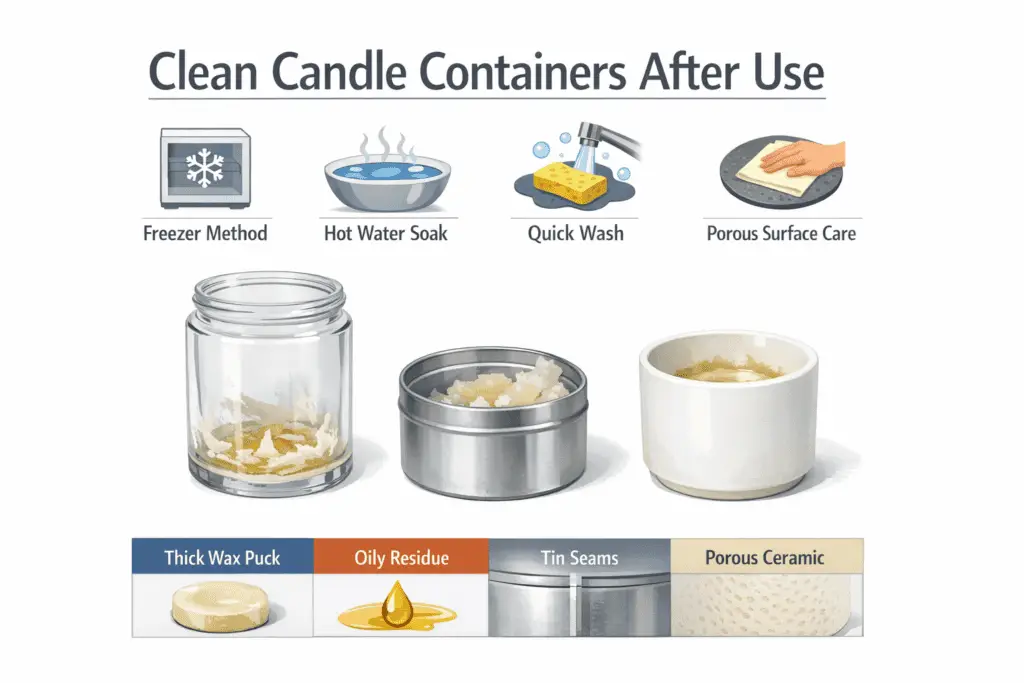
Quick-start decision chooser (start here, escalate only if needed)
| If you have… | Start with… | Escalate to… | Avoid when… |
| Thick wax puck in glass | Freezer method | Hot-water soak | Glass is chipped/cracked |
| Thin wax ring + oily film | Soap wash + wipe | Gentle low heat | You can’t warm the jar gradually |
| Tin with residue in seams | Freezer + quick wash | Alcohol wipe (brief) | Long soaking / dishwasher |
| Porous ceramic/stoneware | Baking-soda paste | Odor sorbents (overnight if needed) | Prolonged soaking |
Remove leftover wax with the freezer method (no-heat steps)
Freeze the jar until the wax puck firms up, then gently pry out the solid wax and wipe any thin residue.
This no-heat approach keeps cleanup tidy and lowers the chance of smearing fragrance oils around the container. For cautious handling, start with candle containers that are not chipped, cracked, or already heat-stressed, and keep the force light.
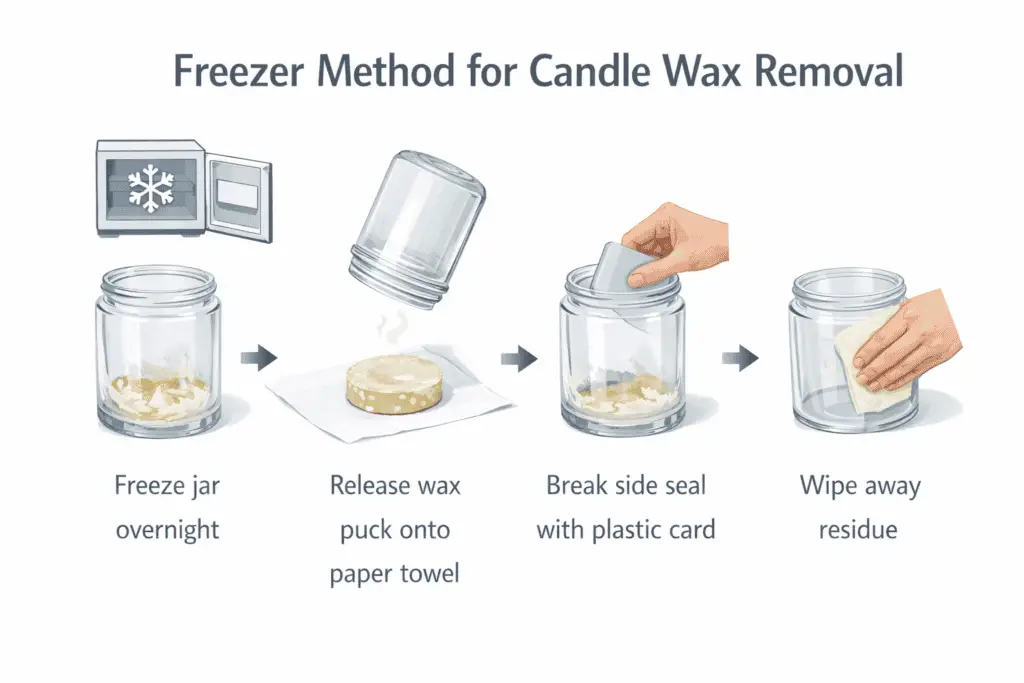
What it is: The freezer method uses cold to shrink wax slightly faster than the container, loosening the “grip” so the wax releases more cleanly.
How long to freeze: Start with a short chill for small leftovers; thicker wax may need longer so it pops out in one piece.
Use these steps to release the wax without scratching the sides or chipping the rim:
- Let the container cool to room temperature if it’s still warm from burning, then place it upright in the freezer on a flat surface.
- After the wax firms up, flip the container upside down over a paper towel and tap the base lightly; if it drops out, stop there.
- If it sticks, slide a plastic card or flexible scraper down the sidewall to break the seal, keeping the tool parallel to the glass (not wedged under the rim).
- Lift out the wax puck and remove loose flakes; avoid digging at the glass with metal tools.
- Wipe the inside with warm, soapy water on a soft cloth to remove the remaining film, especially around the shoulder and base edges.
If you’re aiming for a clean exterior and future relabeling, a fully de-greased surface makes it easier to apply candle labels once the jar is completely dry. Staying gentle at this stage also helps reduce stress from aggressive prying or sudden temperature swings later.
Clean candle jars with a safe hot-water soak (step-by-step)
Fill the container with hot (not boiling) water, let wax float and harden, then lift it out, strain the water, and wipe the jar clean.
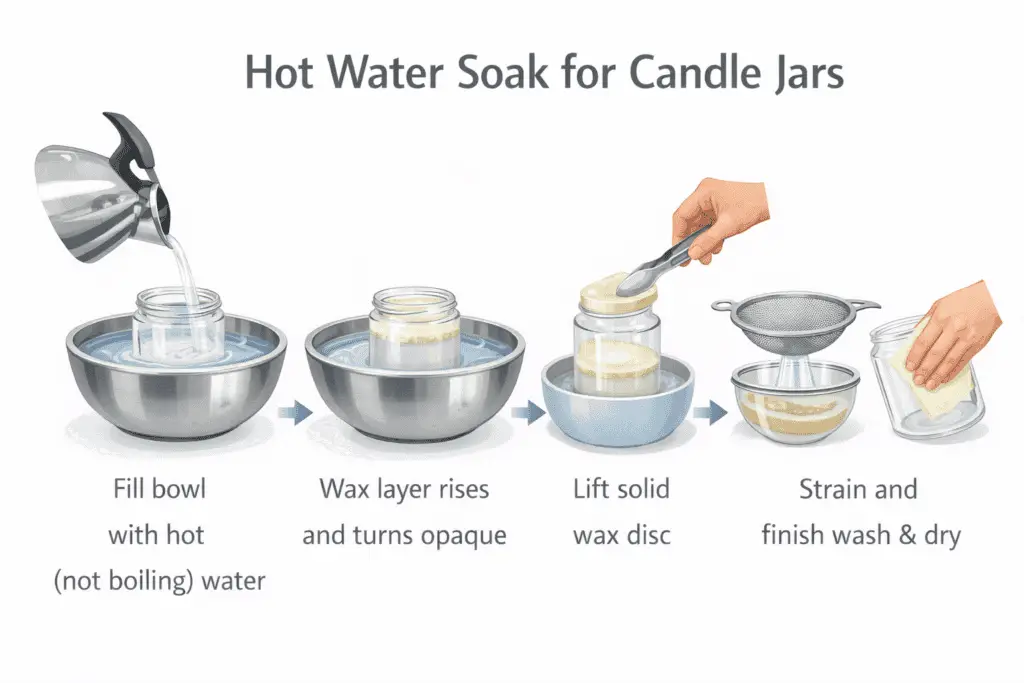
This method softens stubborn rings evenly and works well when wax is too soft to “pop” from freezing. To reduce cracking risk, pre-check for damage and let cold glass warm gradually before you start.
What it is: A hot-water soak uses warmth to loosen wax and lift it to the surface, where it cools into a removable layer.
How hot should the water be: Use hot tap water you can handle comfortably; never pour boiling water into a cool or cold jar, and let cold glass warm up first to prevent overheated or shattered candle containers.
Use these steps to keep the process controlled and sink-safe:
- Protect the countertop with a towel or trivet, and place the jar inside a larger bowl or pan to catch drips.
- Pour hot (not boiling) water into the jar, leaving a little headspace so it won’t slosh; the wax will rise and start separating.
- Wait until the floating wax layer turns opaque and firm, then lift it out in one piece and set it on paper to cool fully.
- Strain the remaining water through a fine mesh into a separate container so wax bits don’t go down the drain, then discard the cooled solids in the trash.
- Wash the jar with warm dish soap and a soft cloth, then do a final rinse and a thorough dry to prevent water spots or lingering oil film.
Use the same slow-handling approach when you pick up a jar that has been sitting in hot water.
Loosen leftover wax with gentle low heat (oven or warming plate)
Gentle low heat loosens wax by warming the container gradually so residue turns liquid and wipes out without hard scraping.
Keep the jar only gently warm by staging it slowly to reduce stress cracking. ΔT is the temperature difference between the container and the heat source, and big jumps raise break risk.
Use this sequence to get clean pour-off instead of smeared rings:
- Bring the container to room temperature, then place it on a lined tray or stable warming surface so it heats evenly.
- Warm gradually until the wax edges soften and the center turns glossy; tilt and pour off into a disposable catch container instead of the sink.
- Wipe the inside while it is just warm with paper towel first, then wash with dish soap and warm water to remove the oily film.
- Finish with a quick, streak-free wipe using isopropyl alcohol on a cloth, then air-dry fully.
This method works faster than freezing or soaking when a thick “ring” clings to the wall, but it becomes riskier when cold glass meets a hot rack or plate. If you keep seeing haze, stubborn rings, or odd odor after cleaning, the issue is usually leftover wax, fragrance oil, or soot film. Material choice matters too, because tins and glass shed heat differently and can leave different residue patterns, so glass vs tin candle containers helps before you standardize one “heat” routine for every vessel.
Common mistakes (and what to do instead)
- Heating a cold jar fast: warm it gradually to reduce ΔT.
- Pouring melted wax into the sink: pour into a disposable catch container and let it solidify.
- Scraping with metal: wipe warm wax out first, then wash.
Pop the wick tab and clean glue residue (mechanical → mild solvent)
Lift the wick tab mechanically first, then use a mild solvent only for the remaining adhesive film so you avoid scratches, smears, and lingering solvent odor.
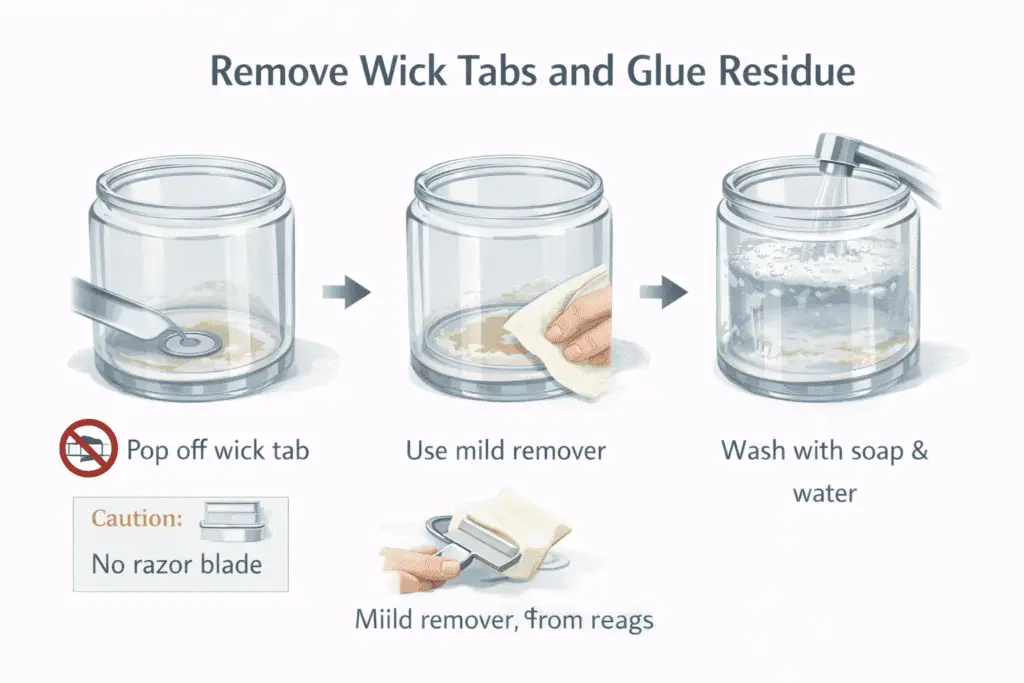
Start with leverage, not chemicals, and check the base for chips or cracks before you press hard. Wick stickers and pressure-sensitive pads usually release cleanly when you break the seal at the edge instead of prying straight up from the middle.
Use this mechanical-first sequence to protect glass and coatings:
- Chill the container briefly or use the wax-removal step that leaves the base clean, then dry the bottom so tools do not slip.
- Slide a plastic scraper under one edge of the tab and twist gently to shear the adhesive, keeping pressure flat against the base.
- If glue remains, apply a small amount of a mild remover to the residue, let it soften, then wipe; avoid flooding seams or labels.
- Escalate to isopropyl alcohol only when mild options fail, then follow with soap and water to remove any solvent film and prevent haze.
Skip razor blades on curved glass and avoid mixing cleaners in a closed space; follow the product’s safety data sheet (SDS) for ventilation and glove guidance. Once the base is smooth and dry, save the full refill workflow for prepare candle containers so new wicks and labels stick evenly without trapping leftover solvent smell.
Quick Q&A
- “My tab won’t lift—what now?” Break the seal from the edge with a plastic scraper; don’t pry straight up from the center.
- “The glue turned gummy.” Stop rubbing; let the remover sit briefly, then wipe and repeat once.
Remove black soot and oily film from candle jars (streak-free)
Wash with warm soapy water, rinse, then do a quick alcohol window-pass with a microfiber cloth to remove haze and dry streak-free.
If the container has chips, cracks, or a loose base, pause before you start. Soot is fine carbon that smears, and the “oily” look is often fragrance and wax residue that soap lifts but can still leave a thin film behind. The alcohol window-pass (one fast wipe with a lightly dampened cloth) breaks that film and flashes off quickly, which is why it looks clearer than a soap-only wash.
Do it in this order for the cleanest finish:
- Wipe out the jar dry first with paper towel to remove as much oily residue as possible (this keeps your rinse water from turning into an oily mess).
- Wash with warm water + dish soap using a soft cloth; avoid abrasive pads that can scratch and hold soot in the scratches.
- Rinse well, then shake out the water and let it drip briefly.
- Lightly dampen a microfiber cloth with isopropyl alcohol and wipe once around the inside in a smooth “top-to-bottom” spiral; don’t keep buffing.
- Flip to a dry part of the cloth and do one final pass to pick up the last moisture before it dries into spots.
If you’re seeing lots of soot in the first place, it usually points to flame or airflow issues, and reducing soot while burning will save you cleanup later. Also keep heat in mind: overheated jars can bake residue onto the walls and make the film harder to remove, both during burning and during any warm-cleaning method.
Quick fixes for common streak problems:
- Rainbow streaks after alcohol: you used too much alcohol or the jar still had soap residue—rinse again, then use a barely damp cloth.
- Lint trails: switch from paper towel to microfiber for the final passes.
- Film that “comes back” after drying: do one more alcohol pass, but only after a full soap wash and rinse.
Quick Q&A
- “Why does it look clean, then turn hazy?” Residual soap or fragrance oil is drying into a thin film—rinse again and do one light alcohol pass.
- “Can I use a magic eraser?” Skip it on most jars; micro-abrasion can make soot stick more next time.
Disposal note: strain wax bits and soot solids and bin them; don’t pour oily rinse water down the drain—wipe oily residue out first so less ends up in wastewater.
Deodorize lingering candle scents (baking soda, coffee, or charcoal)
Add baking soda, coffee grounds, or activated charcoal to the dry container, cover it, wait several hours or overnight, then discard the media and air the container out.
Before you deodorize, make sure the vessel is truly clean and fully dry. Lingering candle smell usually lives in a thin fragrance-oil film you can’t see, plus tiny residues trapped around seams, lids, and textured surfaces. Sorbents work by grabbing odor molecules over time, and a covered jar (lid on loosely, or a plate on top) keeps the headspace concentrated so the media can do more work.
Use this simple “pick the right medium” approach:
- Baking soda: gentle and low-mess for light to medium scents.
- Coffee grounds: good at absorbing and masking, but can leave a “coffee note.”
- Activated charcoal: often fastest for heavy fragrance, but it can dust—keep it contained.
Step-by-step:
- Wash and dry the container completely; deodorizing works poorly on damp glass or oily walls.
- Add a small amount of media to cover the odor source area, or use a small charcoal sachet or packet.
- Cover and wait several hours or overnight, then dump the media and wipe the inside dry.
- Do a sniff test at room temperature; if you still smell fragrance, repeat with fresh media once more.
If you want fewer “strong scent” surprises next time, preventing heavy soot and fragrance buildup during burning helps more than any deodorizing trick. And if one jar stubbornly holds onto certain fragrances (especially in textured, porous, or unglazed containers), material choice can matter as much as the cleaning method.
A quick way to track what actually works for your nose:
- Rate odor 0–5 right after cleaning (0 = neutral, 5 = strong).
- Note the media used and the dwell time.
- Re-rate after several hours and again the next day so you can see which option improves fastest.
Avoid shortcuts that backfire: don’t mix sorbents with solvents, and don’t scrub charcoal dust directly on glass—shake it out and wipe gently to prevent micro-scratches.
Clean candle tins without rust (quick soak, fast dry)
Minimize soak time, wash quickly, and dry immediately—rust starts when moisture lingers in seams, rolled rims, or under labels.
To clean candle tins without rust, remove wax first, then keep any water contact short and controlled. Tins can look dry on the surface while still holding moisture in creases, so the rule is simple: dry tin seams fast before you store them or relabel.
A reliable “quick soak, fast dry” routine:
- Pop out wax (freezer works great), then wipe the inside with paper towel to lift fragrance oil residue.
- Wash with warm soapy water using a soft sponge; avoid long, hot soaking that drives water into seams.
- Rinse briefly, then immediately towel-dry inside and out—especially the rolled rim and base edge.
- Set the tin upside down in a warm, ventilated spot until the seams no longer feel damp.
- If you see water marks or an oily feel, do a quick wipe with isopropyl alcohol and dry again.
How to prevent rust on candle tins long-term:
- Store tins fully dry with lids off for a while so trapped humidity can escape.
- Avoid the dishwasher; heat plus prolonged moisture tends to creep into edges and accelerate spotting.
- If a tin already shows rust freckles, retire it from reuse for pouring and repurpose it for non-heat storage.
Quick Q&A
- “It rusted even after drying.” Moisture was trapped in a seam—air-dry longer with the lid off and avoid soaking.
- “Can I clear light rust?” For reuse as a candle container, it’s safer to retire it; rust can spread under coatings.
Clean ceramic/stoneware candle containers (porous vs glazed)
Identify the finish first: glazed ceramic can take a short warm wash, while porous stoneware cleans best with a paste and minimal water, then a long dry.
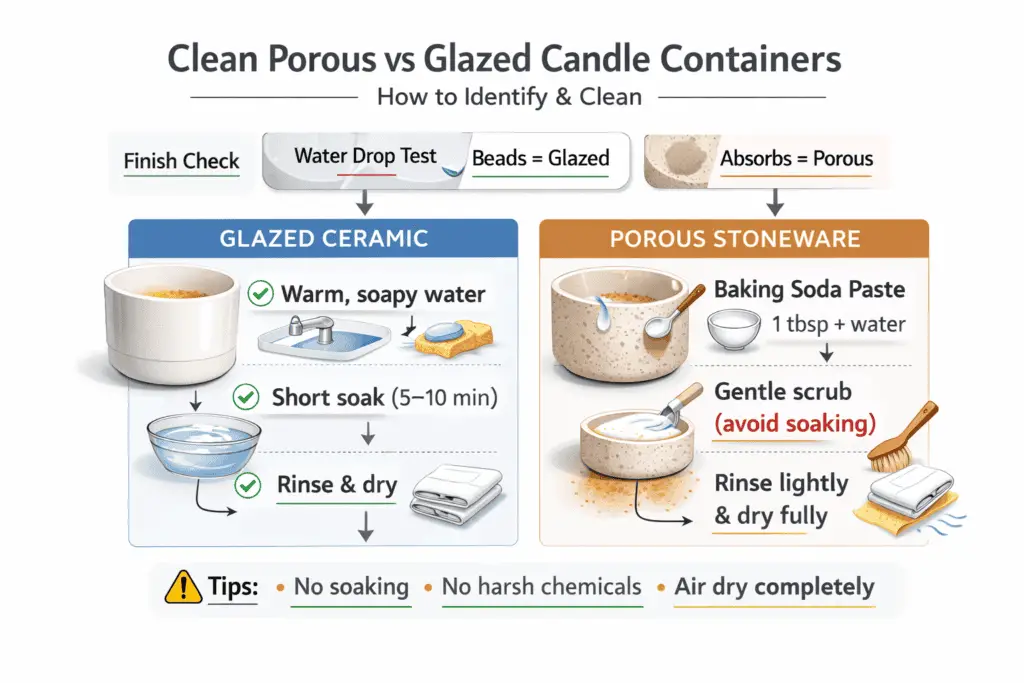
Before you start, do a quick inspection and toss anything with chips or hairline cracks. The whole difference comes down to absorption: glaze behaves like glass, but unglazed clay can wick in fragrance oil and moisture, which is why “more soaking” often makes ceramic smellier, not cleaner.
A quick finish check:
- Put one drop of water on the inside wall.
- If it beads and sits there, treat it as glazed.
- If it darkens the clay and soaks in quickly, treat it as porous/unglazed.
Cleaning steps by finish:
- Glazed ceramic (smooth, shiny, sealed)
- Warm soapy wash with a microfiber cloth or soft sponge.
- Short warm-water rinse.
- Towel-dry, then air-dry with the opening down for a few minutes to clear the rim.
- Warm soapy wash with a microfiber cloth or soft sponge.
- Porous/unglazed stoneware (matte, chalky, absorbent)
- Mix a baking-soda paste (thick like toothpaste) and apply only where film or stains sit.
- Let it sit briefly, then scrub lightly with a soft brush; avoid flooding the surface.
- Wipe off with a barely damp cloth, then do a quick rinse (or wipe-rinse) and blot dry.
- Mix a baking-soda paste (thick like toothpaste) and apply only where film or stains sit.
Odor carryover tip: if a porous jar still holds scent after cleaning, it often traces back to heavy soot or fragrance buildup during burning, so prevention matters upstream. And if you’re not sure what you’re dealing with—glaze, coating, metal lid insert, or mixed materials—start by checking the broader types of candle containers so you do not trap stains or smells with the wrong approach.
Remove labels & sticky residue (oil vs citrus vs alcohol — which to use)
Peel the label slowly first, then remove leftover glue with the mildest option that works (oil → citrus → alcohol), using short dwell times and a final soap rinse.
Start by checking the container for coatings, paint, or delicate finishes. Most label glue is a PSA (pressure-sensitive adhesive), which softens with time and the right solvent—so controlled application beats flooding every time.
Do this in order (mechanical → mildest solvent → rinse):
- Warm the label slightly (warm hands or a warm room), then peel slowly at a low angle to keep paper from shredding.
- If glue remains, choose your remover based on the surface and how delicate it is (start mild).
- Apply a small amount to a cloth (not directly onto seams), let it sit briefly, then wipe—repeat once if needed.
- Wash with dish soap and warm water to remove solvent/oil film, then dry fully so the exterior doesn’t feel slick or haze over.
Mini chooser (start with the mildest):
| Option | Best on | Typical use | Main caution |
| Oil (cooking oil/mineral oil) | Glass, most plain metals | Brief wipe-and-lift | Can leave an oily film—soap rinse matters |
| Citrus remover | Glass, many plastics/labels | Very short test-spot dwell | Can dull some coatings—test first |
| Isopropyl alcohol | Glass, some metals | Fast final cleanup | May affect paints/coatings—avoid on coated tins |
Follow the dwell time and safety notes on the product label and Supplier SDS for whatever you’re using; ventilate well and don’t mix products. Once the surface is clean and fully de-greased, new labels and wick stickers bond more evenly instead of lifting on leftover oil.
Test-spot protocol (fast, low-risk):
- Pick a hidden spot (bottom edge or inside rim).
- Apply remover to a cloth, rub for a few seconds, then wipe and wait briefly.
- If you see dulling, tacky residue, or color transfer, stop and switch to a milder option.
Stop rules (switch to a milder method or stop entirely)
- Clouding, dulling, or softening of a coating/paint.
- Color transfer onto your cloth.
- A sticky “rubber” feel that spreads instead of lifting.
- Strong solvent smell that lingers after soap-and-water rinse.
Before refilling a cleaned container
For this page, the main job is cleaning, not full refill prep. Once the container is fully de-greased, fully dry, and free of lint, move to prepare candle containers for the wick-placement and pre-pour steps that belong to a refill workflow.
Do not reuse a container for refills if…
- There are chips, cracks, or a loose base.
- The rim is sharp, warped, or shows heat stress.
- Odor remains strong after cleaning + a full deodorizing cycle.
- Rust is visible on a tin (especially near seams or the base edge).
Dispose of leftover wax, wick tabs & labels responsibly (don’t clog drains)
Let wax solidify, throw it away as solid waste unless local rules say otherwise, separate metal tabs when accepted, and keep wax, solvents, and oily residue out of sinks and storm drains.
Start by checking the container itself so you don’t handle cracked glass or sharp-edged tins while you’re sorting waste. Disposal rules vary by city, but the safest default is still simple: prevent drain clogs, keep oily residue out of wastewater, and keep contaminated jars out of recycling until they are truly clean and dry.
These steps keep it simple and drain-safe:
- Let leftover wax cool and harden, then lift it out as a solid puck and bag it for trash unless your local program has a specific option.
- Pull out the metal wick tab and place it with metal recycling only if your local recycler accepts small metal pieces; otherwise, bag it and trash it.
- Peel labels and scrape off sticky residue before putting a jar in recycling, and rinse only after the oily film is wiped out first.
- Put solvent- or oil-soaked towels somewhere well ventilated and away from heat until they are fully dry, then dispose of them according to your local household rules.
Common questions that trip people up:
- “Can I recycle a jar with a thin wax film?” Many programs treat residue as contamination, so aim for clean, dry glass.
- “Are metal wick tabs accepted curbside?” Some are, some aren’t—small items can fall through sorting equipment, so check local guidance.
- “Can I compost wax?” Many candles include fragrance, dyes, and blends, so trash is usually the safer default unless a facility explicitly says yes.