
Candle wax comes off wood most safely when you match the method to the surface: finished wood usually needs cold-lift plus light residue cleanup, while unfinished wood needs gentler extraction that avoids pushing wax deeper into grain.
The safest way to remove candle wax from wood is to identify whether the surface is finished or unfinished first, then choose a lift, blot, or residue-cleanup method that matches that surface. Here, safest means least likely to scratch a finish, soften a coating, or push wax deeper into raw grain. A wood finish is a protective coating, oil, wax, varnish, lacquer, or seal that changes whether spilled wax stays above the fibers or reaches them.
Finished wood has a coating or seal still present, while unfinished wood is raw, porous wood where softened wax can sink into the grain. This guide handles wax residue, the waxy film left after bulk wax is removed, but not soot, scorch marks, laminate or vinyl surfaces, dye repair after color transfer, or full refinishing.
Use this quick selector before choosing a method: if wax sits on a sealed surface, harden and lift it first; if wax sits in raw grain or a worn-through finish area, blot instead of rubbing; if the finish is uncertain, start with cold hardening and a flat plastic edge only.
What “Finished” and “Unfinished” Wood Mean for Candle Wax Removal
Finished wood is sealed or coated wood; unfinished wood is raw, porous wood, so candle wax behaves differently on each surface.
A finish usually keeps spilled wax above the grain, which makes surface-safe lifting the first move. Raw wood can absorb softened wax, so the cleanup path must avoid spreading heat, oil, or colored residue deeper into the fibers.
Use visible clues before choosing a method. A glossy or satin surface, a smooth coated feel, or water beading in a hidden test spot usually points to finished wood. Exposed end grain, a dry rough feel, fast darkening from a tiny hidden water drop, or no coating at worn edges points toward unfinished wood.
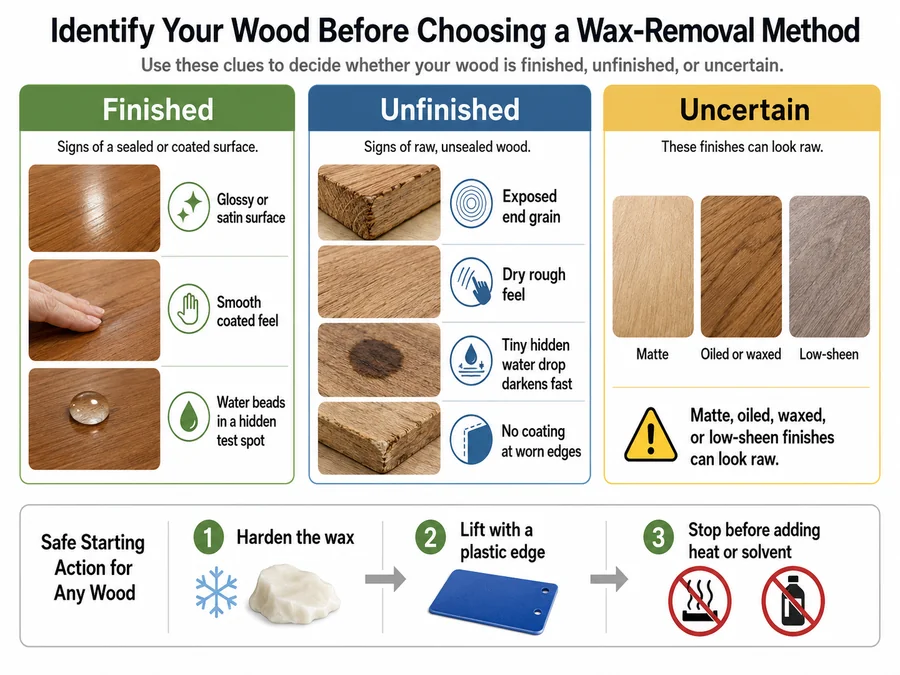
Matte or worn-looking wood is not automatically unfinished. Oiled, waxed, or low-sheen finishes can look raw while still changing how candle wax sits on the surface.
When you cannot tell the finish type, begin with the least aggressive move: harden the wax, lift it with a plastic edge, and stop before adding heat or solvent. That protects finished surfaces from dulling and keeps unfinished surfaces from pulling melted wax deeper into the grain.
Finished Wood vs Unfinished Wood: Which Wax-Removal Method Fits Each Surface
Use a lift-first path on finished wood and a slower extraction path on unfinished wood.
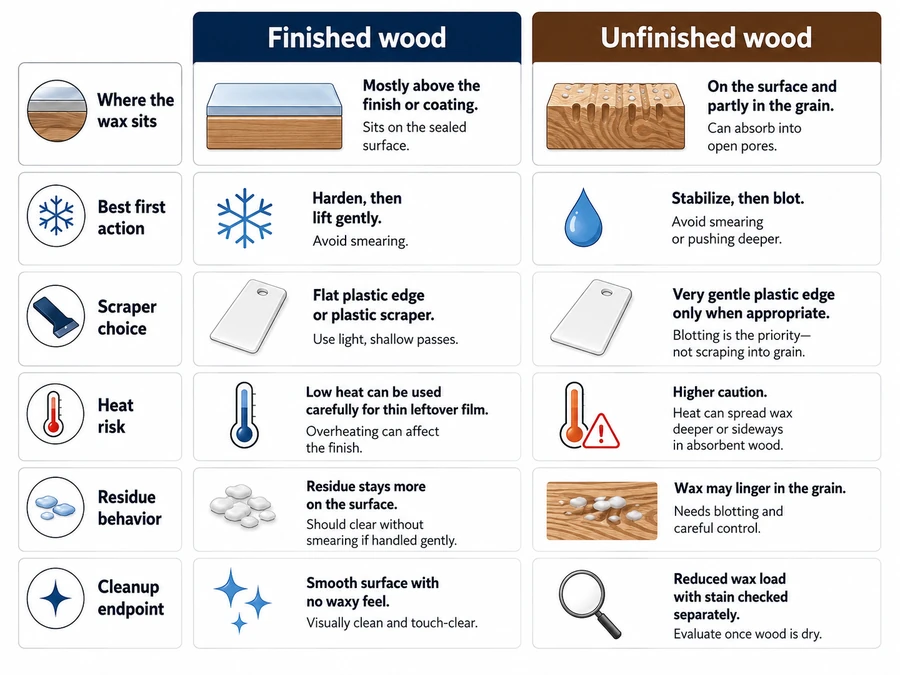
Finished wood usually keeps wax on the surface, so cold-hardening and controlled lifting are safer first steps. Unfinished wood lets softened wax move into pores, so the method must pull residue upward instead of wiping it sideways.
| Decision point | Finished wood | Unfinished wood |
|---|---|---|
| Where the wax sits | Mostly above the finish | On the surface and partly in the grain |
| Best first action | Harden, then lift gently | Stabilize, blot, and avoid smearing |
| Scraper choice | Plastic card or plastic scraper | Plastic edge only if wax is raised |
| Heat risk | Can help with thin film if controlled | Can drive wax deeper if used too soon |
| Residue behavior | Often becomes a surface film | Can reappear from pores or seams |
| Cleanup endpoint | Smooth surface with no waxy feel | Reduced wax load, with stain checked separately |
One successful method on sealed wood can be the wrong method on raw wood. Scraping a finished tabletop may lift a brittle wax patch cleanly, but the same force on raw wood can grind softened wax into open grain.
Leftover color is not the same as wax residue. If the wax is gone but a red, blue, or oily-looking mark remains, treat that as a dye or penetration problem, not as more wax to scrape. Soot and scorch marks also need a separate cleanup path because they are smoke or heat damage, not candle wax sitting on wood.
The choice is not the “best overall” method. The correct method is the one that removes candle wax while protecting the finish on sealed wood or limiting absorption on raw wood.
Steps to Remove Candle Wax from Wood Without Damaging the Surface
Remove candle wax from wood by hardening raised wax first, lifting it gently, then treating the remaining film according to whether the wood is finished or unfinished.
Start with the lowest-risk action because force, heat, and solvent can damage a finish or push wax into raw grain. The goal is to separate the wax from the wood, not scrape the surface clean by pressure.
- Let the wax harden fully.
Do not wipe hot wax. Wiping spreads it into a thinner film and can press pigment into unfinished grain. - Chill raised wax if needed.
Hold ice in a sealed plastic bag over the wax for a few minutes. Keep water off the wood, especially if the surface is raw or worn. - Lift the brittle wax with a plastic edge.
Use a plastic card, plastic scraper, or fingernail. Keep the edge nearly flat so it slides under the wax instead of cutting into the wood. - Wipe finished wood with a barely damp cloth.
On sealed wood, a mild cloth wipe can remove loose flakes and surface film. Dry the area right away. - Use low heat only for thin leftover film.
A hair dryer on low can soften a wax haze on finished wood. Blot with plain white paper or a clean cloth as the wax softens. - Use blotting, not rubbing, on unfinished wood.
For raw wood, place plain absorbent paper over the waxy spot and apply brief, low warmth only if the wax is near the surface. Lift and replace the paper as it picks up wax. - Stop when the texture changes from waxy to dry.
More scraping after that point increases the chance of dulling a finish or roughening raw wood.
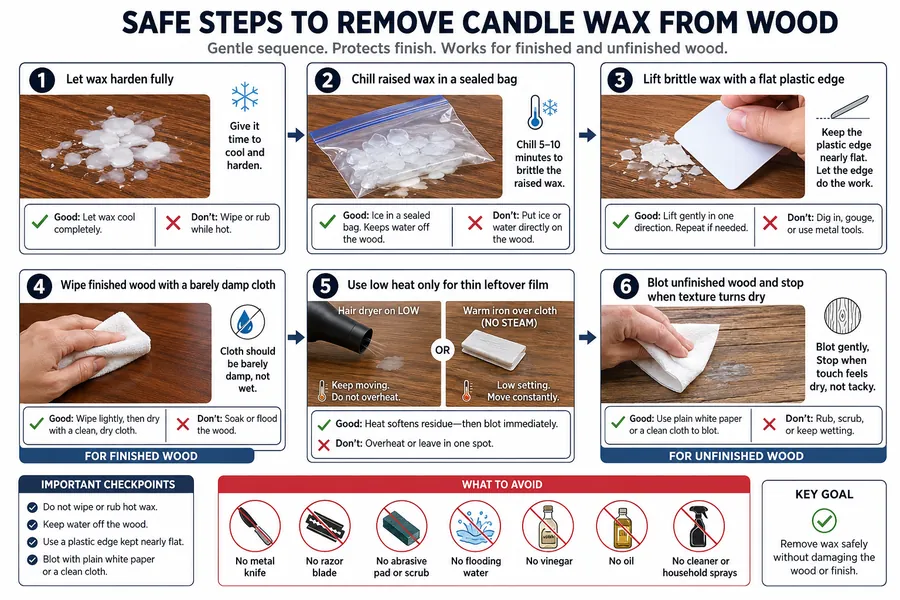
Do not use a metal knife, razor blade, or abrasive pad as the first tool. Those can leave cuts on finished wood and torn fibers on unfinished wood.
Solvent should be a last small-area cleanup step, not the main wax-removal method. If a product is safe for the finish according to its label, test it in a hidden spot first, then dab the waxy film lightly instead of soaking the area.
For unfinished wood, avoid flooding the surface with water, vinegar, oil, or cleaner. Raw grain can absorb liquid unevenly, which can leave a larger mark than the wax spill.
How to Tell Wax Residue from a Dye Stain or Finish Damage
Wax residue feels slick or leaves a cloudy film; dye stain changes color, while finish damage changes sheen, texture, or coating integrity.
These problems can look similar after candle wax is removed, but they need different fixes. Wax residue is remaining wax on or near the surface. A dye stain is color left by candle pigment. Finish damage is harm to the coating, such as dulling, softening, whitening, or scratches.
| What you see or feel | Most likely issue | What it means | Next safe move |
|---|---|---|---|
| Slick feel after wax is lifted | Wax residue | Thin wax film remains | Blot or dab gently |
| Cloudy patch on finished wood | Wax film or finish dulling | Surface needs careful check | Wipe lightly, then stop if sheen changes |
| Red, blue, or dark color remains | Dye stain | Pigment may have entered finish or grain | Do not keep scraping |
| Rough fibers on raw wood | Surface abrasion or raised grain | Wood has been disturbed | Stop cleanup and assess repair |
| Shiny or dull halo | Finish change | Coating may be affected | Avoid stronger products |
| Mark reappears after warming | Wax in pores or seams | Wax is still emerging | Blot again with light warmth |
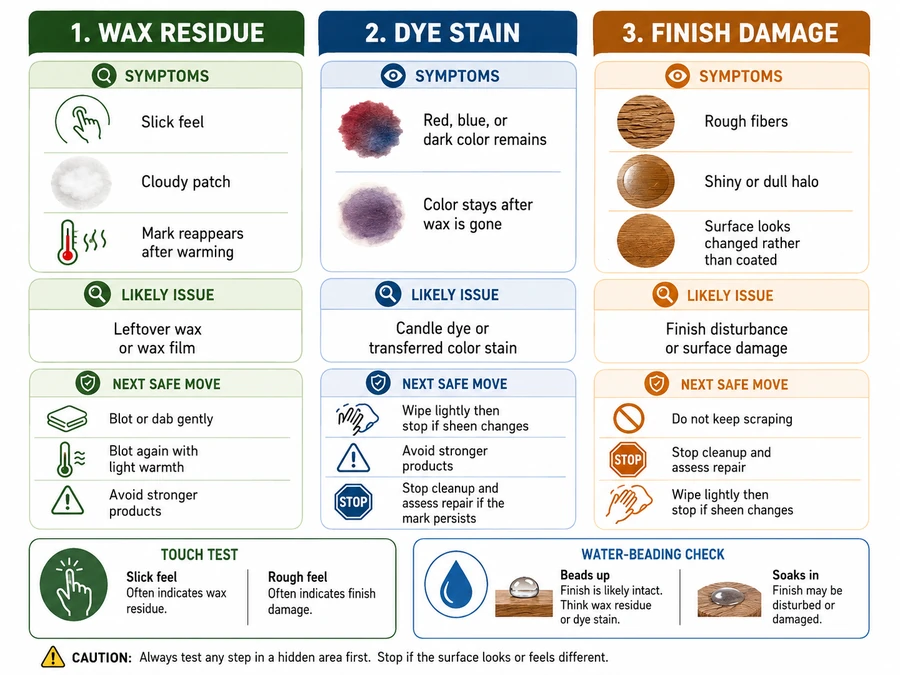
A quick touch test helps separate residue from staining. If the spot feels greasy, slippery, or transfers to paper under gentle warmth, wax is still present. If the surface feels dry but color remains, the wax may be gone and the remaining issue is pigment.
A water-beading check can help on unfinished wood after the surface is dry. If water beads only on the spot while nearby raw wood absorbs it, wax may still be sealing the grain. Use only a tiny hidden or edge test because raw wood can darken from moisture.
Do not chase a dye stain with harder scraping. Once pigment sits below the surface or inside raw grain, scraping more wax will not solve the color mark and may create a larger repair area.
On finished wood, watch the sheen more than the color alone. A dull spot, softened coating, or scratch pattern points toward finish disturbance, so the safest next step is to stop removal and move into touch-up or refinishing decisions.
Why Candle Wax Gets Trapped in Wood Grain, Seams, and Joints
Candle wax gets trapped in wood when heat softens it enough to enter open grain, seams, cracks, or gaps between boards.
Finished wood blocks much of that movement because the coating sits between the wax and the fibers. Unfinished wood has open pores, so softened wax can settle below the surface instead of staying as a removable layer.
Wood grain is the visible fiber pattern in wood, and those fibers can hold wax like tiny channels. Seams are narrow gaps between boards, joints, or joined wood pieces where melted wax can collect before hardening.
Wax usually gets trapped in four places:
- Open grain on raw wood
Unfinished oak, pine, and similar porous woods can hold wax below the top surface. - End grain at board edges
End grain absorbs faster because the cut fiber ends are exposed. - Table joints and board gaps
Melted wax can run into seams, then harden where a scraper cannot reach. - Carved, grooved, or textured areas
Raised details can hold thin films even after the main wax patch is gone.
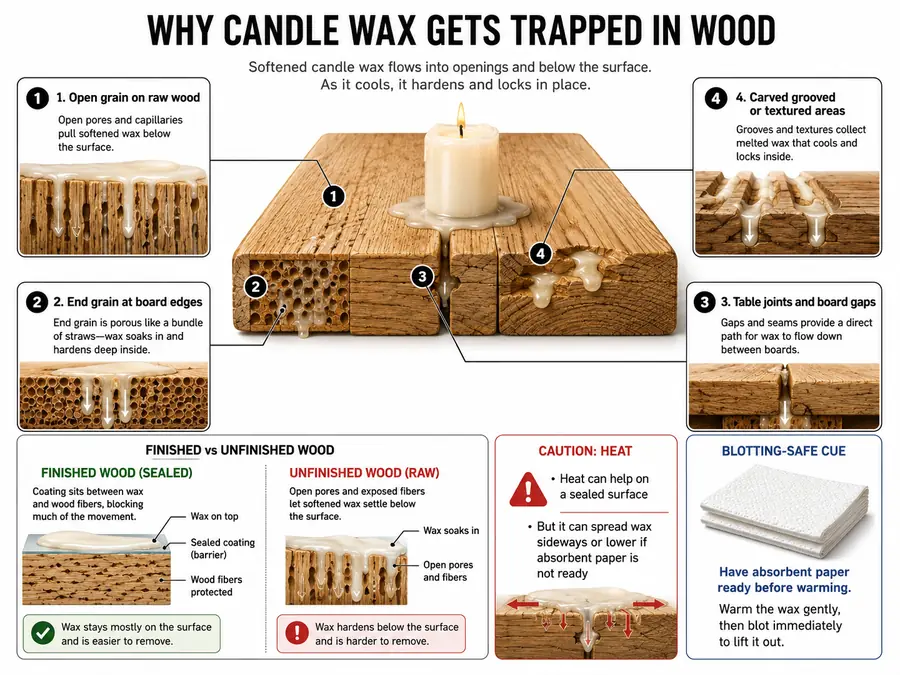
Heat can help on a sealed surface, but it becomes riskier when wax has reached raw grain. If the wax melts before absorbent paper is ready, it can spread sideways and sink lower.
The sign of trapped wax is a spot that looks clean at first, then turns slick, shiny, or darker again after mild warmth. That means wax is still moving out of pores or seams, so blotting is safer than scraping harder.
Plastic Scraper vs Heat vs Solvent: Which Option Is Lowest Risk on Wood
A plastic scraper is lowest risk for raised wax; low heat fits thin residue; solvent is only for small, spot-tested residue on compatible finishes.
Each option solves a different wax problem. Scraping removes hardened bulk wax, heat softens thin film, and solvent may loosen residue, but the wrong order can scratch wood, dull a finish, or spread wax deeper.
| Option | Best for | Use on finished wood | Use on unfinished wood | Main risk |
|---|---|---|---|---|
| Plastic scraper or card | Raised, hardened wax | Usually the safest first tool | Only if wax sits above the grain | Gouging if the edge is steep |
| Ice in sealed bag | Thick wax that needs hardening | Useful before lifting | Useful, but keep water off raw wood | Moisture marks |
| Hair dryer on low | Thin wax film | Useful with blotting | Use cautiously and briefly | Softening finish or spreading wax |
| Warm iron over paper | Wax near the surface | Riskier than a hair dryer | Only with great care | Too much heat or pressure |
| Mild cleaner | Light surface film | Only if finish-safe | Usually not a first choice | Moisture or cleaner absorption |
| Solvent | Stubborn waxy residue | Spot test first | Avoid unless repair is planned | Finish damage or darkening |
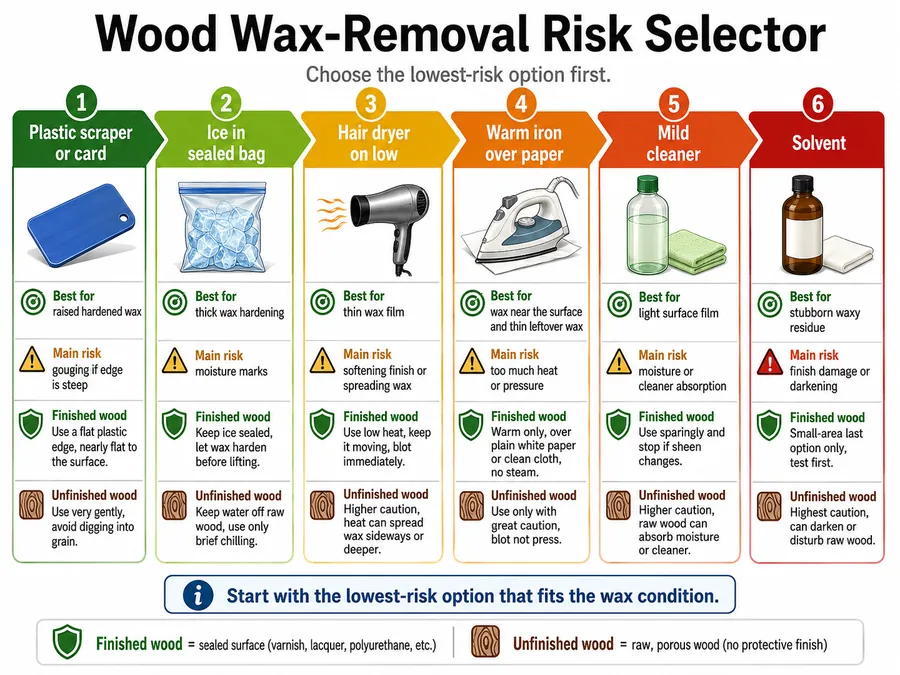
Solvent means a liquid that can loosen wax, oil, or residue. It should never be the first step on wood because many finishes react badly, and raw wood can absorb it unevenly.
The order matters more than the product name. Start dry, move gently, and stop once the wax no longer transfers. A second pass with a low-risk method is better than one harsh pass that removes finish along with wax.
For finished wood, the best sequence is usually harden, lift, wipe, then use mild warmth only on film. For unfinished wood, the better sequence is stabilize, lift what sits above the grain, then blot with absorbent paper if wax remains near the surface.
Avoid metal blades unless a restoration professional is handling the piece. They can remove wax, but they can also cut the finish or shave wood fibers, which turns a wax spill into a repair job.
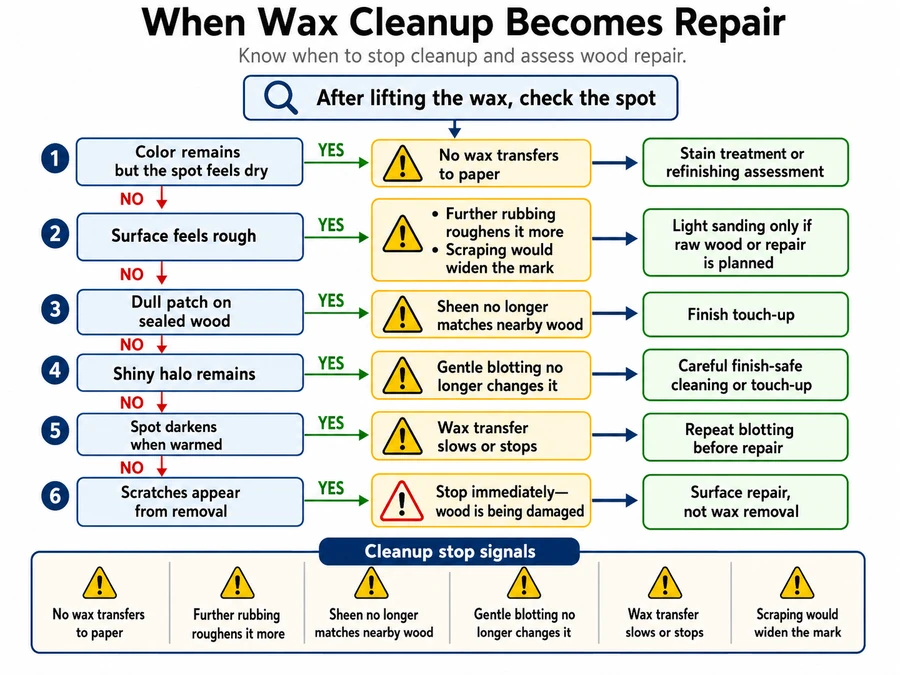
When Candle Wax Cleanup Turns into Sanding, Touch-Up, or Refinishing
Candle wax cleanup turns into repair when the wax is gone but color, roughness, dullness, or coating damage remains on the wood.
At that point, more scraping or heat will not remove the real problem. The remaining mark is usually pigment in the grain, disturbed finish, raised fibers, or a coating change rather than candle wax sitting on the surface.
| After cleanup, you notice | What it likely means | Cleanup should stop when | Repair direction |
|---|---|---|---|
| Color remains but the spot feels dry | Dye stain or oil penetration | No wax transfers to paper | Stain treatment or refinishing assessment |
| The surface feels rough | Raised or scraped fibers | Further rubbing roughens it more | Light sanding only if the wood is raw or repair is planned |
| A dull patch appears on sealed wood | Finish has changed | The sheen no longer matches nearby wood | Finish touch-up |
| A shiny halo remains | Thin wax or polished residue may still sit on top | Gentle blotting no longer changes it | Careful finish-safe cleaning or touch-up |
| The spot darkens when warmed | Wax may still be in pores | Wax transfer slows or stops | Repeat blotting before repair |
| Scratches appear from removal | Tool damage | Scraping would widen the mark | Surface repair, not wax removal |
Touch-up means a small surface correction to restore color, sheen, or coating appearance. Refinishing means removing or rebuilding a larger finish layer, which belongs outside basic candle wax cleanup.
On finished wood, do not sand unless you are prepared to repair the coating afterward. Sandpaper removes more than wax; it can cut through varnish, lacquer, stain, or a factory finish and leave a larger visible patch.
On unfinished wood, light sanding may be reasonable only after the wax has stopped transferring and the remaining problem is raised grain or shallow discoloration. Sanding too early can grind wax into pores and make the stain wider.
Colored candle wax creates the most common escalation point. If red, blue, green, or dark dye remains after the wax film is gone, treat the mark as pigment transfer rather than leftover wax.
The safe endpoint is a surface that no longer feels waxy, no longer transfers residue, and has been checked for color or sheen change. If the wood still looks marked after that, the job has moved from wax removal into wood repair.