To remove candle wax from clothes, lift the visible wax first, treat leftover oily or dyed residue second, then wash and inspect the garment before heat drying.
Candle wax on clothing fabric means hardened or semi-soft wax on wearable garments, not soot, scorch marks, upholstery, or household surfaces. This guide is for washable-clothing cleanup where the goal is to remove wax without spreading residue, damaging fabric, or setting a stain.
Work in order: loosen or lift the visible wax, choose fabric-safe heat or no-heat handling, treat leftover residue, then wash and inspect before drying.
Remove the Visible Wax Layer First
Remove candle wax from clothes by firming up the wax, lifting the brittle layer with a dull edge, then absorbing remaining wax through a clean barrier if the care label allows heat.
Visible candle wax is the solid layer sitting on the garment. Treat that layer before using detergent, because wet cleaning can spread softened wax into the fabric instead of lifting it away.
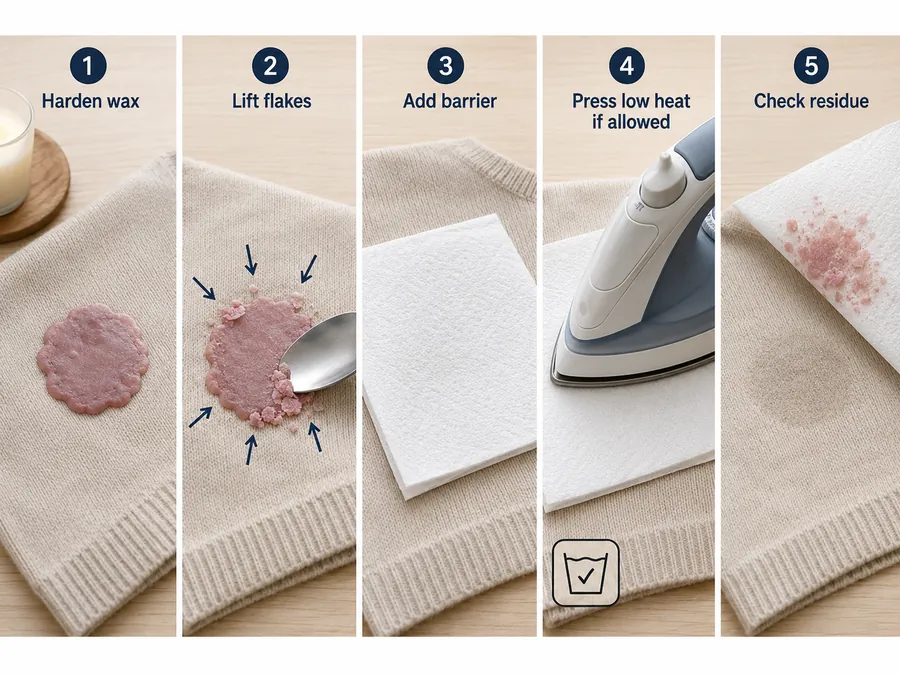
Image placeholder: Original photo series showing hardened wax before scraping, lifted wax flakes, absorbent paper after pressing, and the garment after residue treatment.
Start by checking the garment care label. The label gives the safest limit for washing, drying, ironing, or dry cleaning that garment.
Before starting, gather a dull knife, spoon edge, or card; plain white absorbent paper or cloth; liquid laundry detergent or a fabric-safe stain remover; and the garment care label.
Use this sequence for washable clothes that can tolerate the method:
- Let the wax harden.
- Place the stained area flat.
- Lift loose wax with a dull knife, spoon edge, or card.
- Work from the outside of the wax patch toward the center.
- Shake or brush away flakes before adding heat or detergent.
- If the care label allows ironing, place absorbent paper or a plain cloth over the wax area and press briefly on low heat.
- Move to a clean part of the absorbent layer as wax transfers.
If an iron is not allowed or available, do not force the heat step. A hair dryer on the lowest setting can be used only when the care label allows gentle warmth, and the wax must be blotted into a clean absorbent layer as it softens.
The goal is removal, not force. Scraping too hard can roughen fibers, while rubbing softened wax can push oil and dye deeper into the garment.
Do not pour hot water onto the wax layer. Heat can help only when it is controlled, buffered by absorbent material, and allowed by the fabric label.
Fresh Wax vs Hardened Wax
Fresh wax should be cooled before removal; hardened wax can be lifted first because it breaks away from fabric more cleanly than soft, smeared wax.
Fresh candle wax is still warm, soft, or shiny. Hardened wax feels firm, raised, or brittle. The state changes the first action.
For fresh wax, do not rub it. Blot any loose liquid at the edge with a plain white cloth, then let the wax set. A wrapped ice pack can help firm the wax, but keep moisture controlled so dye and fragrance oils do not spread.
For hardened wax, start with lifting. Bend the fabric slightly to crack the wax layer, then use a dull edge to remove loose pieces. Stop when the raised wax is gone and only a flat mark remains.
That flat mark is no longer mainly solid wax. It is usually leftover oil, dye, or fragrance residue, so it needs stain treatment rather than more scraping.
Choose the Right Method for the Fabric
Choose the wax-removal method by fabric tolerance: washable cotton can often handle careful low heat, while synthetics, wool, silk, embellished, and dry-clean-only garments need lower-risk handling.
Fabric type controls the cleanup method because wax removal often uses pressure, friction, or heat. The safer method is the one that removes wax without shrinking, melting, scorching, or damaging the finish.
Check the care label before using an iron, dryer, hot water, stain remover, or machine wash.
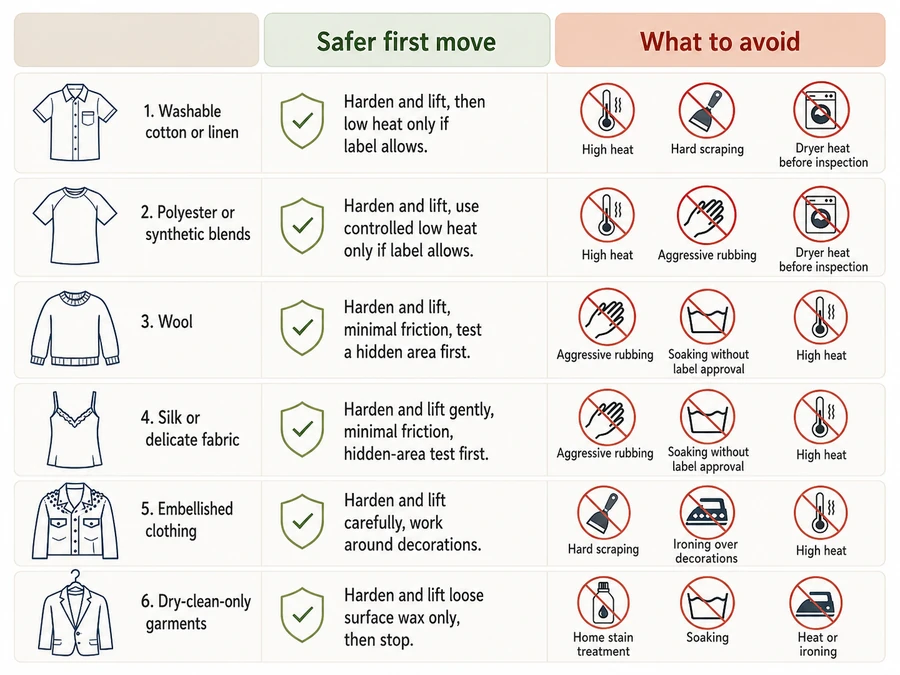
| Garment type | Safer first move | What to avoid |
|---|---|---|
| Washable cotton or linen | Harden, scrape gently, then use low controlled heat if the label allows ironing | High heat, hard scraping, dryer before inspection |
| Polyester or synthetic blends | Harden and lift; use very cautious warmth only if the label allows it | Hot iron contact, dryer heat, aggressive rubbing |
| Wool | Harden and lift with minimal friction; follow the care label closely | Heavy scraping, hot water, normal wash agitation |
| Silk or delicate fabric | Lift only loose wax; test any cleaner on a hidden area | Heat pressing, rubbing, soaking without label approval |
| Embellished clothing | Work around beads, sequins, prints, or glued trims | Ironing over decorations or scraping across raised details |
| Dry-clean-only garments | Remove only loose surface wax, then stop | Home stain treatment, soaking, machine washing |
When the Standard Method Is Too Risky
The standard wax-removal method is too risky when the garment cannot tolerate heat, moisture, friction, or home stain treatment.
A dry-clean-only label, delicate weave, glued trim, special finish, leather detail, suede panel, beadwork, or unstable dye changes the answer. In those cases, remove only loose hardened wax from the surface and avoid pushing the stain deeper.
Use a spoon edge or card only where the fabric can support light pressure. If the garment puckers, sheds fibers, changes color, or shows a shiny patch, stop the home method.
A professional cleaner is the safer route when wax sits on silk, wool tailoring, formalwear, embellished clothing, or anything with a care label that rules out washing or ironing. The outcome is damage prevention, not faster cleanup.
Tell the cleaner that the mark is candle wax and whether the candle was colored or scented, because dye and fragrance residue may need separate treatment.
Treat the Residue Left After the Wax Is Gone
Treat leftover candle wax residue as a stain after the raised wax is removed, because detergent works on the oily or dyed mark better than on solid wax.
Wax removal has two parts. The raised wax layer is the first problem; the flat mark left behind is the second. That mark may contain oil, dye, fragrance compounds, or fine wax residue held in the fabric.
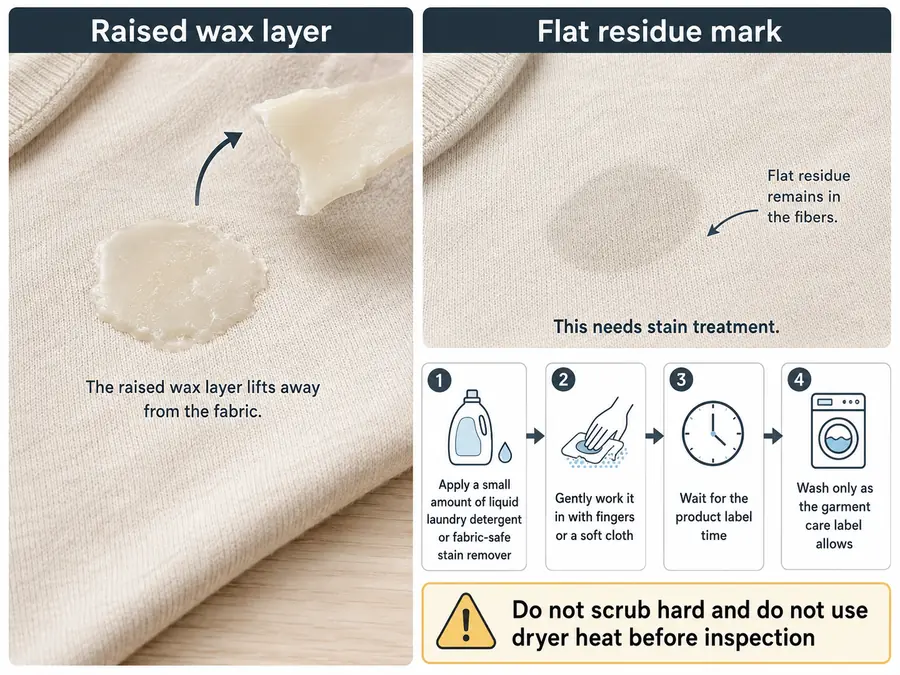
Apply a small amount of liquid laundry detergent or a fabric-safe stain remover to the flat residue mark. Work it in gently with your fingers or a soft cloth, then let it sit for the product’s label time. Do not scrub hard, because friction can damage fibers and spread dye.
Use cold or warm water only when the garment label allows it. Hot water is not automatically better, especially on synthetics, wool, silk, or dyed garments.
If the stain lightens but remains visible, repeat the stain-treatment step before washing again. Repeating controlled treatment is safer than moving the garment into the dryer too early.
If the Wax Leaves Color or Oily Fragrance Residue
Colored or scented candle wax can leave dye and oil residue, so remove the wax layer first, then treat the remaining mark before drying.
Colored wax adds pigment risk. Scented wax can add oily residue from fragrance load. Both can stay behind after the hardened wax flakes are gone.
Use a color-safe stain remover or liquid detergent on washable garments. Test first on a hidden seam when the fabric is delicate, dark, bright, or unfamiliar. If the test area changes color, feels rough, or looks shiny, stop home treatment.
For white washable cotton, oxygen-based stain treatment may help if the garment label allows it. Do not use chlorine bleach unless the care label and product label both allow it, because bleach can weaken fibers or change dye.
Do not judge success while the fabric is wet. Wet fabric can hide faint residue, so inspect the garment again after washing and air drying.
Wash, Inspect, and Dry the Garment Safely
Wash the garment only after the wax layer is lifted and the residue is pretreated, then air dry until you confirm the stain is gone.
The final wash removes loosened detergent, residue, and any remaining small particles. It should not be the first step, because a washer can spread wax flakes or leave oily residue across the fabric.
Washing alone is not the first wax-removal method because solid wax should be lifted or absorbed before the garment goes into the machine.
Wash according to the garment care label. Use the normal detergent amount for the load size, and keep the wax-marked area visible enough to inspect afterward.
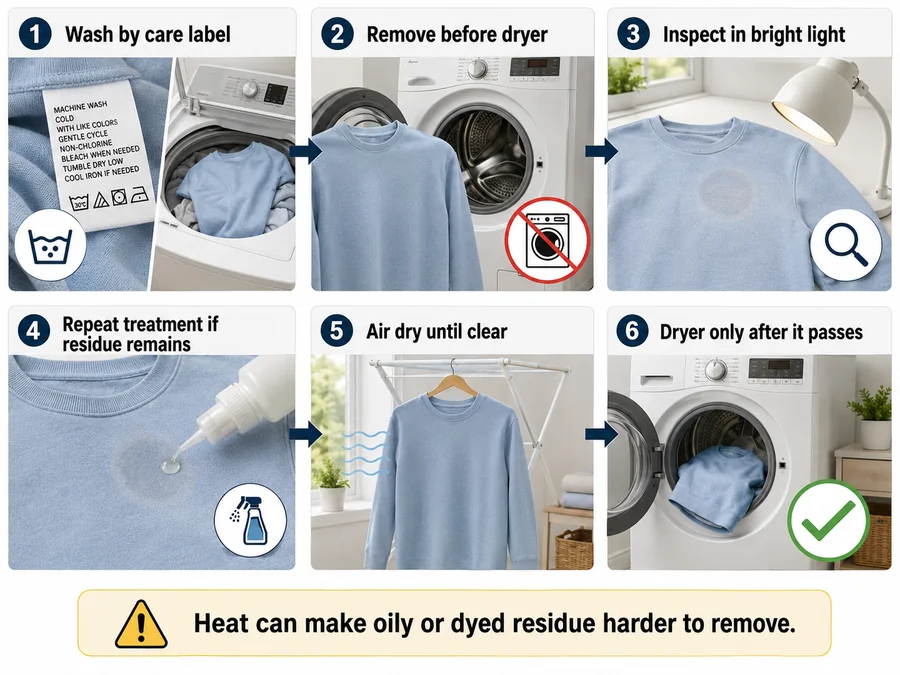
After washing, check the garment in good light before using a dryer or iron. Heat can set leftover oily or dyed residue, making the mark harder to remove.
Use this dry-check loop:
- Wash according to the care label.
- Remove the garment before machine drying.
- Inspect the former wax area in bright light.
- If residue remains, repeat stain treatment.
- Air dry until the mark is gone.
- Use dryer heat only after the garment passes inspection.
Common Mistakes That Make the Cleanup Worse
The main mistakes are rubbing soft wax, washing before lifting wax, using uncontrolled heat, and drying the garment before checking for residue.
Avoid rubbing fresh wax. Rubbing spreads soft wax and pushes it between fibers.
Avoid scraping with a sharp blade. A dull edge lifts wax with less risk of cutting, fuzzing, or weakening the fabric.
Avoid skipping the care label. The label controls whether heat, washing, stain treatment, or dry cleaning is safe for that garment.
Avoid dryer heat until the mark is gone. A faint oily or dyed residue can become much harder to remove after heat exposure.
Avoid expanding the method to carpets, upholstery, walls, wood, or glass. Those surfaces need different removal steps because they are not wearable clothing fabric.