Wood wicks are flat wooden strips used in container candles to create a wider flame and crackle, but they require careful sizing, priming, and burn testing to keep soot and heat within safe limits.
This beginner guide explains what wood wicks are, when they make sense, and how to route the main decisions. Use dedicated sizing, priming, troubleshooting, crackle, supplier, and safety pages when you need exact instructions.
Like cotton wicks, wood wicks feed melted wax to the flame. The difference is their flat wooden structure, wider flame shape, and crackling sound.
Complete here means a full beginner overview, not a full sizing chart, troubleshooting guide, legal compliance guide, or supplier ranking. Safe means a controlled flame, limited soot or smoke, suitable vessel heat behavior, and basic warning-label awareness; market-specific legal compliance belongs in a safety and compliance guide.
Wood wicks can make a candle feel more alive, with a wider flame and a soft crackle. They can also be picky: the wrong setup leads to tunneling, weak scent, or a jar that turns black around the rim. Good results come from matching wick size to your container and wax, then adjusting fragrance and burn habits based on what you observe. Once you run a few consistent burn tests, wood wicks stop being a mystery and start behaving like a repeatable process.
Wood wicks vs cotton wicks: when does wood make sense?
Wood wicks are flat wooden strips that create a crackling flame, while cotton wicks are braided fibers that burn more quietly and are easier to wick.
Choose wood for ambiance. Choose cotton for easier, more forgiving tuning.
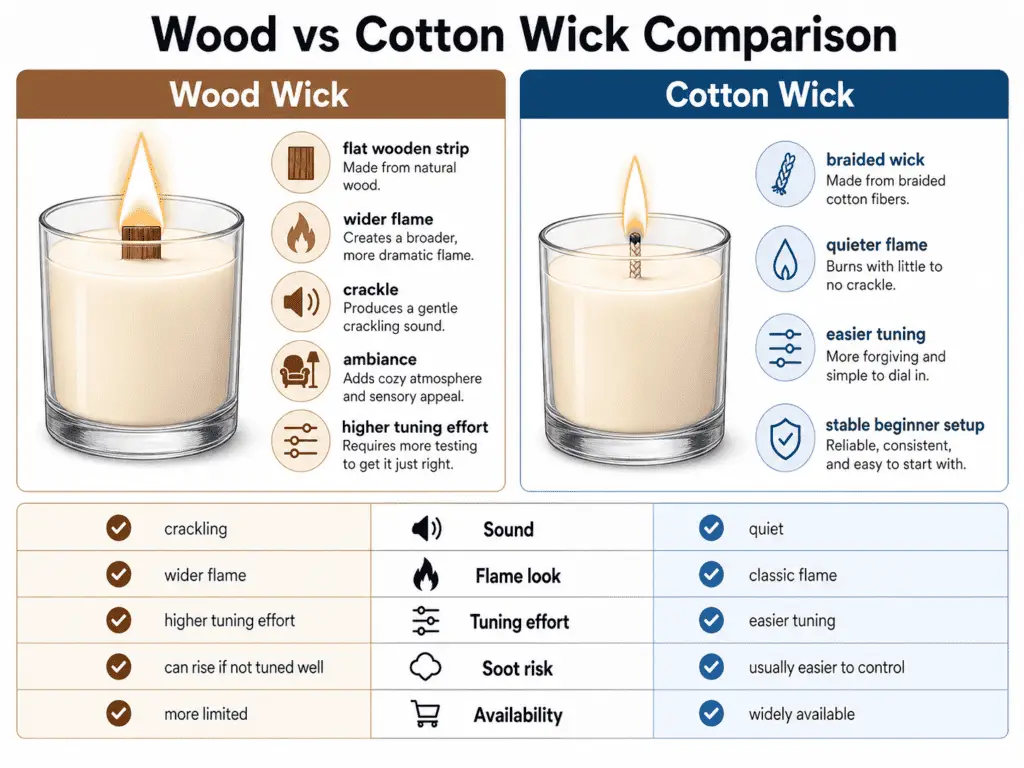
Wood vs cotton: quick reality check based on like-for-like test setups
| Factor | Wood wicks, typical | Cotton wicks, typical |
|---|---|---|
| Sound | Can crackle depending on wick style, jar acoustics, and burn conditions | Silent |
| Flame look | Often wider, fireplace-style vibe | Usually narrower and steadier |
| Tuning effort | Often requires more trial and error to avoid tunneling or soot | Usually easier to dial in |
| Soot risk | Can be clean when sized and trimmed correctly, but can soot when oversized or under-trimmed | Can also soot, but many makers find it easier to keep stable |
| Availability and cost | Sometimes fewer local options. Pricing varies by format and supplier | Widely available, with many established series |
Keep this comparison as a starting point. Use a dedicated cotton-vs-wood wick comparison when the main decision is wick family, then confirm the final choice with like-for-like burn tests in the same jar, wax, and fragrance setup.
Types of wood wicks: single, booster, spiral, and cross
The main types of wood wicks are single-ply strips, booster wicks, spiral wicks, and cross or X-shaped wicks. Each type suits different jars and burn goals.
Pick a style first, then size it with testing for your jar.

Visual type: atlas grid
Purpose: Help beginners identify wood wick formats and choose a practical starting type for testing.
Methods: Type definitions follow common manufacturer naming conventions, including single, adhered, booster, and specialty shapes. Treat “best for” notes as starting hypotheses, then confirm with burn tests in your exact vessel and wax.
Data provenance: Supplier documentation and aggregated maker troubleshooting patterns.
A good way to think about wick families and formats is this: shape plus construction creates a baseline behavior, then your jar, wax, and fragrance decide whether that baseline works.
Single-ply is the simplest starting point. Booster adds more heat potential. Spiral and cross styles are often chosen for visual drama or broader melt-pool coverage, but they still need careful sizing.
Wood-wick format atlas: brand-neutral starting map
| Wick type | What it is | When it is a good starting choice | Common gotchas |
|---|---|---|---|
| Single-ply strip | One flat strip of wood | Baseline testing, smaller-to-medium containers, simpler formulas | Can struggle in stubborn wax and fragrance combinations if underpowered |
| Booster wick | A strip designed to run hotter, often paired or laminated | When a single-ply burns weak, tunnels, or cannot maintain a full melt pool | Can soot or run too hot if you over-correct without testing |
| Spiral wood wick | Curved or spiral shape for showpiece flames | When the goal is a decorative flame and audible character | More sensitive to jar shape and airflow. Can behave inconsistently without tight controls |
| Cross or X-shaped wick | Two strips forming an X for broader coverage | Wider jars where you want melt-pool reach without jumping straight to multi-wick layouts | Can increase heat concentration. Requires conservative testing in heat-sensitive vessels |
Use this atlas to narrow your first test candidates, not to make the final decision. For exact format choices, use the wood-wick sizing and booster comparison pages, then validate the result with a burn test.
How wood wick width, thickness, and ply affect performance
Wood wick width, thickness, and ply control how much heat reaches the wax. That heat sets melt pool size, flame behavior, and how hard the jar runs.
If you move up one size step, for example from 1/2 in, 12.7 mm, to 5/8 in, 15.9 mm, expect a hotter burn and a wider melt pool. Record melt pool width in inches and millimeters, and container temperature in °F and °C during burn tests. Changes in thickness and ply can make a wick act larger even when the width looks the same on paper.

Visual type: diagram
Purpose: Explain how wick dimensions change heat output and melt pool behavior in container candles.
Methods: The diameter-to-melt-pool example is an illustrative model used to explain directionality, meaning bigger heat source usually means wider melt pool. It is not a universal sizing rule. Use a consistent burn-test schedule and measured observations, including melt pool width, flame stability, and soot, to confirm safe performance in your jar.
Data provenance: Manufacturer sizing charts, which vary by series, plus controlled burn-test logging from maker methods.
Wick width is the strip’s side-to-side measurement, and it is the biggest driver of melt pool diameter. Wick thickness is how tall the strip is, and thicker strips tend to hold a steadier flame but can run hotter in the same jar. Wick ply is how many laminated layers are bonded together, and more layers usually mean more fuel delivery and more heat.
Before you read any chart, anchor your thinking in candle wick sizing principles. A wick is not good or bad by itself. It is a heat source that has to match jar geometry and your formula. The goal is a stable flame and a melt pool that grows consistently without turning the container into the hottest part of the system.
Dimension changes and expected effects
| Dimension change | What you will usually see | Common risk if you overdo it |
|---|---|---|
| Wider wick | Wider melt pool, faster melt pool formation | Hotter container, more soot, higher flame |
| Thicker wick | Stiffer wick, steadier flame shape | Harder ignition in some blends, hotter core burn |
| Higher ply, laminated, or booster | More heat for the same width | Over-flaming, loud crackle with soot, hot glass |
Use this section to understand the levers. Use the wood-wick sizing page when you need exact candidate sizes for a jar, wax type, fragrance load, or wick series.
A practical beginner approach is to test a middle wick, then one smaller and one larger in the same wick line. If you switch brands, series, wax, fragrance, dye, or jar shape, re-test instead of assuming the numbers translate 1:1.
Do not solve every weak melt pool by jumping larger. Tunneling can come from jar shape, wax behavior, fragrance load, priming, centering, or burn habits. A larger wick can fix an underpowered candle, but it can also create soot, excess flame, or unsafe vessel heat.
Choosing safe containers and vessels for wood wicks
A wood-wick-safe container is a vessel that tolerates sustained heat without cracking or deforming, while keeping enough clearance for a stable flame and an even melt pool.
Start by choosing vessels built for heat and repeated thermal cycling, then confirm safety by measuring jar dimensions and logging temperatures during testing in both °F and °C. When you are unsure, follow conservative guidance from recognized standards bodies, such as ASTM candle safety standards, national candle associations, and the vessel supplier’s own documentation for heat suitability.

Visual type: checklist
Purpose: Help readers screen vessels before testing to reduce cracking, overheating, and soot risk.
Methods: Container suitability is confirmed through repeated burn tests in the exact vessel and formula, with observation of soot, smoke, and measured hot spots. Use an IR thermometer as a screen and a contact probe for confirmation.
Data provenance: Candle association safety guidance, supplier vessel specifications, and maker burn-test logs.
A quick way to think about candle container and jar selection is: material plus thickness plus shape plus clearance, then prove it with burn tests. Wood wicks can concentrate heat, so thin decorative glass that looks fine can still be the wrong tool for the job.
Fast screening checklist before you pour
| Scenario | Quick read | Why it matters |
|---|---|---|
| Thick, straight-sided tumbler made for candles | Good starting point | Even wall thickness reduces hot spots |
| Tin with a wide base | Usually workable, but watch heat | Metal conducts heat quickly and can run hot |
| Decorative thin glass, seams, or sharp transitions | Risky | Stress points plus heat cycling raise crack risk |
| Narrow neck or heavily tapered container | Risky | Melt pool and flame can behave unevenly |
Use this checklist to reject risky vessels early. Use a dedicated container and candle-safety page when you need deeper vessel testing, market rules, warning labels, or compliance steps.
Wick clips, tabs, and centering still matter on this page because off-center heat can mimic a sizing failure. For exact clip sizes, centering tools, and setup steps, route to the wood-wick installation and centering page.
Preparing and priming wood wicks before you pour
Prepare and prime a wood wick by mounting it straight, securing it in its clip, following the supplier’s coating guidance, and trimming it cleanly before the first light.
Priming a wood wick means preparing its surface and height so it lights easily and burns steadily. Some wood wicks are pre-coated and need no soaking, while raw or uncoated wicks may need a light pre-waxing step if the supplier recommends it.

Visual type: step diagram
Purpose: Show a repeatable pre-pour setup that improves ignition and burn consistency.
Methods: Prep choices are validated with an A/B test, primed vs unprimed, using identical jar, wax, and fragrance variables. Results are logged across multiple burn cycles to catch delayed failure modes.
Data provenance: Supplier prep guidance plus maker A/B test logging.
If you want fewer mystery problems later, treat wick preparation and setup like a small quality check you do every single time. Tiny differences at the start can show up as hard lighting, weak flames, or early self-extinguishing once the candle is halfway down.
A simple prep routine for most brands
- Inspect the wick for warping, splits, or uneven edges.
- Seat the wick firmly in its clip, tab, or holder.
- Center the wick from above before pouring.
- Follow the supplier’s priming or coating instructions instead of applying one generic rule.
- Trim to a clean, even top edge before the first burn.
Use this overview to avoid the most common setup errors. Use the wood-wick priming, clips, and centering page when you need the full setup workflow or a primed-vs-unprimed test.
Burn-testing wood-wick candles: basic protocol
Burn-test a wood-wick candle by trimming the wick, burning in planned cycles, logging flame, melt pool, soot, smoke, and vessel heat, then changing only one variable before retesting.
The test checks whether the wick stays stable as the wax level drops and the jar heats differently over repeated burns.

Visual type: flowchart
Purpose: Provide a canonical burn-test loop readers can follow consistently for wood-wick candles.
Methods: Burn session timing uses published candle burning guidance as a baseline, diameter to hours, and adapts it into a maker test loop: burn, record, full cool, repeat. Measurements include melt pool reach in inches and millimeters, plus vessel hot spots in °F and °C with consistent timestamps.
Data provenance: National Candle Association consumer burn guidance, safety-standards education pages, and maker burn-test logging practice.
The basic burn-test loop
- Prepare: Trim, check centering, remove dust, and set the candle on a stable, draft-free surface.
- Burn: Light and let it run for the planned interval.
- Record: Write down what you see and measure what you can.
- Cool: Let it return to room temperature before the next cycle.
- Adjust: Change one variable at a time, then repeat.
What to record during a wood-wick burn test
- Wick type and size
- Jar inner diameter at the wax fill line
- Wax blend, fragrance load, dye, and additives
- Trim height before each burn
- Flame behavior, melt pool shape, soot, smoke, and vessel heat in °F and °C
- Drafts, room temperature swings, or other conditions that could affect the test
Use this section to understand the basic loop. Use the burn-test planner when you need a full worksheet, candidate wick set, and decision prompts for a specific jar and formula.
Common wood-wick problems beginners should recognize
Common wood-wick problems include tunneling, drowning, self-extinguishing, soot, smoke, excessive flame, and vessel overheating; this overview helps you recognize the pattern and route to the right fix.
Do not treat a symptom as proof of one cause. Wick size, centering, wax behavior, fragrance load, jar shape, trim height, and airflow can create similar-looking failures.

Visual type: decision tree
Purpose: Provide a fast, structured path from tunneling symptoms to the safest next test change.
Methods: Diagnosis uses controlled single-variable changes, including wick size, wick line, fragrance load, centering, and vessel. These are tested in parallel candles. Stop tests immediately if soot, smoke, or overheating signs appear.
Data provenance: Maker troubleshooting patterns plus burn-test logging method.
Symptom, likely cause, and next route
| Symptom | Likely cause | Next route |
|---|---|---|
| Melt pool stays narrow, but flame looks stable | Under-wicking, high-melt wax, wide jar, or early burn habit | Use the wood-wick tunneling or sizing page before wicking up aggressively |
| Flame fades and the wick sinks into melted wax | Underpowered wick, fragrance load, additives, poor prep, or wick height | Use the wood-wick self-extinguishing guide |
| Glass darkens, smoke appears, or flame gets tall | Over-wicking, poor trim, drafts, heavy fragrance, or vessel heat concentration | Use the soot, smoke, or excessive-flame troubleshooting page |
| Melt pool is lopsided or the flame leans | Off-center clip, tilted wick, uneven jar shape, or airflow | Use the clip, centering, and setup page before changing wick size |
Use this section as a recognition map only. Detailed fixes belong in the wood-wick troubleshooting pages, where each symptom can be tested without turning this overview into a repair manual.
Designing for crackle sound and flame aesthetics
Crackle and flame aesthetics come from wick style, jar acoustics, and wax blend, but every vibe must still pass your burn-test safety checks.
Think of this as the creative layer you add after you already have a stable, clean-burning candle. If you approach your product line like candle design and aesthetics, the goal is consistency: a similar sound level, flame look, and glow across jars and scents, without drifting into soot, overheating, or short burn cycles.

Visual type: matrix
Purpose: Help readers choose wick styles and test priorities based on crackle and flame aesthetic goals.
Methods: Aesthetic goals are translated into testable constraints, including flame stability, soot/smoke, and melt pool behavior. These are validated with the same burn-test loop across multiple scents.
Data provenance: Maker design patterns plus burn-test logging method.
The main levers are the same ones that drive performance in wood wick width, thickness, and ply: more output usually means more heat, and more heat can mean more risk. Crackle is also personal and room-dependent. Quiet spaces make it feel louder, and thicker jars can change how sound carries.
Design-goal matrix
| Goal | Testing tendencies |
|---|---|
| Calm spa vibe, subtle sound, steady flame, clean glass | Smaller or steadier wick line, conservative fragrance approach, stable jar shape that reduces drafts around the flame |
| Cozy fireplace crackle, audible pops, lively flame look | Wick styles known for stronger output, jars that carry sound well, careful soot checks, and strict re-testing across scents |
| Minimal soot and boutique clean look, crystal-clear glass, low smoke risk | Avoid pushing wick size, avoid high-pressure formulas, prioritize stable flame behavior over dramatic height |
| Strong glow and label-friendly appearance, even melt pool, attractive light diffusion | Glass finish and wall thickness matter, as do wick centering and consistent trim guidance |
Use this section to set aesthetic goals, not to force louder crackle or stronger flame. If the desired sound appears only when the candle soots, smokes, or runs hot, the aesthetic target must change.
Advanced crackle problems and multi-wick layouts belong in dedicated pages because they add heat, spacing, and testing variables beyond this beginner overview.
Safety and basic compliance for wood-wick candles
Wood-wick candles are generally safe when the container is heat-rated, the flame stays controlled, and every finished candle passes burn testing and labeling checks.
On this page, safe means burn-behavior safety: controlled flame, limited soot or smoke, suitable container heat, stable wick placement, and basic warning-label awareness. It does not mean legal approval, marketplace acceptance, toxicology review, or full ASTM/CEN interpretation.
Rules differ by country and marketplace, so treat this as best practice, not legal advice. If you sell, keep test notes for the exact jar, wax, wick, and fragrance combination you are offering.
For region-specific expectations on warnings and labeling, use a candle safety and compliance guide as your reference point.
Before you pour, check the vessel using safe container guidance so you are not testing in a container that cannot handle the heat. Then run the wood-wick burn-testing protocol and write down what you see across repeated burns, not just the first light.

Visual type: checklist
Purpose: Provide a reusable go/no-go checklist before gifting or selling wood-wick candles.
Methods: Safe to gift or sell is determined by repeated burn testing in the final vessel and formula, plus adherence to recognized safety standards and warning-label expectations in your market.
Data provenance: Candle association safety guidance, ASTM/CEN standards education pages, and marketplace compliance expectations.
Pre-launch safety checklist
Use this quick gate before you gift or sell:
- Container: Heat-safe, stable base, no cracks or chips, and the wick is centered and secured.
- Flame behavior: Steady, not leaning hard to one side, not flaring up after relights.
- Soot/smoke: Light staining can happen, but increasing black soot or strong smoke is a stop signal.
- Melt pool: Reaches the edges without overheating the container walls.
- Clearance: Nothing combustible above or around the candle. Label matches how you expect people to use it.
- Documentation: Batch notes, wick SKU, wax/fragrance loads, and burn-test observations saved in one place.
Use this checklist as a beginner safety screen. Use the candle safety and compliance page for legal, marketplace, regional, ASTM, CEN, CPSC, labeling, or product-liability questions.
Choosing and comparing wood wick suppliers
A good wood-wick supplier helps you choose safe starting sizes by publishing clear charts, wax notes, and troubleshooting guidance, not by promising a perfect wick for every jar.
There is not one best supplier for everyone. Best means the supplier and wick line that fit your exact jar, wax, fragrance, documentation needs, and burn-test results.
If you are looking for a starting shortlist, begin with recommended suppliers that provide sizing charts, compatibility notes, and clear safety language.
To read those charts correctly, it helps to understand how wood wick width, thickness, and ply affect performance so you are comparing like with like. Once you have samples in hand, run them through the burn-testing protocol so your choice is based on repeatable results, not a single good burn.

Visual type: scorecard
Purpose: Help readers compare wood-wick suppliers using practical, test-focused criteria.
Methods: Supplier selection is evaluated using documentation quality, including charts, compatibility notes, and safety language. It is then verified by identical burn-test series across multiple wick samples.
Data provenance: Supplier documentation plus burn-test logging outcomes.
What to compare beyond price and shipping
- Chart clarity: Do they explain how to pick a starting size by jar diameter and wax type, and do they say what counts as too hot or too weak?
- Naming system: Can you translate their SKUs into something meaningful, such as width, thickness, single, or booster, or is it all branded labels with no explanation?
- Material transparency: Do they state what the wick is made of and what treatments or coatings are used, in plain terms?
- Testing support: Do they offer troubleshooting guidance that matches real problems, including tunneling, drowning, and soot, with a strong test-first stance?
- Safety mindset: Do they reference recognized best practices and avoid pushing wick up as the default fix?
Use this checklist to judge supplier documentation quality. Use a dedicated supplier comparison page if you need brand names, pricing, shipping, regional availability, disclosures, or affiliate recommendations.
Wood wick sizing and burn-test planner
A wood wick sizing and burn-test planner belongs on a dedicated planner or sizing page because it turns jar, wax, fragrance, and vessel inputs into candidate wick tests.
Use this overview to understand why a planner is useful: it limits guessing, keeps variables consistent, and forces the final decision through repeatable burn logs. For exact inputs, candidate wick sets, schedule rows, and decision prompts, use the wood-wick sizing and burn-test planner.

Visual type: worksheet
Purpose: Route readers to a ready-to-use planning and logging template for wick sizing and burn testing.
Methods: Planner outputs are hypotheses generated from jar diameter, wax category, and formula pressure, including fragrance and additives. Confirmation requires identical test candles and repeatable burn logs.
Data provenance: Sizing-chart logic, series-specific, plus burn-test loop and recorded observations.
Key takeaways and FAQs about wood wicks
Wood wicks work reliably when you size for jar diameter, prep the wick, and validate everything with burn tests that keep flame, soot, and jar heat under control.
The fastest path to a good wood-wick candle is consistent testing, because small changes in wax, fragrance, or vessel shape can flip the results. If you need a refresh on fundamentals, start with candle-making basics and then apply the same testing discipline to every new variation. If you sell or gift candles, use candle safety and compliance hub thinking as your guardrail, and treat sourcing details from recommended suppliers as helpful documentation rather than guarantees.

Visual type: diagram
Purpose: Help readers route each FAQ to the relevant section instead of repeating full explanations.
Methods: FAQ answers are distilled from the repeatable test loop, including trim, burn schedule, log, and adjust one variable, plus safety-first troubleshooting rules.
Data provenance: Burn-test protocol, safety guidance, and maker troubleshooting patterns.
Core habits that prevent most wood-wick failures
- Choose a heat-appropriate container and center the wick hardware so the burn stays even.
- Pick two or three candidate wick sizes instead of hunting for a single perfect chart answer.
- Prep and prime consistently so the first burn is a fair test, not a random outcome.
- Burn-test in controlled sessions, and log the same observations every time.
- Fix problems with small, single-variable changes so you can tell what actually helped.
FAQ: Why won’t my wood wick stay lit?
A wood wick usually goes out because the wick is underpowered, poorly prepared, overloaded by fragrance or dye, or drowning in melted wax. Use the self-extinguishing troubleshooting page for the full test path.
FAQ: Why does my wood-wick candle tunnel?
Tunneling usually means the wick is not producing enough usable heat for the jar, wax, and burn habit. Use the tunneling guide or sizing page before changing wick size aggressively.
FAQ: Why is my wood wick smoking or leaving soot on the jar?
Smoke and soot usually point to excess fuel, excess heat, poor trim, drafts, or a fragrance that burns dirty in that setup. Use the soot and excessive-flame troubleshooting page before selling or gifting that candle.
FAQ: What is the best wood wick for soy candles?
The best wood wick for soy candles is the one that burns cleanly and safely in your exact soy wax, jar, fragrance load, and test conditions. Start with supplier charts, then verify with burn tests.
FAQ: Do I really need to prime or soak a wooden wick?
Some wood wicks need priming, and some arrive pre-waxed and only need correct setup and trimming. Follow the supplier’s instructions first, then use the priming guide if ignition stays inconsistent.
FAQ: Should I use two wood wicks in one jar?
Two wood wicks can help very wide vessels, but they increase total heat and testing risk. Treat multi-wick layouts as an advanced design choice and use a dedicated layout guide.
If you plan your next batch using the same inputs, logs, and decision rules, your results will get more predictable with each test cycle.